I pointed towards the USM technique as a example how radius and threshold settings are effecting your image differently.
When you understand/grasp that, you understand/grasp what different contrast sliders do differently.
The highlight, midtone, shadow sliders has only different “thresholds” and i think different value’s of greycfor the “dot” but the radius is the same.
Fine Contrast has sharpening properties but the threshold and radius is different from the microcontrast which has very low threshold and very small dots.
When i was trying to understand how i got the working of Silkypix’s blacklevel and there contrast controls in dxopl’s contrast controls.
Microcontrast was too agressive to use as dehaze slider for shots through the watersurface and blacks in tone was just changing in the blacks of the image the exposure.
In the search of getting that “blacklevelslider” i found with help of @gerarto the tonecurve to assist me on that. A none-isch sharping techique which learned the use of tonecurve. USM tool was somehow too much work to get the right threshold and radius for each image that i wanted to clear up.
The advanged contrast sliders, highlight, midtone, shadows, i found out for what there effective wile i was trying to find out why SP’s highlight control tool was more effective then the highlightslider in dxo’s Selective Tone.
You can use them the smooth out or “sharpen” the bandwidth of the tone they are named of. So when you pull things in to the “light” or drag bright things down in to the propper brightnes and it gets ugly you can use the constrast slider to correct that. To balance the detail vs artefacs.
I also played with the lensmodule sliders back then but the automode is most often right.
Then i bought the SPv10 for panasonic for it’s stacking modes and softproofing and edge detection and some other interesting things which i wanted to test/try against dxopl.(the best way to understand “under the hood” working is comparing two different programs which has to different user manuals.)
Because dxopl’s lensmodule and denoising is a key factor for m43 rawfiles to look better then they are i made it a priority back then to learn as much as i could to work with it. V1.2 was not as good in repair/clone as it’s counterpart on my pc.
And i trained myself in understanding controlpoints how they choose a color and brightnes how they feathered out and how i can adjust it as best as possible.
DxO PL is come a long way from v1.2 and it’s become a very good application in more then optical and denoise alone.
Why don’t you open all the advanced settings on the appropriate palettes, then re-save your workspace?
Take a look at the file I posted here to see the differing effects of the various “contrast” tools.
Stenis
(Sten-Åke Sändh (Sony, Win 11, PL 6, CO 16, PM Plus 6, XnView))
24
@OXiDant
Always nice to get an empiric-based knowledge that goes a bit further than my own. It´s always nice to learn more and get a better understanding. Since most converters has been around many years now, they are all a result of a more or less ad hoc driven growth. It´s layer on layer of functions that in many cases overlap. It´s not like a bonzai tree but more like some weed. Maybe it ought to be chastened a bit.
A plus: Not so common these days to refer to Silkypix. It has long time been flying under most peoples radar but it rendered far better previews than for example Lightroom already 20 years ago. I liked it already then. I must download a trial
Silkypix has been bundled with camera hardware products a long time I think, but I is rarely discussed as a serious alterative today. It´s got to be severely underrated.
“This is pure made in Japan software. SILKYPIX corresponds to more than 700 different models digital camera and are supported from professional photographers and shutter bugs. SILKYPIX is selected as digital camera manufacturers’ standard bundled software over the world. Since 2004 when we released “SILKYPIX series”, we are always pursuing “High Quality Image” and SILKYPIX can represent it to customers. Noiseless and accurate color reproduction. Expressive gradation from shadows through highlights. Image processing engine specialized in high resolution to maximize the performance of digital cameras and lenses. Noise reduction to suppress it as much as possible even at high ISO sensitivity.”
They write "Since 2004 when we released “SILKYPIX series” but I think the Silkypix-program really was born already in the early nineties. I have a memory of that since I was the product manager for all Microsoft Windows programs these days at Swedens then biggest software distributor Esselte. I started there about 1991. Correct me if I´m wrong.
Don’t know yet but i owned v7pro when i jumped towards dxopl’s prime denoising and lens module. My m43 image jumped a quality upwards by dxo.
Problem was i was used to idyn and ires and camera color which it took over from my dmc g80. The colors and some things as highlight recovery, blacklevel , contrast centre and som other stuff as cloning was better then dxo’s.
Then i was looking at edge detection. (dof related) and some other nice things v10 offered. Not that i would go back but for 30 euro’s a panasonic only full pro version?
Couldend resist.
Maybe i take a look at SP v12 for Panasonic just to see what it can do.
As a bencemark for dxopl’s features
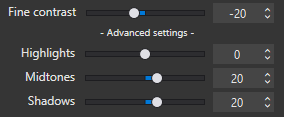
It’s also worth noting that Fine Contrast has the potential to off-set/override all “Advanced” Contrast settings (as provided when Film Pack is installed).
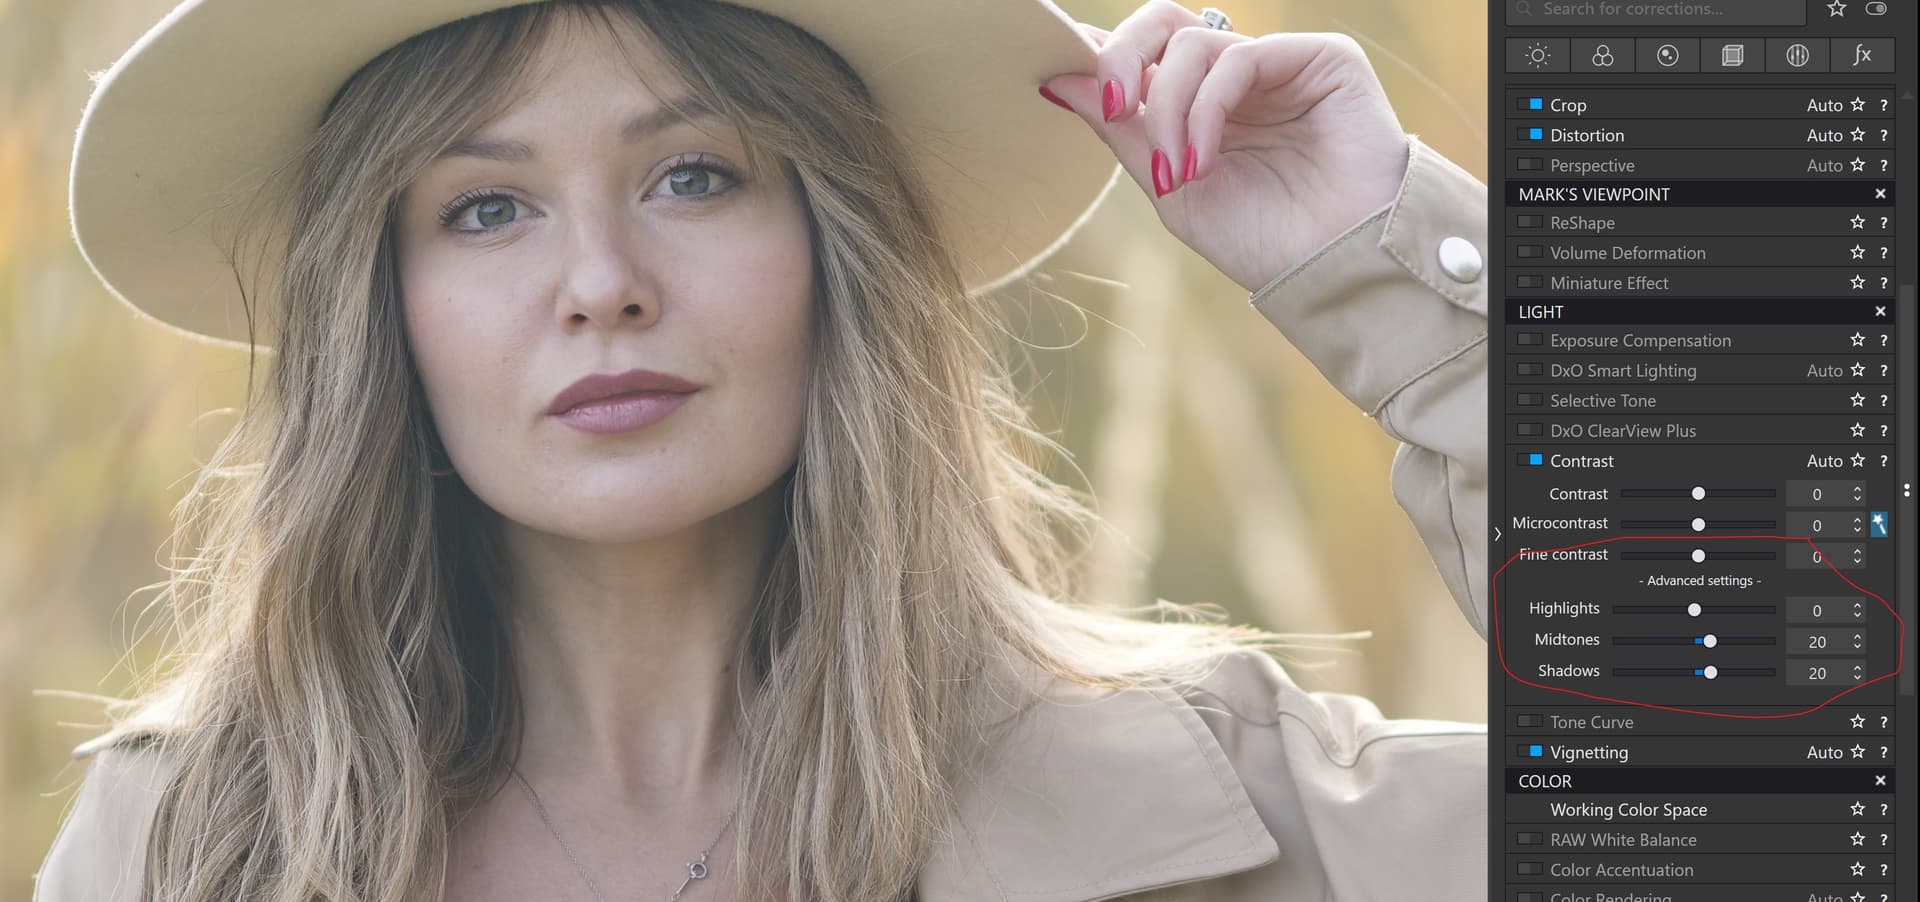
Such that, for example, the result of the following settings is no-change / nuthin !
I don’t believe “no-change” is entirely correct. I assume it would cancel out the midtones and shadows values, but would still apply a negative highlights value.
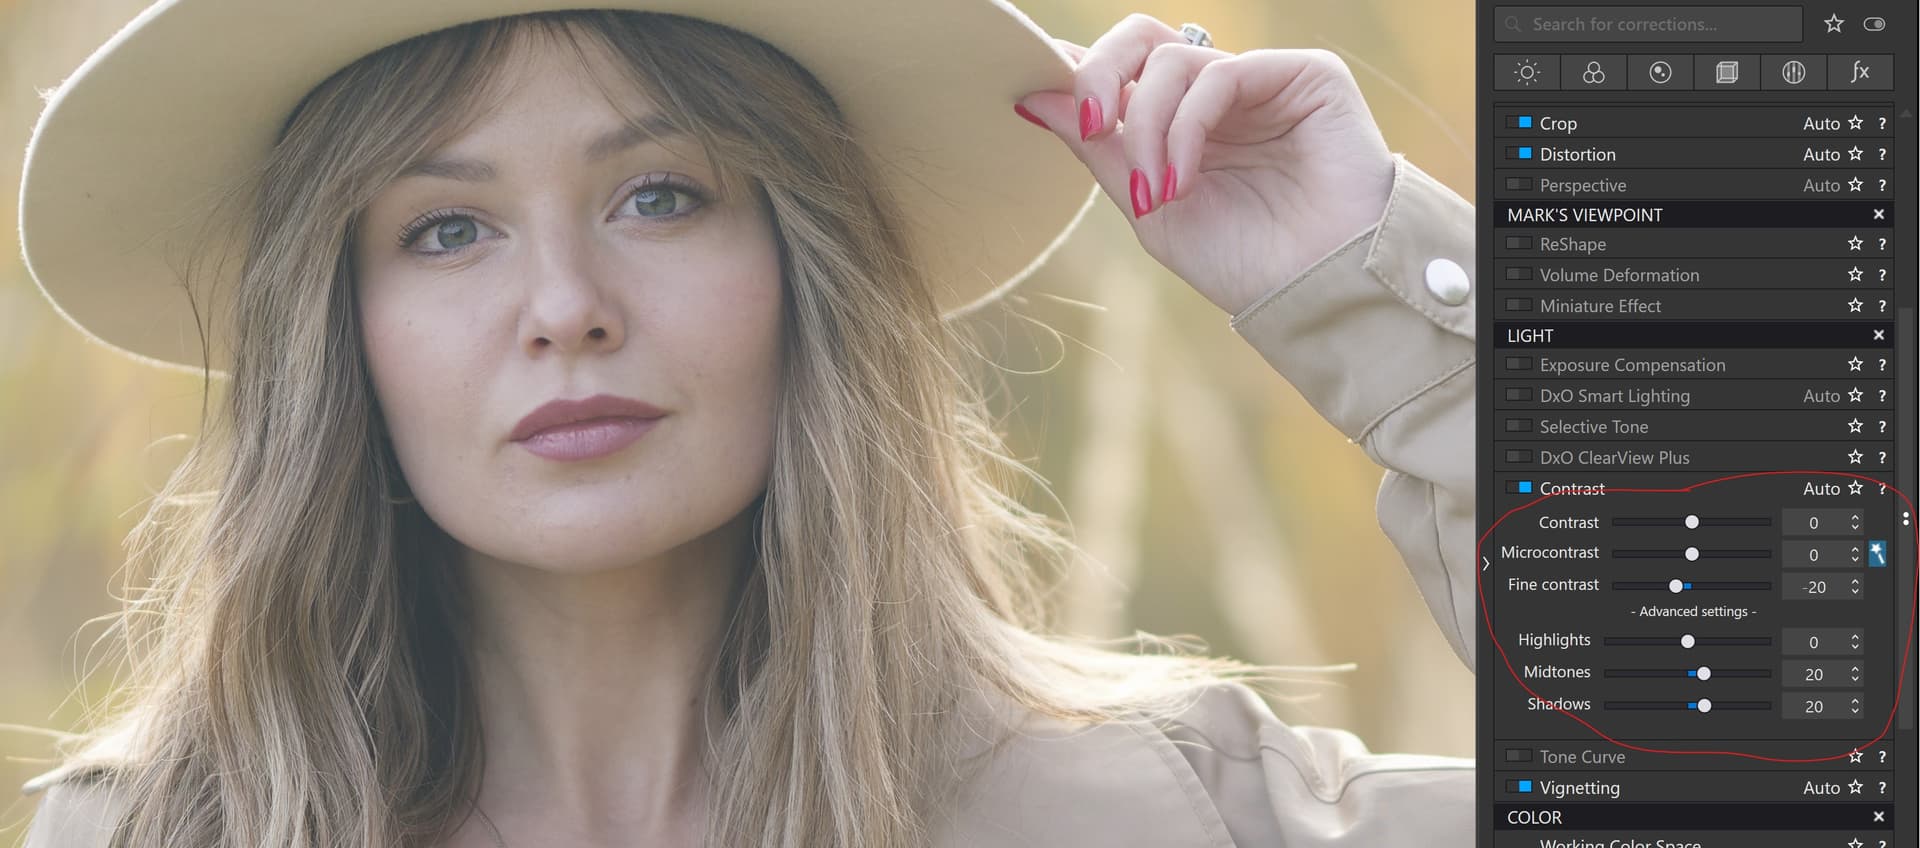
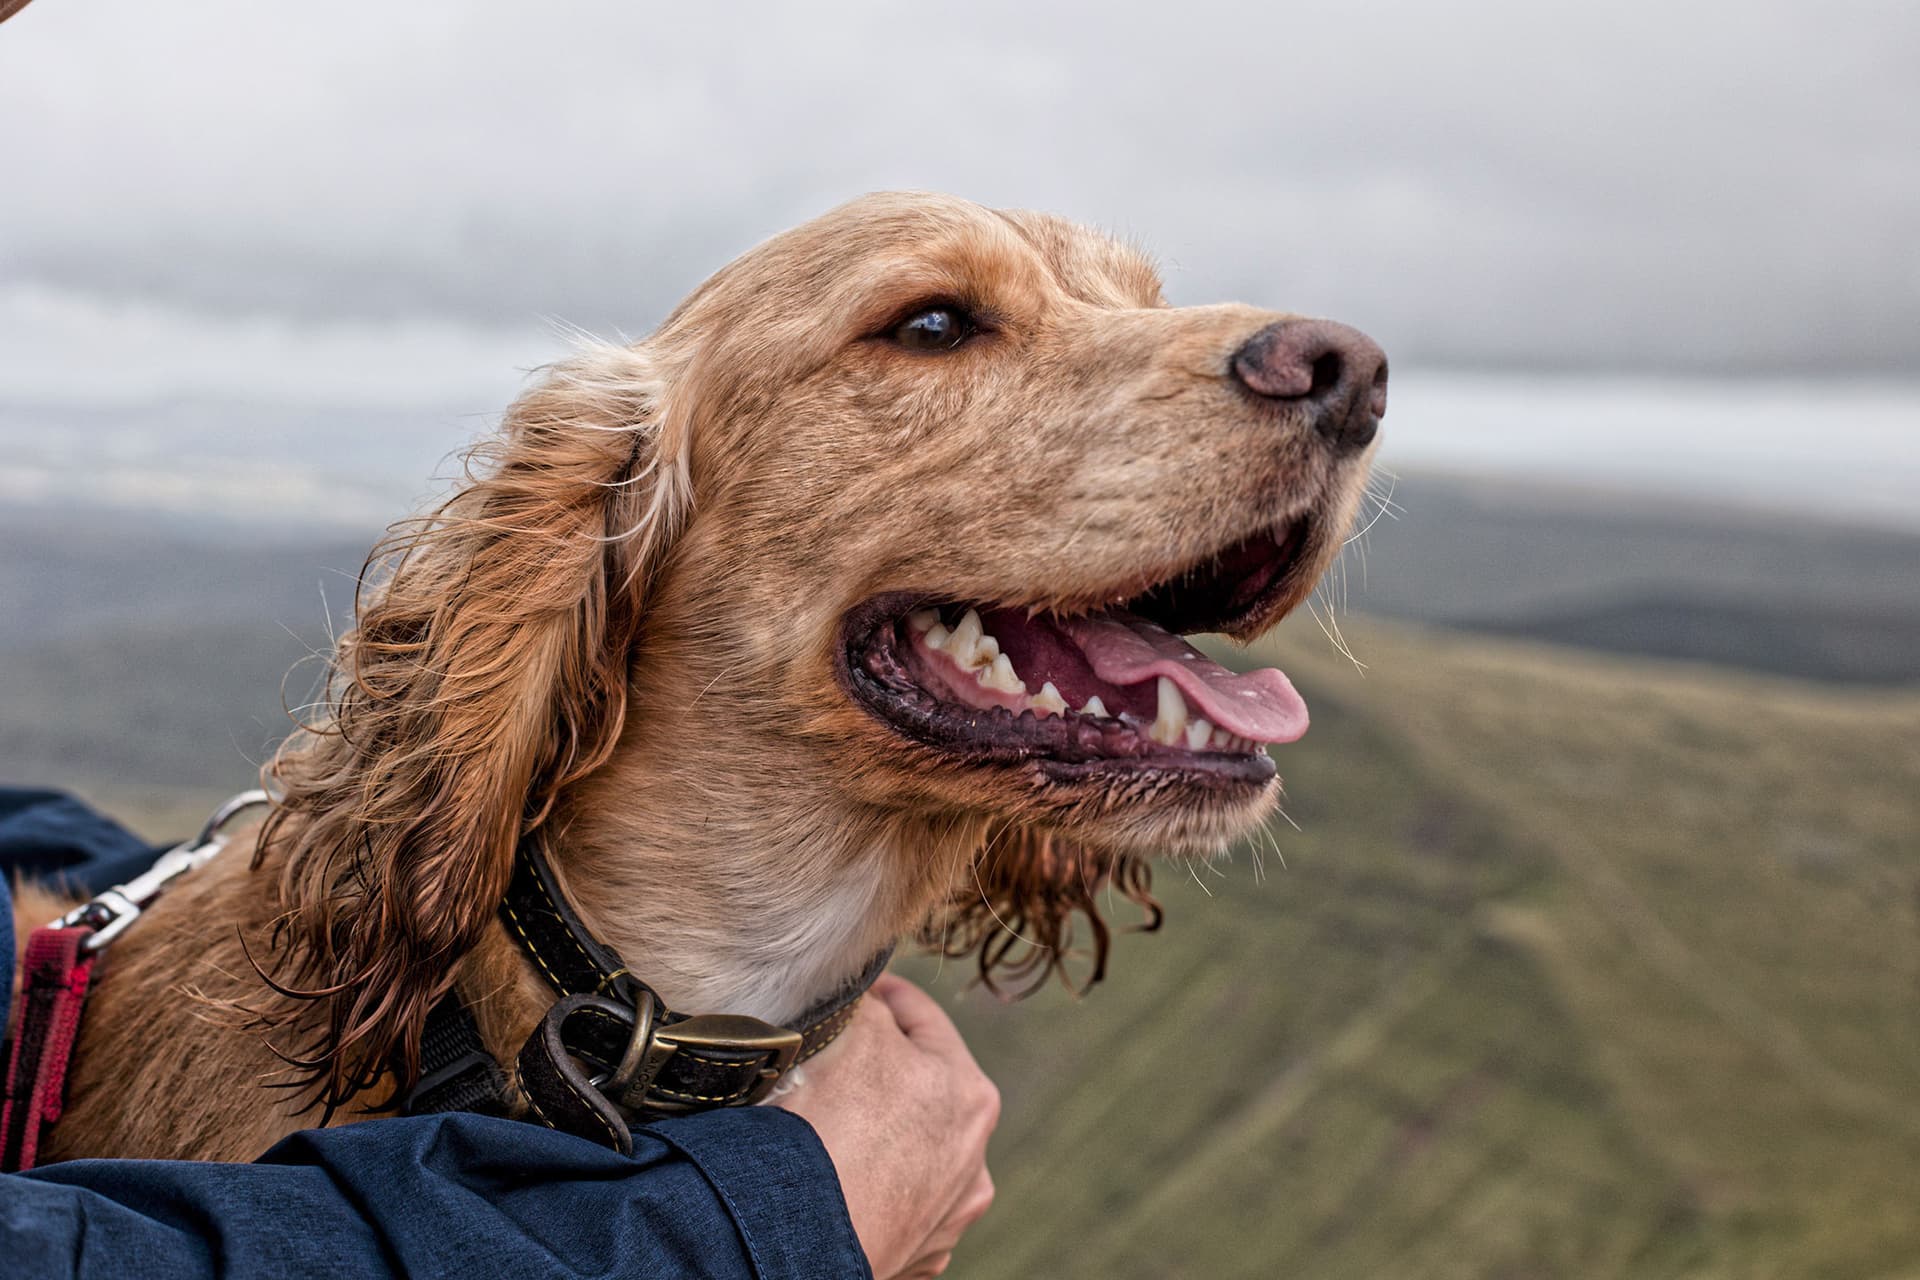
Yes I can on a photo with lots of highlights and at 100%. I doubt that you can tell in these screenshots but look very closely at 100% at the model’s face.
I noticed that highlights = 0, but you suggested that there had been no change. That implied to me that your end result would have been the same as if all 4 sliders were set to 0 which was not the case. -20 on the Fine contrast slider may or may not have nulled out the effects of midtones and shadows sliders but if it still lowered the highlights. Additionally, there are probably overlapping adjustment curves between the highlights, midtones amd shadows sliders so adjusting the Fine contrast curve in the negative direction may not completely null out the results of the 3 advanced sliders. even if all three has +20 values.
Not noticing a difference on a few examples doesn’t mean there isn’t a significant measurable difference. I agree that the three advanced sliders together represent the same general range and type of adjustments as the Fine contrast slider, But I don’t think that any of us can say with certainty that the equal adjustment of all three advanced sliders in one direction can be completely nulled out by the same adjustment of the Fine contrast slider in the opposite direction.
Each of these tools behaves much like unsharp mask with different correction radii. In Photohop, you can set the radius of correction and apply multiple passes at different radii. Neither LR nor PL let you do that (PL gives you unsharp mask, but with very limited radius and only one pass), but each offer the sharpening tools you mention. The catch is that the chosen radius is different in each tool and they don’t match from LR to PL. You can pretty quickly figure out the numbers if you put the same photo simultaneously in LR, PL, and Photoshop. Tweak a tool in one of the first and then adjust the Unsharp Mask radius in Photoshop to produce an equivalent result and note the radius number. The tools in LR and PL may have a little more subtlety than a straight unsharp mask, but the result is close enough to figure out the radius of correction. Bottom line is that there is no direct equivalency between the tools in LR and those in PL, only similarity.
If i am correct the selective tone and thus selective contrast sliders have to much overlapping for LR users who are trying out dxopl.
Those who are used to building with layers are also frustrated/seeking solutions to compare there old edit workflow.
What speaks for dxo’s workflow is when you setup your own workspace with all the important ducks in a row is the speed you can edit.
The more choice of tools the longer you are seaking the best solution.
About fine contrast.
Yes it’s filmpack only. Why is for me a question because it’s a main tool not a coloring/taste tool.
The light, mid and shadow tone and contrast sliders are having a larger bandwidth then the fine contrast slider.
The main effect of fine contrast is softening or gentle sharpening of for instance soft colors like skin and stuc wals to enhance larger details but not edge out smal details like wrinkles , skin defections and stuc structure.
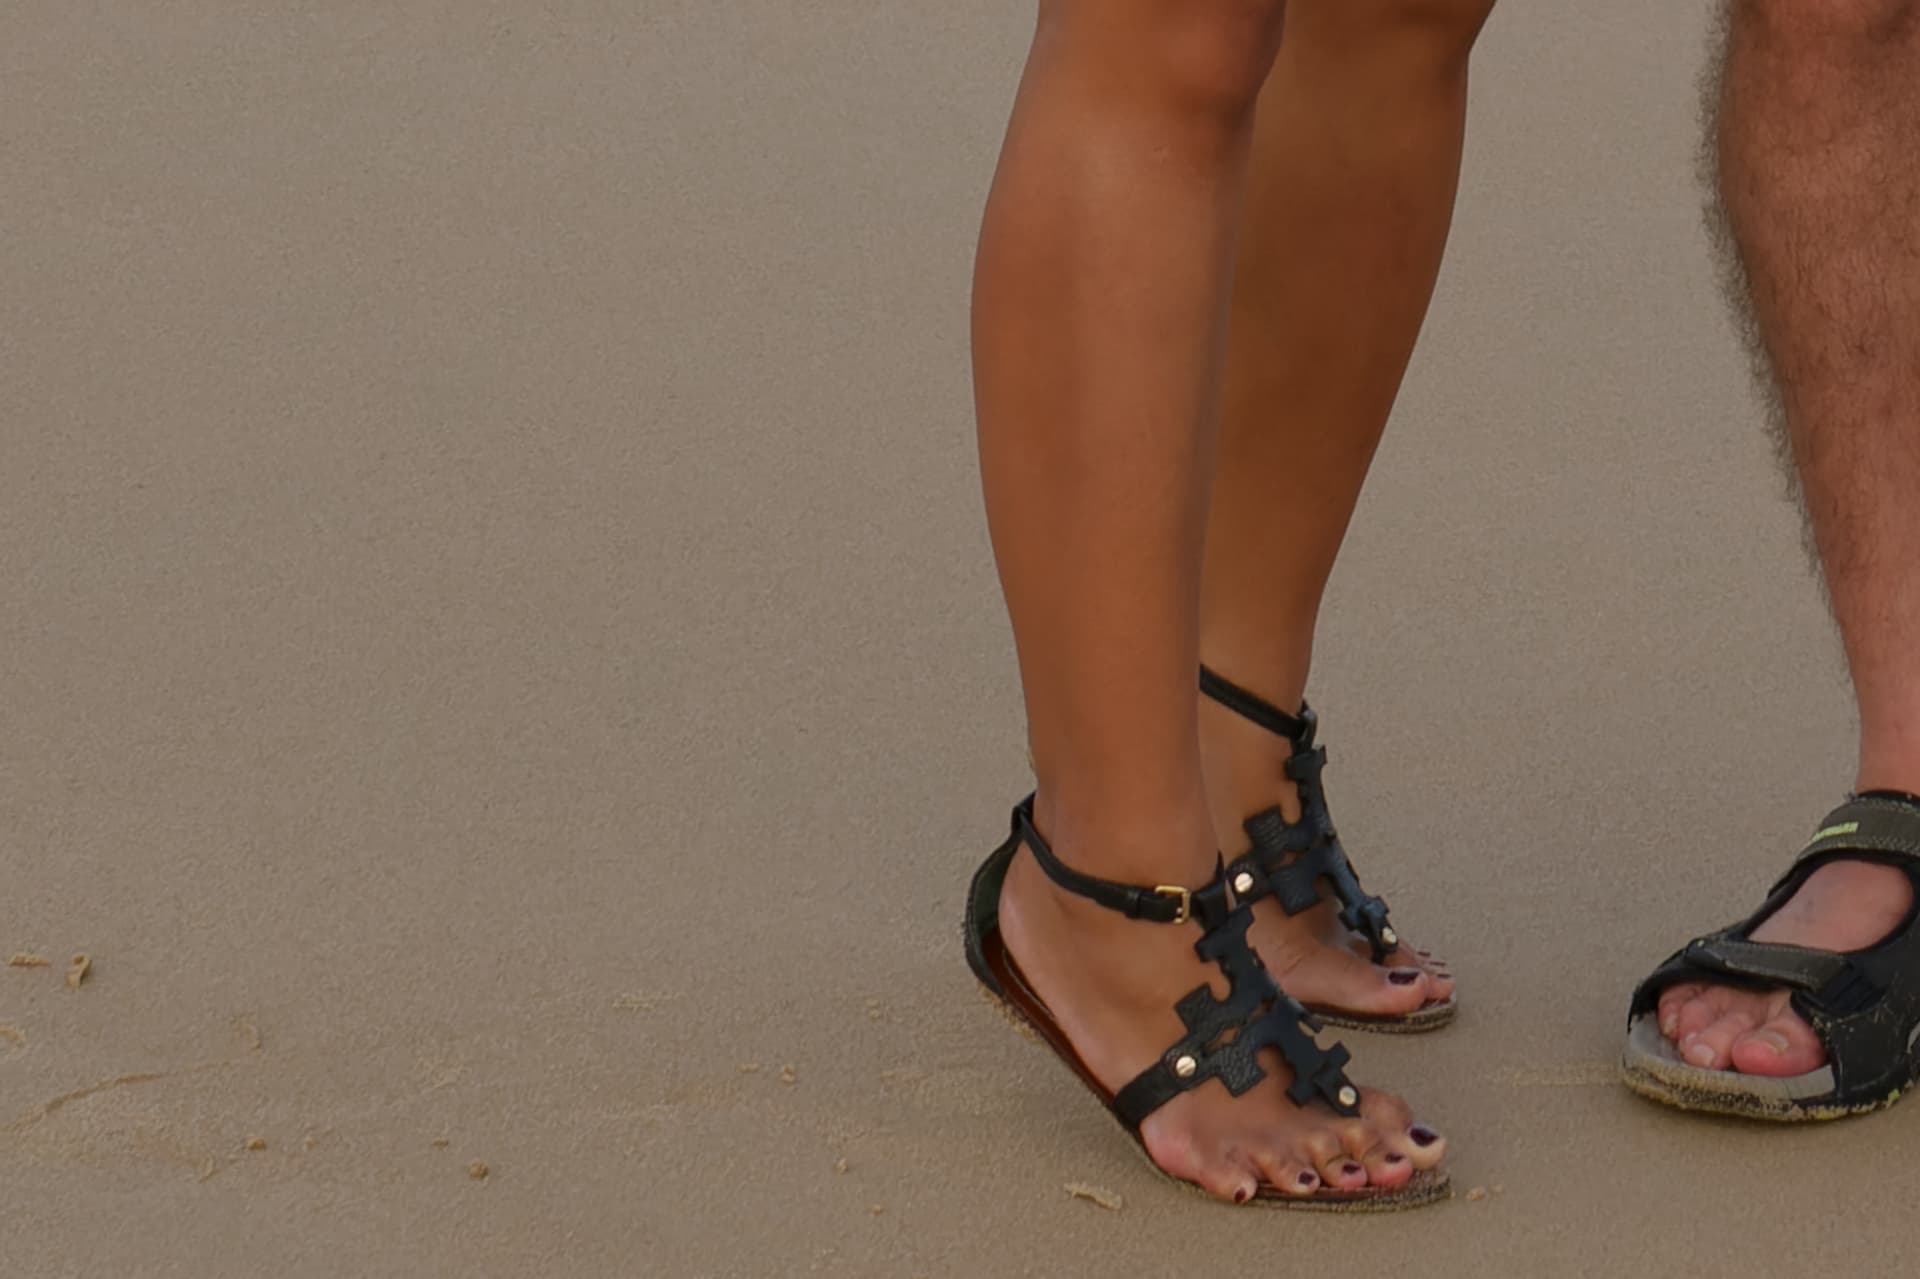
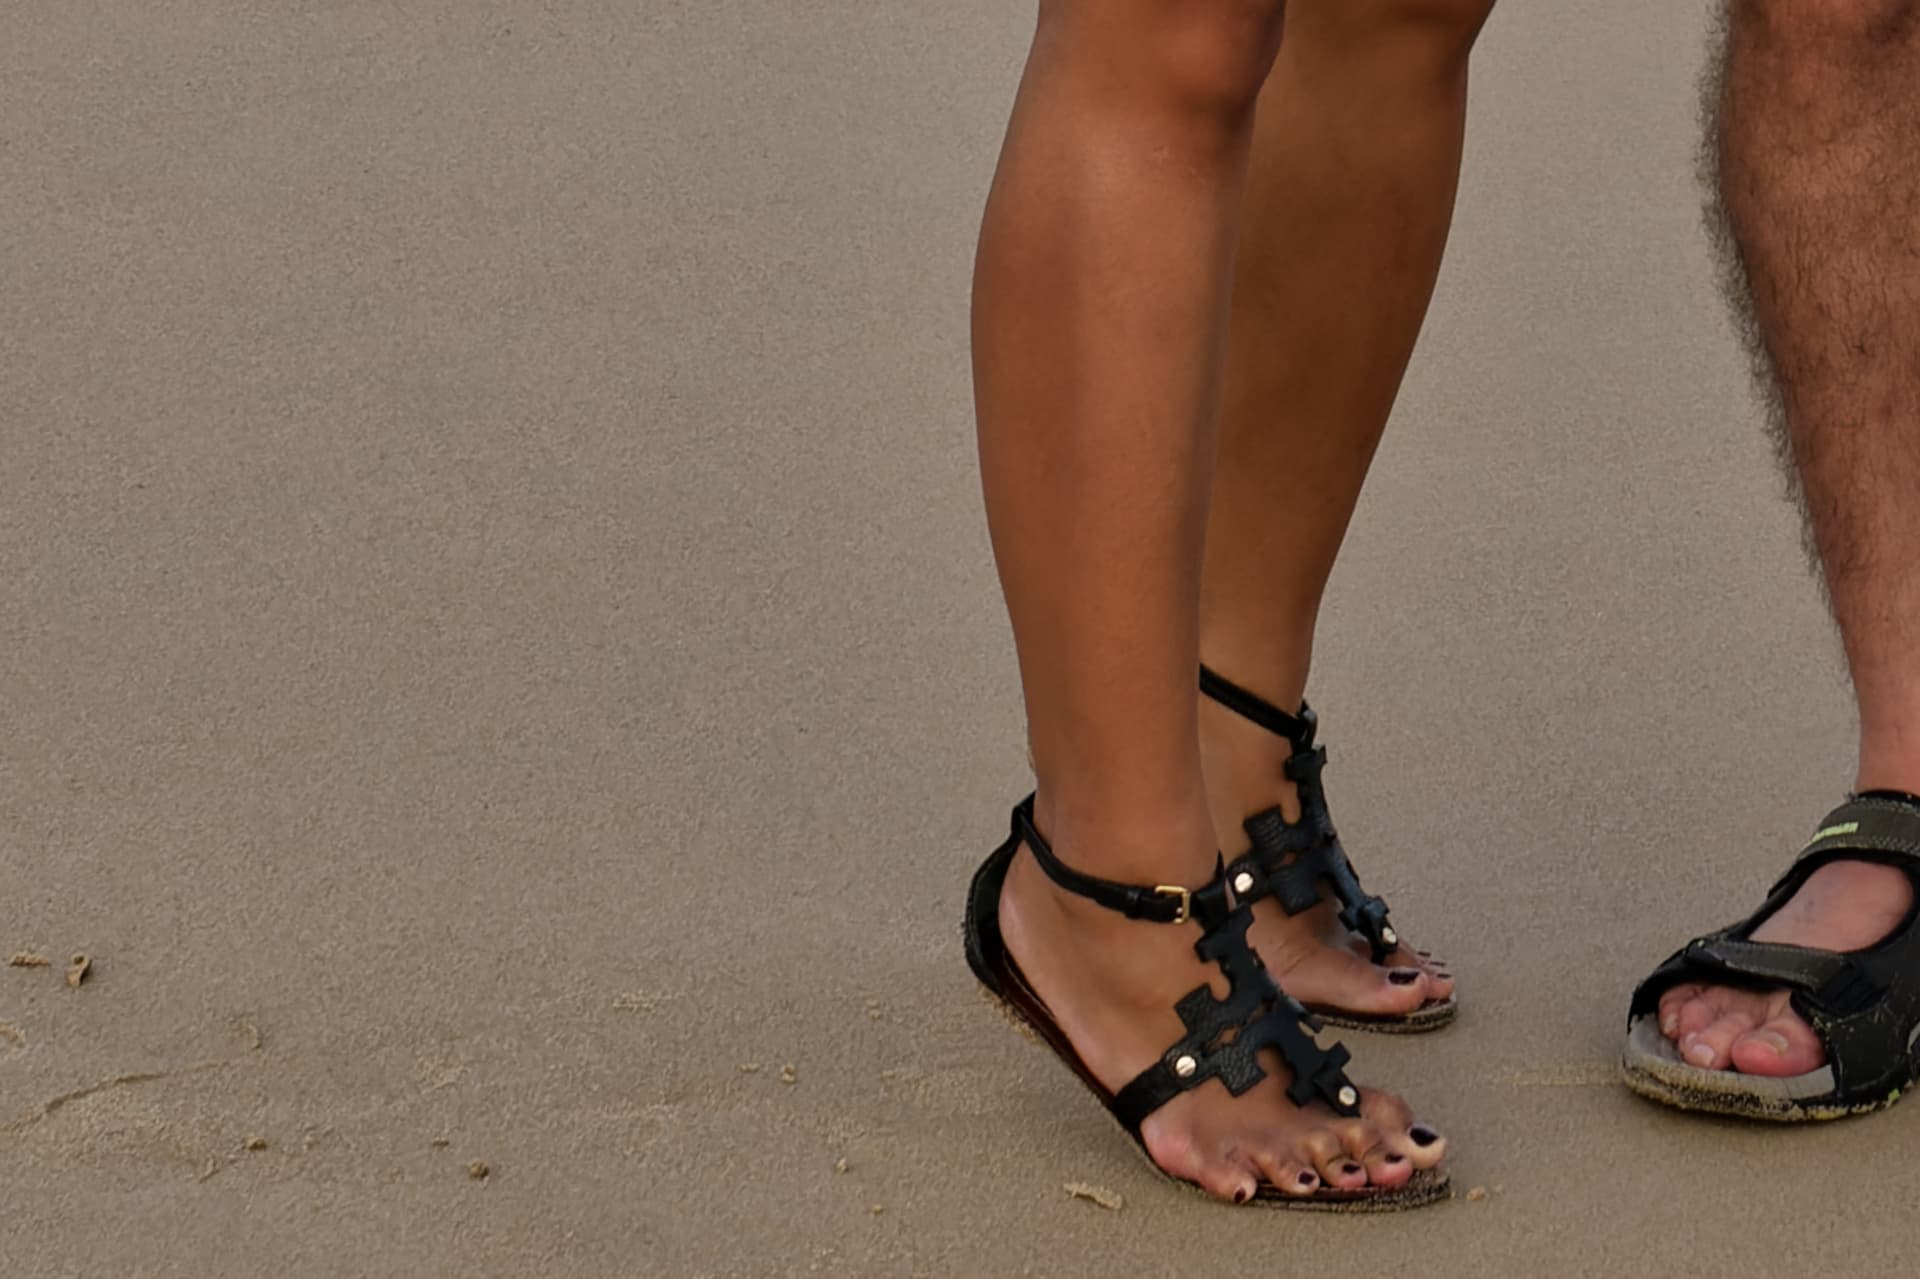
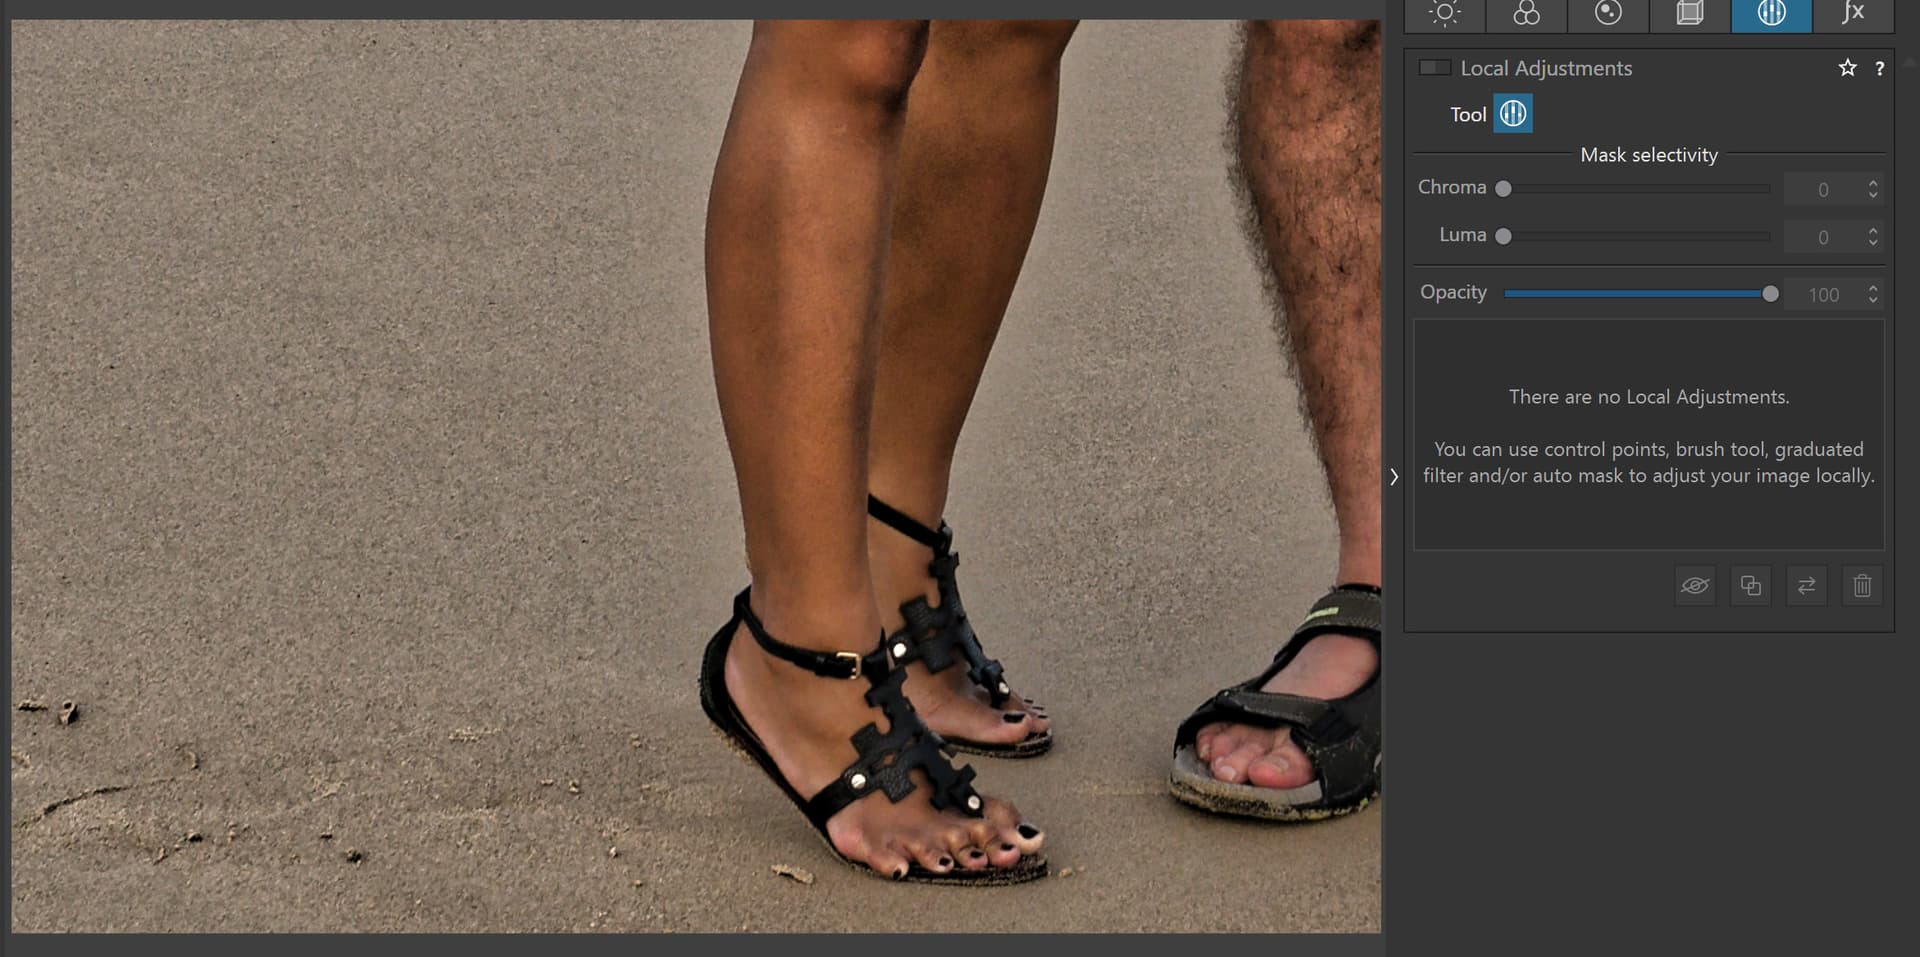
I’m pretty sure the ‘help’ descriptions are wrong. They say that microcontrast targets ‘very small details’ while fine contrast targets ‘medium sized’ (i.e., larger details). But then look at this examples, particularly the sand:
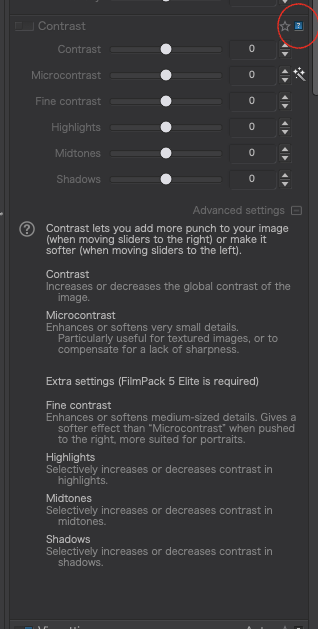
@DocNo That was exactly my finding too. From Photolab’s help on the details:
Microcontrast
Enhances or softens very small details. Particularly useful for textured images, or to compensate for a lack of sharpness.
And…
Fine contrast
Enhances or softens medium sized details. Gives a “softer” effect than Microcontrast when pushed to the right, more suited for portraits.
Two things strike me:
Microcontrast appears ‘heavier’ than Fine Contrast and seems to impact medium sized details.
Fine contrast’s description seems contradictory. If it really does impact medium sized details then it should give a “heavier” effect than Microcontrast, where Microcontrast impacts “very small details”.
I think they’ve got it backwards: Microcontrast impacts medium-sized details and Fine contrast impacts very small details.
Microcontrast is clearly heavier than Fine Contrast, It’s a minor thing, but I’d suggest changing the “Help” descriptions to describe Microcontrast as impacting mid-sized details and Fine Contrast as fine details.
It’s a good point you make re the appearance of a mask. I went back and checked and there’s definitely no mask on my wife’s skin. Here’s a more extreme version, with microcontrast (only) to the max. You can see there are no local adjustments. Not sure why the effect fades out near the skin. Any ideas?
 - Fine contrast “off-sets” the Advanced settings