This proposal is not specific to Mac versions. You might nevertheless be interested.
nope. I constantly redo the pictures. I’m not watching pictures, since I can remember them - all those that I want to resee are exported to photos in my Mac. I have a library where I store pictures from a single city (I have hundreds of pictures from each street). Every time I get a new insight into the aesthetic of a picture I’m going to redo some into that one.My pictures are not there to rot but I’m constantly working on one of them depending on my whim.
A question from a relatively new PL user, who is now using PL4. I changed my preview to no correction, then realized this eliminated the corrections for my lens and camera, so I changed it back to STANDARD.
Based on the above discussion, are there other changes I should make to optimize PL4 for general use, or is it all set “out of the box”?
Hello Mike,
good finding!
In general every pre-set is just a starting point. There is no right and wrong with presets. The Standard preset is a good starting point, nothing more but also nothing less. I recommend you start with that in the beginning.
After some learning you might notice that i.e you tend to increase slider x by so much and use slider y in addition what is set in the Standard Preset. The moment you see this patern you just save these settings as “Mikes starting” preset und use that in preferences.
I personally have 2 customized presets. One for Landscapes - which I do a lot - and one for protrait.
As most of my pictures are landscapes I have that set in the preferences to be applied automatically.
The few portraits I shoot I just selcet in the filmstrip and click on “Apply preset” and choose “My Portrait” preset.
But even with these presets, there is hardly any file where I do not start fiddling around. I repeat a preset is just a starting point.
Sigi
2 Likes
You might like to change that to “DxO Optical Corrections only”. Then you get the best of both worlds - the essentials for your camera/lens and a much more “neutral” starting point.
1 Like
Thanks. I agree with you.
If I set it to nothing, then the “bad” effects of my camera/lens will show up in the photo. Since I don’t want that, either standard or DxO Optical Corrections only would be good - since I’m so new at PL4, I have left it set at Standard for now.
I’ll see how this goes. I no longer feel “lost”, but I do feel like I need a compass so I’m more aware of where I’m at. I guess that’s natural for a while.
As for colour rendering, I liked the following as a default
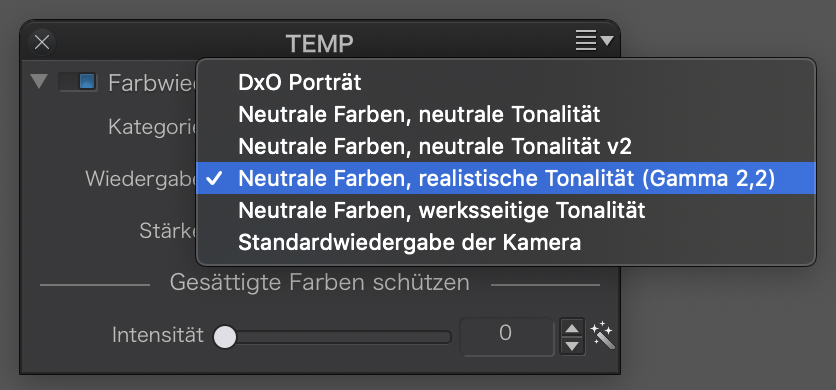
This rendering takes some getting used to. Many images look comparatively bland, but with a bit of added contrast (I often use the tone curve for it) and colour accentuation, the results are how I like them. The DxO Standard preset struggles with high contrast images and DxO Smart Lighting can create visible halos, specially in dark areas. As of today, I set DPL to default to NoCorrection and then apply a linear DCP profile for a more film like look.
Distortion correction slows down processing and is, imo, not really necessary for things other than photos of things with straight lines…
1 Like
I’ll post a link to my gallery from today. I’ve been trying to learn how to use my Leica M10 correctly, and how to use the new Photo Mechanic Plus, and then PhotoLab 4.
I took maybe 100 photos today walking around Miami Beach for an hour or two, cut in in half viewing images in Photo Mechanic, and then moved them into Photo Lab. After all that, I had 13 images left, which I uploaded in full size to my image gallery at Smugmug.com .
You can find today’s photos (what’s left of them) at this link:
In the past few weeks, people have been telling me about all the things I did in PhotoLab that didn’t work very well - mostly because I over-processed the images. You (and anyone else who wants to do so) can view these, and tell me if I’m still making mistakes.
About your rendering - sure, I will gladly try it, but where are the settings to select that, and in English, which one should I try?
As for me, I’m very happy with today’s results, but I was very happy several times in the past, until people pointed out mistakes. As a result, most of the tools in PL4 I ignored. I only made basic corrections, mostly cropping, and when my camera was confused by the bright blue sky I needed to try to adjust the exposure. If you keep clicking on an image, it will continue to grow in size until it reaches 100%.
I opened up that window on my Mac.
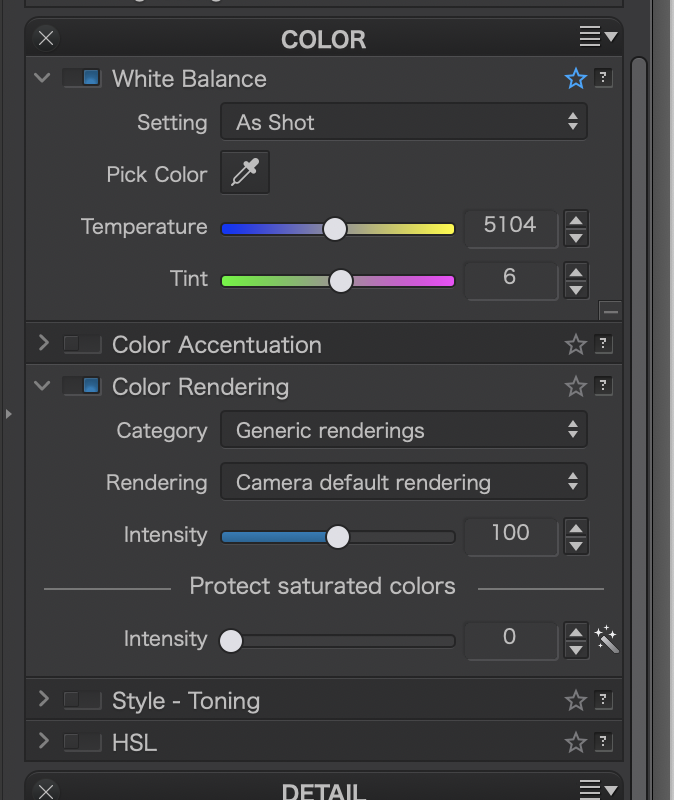
I have White Balance, not RAW White Balance
For Color Rendering I see that you have changed “Rendering” and “Intensity”
What do those do? Why might I want to use them? Do you leave that as the default setting?
First time I’ve uploaded an image here - hope it works!!
Well, first, we take photos, then we make images of them. The expression of the results may please one person, another person might have a different impression and opinion.
Not all that is different is wrong. If it were, we’d still be engraving cave walls.
Looking at your images i say looking good and in some you can use local adjustments to bringout some detail in the shadow.
Flying bird, shot against sky so wings are dark. This is a excelent oppertunity go use controlpoint on the bird to light up the detailsof the wings you shot. (it’s your object of interest so lighting it up doesn’t ruin the autencisentie , doens’t make it unreal.
If your memory saw that detail looking yourself you can bring out that in your image.
If you did saw only dark not. The viewers brain would be picking up the unreal view as HDR look then.(johanna’s beach shot example shows that. Sand and rocks straight in the sun.)
Same by the treetruncks those wierd forms screaming for microcontrast localadjustment clearview. Just try it and see if it’s enhancing or not.
Best advise i can give you is: Make your image as liked then use Virtual Copy’s to experiment om the details the artistic “enhancements”.
Export those all as jpegs and view on larger screen like a smart tv or back on your monitor. By flipping back and forward you see the effects and can decide if it’s better or worse.
And “over processing” aka beond natural look, doesn’t alway’s be bad.
Sometimes lead the eye to something by extra contrasting or blurring non interesting parts is part of your idea of what you want to show us.
New things for me to try, and learn:
control point - I know about that, just need to start using it.
(No, looking through the small rangefinder/viewfinder window, I didn’t see any of that detail - I saw a “blob” that was the bird, and waited to capture it just before it reached the water. I was close. Silly me, I could have held down the shutter release and gotten several shots, but I forgot about that. One more thing to get used to.
microcontrast local adjustment - need to learn how to do this.
clearview - I love the effect, but so many people wrote me to say it looked awful. I guess I just over-did it.
virtual copies - need to learn how to do this.
overprocessing - I guess too much of a good thing is not too good. I’ll continue to do this, but with a little more restraint. (The guys in the Leica forum want things to look natural, not over-done.)
If I didn’t expect it to rain again today, I would take the same walk as yesterday, and try some of the shots again, improving them based on what I learned. It’s still a cloudy day though - would rather have real sunlight helping things look their best.
Use @Pieloe’s tutorial to grasp the way it works using the tool. then watch some video’s to see it working to understand it’s potential.
local adjustments are great controlled tools to finetune a image piece by piece.
Yes, because Clearview does not only adding “black dot’s” (as in dehaze a color, make it more saturated and less faded) it also sharpens the edges of the colorplanes which can be overdone and be as overdone USM (Unsharpmasking) By using local clearview you can leave the places alone which starts to be ugly when you pushes the slider more towards 100%
(i use it often around 15% til 33% but not 50%. Then is use 15-33% ánd add some local Clearview on top of that where i need it.)
quite easy:
at any moment of development you can rightclick on the tumbnail in the filmstrip and select “make Virtual Copy” then it “clones” the original making a copy, a second twin. the original becomes the master then. you can edit this twin as you like and the master doesn’t change.
i did some image’s again and again in a few years as learning material. So every time you have a “difficult” image copy that rawfile in a “test folder” and every time you learned something go in that folder and reset the settings and start over. then copy your earlier work in to a sub folder in export folder and export your new try out in that folder. See if you gain some improvements. If so replace jpeg in your archive/webpage or delete and wait until you have new knowledge when trying things.
Having fun is the most supporting way of this hobby so who care’s some critics along the way.

1 Like
Virtual Copies - wow, how cool is that!!! And it labels the original as “M” (for master) and my first virtual copy as “1”. This is awesome! I had no idea how to do it - I used to be concerned about doing things, because if I didn’t like them, I’d need to go into “history” and delete the most recent changes. This is much easier, and much more organized.
How do I find “@pielos’s tutorial” ? I will search for some videos. I know how control points work in Nik - is it the same here? Time to do some searching.
this is of v3
Start here:
2 Likes
I have installed PL4 this morning and where PL3 bogged to a halt (20k+ in incoming pictures folder) PL4 can cope quite well with it. I’m pleased, yep. All pictures are on spinning rust so that’s quite good.
2 Likes
performance improved in PL5. There is still an issue when moving pictures around in the Library view (after moving about 5 times, to different folders) where the performance gets bad, easily corrected by closing and reopening the application. But so far I’m quite happy with PL5, I think I’ll make a YouTube video about it.
Throwing that many images at PhotoLab is asking for problems, depending on different causes, e.g. the default preset. I find that PhotoLab is much more well behaved when the number of images of a selected folder is relatively small, say 100 images instead of several thousands.
1 Like
I shoot corporate events, including week-long conferences. I’ve never had issues with PL2/3/4 handling folders with several thousand images.
What’s your default preset?
I find that with “No Correction”, large folders handle much better than with other presets.