PL4 reads Ratings that have been written by other software, but doesn’t write changes in Rating back to the image file or the XMP sidecar file. That topic has been the subject of a lot of discussion here. Personally, I don’t use the metadata features of PL4 at all, depending instead on a stand-alone digital asset management program (the Windows-only IMatch https://www.photools.com/). Metadata management is a very deep and complicated issue made more so by camera companies and others who insist on proprietary techniques…
ExifTool is indeed very powerful and provides a very deep look into the metadata that’s generated by many different camera makers and camera models. It’s possible you can ‘trick’ PL4 into thinking your M8.2 is an M10, but it’s likely to be quite complicated and depends very much on how camera names are stored by your camera maker in so-called maker notes. Only try this on copies of the image file!
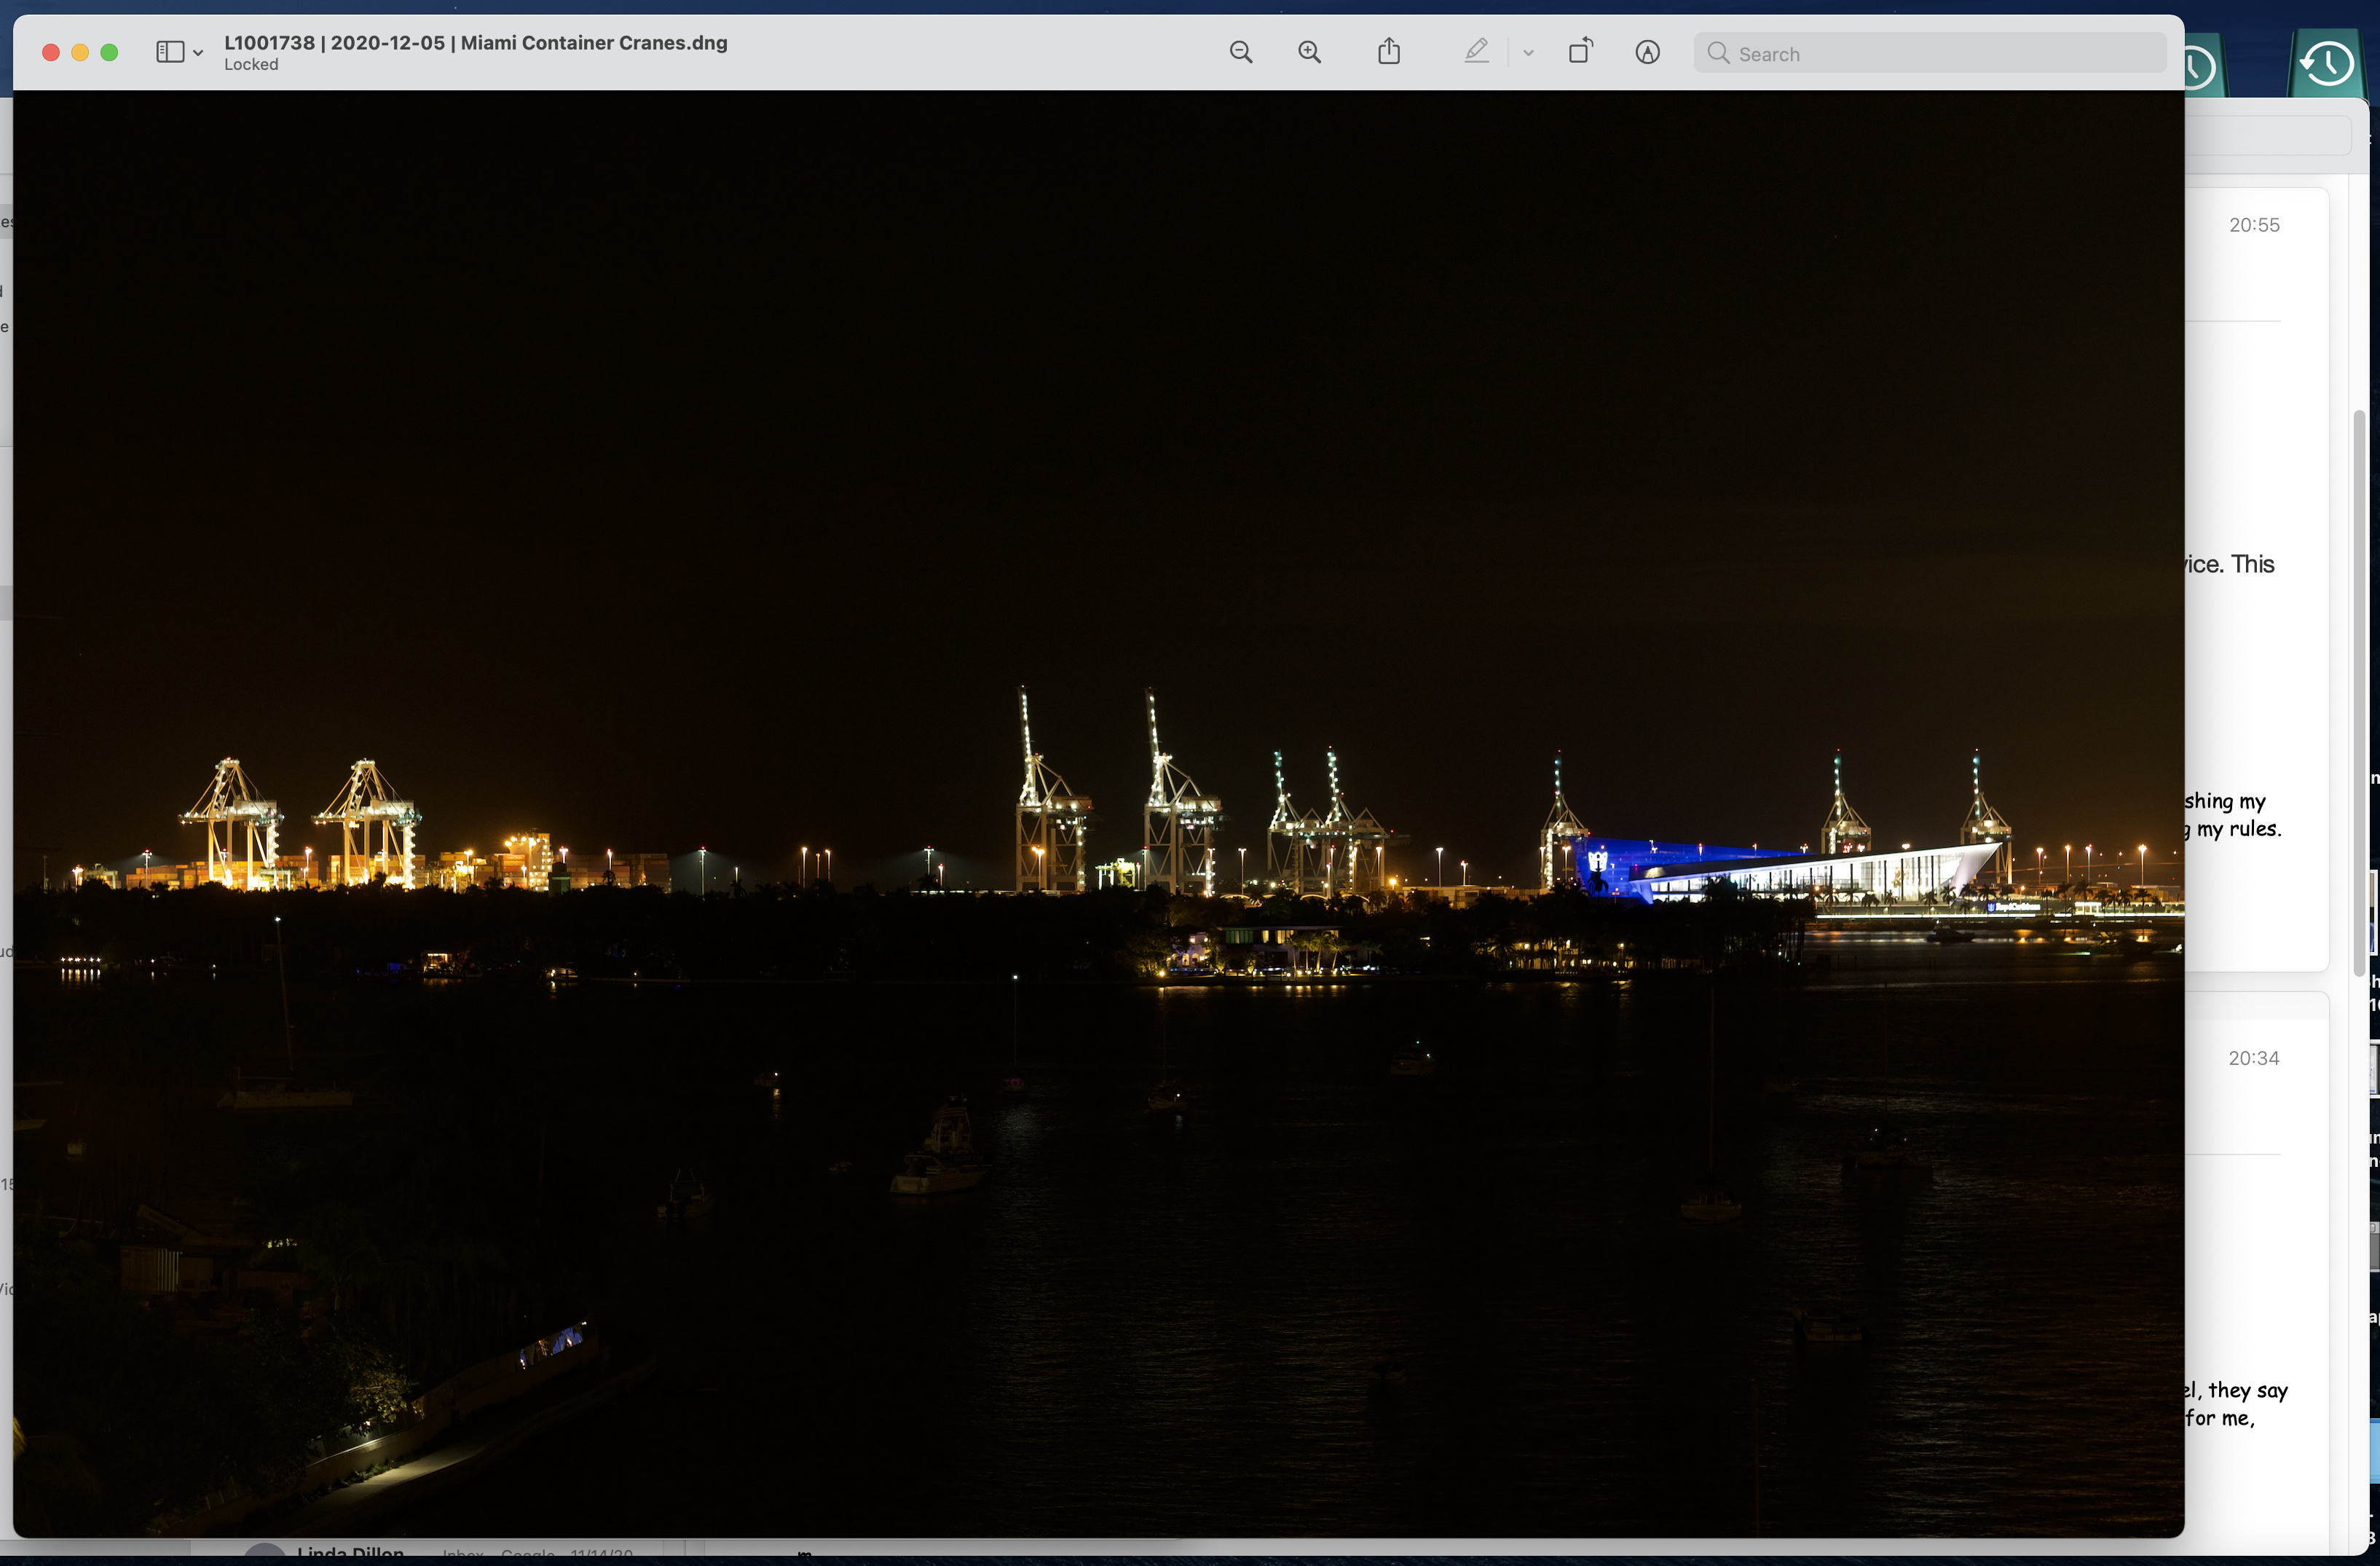
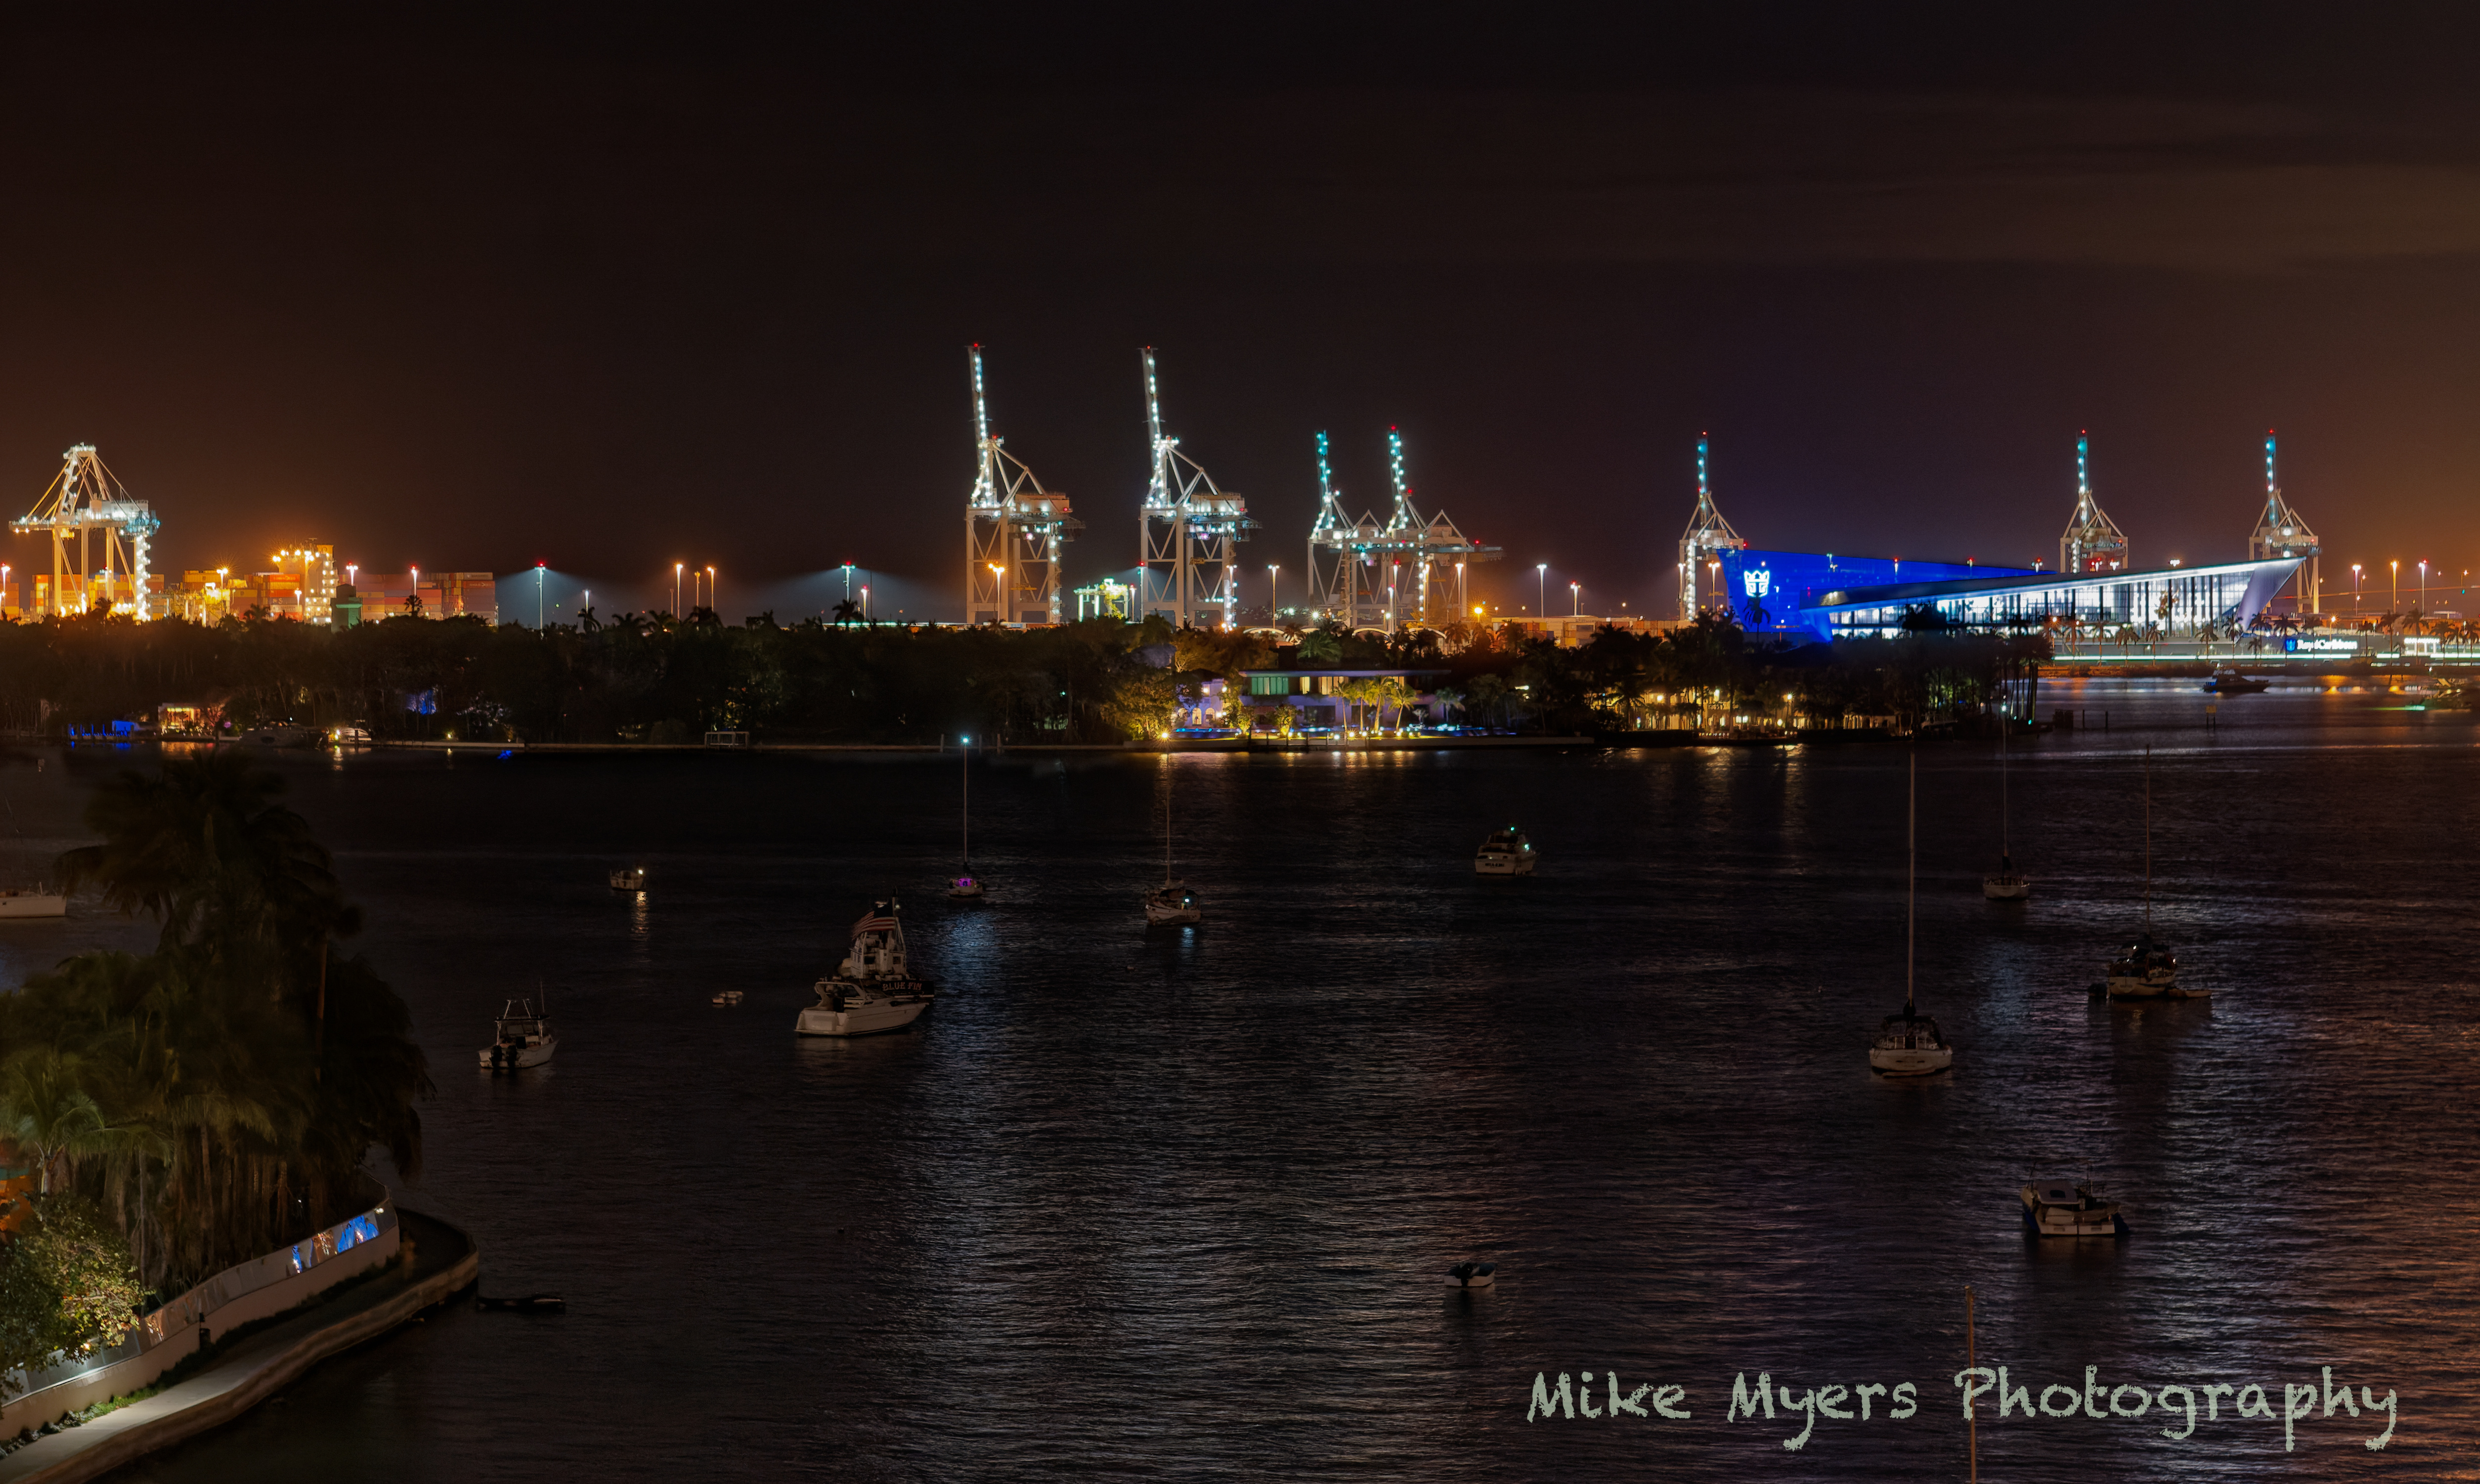
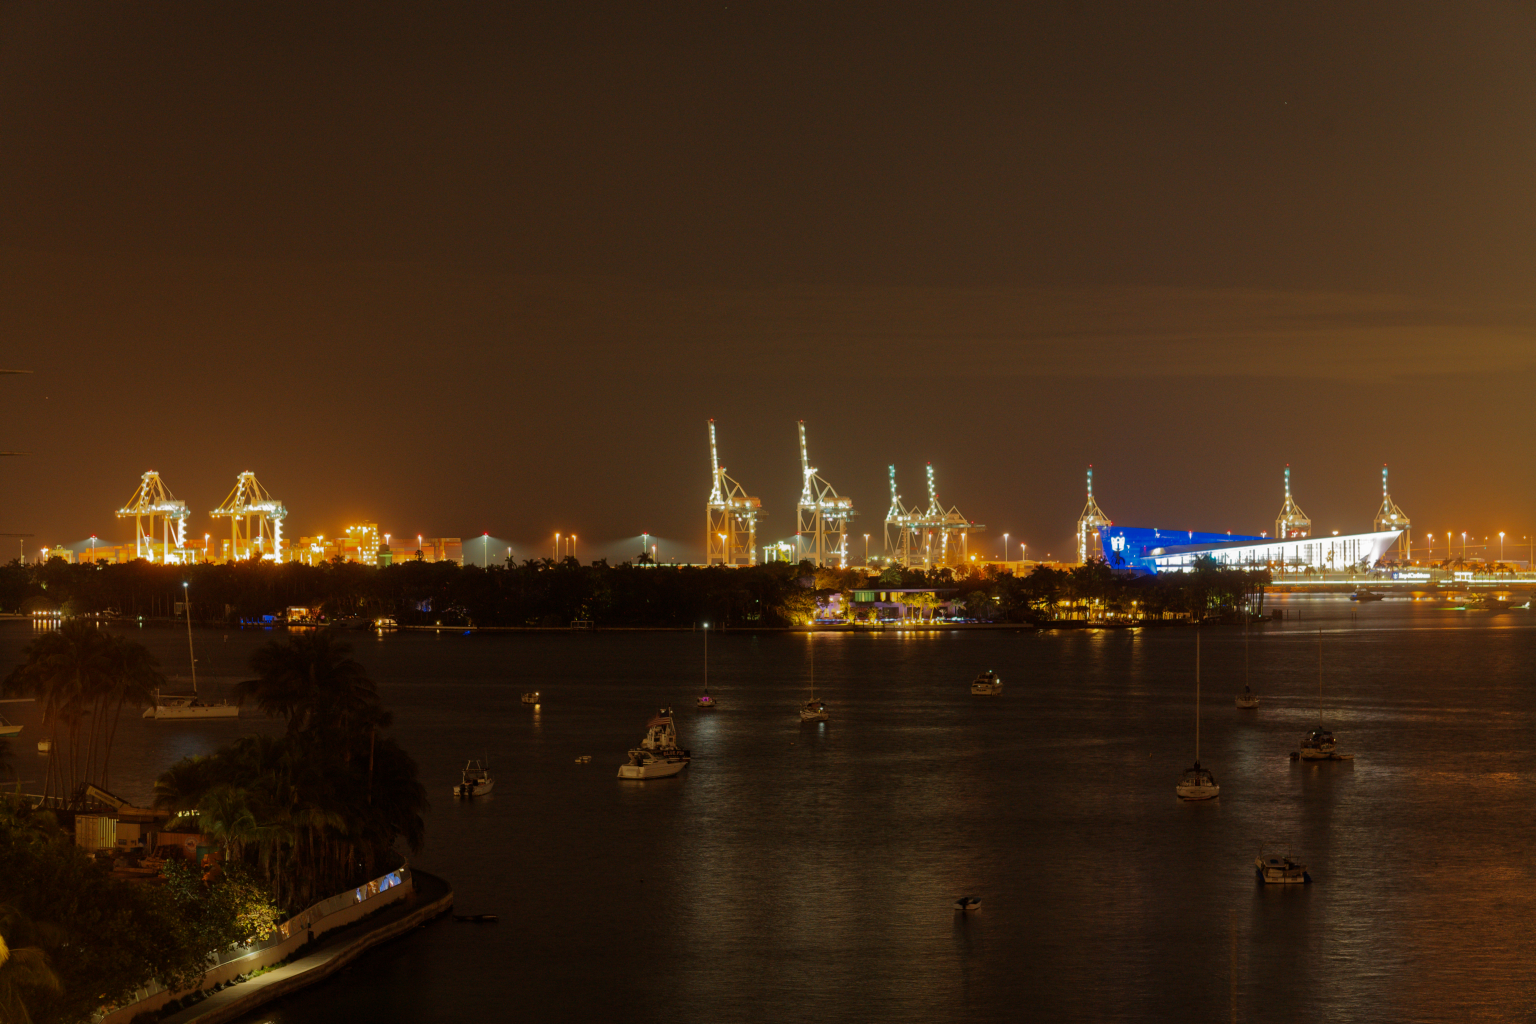
Based on what I learned from the previous night-time shot, I wondered if I could get a decent photo of the Port of Miami cranes that load/unload the container ships. This was to be late at night. I found by trial and error what seemed to be a reasonable exposure, and then set my Leica up for bracketing - five images total, with each being two stops from the next.
So, I’ve got five images to upload, and I suspect the middle image might be the best one to start with.
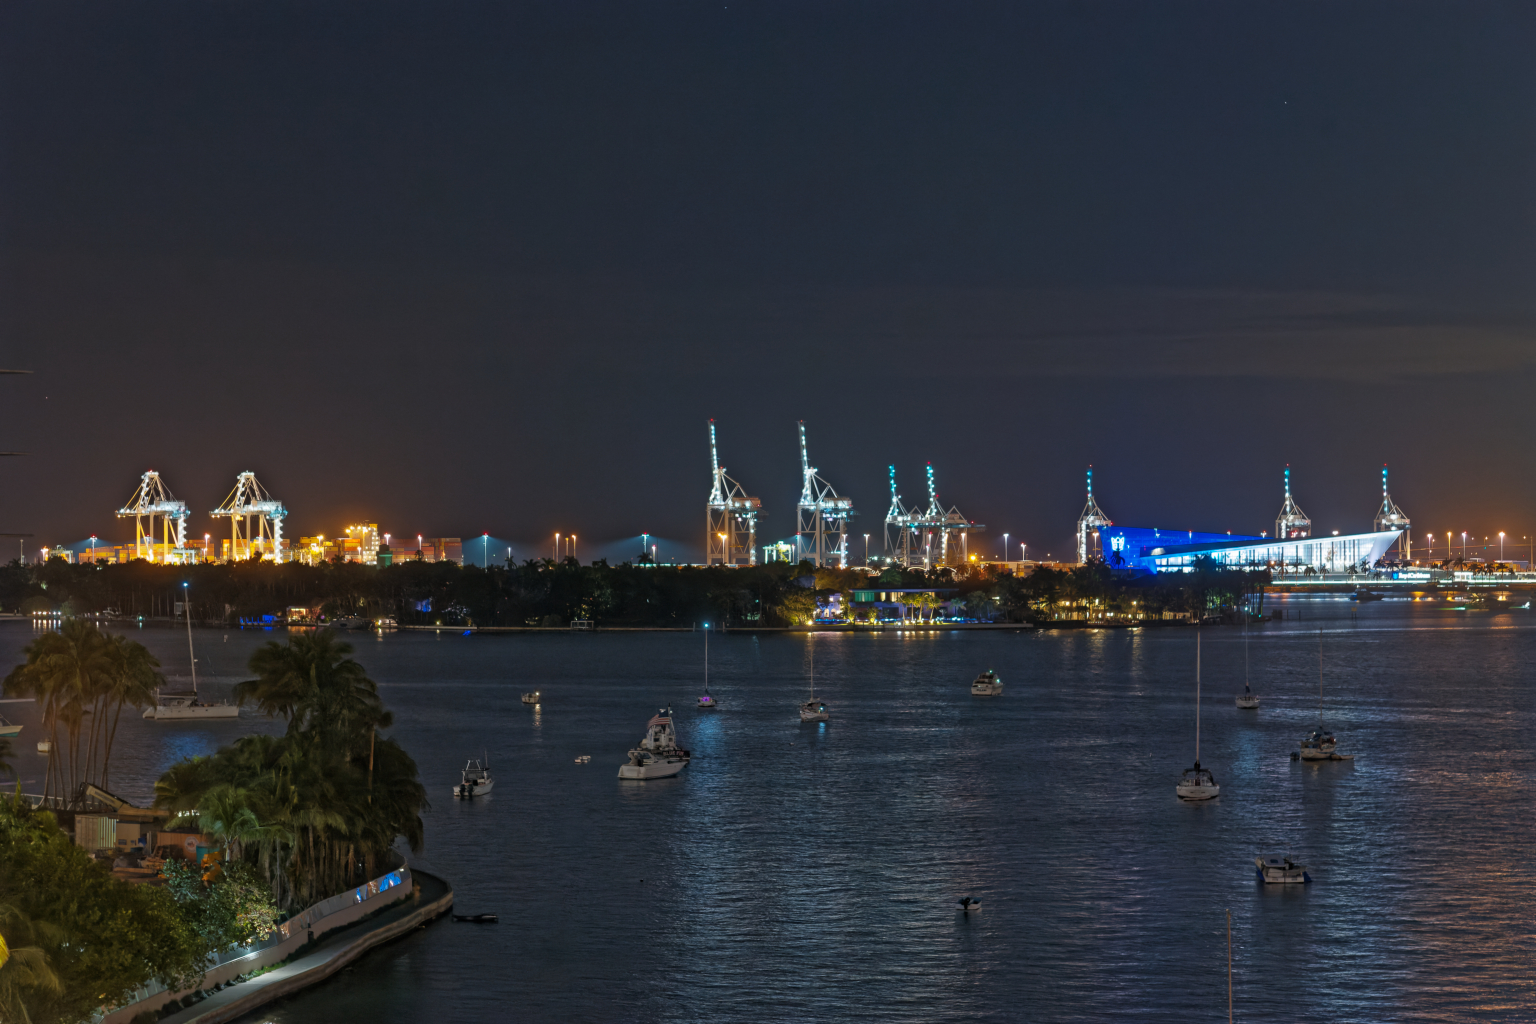
I’m no longer thinking that the final photo should be the same as what I saw, as once again, I didn’t see very much. By looking at the image that is greatly overexposed, I see that there are lots of things there that might look great in the image, regardless of my not seeing them when I took the photo.
As for taking, they were all done on a tripod, no exposure correction. I set up the camera to take 5 images, one at my guess for the best starting point, and then +/- 2 stops, and +/- 4 stops.
I’ll see what I can do as well, but considering it’s almost midnight here, I’ll do this tomorrow.
I also did a screen capture of the middle exposure - will upload that as well.
L1001736 | 2020-12-05 | Miami Container Cranes.dng (15.6 MB)
L1001737 | 2020-12-05 | Miami Container Cranes.dng (18.0 MB)
L1001738 | 2020-12-05 | Miami Container Cranes.dng (20.7 MB)
L1001739 | 2020-12-05 | Miami Container Cranes.dng (24.0 MB)
L1001740 | 2020-12-05 | Miami Container Cranes.dng (27.3 MB)
I have a similar workflow:
- import and rename with Photo Supreme
- Cull within Photo Supreme
- Keyword etc…in Photo Supreme
- Create a project in DPL and edit the files there
- Export as 16 bit tiffs
Aha! a crack in the armour of the “pure” photographer 
And it is all down to what Ansel Adams called visualisation, where, essentially, he worked out in his mind what he wanted the image to convey and then worked out in practice what it would take in terms of exposure and development to realise that “vision”. Something that involves far more emotion than just pure record photography 
If by trial and error you mean assessing the exposure on the back of the camera, then you need to remember that you are looking at a jpeg image that is a “best guess” of what the RAW could look like, made by the camera.
Once again, I can’t emphasise how useful it is to know the dynamic range of your camera and to try to avoid over-exposure at all costs. The problem with this type of shot is that you almost bound to get over-exposure on the actual points of light (similar to trying to meter the sun  )
)
Personally, I would have spot-metered the lit wedge-shaped building on the right and placed it as 2 stops over-exposed.
To completely avoid blown highlights, I found 1737 was fine but you might have been able to add 1 stop to that. What are known as specular highlights, such as points of light or bright reflections are “allowed”
Interestingly, if you use FastRawViewer, you will see that it is almost impossible to achieve blocked shadows - even the lowest exposure only shows a few dots here and there. In fact, if you had exposed in 1 stop increments, you would find that halfway between 1738 and 1739 seems to be about the sweet spot between not enough shadow detail and too much noise.
It would be very interesting to see what result you get by spot metering the brightest part at +2, which should be at the limit of your sensor.
DxOMark shows your sensor as having 13 stops of dynamic range at 100 ISO, so I would expect you to be able to place highlights at around +2 without too much problem, leaving the shadows to fall anywhere around -11 stops, which is pretty dark, and still recover details.
Oh, and my attempt at “perfection”, based on 1738
L1001738 | 2020-12-05 | Miami Container Cranes.dng.dop (11,4 Ko)
1 Like
one thing of advice:
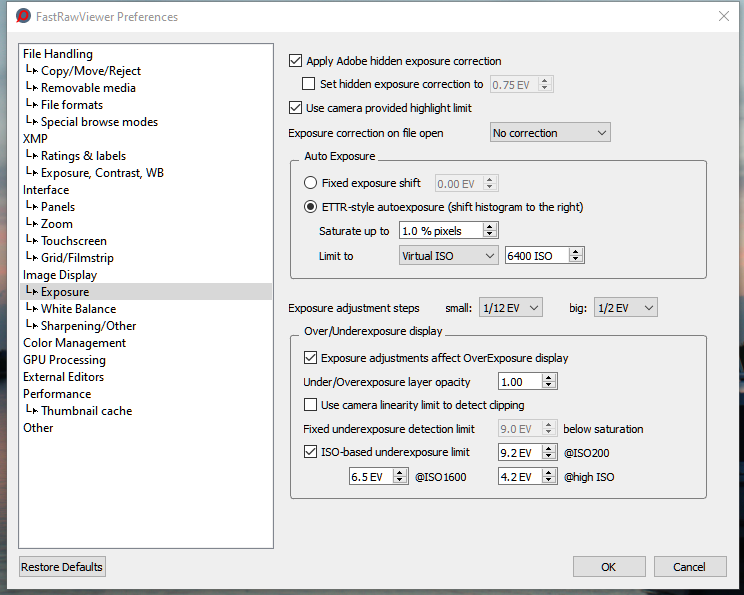
set FRV dynamic of your camera 2 -3 stops smaller.
i have a 12,5 stops DR camera.
This for the high and low masking (OE UE) and there blown near to blown graphics.
@gregor:
one of the images we had as problem for DxO AWB- colorpicker:
blue light as shot
auto modes
SP Absolute AWB 6319/3, Auto natural WB 6403/3 and FRV 5366/-9
link to to original test.
to see the subtle difference between absolute and natural:
video click here
Absolute is a tadd colder then natural.
did some small test with my known images and the FRV’s AWB aka Auto is a nice reference number to dial in DxOPL’s WB tool. (it would be nice if the XMP data of this change (FRV can write the WB in the XMP) is picked up by DxOPL. )
But on DxOMark, it’s a very different story.
First, the camera’s claimed ISO is one full stop too fast

Then, if you take the theoretical ISO of 800, the DR is actually 10.69 stops
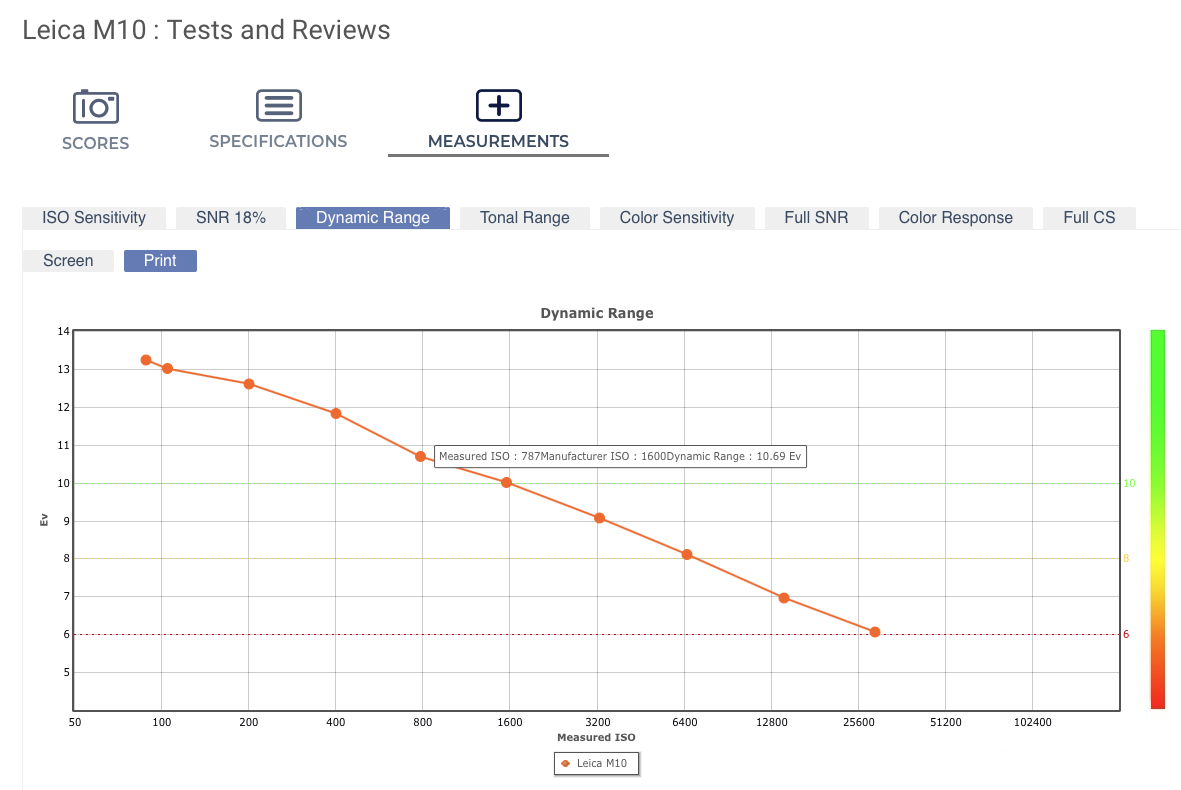
But then they do say that 78% of statistics are made up
Although I would rather take DxOMark’s figures. I’ve certainly found them to be good on my cameras
Certainly.
Interesting that the notes on the bottom of your screenshot refer to their data being derived from DxOMark - and yet it is quite different 
my own FRV setting is quite simmilair, i got those from FVR support when i asked how to read DxOMark and there prefferences.
But these is also more “reality measurement” i think.
base 9.18 and 6400iso 4.23.
But i fine tuned it:
(what’s camera linearity limit?) it’s active on your setting.
“For more cameras (derived from DxOMark data) see DxOMark Photographic Dynamic Range Chart. However, data on this chart, when available, is considered to be more accurate.”
if i read it correct they say for other not here listed camera’s go to DxOMark.
edit and hmmm interesting:
12,5EV DR
they linking to there own list in that sentence.
confusing.
somewhere i have warning ring in my head.( i asked i know)
i switched it off and can’t recal why.
something in “hidden correction” i think it’s about using DxOPl and not a Adobe leaning application.
Hmmm. Before now, I had never heard of photonstophotos.
From my real world experience, their numbers are very conservative - they only quote 11.19 EV @ 100 ISO. DxOMark’s numbers give me 14.36 EV @ 100 ISO and I have proven, from my own tests, that this is far more accurate. I can certainly recover amazing amounts of shadow detail with PhotoLab in images that, before processing, appear almost totally black.
found the answer of my question by FRV support:
“DxO is providing numbers for engineering dynamic range. Photographically useful dynamic range is about 3 stops less. I would say Panasonic G80 starts at slightly more than 9 stops (at base ISO), and shaves about 2/3 to 1 stop off it for each extra ISO stop.”
Can’t find the why i didn’t turn the “Use camera linearity limit to detect clipping”
i am foggy about this memory but i am quite sure i decided not to use it.
i think it’s a bout the hidden “gamma” setting aka exposure correction @gregor mentioned.
i think it shows now the DxO “brightness” but as i said foggy about why i decided this not to activate.
Now, that is interesting. Certainly, although I can find detail at 12 stops below measured exposure (14 stops minus 2 stops over-exposure), I would certainly need PL4’s DeepPRIME to make it look anything like detail instead of noise.
Using the ETTR technique, essentially, I fix my right end exposure at +2 stops and then let the shadows fall where they will - I don’t really have much control over that unless I bring in lighting.
To go back to film photography, we would be very grateful to get 14 stops range out of a B&W negative; and that not without using the Zone System to heavily modify the exposure and development times. I was positively gobsmacked when I realised that my D810 could produce such HDR images without taking the time to catch breath 
On my wall - for these two choices, the second version. I’ve got to add though, that it doesn’t look “natural” to me. It looks like what it is, but with my new way of looking at images, it is excellent. That detail was there - and had you brought a gigantic flash with you, this might be what you would get, so in every way I now think of these things, I’d scrap the first (boring) view and go with the second (beautiful) view. A month ago I might have answered differently but I now have a different perspective. This revised photo is completely “real” as I see it now.
2 Likes
That part sounds logic.
The part of that offset of exposure correction for adobe products.
I like to know what that means. How this effect my use in FRV before DxOPL.
Maybe nothing. As in it is only usefull if you use xmp and let a LR read this.
And all other ignore this.
So it’s a way of preview brightiness control for FRV.
All the previous responses and charts and graphs look interesting, but I have no idea yet what they are, or why I need to understand them.
If I take whatever camera I have, and set it on a tripod, and capture a bracketed night shot (maybe 5 shots with one stop difference between them), this is all I can do. Dynamic range and all the rest are irrelevant - all I can change includes three things - ISO, aperture, and shutter. Maybe a year from now all this will make more sense to me.
One thing has changed from before - I thought I knew what I wanted a photograph to be like, but I was limiting myself, preventing me from creating the “best” image I can from an already captured photo. In very simplistic terms, since it would be a “real” photo if I captured it as-is, and it would also be a “real” photo if I used a flash to light up the scene, I was needlessly limiting my self by not lighting up a scene to show the otherwise hidden details. Before I take any new images, I want to work on the photo of the cranes from last night, and show some of Biscayne Bay surrounding the area I was interested in.
Thanks to you guys, I now have lots more tools to evaluate my captured images, and select the best one for editing. I just need to learn how to use these tools, probably starting with Fast Raw Viewer.
1 Like
I picked an image that was slightly brighter, then added adjustments and local adjustments, and set the white balance for one of the lamps. If I was going to post an image for viewing, this is what I now thinks looks good (even though most of the detail I couldn’t see with my bare eyes).
L1001739 | 2020-12-05 | Miami Container Cranes.dng.dop (10.6 KB)
L1001739 | 2020-12-05 | Miami Container Cranes.dng (24.0 MB)
A simple reply is - you will make better pictures and have to do less work in PhotoLab to achieve them.
I’m sorry Mike I thought you were more of a “purist” photographer than that Night shots very rarely need bracketing, or as it is otherwise known, hit and hope mixed with a bit of “if I take enough shots, one of them’s going to be right”
It’s certainly not all you can do. You can get used to spot metering and that, combined with a knowledge of what your camera is capable of, will give you the perfect (yes, I said perfect) shot every time.
You don’t need a year, you just need a clear, succinct explanation, which is what I will try to give. If you don’t get it first time, we’ll put it another way.
Let’s start with a definition of what dynamic range is in terms that are of interest to the average photographer…
Dynamic range is the number of stops between the exposure required to see detail in the deepest shadow and the exposure require to hold detail in the brightest highlights.
To start with, you need to decide on what ISO you want to use - one that is not too slow if you are going to handhold or not too fast that it gives you lots of digital noise.
If the world were a perfect place and everything stood completely still while we took a picture, 100 ISO is absolutely ideal, especially for the kind of landscape shots you seem to favour. But, if necessary, you can increase that speed quite considerably, knowing that PL4’s noise reduction can get rid of that excess noise, even at relatively high ISOs. Unless I am using a tripod, for “wandering around” daytime photography I tend to use 400 ISO.
Apart from generating more noise with higher ISOs, another thing they do is to limit the dynamic range (difference between darkest and lightest parts) that you can record without losing detail.
This chart shows you that, with your camera, you have got as much as 13 stops of range at 100 ISO but, if you were to use 25600 ISO, you would only have 6 stops of range.
Why does this mean?
Well, if you are shooting against the light, you are going to need as much range as you can get, in order to neither block the shadow detail or blow the highlight detail; so you are going to have to keep the ISO as low as possible, given the light available.
However, if you are shooting with the light behind you, or in diffuse light, you could possibly get everything into 6 stops (Fuji Velvia 100 transparency film is only capable of 5 stops and is a firm favourite of large format landscape photographers) so, if necessary, you can raise the ISO and still get everything in.
So, let’s take the kind of shots you have been showing us. The earlier ones were taken against the light but, if you were using a tripod, you could safely use 100 ISO, unless you wanted to avoid subject movement blur. This then allowed you to profit from the maximum dynamic range of your camera and take “HDR” shots in one frame rather than having to bracket and blend two or three pictures afterwards.
Now to discuss what happens when you meter a scene.
All light meters, including those in cameras, try to make the exposure an average 18% grey; not black, not white, not even mid-grey.
When we spot meter this white van
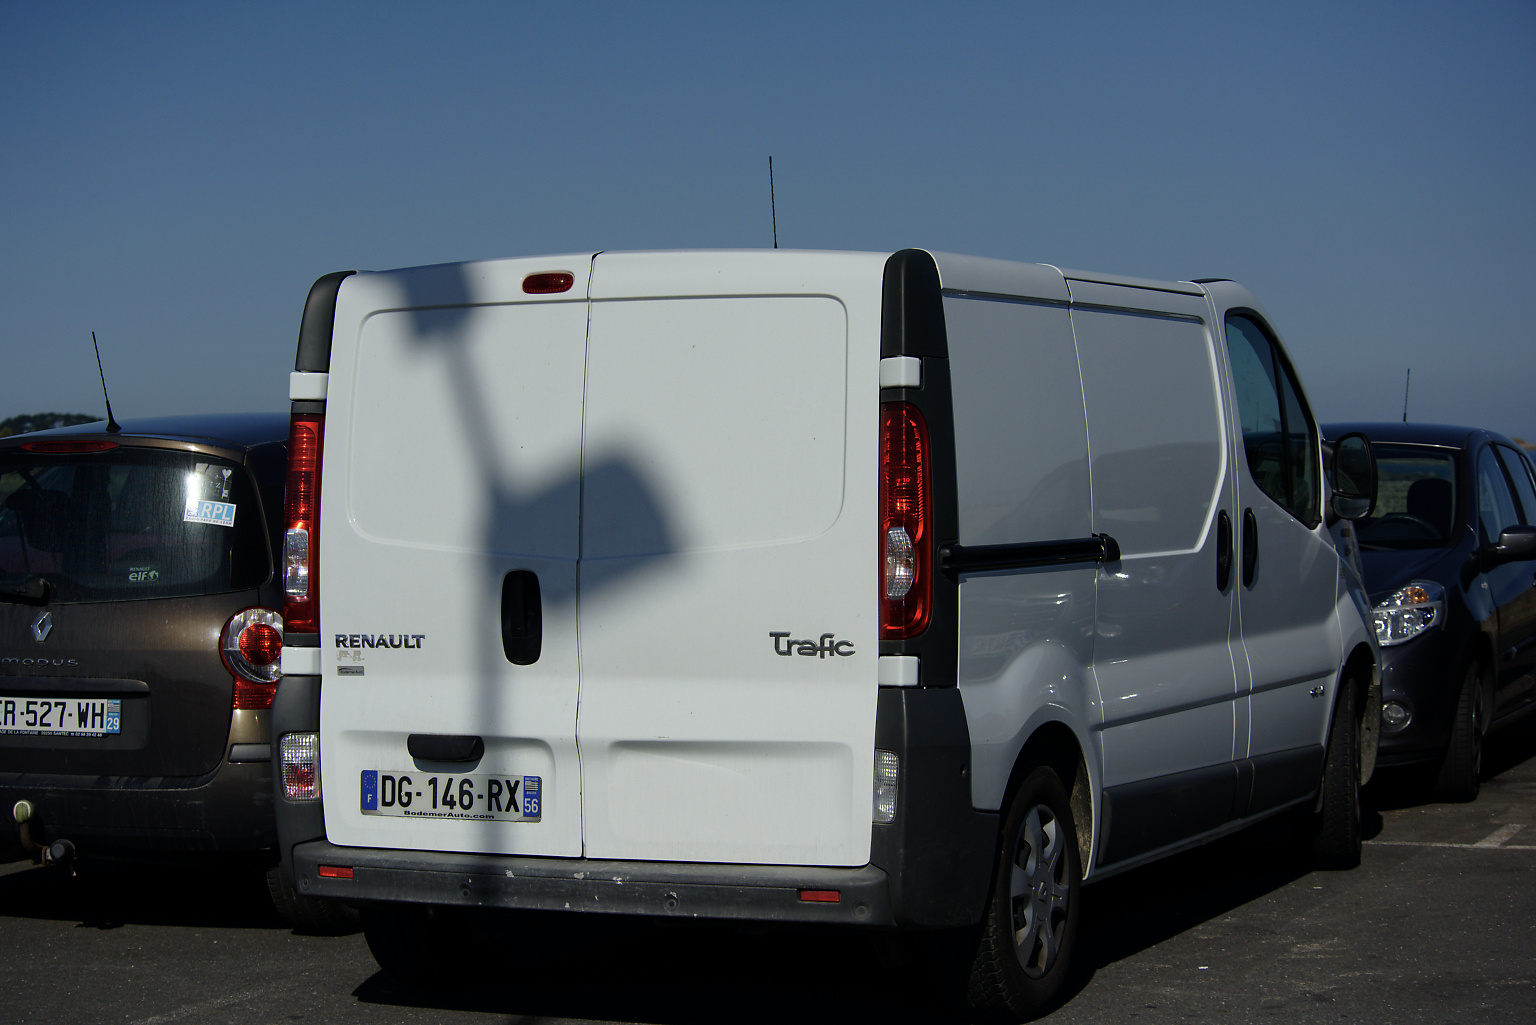
… it comes out a mucky grey.
Now, because we found out that your camera can over-expose by up to 2 stops without losing detail in the highlights, we can tell the camera to deliberately over-expose by those 2 stops
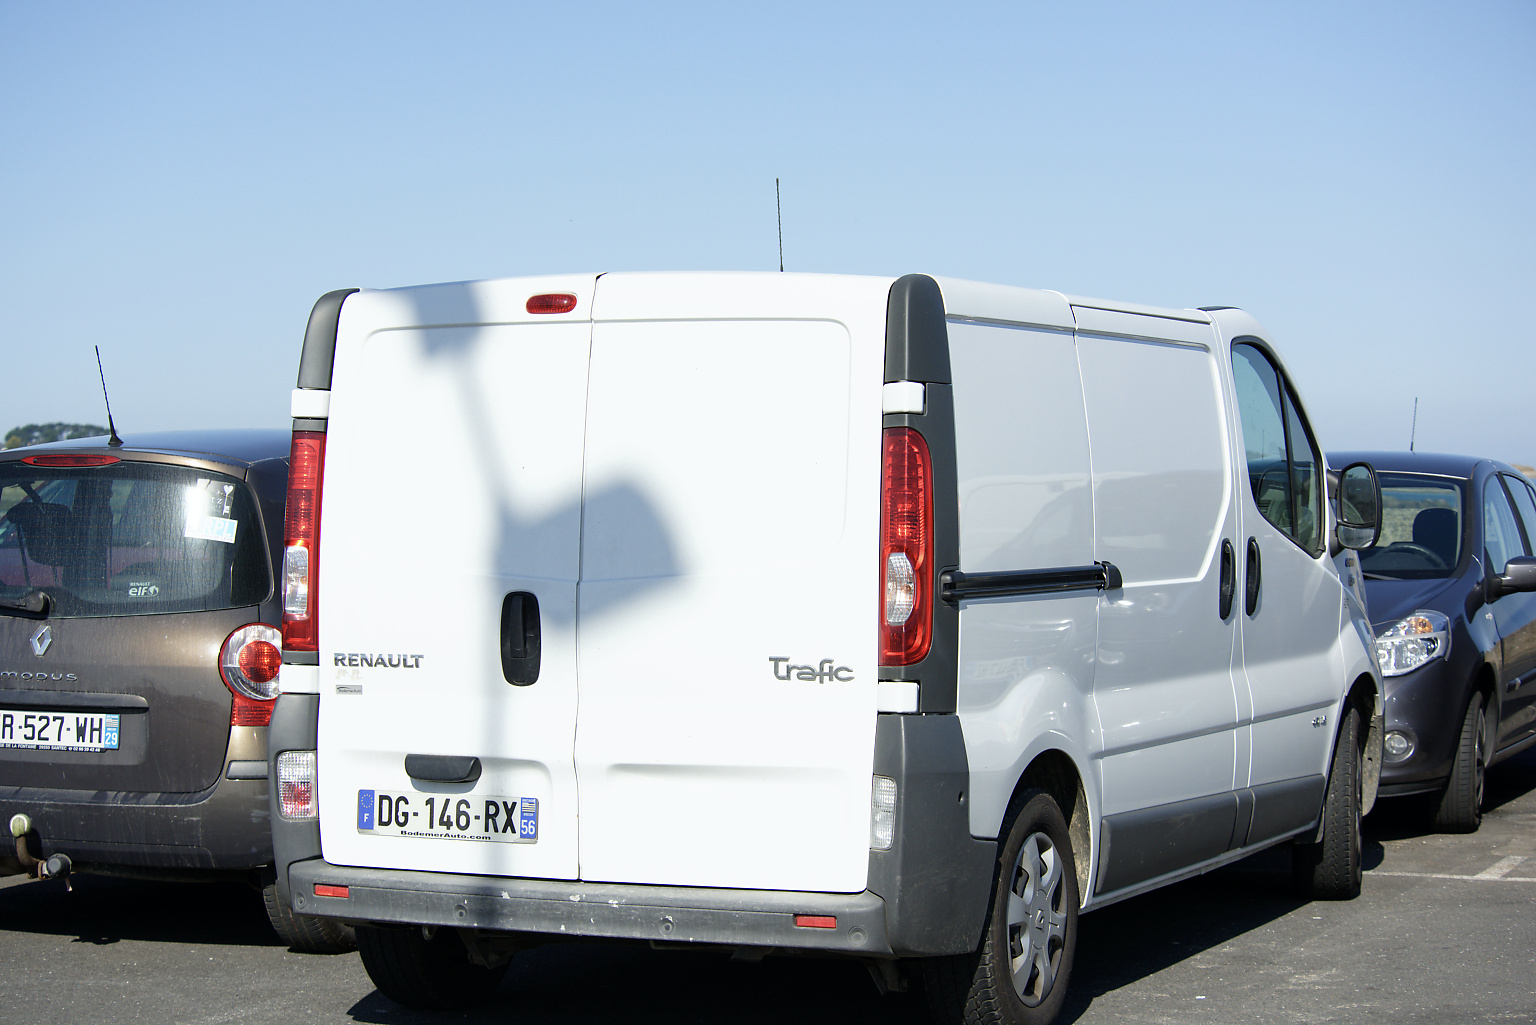
… which then gives us a properly white van with the detail of the panels still visible in the doors.
Which is why we advise you, in the case of high contrast scenes, to spot meter the brightest part and add two stops. On my camera, if I set the exposure compensation dial to +2, the metering will then tell me the right exposure without having to add the 2 stops on afterwards.
Am I going too fast? Let’s take a break there and you can come back with questions if you need to.
3 Likes
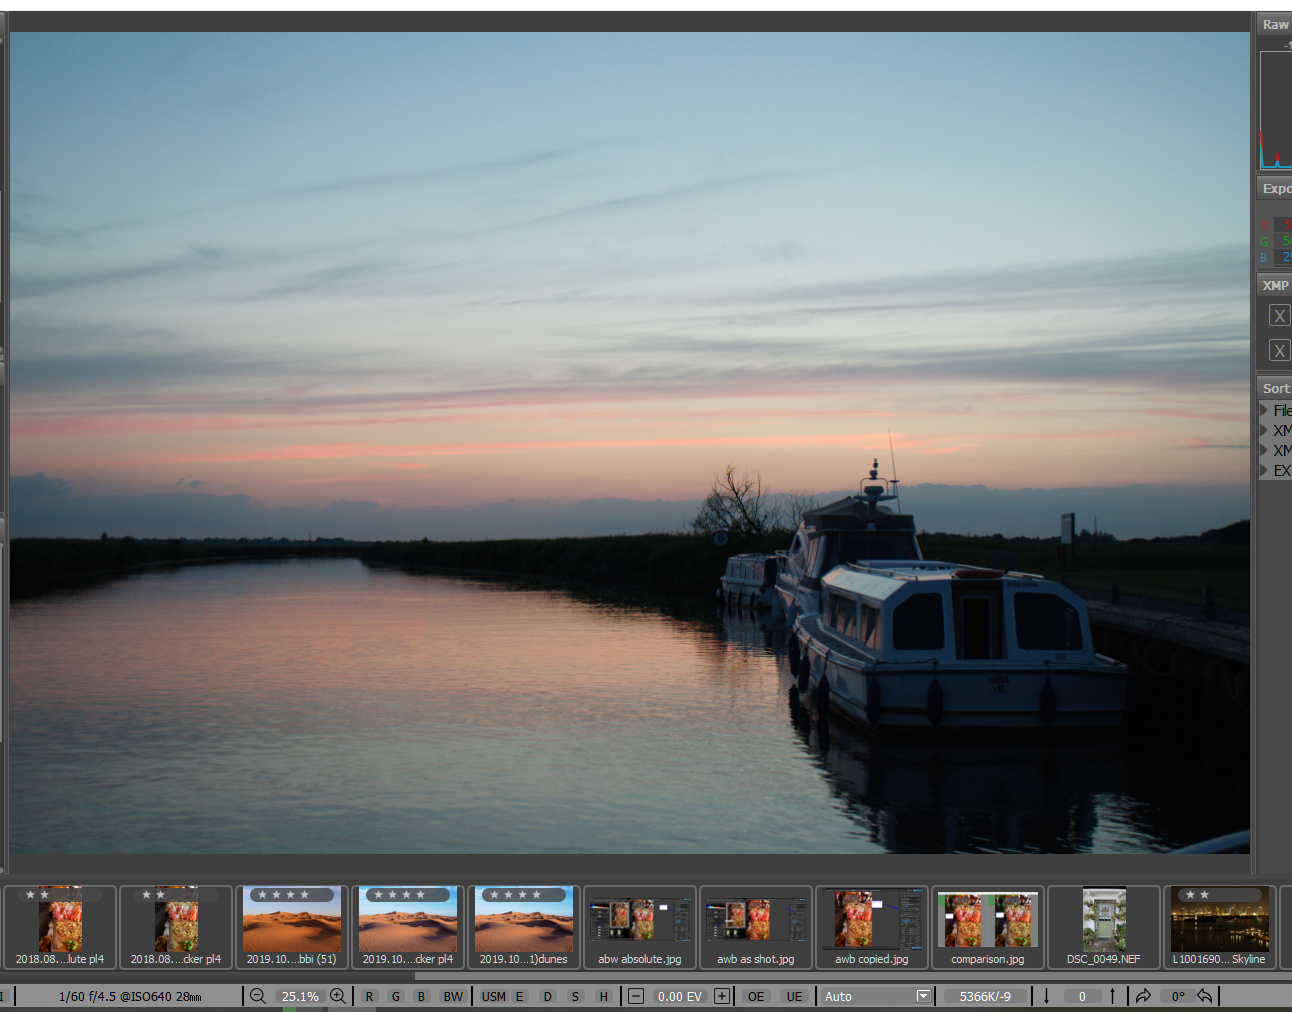
Unfortunately, you have sent 1739 and posted a jpeg of 1738. 1739 is marginally over-exposed I the highlights. Which did you intend to discuss?
[Edit]
I took an executive decision and worked on 1739 since that is what you sent.
All I have done is to lower the Highlights Selective Tone level to -100 and the takes care of the blown highlights in the windows of the wedge-shaped building on the right
1 Like
Yesterday I thought I would work with 1738, but this morning the slightly overexposed 1739 seemed like a better choice. All that I’ve done today, has been on 1939.
I originally uploaded all five of my bracketed images, because at that moment I wan’t sure which was “best”.
They are all the same image, but for the bracketing.