Added later - the above is for photojournalism.
All bets and rules are usually off when the photo is for magazines.
Never trust a photo you see in a magazine, unless you know the source.
This is especially true for cover photos. 
Added later - the above is for photojournalism.
All bets and rules are usually off when the photo is for magazines.
Never trust a photo you see in a magazine, unless you know the source.
This is especially true for cover photos.
Geesh this is putting yourself in a corner editable wise.
then this is total out of the question…LOL
i imagine that 90% of the toolset DxOPL offers can’t be used to its power.
Are you using this all the time as your “code” ?
Or are you making sets for your self (free of bounds) en an other for display?
I no longer worry about this. Any time I go way over the line, I call the result a “Photo Illustration”. How much, or how little, I do, depends on where and how the photo might be used. Once I call it a Photo Illustration, there are no more rules.
Luminar is a wonderful tool for photo illustrations.
Oh, about your photo - without seeing how you changed it, I have no idea. I assume what you posted was “reality”. Software such as Luminar is shaking the foundation of what is “real” - experts could always fake it realistically, but now anyone with a computer can turn the image into a fake. …but they usually leave behind signs that give them away.
For what it’s worth, most of the replies to my posted images are about how to make them more realistic, almost always by removing artifacts from the image editor I used.
I am not a photojournalist and I’m not personally interested in capturing images using photojournalism standards.
My goal is to capture images that I find interesting based on a number of factors including the subject matter, lighting, and the shape, texture, contrast and line of the objects in the image. I am also fascinated with black and white photography, and, not surprisingly, shape, texture, contrast and line are also the major components of good B&W white images.
I modify my images to improve their exposure, eliminate distortions, and remove distracting objects. I only work with what is in the original image. I am not interested in composite images and do not add objects that were not there like replacing skies. Anything else is acceptable.
I am not necessarily always interested a true representation of exactly what I saw but rather in my own interpretation which I hope will be interesting to look at. No image tells the absolute truth regardless of how well rhe SOOC image is framed or exposed. Accepting that premise gives me a lot of leeway in adjusting my images.
Mark
Well the pixel editing things as replacing sky’s or adding buildings or people, is fiction.
Cloning a pole out of the way is cleaning up.
Changing colors is artistic view.
I only do fiction for learning purposes not to have my image"improved".
Like @mwsilvers said. Everything is ok as long as you keep the core alive and be happy with the result.
The bottom photo looks best out of the comparisons. Though ClearView definitely has acceptable limits. Once that crispy white appears on contrast zones or edges I know I have gone too far and dial back whatever I did by about 50%, then question what I am really trying to accomplish.
ClearView, dehaze, smart lighting, etc. quickly start having that artificial phone photo look.
My advise on another alternative to aid in ClearView effect, (that you can push a little further but retains a more natural look) is NIK Viveza Selective point on shadows / contrast + / Structure + / Brightness +
That has been my experience with it.
OXiDant - I spent way too many years in participating in www.sportsshooter.com . I had to pay $25 per year to maintain my membership, and prove that I could capture good images and provide proper captions. I learned a lot from those guys. For better or worse, I’m now “stuck” with that mindset. But this is only for images I “publish”.
As long as people know that my image was “enhanced”, I’m free to do everything you mentioned. If I’m making a “digital post card”, or a photo for a magazine, or maybe a website, I’m all for it.
My “hero” for years has been Ansel Adams. His completed Moonrise photo looks nothing like a print of his image, with no enhancing. If he can do it, I can (try to) do it, but I’m then creating art.
I guess my thoughts are it’s good to know both how, and when, to do these enhancements.
Once I got the three images properly shown in this forum, I agree with you completely. The top, stock, image was too “dull”, the first attempt at editing (middle image) looks like I went too far, and the bottom image looks good to me, without looking “phony”.
Regarding “NIK Viveza Selective point on shadows / contrast + / Structure + / Brightness +” - I keep reminding myself that my goal right now is to learn PhotoLab 4. I think lots of Nik tools would be helpful, but only after I “graduate” out of first or second grade with PhotoLab. Thanks for the feedback.
This image shows one of the things, AA used to make his images with. AA also used the tools one uses in a darkroom for local corrections in order to enhance the expression of his images.
If I remember correctly, he was capturing images on sheet film, maybe 8" x 10". To make prints, he would have used an enlarger, and I know he controlled how much light reached the printing paper to get the results he was after. I think I have seen some of his notes indicating how he needed to increase or decrease the light reaching the paper. I’m guessing these are lights that shined on the negative, and eventually hitting the printing paper? If I’m right, this would not only give him excellent control over the exposure from the enlarger, but make it easier to create multiple prints.
Fascinating!!! Thank you for posting. I’d love to find a book about AA that explains these things in a lot more detail.
Oh, and I certainly agree with what you wrote - this would give him a lot more control to enhance the expression of his images.
I also read that over time, his interpretation of the negatives changed. There was an article I read that showed how “Moonrise” got printed differently during the years he was working with it.
If Ansel were alive today, he would marvel at the control a program like PL4 gave him, and he would find a way to get his desired results.
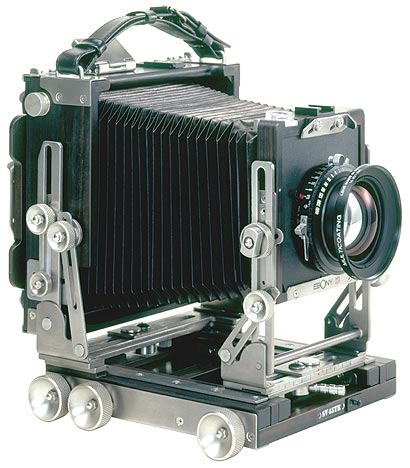
Ansel Adams was heavily involved in image “enhancement”. You fairly much have to be with large format film photography. My “other camera” is an Ebony SV45Te (5" x 4")
… and I used to run the UK Large Format Photography Group, where we would run workshops to help people get the hang of taking, processing and printing from such beautiful machines.
Some of us would use traditional wet darkroom techniques but others (like me) would scan the developed negatives and transparencies and treat them in pretty much the same way as we do digital files. The main difference being, with film, there’s an awful lot of dust spots and scratches to get rid of from the scanned image. But, however we produced the finished prints, the trick was in knowing how to make the best possible exposure in the camera, which made it easier to print from the negative.
And it is still true with digital that, if you create the best possible image in the camera, the less you will need to do in post-processing. But the mistaken belief that you can take an image and not have to do any manipulation only ever happens rarely in real life. Heck, the camera even messes around with the image just to get a jpeg preview to show on the rear screen.
The big difference between digital and film is that, with film, we don’t get a preview image on the back of the camera. We need to know that the settings we have used will produce a negative that is relatively easy to print or scan before we actually press the shutter. Well, with film costing anything up to €10 a sheet to buy and process, you don’t want to be wasting too many shots.
And larger 
He used techniques known as dodging and burning to selectively increase or decrease the amount of light reaching the paper. I had a friend who was a master printer and he showed me a print that had taken him 27 separate exposures on the enlarger to balance the tonality and contrast.
I don’t know about making it easier. Every single print has to be made in the same way, with all the different exposures, dodging & burning, etc. And then, when each print is dry, you would have to retouch out any dust spot and scratches with a scalpel and special inks. which is why I choose to scan negatives, digitally retouch out the dust and scratches (once only) - then it becomes easier to produce as many prints as you want.
Of course. Your view of what makes a good picture great changes over time and, with increased knowledge, you find better or different ways of achieving that view.
But, regardless of how he realised the physical print, he always said that you needed to make the best possible negative to get the best possible print. Instead of blasting of several hundred images in the hope that one of them worth printing, we should try to get to the point where we can take one picture, knowing that it will make a great print.
I use PL to do the same kind of things that you would do in a darkroom, including dodging and burning by using local adjustments.
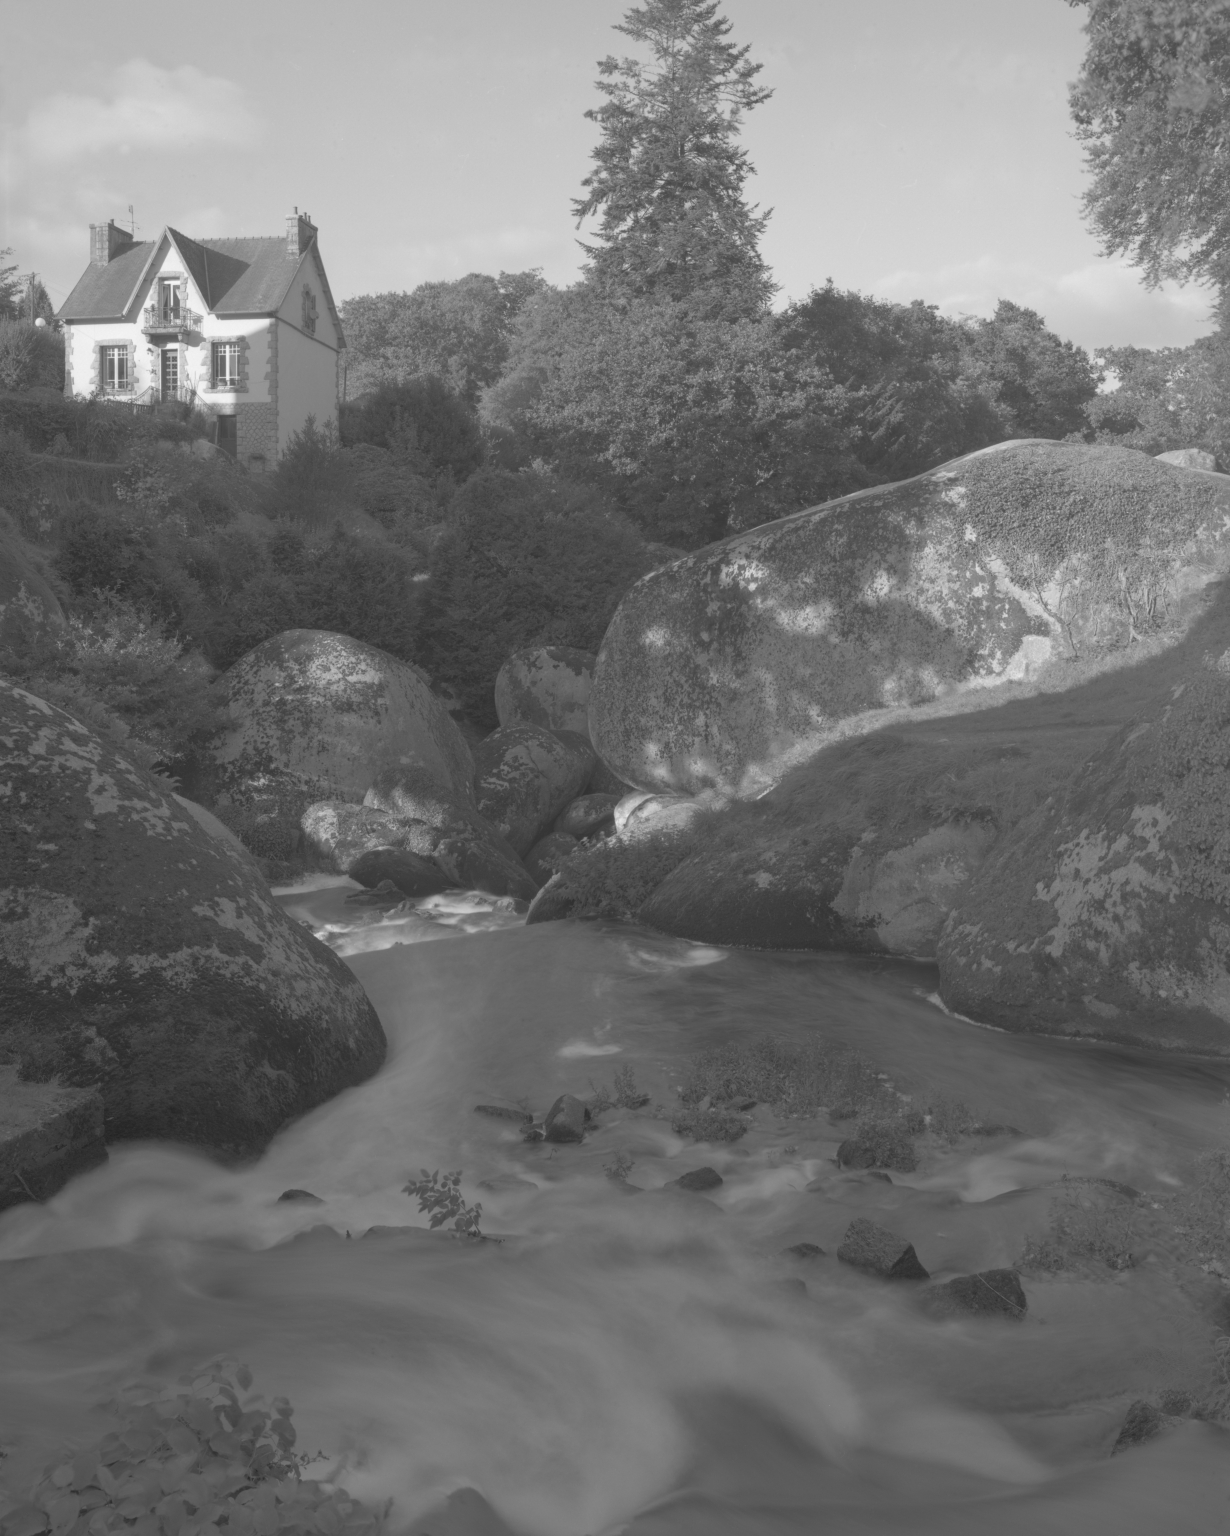
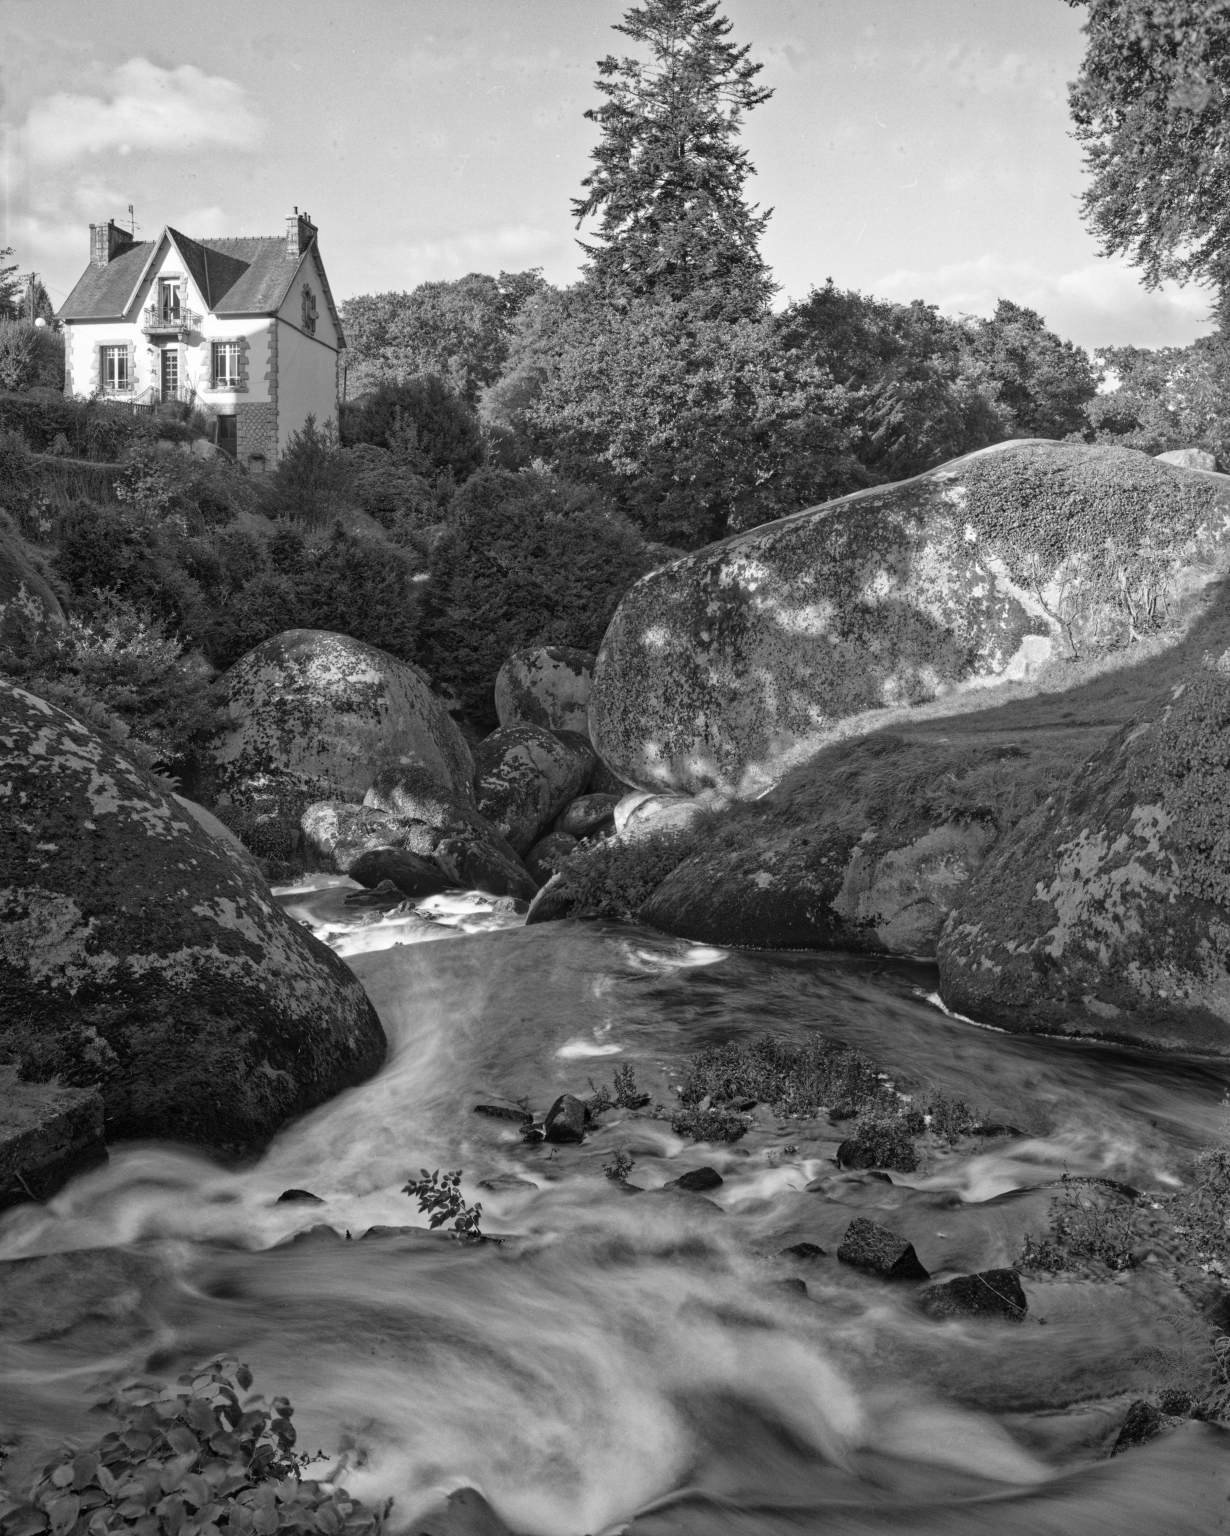
Here’s a straight scan of a 5" x 4" negative
And here’s the same file after processing in PL4
…that has already been inverted by the scanning software, I guess…
This is where local adjustments comes into its own - you can select which part(s) of the image you wish to enhance.
In this image, I used a graduated filter in the local adjustments to pull out cloud detail in the sky only.
I could have done that but, in this case, I actually inverted it in PL, adjusting the basic contrast and levels; then, because inverting changes the sense of the sliders, I exported it to another TIFF and started working on it from there.
And, at the risk of information overload, here is my version of your original image (or at least the jpeg version you posted) with ClearView Plus (34) only applied to the sky with Control Points and, globally, micro-contrast (50) and shadow contrast (65)
I wish I had known someone like you in the 1970’s. I had a Simon Omega enlarger that accepted up to 4x5 negatives, I had a 4x5 view camera, and a large “Graflex” if I remember correctly where you looked down into the camera. I had all the other processing gear too. What I lacked, was someone like you to guide me in how to use it effectively. This was in addition to my 35mm rangefinders and then a Nikon F.
That is an outstandingly beautiful camera! I’m curious - does anyone make digital backs that work on cameras like this? I’m guessing not - the sensor would be too expensive. I remember I thoroughly enjoyed using the camera, and with all the tilts and twists an height adjustments, I could capture any unusual scenes I found - but no “action”. Is this picture literally YOUR camera, or a generic picture of an Ebony? Speaking of which, until now, I’ve never heard of Ebony.
These cameras are still available, new, from B&H:
…and even an Ebony:
And if I wanted both a large format camera, and a digital back:
Thanks for the explanation of AA’s printing techniques. I remember seeing a photo of his “guide” for how to print an image, indicating how much exposure to give different parts of the negative. I was wrong, there is no “fast” or “easy” way to get the results AA wanted back then, but with a large format digital camera, and PL4, once he would have figured out the perfect corrections, he could have then turned out as many prints as he wanted. Something I know nothing about, is what kind of printer and paper is available nowadays (if at all) to create the same quality as what AA did printing the old way…
Something you wrote really hits home:
“But, regardless of how he realised the physical print, he always said that you needed to make the best possible negative to get the best possible print. Instead of blasting of several hundred images in the hope that one of them worth printing, we should try to get to the point where we can take one picture, knowing that it will make a great print.”
I guess I ought to take my Leica, or whatever camera I use, and a light meter, and calculate the best possible exposure. I’m way too lazy now - I get an average exposure from the camera, adjust it based on my own experience, and take the photo. To be honest, if it was an important photo, even after I figured out the exposure I would use, I would “bracket” in case I was wrong. I’m obviously not “there” yet, but I’m taking probably 50 photos. AA probably would have taken two to five. He wanted another Moonrise image, but the light had gone.
Which brings me right back to this PL4 discussion. AA knew the results he would get, from getting the right exposure to knowing how to develop and print. All those special darkroom printing techniques he used seems to me to be the equivalent of “developing” my print using PL4. Personally, I’m still learning - that’s probably obvious. I’d like to get to where I am totally comfortable with it, as I think several people here are. I understand it takes time, and practice, and making mistakes along the way, then correcting them. I think AA did the same thing, re-adjusting his printing techniques to get what he wanted - and then changing them, over the years, as he changed his mind as to what the print should look like.
Final thoughts - if I were to ever get serious about this, I like your method of creating what you hope is a perfect negative, capturing all the necessary detail, then scanning it. Once you’ve done that, you would have a huge, high-resolution image, of everything captured by the camera. Which gets back to this thread, how to get from your scan, to the finished print you show below it. You are obviously VERY talented - was this done in PL4 ? Regardless, I’m convinced it could be done in PL4. I love your end result. Maybe I’ll eventually get to where I can create similar results… I don’t know if I’ll ever get there, but all my posts and questions are my way of learning how to do so.
I wish I had found out about LF photography back then. I didn’t get into it until 2005. Mind you, that was the time when everybody was going mad for the “new” digital photography and you could pick up LF and MF gear for a song.
Yes, it is.
Yes, we would often joke that we would get movement blur photographing a tortoise.
It’s a catalogue shot of the exact model that I possess. Unfortunately, the Japanese guy who designed and made them retired a few years ago.
Sorry but that is just a Wista that happens to be made out of Ebony.
The digital backs are only medium format 6x6cm, 6x7cm and 6x9cm. The view camera is there to give you the movements.
I scan my LF negs at 2400ppi, for printing to 50" x 40" at 240ppi and this gives a roughly 115 Mpx image, which can easily get to over 1GB for a TIFF file. So, now you can see why digital LF backs are not easy to come by, although somebody did once make a scanning back, but that meant everything had to stay perfectly still for the time it took the scanner to cover the image area.
Since printing to 50" x 40" is not something I would do that often, I usually scan at 1200ppi, giving me a 28Mpx image, which is fine for the average exhibition. If it weren’t for the movements and the distortion free lenses that come with LF, my Nikon D810 does better than that at 36Mpx.
Actually, you can get “perfect” exposures with just a digital camera.
Start by putting it into manual mode, including setting the ISO manually and the colour balance to 5600°K. Then set the aperture to give you the depth of field the you want - if you want an “average” DOF for everyday shooting then use f/10 since that is the point where DOF is maximum without incurring diffraction, which can start to soften the image slightly.
Use the spot metering mode and find the brightest part of the image and take your reading from there. With most modern digital cameras, this reading should represent 2 stops above the “correct” exposure for the scene so, whatever that reading gives you in shutter speed, slow down the speed by two stops to “place” the exposure correctly. Don’t forget that the meter is always trying to make whatever it measures to be 18% grey, which is why you need to force it to over-expose to make the brightest area nearer to white. This is known as ETTR (expose to the right) Now you should have a “perfect” exposure that will not blow out the highlights and from which PL can recover the shadows down to the limit of its dynamic range.
You may find that you need to experiment to get the over-exposure of the brightest highlight right but it will usually be a maximum of 2 stops but can be anything down to 1⅓ stops.
Rather than go through all this for every shot, not many people realise that, as long as you are shooting in roughly the same lighting and direction in relation to the light source, you really don’t need to keep on changing the exposure.
Now the challenge is to limit yourself to only taking one shot of a subject and not look at to on the back of the camera, only seeing the image when you get it onto the computer 
Now that you have the “perfect” “negative”, all you’ve got to do is learn how to use PL to recover the shadows and re-balance the range of tones in the image. Hint - start with Smart Lighting in Spot measuring mode, placing rectangles in the darkest and brightest parts of the image.
We’ll soon have you printing like a digital Ansel Adams 
This sounds potentially very useful - I don’t know much yet about “Smart Lighting”, and I had no idea I could do the things you’ve described.
I will search for more information on “Smart Lighting”. I obviously don’t know much about it.
Thanks for all the other advice - you could write a very useful book about all this, if you had the time.
I did turn off “image review”, but then turned it back on. I’m never really sure about the framing. I suppose I ought to turn it off again, and leave it that way for general use.
Personally, on normal images, once I have set the white point, adjusted the white and black points of the histogram and tweaked overall exposure I go straight to local edits. I know this is not popular with some but default conversions in many raw converters these days is very good and global adjustments ends up trying to balance adjustments globally while minimising their “bad” impacts.
Local adjustments in a raw converter don’t come with any penalties if you have a good local adjustment UI and DXO have made significant improvements with their layer based local adjustment UI. Not as good as the class leader, C1 but they have narrowed the gap considerably/ I expect further improvements in V5 ![]()
With local adjustments you avoid the “this adjustment looks great on the trees but the sky now looks bad” situation. By going straight to local adjustments you go straight to “clouds look great” and “now the clouds look great” ![]()
Local adjustments are “basically” how we worked in the darkroom. We chose the contrast of the paper and overall exposure and then used local adjustments (dodge& burn).
It is also worth bearing in mind that the human eye is a variable aperture lens where the aperture changes depending on the light where we are looking. Local adjustments allow us to effectively mimic what we were able to see at the time.
If you want to learn how to use Control Points, this short video will help:
DXO-PL3 U-Point Technology Robin Whalley

Ian
It’s very good at spreading out the tones to fill the histogram. A bit akin to setting the black and white points in Photoshop.