How do I protect or erase an area when using a control line?

I think I finally understand what you both are telling me.

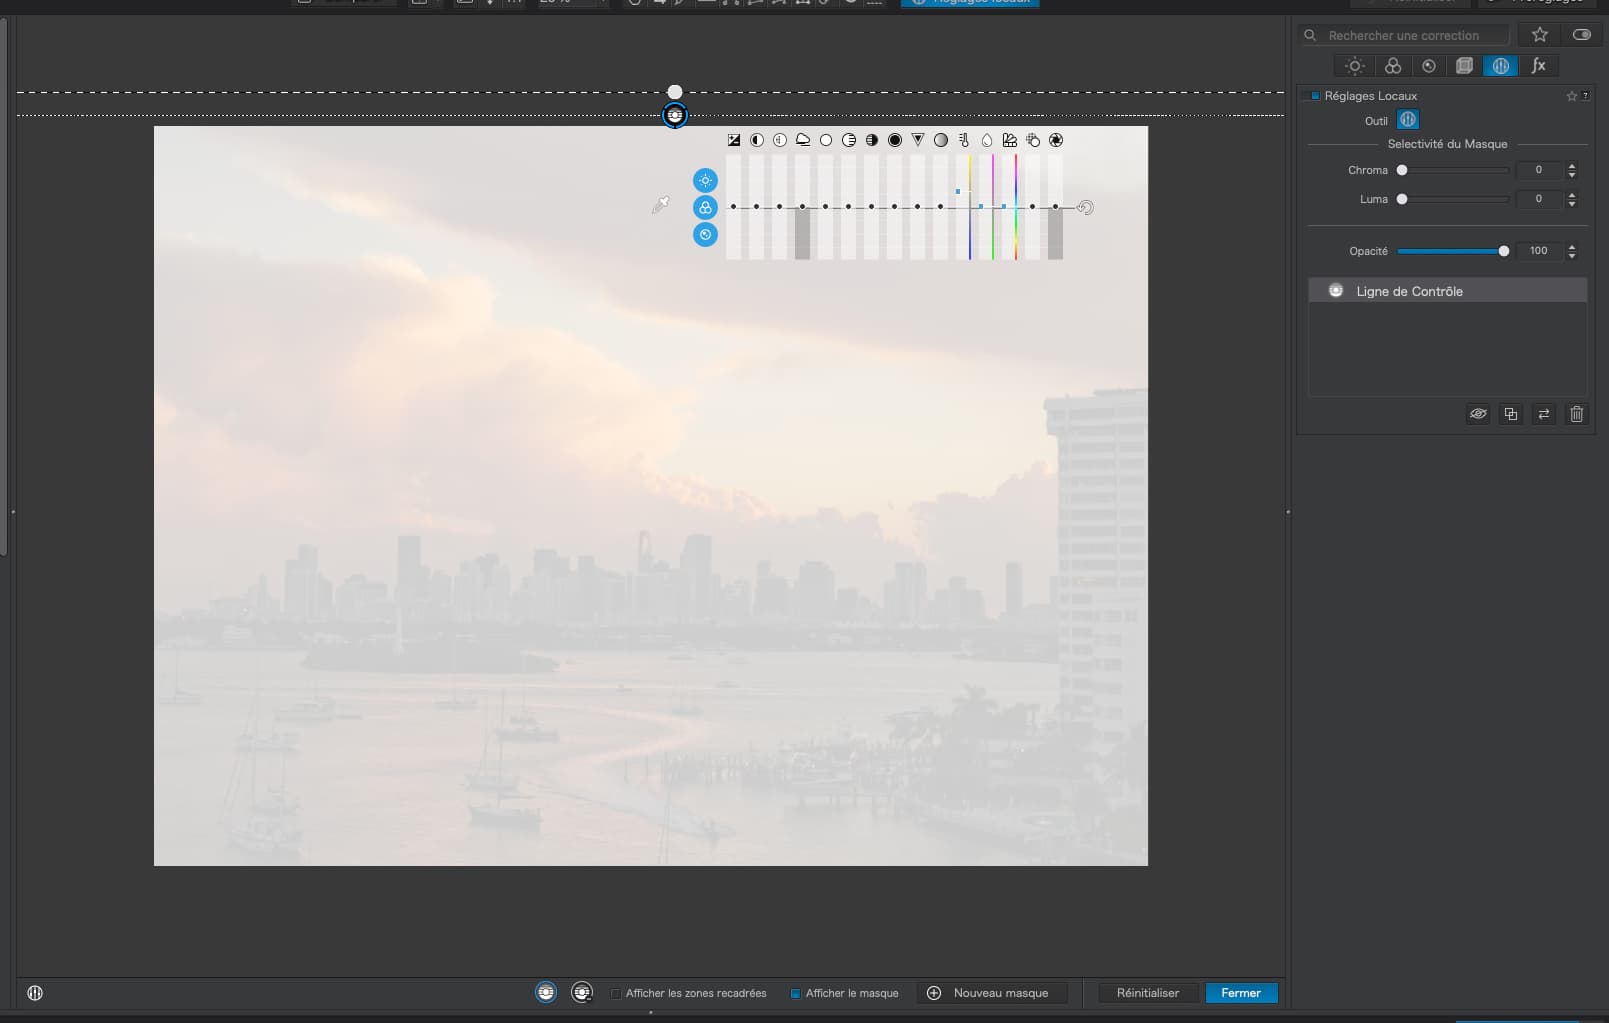
I made another VC for testing. I added a control line, including most of the image. I deliberately placed the pipette over a dark part of my image, and looked at it with the masks off, then on:

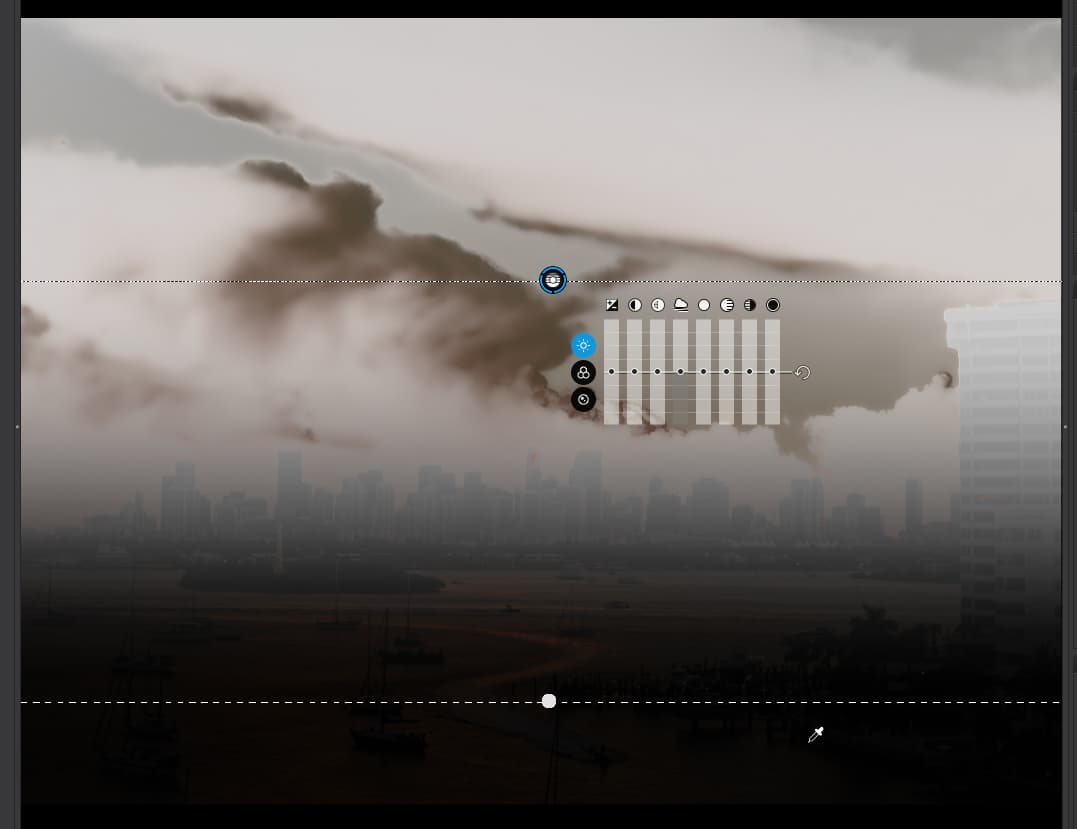
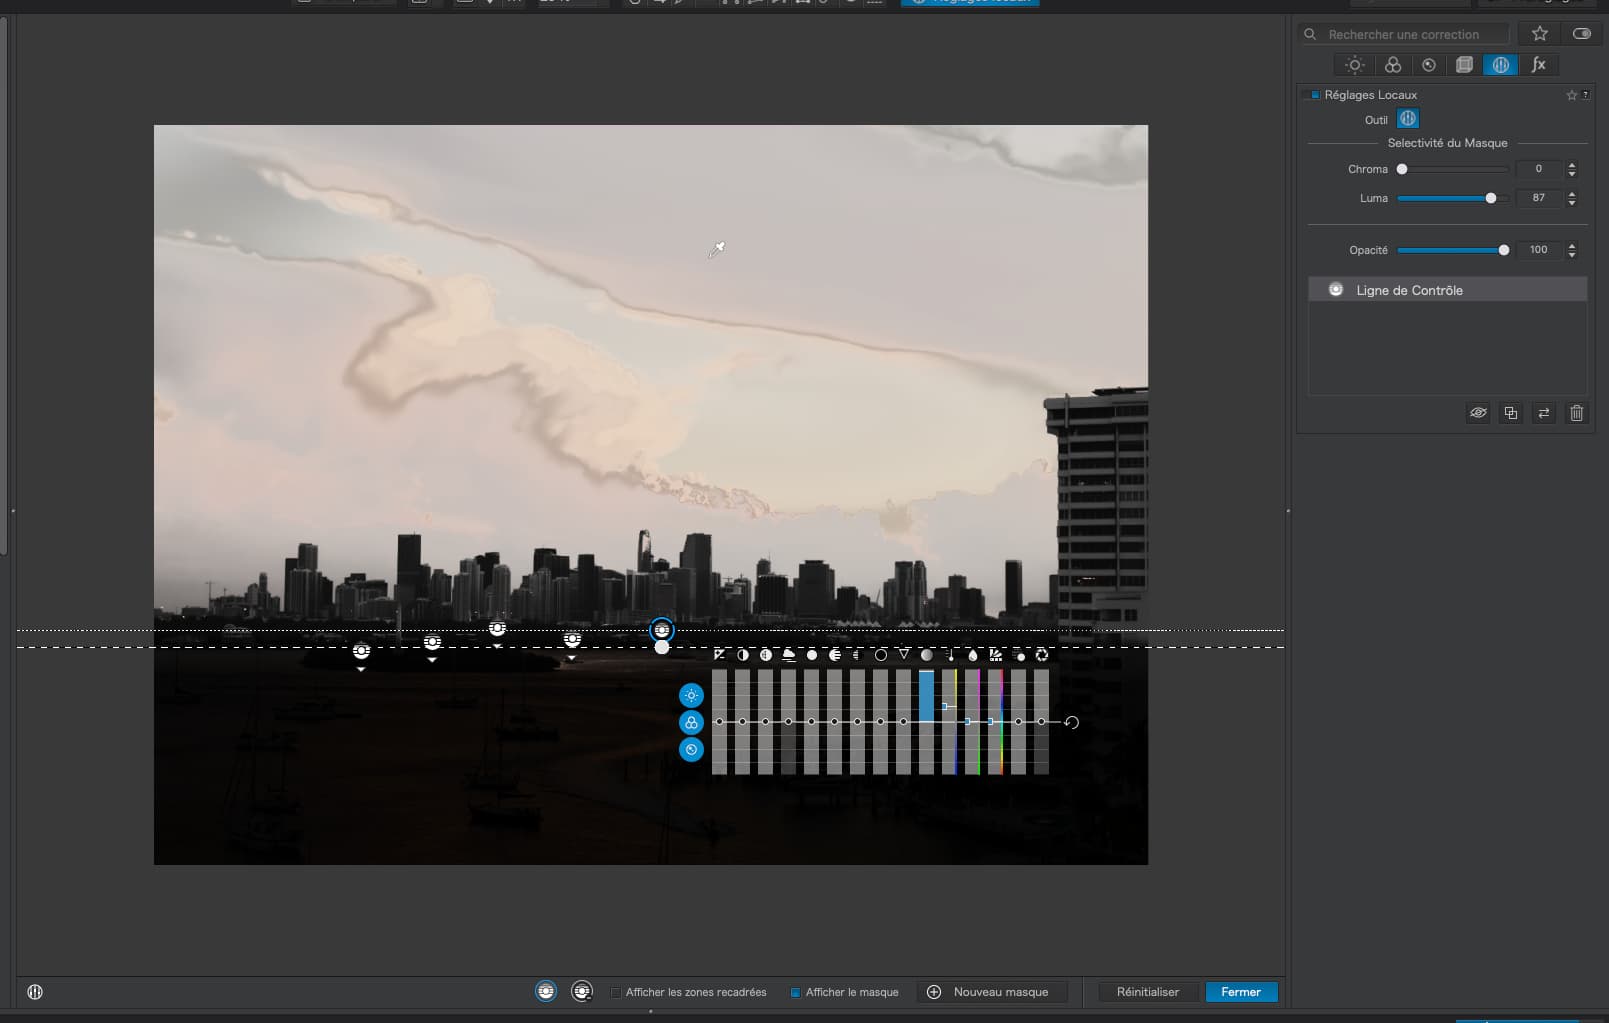
Most of the explanations about the pipette seem worthless - nobody explains why or where to put it somewhere. So, I move the pipette to the brightest part of the image, and repeated my tests to see for myself what happens:

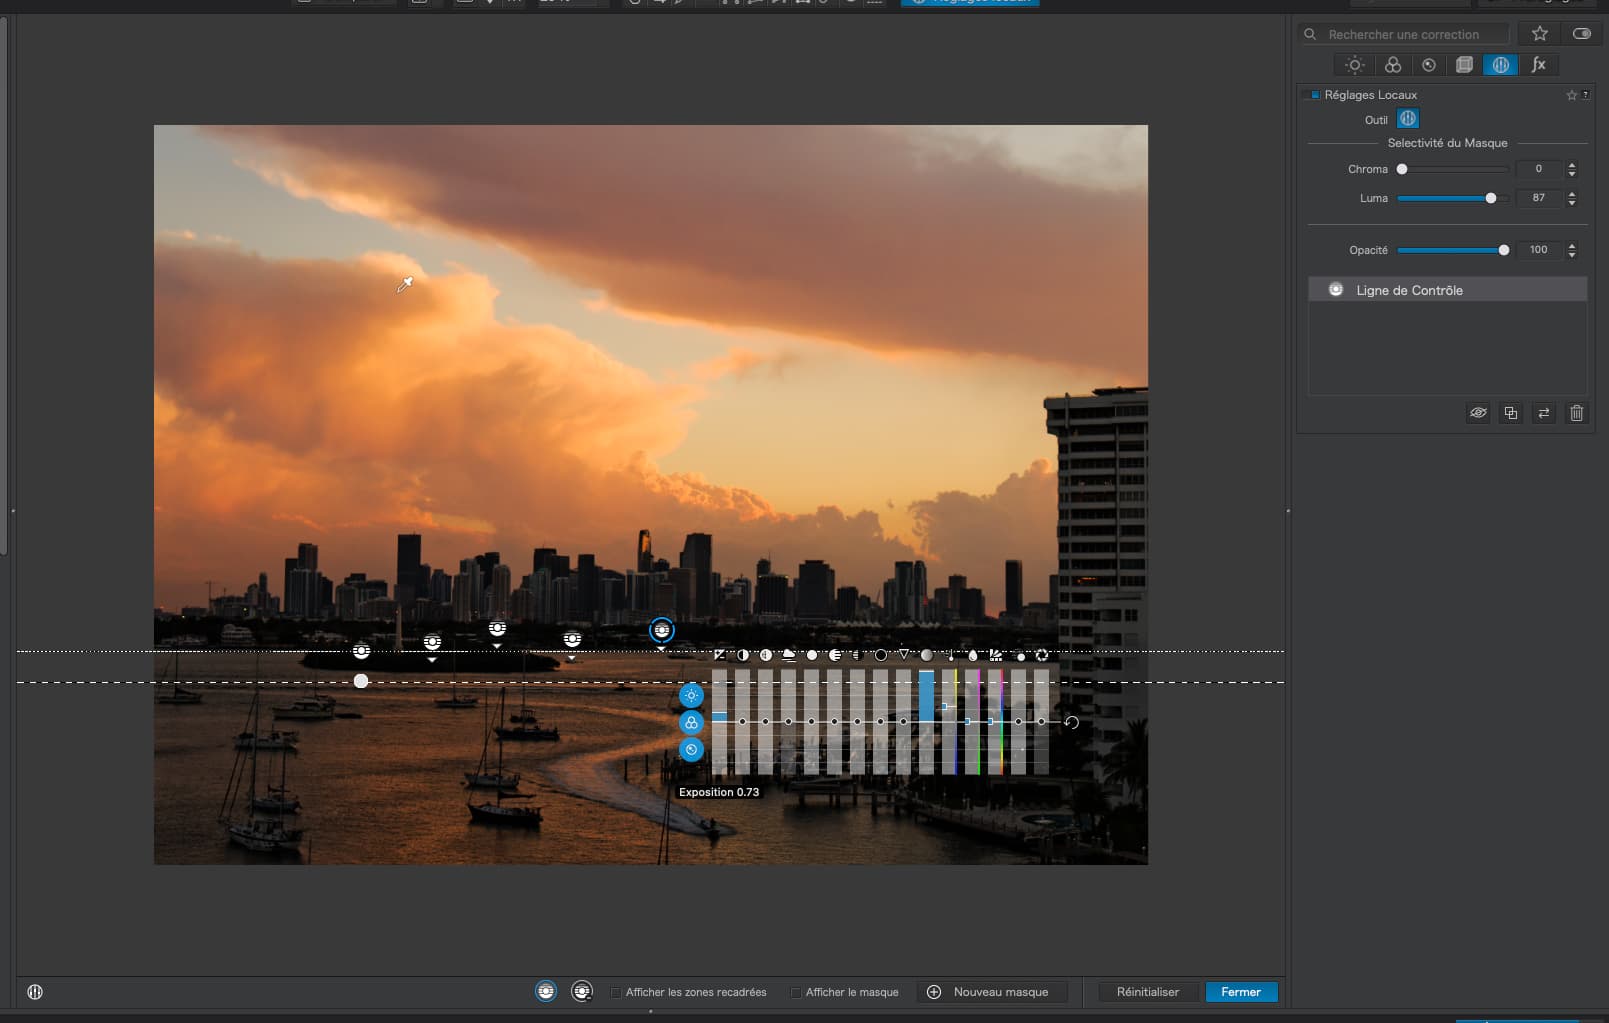
From this crude test, I now understand that where I place the pipette on the image, that is the spot that the brightness is “tuned” for, and the mask will show me the “darker” areas or the “lighter” areas, depending on where I place the pipette - or anything in between presumably.

Wow.

Most of the articles I read about this are nonsense, as if the person writing them didn’t understand this stuff.

The explanations here would have been perfectly adequate, if I was a bit smarter.
I still need to work with the Chroma/Luma adjustments, but that can be tomorrow.

In order, I now need to learn the appropriate place and direction (upright, or upside down) for the control line(s). Then I need to understand where to put the pipette in my image, and why. When I have that sorted out, and only afterwards, After that, I need to learn how to use the Chroma and Luma settings.

Compared to what both of you know and understand, it’s like I’m a little kid in kindergarten, with a computer, that does a lot of stuff, with strange things happening on the screen, much of which I don’t understand (yet).

I’m hoping to go out early tomorrow, after sunrise, when the workers first start work on the new building near me, which will be back-lit at the time, and take one image with my D780 that I can practice on.

(Sorry for maybe wasting all of your time seeing stuff here that is so obvious a first grader can already understand it, but I suspect a LOT of other people here are just as lost as I was - and I’m still not “out of the woods”.)

This combination image makes the results of the placement of the pipette even more obvious.

Something like this image should go in the PhotoLab instructions.

… and hopefully, why it is so important to experiment.

→ You need to adjust the chroma + luma settings with mask view on. ←

But what you are not showing in your comparisons is the effect of the selectivity sliders. As I have said before, if you don’t make use of those sliders, you might as well be using a graduated filter some of the time.

I have said, and will repeat, the image you have chosen is not really suitable for a Control Line as there is no obvious straight line to base its position on. Look at this post again to see a better image type.

You also need to consider using Control Points, both positive and negative, for an image like yours, because they are more flexible in this kind of situation. They also provide Selectivity sliders, which you really need to master.


Nonetheless, here is the kind of difference Selectivity can make to the creation of a mask. The mask is drawn from outside the image to give 100% coverage (no graduation). The pipette is placed on the upper sky

50 luma / chroma 50 (default)

Essentially, the only part not selected is the highlighted part of the cloud.

100 luma / 100 chroma

Very selective - only those parts of the image with very close to the same tonality to the pipette point are selected.

0 luma / 0 chroma

Essentially a global filter where everything in the image is selected.

0 luma / 100 chroma

This has selected everything of the same luminosity, but has only selected those parts which have the same coloration as the pipette area.

100 luma / 0 chroma

This has selected everything of the same coloration, but has only selected those parts which have the same luminosity as the pipette area.


In order to select the whole sky, but only the sky, I had to add four more supplementary lines in order to select several different areas of luminosity (selectivity luma 87), whilst leaving the chroma selectivity at 0 to cover all colours. Here are five screenshots, showing the different pipette points…


Applying a strong Saturation and a slight Exposure increase, for demonstration purposes, comes out like this…

… where the foreground, including the building are not affected.

1 Like

So true; everything I did here last night was an experiment. I was getting tired, and sleepy, and wrote that I would continue the next day.

I know, but it was a lot of “work” on my part just to realize the basics of how the control line works. I sort of had an idea of what the control line did, but minimal understanding until I did that testing.

Everything gets easy, or should I say easier, once you understand it - and while I had some words I thought I understood, I really had minimal understanding of what was going on.

Before writing paragraphs, one needs to understand words. I think I used to learn new concepts more quickly. It reminds me of when I was studying Naval Architecture. I had no idea of why a ship might capsize, and it wasn’t until I understood the positions of “center of buoyancy” and “center of gravity” that the bell went off in my brain, and it all suddenly made sense to me.

My plan for later today is to study all the examples you have prepared, and maybe then test all of them on a sample image. At this moment in time, it’s not very “intuitive”. Yet. Thank you for posting all that - and I hope you get to write an illustrated article about this that DxO can publish.

(For people who don’t yet understand, when I searched last night for where to put the pipette, the results I found were rubbish, such as “put the pipette in the appropriate place” type statements. Well, that was why I was doing the search - to try to find an appropriate place. Now you’ve explained both that, AND the adjustment sliders, which I considered the final thing I needed to learn.)

If I get nothing else accomplished today, my goal is to learn and understand this.

Suggestion for DxO - in my sample image last night, it showed BOTH the image with no mask, and the image with the mask turned on, simultaneously.

I wish there was a way to show both views, side by side, so I could see what was happening simultaneously. A side window, that showed the effects of the mast, would be very helpful, and make it easier to learn this. Like this:

THIS is what started to help me understand what was going on, but with the two images side by side, it would all be obvious, even to me!!! I’m sure DxO can find a way to show both views simultaneously, and I think that should be the default view especially for people like me who are trying to learn this stuff!!

use the compare tool – with a virtual copy

1 Like

for Control Lines, Control Points and their negative counterparts

see → DxO Webinars by @PhotoJoseph | PhotoJoseph.com

2 Likes

Great advice - and that’s what I’ve been doing, re-setting the image to the way it was first imported, with the camera and lens corrections. I will try this with my desire to see both with and without the mask.

  • Thank you - PhotoJoseph has always been a huge help. I should have added his name when I did the search.

  • I did do a search for places to get help, and each of them made a mistake, based on what I’ve learned here. It was a waste of time.

  • Yes, I will go to all three links, right now, before I do anything more.

  • I still think placing the two views, side by side, would be very useful, at least for a while.. Maybe I’ll find a way to do it manually for a while, with two windows side by side.

  • I’ve change how I feel about the past few days - not “stupid” but “ignorant”.

  • Once again, Thank You all!

I will try that before anything else.

PhotoLab can only display before and after versions of an original image or a virtual copy. . It cannot compare two virtual copies to each other.

Mark

Obviously, my wishful thinking is obliterated by the facts. Maybe eventually the next version could provide this if others thought it would be helpful. By the way, what I wanted to see simultaneously was the image, with all the PhotoLab controls, but no mask, and also the same thing with the mask turned on. Then I could move the Picker around, and instantly see how it affected the mask. That’s what I tried to show up above, by making two ‘screen captures’ and placing them side by side.

In the meantime, I’m now part way through watching the PhotoJoseph video (for the first time):

So, so many things are now becoming obvious - by using a video, it is more obvious what is going on, and why. Sorry, I should have watched this video long ago. Usually @joanna’s image are all I need to see, but watching @Photojoseph is FAR better than my test images were.

Watching PhotoJoseph, I noticed that PhotoLab already does what I’m asking for. When I have masking turned on in the main window, my full image also shows up in the left column under Move/Zoom. So apparently, with the masking turned on in the main window, I can move the picker around, and immediately see the results in the small window at the left.

Apparently all the things I was puzzled about are answered in the PhotoJoseph video.

I’m wondering if everyone else here already knows all this, and I’m just wasting people’s time by all this posting. I now realize that most of what I was asking about has been answered and explained by @Joanna’s posts. While watching the video, I realize what Joanna was trying to show.

Wonderful video - thanks, @Wolfgang for the link.

Would you believe, as so often happens, just when I thought I had it nailed, Joseph showed me a better way to do something that I had found a “kludge” for?

You are busting my bubble. I thought you could be the person teaching him. I guess you both are brilliant!

An “admission” - I did watch this video, “live”, long ago. I remembered when he answered one of my questions, the one about how far apart the two control line “lines” should be. You already answered that, but when I heard that in the “live question and answer”, it came back to me. Of course, “watching” and “understanding” are not the same thing.

My concern right now, is looking at the original image on my computer display, and deciding what to do about it.

This has been on the PhotoLab backlog for years. I wouldn’t hold my breath.

Mark

Thanks, Mark - by now, I understand all of this SO MUCH better than before. No wonder @Joanna is telling me that I’m not using the tools correctly, because I didn’t know about other settings. Searching the internet, I decided I know more about this than some of the people posting “how-to” info. Joanna has passed this on to the appropriate person.

It’s been a fascinating three-day experience, and the wonderful video by PhotoJoseph made everything perfectly clear, and then some.

One thing PhotoJoseph didn’t say, is all my confusion and desire to see the image with and without a mask is already solved - while watching the video, I could see the image without masking under the Move/Zoom tool in the left “pane” or “panel”.

I figure I am either much “slower” than other users, or a huge number of other people don’t really understand this either.

I’ll probably still mess up on my next edit, but because you know how to use the tools better than I do, but not because I don’t know those tools exist. I’m way too stubborn - I’ll never catch up with Joanna and Wolfgang, but I can get closer!! I think. :slight_smile:

yes, one can (at least in Windows)
Screen Shot 04-25-23 at 11.23 PM
shown with VC1 selected

Screen Shot 04-25-23 at 11.24 PM 001
one can compare VC1 with the (M)aster as well with VC2

→ when the selected pic (VC1 in this case) is in mask view,
one also can compare that one with the others (w/o mask) ←

1 Like

Same on Mac

1 Like

You are correct. I had forgotten that.

Mark

1 Like

What I was after, was to see two views of any image, one with masks off, and one with masks on.

Several of the images PhotoJoseph edited in his examples had a bit of haze, or fog, or whatever the appropriate name might be. I’ve taken images like that, but they were mostly in Nepal or Northern India, in Dharmsala. On a whim, I went looking for an image to try these ideas on, but they’re all ‘jpg’ as back then I didn’t realize the beauty of ‘raw’. It was 2006, and I was using my Nikon D70.

This is the image I worked on:


DSC_4387.JPG.dop (38.6 KB)

Very small changes, getting rid of a dust spot on the sensor, and using the tools that PhotoJoseph explained - but the biggest thing I wanted to fix, the very bright area at the top right, from the sun, didn’t want to get much less prominent. Other than that, I am very happy with the result (at least until you all point out my mistakes!)