I have backbutton for lock AE and or AF.
I have it for long teleshooting prepped.
AE/AF locked so i can swabber around and wait for the moment to click.
I assume i can use that when i set it to AElock only. 
(forgot about the function.)
1 Like
Keith, have to disagree here. Nikon cameras leave quite a bit of headroom in the RAW files just as you say to make sure the photographer doesn’t miss the shot or blow out his highlights. Most of the time wasting more than a full stop of headroom is okay. At low ISO, the dynamic range is theoretically 14 stops on modern Nikon full-frame cameras (D750, D810, D850, Z6, Z7, etc). What’s half a stop of additional exposure then? Unnecessary as you say.
On the other hand, I’m shooting night time sports at ISO between 6400 and 20000. Dynamic range is down to four or five stops. Adding an extra half stop of light to these images is a significant improvement.
I now shoot all my nighttime sports at +0.3 exposure compensation (aperture priority) and it’s been an improvement. Here’s what a typical histogram looks like:
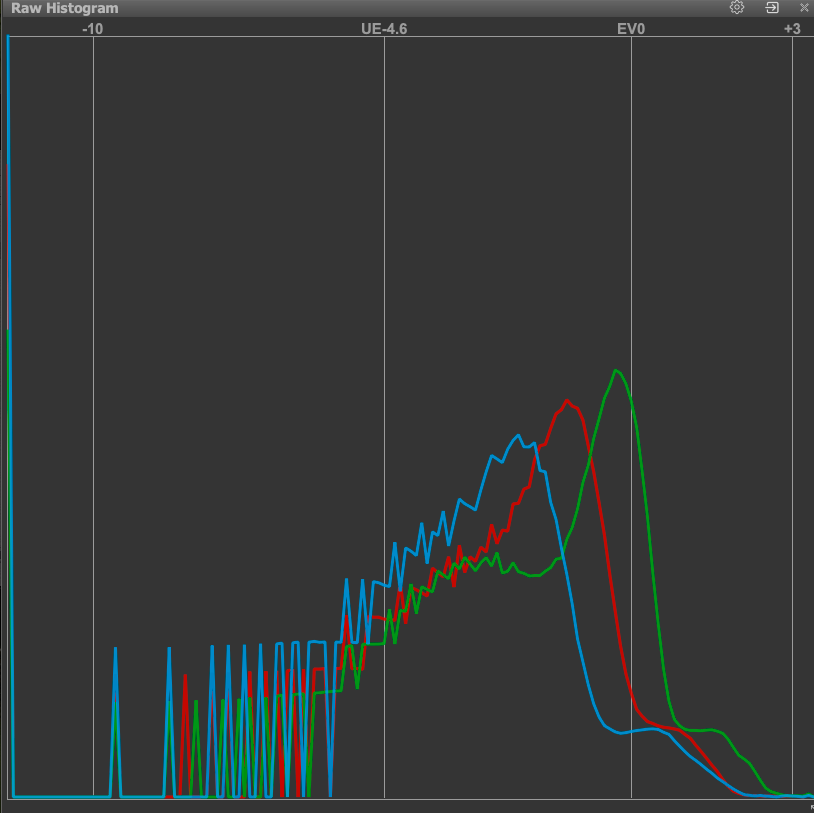
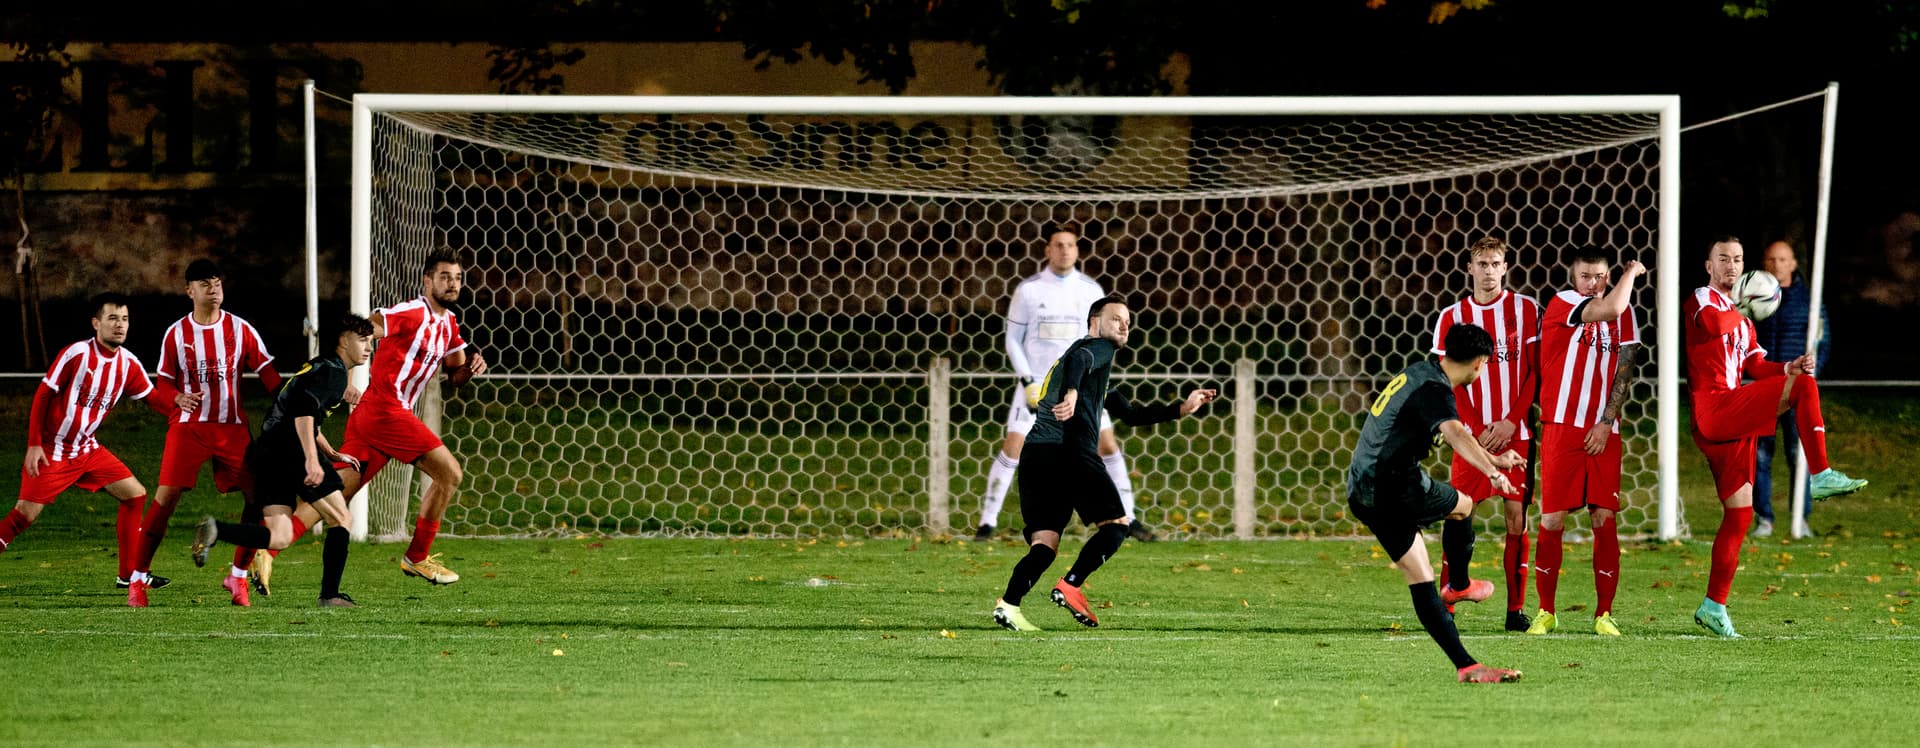
Here’s what the result looks like:
Here’s another histogram (less typical more complex) also at +0.3EV
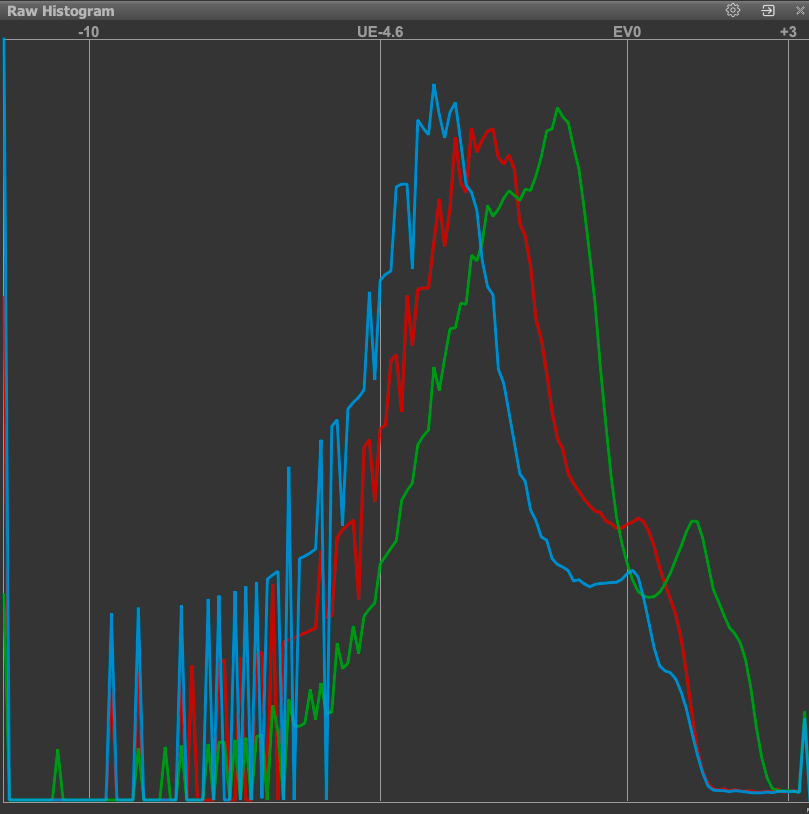
The actual image looks like this after processing:
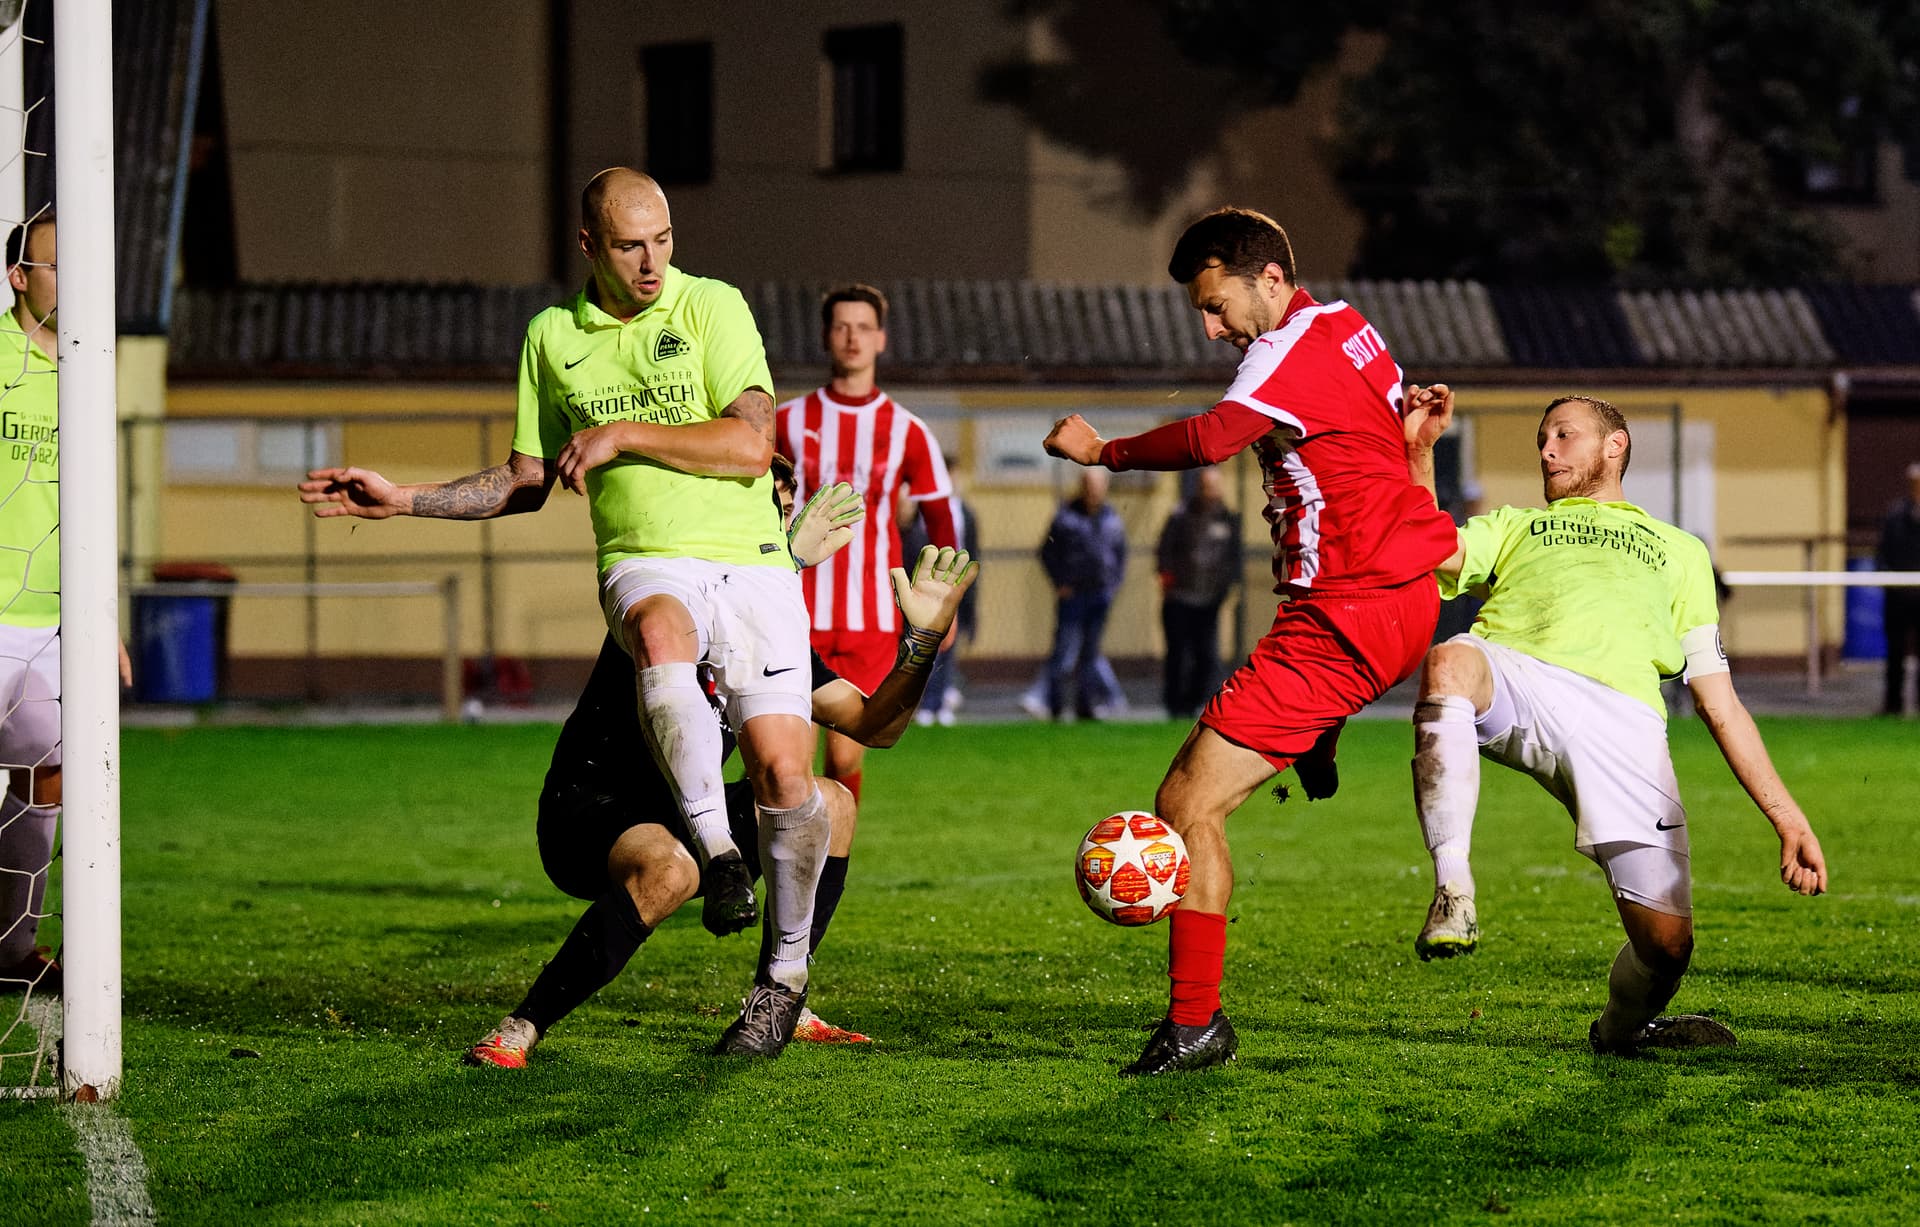
Capturing an extra +0.3 of light makes a difference. The exposure bump in the green channel in the extreme right of the histogram is for a bar lamp which doesn’t appear in the cropped photo.
I plan to try +0.7 EV compensation and even +1 EV. Why don’t I just do static tests? Static tests won’t show enough variation to be meaningful. Theoretically there’s more than a full stop of headroom available on most of my cameras but as Keith points out Nikon (and other manufacturers) deliberately leave a margin of error/safety.
I don’t plan to ETTR for daytime photos at low ISO.
Do you need a raw histogram to archive this??
From the manual
Auto: automatic calculation of grid zero (gray point position) and setting grid step to 1EV. The
zero is located at the level that is 3 stops (8 times) lower than the maximum pixel value rounded up (ceiling) to the nearest power of 2. For example, if the maximum value of all pixels in the photo is 3000, then the nearest power of two greater than this value is 4096 and the EV0 value
for this photo will be automatically set to level 512.
The maximum can be determined either as the maximum pixel value in the currently opened
frame, or as a theoretical maximum for the given camera. The setting that switches on the
choice of the theoretical maximum for the maximum is available in Preferences – Histograms –
Set histogram EV0 by (please see the chapter on Preferences below).
The main difference between a RAW histogram and a RGB histogram is the gamma correction.
George
From what you’re writing, if I’m walking around a tourist spot at night, shooting with available light, I would benefit by slightly over-exposing, “+0.3 EV”, and using aperture priority? This is something I deal with quite often in India, when I’m shooting at night trying to shoot people gathering together for some function, but I’ll test it out here at home before I return.
Whether to ETTR is mostly a function of ISO. As ISO climbs dynamic range falls. By ISO 3200 dynamic range has fallen to between 5 and 7 stops depending on the camera. Stealing back an extra third or two-thirds of a stop will radically improve the quality of an image.
Of course, such circumstances often arrive at night. Where ETTR would be more of an issue in low light would be with stage photography where the highlights can be very bright. But in this case, ISO would probably be lower. I don’t think we should be afraid to blow out extreme highlights. When shooting film we all blew out extreme highlights. The caveat is that emulsion deals with extreme highlights better.
Fortunately PhotoLab Selective Tone Highlights reducer works wonders on taking the edge of extreme highlights. I almost always reduce Highlights by about -10 which allows me to push the overall exposure a bit higher. In dark room terms, reducing the Highlights slider is like adding a small burn (dodge and burn) when making a print.
For those who are interested in the article I referred to, you can find it here: ChromaSoft: Why "Expose to the Right" is just plain wrong
Thanks, Will do but first I need to familiarize myself with the highlight weighted metering implementation by Pentax. I’ll go back and check out the discussions you have referenced once again.
Larry
I did some more thinking about this question and checking against my photos. My views have partially changed. Here’s what I originally wrote:
The main reason the ETTR photos look better is not ETTR but due to capturing more light. By changing exposure adjustment to +0.3, I’m adding almost a half stop of light to the image. Of course it looks better! There’s more light captured as shutter speed would be 1/500 second instead of 1/800. More blur on motion though.
On my former D4/D4S and current D5, ETTR is useful as these cameras are not nearly ISO invariant. When boosting exposure, there’s lots of shadow noise. One should shoot at the correct ISO and capture as much light as possible against a given ISO. Hence my feeling that ETTR is improving my photos with the D5. It’s mostly true.
Field tests with the D4 showed that setting ISO higher (ISO 20000) created better images with less noise and more detail than shooting with the same shutter speed and aperture at ISO 8000 and then lifting the exposure in post. Adding +0.3 or +0.7 exposure compensation made for more lively images with better definition and colour. Very few images had any highlight blowout.
On the other hand with the Nikon D750, D800, D810, D850, D780, Z6, Z7 etc the cameras are mostly ISO invariant.
With an ISO invariant camera, one can lift shadows up to five stops before significant luma noise or chroma noise appears. Blown highlights at can’t be recaptured though at either ISO 400 or ISO 16400. Thus, with an ISO invariant camera it would be better to shoot at ISO 6400 when a scene calls for ISO 12800. The image will be too dark but there would be no consequences to boosting exposure a whole EV and highlights would be safer.
Do I have the stomach for shooting most of a match with a back screen so dim when reviewing images? Probably not.
I haven’t yet done a serious field test with shooting an ISO invariant camera at lower ISO and boosting the exposure in post. As a studio test raising exposure works just fine. The best way to do the test in the field would be to set manual exposure and then change ISO up and down across a range of about four stops. When processing the images, one could determine if raising exposure in post keeps image quality the same while allowing more headroom for highlights (with local adjustment or masking to prevent the general exposure lift from blowing them out in post).
Of course shooting at low ISO would wreak havoc with any automatic mode like aperture mode so shooting ISO invariant means using exposure compensation to partially reverse the ISO invariance or shooting manual and giving up all the wonderful auto-exposure tools built into modern cameras.
It may be worth it to gain an extra stop or two against bright lights (stage or sports). More than a stop and a half of ETTL would make the shoot technically difficult (more or less blind with no field image review).
Or one could just do what Nikon (or another camera manufacturer) suggests and shoot against listed ISO. Everything will work right and look right and there will be 1.5 or 2 stops of headroom for the highlights.
I don’t plan to ETTR for daytime photos at low ISO.
The article Keith’s cited indicates that ETTR can be useful at low ISO: one cannot lower the ISO further but one can add more light to and pull back exposure in post, capturing more dynamic range and more differentiated tonality in the main body of the images. But only if one is not blowing out highlights. So in fact one should use ETTR to expand dynamic range at low ISO.1
All these modern cameras are so good at low ISO that photographers don’t really need to be scraping back extra dynamic range. ETTR was popularised by Michael Reichmann (RIP) of Luminous Landscape fame. Reichmann shot Canon cameras which until very recently suffered from very strong shadow noise. The Canon cameras current at the time was the Canon 1DS (2001) and 1DS II (2004) both of which Reichmann had access to. Top end dynamic range was in the 8 EV range, falling to 4 EV by ISO 3200. This compares with current Nikon and Sony cameras in with 12 EV dynamic range at base ISO and 7 EV dynamic range at ISO 3200.
With those Canon cameras chroma noise in the shadows, taking advantage of the lost safety stop at the top of the histogram made a lot of sense and would still make a difference with cameras like the Canon 5D III and 5DS R with noisy shadows (the 5D III is much worse, I owned both and shot lots of high ISO sports with both).
- The author’s testing at high ISO is not particularly convincing and is strange as he’s testing against a small sensor (Canon G10) which has different characteristics than full frame DSLR sensors.
I don’t think you should involve ISO in this investigation. ISO is boosten the input signal and so the noise. You’re investigating the sensor.
George
2 Likes
Iso isn’t exposure. And Expose To The Right is about letting more light in then necessery. In order to gain extra exposure in the shadowparts of the image to avoid noise
1 Like
… see the author’s explanation, WHY he used a small sensor camera
I read it Wolfgang. I’m not buying into the explanation. The sensor size is different enough to invalidate the premise. Programming will be completely different. I was not very persuaded by the article at all. The author Sandy seems to be on a witch-hunt.
Michael Reichmann’s articles including histogram and field results with full frame cameras seem more convincing as well as my own experience with Canon full frame cameras.
Did you read his article? I think it’s complete nonsense. Not the ETTR itself but the way it’s explained.
George
1 Like
I just found this article I wrote for our Birdlife Photography group which I think some of you may find interesting.
Digital Photography Myths.pdf (214.5 KB)
Thanks to Your point of view  and to highlight “experiment for yourself”.
– That’s the important thing to get to know your cam.
While personally, I’m not doing wildlife and seldom landscape but concerts and people, I often face high dynamic contrast scenes and always changing light on stage.
To me the most important is to get the shot (a catching expression) – otherwise the pic will be deleted.
From that perspective there is simply no time to fiddle around and usually the cam is set to
- Aperture priority (to control depth of field)
- Auto ISO (allow maximum, exposure time 2x faster)
- AF-S or AF-C (back button)
- Center-weighted metering
- exposure compensation on the fly (back wheel).
BUT, there is no blueprint and everybody has to find out him/herself.
That’s a very interesting article Keith; as are the linked articles.
What I have learnt is that I was using the term ETTR without realising that it has a whole mystique behind it and that what I was calling ETTR is not what it was intended to be about - sort of.
The problem is, now I find it difficult to find a single word/acronym to describe what I do.
I think I am going to have to call my approach JERM (Joanna’s Exposure Range Maximisation) 
Here’s an attempt at an explanation:
Film
In the days of B&W film, it was necessary to manipulate both the exposure and the development of the negative, in order to “fit” a wide range of light levels into the final print.
A generalisation of the numbers is that it is possible to fit e.g. 14 stops of light into 10-12 stops on the negative, which then had to be compressed into 8 stops on the printing paper.
In talking about the Zone System, Zone 5 is considered to be 18% grey, which is what virtually every light meter measures at.
To do this, you would typically use the Zone System to measure the darkest part of the image, for which you wanted to see barely perceptible detail. Then you would take a reading from the brightest part of the image, for which you wanted to see barely perceptible detail, and measure the difference. If this difference was greater than 6 stops, you would then over-expose by the requisite number of stops and under-develop by a calculated factor in order to produce a negative that was printable.
Digital
The available dynamic range on many modern digital cameras can be as high as 14 stops but those 14 stops are very unevenly divided around the 18% grey reading with only 1⅓ to 2 stops above it and the rest below.
As long as the difference between lightest and darkest parts of a scene is less than 10 stops, most of the time, you don’t need to bother with manual exposure, centre-weighted metering should work fine, with possible compensation of -0.7 stops for some borderline shots.
Whereas centre-weighted metering might be fine for low dynamic range scenes, if there are any really bright areas in the scene, you will need to adjust the exposure in order to avoid blowing those highlights; and this where JERM works particularly well.
ETTR seems to be all about using the histogram on the back of the camera to determine when the highlights are blowing and adjusting to bring them into range.
With JERM, you don’t need to use the histogram at all, just get to know your camera well enough and use that knowledge to place the exposure for the brightest part of the image as close to the top of the available dynamic range - not the histogram, which tends to be calibrated for JPEG and not RAW.
So, if, after testing, you find your camera can over-expose a bright area by 2 stops without blowing, then that is the amount up to which you should over-expose, which will leave 14 stops (or whatever the DR of you camera is) for everything else down to the deepest shadows. And all without having to look at the histogram.
To me this is true ETTR because it is exposing to the right of the dynamic range of the sensor. I would rather refer to the “old” system as ETTROTH (expose to the right of the histogram)
Absolutely!!! 
For the kind of photography you are talking about, that certainly sounds like an excellent starting point.
The idea of ETTR is overexposing if possible and the correct the overexposure. The goal is that by correcting the overexposure also the noise is reduced. It’s not a way to gain a correct exposure.
Did anybody ever tried to check the arguments based on a RAW or JPG histogram???
George
2 Likes
I work with live files in extreme high ISO environment every week about six months/year. My results showed that ISO invariant techniques of shooting with lower ISO and raising exposure didn’t work that well creating muddy images. ETTR for a Nikon in low light is a great way to make sure there’s enough light on the image to create a good master. It worked out to adding exposure compensation of +0.3 or +0.7 when shooting in aperture mode. On Nikons that exposure compensation keeps meaningful highlights safe most of the time in low light. I’m sure there’s environments where leaving exposure compensation neutral or even -0.7EV would lead to much better results.
More light = better photos. ETTR is just a path to more light. ETTR was invented because the exposure programming in Canon cameras was excessively protective of highlights leaving in so much headroom that the shadows (which were awful) were horribly compromised.
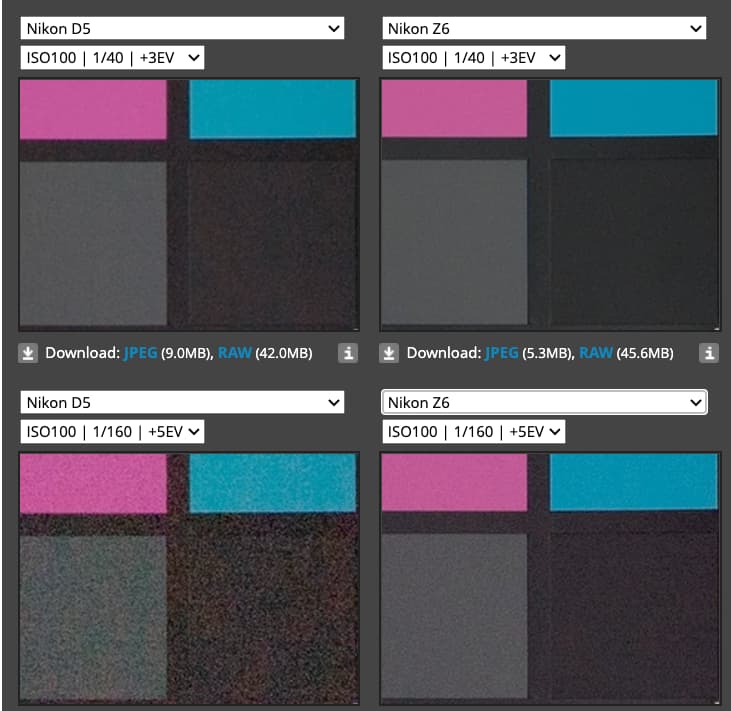
Still would like to do the Z6 (ISO invariant) and the D5 (ISO variant with noisy shadows when pushed) head to head to see what happens when overexposing in camera and then correcting with PhotoLab. Image size is in the same ball park so it will be a good comparison. Perhaps at Christmas. Too many real world photo sets to work on between now and then.
I meant the arguments on a RAW or JPG histogram. By example that a RAW histogram gives more space to overexpose. I doubt that.
George
But JERM is a way of achieving the perfect exposure for contre-jour shots, because it doesn’t rely on over-exposing, simply placing the brightest exposure at up to 2 stops above the 18% grey reading the metering gives, depending on your camera. And it is guaranteed to work every time.