While I have effective results using control points in other tools, Selective Sharpening just isn’t my friend.
In the image I’m working on, there are two areas I do not wanted sharpened or I want most the image sharpened except for two areas.
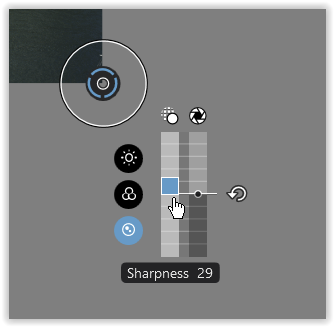
When I place a control point and adjust its radius, changing opacity appears to make little, if any difference. Either the effects are subtle, and running the before/after sliding bar across the area isn’t show the change I expect or I’m not using the feature correctly.
My general “how does this work” test is to jam the settings to the limits to see what is now exaggerated. With Selective Sharpening, this isn’t helping me understand how the feature works.
I read the "Sharpener-Pro-3’ four step list in Support and that hasn’t produced even close to what I want/expect.
Somewhat related, I’d like the areas I don’t want sharpened to “dissipate” into the general bokeh. There is a distinct linear quality I want to reduce without resorting to retouching.
Advice on this and sharpening control points in general?
Wow, you are right about the Output Sharpener, I didn’t know that. I have to admit that I’ve never really used those Nik sharpening tools. It depends on which one you use though. You are correct about the Output Sharpener, no negative control points, but the “RAW” Sharpener does have them. I’ve watched a couple of webinars on them and a negative control point is just the same as a positive control point it’s just that the positive CP has it’s opacity set to 100% and the negative CP has it’s opacity set to 0%. So even in the Output Sharpener you can set a CP wherever you want it and simply reduce the opacity to 0% and it will do the same thing.
Personally I do selective sharpening on the RAW file in PL3 using Local Adjustments rather than converting to TIFF and using Nik. That’s the reason I’ve never used those tools before.
To the OP: I’m not sure which Nik sharpening tool you’re using but setting a CP and then reducing the opacity to 0% will act as a negative CP.
I also tried that, but it didn’t seem to work. Maybe I applied it incorrectly. In any case, this is the first time I’ve ever looked into either of the Nik sharpening tools. I’m not sure if there is any advantage to using them over what I can do in PhotoLab.
Totally agreed. I tried a 30 sec trial and could not see much difference but maybe it will suit the OP’s needs. I don’t see ANY advantage to using these Nik tools for local sharpening. In PL3 I’m working on the RAW file and the negative CPs actually work. I think these two tools along with Define NR are very dated and should probably be dropped from the collection. I suppose DXO is keeping them around as some sort of legacy thing or maybe buying 8 tools for $150 sounds better than 5 tools for $150.
Maybe they will eventually replace them with some new tools that are actually useful.
I put points out, slammed the settings to the stops, and didn’t see anything obvious. The problem comes down to needing an in-depth explanation of how this is supposed to work. Guessin’ and gropin’ isn’t the way to go.
It may be that slamming to the stops, in this case, doesn’t show much. I’m turning a negative CP into a positive CP or vice versa.
At this point I’m working almost exclusively in Nik, working on flowers and birds (static, not in flight).
We favor “shelter in place”, rather limiting “people watching”, landscapes, etc. Still life… um… doesn’t quite call to me. So I bang away at birdies and blossoms. Nik has very much been my friend for that.
The basic work flow is RAW sharpening, lighting (tons of CP’s), output sharpening, and noise reduction last. That undoes some sharpening, but it also does a very good job of addressing sharpened noise. I use only manual reduction sampling. Sometimes the Automatic mode puts out a couple of tiny boxes - poor sampling IMHO.
I haven’t been able to figure out how to use these CPs effectively either while processing the TIFFs generated from scanning slides. I have found that a very mild adjustment of the global Output settings is very effective at sharpening the whole image. The problem comes when you don’t want to sharpen the whole image. So my workflow in such cases is to sharpen the whole image, save it back into PhotoLab 5,use its CPs to select the areas I don’t want sharpened, and then unsharpen them using the sharpen slider.
Your description can help, when one has no access to a pixel editor, which makes it much easier to control the effect (any effect) with masks.
For those using PL, I would suggest to apply Local Adjustments → Sharpening
instead of this merry-go-round. Then also, one is not restricted to Control Points only. To (better) evaluate, just make sure the TIFF (JPEG) file has the correct output size.
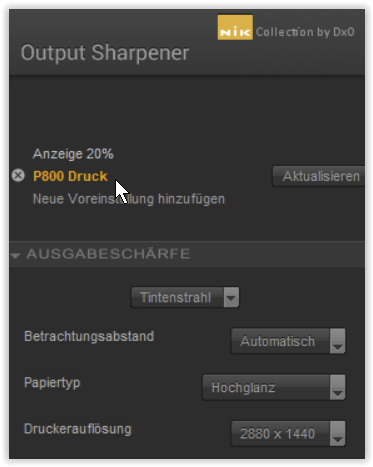
Personally, I always use Nik OutputSharpener with FineArtPrinting → Automatic ‘mode’.
while “Anzeige/Screen” worked well for web publishing
(running a homepage for a photo club).
But, one can also go creatively (global application),
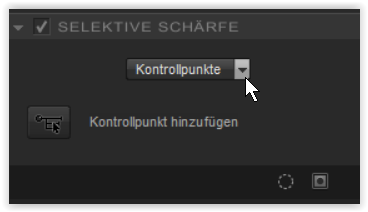
– or restrict everything with Controlpoints
or with Colour ranges (!)
which I used to exclude sharpening e.g. from the sky …