Note: I am classifying this issue as a “Bug” because it was something that was working (very well) with OpticsPro … but it has been lost/broken with the implementation of PhotoLab.
Background;
Modern sensors (especially from the likes of Sony & Nikon) are tending, more and more, towards being “ISO invariant”.
The practical benefit of these sensors is that one can shoot at low ISO values with exposure settings that would traditionally depend on high ISO settings - which results in a dark unprocessed RAW-image that can be brightened during RAW-processing to maintain wide dynamic range (for a high-contrast scene) with minimal impact on image noise.
OpticsPro has a setting within Smart Lighting for Mode = DxO OpticsPro 9 … and, this setting proved to be exceptionally good at processing purposefully under-exposed images (shot at low ISO setting).
In fact, this setting was so effective, it was simple & easy to achieve excellent results with only a few clicks of the intensity slider.
Unfortunately, altho I have tried with many different images, I am simply unable to replicate these results using PL … and, even when I have come close, it has taken a long time, trying many different settings within PL.
As I am taking more advantage of the ISO Invariant nature of my Sony cameras, I am often (and reluctantly !) finding it necessary to revert back to OP11 just to achieve correct brightening of my images … which is NOT a “good thing” !
Bug fix recommended;
Provide in PL the Smart Lighting algorithm that is known as Mode = DxO OpticsPro 9 within OpticsPro.
It does not need to be called Mode = DxO OpticsPro 9 within PhotoLab (I fully understand why that would not be a good idea).
Instead, it might be named “Mode = Brighten” (or whatever) - and it could be sold/spruiked as a Smart Lighting feature that assists with processing under-exposed RAW files from ISO-Invariant sensors.
*Sony & Nikon users: Please vote for this bug fix.
The whole topic somehow falls in the category “Process Versioning”. It is a valid expectation of a user, that after a RAW has been processed, nothing happens to it, if it is opened in an updated version of the tool. It is as if “MS Word” would change your text document content after update.
Thank you, @Asser - Unfortunately, this is exactly the situation in which I have found myself (with the abandonment of Smart Lighting Mode = Optics Pro 9 in PhotoLab)
Now, none of my images that I had previously processed with OpticsPro + Smart Lighting Mode = Optics Pro 9 can be replicated (to my satisfaction) using PhotoLab … and, believe me, I have tried.
Just out of interest to forum users and staff; there are several post about backwards efficiency/“less good working” of the Smart lighting tool.
i am new user so no experience in earlier versions. So i think it boils down to the questions:
can someone provide image examples of v7 v9 and pl smartlighting to see what they mean?
is there less dynamic range? more noise in shadows? earlier blown/ graycolors(loss of color) in brightparts?
why would be the algorithme of v7-v9-v10-v11-vPL1.2.1 not be constantly improved or at least steady the same? (normal a product is not engineerd backwards in quality.) So this is interesting to investigate why this feeling(false or true.) of less good working SL is repeatable on testimages.
maybe its just a different way of use? (boxes of interest/face reqocnision are new. And you can use this to influence the algorithm.)
i would be interested in the findings of Benoit and Doquocbao in this matter.
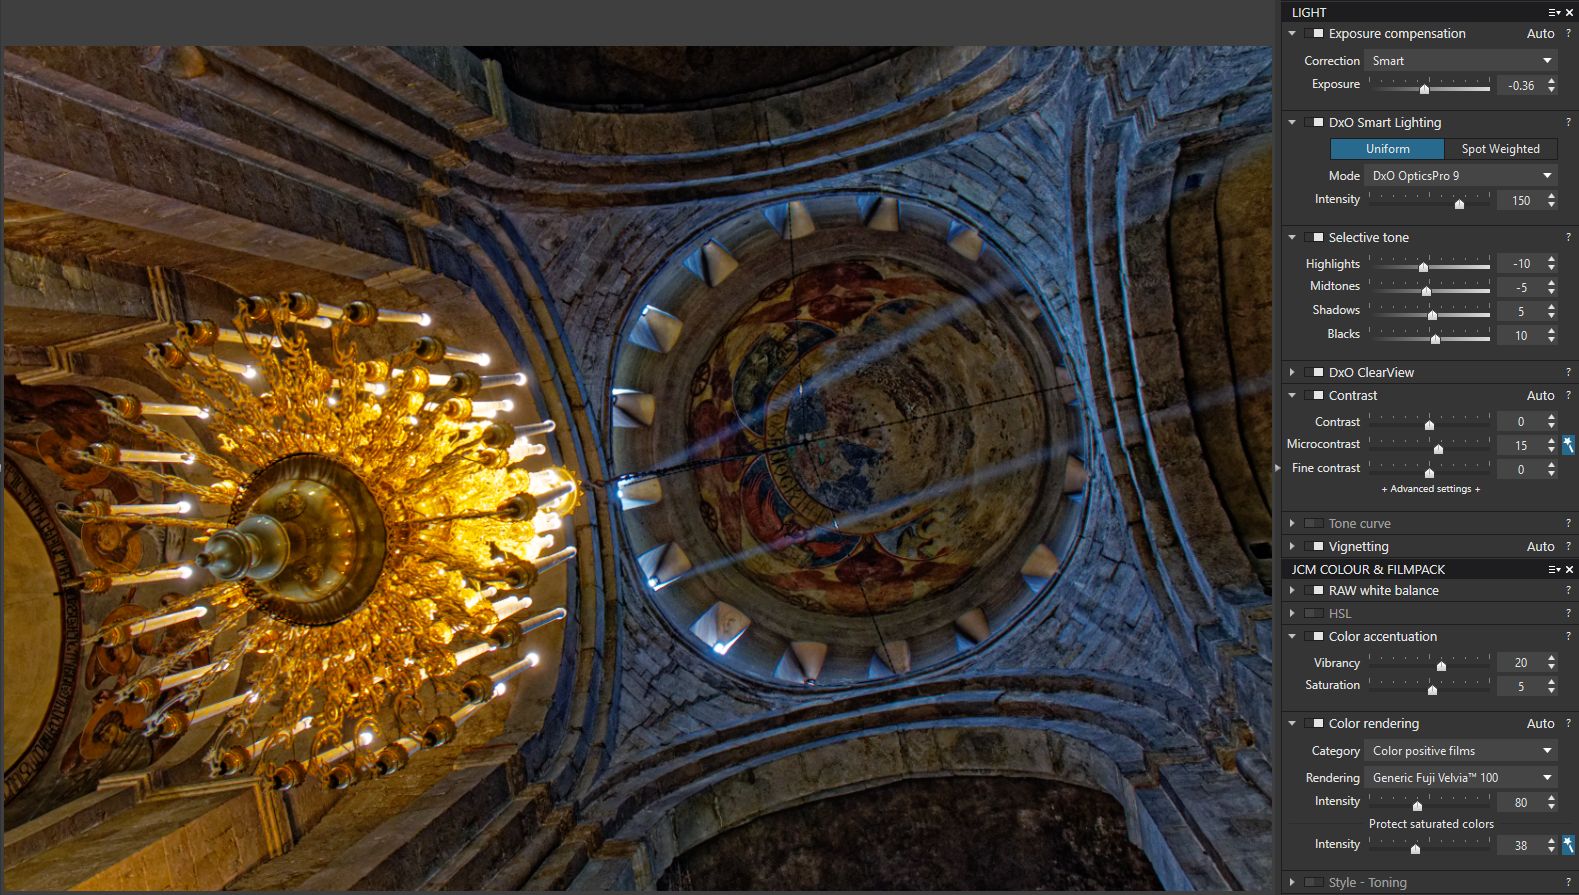
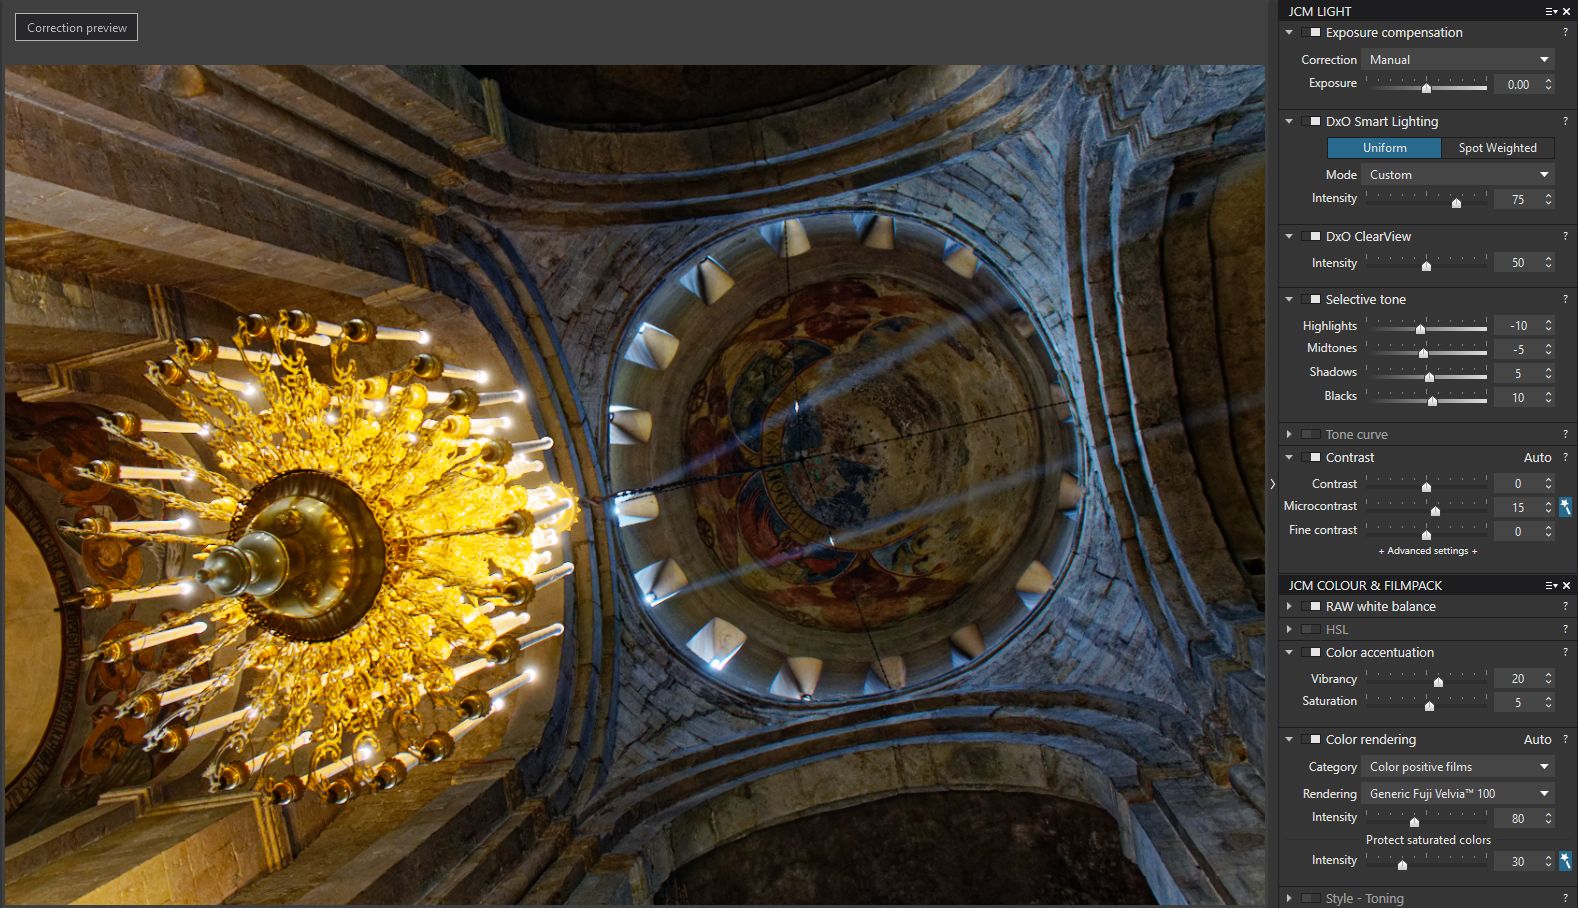
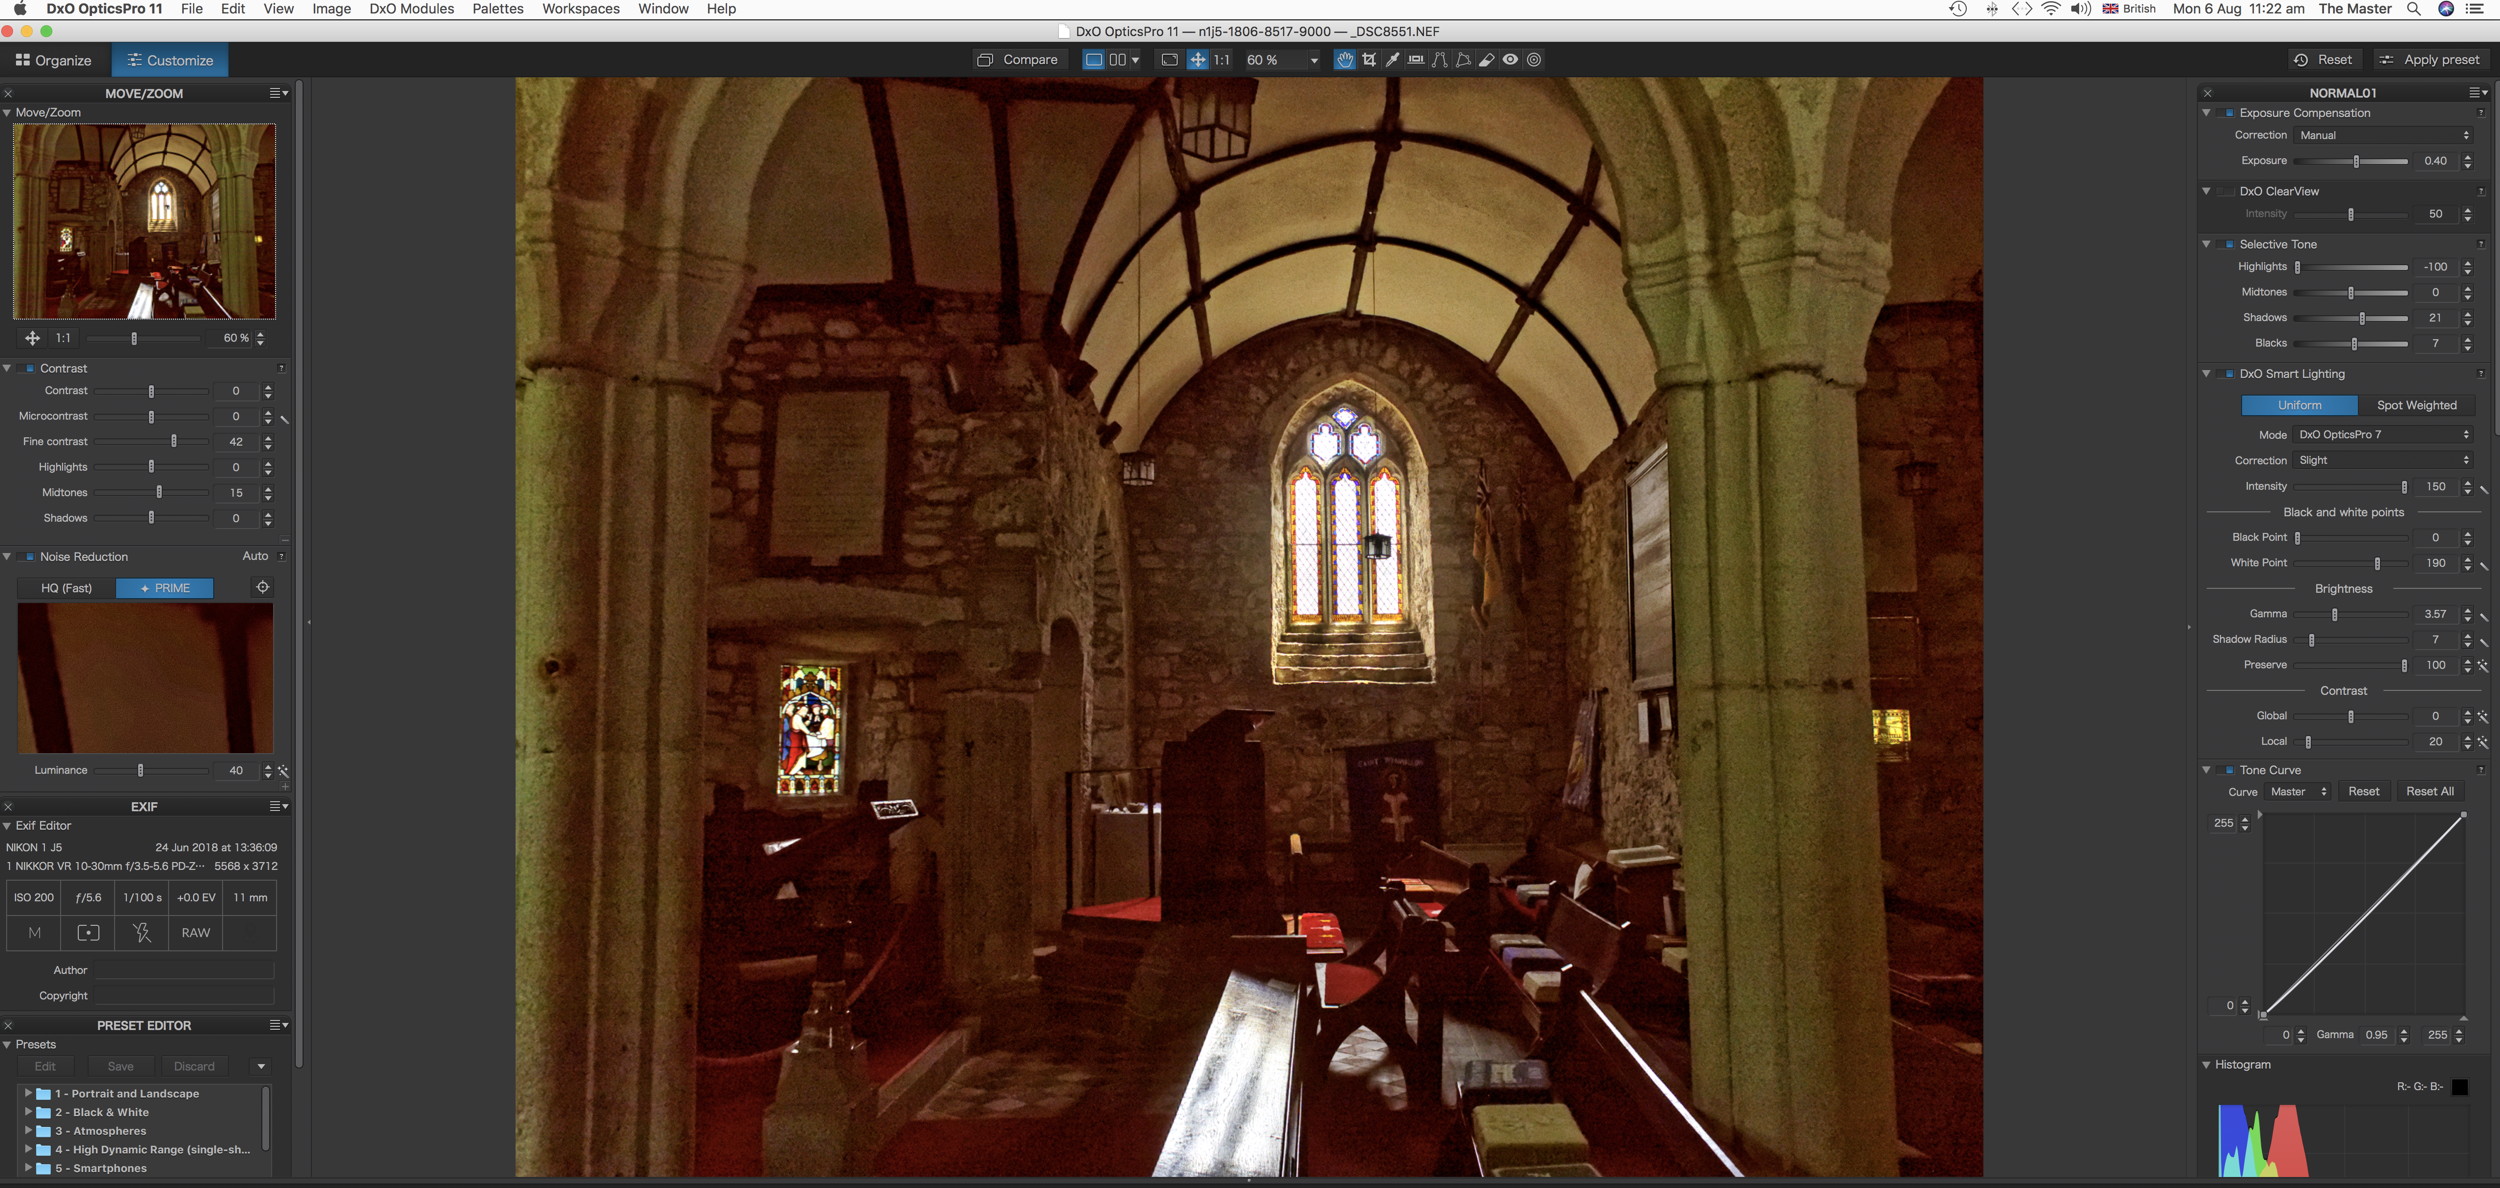
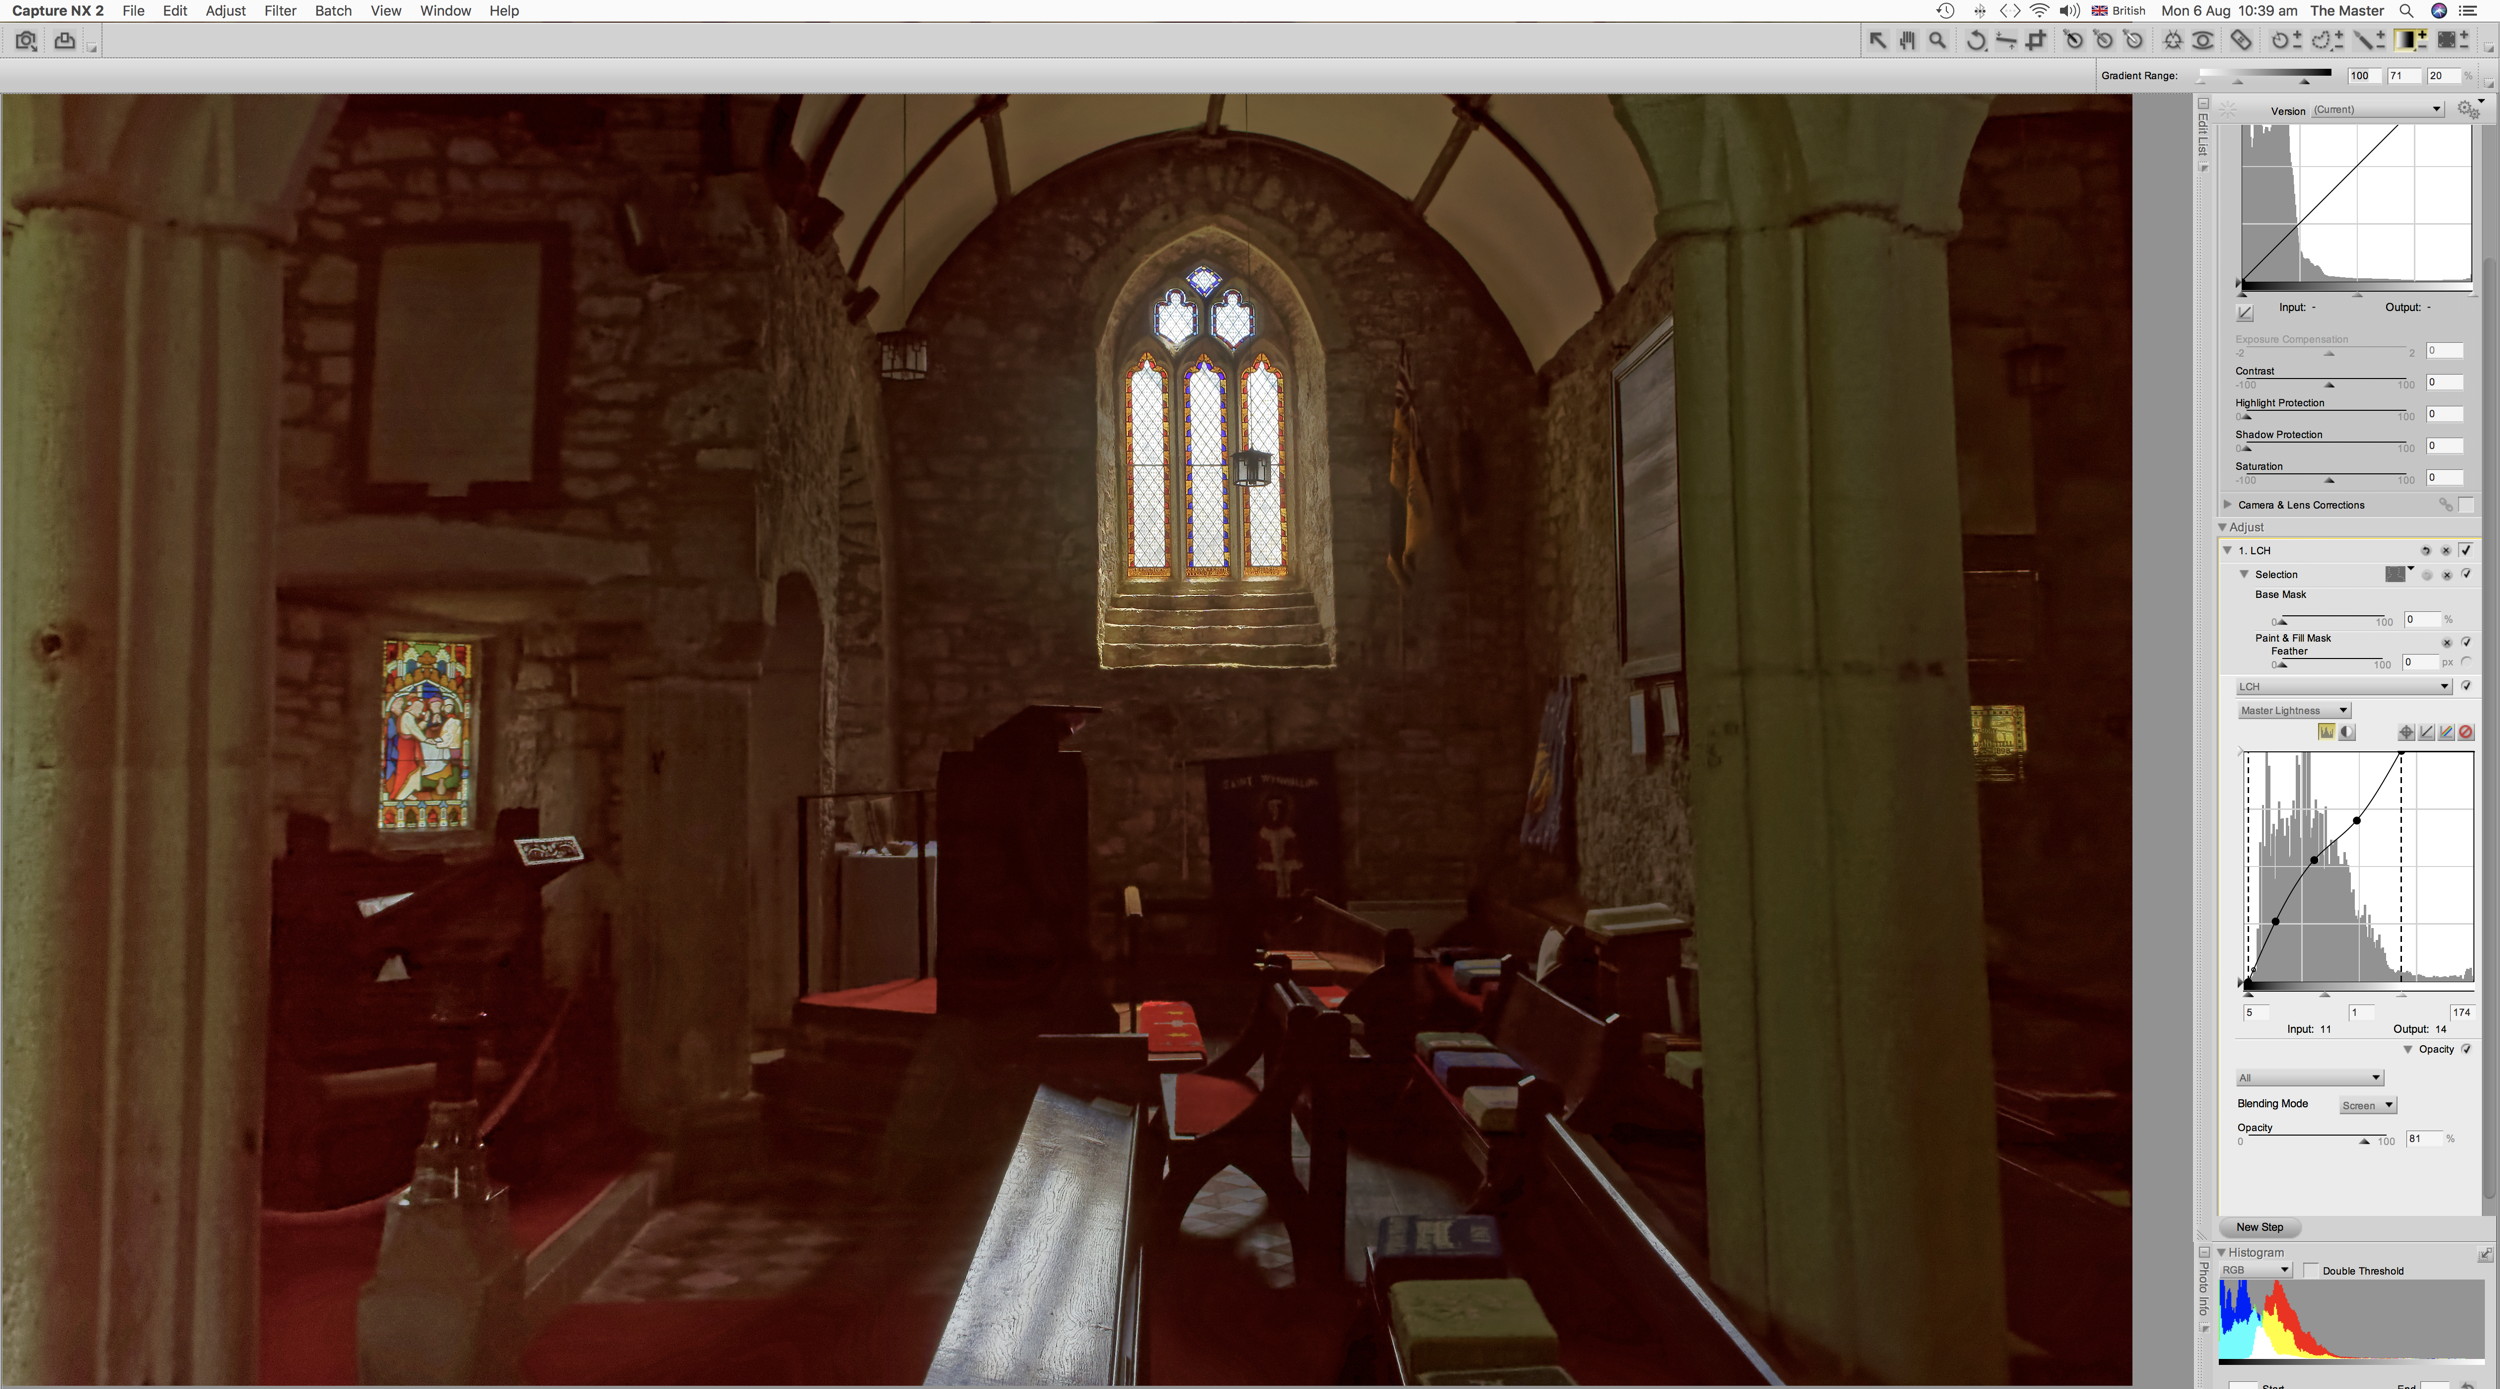
Note: The comparative images will be rendered too small here to truly appreciate the differences - I suggest you download them, and view them with your favourite image-viewer.
A RAW image I processed using OP - with Smart Lighting mode = DxO Optics Pro 9
As you will see, the two resulting images are quite different - with, in my opinion, the OP version being significantly better in many respects;
the chandelier in the PL version is “over-blown” - c/w the OP version where candle-lights are well controlled and the brightest parts of the chandelier itself are quite distinct
the natural light coming thru the upper windows, and especially the two light beams, look much better in the OP version.
the interior of the upper cupola is “mushy” in the PL version – as is the area inside the arch to the right and at bottom (of the image).
the “blue” colour in the natural light shining on the upper walls is much more natural (and as I recall it at the time) in the OP version
if you switch quickly between the 2 images and keep your focus on the left side, around the chandelier - you’ll notice a lot more detail in the OP version (whereas the PL version seems to be overwhelmed by the bright light coming from the chandelier).
etc, etc
As I trust you can see in my example — Yes.
That’s a question for DxO - but, I trust you can see that the images are significantly different - - with no changes to corrections (as you can see in the settings I have included with the screen-shots) - other than that PL is using its interpretation of the settings originally applied with OP.
Regarding the issue of “backwards compatibility” - - I trust you can see that PL’s interpretation of the original OP settings has produced quite different results (with the PL version being inferior, in my view).
I have made many extensive attempts (on purposefully underexposed RAW files) to get the same results with PL as I was able to achieve with OP with Smart Lighting mode = DxO Optics Pro 9 - - but, to no avail.
If there’s a way to achieve this with PL then I’d be OK about the loss of this feature … but, it’s beyond me !
I reckon it’s quite likely that the loss of the Smart Lighting mode = DxO OpticsPro 9 (& 7) was a result of the name-change from OpticsPro to PhotoLab … such that all reference to the “old” OpticsPro name was simply expunged.
Unfortunately, it was a case of throwing the baby out with the bath-water !
It has been under-exposed on purpose, with low ISO, in order to avoid “blowing out” detail in the bright light coming from the chandelier and the natural light from the upper windows.
I used to be able to rely upon OP with Smart Lighting Mode = DxO OpticsPro 9 to “brighten” such images whilst retaining detail and contrast in the under-exposed areas … but, I am unable achieve the same results with PL.
I have been through roughly the same exercise on a couple of my difficult church interiors, but came to the conclusion that maybe I was dragging my heels unnecessarily. The results are different, but probably no more than any 2 edits months apart in the same (or next) version. I did find, however, that in PL I had to resort to messing with curves and (a) the toolbox is just not big enough for this to be easy and (b) you have to use the RGB readout above the histogram to pin-point where an essential contrast is on a line/curve (cf Nikon Capture NX2 whence I came to DxO which has a point riding the curve; I wish anyone messing with U-point would rummage out a copy as there is a lot to be learnt there).
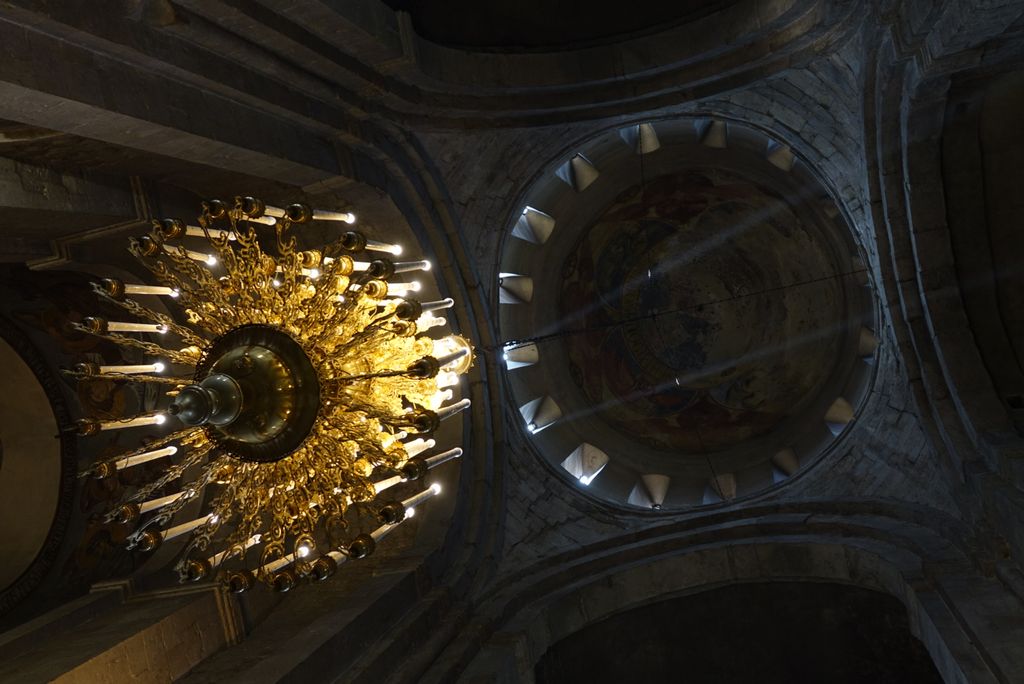
@John-M, thanks for this example: op vs pl
going true the settings:
exposure compensation: -0.36 vs 0.00.
protect saturated colors 38 vs 30
about 150 vs 75 that maybe just a ruler number and not different.
Chandelier: coper disk: op is more darker yellow and the surrounding also, the coper arms are more separated/distinguished. Same to see lower left cornerstones bright spot in PL.
dark area behind the arces top and bottom: strainge that the chandelier is brighter (because of no exposure comp?) but those dark area’s are closed shadows and the centre dome is less detailed in lines and color.
natural light part in the dome : OP is more (darker?)blue-ish vs PL, same as the structure which way the beams radiate.
About the details can’t say, to low resolution.
But in general i agree with you, the new (PL) isn’t better. (can’t say if its more natural/realworld looking, in color temp and such i mean, wasn’t there.)
So it is fair to say the backwards compatibility isn’t 100%. ( maybe it isn’t possible?)
(DxO staff?)
i would be having a go, can you provide the raw file? (i don’t use it other then for this purpose.)
I did some testing to see if i grasp the tool and how i can use it. and the first results are promising. (it is some different of the NIKcollection v2 of the free ones. Nik vivenza2 is about color management in hue, saturation, contrast, brightnes, and dxo’s upoint does have more control, sharpening exposure and such. So it should be doing better because it is raw instead of tiff.)
About using Smart lighting along with other correction tools i popped that question here about which tool influence the other if i manual correct a image part (upoint) or hole (exposure, sliders of selective tone and contrast) That said, lots to learn before i can say yess ive gott it.
About blown colors/white bleached area’s ive bin searching for the perfect steps to follow without the use of upoint. This is what i came up with:
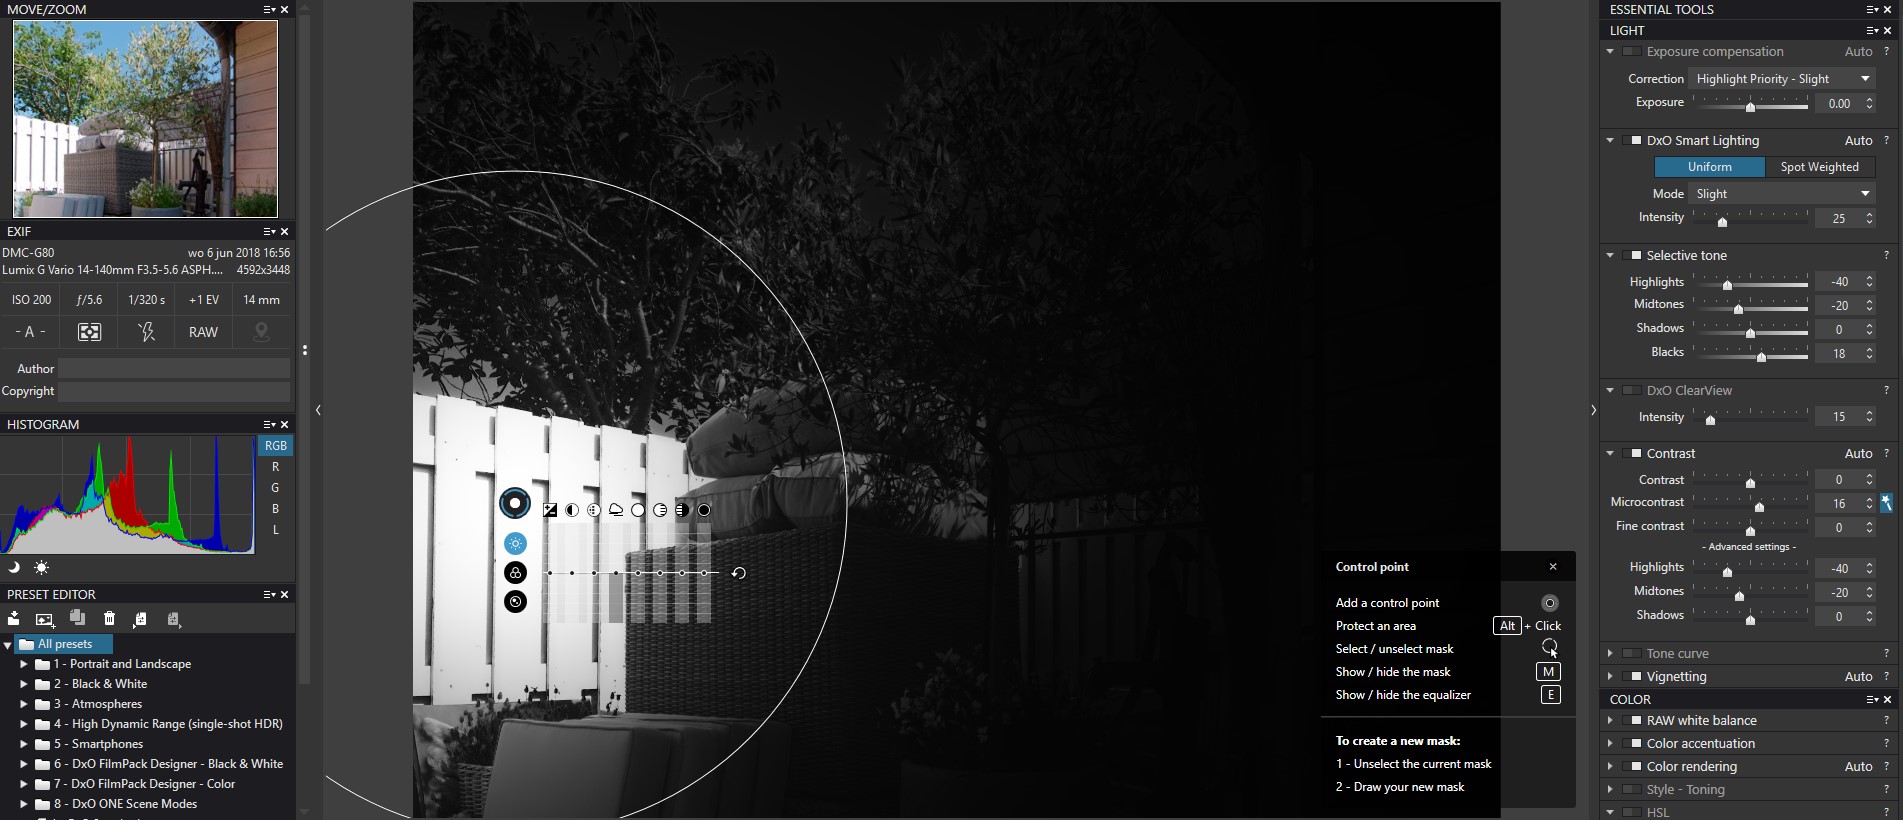
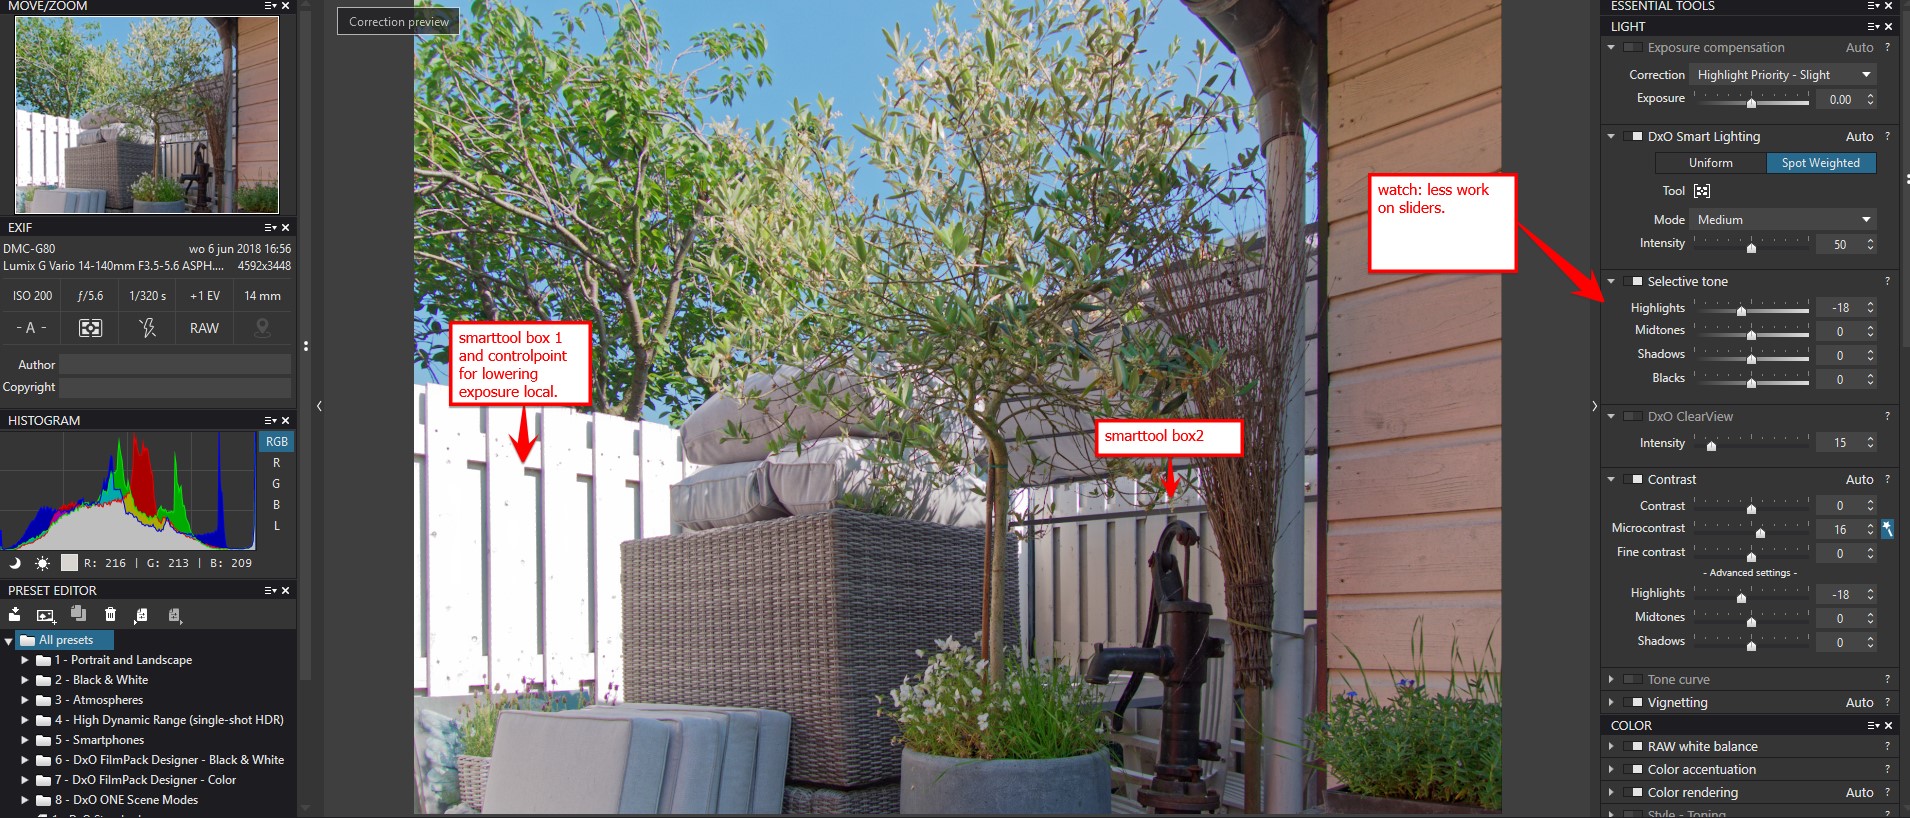
SmartLighting Spotweighted mode slight on default.
use box tool to mark bright and shadowspots of interest. (this would close the histogram more down/ away from black and full white) so i raise shadow and lower blown area’s.
selective tone and contrast highlight equaly turn down to avoid gray-isch lost detail. same in shadow raising by turning up blacks/shadows. (if need to much (highnumbers) and the details suffer i turn on exposure compensation even it was advised not to. ("smart lighting behaves independently from exposure setting, and we advise using smart lighting only, as it already includes a mechanism aiming at using whole dynamic range. If you use exposure in center weighted average mode, it should adjust exposure so that the center of the picture is well exposed". quote from benoit.
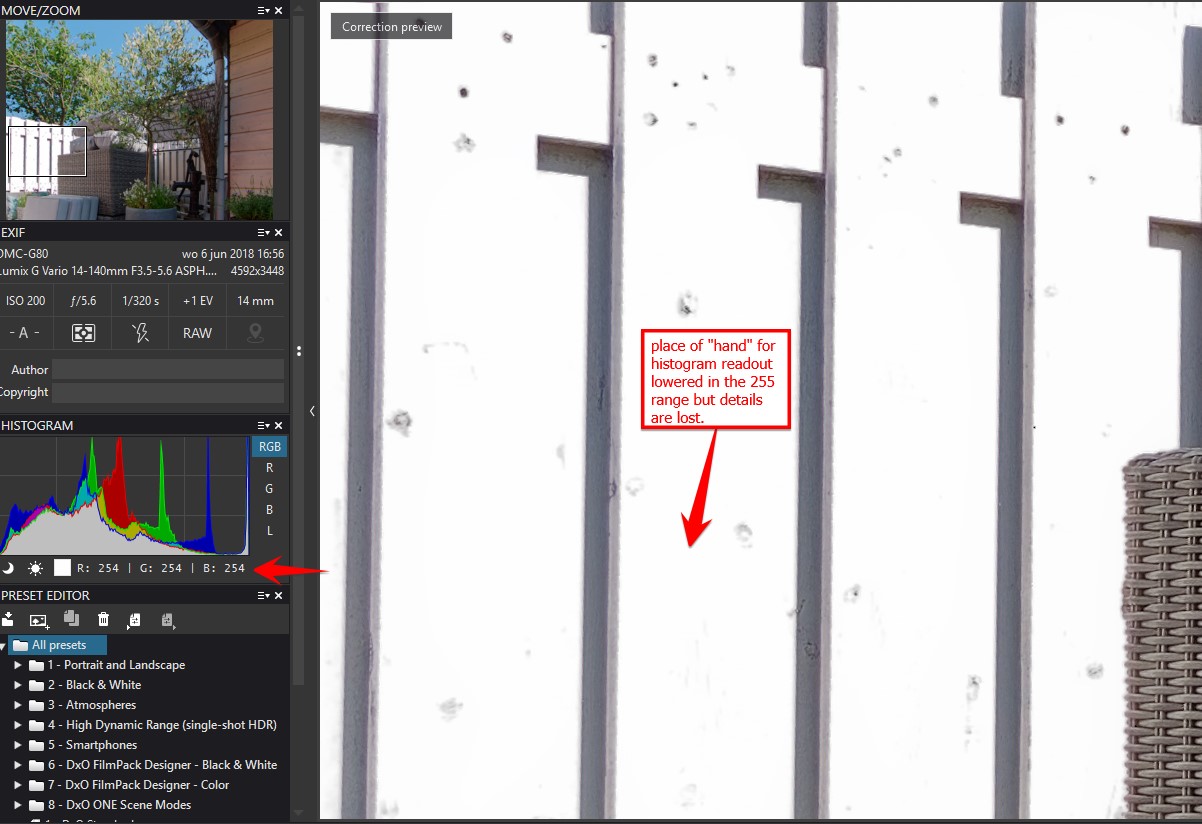
Some times i need to push the low end(left side) down of the histogram towards “0” to avoid loss of brightparts.
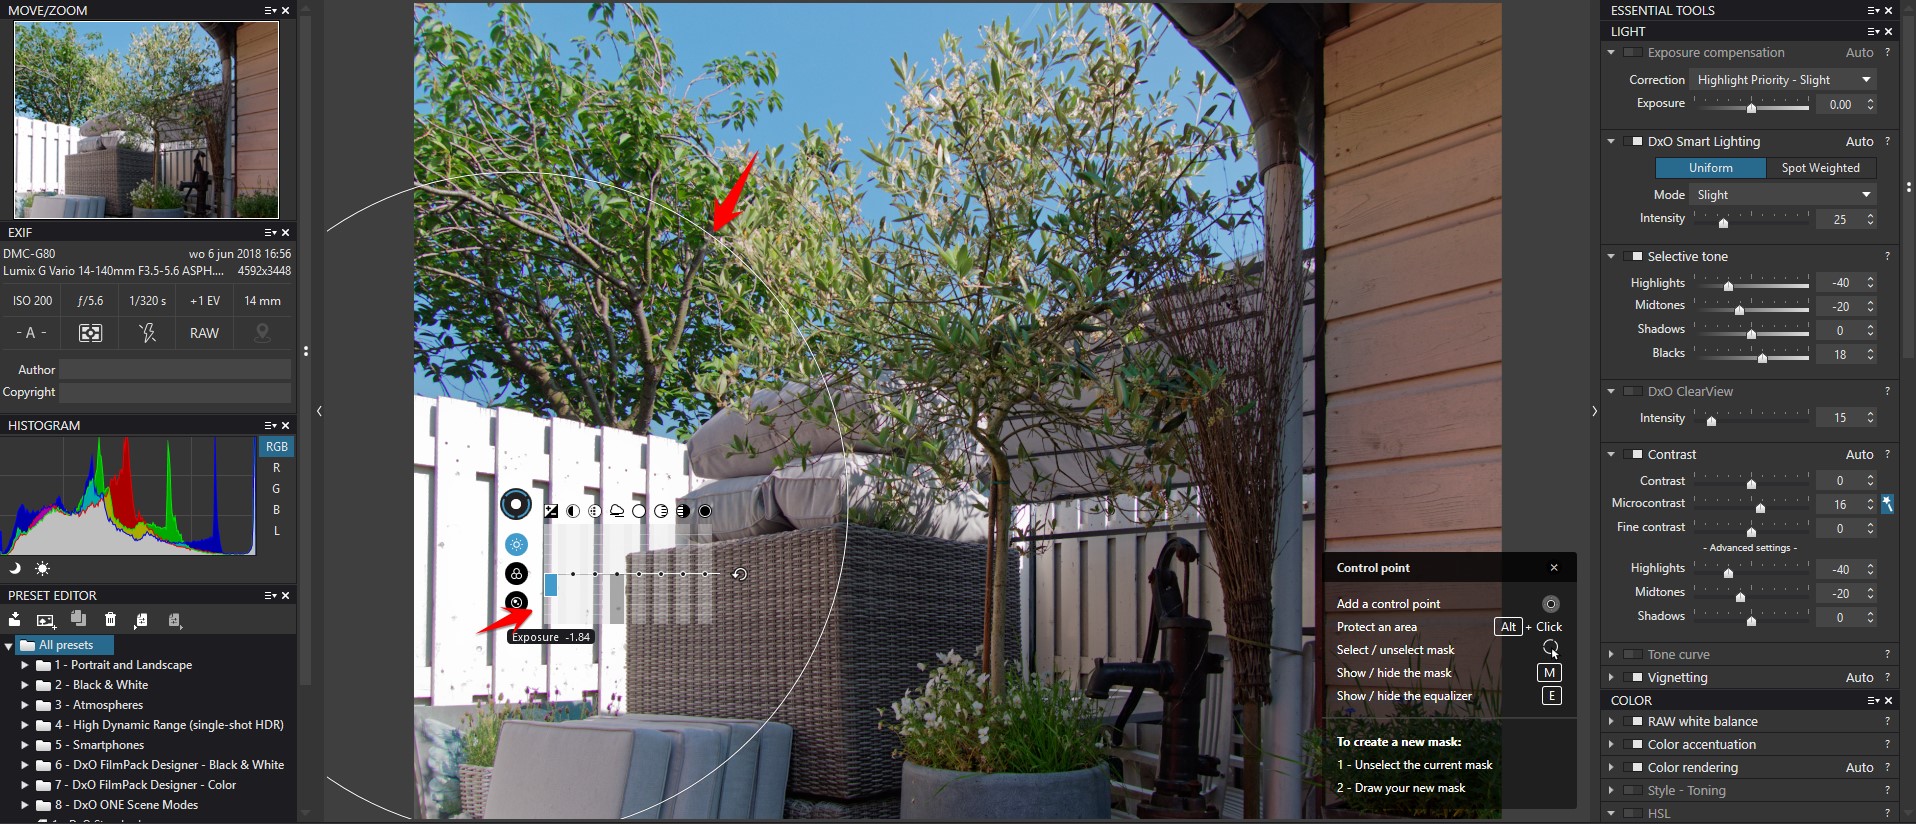
now i can add one extra and that is controlpoints
BUT! how does Smartlighting react on controlpoints in the image? does it counter react and change the changed section in a controlpoint?
See a influence of a control point pinned on a bright spot:
highlight controler:
chroma- lumiance 100% to chroma.
Saturation-hue 100% to saturation
luminance restoration: 100% to the left (lowers brightpart of histogram)
dr expansion: 1.53EV to shift upper histogram inside the 0-255.
this was 1 minute work.
Last thing about color control:
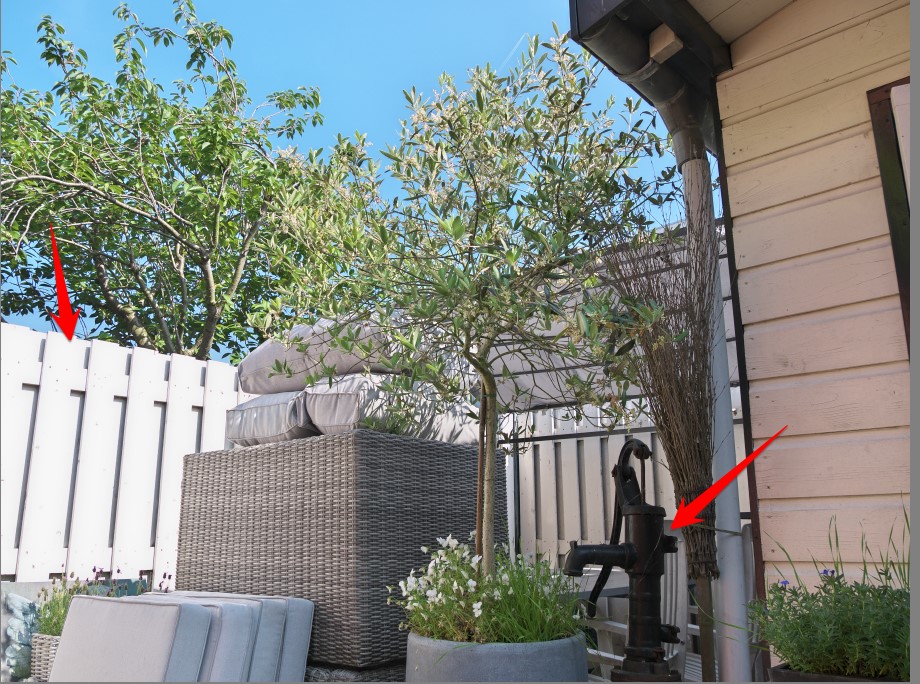
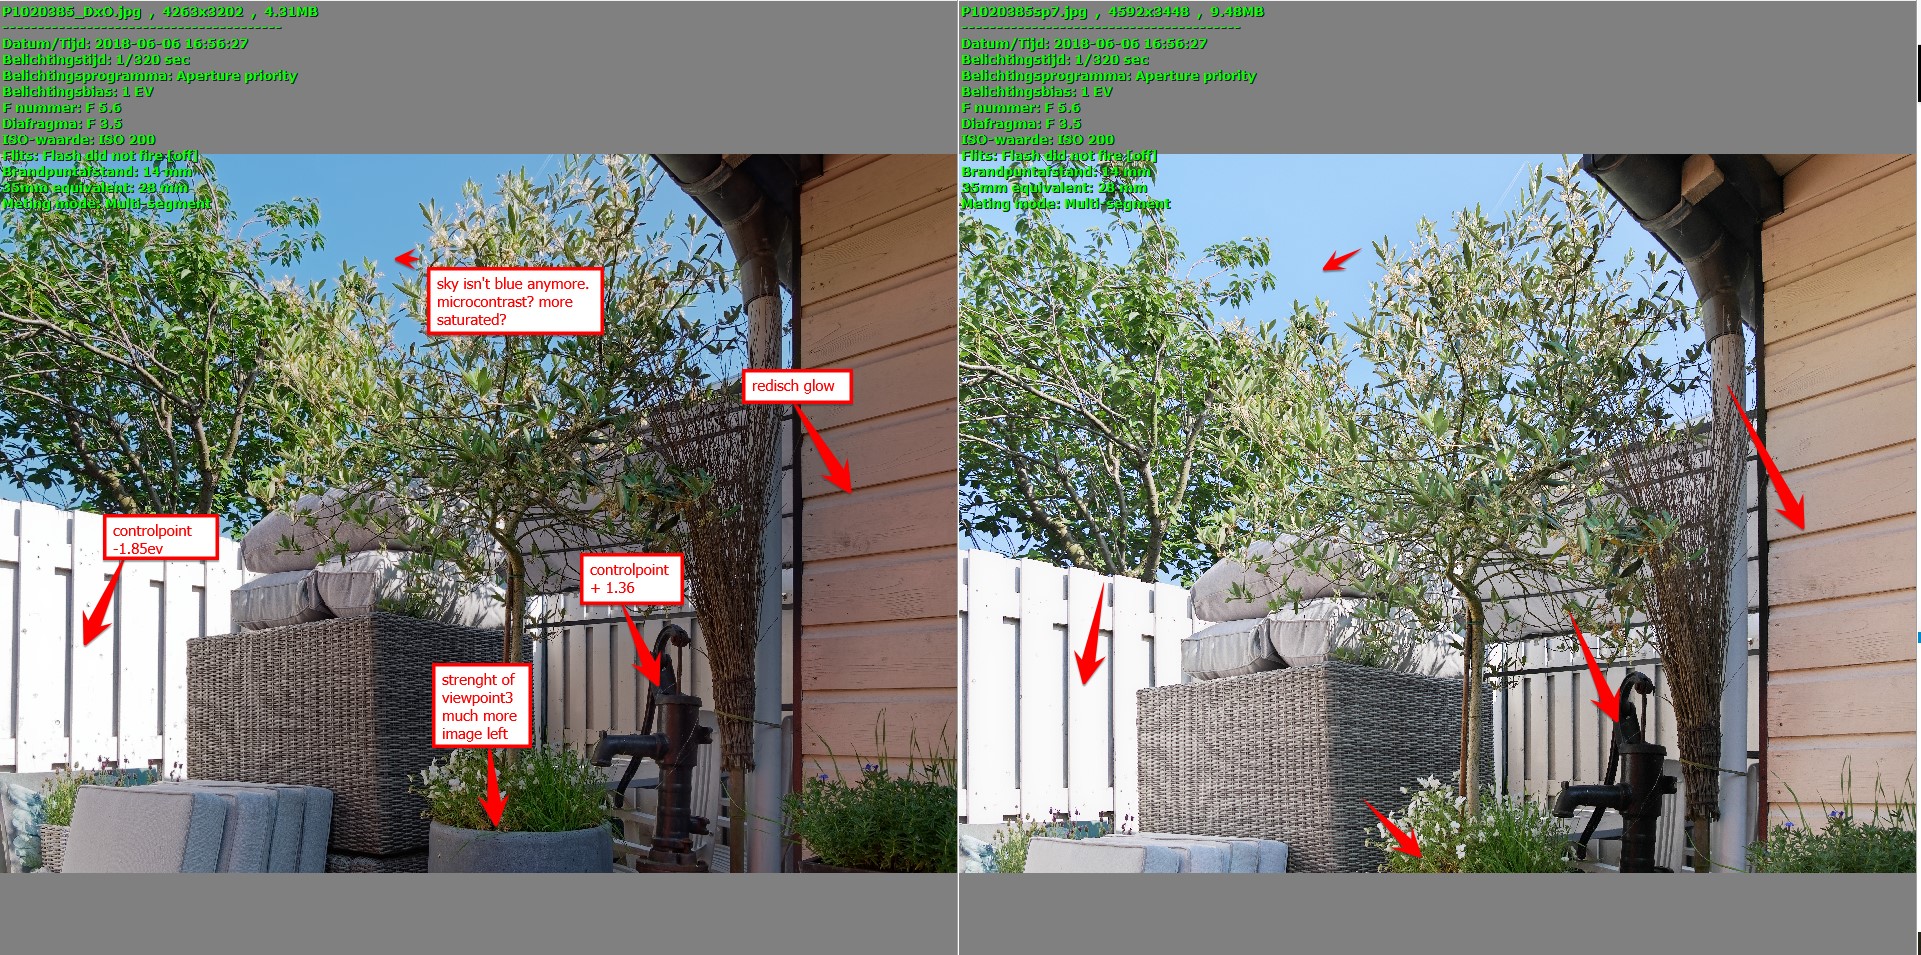
The right part (shed) there is a orange sail/sheet reflecting on the white paint.
and much more visible in dxo’s version because of the fact it has a darker shedcolor and it goes redisch :
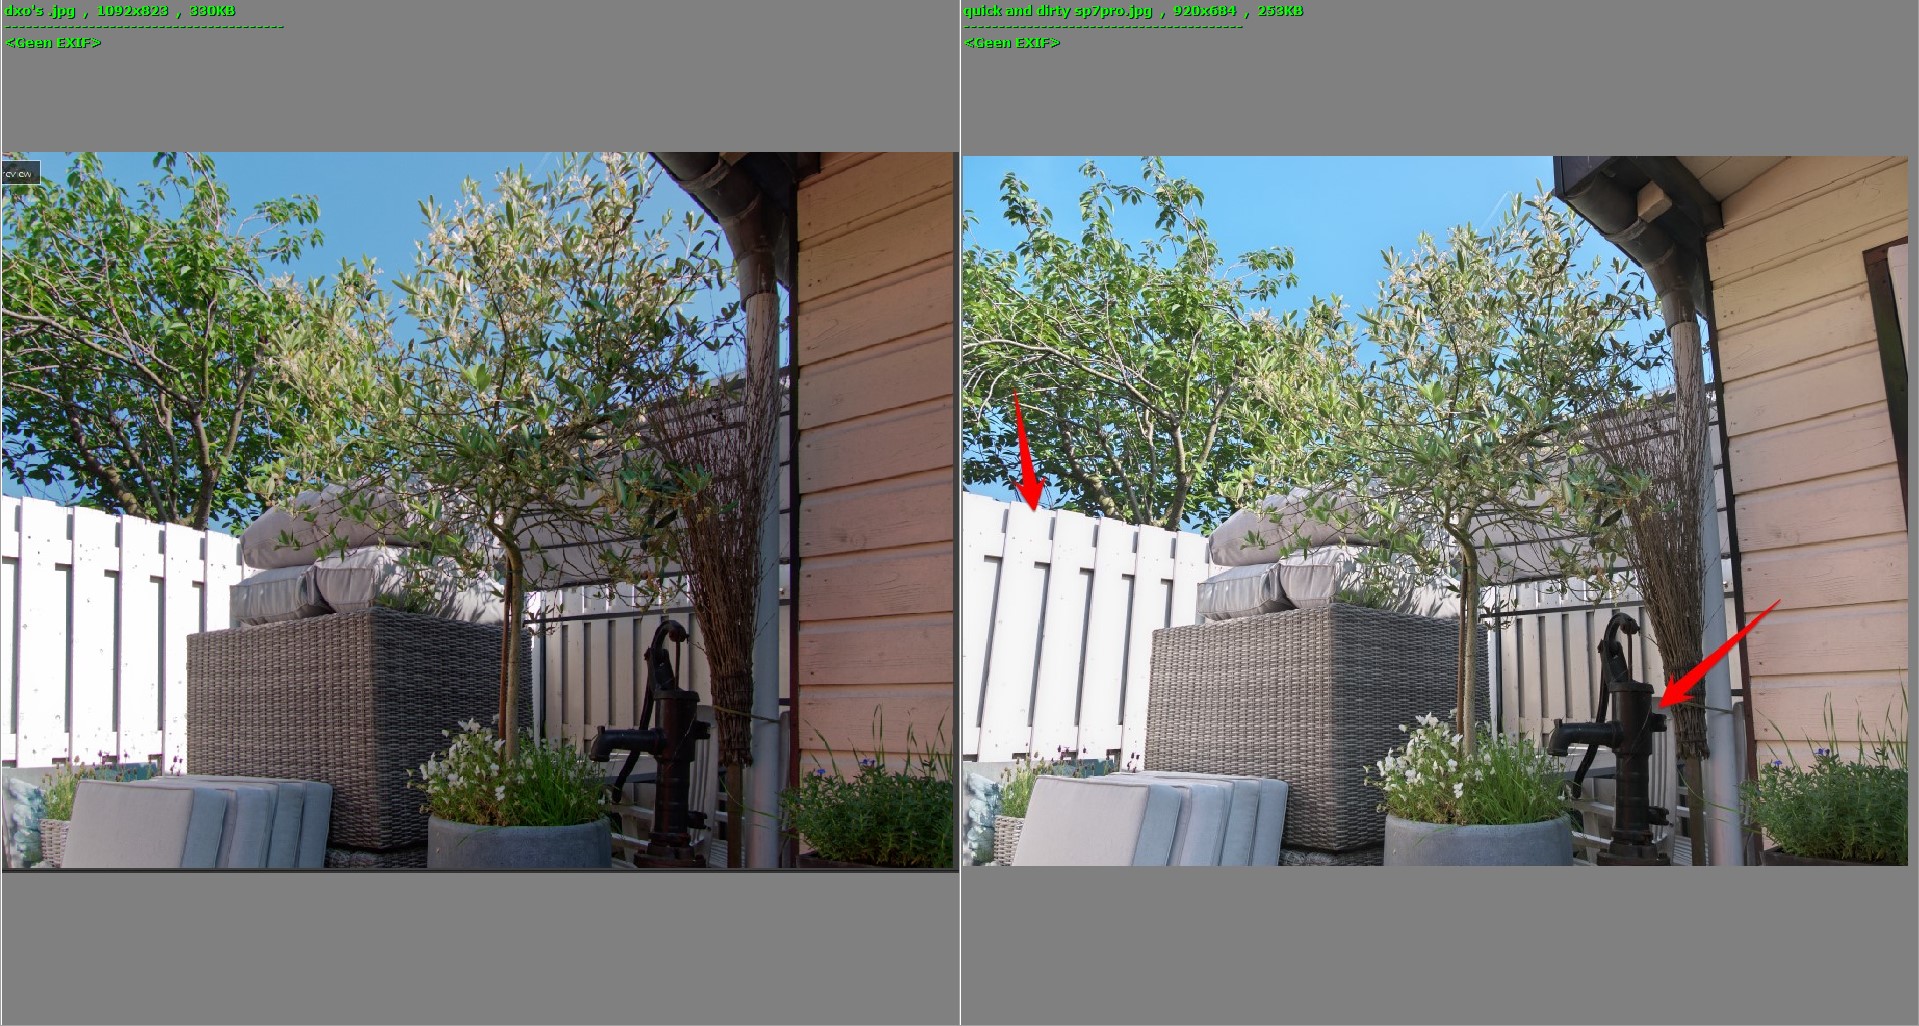
This is a full edit dxo vs sp7:
Sp7 wins on exposure control if i don’t use those local controlpoints in dxo.(smartlighting boxes and controlpoint)
DxO wins on details lenssharpening (i didn’t manual adjusted sp7pro so maybe i could gain something there.) and dxo wins on viewpoint correction image prevation.(more image left)
Overal PL does have the upperhand but as far as there Smartlighting stuff? in uniform mode it loses.
last attemped started from scratch (just quick perspective isn’t 100%) did wonders in the exposurecontrol:
So yes use the boxes of smartlighting on the darkest part and brightest part to set your dynamic range.(this way i can turn the intensity-slider higher without losing natural look.) And use controlpoints after that to stretch even further if needed. After that fiddle with the selective tone and contrast and colorvibrancy to finish the imagelook.But this was all about overexposure correction in normal exposure.
underexposed and lifting should be working the same in choosing the boxes of interest.
But still i would like to give that church image a go in both apps.
Edit remark in general:
and still this"(in having the Tone Curve reflect the impact of other contrast-influencing functions) …" and this:
"• eyedropper ETTR = I point at a white area and click on it, and the exposure compensation corrects the whole image until this spot is about 255 of the range of 0-255. (just near max white before blown.)
• eyedropper ETTL = I point at a place that’s suppose to be black and eposure compensation corrects the whole image to get this spot near blacklevel 0.
–> yes, that’s a nice suggestion and we’ll add it to our backlog." (can’t wait to see this in update)
will help even more to control exposure and dynamic range of a image.
It is al about quick clicks to set up frame. (get your image inside the histograms borders.)
the more you need to fiddle exposure and DR the more is starts to look unnatural and/or overcooked. And your space for contrast, microsharpening and color editing is narrowing down.
My remark about effective application of U-point technology referred to Nikon Capture NX2, not the football game played with Nik after they fell out with Nikon, nor the panic addition of Local Adjustments in PL
Having done some homework revision at CambridgeinColour, I realise that what is missing from trying to use the Tone Curve in PL is that it is NOT a luminosity curve and the DxO v7 Black + White points and Gamma probably did work on a hidden luminosity curve. Maybe it is a Luminosity Curve we need in PL in addition to the Tone Curve
owh i am sorry, i only know the last two and i am not skilled in it. Neither a skilled pp-er or photographer to earn money for that matter. so i only react on what i see and know/understand or think to understand.
you could be right. Luminosity is about light energy reflecting from a surface and Tone about the degree of light and dark within an area of color or colors. (Tonal curve represent the amount of dark and light in an image but not the amount of light energy captured. you can lower or increase light energy and stil get the same tonal curve. (it is only cut off (smacked flat) by the borders of dynamic range of the capturingdevice. (But the deeper meaning and detailed difference between those two…)
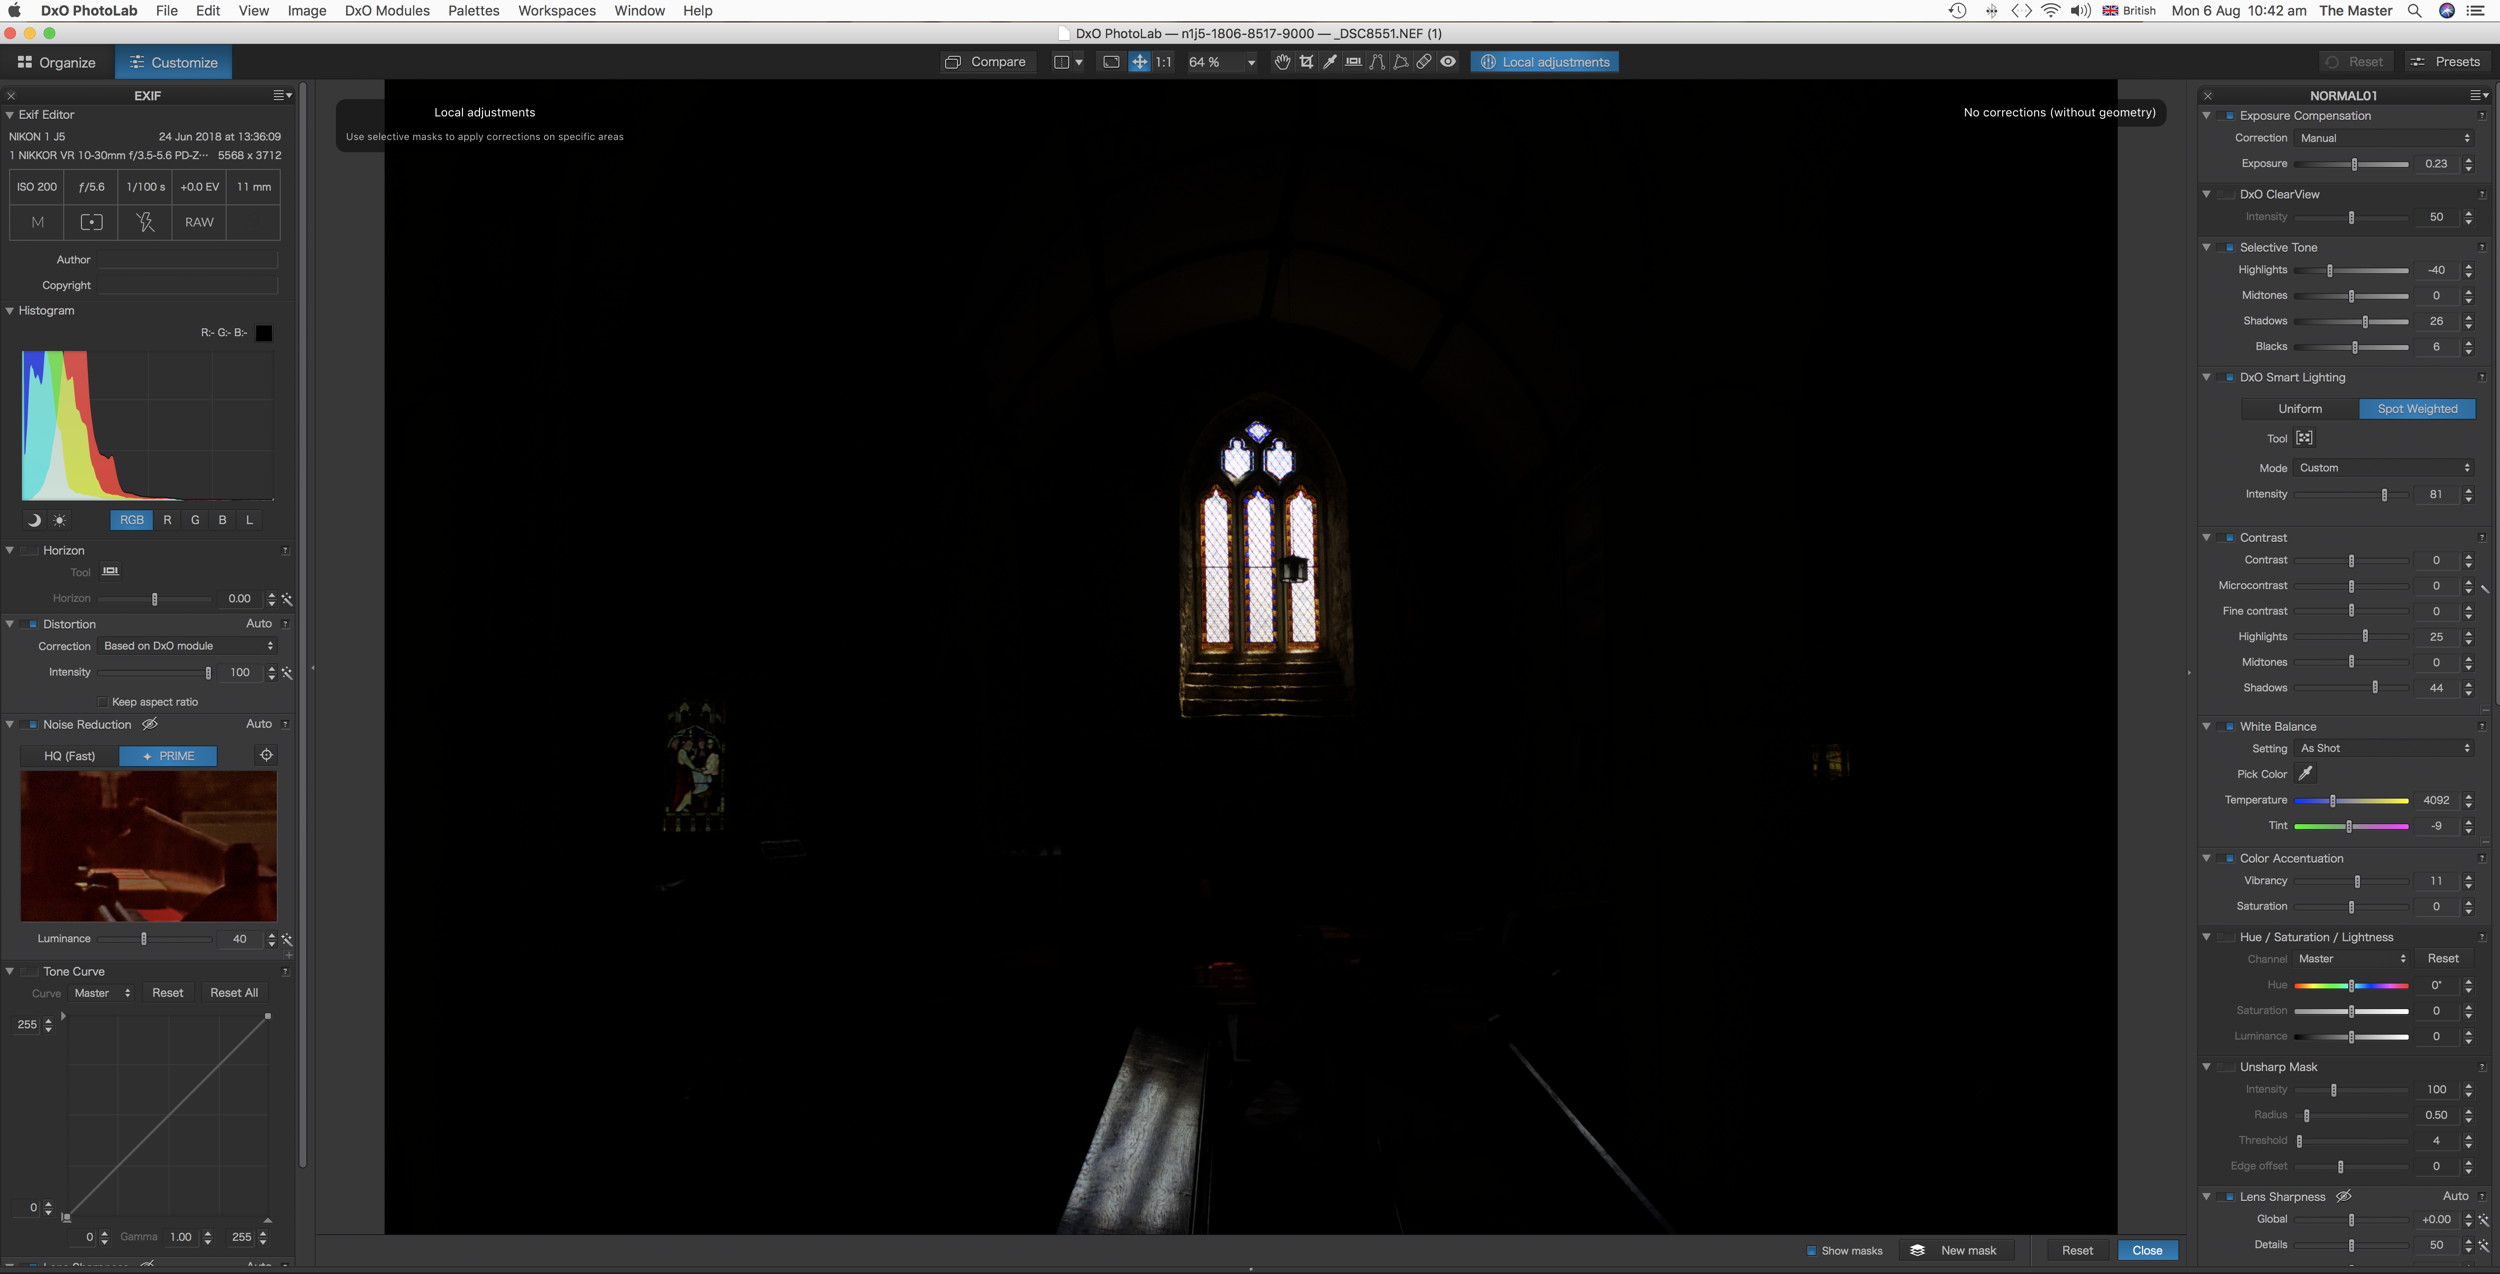
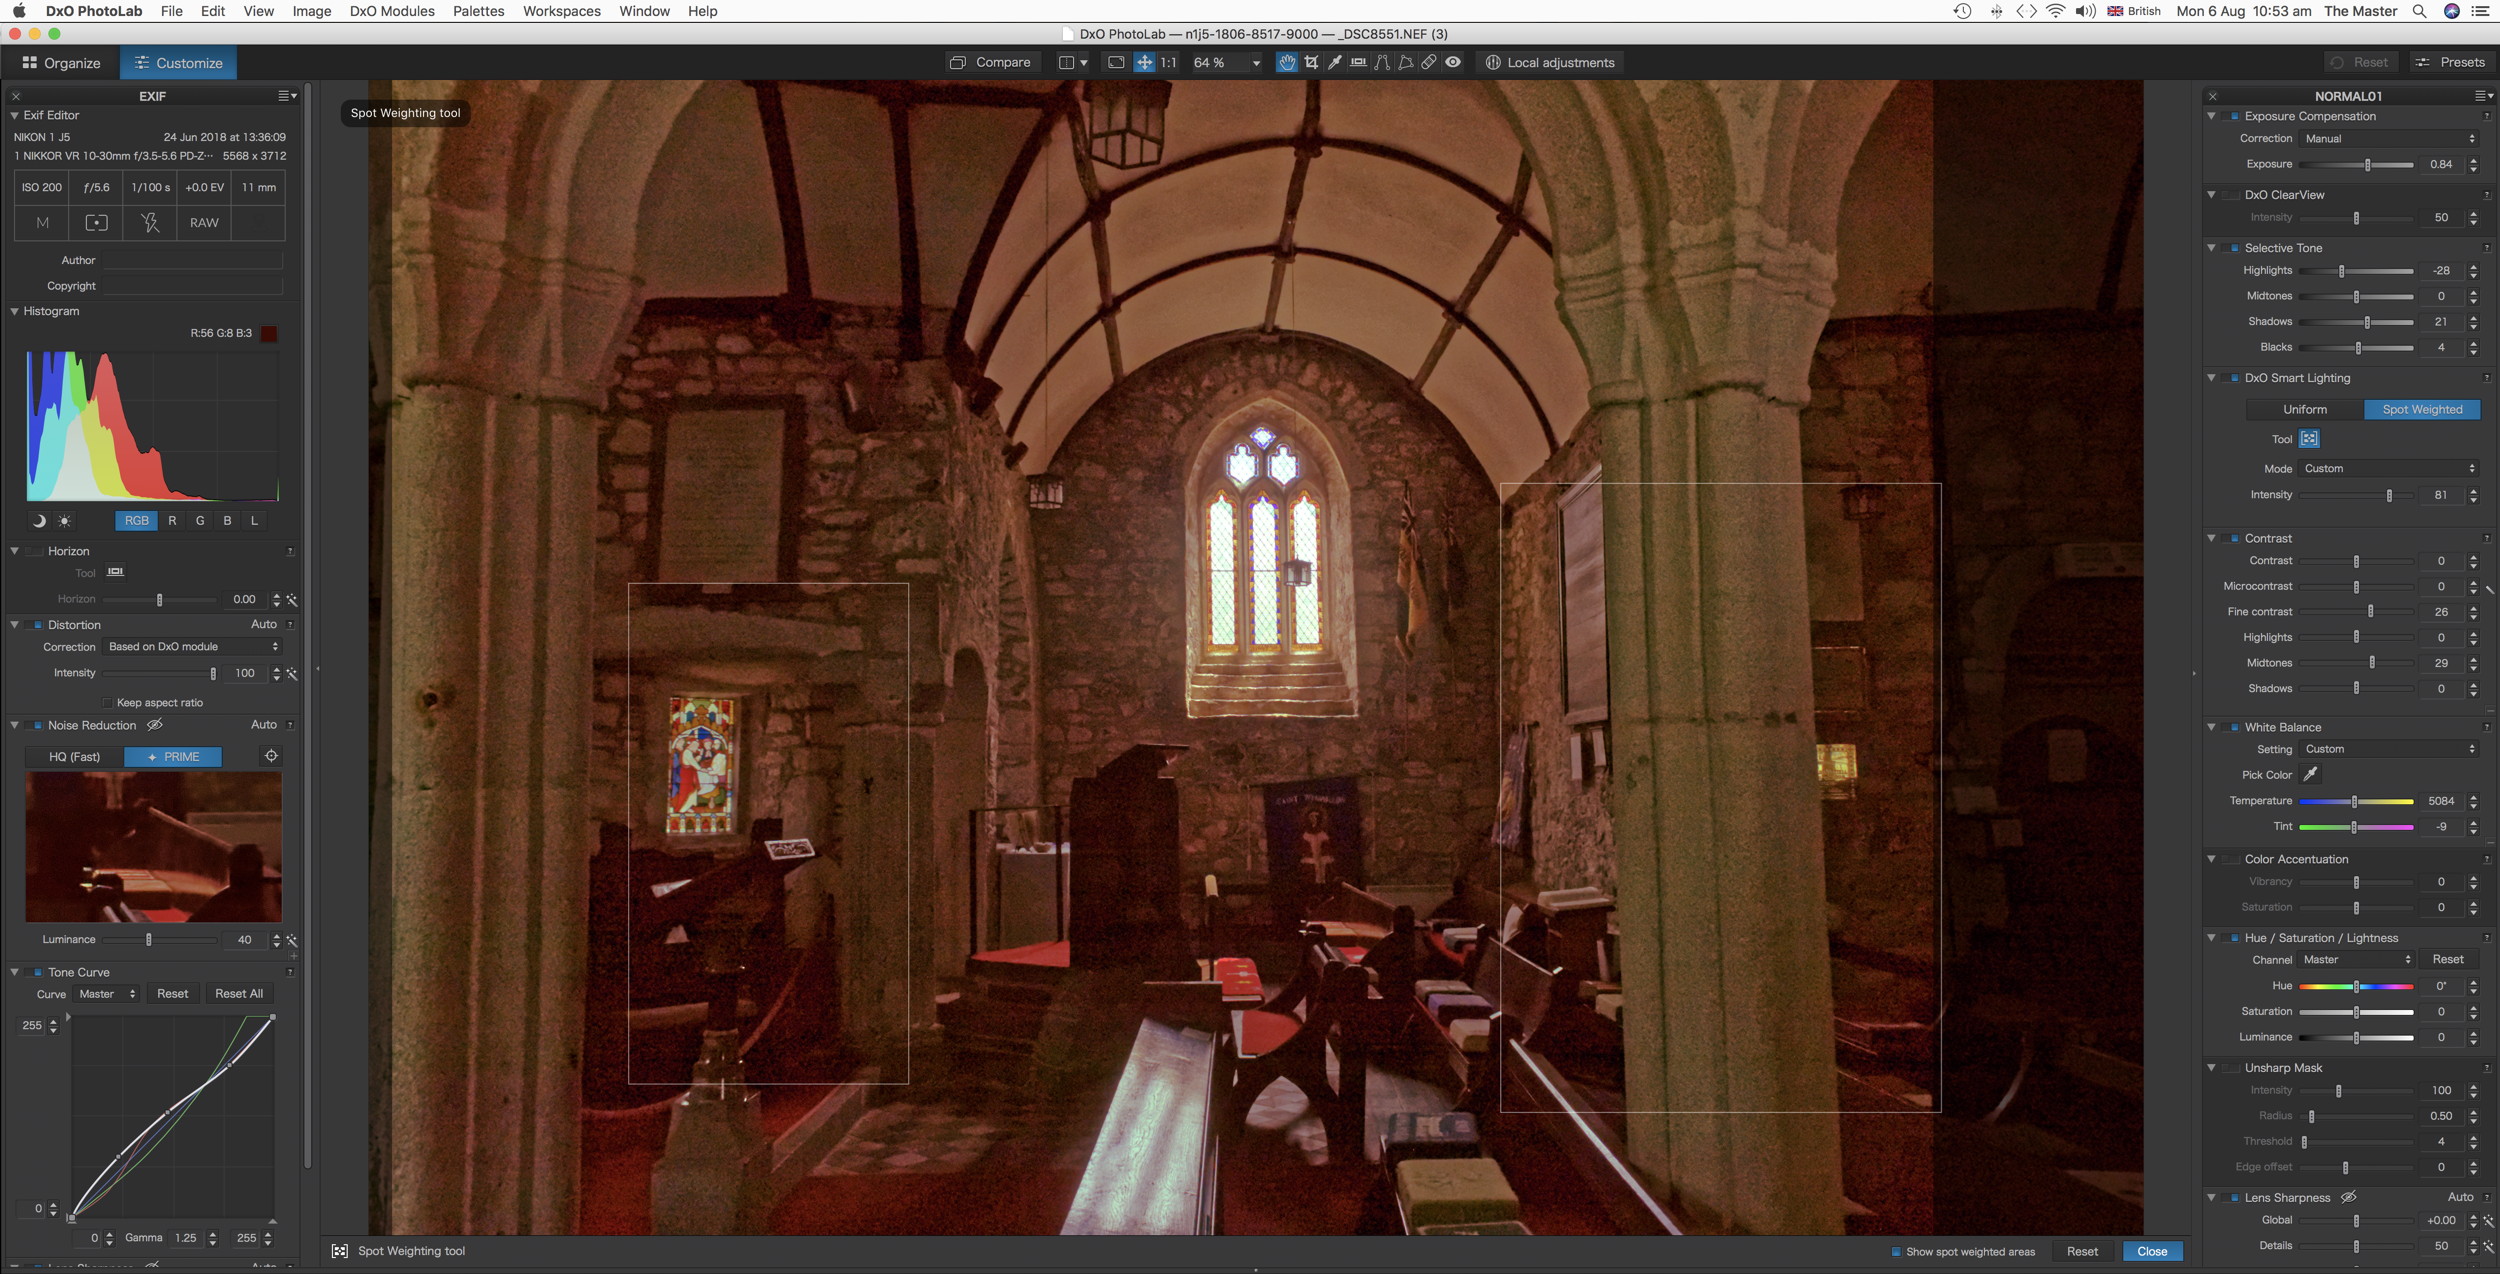
I am attaching 4 pics to demonstrate our problem, the 1st 3 to show the difference between DxO v7 Smart Lighting and PL on the same ‘deliberately underexposed’ image. There is then a 4th to show the PL version exported to Nikon Capture NX2, mainly to show the tool range for intelligent use of Upoint technolgy; the pic doesn’t come out particularly well as it has had to be converted to .tif and I don’t think Local Adjustment even with full control of mask is the answer…
To my mind, it is only the DxO 11/v7 lighting that preserves both the huge contrast below the central window in sunlight and the colour of the smaller window bottom left.
The Capture NX2 dump is to show the tools: Lassoo, Brush and Gradient each subject to gradient range immediately below. Then a choice of the full toolset of the programme, of which I have chosen Master Lightness (Luminosity), with several blending modes each controlled by opacity %age.
What you techies have to come to terms with, is that to get a Local selection to work with a proper toolset is to introduce either Layers as PS (ughh) or an equivalent of the NX2 steps. I have previously suggested that in PL, the way to do it would be to use Control D after implementing overall adjustments to create a Special Virtual Copy that ALSO triggers a new panel of Mask Tools. In the changes at DxO it has probably been lost without trace, but if Svetlana does bring the whole thing to attention, well…
Meanwhile a Tool using Luminosity Curve might be a lot quicker
BTW Nikon Capture NX2 has been abandoned for a number of years owing to a copyright dispute with Nik software. I retain my copy as it is still useful when a mask operation is really needed, most usually to bring up the eyes of birds especially say Guillemot; after main processing in DxO/PL. NX2 won’t accept .nef from newer cameras, so it is necessary to convert to .tif first. http://www.pbase.com/crisscross/image/167549782
Hello,
The Lighting v7 and the Lighting OpticsPro9 are 2 obstacles that block the local correction feature. That’s why when we introduce local correction in PhotoLab1, we had to remove these 2 lighting modes. It is sad but it was the best choice at that moment.
Of course, we can re-integrate these lighting options but we have to pay a lot of time and I guess that our resource does not allow doing it right now.
I hope you understand this decision.
Best regards,
Bao
Ahh, OK - - It’s very helpful to receive an explanation for the course you took … Thank you, @doquocbao
Yes ! … Please do keep this on your list, for when resourcing allows it to be addressed (I will keep reminding you - from time to time )
Note: I can understand why you may not wish to implement this algorithm into PhotoLab with the names of the modes containing “OpticsPro” - - but I certainly would like to see this excellent feature reinstated as soon as possible, in whatever way that enables it to receive some priority.
In the meantime; are you able to suggest any general correction strategy that might be best suited to processing purposefully under-exposed images ?
Why? because they are written before the local correction tools or the way they work?
And what is different between the new lighting and those two older ones?
Is it possible to integrate them less costly as a lighting version which deactivate local tools if used? so it is usable until it has a fully integrated version?
Yes please from me too. Because , see above , does the local tools like controlpoints messing up smartlighting? like if i lower or raise exposure in a controlpoint does smartlighting be influenced or is it added (like +2ev smartlighting and controlpoint +2ev =+4ev for the selection that the controlpoint influences?) to the smartlightings settings? because smartlighting in boxes of interest is used first and then if needed local corrections above that.


 )
)