How does one make use of FilmPack’s timemachine when editing photo in PhotoLab (PL 6). When in FilmPack (FP) there are way more options on film simulations. The timemachine feature in PL seems to be more of a gimmick than what is offered in FP directly. This is made worse that there doesn’t seem to be a decent workflow to go from LR to PL to FP, back to PL and finally back to LR.
It is a gimmick. I suggest you make a text shortlist of the film simulations you like and switch between them. What would really help would be the ability to mark favourite film simulations and have them appear in a separate virtual folder. Switching among my favourites in Camera Body, Film Positive, Film Negative and Digital Films is an exercise in frustration as there’s only about six or eight I like or use for my photos after much practice.
Here’s my short list for Nikon NEF those who are interested:
Agfa Vista 200 (great contrasty film look but turns grass yellow/amber which is an issue for me as a sports photographer)
Fuji Classic Neg (removes colour, increases contrast but adequately subtle)
Fuji Pro 400H (successfully brightens highlights in dark images in high ISO)
Fuji Superia 200 (also brightens dark images, reduces contrast and lowers vibrancy, strong grain for appealing retro look)
Fuji Velvia 50 (adds contrast, deepens blacks and makes red more intense: colourful, intense but can be too strong for images which are already contrasty)
Leica M9 (makes Nikon skin tones look like Canon skin tones with more pink and a bit more contrast, removes the slight yellow tonality which is the Nikon digital signature: I’m not complaining about Nikon as all the tones and proper balance among them is there, colour tonality is not strange and constantly changing between every model as with Sony bodies, although the D4/Z6/D850/Z9 have a very different signature than the D5).
What I’ve started to use quite often is the intensity slider for these looks. If Velvia 50 is too strong on a specific image at default 100, it can look great at 75. Of course, the intensity is not entirely linear. Below a certain level or above a certain level some of the looks radically change character rather than intensity.
I just wish I could add all of these looks to a favourite folders to speed up switching between them. Right now I have presets with all of them but if I’ve already started working on an image, using the preset is no longer a good option.
I use Fuji Velvia 100 film for large format work. It is highly saturated like the 50 but much more balanced and neutral in colours; although you need a very pale yellow filter when shooting in high UV conditions.
The FilmPack 6 license enables Time Machine presets stored in PhotoLab 6, some of which require colour renderings that are also unlocked by the FP6 license. People who don’t use presets can do without FilmPack, which also, unfortunately, adds the fine contrast sliders to the Contrast tool…
I hope that DxO will move the fine contrast sliders to PhotoLab like they did with the Perspective tool, I’ll not hold by breath though.
Applying time machine presets in both apps is different, because they have different user interfaces. Nevertheless, functionality is the same as far as I tested (quite a while ago) in PL vs FP.
Working on images with FP functionality in PhotoLab requires no change of applications, hence no break in the workflow, hence no pain.
They way it works is that if you have a FP license then FP’s features are unlocked within PL … which you then use as part of your normal PL workflow (You don’t even need to have FP installed !)
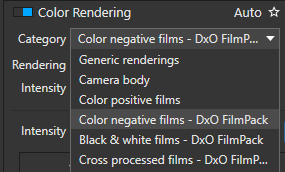
For example, to apply FP colour rendering from within PL;
Choose one of the FP categories; - say, Color Negs
Select the first Rendering type; - it’s instantly applied
Now, simply press Down-Arrow - and, one by one, each available Rendering-type will be applied to your image.
Tip: Probably best to do this with a Virtual Copy - so you don’t lose track of your original rendering.
I will pay a little more attention but it appears that there are more film emulations when using filmpack standalone - I am not referring to what I’d call the gimmicky filters.
There are the same number of simulations in both the stand alone and embedded version of FilmPack 6.2 Elite. If you can identify specific film simulations that you believe are only in the standalone version please let us know which ones.
 - say, Color Negs
 - it’s instantly applied