I obviously can’t do that until this evening - too bright. I did go into the brightness display on the ASUS, and it was way down. I clicked on the button to increase brightness until it reached the mid-point, 50, and the display screen with wallpaper looks good, I can see all the gray rectangles on the b&w chart you sent me, and I think I can see all the color bars.
I spoke to the tech support person at x-rite - he told me the unit has a default setting of 120 for luminance, and that the only reason for using a lower value was for people who are printing these images. He felt I should leave it at 120 for “web” use.
As a test, I will calibrate it now, with the screen brightness set to 50.
(How do I check what “light meter” value my monitor is currently using?)
Also, before you calibrate your Asus monitor, make it display a completely black field covering the entire screen and keep the room as dark as possible. If the room is dark enough, you will notice that the black screen isn’t uniformly black. There is likely to be some “clouding” - areas of the screen that are lighter than other areas. There might also be some “light bleed” along the edges of the screen, where the monitor’s backlight isn’t being properly masked by the bezel. (All of this is typical of this kind of monitor. I have a very similar Asus monitor and had to wedge some paper into the seams behind the monitor where the light bleed was occurring in order to seal the bezel better.)
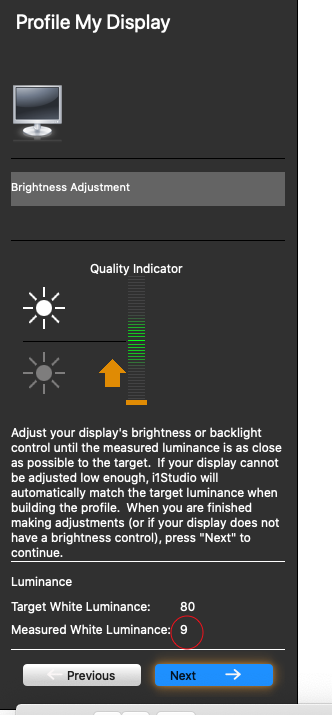
When you calibrate, make sure that you position the X-Rite over a dark part of your screen, not a lighter part. Then you’ll get a good calibration. If you then brighten the room, everything on the screen will look darker to your eyes, which is why it’s so important to control room light if you want precise control over your images. 80 cd/m2 might simply be too low for your environment.
When I calibrated my Asus (PB258Q) for 120 cd/m2, I set brightness to 28 and contrast to 80. Picture mode is standard, blue light filter is off, ECO mode is off.
I use CalMAN to calibrate with an X-Rite i1Display Pro colorimeter. I first get the contrast right using the early steps of the calibration process: setting contrast as high as possible before there is clipping of the red, green, or blue color channels. Then I go back and adjust brightness and contrast as needed (some monitors also have a backlight adjustment in addition to these two) to get the desired luminance, then calibrate all settings from there. CalMAN rechecks the luminance after most of the calibration is done - it usually changes a bit since it was initially set because of the need to adjust for gamma and grayscale accuracy. I don’t know if your calibration software works similarly or not.
After setting the brightness to 50, I wanted to try a “default” calibration. It’s too bright to do what I think you want me to do, so I did a calibration anyway, starting with the brightness level in the middle of the scale, “50” (I assume it is 0 to 100). The tech person at x-rite suggested I try with “photo” selected, and see what happens.
The calibration software went through a series of tests to select “contrast”. Then it got to Luminance. It said the current luminance was 133, and I lowered it to 120 for this test.
Everything seemed to go normally. I could see each of the “demo” photos x-rite provided. For the gray scale you wanted me to check, I could see every one of the rectangles, but the ones at the right were similar. I could still see a division from one to the next. The two at the extreme right were barely different from each other. The white rectangle at the left was clearly brighter than the next one, and so on. For the color chart, in room lighting, I only have trouble making out the very first boxes on the left, but it doesn’t look that much better on my iMac which is much brighter than the ASUS. I think I can see everything on the ASUS that shows up on the iMac, BUT when I view on the iMac, the right (brightest) end of all the color bars have many “rectangles” that blend together. The last three bars for each of the colors on the iMac look the same, while on the ASUS I can clearly see the difference.
Now, with the blinds on the windows open, I can clearly see everything on the ASUS, but it’s too dark for me to want to use for editing. Closing the blinds should make it fine, and editing at night will be perfect.
I’m going to stop for a while, and take some new photos, close the blinds, and see how well I can work with them - and how well the results work (or not) for you.
I have “Venetian Blinds” on my windows and a large sliding door to the balcony. When they are closed, my room gets reasonably dark. Maybe my light meter can give me a reading showing how “dark” it is.
I’m just trying to understand why you are struggling so much with your monitors. I use my Samsung 28" 4K monitor day and night and while there are some differences depending on the ambient light I don’t seem to be having any serious usability issues.
I am, but they don’t do very much of that unless/until I get outside in bright sunlight. Looking at this screen right now, the screen does look the slightest amount brighter looking around them, rather than through them. I just put on another pair specially made for doing photography - they are clear, and the white screen looks identical while looking through them, or around them.
(They are progressive lenses - the top part is for distance, and the bottom part is for the LCD screen on the back of my camera.)
Good thinking - that might have been the problem, but if it were, it would also have the same effect when I’m looking at my iMac screen.
When I used the monitor at the default value, 50, I never had any problems or issues that I was aware of. Everything was fine, but in bright daylight, my iMac adjusted accordingly. The ASUS didn’t automatically change based on the brightness, which made it easier for me to use the iMac when my room got extremely bright. Everything seems to be back to normal now, allowing the ASUS and the i1Display Studio to tell me what to do.
Once again, see what the current figure is after adjusting to see the test patterns and go from there. But I would still try to go as low as you can once the contrast is adjusted.
In that case, the contrast is not quite right yet.
At least we seem to be getting there a bit at a time
I never got asked about contrast in the configuration, and I haven’t yet found a RESET button. I will call ASUS and ask about this.
I did fine the exact user manual for my display:
…starting at section 3.1.1 (really 3.1.2) it has all the functions and the possible settings. As far as I know, the display is still at the default settings. I never looked into this in the past.
Hold down Menu Button + Power for 7 seconds. Then let off for a few seconds and hold down the Menu Button until you see the special / hidden blue menu on the far left of the monitor.
…I don’t think there is anything to reset. I never looked into this in all the years I’ve owned it. I guess I could go through all the choices, and document how things are set now. It’s probably just the way it came from the factory, and there is no assurance that is the best configuration for what we’re now doing.
The way it’s set up now, it’s useable in the daytime, and perfect once I darken the room.
I just found the manual, including how to adjust contrast, but the i1Display Studio setup software never asked me to adjust contrast. I posted this elsewhere, but I will call ASUS and ask before I start messing around with hidden menus.
I took some new photos this afternoon - I will edit one or two of them. If they “work” for you, maybe I should stop here, while everything seems to be working fine from my point of view.
I did a screen capture - on your calibrated display, you (and everyone in this discussion) should see the same thing as I see on my ASUS, and for that matter, it looks exactly the same on my iMac which has the brightness turned down to match the ASUS (except on the iMac, columns 1 and 2 are just about the same):
I’m old fashioned - before I change something, I like to understand what all the settings were before the change, especially when I’m obviously an “idiot” about this, as they use terms I never heard of before. It’s an old habit I got into from racing - before changing something, know how to go back to what it was prior to the change. As to the cable, if my memory is correct, it comes from a Thunderbolt 2 or 3 connection on my Apple, and again if my memory is correct, it goes to the “Firewire” input on the ASUS.
Until I hear back from Joanna, I’m not changing more stuff - I like what it does now, and it almost perfectly matches the display on my iMac when the iMac brightness is set correctly.
Thanks for the information - I will add that to the places I need to look.
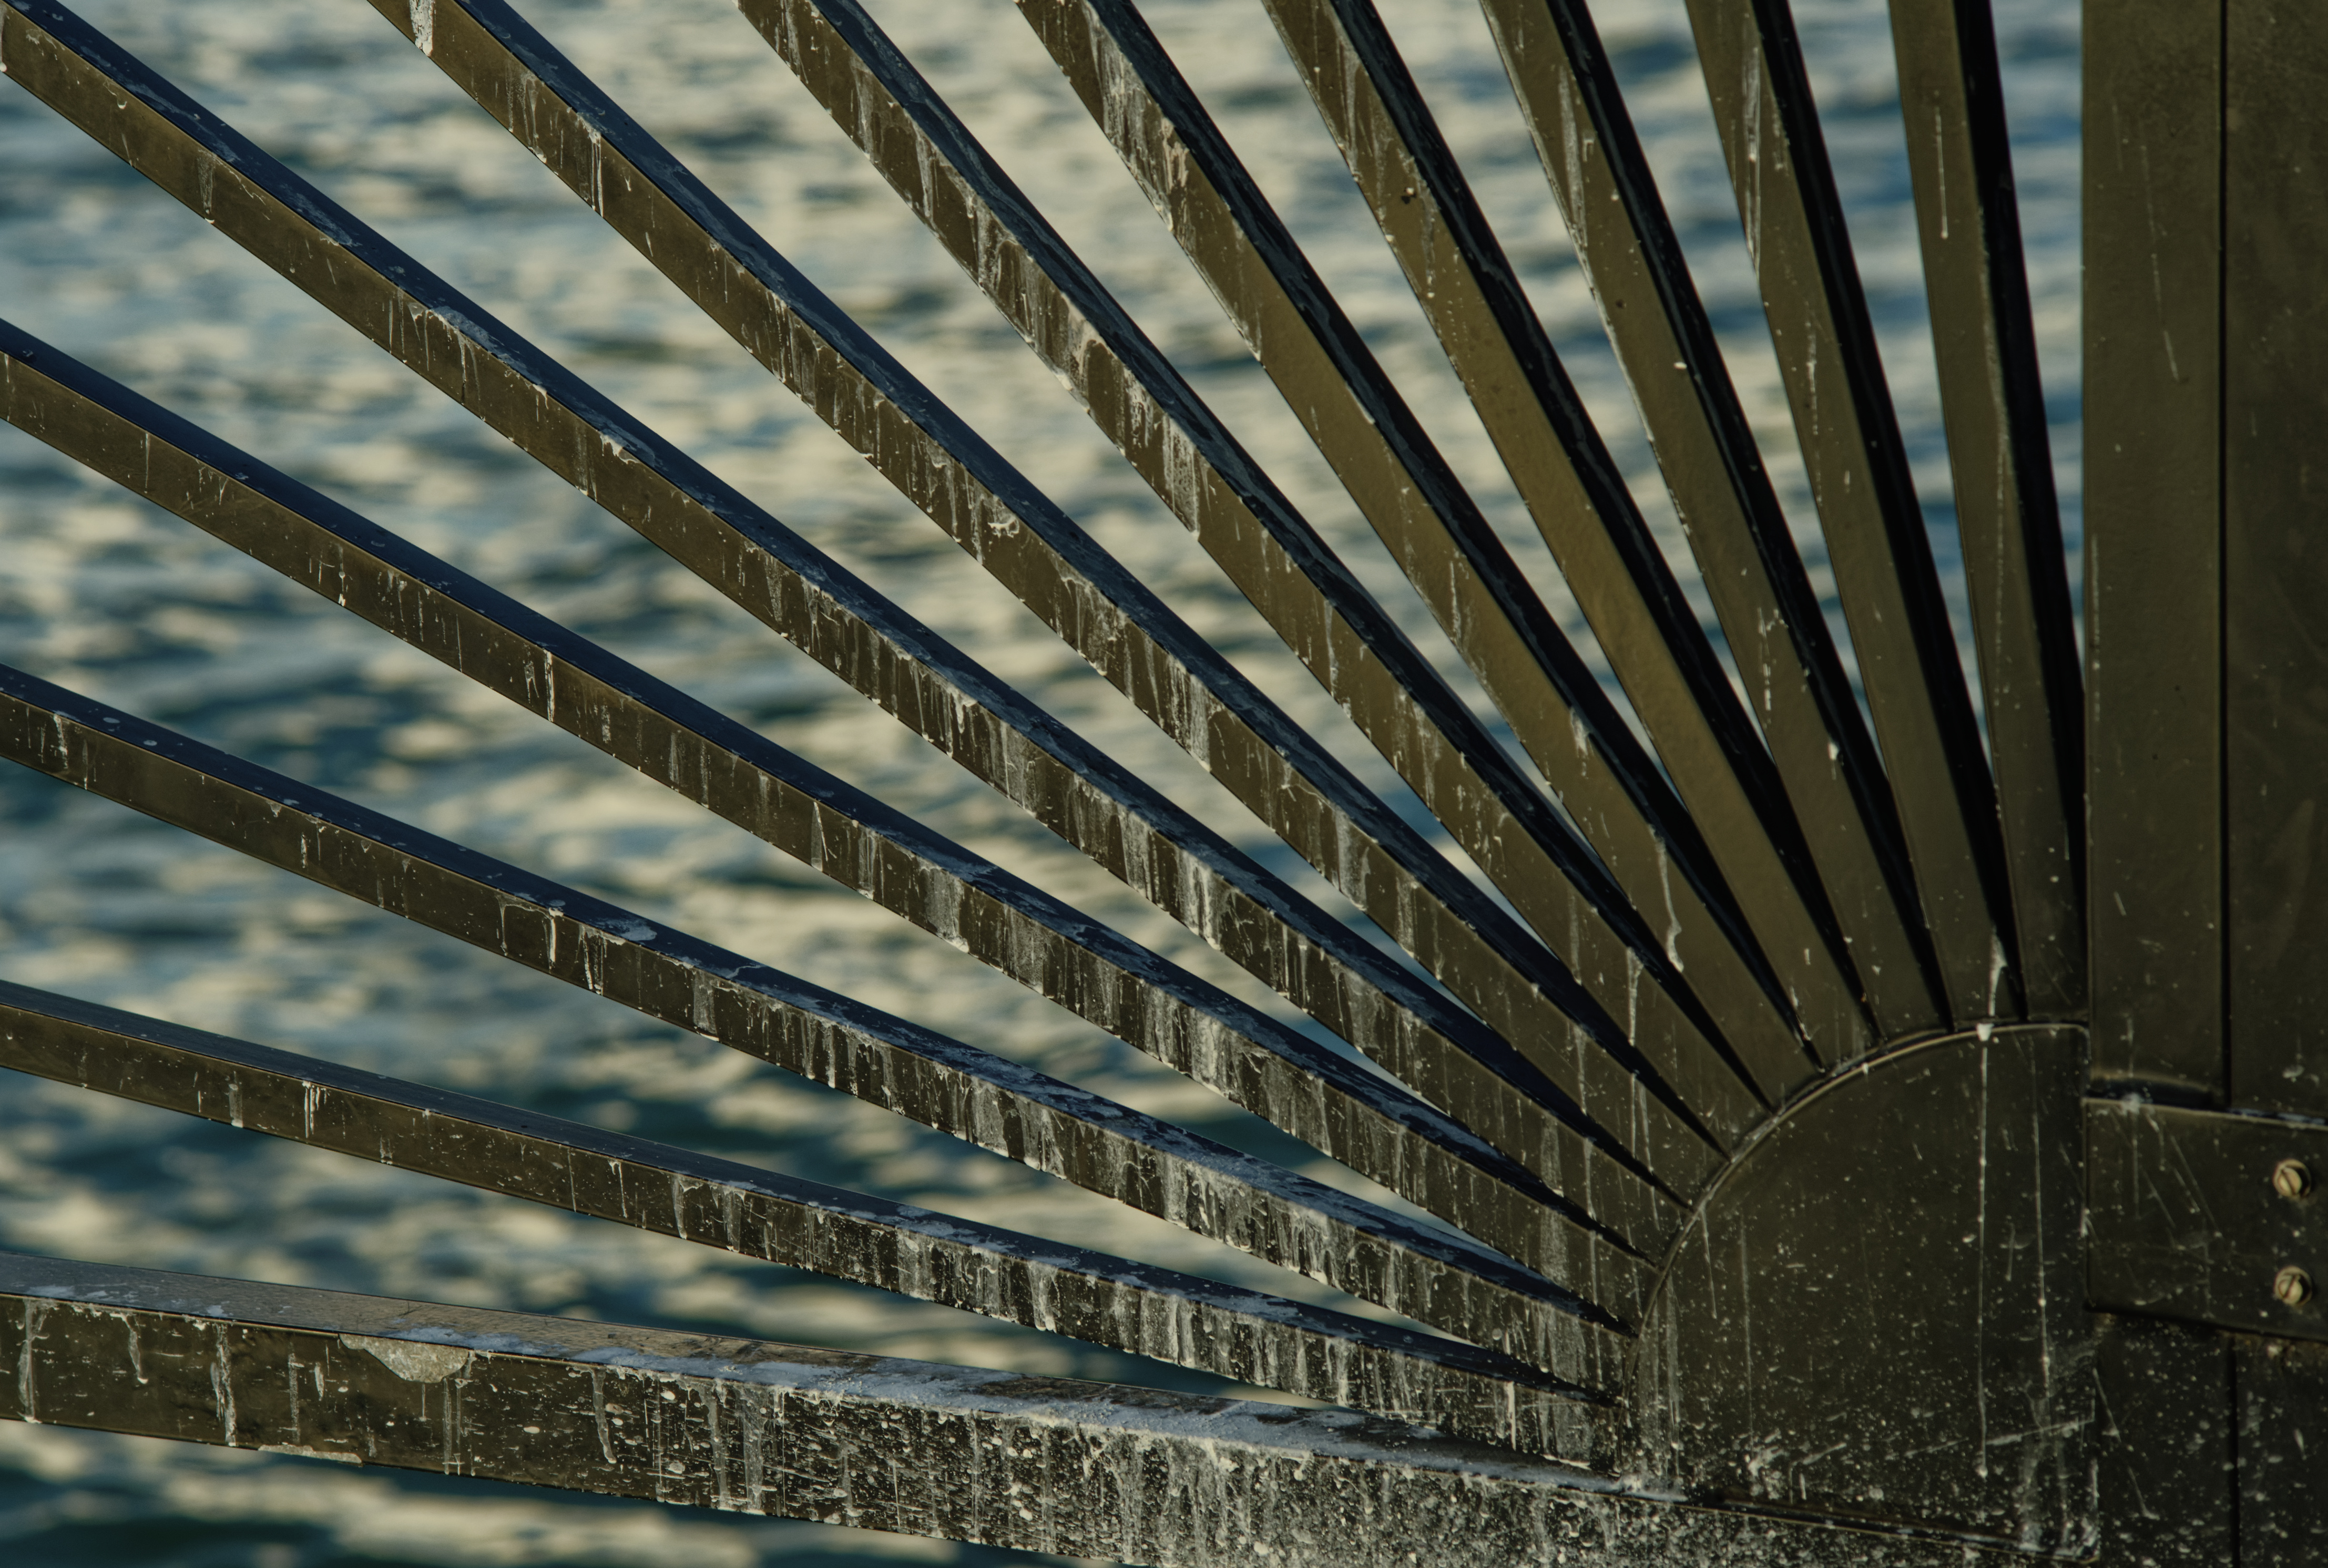
As a test of what things are like now, with my still rather limited knowledge of what TO do with PL4 (I know lots of things to NOT do), here are two images from this afternoon. They’re taken with the Nikon Df, and the 75-150mm manual lens, and based on an earlier suggestion, I fixed up one of my original Nikon polarizers and used it as well. It minimized light reflection in the water, but didn’t do much for the clouds and sky. (Lubricating oil and lots of moving it back and forth to free it up got it working again. It’s been sitting for maybe 20 years, maybe lots more.)
If my display settings are close enough, even this should work. It’s another sunset photo, but taken from ground level, just as the sun was vanishing behind the buildings, 30 seconds later, it was gone.
I wanted to bring out more detail in the boat and buildings, but then I decided that was a bad idea - keep it simple.
And as always, another question. This image looks just the way I like it on my ASUS. If the calibration is close enough, I think all of you will see it the same way. However, by browser window, as I’m typing this, is all “white”, making the image look way, way too dark. But when I slide the windows half way onto the ASUS, I can confirm that the image looks the same - but the dark border from PL4 makes the image look so much nicer than the white border in my browser. Ain’t no way around that yet, unless I can somehow put the Safari browser into a “dark mode”.
Oops, I asked about a dark mode for my browser, Safari, which doesn’t exist - but - when I went to Apple’s general page for system preferences, I could, and did, turn on dark mode for the computer. Great.
…but when I come to the feedback page from DXO, this discussion, the white background is apparently not changeable. Seems like a gray color might be a better choice, for discussing photos. Maybe something that could be considered for the future.
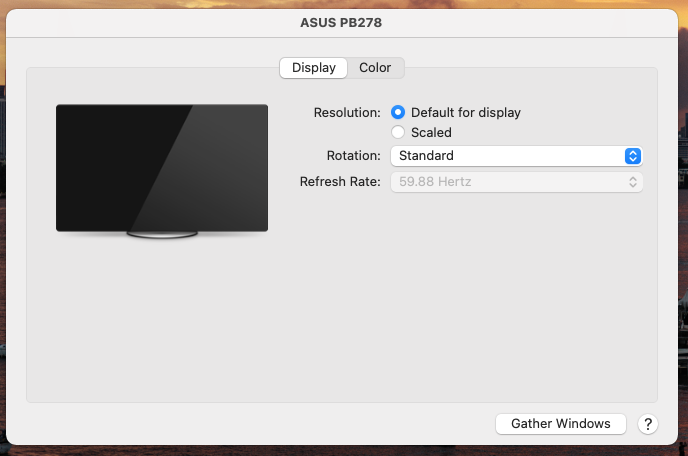
Hmmm… We are combining bad information here with a bad memory on my part. I don’t know where that drawing came from, but it’s not my what I have on my ASUS PB278.
I wrote “Firewire” earlier, but the correct name is “DisplayPort”, and there is a cable between the DisplayPort connection on my ASUS display, and one of the Thunderbolt inputs connected to my iMac. As I recall, I am actually using a “mini display port” connector, which is plugged into a Thunderbolt connection. I was told this would work, and it did/does.
My way of doing things is slow - I learned that lesson long ago. Make sure of everything before doing anything, and not change settings without documenting what they were, so I can get back to where I started if there is an issue. There is no rush on doing this, or anything else.
No, I’ve not seen such a screen in i1Studio. I was thinking about adjusting the contrast by eye using the grey/colour scales. The theory being tha, once you can distinguish the steps in those, the contrast should be about right.
Did you run i1Studio up to the metering to see what number it gives for the setup you’ve achieved?
Well, the images you just posted look OK, brightness wise, on my monitor so, if you are happy, go with what you’ve got. I’m just curious to know what brightness you’ve ended up with.