My answer to that one. Is did you have a histogram in your camera in your film days. No! So why are you relying on one now. Just because modern technology allows all these gizmos in the camera. You do not need to use them.
1 Like
Starting with my first box camera, and then with my 1936 Contax II, I didn’t know anything about exposure meters, only the “sunny-16” rule. I had to learn by learn by experience, making notes, correcting from previous attempts. That led to a lot of “educated guesses”. Oh, and buying exposure meters, and trying to learn the difference between “incident” and “reflected” light.
In a few years, digital cameras may calculate the light individually for every pixel - that’s my guess.
Looking at the full image, your version is preferable. But the faces looked too dark, and that’s the most important thing in the image - IMHO. The white car is far too annoying. You didn’t like my “fix”?
Aha!!! I never considered that, will try this later this morning.
Some things you wrote now seem obvious. I returned the exposure compensation to zero, meaning the faces are now too dark. I’m lost about how to use the Tone Curve, as while it makes the faces better, it hurts the rest of the image. I gave up and used two Control Points, which left the rest of the image alone, and improved the faces.
You have better eyes than I. I was holding the camera in a fixed position, aimed across the street, and I took a photo as the bike came into view, and another photo when things looked good to me - but I didn’t even notice the post coming out of her head. I should have set the camera to “burst” mode, which would give me a choice later. When I set up the shot, that white car wasn’t there - it came into the photo just as the bicycle did.
I like your version, but the too-dark faces bother me. The dog of course looks better at the correct exposure as you showed.
The car - I made it as un-interesting as I know how.
Finally, I used “fine contrast” as control points to sharpen up the bike, people, and dot. Just a tiny amount. When I look at the street surface, your version is MUCH sharper than mine. Not sure which I like more… I still think the faces are too dark, but when I made them just slightly lighter, something looked strange, so I backed off.
780_0909 | 2023-05-20.nef.dop (19.2 KB)
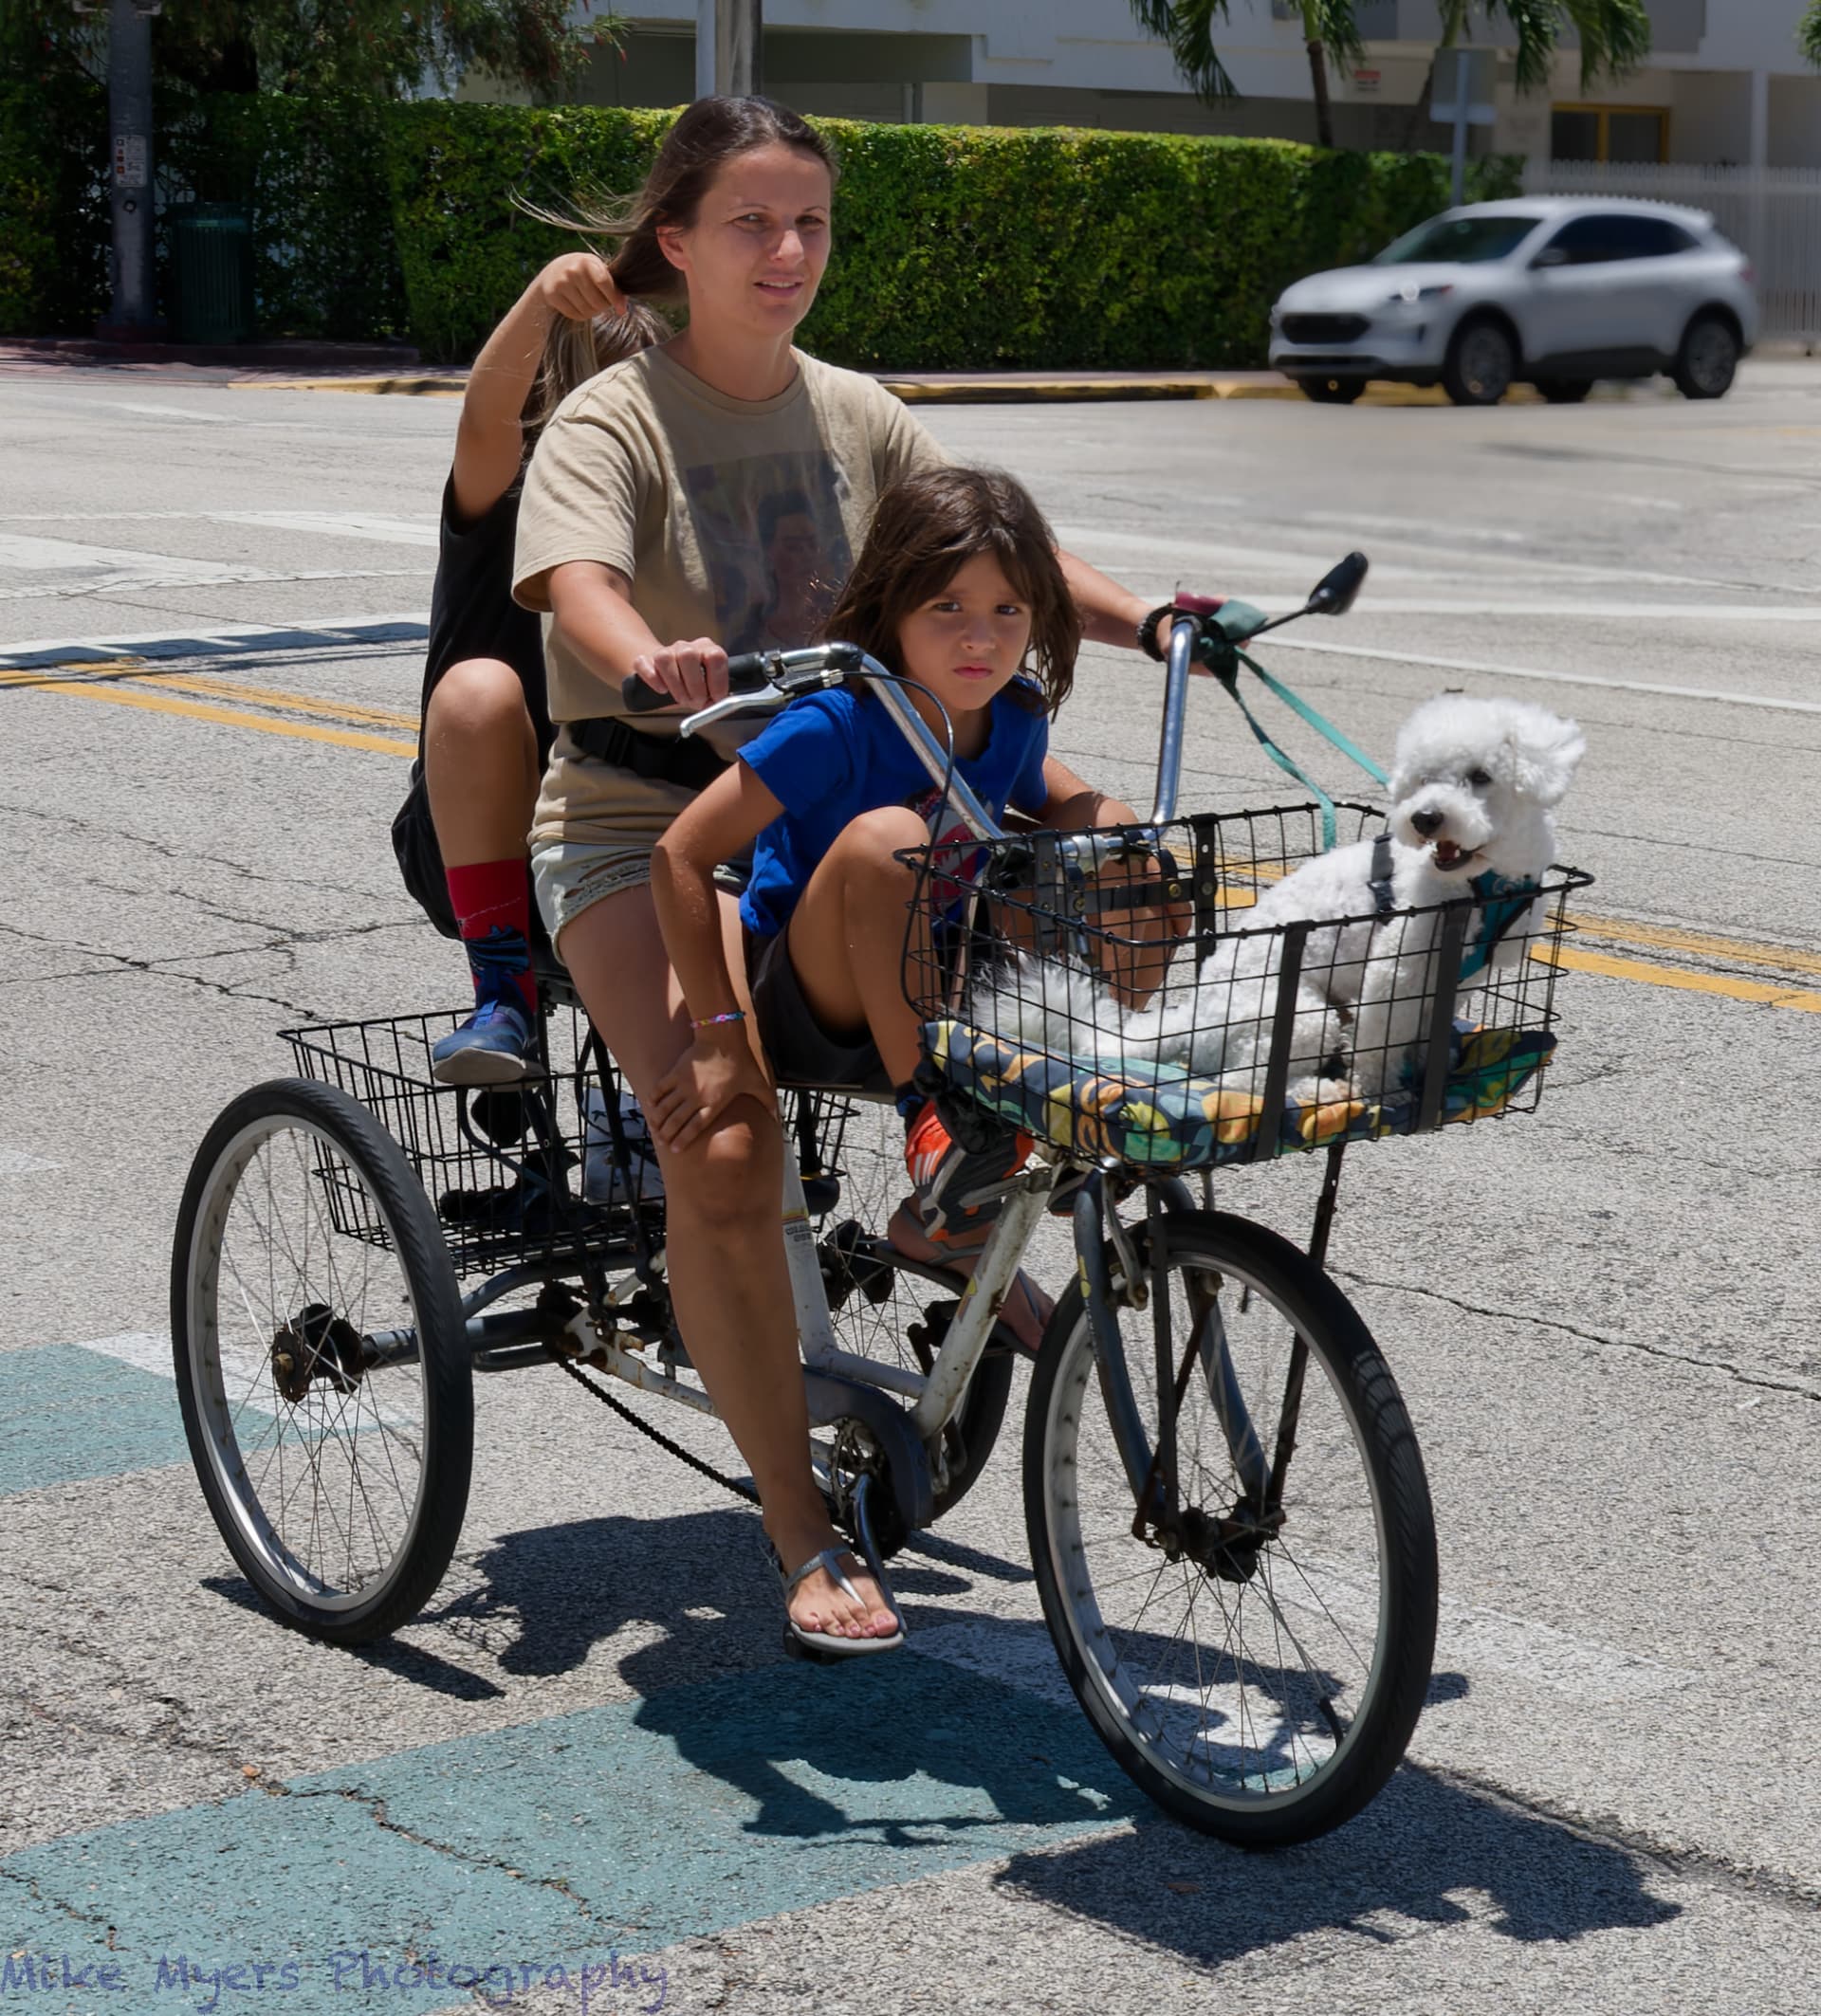
The biggest “issue” is there is no “subject”. Is it the lady, or the kid, or the dog, or the bicycle? My eye doesn’t know exactly “where” to go…
I don’t feel I’m relying on them, any more than I’m relying on the “image review” on the back of the camera. None of this was available with my film cameras, along with no control over a lot of things, including ISO. I used whatever film was in the camera, for 24 or 36 exposures. I think “taking advantage of” is a better way to say it than “relying”. I used to get home, only to find out someone had blinked - wasted image. …I ought to go out some day with my film camera this week to remind myself of how things used to be.
Long ago, when I was photographing large machinery, with camera on tripod and everything set up, I would use a polaroid back to capture an image to show to all the people involved, who sometimes moved things around slightly so the photo showed exactly what the picture would be like. This was much better than what I would do now, asking people to look at a captured image on the viewing screen of my camera. The people around me used the machine, and knew what they wanted to show in the photograph. I would also take several photos. The Polaroid back fit onto the rear of the 4x5 camera (with all the adjustments) perfectly. I wish I had bought that camera from the owner, when he retired… (I did buy his Nikon F4 and his lens collection.)
@Joanna, I did something stupider than what you think - I did check the camera to set the exposure, but I forgot that I had left the meter set to “spot metering”; 99% of the time I have it in “center weighted”. Completely my mistake. Grrrr… Now, seeing the color and B&W versions, the B&W is preferable. I wondered about that, but never tried it.
Two thoughts, first, while I agree with what you wrote, and while I considered buying a 600mm lens, I didn’t want to spend $1000 or more for something I would rarely use. What I used, and the image I got, I felt was “good enough”.
My other thought - why would you crop the image the way you did? It leaves out everything that was my purpose in taking the image at all, the paddle board. Maybe the image, and the composition, are better in your version - hard for me to tell. I’m also pleasantly surprised that from this original image, you were able to capture what you did, and it still looks sharp!

Good thing I was using a tripod, but I’m pleasantly surprised at how well the lens worked. The photo was much less interesting, until he paddled into the brighter water (due to a reflection of the sky).
Thanks. I’m sorry to all you button pressing, gadget wielding, digi-snappers, but I’m an old school girl who takes great pride in getting to know her equipment and, once I have done that, I find I simply don’t need all that stuff to turn out my images.
I don’t need histograms, rear screens or blinkies because I have learned just how my sensor reacts and how to make perfect exposures every time (well, barring the odd mistakes)
That’s a bit different. Back then we only had limited dynamic range and film was/is expensive.
But, when you consider this image (sorry for the small size)…
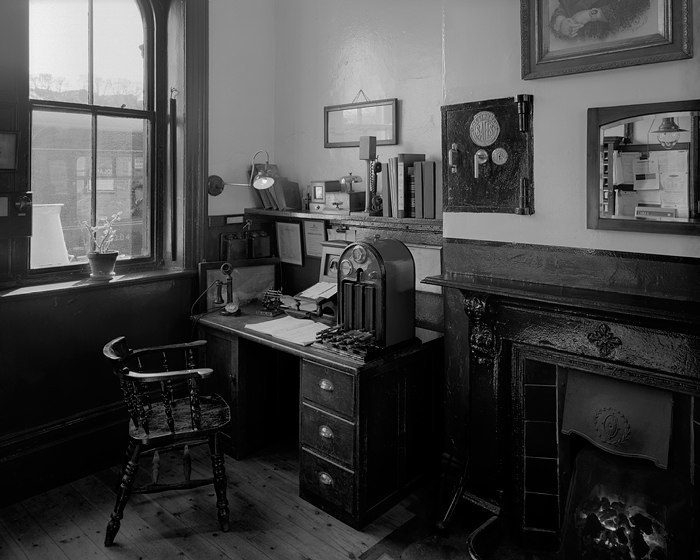
… taken on my Ebony using a spot meter to assess the lighting, calculating the dynamic range of the shot, working out the exposure adjustment for compressing the 14 stops of range into a negative for scanning with only 10 stops range. Then when you see the resulting 30" x 24" print from a Lambda printer on silver halide paper, you might realise why I have simply transferred all those skills to the digital age and ignore all the rest.
I’m not saying that my way is the only way to go but, after having taught these techniques for many years, and seen people suddenly realise that it is easier than trying to understand all those menus on modern cameras, I continue to take photos that are easy to process and print.
The problem I come across most often is folks like @mikemyers, who think they need all “that stuff” and get all confusabobbled trying to learn it all instead of just reverting to the “good old days”.
If you take the time to “revert” to the old ways, you never need to look at the rear screen again, apart from checking the framing maybe.
Thanks. I had forgotten that one.
Oh dear Lord no! When will you get it into your head that the best photographers take control of their exposure, not leaving it to some engineer to make a best guess.
Look again at how I edited the tone Curve but, also, at where I placed the Smart Lighting rectangles.
Please Mike, how many years have you been a photographer? You already took a couple of shots. The post is not that obvious and, with a bit of effort, you could easily remove it.
But the faces are not “too dark” in my version. The subject is strongly backlit in a midday sun. By brightening them, you are taking away the contrast and modelling that such lighting gives.
Except the unnatural blur actually draws the attention as it is the only part of the image that is blurred. That cannot happen in real life.
Of course there is. It is a family and their dog on a trike, which occupy fairly much the whole frame.
But you don’t need to do that. Just switch off the gizmos and ignore the rest.
By using a very old “rule”, you just took a near perfect exposure without even having to use the meter. How much simpler do you want? With everything set to manual and turning off the rear screen, the D780 becomes a film camera that doesn’t cost anything for film.
For studio work that’s just what I do but with a modern twist. I connect the camera to my MacBook with a long USB cable and use the Nikon’s Camera Control software to instantly upload the shots as they are taken into a folder. PhotoLab is set to monitor that folder and I can view, consult on and edit each shot on the 16" screen as I make it.
When shooting manually, when you know the exposure (1/400sec @ F/8, ISO 400 for this shot) it doesn’t matter what mode your metering is in - you are not using the meter.
Only as long as you don’t want to enlarge it.
That is just a screenshot of part of the image, from Topaz Phot AI at 100% zoom on a 2.5x enlargement.
No, it doesn’t look sharp, it looks over sharpened and the skin tones and dog’s fur have turned to plastic.
It’s just a matter of not bothering to take photos with 1,000mm vision but only a 300mm lens.
1 Like
Very beautiful picture for a lot of reasons. One being the calm composition, brought in by a LF camera on a tripod and some knowledge to tilt and shift, and the other is the tonality with no distracting colours (which we users got used to). And also the subject, stationary, from ancient times when colour photographs were the most expensive ones. Although, on second look and seen the bulb of the lamp and the reflections of the pot plate being the by far brightest part of the image, I think I’d have tried to bring up the bright walls - but then, what do I know about it’s colour? These days a lot of walls are bright white, but the era of this office white colours on walls were more rare.
I think we both agree on “many functions are simply not necessary/hard to use/difficult to find/complicated to set-up in modern cameras”. But they make a nice amount of bullets on the feature list, even if they are explained badly, implemented poorly and often work not as expected. Therefore disappoint regularly. But few definitely are quite handy. And if we users are only comparing spec-sheets, that’s what we get.
I just don’t understand what you’ve done. Could you tell me?
George
1 Like
Ok. You asked for it.
I started by using a 1º spotmeter to read the brightest part of the scene, which is the lit mantle on the gas lamp. Then I measured the darkest part, which was the corner between the floor next to the fire and the side of the desk.
Take those two measurements and find the difference between them. In this case, that gave me 14 stops.
I know that I can scan Fuji Acros 100 film, which has 10 stops range, and get detail in both highlights and shadows, so I now know that I have to compress the range by over-exposing by 4 stops, placing the darkest shadows on zone 3 and then I had to under-develop the film by a matching factor.
That then gives me a perfectly exposed TIFF file that I can the “dodge and burn” to tune the tonality and contrast.
1 Like
Thanks.
I forgot that the image was taken with an analogue film. It’s a game with overexposure and under development. The method Ansel Adams when I’m right.
George
Or, I could use my M10, with the rear screen review turned off, and completely ignore ALL that extra stuff that Nikon gives me. Just set aperture, iso, shutter, and focus. End. …I guess the M10 can do some of that stuff, but when I’m using the optical viewfinder, I’m back to the basics. ![]()
Most of the time now, even with the D780, I’m not using the rear screen. I “can”, but rarely do so. Ever since they named it “chimping” it sounds like a disease. With both my Leica’s, the review image is usually turned off but for rare occasions. With the Nikon, I’m not as confident as you are, and I often make mistakes. Very often. Guilty as charged.
I won’t argue with that, but often I don’t have “the time”. For the lady on the tricycle, or whatever the name is, all I had time for was to raise my camera, aim at the car (not at her) and wait for the moment to shoot. I never noticed she was looking at me - with burst mode, she likely would have looked up ahead, as I wanted to capture the photo. I’m not arguing with you - I do think that in general, what you say is true. Heck, if I had used burst mode, I’d never have selected the image of her head growing a post on top. I don’t think that fast - not sure if I ever did. Especially nowadays though.
Hey, I’m just predicting the future, not wanting anything. How many years do you expect it to take, before each and every pixel will “turn off” before it gets overwhelmed by light? I can see the ad now “self regulating sensor pixels”.
When I was “working”, I left the camera in burst mode. Very inexpensive insurance, and when there is no time, this improved the chances of getting the best shot to send to the editors. …I don’t do it now, because I’m trying to emulate you and how you do things. If/when I go back to action photography, I’ll be back at high-speed-burst shooting. About the post - that doesn’t bother me as much as her eyes staring at me. That does bother me, but I’m stuck.
Which is more important, that someone skilled at photography will realize what you just wrote, or that an average person will just see the darkened face? From my point of view, the faces “look too dark” even though I now realize, and accept, that they aren’t. My editors would have agreed with my doing stuff like that, even if it was technically “wrong”. If the photo was of an object, not a person’s face, I would feel differently.
I’m not sure how to respond - I usually think there is going to be “something” in my photo, which the rest of the image supports. In the latest post of this image, is it the lady, the kid, or the dog? I guess I will accept your answer, it’s “the family and dog on a trike”. I’m no longer sure it matters - it’s just that usually there “something” that is the subject, and everything else in the photo should support that, and that is where I should focus and direct viewer’s attention. I guess I need to think about this some more.
The D780 now has all sorts of “gizmos” working on my image - compared to my M10 which I think has none. Just four settings. I think I turned off just about all the gizmos on the D780, and I can now turn off image review (I think it is already off). But now that I know it’s there, I start looking for the other things, like the “level indicators”. Yeah, I can mostly do what you suggest.
Yes, but depending on which metering method I selected, the D780 is also showing me an exposure indicator for what the camera thinks is correct. I tend to leave it on “center weighted”, but quite often, I put it on “spot metering”. I guess my M10 does the same, but it’s simpler and easier to ignore.
VERY PROFESSIONAL!!! I ought to learn how to do this, but hopefully without using a cable.
I see things very differently. I start by deciding what aperture I want, based on how much or little depth of field I want. The shutter has to be high enough for me doing the hand-holding and if the subject is moving. What’s left is ISO, and while I’m doing this manually for you, I wold be perfectly happy to let the camera select an appropriate ISO based on my other settings. I know you won’t agree, but as long as the exposure is correct, why should I care which ISO the camera selected?
Stop changing horses. Stick with the Nikon. Once you have set it to manual, you’ve got the same as any other camera, film or digital. Just ignore “all that extra suff”.
Let’s see, you know how to set the aperture, speed, ISO and how to focus using the back button. You know how to change between spot and centre-weighted metering. What else do you think you need? Why I could be regarded as confident is because I don’t mess around with anything other than that.
Yes, I have an expensive camera that I have chosen to “convert” into a simple point and shoot.
But that is all you needed to do. The exposure was perfect and the composition was fine.
You’re starting to think journalistic again - stop it ![]()
No it hasn’t. You’ve turned off all the automatisms and are ignoring the rest.
The exposure meter in the viewfinder shows you the correct 18% grey for the selected square. Just treat it like an external meter.
Indeed, the Sunny 16 rule is there for those times when you don’t have enough time to think. Normally, when I have time, I usually use f/10 and 400 ISO, with the speed to suit. Or I set the aperture for an appropriate DoF and the juggle the speed and ISO to suit. You can use auto-ISO but it can interfere with the dynamic range available for high contrast shots.
1 Like
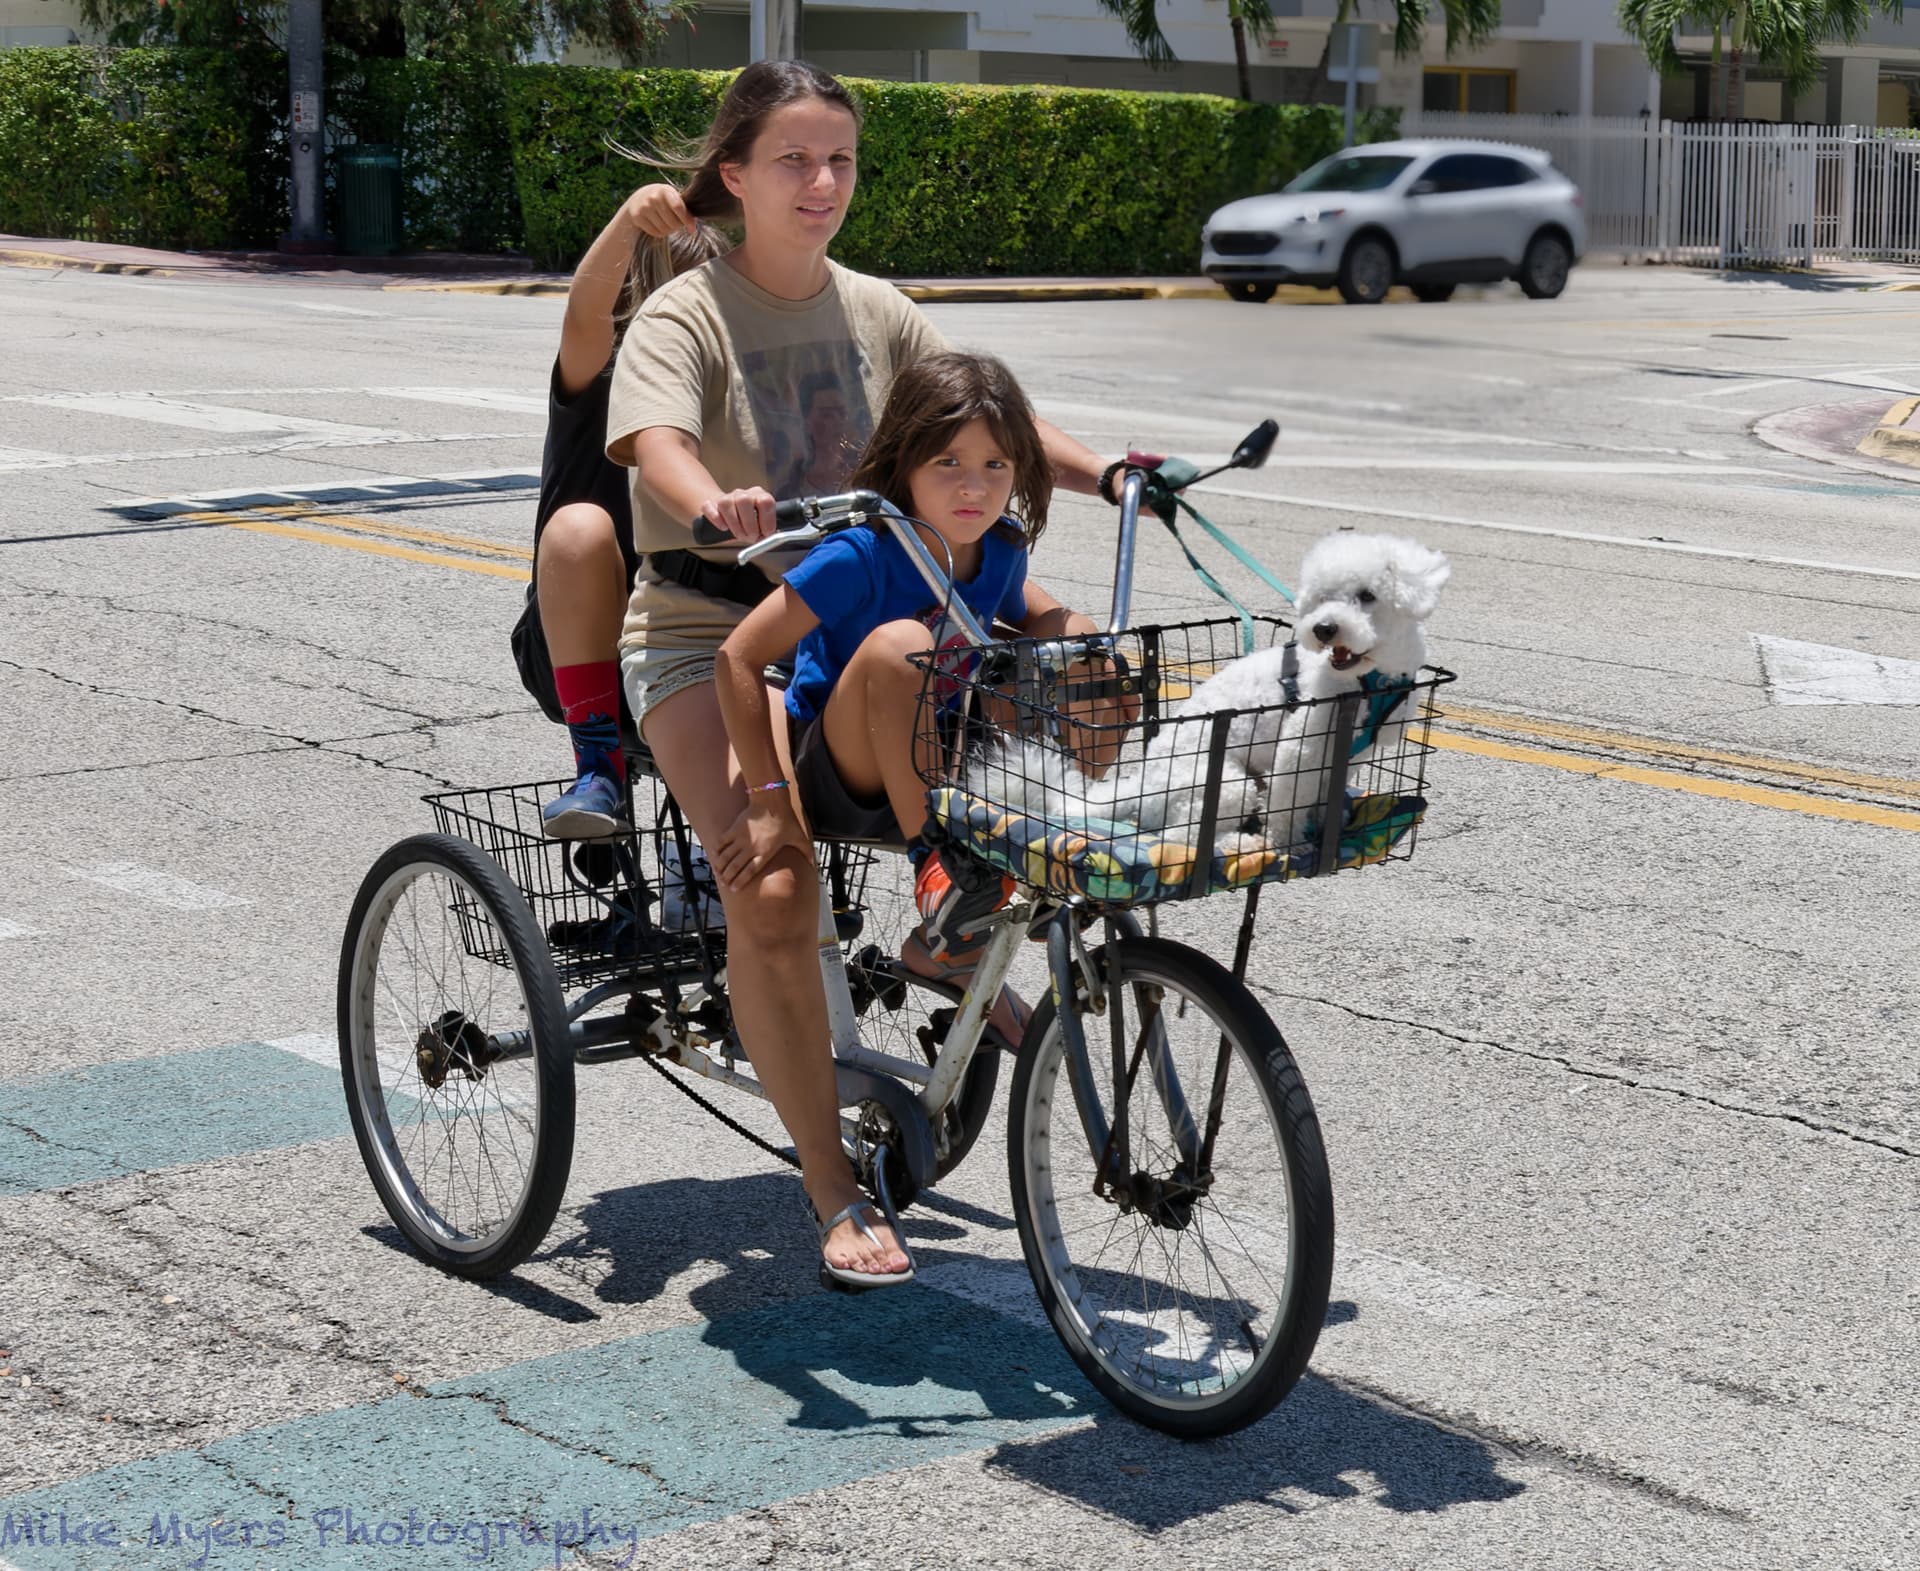
@Joanna, what you wrote kept bothering me, because I think you see this better than I do, but I struggled to agree with you as I couldn’t see it your way - and then it hit me - my photo was cropped almost completely to just the rider/trike/kid/dog, and I started to think, what if I didn’t crop in so close. Here’s the result. In my mind, I now see the scene, which includes (but isn’t limited to) the rider/trike/kid/dog, and my mind now visualizes the image the way you describe. I guess the scene needed some “breathing room”. If so, my mistake (I’m good at mistakes!!).
Yes, but it’s more than that. Setting the aperture based on more or less depth of field is creative, to capture what I want. Shutter speed needs to be high enough to prevent camera blur, and maybe high enough to prevent motion blur when desired. ISO - now that we have DeepPRIME, why should I care???
This puts all my attention back to capturing the image I want, the timing, the framing, and all the things I consider important. From that point of view, I can shoot my Nikon the way I prefer to shoot my Leica, leaving me in control of the image, and the camera in control of the exposure.
Yes, but you also wrote:
By leaving the ISO up to the camera to select, and shooting in only (M)anual mode, all my cameras will become simple point and shoot cameras. The selection of which camera to have on me will be back to where I’m going - as I’m not going to take the Nikon with me when I go out to buy food, or eat at a restaurant. Neither do I want to be stuck with only my phone.
The biggest issue with the “Sunny 16” rule, is that much of the time I don’t want to be using f/16. A lot of the time I would prefer to blur out the background, with only my subject lit up properly. Even with the bike shot, I found myself thinking I don’t want f/16, but there was no time to change it. With auto-ISO I don’t need to worry about the exposure, I can just deal with aperture and shutter - and focus of course!
Because, with higher ISO, not only do you get more noise, which is, as you say, is almost irrelevant with DeepPRIME, but we also get quite a significant falloff in dynamic range. Instead of 14.6 stops at ISO 100, we end up with only 9 stops at ISO 10,000.
So, you’re photographing a high dynamic range scene, with deep shadows and bright highlights and, all of a sudden, the camera decides to jack up the ISO to 12,800, thus blocking your shadow detail and/or your highlight detail. There is nothg DeepPRIME can ever do to help with that.
As I have said more than once before, the Sunny 16 rule is only there for “emergencies”. Normally, you set the aperture to whatever suits the desired DoF and then meter for speed and ISO - as long as you aren’t chasing after grab shots all the time.
For example, if you want to use f/10 with the same lighting as the Sunny 16 rule, then offset the shutter speed by the 1⅓ stops difference in aperture to give you 1/1000sec instead of 1/400sec at 400 ISO.
1 Like
I don’t disagree with anything you just wrote, and I’d like to think for the kinds of photography I enjoy most, nowadays, I don’t expect “grab shots”, but if/when they happen, auto-ISO might be helpful. With your experience and memory, you would instantly know the proper exposure. I also assume you would see the flashing red light in your brain before you “guessed” at an exposure, and your “guess” would most likely be fine. Even the reflection in the image at center, top, aligns with the window frames at the left. The desk lamp appears to be on, but that doesn’t mess up the exposure. You went to a lot of effort to have everything “just so”. What I’m guessing is a picture at the middle right, but my eyes are telling me it is three dimensional, which I doubt, but I’m not sure. I assume that’s a fireplace at the bottom right - and if so, I’m surprised you didn’t also set a fire! :-). The chair being off at an angle also helps - it it was aligned perfectly, the image would have been too “stiff”. Perfection!
With every aspect of the image perfect, it’s obvious a lot of thought went into capturing that image, in so many different ways. I’m guessing you had the camera/lens absolutely level, and with the range of brightness you captured, that exposure had to be very exact.
Trying B&W, Fuji Neopan Acros 100:
Without color, and without blurring the car, the car no longer is yelling FAKE.
Something for me to remember in the future.

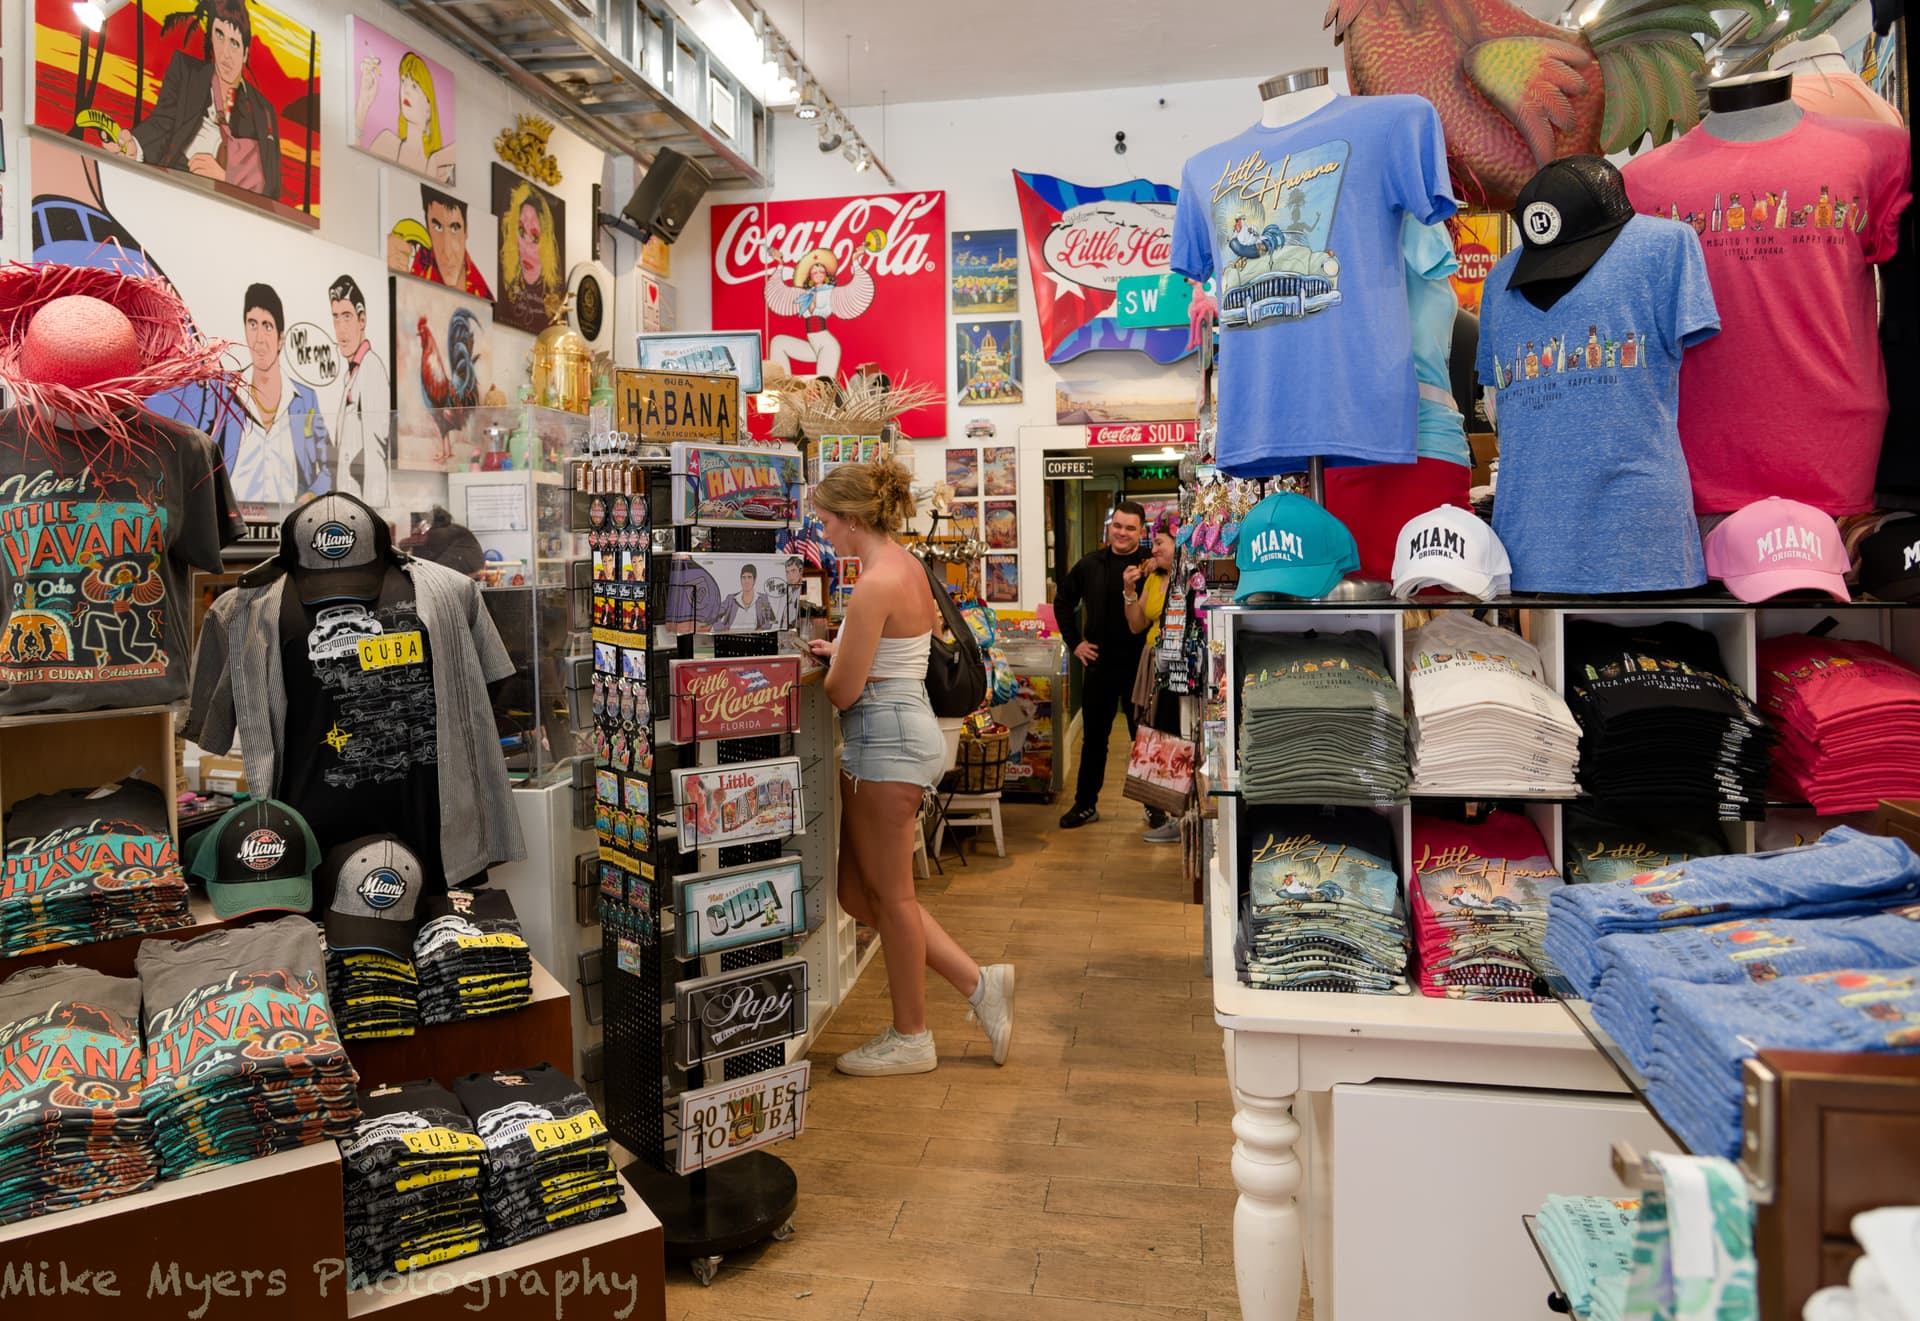
During my short visit to Little Havana, while waiting for our lunches to arrive, I went into a souvenir shop across the street. I thought it was fascinating. As I recall, I focused on a lady doing some shopping, and waited until she came up to the counter. Two people can be seen at the rear of the store, but with the lens set to 24mm, and at f/5, I expected the rear of the store to be blurry. Shutter was 1/100th, and I had the ISO set at 2000 because I thought that would help keep things sharp. I got one shot off, before people re-arranged themselves, and “the moment” was gone. The perspective control let me keep the vertical lines parallel. Gee, all that time in the shop, walking back and forth, and only one image to show for it - but everything worked.
In retrospect, I maybe should have cut off the decapitated chicken at the top right, but then I’d have lost the painting at the top left. That’s as wide as my lens goes, and if I backed up, I would have lost the composition I wanted. I’ve stared at it too long to be objective about it - it is what I wanted, but maybe people will think it’s nothing more than the inside of a gift shop, which in reality, it is - but I hope I arranged the photo appropriately.
@Joanna’s photo up above reminded me of this image, but where Joanna had been so precise, I just wandered all over until I got a composition I wanted. It’s the only photo I took. Oh, and while the image contained what I wanted, it was PhotoLab that allowed me to bring out what I “saw”, without being rudely corrected and cropped by the camera. It’s nice (as I see it) when Photography becomes so enjoyable! (Pun intended.)
780_0808 | 2023-05-09.nef (31.5 MB)
780_0808 | 2023-05-09.nef.dop (13.4 KB)