Off-Topic - advice, experiences and examples, for images that will be processed in PhotoLab

@George about as useful a comment as a chocolate teapot, although that might at least be edible providing you are not allergic to chocolate etc. etc.

The requests was a serious one to the “brains” on offer in the forum not a contest for the most useless or most sarcastic (that’s not allowed on the forum!) or most … response.

If he is “just” taking a “photo”, why the special rig and what is he actually photographing? The question is real and I should have asked him at the time but I would still like to know.

A better answer but divining rods tend to be way more “crude” tech!.

and the metal object is a ruler.

My camera was an FZ5 Bridge camera so JPG only and not many pixels to enlarge and it might have been a “stunt”! But the device he is using looks like a smart phone and this was genuinely taken in September 2008, but apparently they existed https://www.cnet.com/pictures/best-smartphones-of-2008/null/!

I will probably never know what he was doing , other than taking a photo!

And I would say that this is an excellent exercise in “seeing” and I think it was a good “catch”

I can certainly see what might have attracted you to this scene but I’m not sure if it can be made to truly work as a finished image.

I like the leading line that starts at the top right corner and then sweeps round and I also like the refection of the pillar in the puddle, where the curved line continues, in the reflection, to the bottom right corner.

The problem you have here is the same as for my shot of the bicycle stands - everything is at an angle, except the “verticals”.

The parallels tool just defaults to horizontal. There is nothing to stop you repositioning the lines to vertical by dragging the “handles” and aligning them to vertical structures.

Well, I can’t see how - what did you do to “cheat”?

I certainly think B&W is a good idea - it hides the contrasting reddish patch at the top right, which can draw the eye. And I notice you tastefully removed the discarded white garbage.

I’m not sure why you decided to shoot at f/4.5, as this made the one pillar the point of sharp focus with the rest slightly soft. I would have thought to make most of the railings sharp. But, without a chain saw, the trees get in the way of isolating the pattern of the railings.

I would more than likely have taken this as a shot had I seen it and I would have argued with myself for a while and marked it as one of those that “almost” made it :wink:

Here is my version…

A slightly different crop and I corrected the verticals. I also “removed” the reflection behind the railings, as I felt it distracted the eye somewhat.

780_0089 | 2022-11-20.nef.dop (52,8 Ko)

I am still not entirely happy with the trees but, without a chain saw… :crazy_face:

All in all, a good attempt.

In the light of that info, I would tend to say he is using a Blackberry and a homemade “tripod” and he is trying to work out how to control depth of field by measuring the distance to the rod and seeing how small he can get the depth of field.

I did a similar, less precise, experiment with my iPhone about four years ago…

Or I could be talking out of my **** :roll_eyes:

1 Like

@Joanna or you might be making a lot of sense. I am still intrigued by what he buried and how deeply it is buried. Judging by the watch and the shoes he looks to be reasonably well off so a Blackberry owner he might be.

This was the year before I jumped ship and took the money and ran but I cannot remember exactly what phone I was using at that time!

Leaves caught as they pass over a small weir. The patterns in the water are turbulence reflecting the light at different angles

He is using a smartphone on an alternative tripod for stabilization.
The question of what he is shooting is a complete different question. I don’t know.

George

@George The item he is photographing is well made and looks manufactured rather than hand made. It looks a bit like the top of a monopod but they don’t usually have an aerial or pointer attached! and a collapsible monopod wouldn’t require a huge hole to bury it (just for support so it can be photographed) or are there foldable legs just showing. i.e. this is the top of a mini tripod …

There might be a groove cut in the black section to allow the pointer to lie flush when folded down and the whole top section might also collapse down but …

@Joanna My wife looked at the image a minute ago and suggested that the ruler might just be a convenient “sand levelling” scraper.

It only goes to show if you don’t ask you may never know!!

It is possible it is a manufactured prototype that he wants to photograph as part of a marketing campaign but…

thanks for the link – and to complement for those interested
Bridging the Gap: Classical Art Designed for Photographers | Adam Marelli - YouTube

The first one, I thought you cut out too much in your framing. From the second one, to me the first picture has been over cropped. The second one. It’s obviously taken in the wet weather and you have left quite a bit more room. Much better. It’s a pity you couldn’t get a little lower so that the thicker post farthest away. Just met the grass and bushes beyond. That would have stopped your eye going out of the picture and having to come back along that further tree line. The only problem with that might have been! The ball on the top of the furthest post which might have got lost in the tree trunk behind and moving position would have ruined the three positions of the posts.

Nice one. Looks good in black-and-white.

I walked by this scene on the way to and from the food store. On the second walk-through, I saw things I hadn’t noticed earlier. I left extra room around the image because I didn’t want to once again be limited in cropping when I got home. The first version I uploaded was cropped in any number of ways, and then I got rid of too much stuff. After dinner, I had a fresh view of it, and went back to the beginning and started all over again, being much more stingy in cropping.

I have set the viewfinder of my D780 to show things in B&W. I need to learn to “see” in B&W again. I think black & white images give photos more of an impact on the viewer.

Other than for my left hand holding my groceries, and not wanting to get too low for other reasons, I think getting lower might have improved the image I was taking, but now that I see it on my screen, it might have lost a lot of what I like about the image. Then too, I wasn’t very enthused about kneeling down in the wet grass and mud.

One thing I’ve learned - if I want to capture better reflection photos, I should go out while it’s still raining hard, and the puddles are huge. Maybe my left hand needs to hold an umbrella.

I also learn (re-learn??) how to “see” in black & white. Changing the viewfinder was easy, but my eyes have long since forgotten how to see the world without color. Changing the viewfinder setting helped, but I now know that the “rendering” settings for B&W film vary so widely. I’m using settings @Joanna once suggested, but I need to practice more with this.

Watched it non-stop from beginning to end. Some things I already knew, but the overwhelming majority of what he explained was new to me - or at least something I knew very little about. I’ll try to remember these things for the future; hopefully most of them will be ideas that I can implement without having to “copy” something I’ve read elsewhere.

A lot of the video, like alternating “dark” and “light” was totally new to me - never thought about it before, never read about it, but the way he explained it, not only did it become “obvious” but I’ve got some examples of how to use it.

Also interesting to me that he most likely makes do with 35, 50, and 90. He didn’t say anything about what hardware he uses, which is fine with me. I now think that’s much less important.

Final thought - knowing myself, I think it will be very helpful to watch it again from beginning to end, maybe a few times. That, and deliberately try to use what I’ve learned.

Take notes too… At the beginning, there’s a list of topics to be covered. Some entries come in green print. These are the topics to remember and act on…

Trying to find it - is this something within the video, or on the B&H web page?

Checking YouTube, he has posted several other potentially interesting videos. Here’s another:
https://www.youtube.com/watch?v=lRDTLS4WIY0

Aha! The list you referred to is in the other video, that I just posted the link to:

Thank you for that advice - this is also a great video. I might not have played it were it not for your post.

“Bridging the Gap: …” is a bit older and if you will explains ‘some of the basics’ for “… Expressing Your Creativity …”. Watching both videos, I also like Adam Marelli’s unobtrusive, yet clear presentation. :slight_smile:

I will probably need to watch both videos several times, so these ideas can “sink into my mind”. Some I already knew; most I was unaware of.

I also want to just look at things as I’m walking around, and wonder how I can apply these new ideas, even if I don’t have a camera with me at the time. I would like to try to train my mind to “see” these things. That’s a first step.

Try using your phone camera as a “sketch pad”, like artists used to make sketches before they started on the finished work.

1 Like

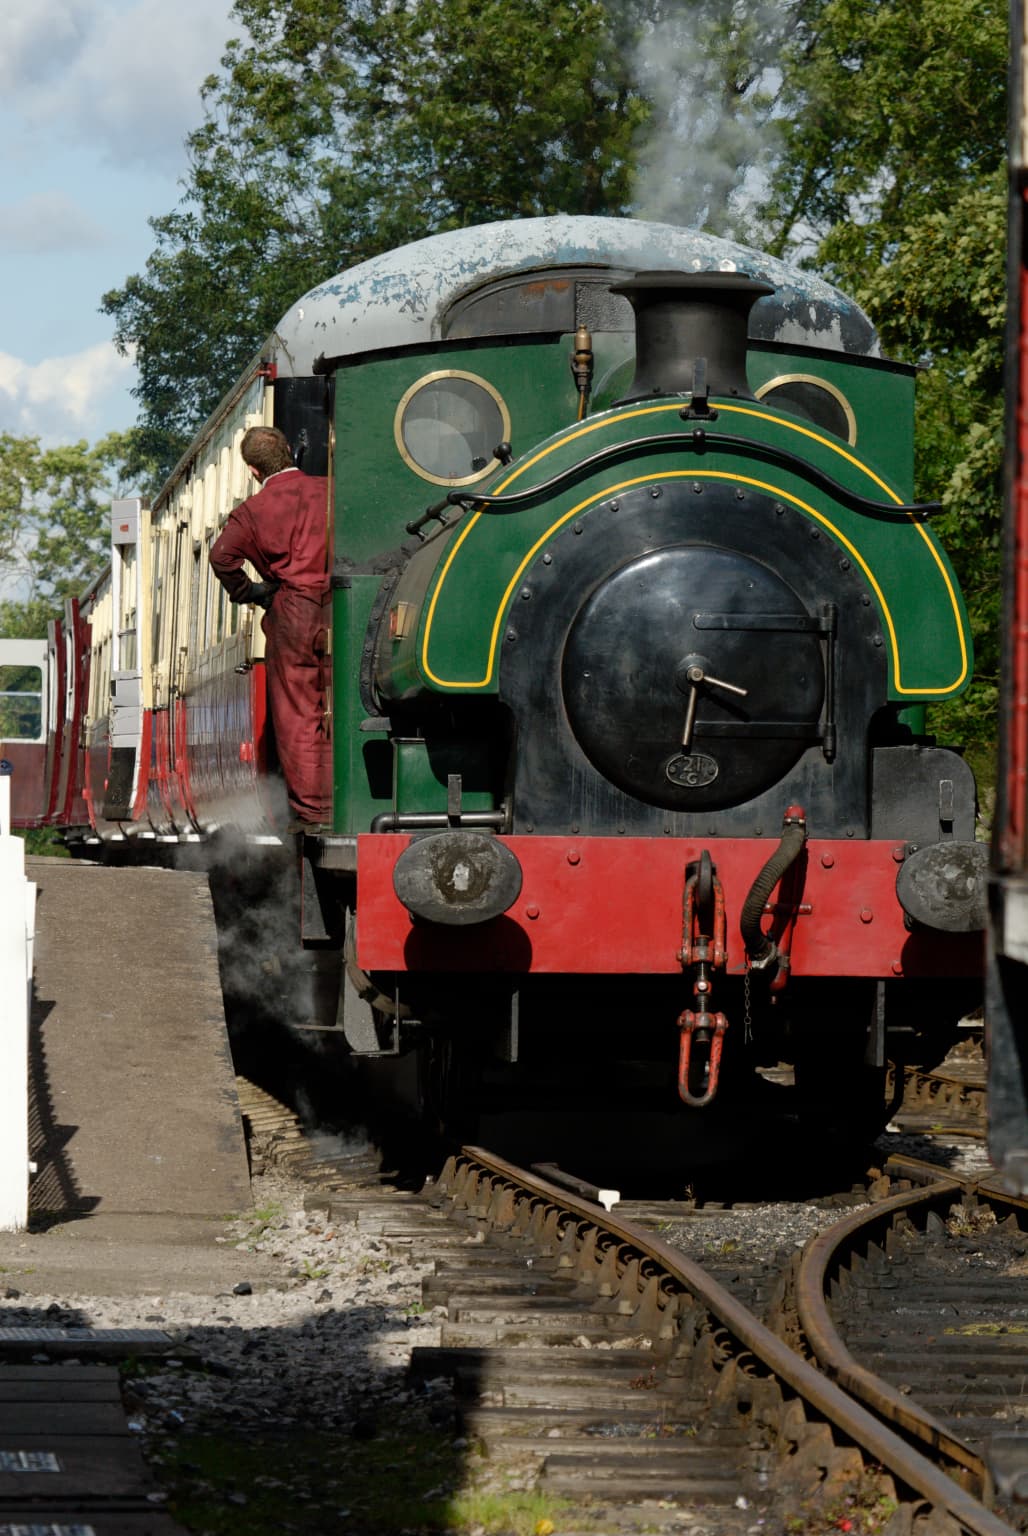
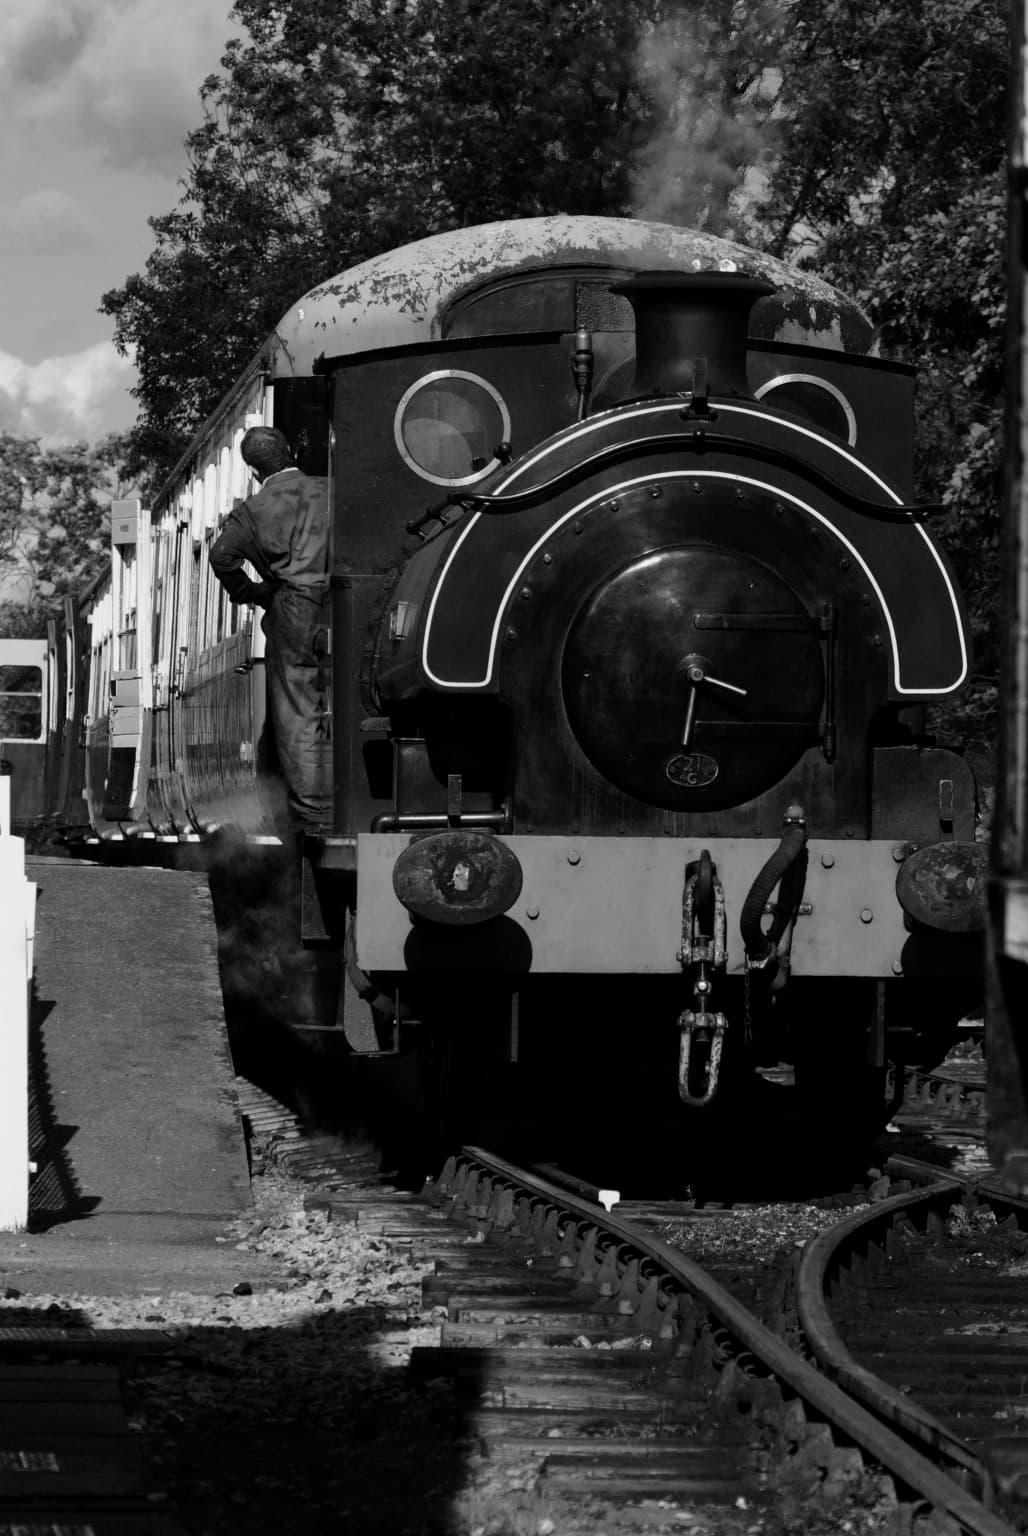
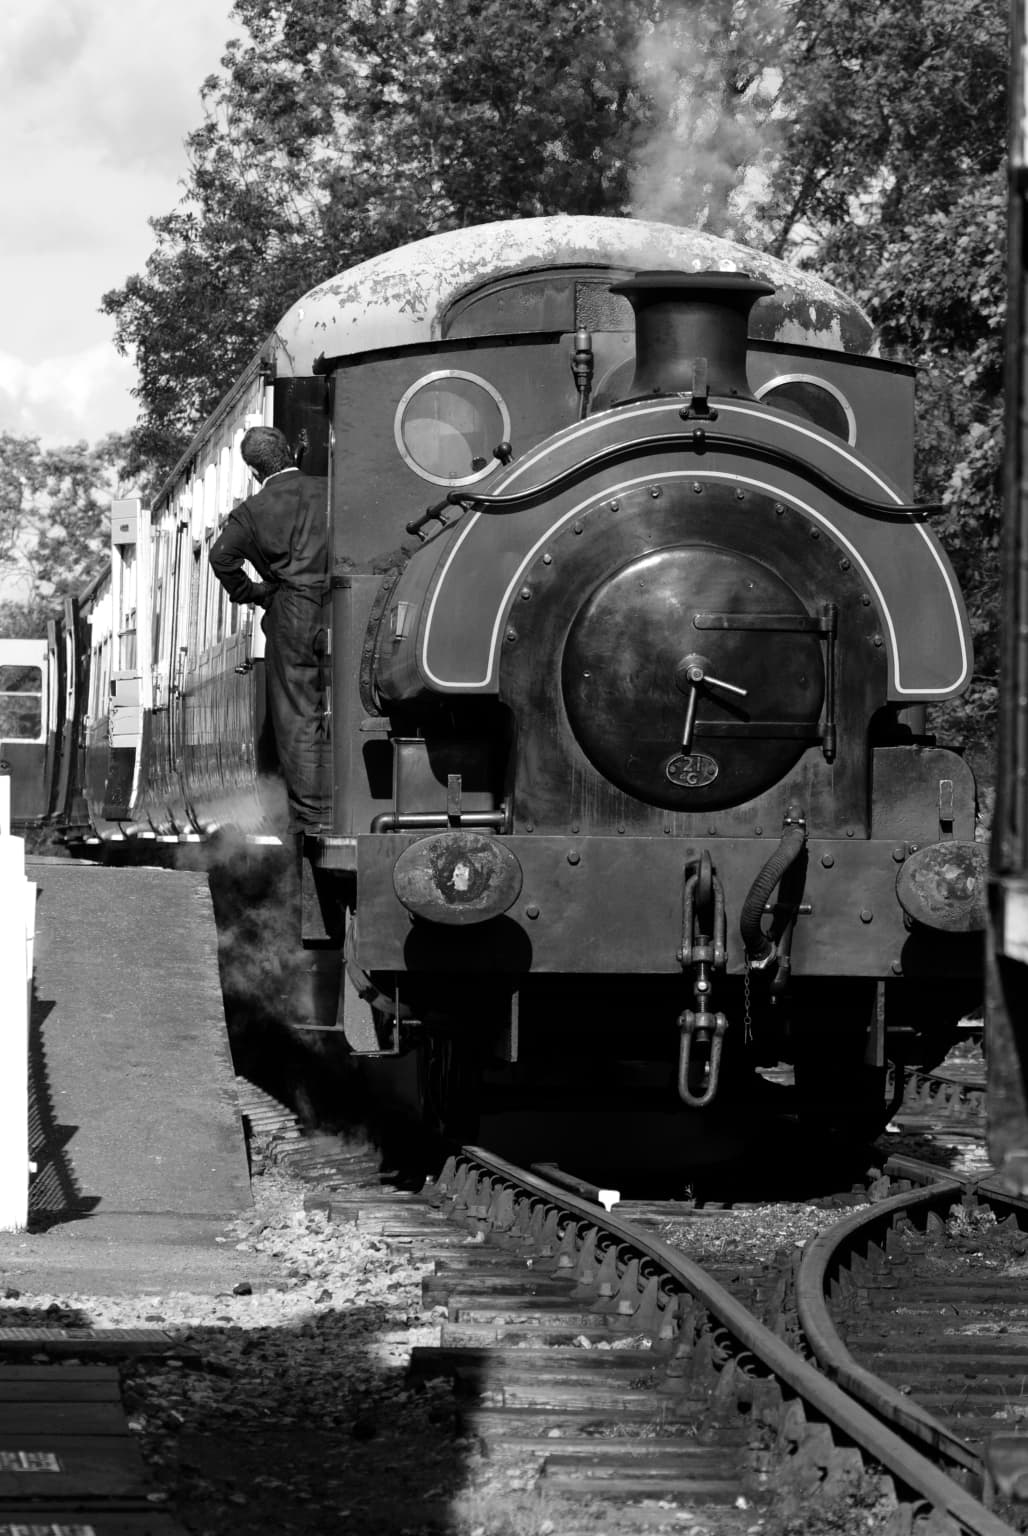
Going a little further off-topic. Three weeks ago, I learned how to configure my M10 to see the world in black and white. It had no effect on the raw images, but I thought I might learn what to look for in my black & white viewfinder to make a more effective photo. It sort of worked, but it was very limited - all I could see was the image in my viewfinder - but I knew it would be captured in the ‘dng’ image in full color, and if I knew what to do, I could edit the image to make a more effective b&w photograph. Then, late last week, I did the same with my D780. When I use the camera, I see the world in black & white. I can use the PhotoLab tools to save it as a b&w image, emulating various black & white films if I wish to.

None of this helped with my original concept, seeing the world in a way that allowed me to edit the colors to make a more creative black & white picture.

Now, as I was going through the B&H Photo video collection, I found this gem:
https://www.youtube.com/watch?v=V8Hh8S-Z68s

As I’m writing this, I’m only half-way through the video, but it’s already obvious to me that I can use PhotoLab’s color controls in a way that will get me a desired result in the image that I convert to black&white. Or, to put what I’m thinking more clearly, if someone is wearing a yellow sweater, which becomes gray in my final b&w image, I don’t have the tools in PhotoLab to correct the shade of gray. BUT, if I go back to the original image and make the yellow brighter or darker - bingo!

I see there is a lot more of this YouTube video for me to watch, but I’ve already discovered at least one way to adjust the brightness of different parts of my b&w image, by altering the color settings in the original image.

I haven’t yet reached the part of the video that will better help me visualize a final b&w image based on what I see in my viewfinder, but I’m sure that will be discussed by the time I’ve seen the whole video.

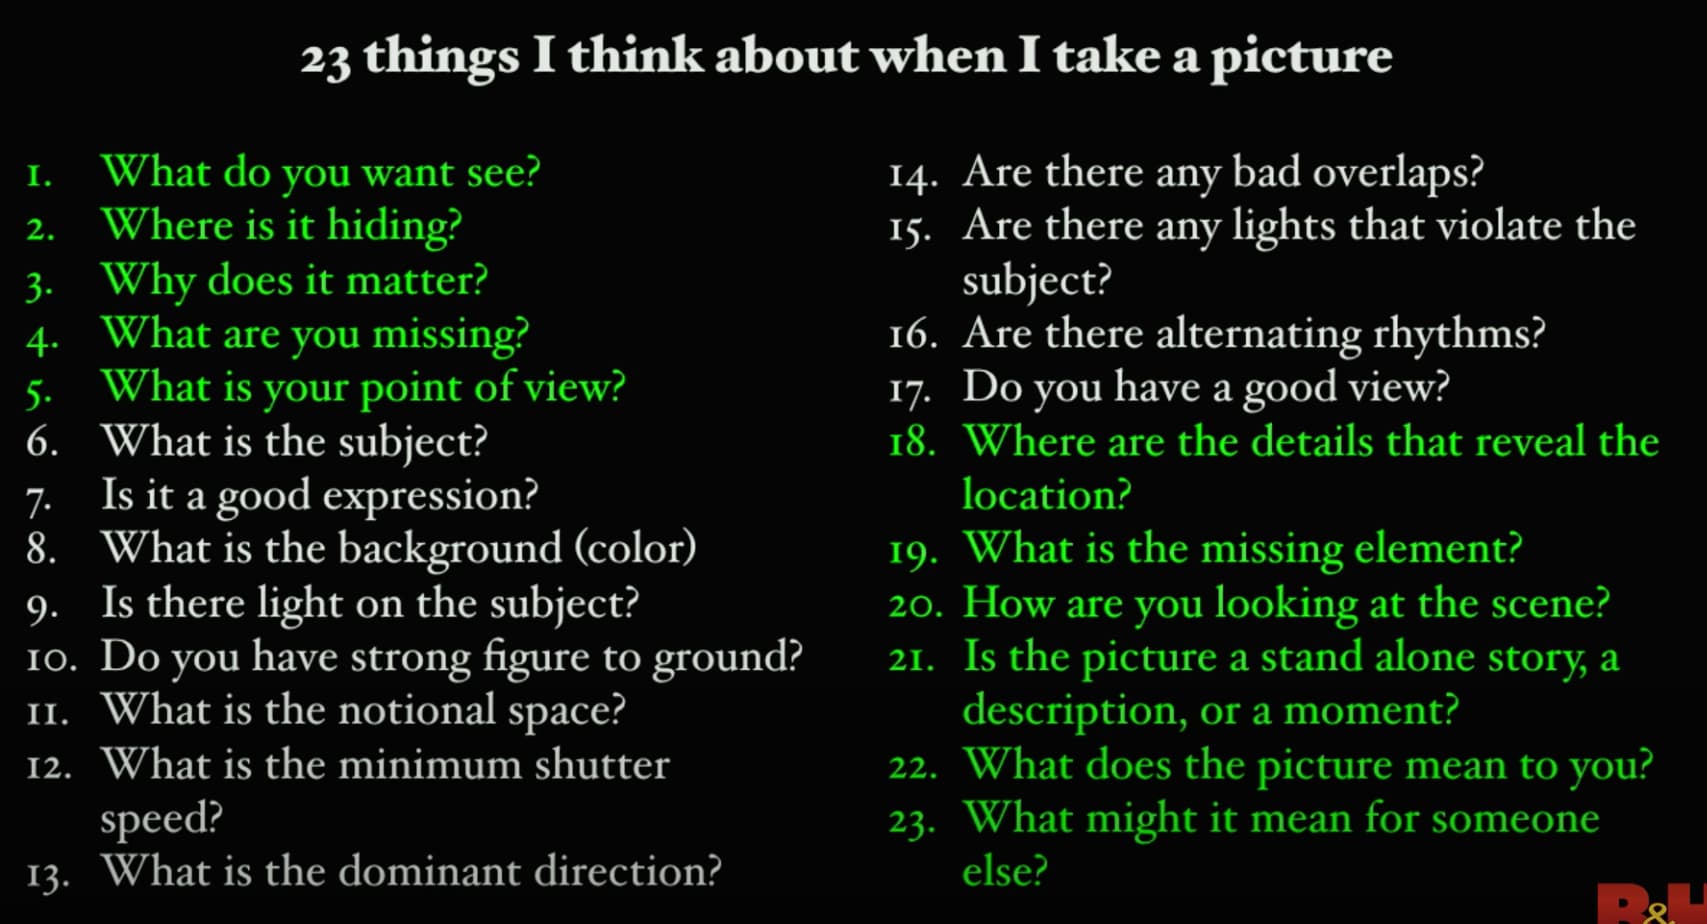
I think that all of these videos are showing me what to look for in the viewfinder, to create a better image. Some I already knew, but there is so much more!!!

If I don’t get it right in the camera, I’ll never really get it right in the finished image. My brain feels like it is spinning.

Yes you do. Convert to B&W by selecting something like the Fuji Acros 100 FilmPack preset and then start playing with either the coloured filters or the channel mixer (both on the FilmPack palette)

Colour…

Just B&W film emulation…

Red filter…

Green Filter…

Etc…

Yes, I can understand how that would work.

Back to my question - this is what I think I am now learning in the B&H video I linked to

The color yellow might look very bright to me, but colors mean nothing in b&w. What I think she wants me to do, is open the color image, select the yellow sweater, and make it brighter, or darker, in which case it will show up in the b&w image either lighter, or darker.

@Joanna, since I don’t know this b&w films, can’t I simply save the color image as b&w ?

Doing it your way sounds to me like trial and error.
Doing it her way sounds very precise to me.

She does give examples at the end, but she is using Lightroom.
I’m trying to convert what I see her doing in Lightroom, to how I would do it in PhotoLab.