I love the DXO lab and would like the team to consider implementing the loupe(zone checking histogram) which is only found in Silver Efex. I think it would greatly improve the editing workflow. Thank you.
Oh my god this would be an amazing addition! Please consider it. Aperture had a feature like this and it was great to be able to quickly and easily see the details and effects. If not a loupe, then at least a split view that allows for different zoom levels, similar to Photoshop’s “new view” feature.
Hi Daniel - Welcome to the Forum! Your request is different than @digitalghost’s (loupe histogram readout), while You are asking for a generic loupe to view details… that is already possible - at least on the Mac version of PhotoLab (I’m using v1.2.2).
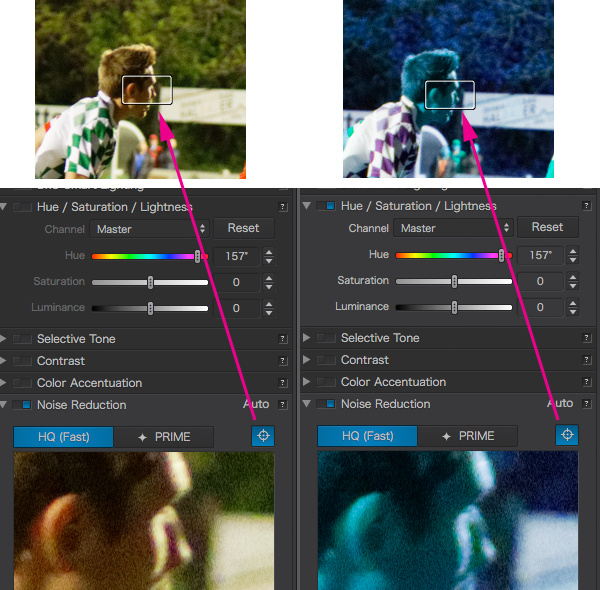
Please reference Fig. 1 below while reading the following. Also I am using an image provided by @uncoy in another thread as my own images are much smaller and would not show the benefit quite so clearly; to fit Alec’s image on my screen it is reduced to 20% of the original.
Look in the “Details” palette > “Noise Reduction”. Note: this option does NOT need to be selected (in Fig.1 it is). This is the location of the “loupe” intended for use with “Noise Reduction” - but I have found it to work with other properties as well. In Fig.1 below I’ve made adjustments to the “Saturation” (“Color” palette). Also works with “Lens Sharpness” (“Detail” palette), etc.
To activate the loupe click on the crosshair icon at the right, and just above, the loupe preview window in the “Noise Reduction” palette. Wherever You click (or drag) the loupe in the main viewing window the loupe preview will update.
Fig.1
3 Likes
I was a huge Aperture fan. The loupe was just one of many nice touches. Aperture 2 was wonderful, Aperture 3 seemed an inferior tool, overly influenced by the dumbing down, iPhoto kick Apple went on.
That’s a very clever use of the Noise Reduction preview Jim.
@digitalghost @dlewand691 The reason that there’s no loupe preview right now is that PhotoLab calculates out the whole image to show truly accurate previews. Without calculating the full image there is no preview at all. Hence the most efficient way I’ve found to work is:
- 4K monitor: you get a lot of pixels to allow you to see most of your image at 100%
- toggle between fit to screen for general editing and 100% for previewing. This is easy as Command-0 is Fit to Screen and Command-1 is 100%
Those are the only two views I need. Once the preview is calculated there is no delay when switching magnification so it’s very fast. When making changes, unless they are to sharpening or noise reduction where you need pixel level preview I usually make them on fit to screen.
The 4K isn’t absolutely necessary. I use the same technique on my MBP 17" where there’s a lot less pixels. It’s just more awkward to only see a small piece of the image.
2 Likes
I fully agree.
- Today there are affordable 4k screen
- F3 and F4 keys for Windows
- Think about reduce the inactive palettes
Pascal
2 Likes
Thanks for the reply… My suggestion was based on Ansel Adams use of the zone system.
How do you direct the viewers gaze? Taking a look at Ansel’s work you can see that the shades are all constructed. The zone system helps you put/determine the brightest/dark parts of the image through the use and understanding of the grading system.
In Silver Efex, the loupe hightlights the areas and helps one see where the brightest/ darkest parts are.
this is what I suggested.
Coupled with the U point technology, I believe one can get more creative by adjusting lights and shadows in RAW real time.
I hope this makes it clear.
2 Likes
So this is like the clipping masks available in PL today but then for 10 luminance levels?
Interesting, I have to try that in Silver Efex. I like to visualize my pictures with the zone system and also do the exposure metering with it in mind. I never thought about using it in post so far.
2 Likes