How to process night images with colorful reflections on water

OK, let’s start the analysis :slightly_smiling_face:


But before that, a simple rule that allows you to take a reasonably exposed photo without using a light meter - the Sunny 16 rule.

On a sunny day, set your camera to ISO 100, 1/100 sec @ f/16 and you will get a pretty good exposure. Adjust the speed or aperture as it gets progressively duller


Now to your shot…

For the first image, you used ISO 100, 1/90 sec @ f.2.8, which, apart from being able to see it in the photo, tells me that it was far from a sunny day. In fact, the light was some 6 stops less than “sunny”; duller even than “Open shade/sunset” - thus reducing the dynamic range of the shot.

In addition, these numbers tell me a couple of things about your camera settings including the fact that your exposure measurements are calculated in ½ stop increments, which gives you slightly less fine control when compared with the more usual ⅓ stop increments. Not the end of the world but possibly worth changing it sometime.

Now, your eye may tell you that the boat is white but, in fact, very little of it is truly white due to the lack of light and the angle at which the light is falling on the side of the boat nearest you.

Viewing the first shot in PL, I can actually increase the exposure by two stops without blowing the white of the boat body, thus showing that the exposure should have been near enough spot on if you had increased the exposure in the camera.

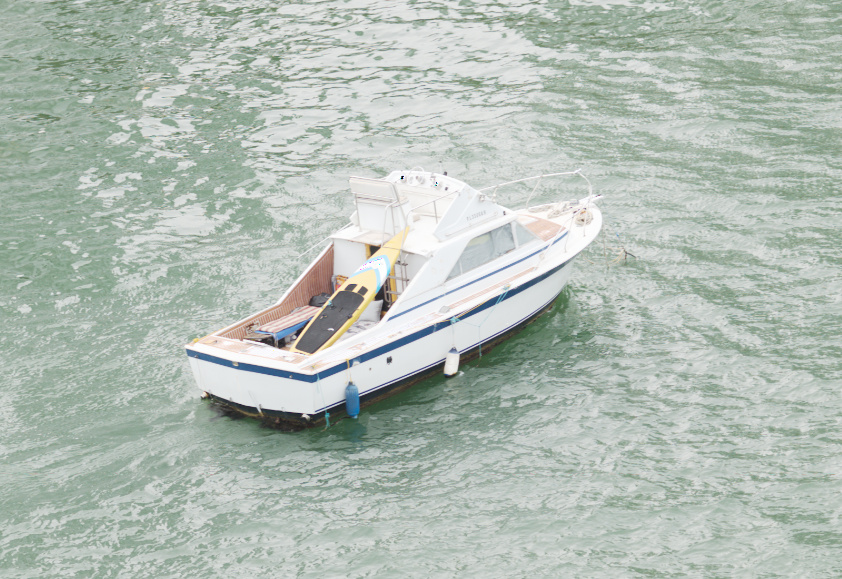
Now the boat looks white but, given the lighting conditions, possibly too white. Certainly, there is still detail in the highlights but it’s starting to look slightly unnatural

If I show the grid in PL and find the centre of the image, I assume this is where the spot meter was aimed at.

… which, indeed, looks more like the 18% grey that you would get with that reading.


Because you changed the aperture as well as the shutter speed for your second shot, you actually ended up with only virtually 1 stop of over-exposure and yet, in PL, you only need to reduce the exposure by 1/10 of a stop on this second shot to recover the highlight detail.

This can simply be down to the fact that altering the exposure in PL isn’t necessarily going to give you the exact same effect as doing it in camera.


So now we come to the question of what is the right exposure?

For this particular scene, in these lighting conditions, I would tend to offer you two possible ways to get a better shot for what is a relatively low contrast scene, mainly due to the limited light,

  1. use centre-weighted metering and you won’t be far off.
  2. spot meter but only over-expose by 1 stop to make the boat brighter but not as brilliant as it would be in bright sunshine.

With ETTR, you need to learn where to “place” the brightest exposure to give you a realistic idea of how bright the object was. I would only use +2 on a sunny day when something is truly white; otherwise you’re going to get something that looks unnaturally bright given the lighting conditions.

For this experiment to work well you are going to have to find a larger target for spot metering and on a sunnier day :wink:

It sort of comes back to your adage of keeping it real :laughing:

Here’s my take on how I would represent the shot, based on the first shot with a little Smart Lighting and a bit of tone curve.

1 Like

Addenda to my last post.

Today is a dull day but I love clouds and the sky is far from featureless.

So, using the same technique of spot reading the brightest part, I metered on the brightest bit of the sky but, because it is not pure white, instead of over-exposing by 2 stops, I placed the brightest part at +1⅔ stops.

Here is the image without any work

And here it is with a bit more saturation all over and a local adjustment of exposure and ClearView Plus to bring out the clouds

This is not meant to be a great work of art, just to show what can be done on one of those days when even the light is fighting you :roll_eyes:

1 Like

Well, you were right, and I was wrong. There is a button on the front of the camera underneath the rangefinder window. The book says this is a “focus button”. While I have one of the Visoflex electronic viewers that goes into the accessory shoe on the top of the camera, I’ve never tried it yet - my thumb rest is always in the accessory shoe. The Visoflex allows the electronic focusing aids to function, and this button I guess is how I control it.

At times like this, I sometimes think I’m too old for all this new stuff, but my entire goal in buying the M10 was to replicate my experience growing up with rangefinder cameras. I guess that’s not really possible, as once one opens a door labeled “digital” a whole new world opens up.

I guess it’s quickly approaching the time for me to remove the thumb rest and put the Visoflex in place to learn how to use it.

Sorry for the confusion. I wish Leica and the book had identified it as an “electronic focus button”.

On my m43 i would be needed f/8 iso 100 1/100sec :wink: or if i don’t use exended iso but base iso: f/11 iso 200 1/100sec.
aps-c 1.5x or 1.6x crop. m43 is 2x crop
(when the summer is arriving again remind us about this now it’s cold darkisch weather…)

“Sunny 16” I know from back in the 1960’s. Sometimes, I select f/16 deliberately, to see if my ISO speed and the suggested shutter speed sound reasonable, based on the lighting. I’ve got to admit though, that I haven’t done this in a long, long time. With my Nikon and Fuji cameras, the camera suggested a good exposure every time. I think I got lazy. I never started to think about this again until I got the Leica. With a manual control for the aperture, I didn’t have any choice, and I refused to select “auto” for everything.

With the boat rocking back and forth, and no tripod, I tried to put the circle in the viewing screen over the “top” of the boat, where it was mostly “white”. Regardless of what the EXIF data shows, I never changed the aperture. If I was smarter, and if I do this again, I won’t touch the shutter dial, and I will ONLY increase the exposure by two stops on the aperture control. I have no idea why the EXIF data says I changed the aperture - it’s a manual lens, and I don’t know wy the EXIF data changed, when I didn’t (know enough to) touch the aperture ring on the lens.

better understanding/guessing about which choice is giving which result and have some flexibility in a way that more roads lead to Rome.

True, post process capabilities are a major influence on the end result. (but the OP was struggling in “real capturing” journalism image’s with minor editing and as the thread grow he shifted a bit to a point that “natural looking editing wile revealing shadow details by lifting en and recovering highlight detail due lowering highlight” has some interest to.)
So it derailed a bit :sweat_smile: but aslong as it’s suites the purpose of learning things who cares? :smiley:

Like your warm glowing image. It shows the pollution in the air of the city reflecting the streetlights and window glow.
Water is a bit purple but not in a disturbing way.

Heheheh. But as Christian and I both said, it really wasn’t white, or at least not as we would think of it for the example of ETTR metering.

And, as I demonstrated, for this kind of scene with this kind of lighting, you don’t really want to make it pure white.

This might be down to the camera getting too smart and “inventing” a value to comply with its internal machinations.

The problem with that is that you are altering the depth of field by doing the and, although it doesn’t matter in this shot, there are going to be others when it will. Don’t forget the third side of the triangle. If you can’t alter either the shutter speed to he aperture for various reasons, simply change the ISO :slightly_smiling_face:

Regarding metering, one thing I could have done, is held out my incident light meter, the Sekonic, and I would then have a suggested stating point for the whole scene - but without spending $600 at B&H Photo, I can’t meter the boat. I could hold a piece of white paper in front of me, and use the spot metering on the camera to get what ought to be something close.

Had we not been involved in this discussion, I would have left the Leica on “center weighted”, and gone with that exposure. That’s been working well for me for all the time I have used the M10, The camera has indicators in the viewfinder that tell me when it thinks the exposure is “right”. Or, I can set the ISO and the aperture, set the shutter speed to (A) and the camera will tell me what shutter speed it recommends. In fact, if I press the shutter release further, that’s the reading that the camera will use for shutter speed.

All this leads up to ETTR, as you wrote " you need to learn where to “place” the brightest exposure to give you a realistic idea of how bright the object was. I would only use +2 on a sunny day when something is truly white; otherwise you’re going to get something that looks unnaturally bright given the lighting conditions." This was the point of this test. I will try this again, trying to find something WHITE that is big enough to spot meter, then take a photo at the camera’s suggested setting but with the lens aperture opened up by two stops. Hopefully the camera was trying to turn “white” into “gray”, and the two stops of exposure will make it white.

If nothing else, I now think I understand what you want me to do, and more importantly, WHY. (Makes you a very good teacher!)

In fact, as I said, for this kind of scene and lighting, that is what I would have done.

This whole ETTR thing arose because, initially, you were trying to perfect high contrast and contra-jour shots.

Aw, shucks :blush: :blush:

It is very interesting to me, that even though the sky was very bright to begin with, and you overexposed by almost two stops, you were still able to bring back all the sky detail, and meanwhile, by overexposing, the detail on the ground came up better. Had you described this to me two days ago, I would have guessed that the ground would certainly improve, but the clouds would be lost because of the overexposure.

I guess that is the point of this discussion, but I am still struggling to accept this in my head. It’s obviously a very useful concept. These two photos prove that this concept is correct.

Did you ever get involved in using the Zone System for exposing LF sheet film? Now that takes some getting your head around! This is easy by comparison :nerd_face:

As a general guide, yes, compensating with the ISO sounds better than doing so with the aperture. Just as easy. When I’m doing it for real, I usually know what ISO and Shutter I would prefer to use, and with PL4 the ISO is no longer such a limitation.

Right now, I agree with you. The white balance needed adjustment, but I like what I see. What bothered me is that this photo shows a LOT of things that I didn’t “see” because it was so dark, and my eyes hadn’t adjusted to compensate fully.

I thought that it wasn’t a “real” photo (from the perspective of a photojournalist) as it showed detail that my eye didn’t see, but I’ve changed the way I feel about this. Whether I saw it with my eyes or not, the detail WAS there, and I’m certain if I put my hands around my eye to blank out the bright lights, I would then see the detail captured by the camera.

There is a divider separating “photography” from “photo illustrations”, and after the discussions here, I now agree with the other people here. Going too far, it will cross over that barrier, and become a photo illustration, but changing the aperture, shutter speed, or ASA/ISO value should not - it would still be a photograph (maybe good, maybe bad, maybe horrible).

This I don’t accept. Leaving a camera on automatic settings and capturing an image should result in what I call a “real” photo - that’s what people could, or did, see. Using trick filters on the internet change the image that makes it into a “photo illustration”. Here is a lit of what is acceptable, or not, in the world of photojournalism:

Here is what the Leica Focus Button does:

Joanna, now that I understand what we’re doing, I repeated the test, this time aiming the camera at a white building opposite my own building. I raised the ISO to 400, set the aperture to f/8, and selected spot metering. The camera suggested 1/500th for shutter speed, so I took the first photo. Then I changed from 1/500 to 1/125 for shutter, going two stops “brighter”. I will attach those two images.

They seem to look to me just like what you told me they would - the first image shows a gray building, and the second photo shows a white building. According to my camera, only the very top right part of the image is blown out.

Here are the two images, before opening them in PL4:

L1001756 | 2020-12-07 | Dynamic Range Test 2.dng (31.9 MB)

L1001755 | 2020-12-07 | Dynamic Range Test 2.dng (27.1 MB)

Follow-up question. If I open these two images in PL4, I don’t want PL4 to use the corrections from the last image I edited. So I went in and turned off all the corrections in PL4 other than the ones that said “auto”. Do I need to do this manually when opening a new image, or will PL4 automatically do this?

One last bit of information - PL4 still thinks I’m using my 50mm lens. This was taken with my 90mm Summicron - not sure if I can find that in the PL4 database. I need to look. It won’t matter for what we’re discussing though.

I guess what I need to do now, is open the images in Fast Raw Viewer.

The exif says 50mm.

George