Editing high dynamic range images in PhotoLab 5

It has been said so often, when capturing in raw-file format

  • set Colour space to AdobeRGB
  • set Picture Style etc to flat / neutral
  • switch off things like Active D-Lighting (in Nikon speech)

to ensure the least effect / influence on the camera’s metering system.


(ed)

2 Likes

It was for a different reason, but a year ago I turned off my rear screen on my Leica and stopped “chimping”.

As Wolfgang just posted, those three things are turned off on my 750, and I also turned off “Auto Distortion Control” - not really sure what it is or does, but PL5 is already doing lens corrections, so this might lead to double corrections.

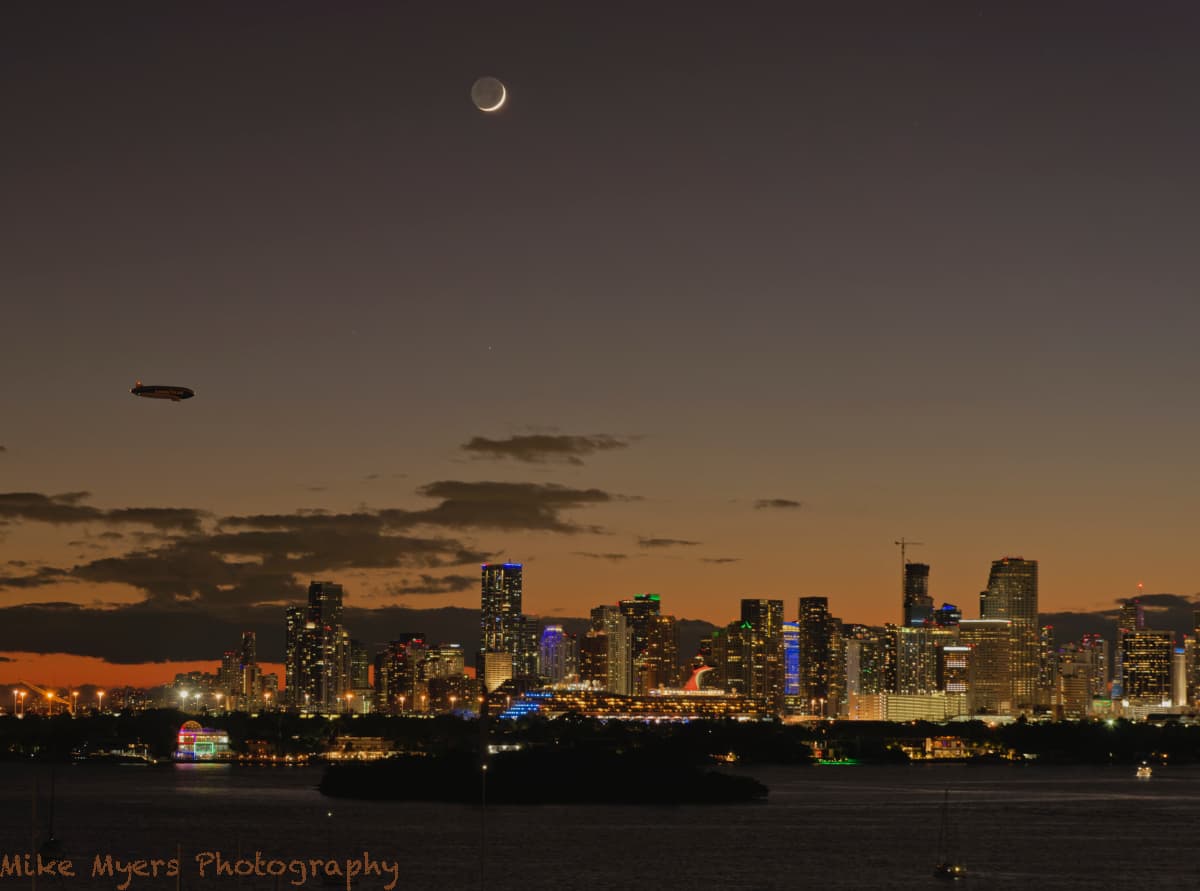
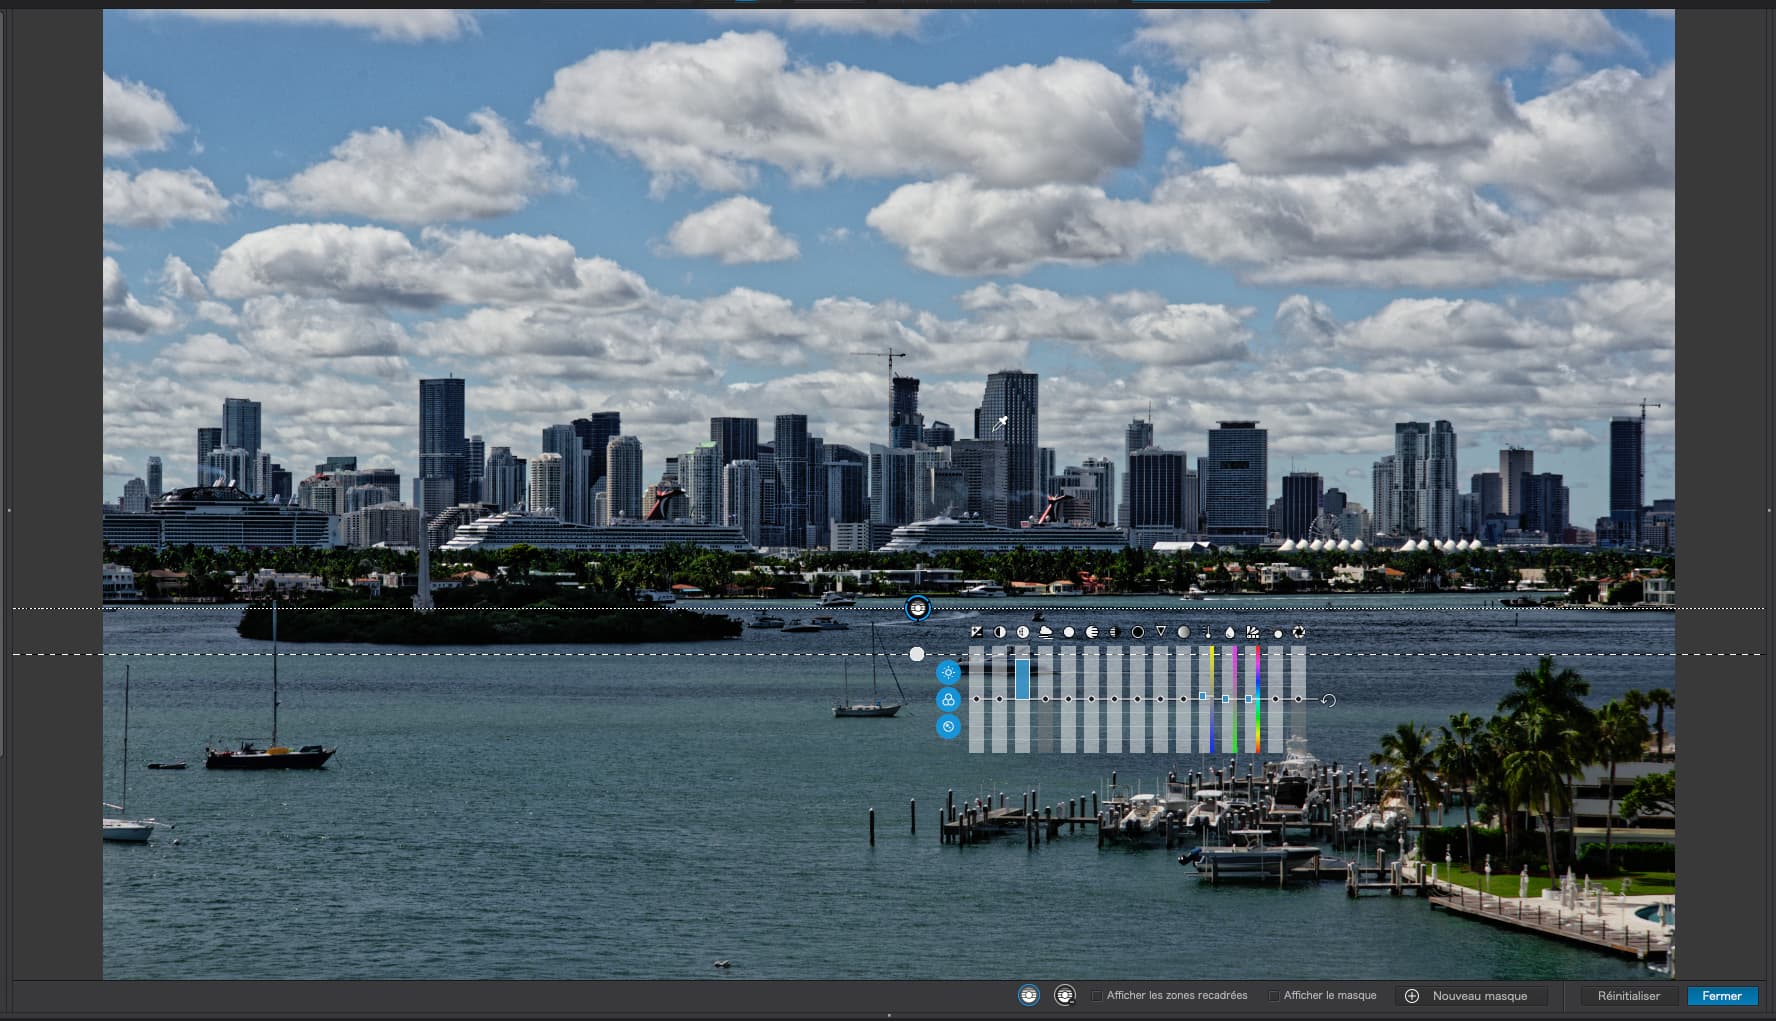
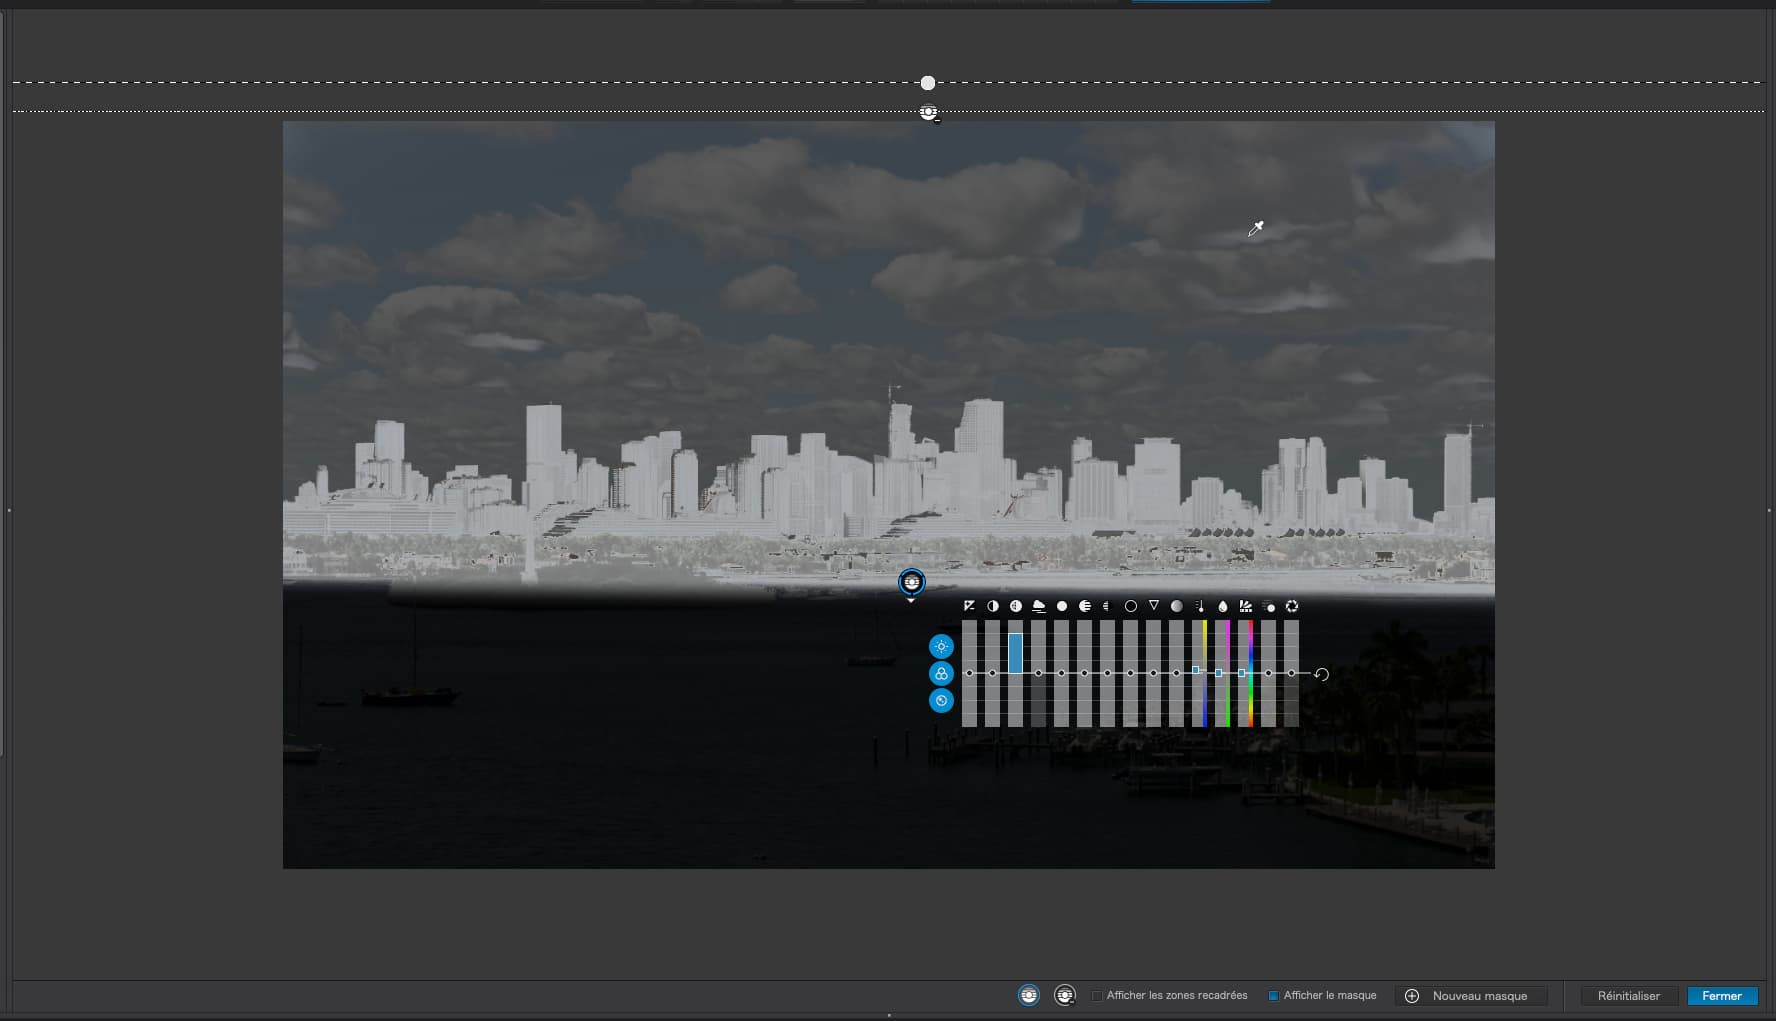
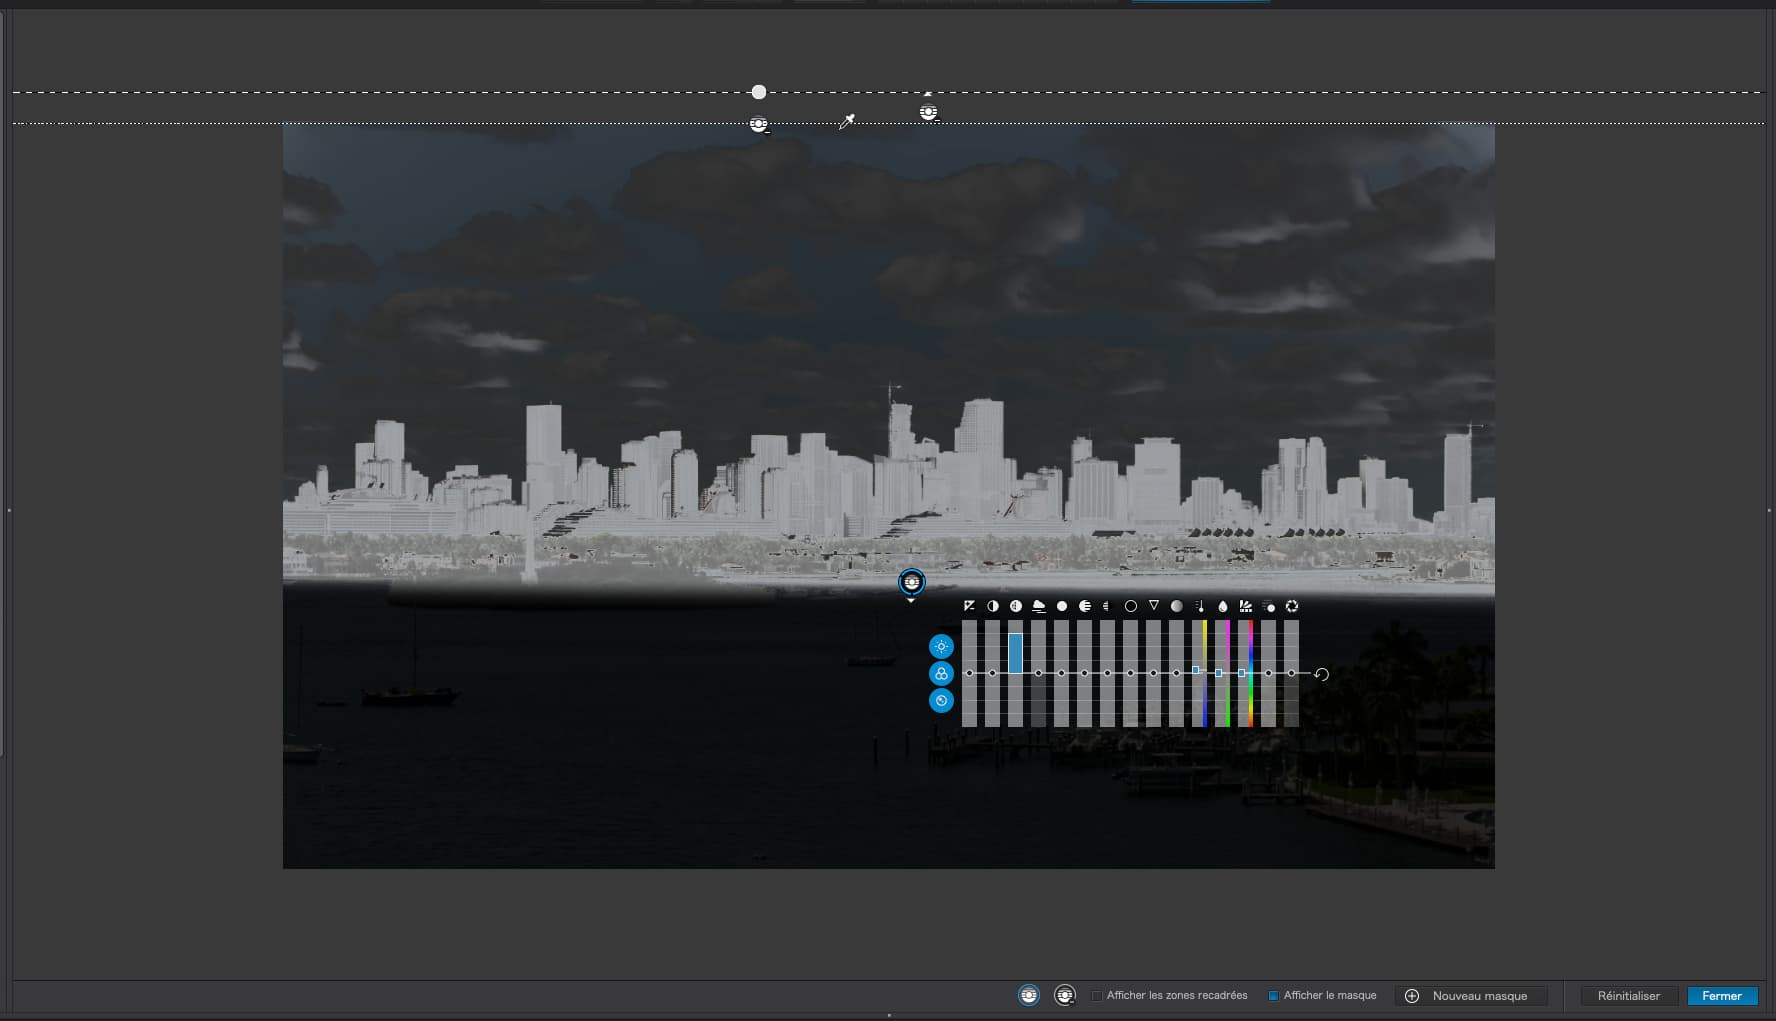
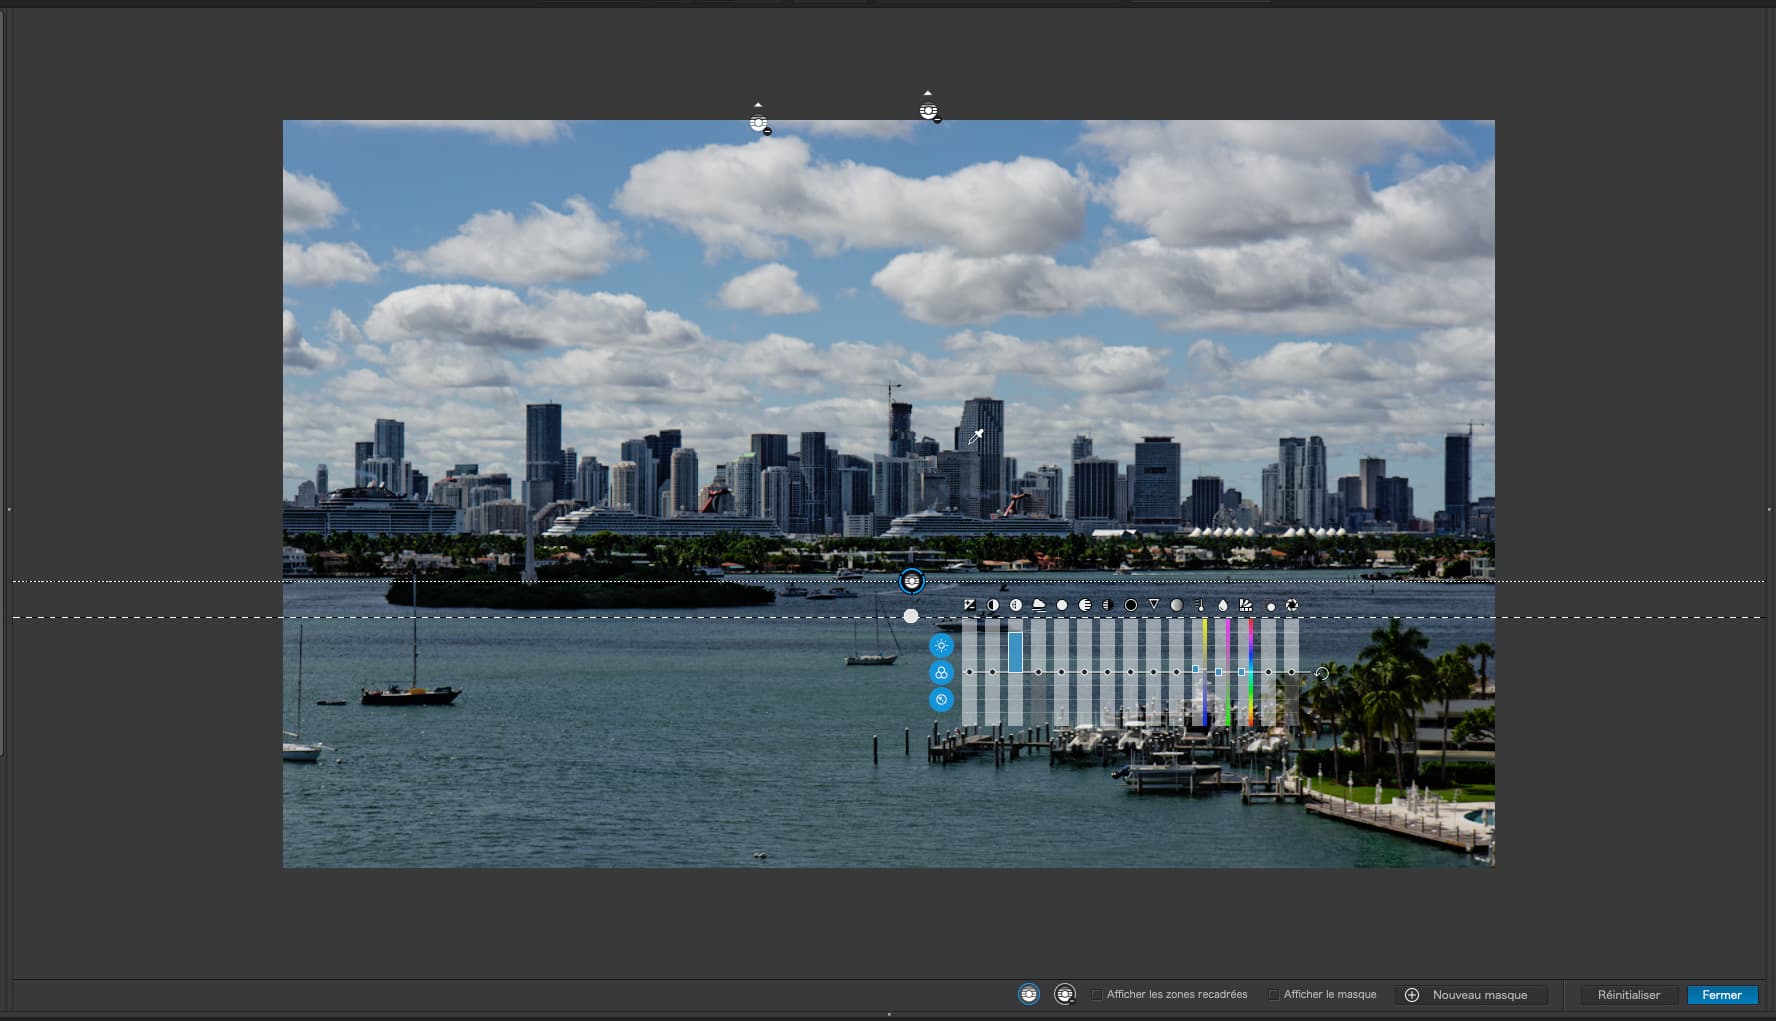
Joanna suggested a new way to measure light, which I’m currently doing, and the exposures seem to be good. I missed measuring the light on the “funnel” on the cruise ship - since Nikon now has two ways to set the spot metering, I want to try Nikon’s tool that automatically finds the brightest part of an image. There’s a cold front coming through Miami, so all the fog and rain should be gone sometime today.

My new tripod must be angry at me for some reason - it bit me, nicking the end of my finger as I tried to lock the legs in place. Ouch. Didn’t stop bleeding for a long time. I did discover though that with the lens extended, it goes much higher than my old Bogen, and it does feel rock steady.

Unfortunately, I seem to be a ‘creature of habit’. Once I get very comfortable with any one of my cameras, I lose that ability to manipulate the others. I need to start using all three cameras at least once a week, so I can easily use any of them. They each have their purpose, and things they excel at. My Leica would have been better for my Halloween shots, and my X100f Fuji is so small and light there are times I carry it instead of the larger and bulkier 750. I just read Thom Hogan’s D750 review:
https://www.dslrbodies.com/cameras/older-dslr-reviews/nikon-d750-review.html
…which reminded me that it isn’t sealed completely against water intrusion. Supposedly the new Z9 is sealed that way. Speaking of which, I am sure I would find it very difficult to switch from the D750 to the Z9 - which is the same reason I switched from the D3 to the D750, smaller and lighter.

Back to this post, I found it very annoying to meter on the part of the sky right next to the sun, as the after effect of doing so left a “dark cloud” in my vision for a while, from reacting to the sun. Using the highlight-weighted spot metering, I may no longer need to do that.

Oops, Thom Hogan also wrote this:
"Remember, if your eye isn’t at the viewfinder blocking light getting in the back way, the metering system sits just in front of the eyepiece and will pick up stray light and get fooled. As usual, Nikon supplies a little plastic “cap” you’re supposed to clip to your neck strap and use to cover the eyepiece, but most people forget to carry that or lose it. "

with Nikon D750 only affects the jpeg-file.

BTW, my cams are set to Auto Distortion Control ON and Vignette Control NORMAL,
but I don’t process those jpegs taken together with the raw-file.


since Nikon now has two ways to set the spot metering, I want to try Nikon’s tool that automatically finds the brightest part of an image.

Mike, you have “Spot metering” and “Highlight-weighted” (spot metering) but NO automatic to find the brightest part of the pic. The latter one reduces the exposure by ?-EV. Your manual mentions to take in account the colour, but otherwise it is somewhat nebulous to me. – To repeat, you have to test it!


Reading your ‘report’ about using multiple cameras …
as if to me somebody said, concentrate on one.
:slight_smile:

This was my reasoning for doing the same thing.

Oh, yes. Do try to do a comparison shot at the same time. I would be very interested but, as you saw from last night’s pictures, we don’t really get that much opportunity for such a “well lit” scene :stuck_out_tongue_winking_eye:

Ouch indeed. And one reason why, when I chose my LF tripod, I went for a Gitzo with locking collars rather then vicious teeth. Unfortunately, they cost a whole lot :roll_eyes:

Now stop that right now! You’ve already got too many cameras (a bit like me) :rofl:

Yes, same here. I tend to point somewhere a little bit further off and compensate by not compensating as much. One way around it is to use live view to point the camera instead of looking through the viewfinder directly.

Ah good. That’s useful to know.

Yes, I’ll need to test, once the weather clears up. In the meantime, here again is what I was reading:
https://www.nikonusa.com/en/learn-and-explore/a/products-and-innovation/using-the-highlight-weighted-metering-mode.html

…and here is what made me think it’s automatic: "highlight-weighted metering automatically detects and meters highlights for optimal exposure".

I need to take two photos, one as I’ve been taught in this discussion, and one trying to let the camera do this automatically. Will post both here, for your evaluation.

Well, small change in my plans. For quite a while now, the first time I take a photo with the 750, it often doesn’t work correctly. After that, it’s perfect, for as long as I’m using the camera. I meant to call Nikon about this, but never got around to it.

Then, in reading Thom Hogan’s review, I found this:

Further update. The D750 has been the recipient of multiple Nikon Service Advisories. The first of which was due to “shading of images” (the flare issue just discussed). The second and third were due to shutter issues. It behooves you to check the page just linked and verify that your serial number doesn’t have the issue.

So, I followed through, and checked my serial number, and sure enough, my 750 needs to go to Nikon for repair, which would put me in a bind but for something else I will now do. I got a broken Nikon D750 from a friend, which attempted to commit suicide. It was on a tripod with a huge lens on front, and when my friend wasn’t looking, it toppled the tripod over, resulting in the lens violently coming detached, taking the front part of the camera with it. I checked with my local repair shop, and they tell me it’s not that unusual, and they will have it fixed for me in two weeks. So, I’m going to go ahead and do that, and send my own 750 off to Nikon once I get the other camera back. It’s a free repair, even though my 750 is no longer under warranty. Until I get the other camera back, I’ll continue using my camera. At least all the above is my plan, as of today.

For anyone else reading this, if you have a D750, check your serial number.

Looking at the sun through a viewfinder can seriously harm your eyes. Use liveview for such shots.

1 Like

Excellent suggestion, and I mostly did that, but how do you meter accurately without looking through the viewfinder? I found it annoying, and only did it once, for less than a second. The sun was barely peeking out from below a cloud. Looking at the full sun - no way! (Another good reason for a digital viewfinder, spelled Z9… :slight_smile: )

I agree. I wasn’t looking to do anything to WB at all. All I would like is for my in camera overexposure warning (blinkies, zebras, whatever) to actually have some meaning related to the raw file. I thought there may be in in camera adjustment that would better tune the overexposure warning for those times that you just don’t have time to meter properly.

UniWB is currently the only way to achieve what you want…until camera manufacturers come up with something that relates to RAW rather than to processed thumbnail or preview JPEGs…

I finally got around to setting up and trying the tripod. My finger still has a band-aid from yesterday’s goof. I read through all the instructions that seemed relevant - they seem rather confusing, and maybe I’m just slow, but it seemed to take forever to figure out the camera mounting plate. Eventually I got it to go on and off the tripod, but the “locking lever” takes a LOT of force to remove it. I attached the camera, now that I know which end of the mounting plate points “forwards”, like the lens. The main feature of the tripod is that unlike even my Bogen, the camera was locked solidly in place, no “wobble” that I could feel.

My D750 must have figured out that I plan to return it to Nikon, as the first time I pressed the shutter release, it didn’t do anything - but the next shots were fine. I set the camera to f/10, Aperture Priority mode, and selected Spot Metering Highlight Weighted, then took the first image that didn’t work, then two more right after. I wasn’t sure how to bring up the artificial horizon, but set the camera to shooting pretty much straight ahead. If I did this for real, I’d have lowered the horizon just a bit, but for this test what I got was good enough. I’ll leave it for all of you to comment on lens sharpness, but at f/10 it should be good. This was with my 24-85 Zoom, because that’s the lens that will most likely mounted on the camera most of the time.

I’m confused by the image - the middle part is perfect, the extreme left is slightly less so, and the extreme right is not nearly as sharp. ISO was 500, not needed, but should be OK, f/10, so depth of field should be good, and 1/2000th so there should be no errors from movement, especially on the camera. Time to try this with a different lens, maybe my Nikon 80-200.

Here’s the original file, and my .dop file which only includes a crop to get rid of the half-boat at the bottom. Oh, and DeepPRIME worked this time, maybe because I only selected it and cropping. Also, Aperture Priority with spot metering highlight weighted seems to have done what I would have expected, set the exposure for the clouds. With Joanna’s trick of +1.7 EV, this might have been perfect for PL5.

_MJM9545 | 2021-11-06.nef (28.3 MB)

_MJM9545 | 2021-11-06.nef.dop (12.1 KB)

I put on my 50mm f/1.8 Nikkor lens, and dropped the ISO to 100, meaning the shutter speed went down to 1/500th. I took three images, just in case. Processed in PL5 same as before, and only selected DeepPRIME, no other corrections.

PL5 got as far as exporting the file, but then crashed. Oops. Here’s the first part of the crash message:

OK, here’s the original image, and the .dop file, and then the exported image:

_MJM9548 | 2021-11-06.nef (28.3 MB)

_MJM9548 | 2021-11-06.nef.dop (11.4 KB)

I guess I don’t use that zoom Nikkor for important photos any more… :frowning:

I greatly prefer the results from my non-zoom lens - again.

@ Todd

In post #203 I mentioned “set WB to AdobeRGB”, which is nonsense of course.
It’s corrected now set Colour space to AdobeRGB

sorry for that :slight_smile:

2 Likes

Not sure if this is good or bad, but I “read” what you meant to write, and never noticed. Me bad.

Anyway, I tried to edit that last image. I couldn’t get what I wanted, so I stopped. I wanted the buildings to show up more, but in reality, the sun had moved, and I was an hour too late. Then DeepPRIME crashed, so I used PRIME. I didn’t like the end result, so I stopped. If nothing else, I am learning more about how to use Control Lines, from following Joanna’s examples in this forum.

I didn’t realize until now that I need to go to “Local Adjustments”, then to “Mask Selectivity”, at which point I adjusted “Luma” (which I assumes means luminance, or brightness). In the end, I gave up - anything I tried to do with the buildings with Control Lines made them look fake. For that matter, the clouds look fake, but that’s not due to my editing…

Every time I do this stuff, I learn more. I guess that’s good. Now I know how to use the tripod better, and more safely, And how to use the tools.

_MJM9547 | 2021-11-06.nef.dop (14.4 KB)

Had a look and tweak with the two images of the harbour at noon.


The shot taken with the prime lens looks crisper, which has also to do with the different focal lengths used (50/85) and what seems to be a slightly different distance of focus.

The zoom lends itself to a decent image, but takes more work (more than I did here), but the rule of thumb that primes deliver crisper results is confirmed. Also, the 45 minute difference between the two shots can make a difference in how the light is scattered by the humid air, but all in all, both lenses can be used. Take the 50 for crisp images and the zoom for more flexibility, zooming by feet has its limits here ;-).

@mikemyers

I quickly checked your pics with 24-85mm and 50mm lenses. – Yes, your zoom seems to have a problem on the very far right side.

While it’s a convenient lens (I always have it on one of my cams), you have to know, that it suffers from some degree of field curvature, which simply means “not ideal for flat subjects”. For ‘critical’ shots I step down to F8, which is about the sweet spot
Nikon AF-S NIKKOR 24-85mm f/3.5-4.5G ED VR on Nikon D750 vs Nikon AF-S NIKKOR 50mm f/1.8G on Nikon D750
Nikon 24-85mm f/3.5-4.5G VR Review - Optical Features

When you send your camera to Nikon (what I wonder about, as you never realized a fault), maybe you add your zoom and explain about the out of focus on the right. Could be that the lens is somewhat decentered.

Back to almost night, trying to improve on what I did yesterday, paying attention to the suggestions from Joanna in particular.

Using the 24-85 again, due to versatility. Exposure was ISO 640 to keep the exposure time down, f/7.1, same reason, 1/2 second, so no real sharpness in the moving (backwards) blimp, and 85mm to get the composition I wanted. The moon was there, and fitted in perfectly, but I see more of the moon in my capture than I could with my eyes. It’s darker than your shot Joanna, as I wanted to capture what was left of the sky. Camera was set to spot metering with the automatic correction of what might be a lot more blown highlights. I couldn’t make the water look like your second shot I like so much, as the sky was too dark - not much to see in my water.

I glanced at the image replay, which I left on, but the raw image shows the scene much better. Tripod worked great - it’s amazing how good it is! Steady as a rock, but weights so little. One thing is for sure, this image does NOT look like it was captured on an iPhone!

Todd, I agree with you 100%, probably more. This is like taking a class in PL5, with all the wonderful feedback from so many people!!!

Tonight’s results:

_MJM9561 | 2021-11-06.nef (25.1 MB)

_MJM9561 | 2021-11-06.nef.dop (14.8 KB)

If I could, I would like to lighten up the water and the island, but without making the image look “fake”. What you see in this photo is pretty much what I could see with my eyes, but for the moon - all I could see was the crescent.

Oh, and if anyone is interested, the reason for the blimp being over the city, was a big football game was going on, and they like the overhead coverage from the blimp, as the blimp sort of stays put in one place for a long time.

All in all, a technically excellent shot, needing a minimum of corrections.

Here’s an export from my effort…

The only thing I felt would help was to de-haze it a little. So, all I’ve basically done is to boost the reds and greens a bit using the colour wheel, add a bit of shadow fine contrast and create a Control Line to put a bit more detail in the buildings and ships only.

To start with, I added a control line, just below the water line, to include everything above it…

I placed the pipette on one of the buildings, moving it round until I got the flattest and brightest appearance to the zone I wanted to mask. I then played with the selectivity sliders, to flatten it out as much as possible, and found that a Chroma of 23 gave the flattest appearance.

Then I adjusted the Micro-contrast slider on the equaliser to give me good, but not excessive, detail in the buildings…

The only problem now is that the clouds have also taken on a somewhat “crunchy” appearance, because the mask was covering them was well as the buildings. This can be solved by adding a negative control line to the mask to exclude the sky area and this is where I was inspired by something @StevenL said about being able to use a Control Line to cover the entire image.

I zoomed out so I could see some space above the image, selected the negative control line tool, and than dragged up from the top of the image to give me a mask that covered the whole image. Then I moved the pipette to a part of the sky that gave me the darkest overall coverage…

As you can see, this doesn’t give a particularly dark mask, so I added a second one. This time I moved the pipette to one of the lighter bits of masked cloud, which gave me a much darker overall mask.

Now, hiding the mask, you can see that the clouds have lost their crunch, but the buildings have retained that extra detail…

I think we haven’t yet realised everything that Control Points tool can achieve, but I hope that this gives you another glimpse of what can be done.

Here is the DOP…

_MJM9545 | 2021-11-06.nef.dop (26,9 Ko)

4 Likes

Yes, that ties in with @Wolfgang’s deleted post and what I was thinking. I am not sure whether that kind of thing is fixable (at least at a reasonable cost) and maybe it’s time to ditch it, like I have with my 18-35mm lens which was giving equally weird effects like triangular flare from stars in night sky photographs.

Now, if you want a cracking all-purpose lens, might I strongly suggest Nikon’s 28-300mm? Ken Rockwell reviews it here, with comments like…

This 28-300mm VR replaces the entire bag of lenses or zooms used to carry. No longer do I carry any other lens in this focal length range. This 28-300 really does replace every other wide, normal, tele, macro and zoom. It’s superb for photographing anything that holds reasonably still. As you can see, it’s ultra-sharp handheld under any condition; leave the tripod at home except for star trail photos.

We both used to have the older 28-200mm lens (without VR) and it was “OK” but this is a whole different beast. They are almost never off our cameras, apart from for the best shots when a prime is usable and gives the edge.

Manufacturing variation, pass/fail tests and transport can lead to lens faults in every lens and more so in lenses that use many elements and shifting groups. Although 28-300 is a versatile focal range, dxomark puts the lens at the end of the list as shown below.

left column: dxomark score
right of it: sharpness

More to read:

1 Like