Right. PL6 with the DxO Wide Gamut WCS will more accurately preserve the color gamut of the source and give more latitude for edits. Doesn’t equal “correct” - that is up to the whole color rendering pipeline and user preferences. For example, with many FilmPack color renderings applied to my Olympus RAW files, it usually doesn’t matter which working color space I select. Unless colors are very saturated, I won’t see a difference. But other adjustments do yield different results, and technically the DxO Wide Gamut WCS gives an advantage. But when colors are very saturated, errors can occur in the output rendering in a small color space, requiring adjustments which differ according to the working color space.
1 Like
Very eloquently put Greg. This is what I meant when I said more correct.
1 Like
Yes, I agree - I’m happily using it too, Keith … with the new Wide Gamut WCS.
I’m not meaning to assert that. Only that PLv6’s behaviour (as currently implemented) can be confusing.
(Other than some glitches with rendering of some Presets, etc), the only major thing that bothers me with PLv6 is that what I might be seeing on-screen/within PL is not necessarily what I get when viewing the end result on that very same monitor.
To avoid that conundrum, I simply have Soft Proofing permanently activated - and then “all is good”.
John
I’ve been looking through some of my own images with PL6 finally and I’m not seeing differences as much as the same flaky application behaviour I’ve seen in the past releases.
Sometimes images don’t load in the browser (reported that in PL1 already, in the film strip then); rotation I did in PL3 or PL4 can be dropped; crops can differ slightly on export with perspective correction; optics modules aren’t consistently applied after downloading resulting in differences in colour and geometry, which is sorted by browsing to another directory and back. In fact, in all of the cases where I’ve initially seen a difference between PL5 and PL6 in PhotoLibrary and/or Customize (just viewing previously edited images), jumping out and back has solved the problem, but having to do this doesn’t really instill confidence that I’m seeing what I’m supposed to be seeing when I open an image.
This is on Mac. I’m sure it’ll be a different set of problems on Windows. It’s not as bad as I expected given what some others have experienced, but the application is still buggy, and some of the bugs have spanned over several releases now. I don’t know if DxO purposely doesn’t fix bugs to string people along, but they certainly don’t go out of their way to fix them.
Just catching up on this very interesting thread. Huge thanks to Keith, John, and Wolfgang for sorting through and documenting the new color space and apparently, new under-the-covers color workflow DxO is marching forward with.
Is it possible that DxO intends to color profile certain printer/ink/paper combinations just as they profile camera/sensor/lens combinations?
Thanks for your positive comments ![]()
![]()
As a first guess, No. I think they will just allow you to select profiles for ink and paper produced by the manufacturers of those items.
2 Likes
Indeed. Red River is my paper of choice and their own profiles with printer/ink combos have been invaluable to me over the years. [[ICC Profiles & Inkjet Printer Color Profiles]]
It’s the variability of inks that drives me crazy though…
Hi Chuck,
I’m printing since a while (still with PS), so ask anything you’d like to know
and for some differencies – I’m on Windows and Epson.
Wolfgang
1 Like
Closing in on 150 posts on this thread… I wonder if DxO might consider it is well past due to deliver the promised paper on colour management in PhotoLab?
4 Likes

4 Likes
Thanks very much Keith for your efforts in putting this together.
My present workflow is Camera RAW CR3>Lightroom>PL6>Confirm Deep Prime Setting>Export as DNG (Denoise & Optical Corrections Only). It would seem that none of this color management should have an affect, but I thought I saw something in this Forum mentioning that it might. I would appreciate any thoughts on this.
Thanks, Rod
Search the forum for the words DNG color rendering. DxO says color rendering isn’t applied when exporting to DNG (because DxO only writes linear DNGs) - but some people have noticed a contradiction or two that DxO has yet to explain.
1 Like
Thanks very much Greg. I hope for everyone that a fix can be found soon by DXO. In the meantime I still have 5.5.0 installed so will revert to working with that. I also have older versions if needed.
Rod
@KeithRJ these look rather good.
could you implement Protect Saturated Colors and “colorrendering category/rendering.” in the flowchart?
and these?
Vigneting is corrected first (optical correction CA, Denoising Prime, WB before demosiacing)(as it depends on calibrated data**), then exposure, smart lighting, selective tones, contrast, clearview, microcontrast and then custom tone curve.**
The bolded are done after every change in color by the optical module (denoise prima only on export but before demosiacing so demosiacing is one’s done again after the last edit and all editsettings are applied in one go just before converted to export product.
the exposure and such is in the edit loop.
The rendering of protect saturated color is also in the edit loop because of your push and pull in color and lumination.
(this would complete your flowchart.)
Thanks
Peter
Some explaination of DxO Staff done when plv4 was having a new DNG type:
In fact the DNG that we export has its color data expressed in sensor color space, we don’t switch to any usual color space (like sRGB, AdobeRGB, etc.) to avoid destructive transformation. Interface displays “as shot” but it should rather display “native camera color space”. And on the DNG produced this way, you can then apply any color transformation once reopened in PhotoLab, as you would have done with the direct RAW file.
which is applied in this “rawDNG”:
Exactly these one (distortion, vigneting, lens sharpness and chromatic aberration) + denoising and demosaicking. No color rendering applied (picture remains in sensor color space).
The bold is all of the optical module.
1 Like
Thanks Peter. Perhaps I am remembering wrong, but I keep thinking of reading in several places that the sensor doesn’t have a “Color Space”. My understanding had been that the demosaicing software that converts sensor data to RGB must apply some kind of color space and rendering so that our screens will show us this image.
When PL shows us the RAW image on the screen ‘Something’ must be done so we can view it. Then when PL Exports as DNG with ‘optical and denoise only’ I understand the linear DNG to be “Partially Demosaiced”. Does that mean the same ‘Something’ we saw in PL, or is it something different? Then when I open the DNG in LR, do I see that same something OR does that not apply and I only see the rendering applied by LR?
Sorry if this post sounds confusing. It’s because I AM! ![]()
Oh i am often too! ![]()
No you don’t remembering wrong. Rawfile’s don’t have a “colorspace” like the horseshoe everyone knows.
They have a physical bount restriction of which wavelenghts the camerasensor can capture. Every sensor has it’s own sensitivity of wavelenghts balance which is “straightend” by the manufacturer’s algoritm in order to give a “natural” index of the captured light/photon’s in order to reproduce colors as they looked when you saw them yourself. So the “sensor Color Space” is the range of wavelenghts it can handle/capture. A spectrum.
(infrared sensors has bin made by “ripping off” the IR-raster. (can’t recall how (i do have a link somewhere) but every normal camera can be turned in to a IR-camera.)
Demosiacing is used to convert a r,g,b,g raster which is layed over the sensor to only let that part of the wavelenght through which charge the sensors well. Red-isch, green -isch, blue-isch, and a extra green-isch because that’s a “weak” color for our eye’s. (note every Well can capture “all wavelenghts” if you rip off that “bayer array” to be able to reconstruct “colors” they made a clever grit which gives some grouping of RGB kind lay out.) It’s much more complicated then written by me above doh.
After the demosiacingprocess the “color” as we know it is present. (it’s calculated from those three “wavelenght-range” amounts of “light”) whitepoint for WB is set which give you the hopefully correct color back which was radiated from the object into your camera lens. it’s mapped into a preview like RGB color space: the horseshoe icc profiles.
The amount of bits used to describe the values of saturation of each channel is plotting the size of the colorspace.
i don’t go any deeper because then i get lost in the details.
What they mean is it’s a “floating Whitepoint” no real WB is set yet (like you have in a OOC-Jpeg or tiff). All available colorpossibility’s captured by the sensor and stored in the rawfile are still there. (Loading a rawfile in a workingcolorspace means often some colors are “clipped” which means gone. (dxo was earlier a AdobeRGB working colorspace which was too narrow for some users. Too much of the original data was clipped/compressed. So the option for them was create a “rawDNG” with the full range of possible colors still in there so you can process that in say LR which was using a larger working colorspace.
Now we have Wide Gamut working colorspace in V6 so that isn’t needed any more.
Why you can still use the “workaround” for is gaining processingspeed. (DxO uses realtime rendering and optical module calculation which slows down your “preview” changing when editing. The Blur blob moments.)
Biggest “problem” in RAWDNG is interpretation differences which can change the overal image color temperature due the floating WB/whitepoint. ( So it can be looking different in DxO and LR as starting point.)
Which is by export and insert again in DxOPL not a problem because i assume that the same rendering is applied as when you keep it inside the working colorspace.
A tiff has a “fixed”, pinpointed WB set so much less surprices in opening those in different applications at the cost of losing much of the colors in the process.
last note: the original “lineair DNG” of dxo is basicly a 16bit Tiff like file in a DNG- container. That’s why a lineair DNG is crippled and not very much better as a regulair tiff. (colorspace is narrowed down.)
Again i simplified it because when i going in depth and detail i got confused too.
edit Don’t try this at home with your 1000 dollar camera
it’s very eh quick show of spectrum adjustment of a camera.
edit 2:
the RAWDNG is a passthrough. You skip the working color space and regulair edit-area. like you just demosiac and pixelize the rawfile in RGB values and go straight to export.
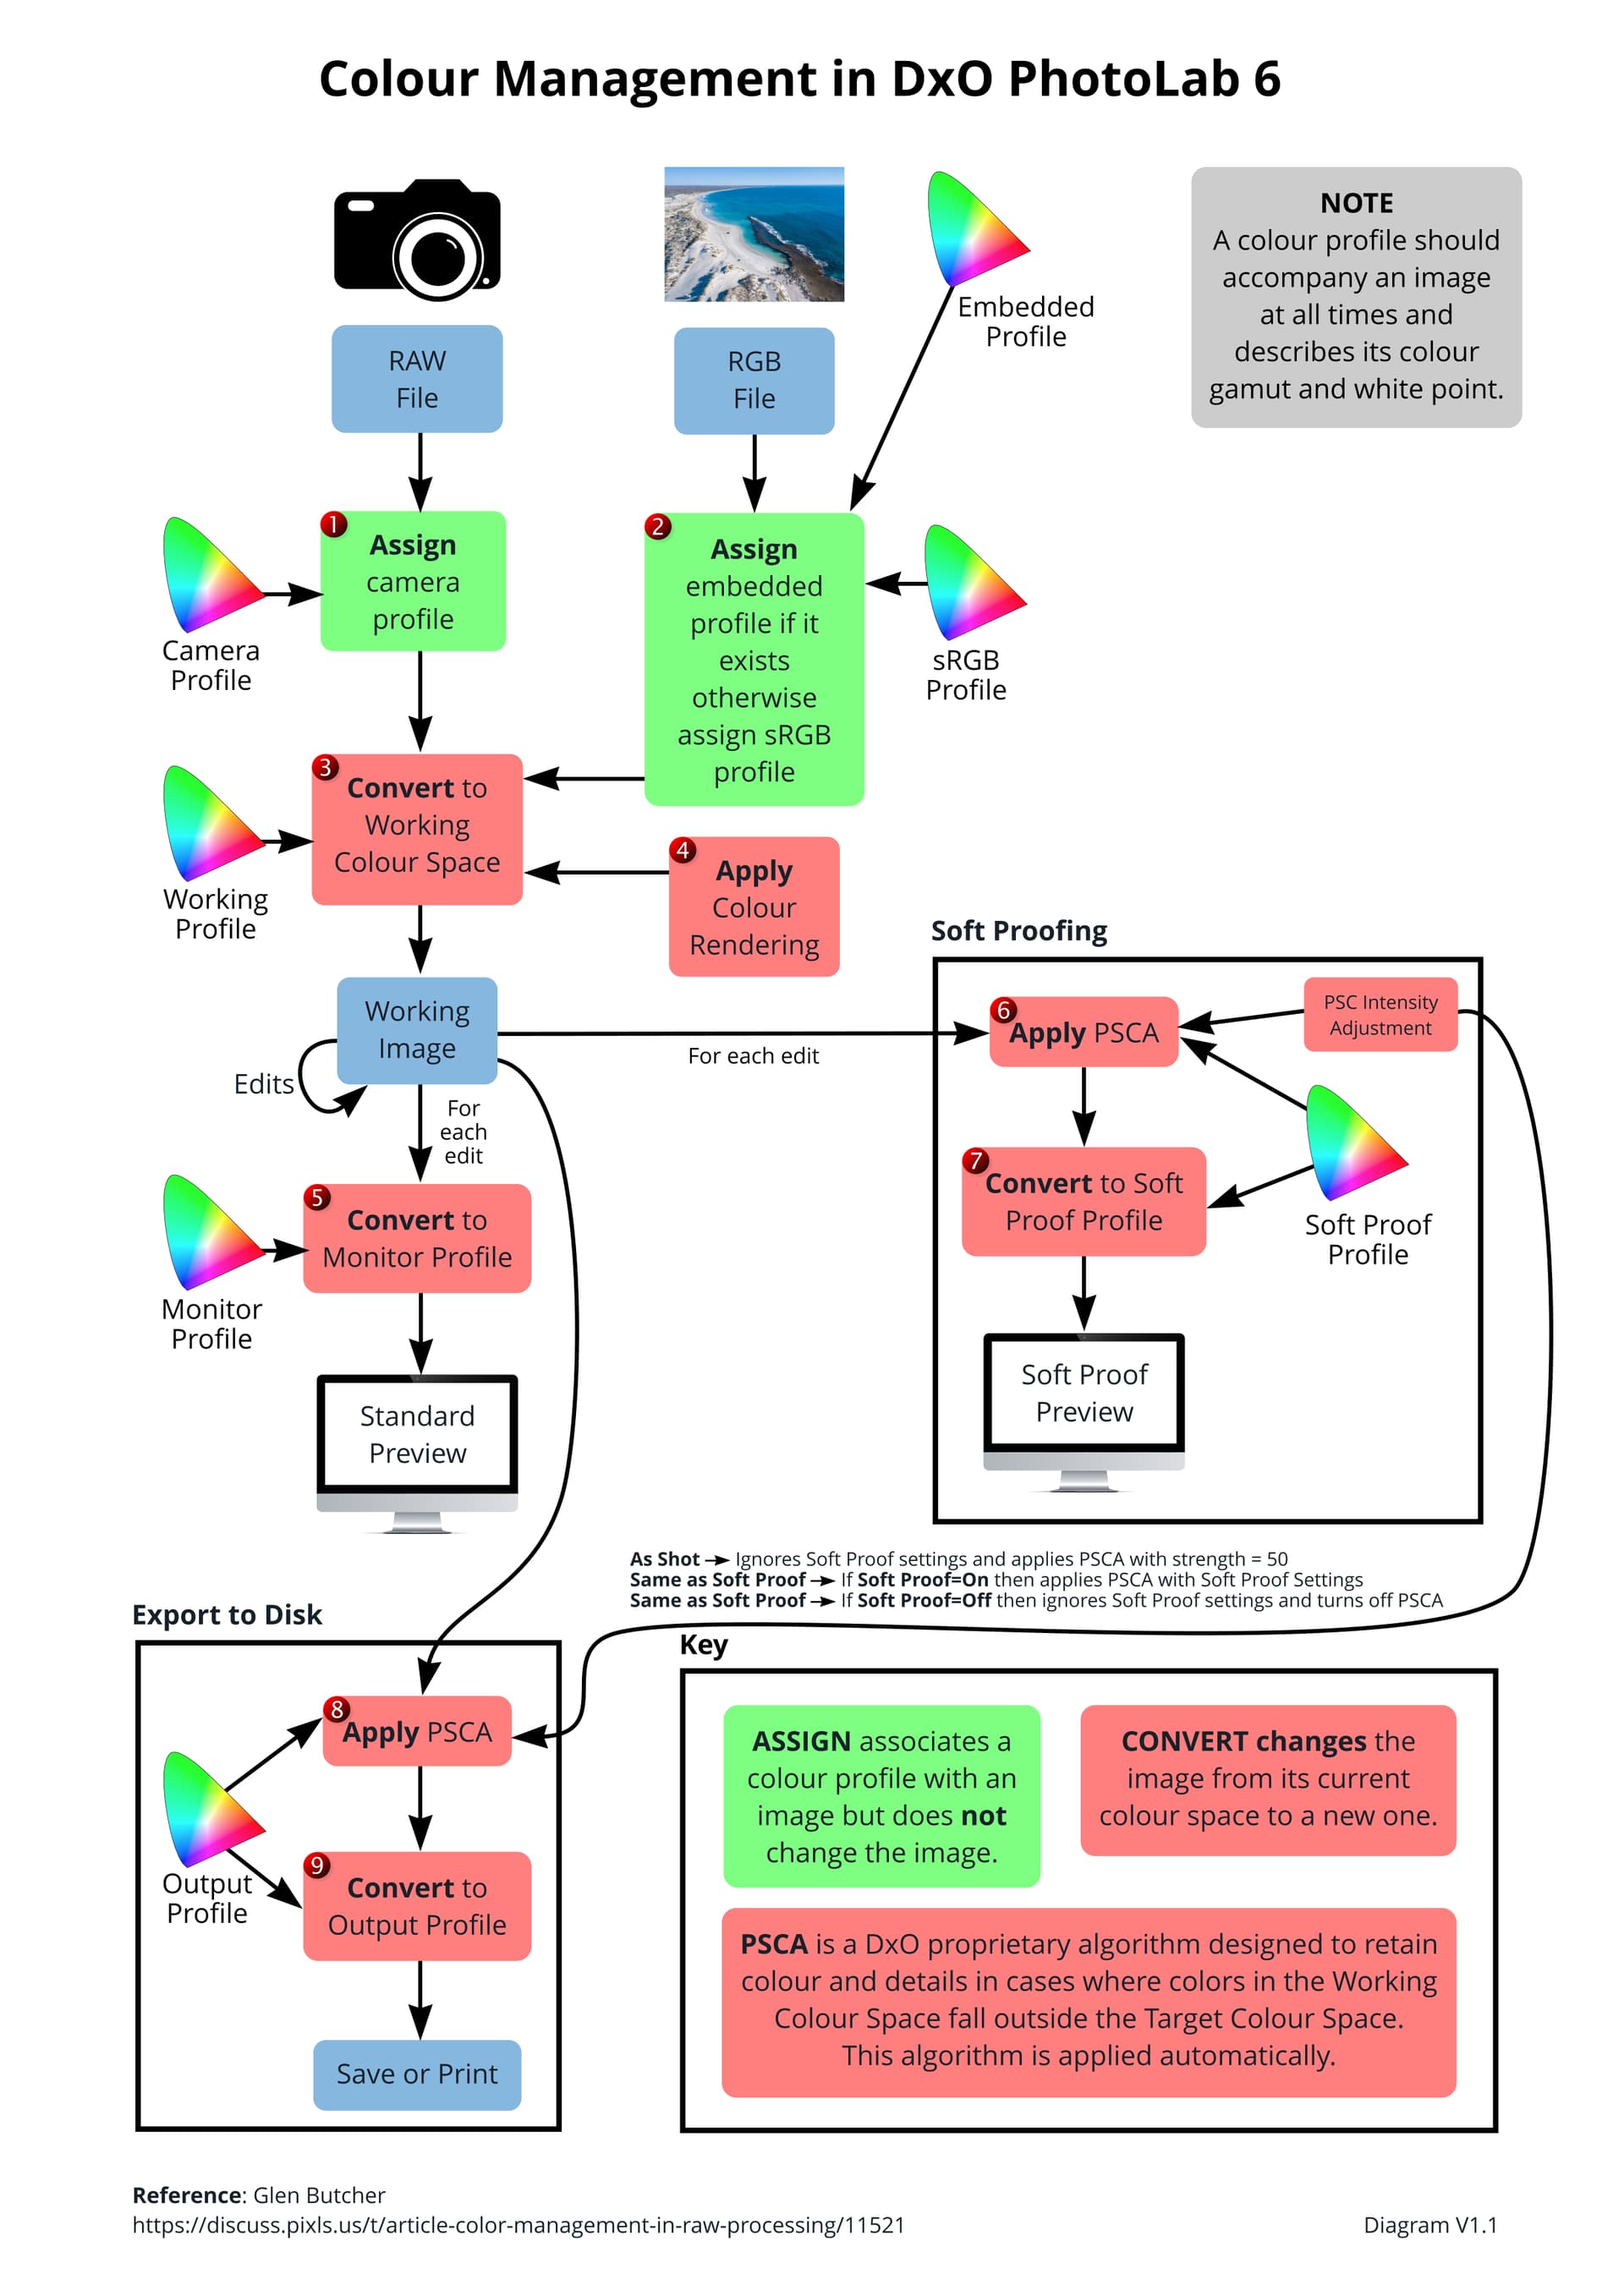
These are already there: Block 4 is your Colour Rendering and PSCA is the Protect Saturated Colours Algorithm
The intended purpose of the diagram is to help people understand colour management in PL6 and not to provide a workflow for all editing options in PL6. So, sorry I will not be adding anything that is not Colour Management ![]()
Actually, demosaicing (along with DeepPrime) is the very first step in preparing the RAW file for editing and has nothing to do with WB. WB is initially taken care of by colour profiles which should have the initial WB settings and is applied AFTER demosaicing using WB settings in the camera profile. Manually changing the WB is an editing function and not part of colour management.
Any other comments and/or suggestions for the diagram will obviously be considered.
Below is a slightly updated version of the diagram with a small change to the wording for the application of PSCA during export.
Thanks to all for your comments and suggestions.
1 Like
But I still think that ‘Soft Proof Preview’ is done in the ‘Monitor Profile’ and that should be part of the diagram.
As far as I understood all the conversion are done via a ‘Profile Connection Space’ as shown in Soft Proofing - #26 by George. Every image is going via that Profile Connection Space, also the Soft Proof Preview.
George
@George, the monitor profile does not change when soft proofing as it is set by the OS. Soft proofing converts the in-memory image (which is in the monitor profile) to the SP profile and displays it on the monitor thereby simulating what the image will look like on the device for which the SP profile has been selected.
You will only see a difference on screen if the SP profile has a narrower gamut and/or different white point to the monitor profile.
So, soft proofing does display the image on the monitor on the monitor gamut but had been covered to the SP profile which is usually a smaller gamut than the monitor profile and should look different.
Hope that helps you understand this a bit better.
1 Like