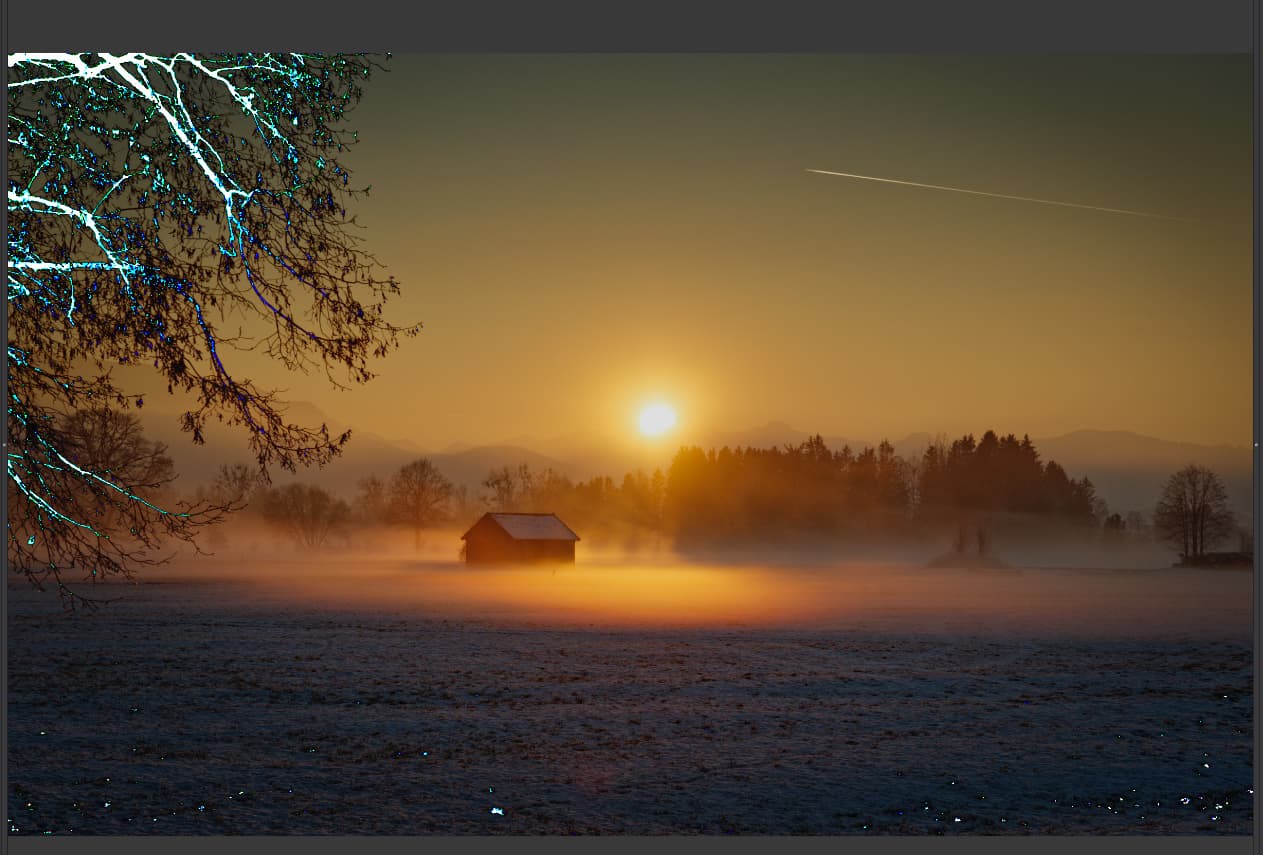
This is what I did, while Joanna was creating her post. I gave up on the sun, because anything I might try to do to fix it, would do the opposite. So, I just tried to make the scene look good to me.
Now that I’ve finished, I’ll look into what Joanna did.
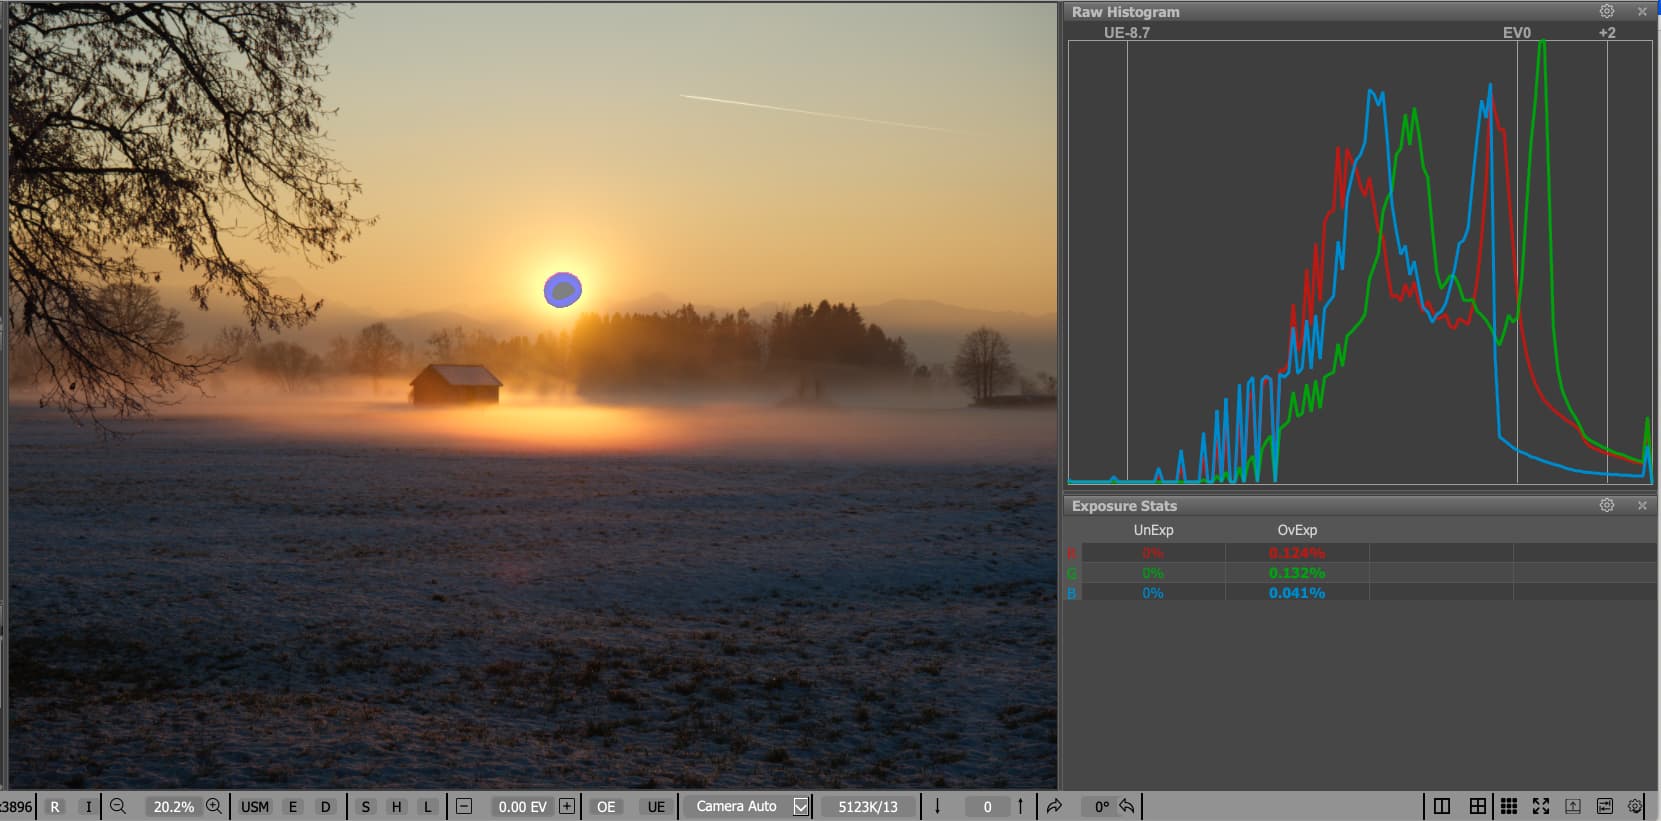
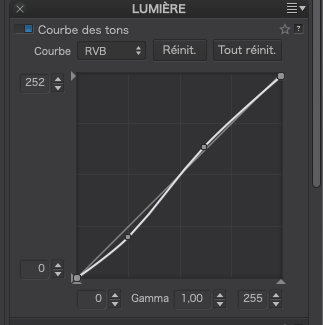
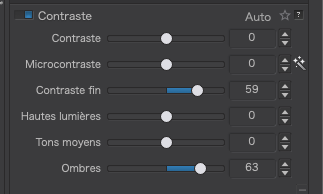
By lowering the highlight point on the tone curve as much as you did, you might have reduced the intensity of the sun but you have got blocked shadow detail in the tree and in the foreground. Did you show the warning flags while adjusting?
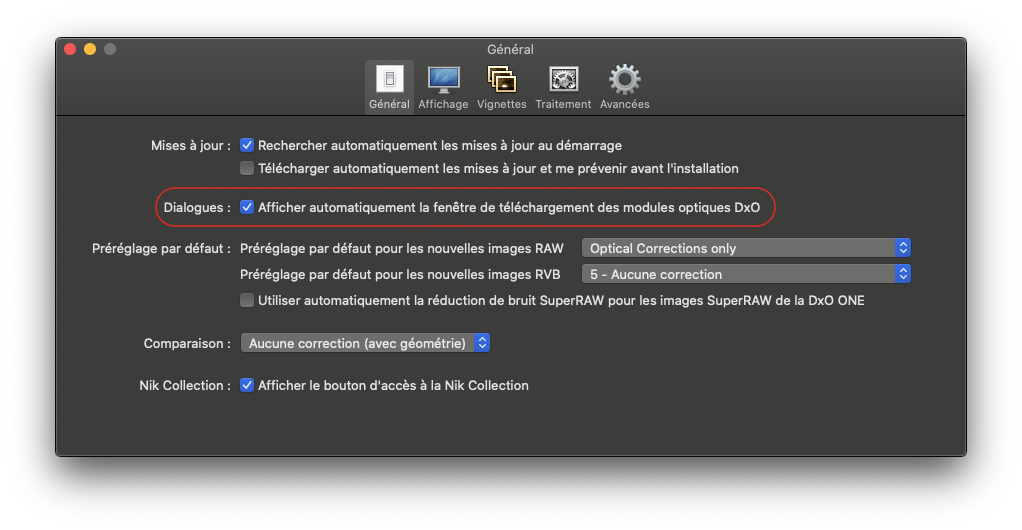
PL5 wanted to download a module, which I did. Now I’m confused. If so, what went wrong? Now that it’s all done, how can I verify that the module is really there, or not?
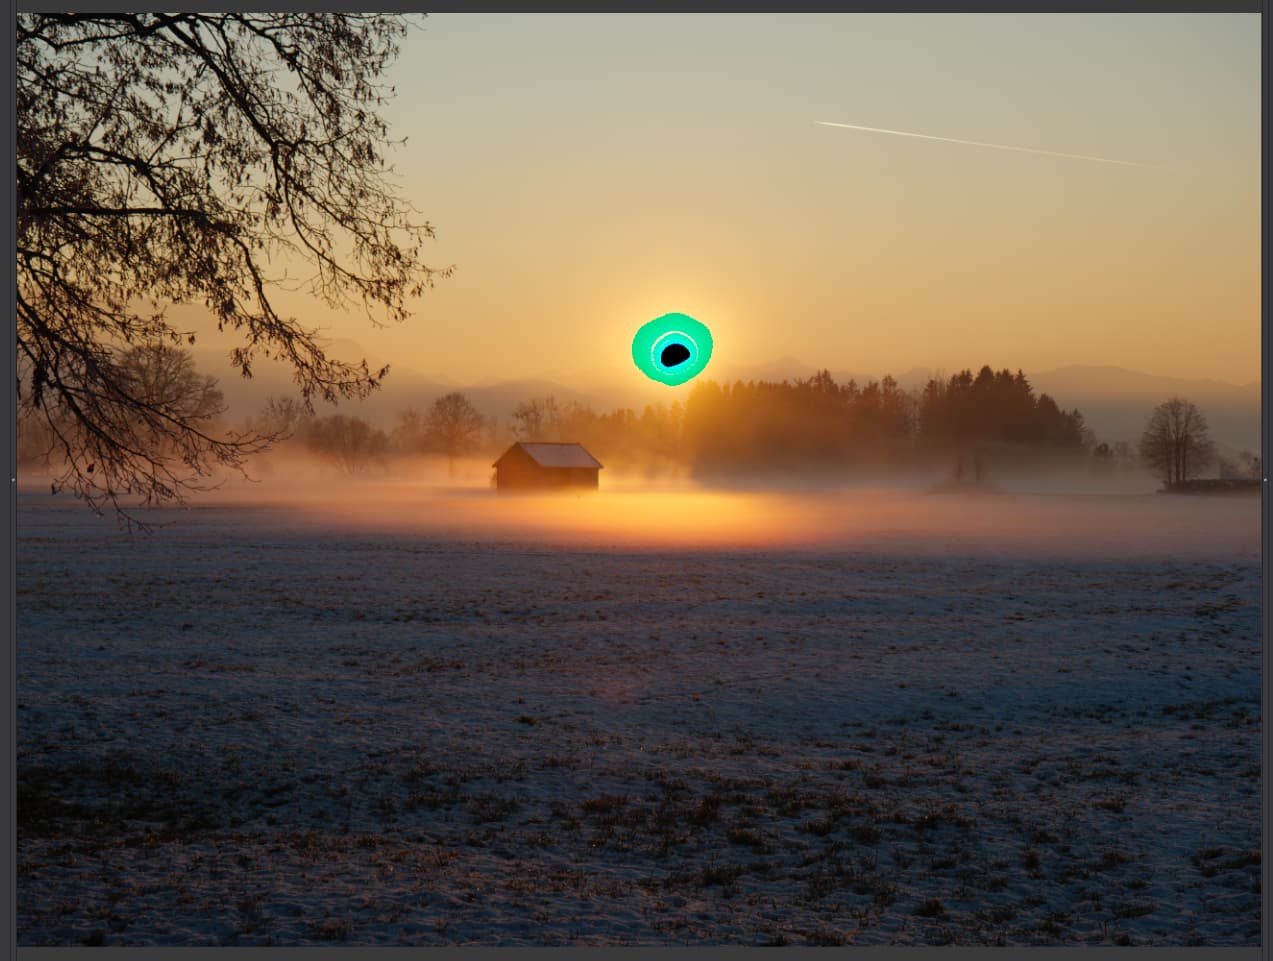
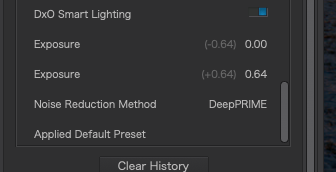
I didn’t use Smart Lighting with the sun, as it was burnt out. I never thought to do so, only that it was a bad idea - next time I’ll use the brightest part, even if it’s blown out?
No, I didn’t use the warning tabs, as they couldn’t fix the sun.
Regarding the shadow “detail”, by doing what I did, won’t they simply become “black” in PL5? I just checked - changing the lower setting to “2” instead of “0” turned off the warning flags. I usually do this, but not this time. What effect would this have on the image? Once something is “black”, it can’t get any more “black”.
I guess I was wrong about this - if the sun is completely burnt out, why would/should I use that for the Smart Lighting? I did think about it, but I guess now, in retrospect, that was a poor choice.
I fiddled with the image on my screen, until I liked it, and then stopped. Not very scientific or precise.
I ended up liking the image, but to me, the sun ruins it
Hmm, what did I do wrong? Doesn’t this mean PL5 did download the modules? How can I check?
Sorry, I didn’t pay attention to the file(s) PL5 wanted to download - I assumed (bad word!!!) that PL5 would display and then download any files it needed???
Checking further, should they be listed in ‘history’ ?
Come to think of it, it might be because when I first opened the file with your DOP, I hadn’t installed the module and PL defaulted to non-module adjustments.
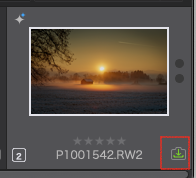
You can tell by looking at the thumbnail…
If you can see the download symbol, it’s not yet installed. In which case, just click on it to download it.
Please note that to reproduce: You will need to create a DNG file with “Optical corrections and NR only” and then apply the attached DOP file to the DNG file.
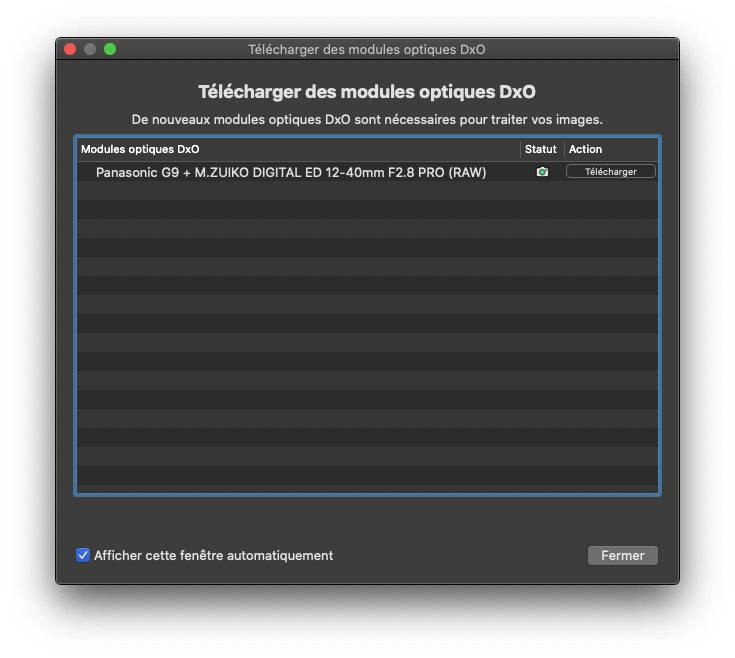
The module screen you posted is what I think I saw, but other than to click on the button to install it, I didn’t really even read it.
By the way, if the sun is literally included in a scene I’m about to photograph, I assume it’s not going to work out well. I forget who in this forum reminded me that it’s not good to even look through the viewfinder if it’s a “real” sun. With a digital display, I don’t worry.
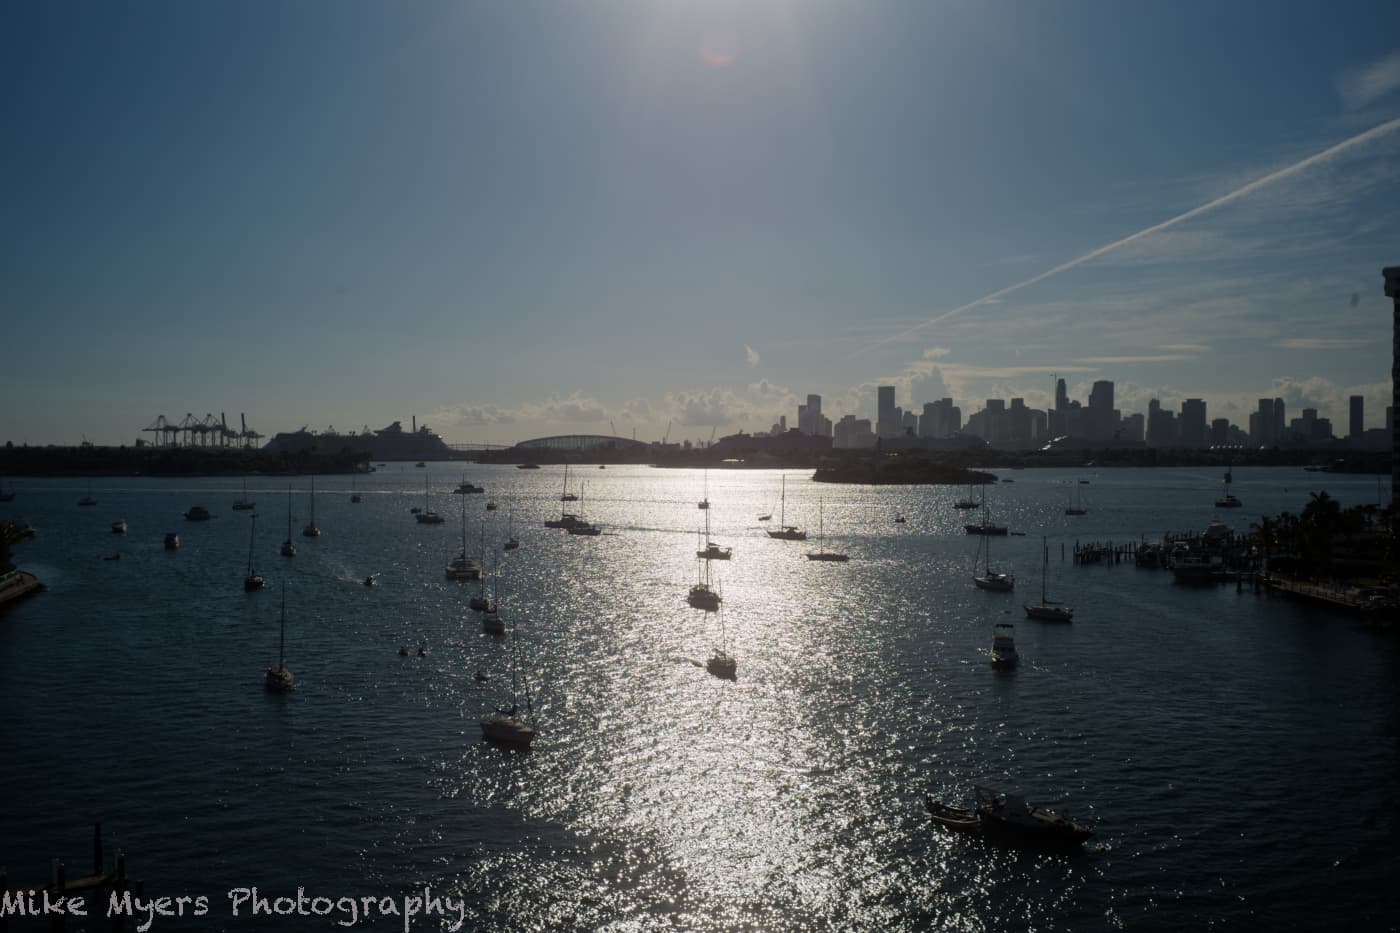
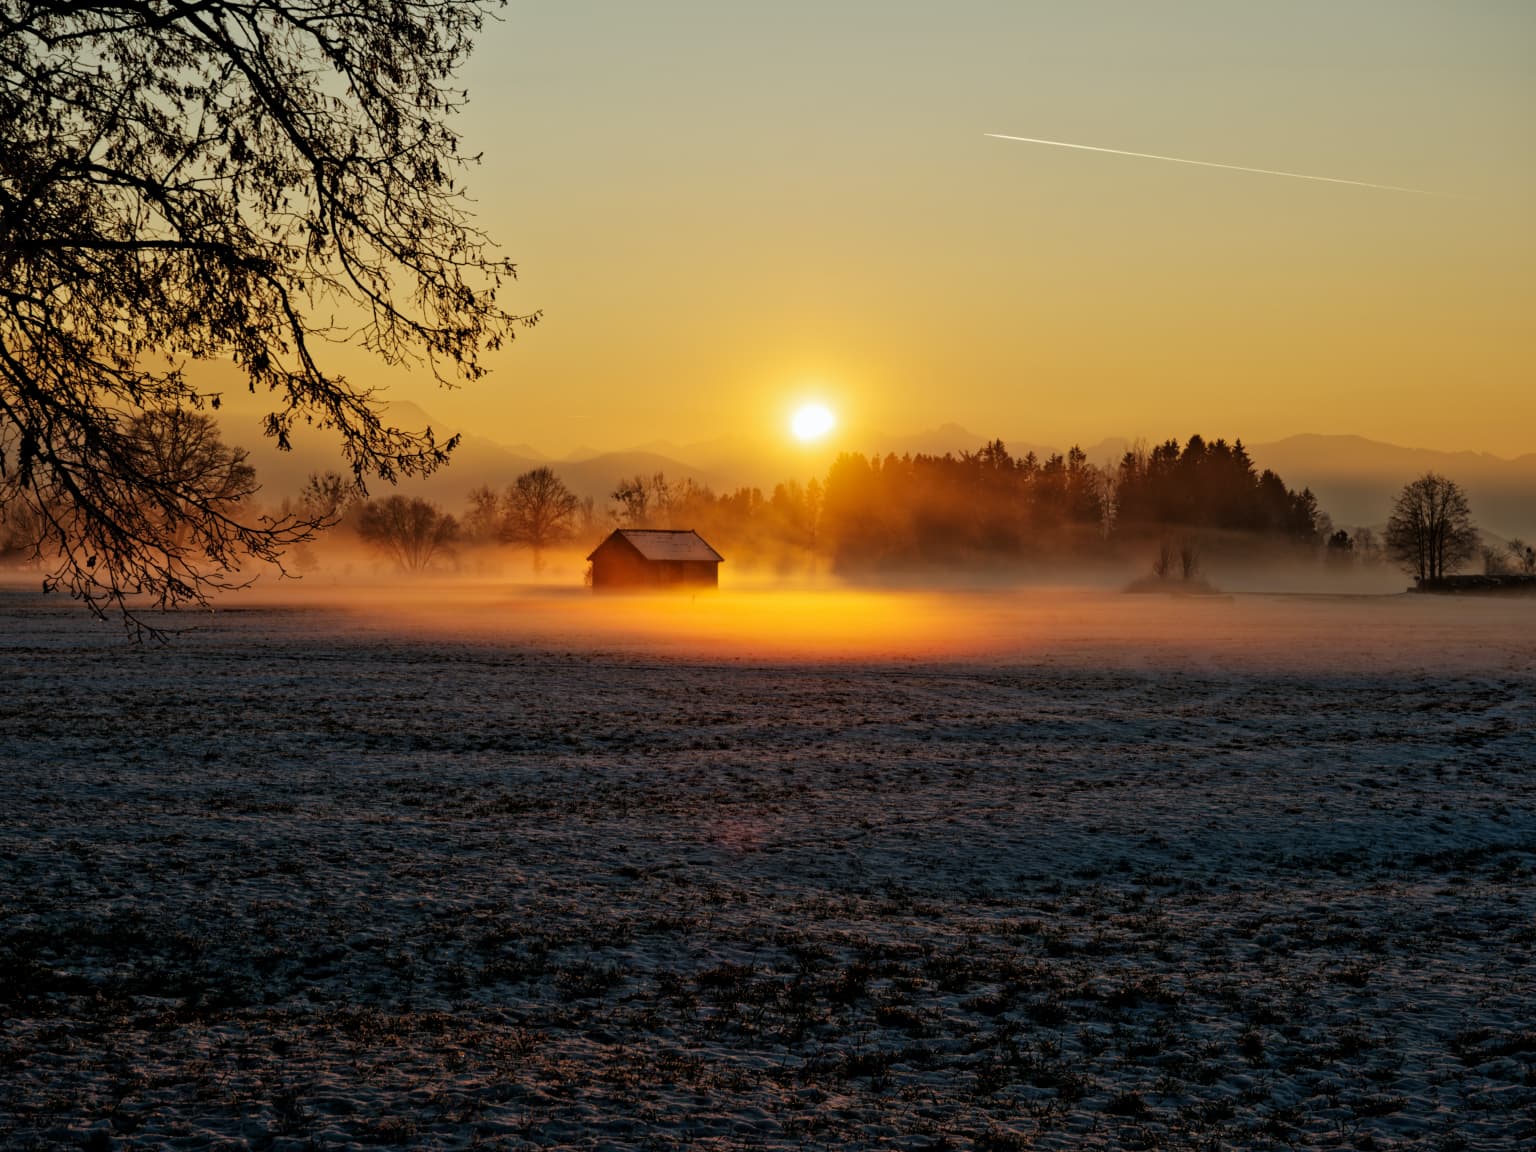
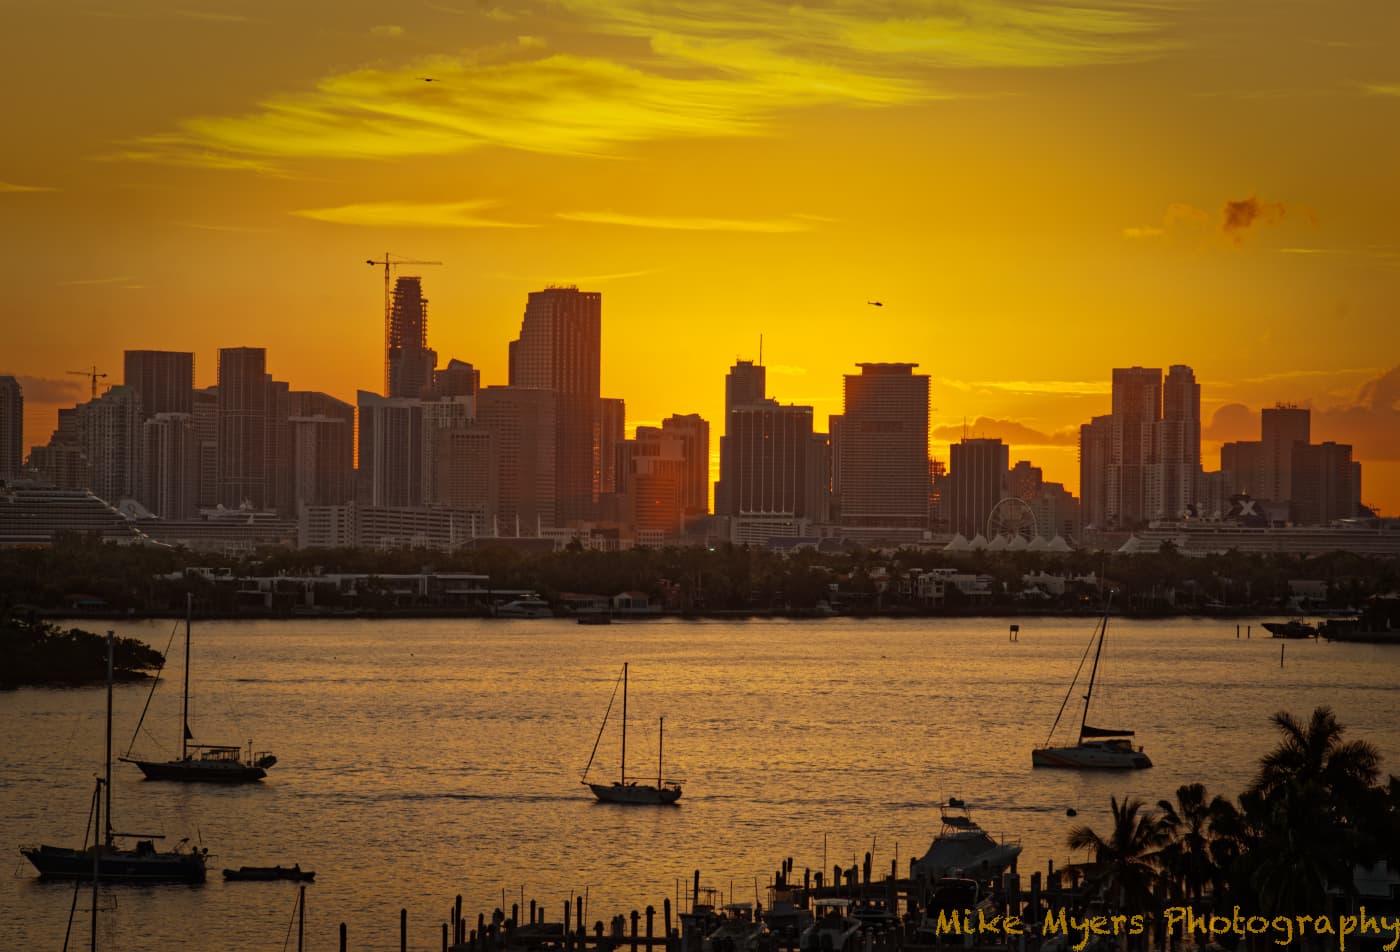
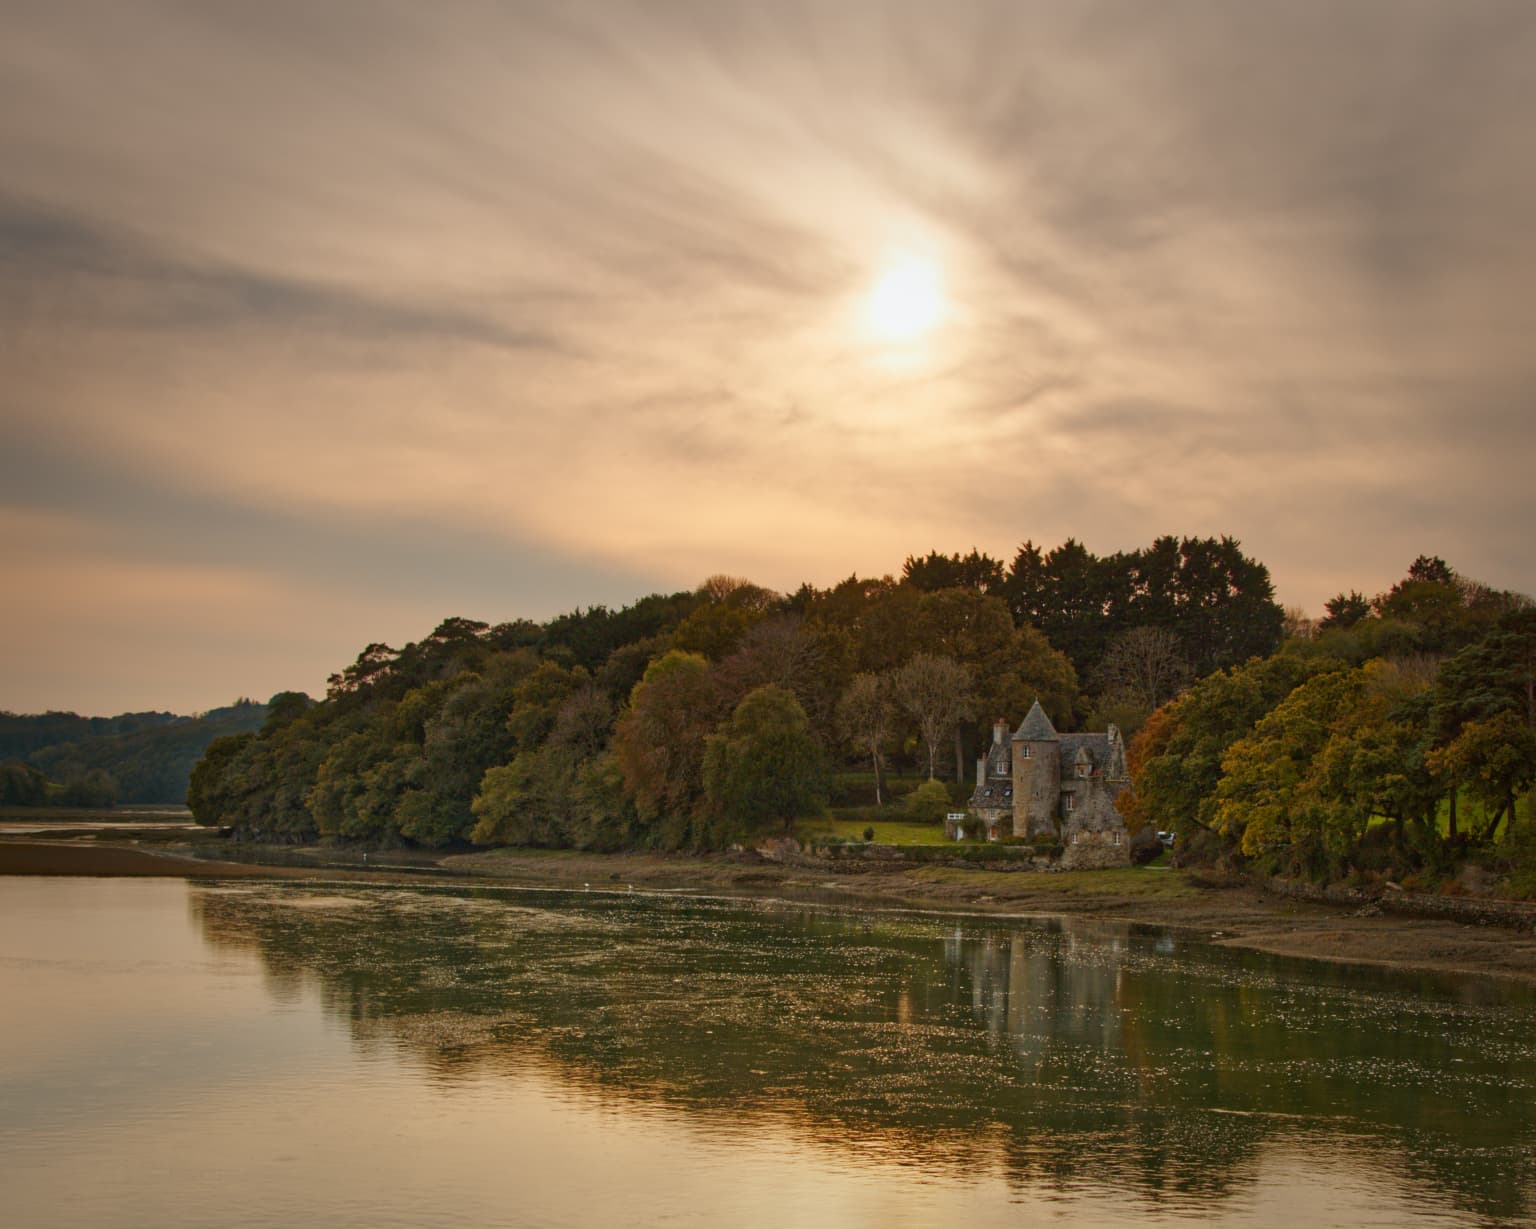
I haven’t posted a sunset photo here in ages, both because I’m doing other things, and because the sunsets have been quite boring lately. I decided I would try today, with the M10, and my 135mm Tele-Elmar lens, that is supposed to be very sharp.
I waited until the sun was behind the buildings - maybe I waited a little too long, but once I opened up the shadows, I was rewarded with lots of reflections from the other buildings. It’s nice that the helicopter came by, but the bird at the top left must have been camera shy.
I suspect all of you know what the finished image is likely to look like - not me. What I saw with my eyes is mostly like this image when I click on the COMPARE tool. I’m pretty happy with it (but I’m sure Joanna will show me how it could have been better), and I’ve mostly lost interest in Leica’s new M11 camera.
Not necessarily. The trick is to learn how to master the exposure. Take a look at this picture by one of the greatest Impressionist painters ever, JMW Turner…
See how the ingot really appears to be illuminated and yet you get to see the surrounding detail.
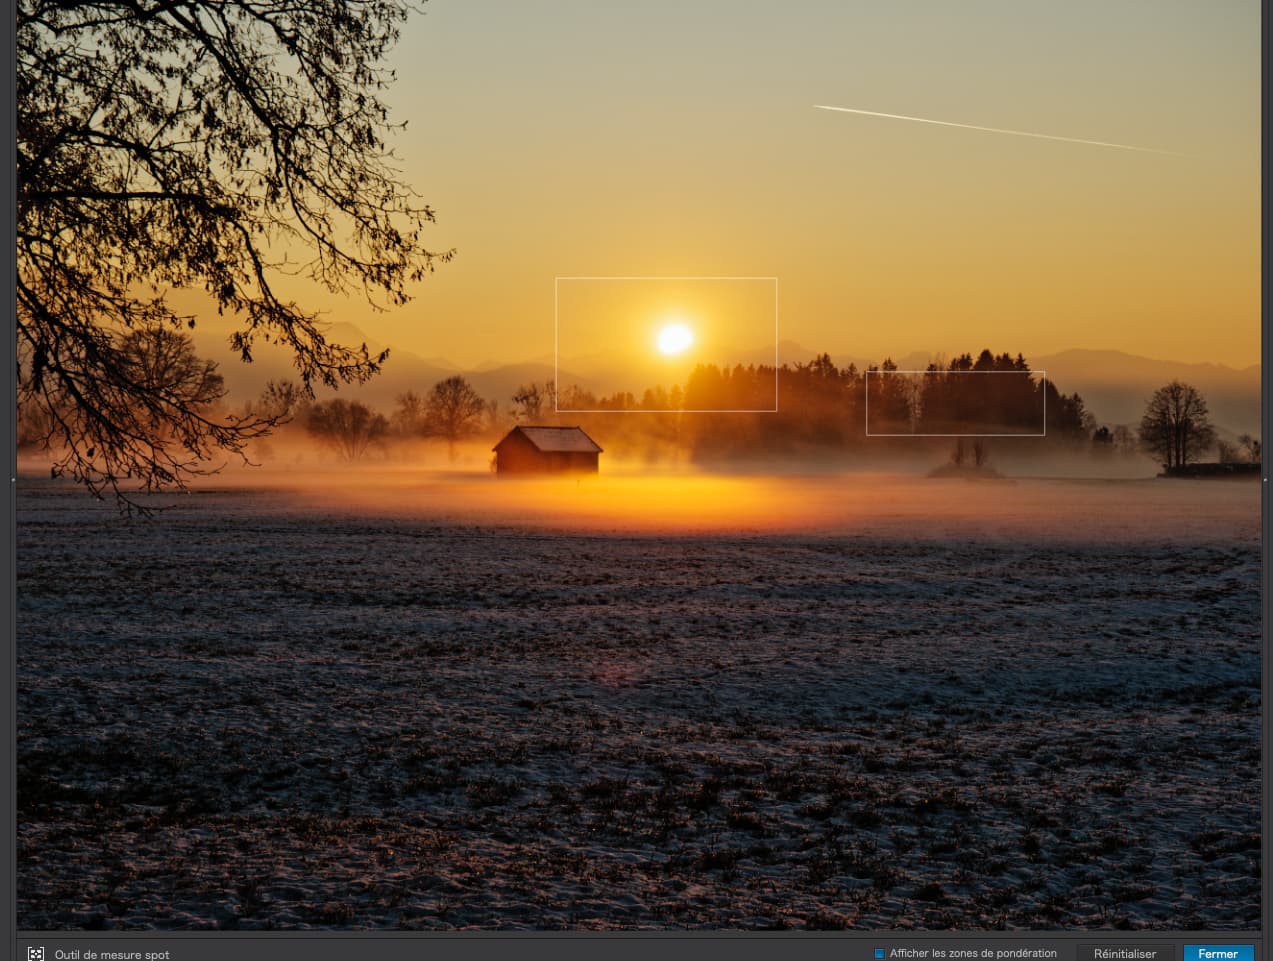
This kind of image is possible with a digital camera but you just have to use a camera with the highest possible dynamic range, learn where to take a spot reading from and where to place the reading in respect to 0EV. And then, once you get it right, remembering what you did for the next time and, most importantly, stop swapping cameras and getting confused over which camera does what.
Then you need to get used to manipulating the Spot Mode Smart Lighting, Tone Curve and all four of the Fine Contrast sliders in order to invoke that feeling of burning eyeballs without burning out the highlights too much.
@chris43’s image has just about the right amount of over-exposure on the centre of the sun. What is important is that Chris waited until the sun was sufficiently obscured by atmospheric dust before taking it. Chris, I think JMW Turner would have been proud of that as an image.
How come, on a tripod, you didn’t get the camera level? If those cheap Leica’s don’t include a level, buy a cheap one the sits on the hotshoe And then you didn’t quite get it level in PL5
Nice to see you used a Control Line, but you still didn’t change the selectivity; which helps to avoid overspill into adjacent areas and, in this case, helps in not increasing the exposure in the flare from the sun. Take a look at how I used different adjustment tools, than those you used, to bring out the detail in the buildings a bit more.
With the global adjustments, try not to use either Contrast or Micro-contrast since they both affect the smoothness of the sky and clouds and can start to bring out too much detail in the water as well.
I also reset the colour temperature to the in-camera value and, instead, applied a Control Line to the water with quite a high selectivity of both Luma and Chroma, in order to accentuate the sun reflecting on the water, by warming up the colour temperature and raising the Vibrance just for there.
Personally, I would have avoided or removed both as they distract the eye from the central subject. To my mind, even the stray cloud on the right could do with removing.
Main take-home point is to try to use more localised corrections, if possible, rather than blitzing the whole image and creating side effects. Oh, and try to use more selectivity with Control Points.
I understand and appreciate everything you’ve written about this concern, but that’s not what the question was about - “if the sun was literally to be included”, and by that I meant the real sun, un-obscured, and not hidden. I do use your suggestions whenever I can, waiting for the sun to be hidden, or mostly blocked, or I move to where I can put a tree in front of it, but what if none of these are possible? To me, I’m either going to have a burnt out hole in my photo, or I simply don’t take the photos at all. I like what you wrote, and yep, emotionally, I can “feel” blinded by something in the photos you showed, but what if the sun is right there in the sky, included in the image area, with no way to control it? I don’t feel good even looking at it, let alone taking a photo. I don’t think there is any answer, yet, but camera sensor designers could probably come up with an electronic solution, that prevents the sensor from ever getting “blown out”. Since I’m in no way a sensor designer, I’m stuck. …Helen’s way is by far the most practical, shooting when the sun is obscured, and that will result in a beautiful image such as the one you posted above. …but what if there is nothing there to obscure the sun? My take from this, is that when I see a scene similar to what Helen saw, to try to take advantage of it, and capture photos including the sun.
I remember it being you, @Wolfgang or @platypus, and I remember feeling concerned that I don’t want to damage my eye just to capture a photo, and the only way around this that I can think of is where a “mirrorless” camera, not a SLR, DSLR, or RF. If I used LF I think that would also be safe, as I’m not seeing the sun directly? My take on this is that if something is so bright it’s uncomfortable to look at, to not do so. I also have doubts as to whether or not this can damage a sensor permanently. All good reasons to never do so.
As I was taking the exposure, and as I was examining it in PhotoLab, I remember thinking that you would once again like the exposure. If you knew the whole story though, you would be disappointed. Jono Slack is a professional photographer who Leica selected as one of the people to get a pre-production Leica M11 camera, and he not only wrote a review, but posted a gallery of his images. I liked what he wrote, as perhaps the best way to get the most out of a rangefinder camera. Leica M11 review by Jono Slack
Two things came out of this for me. The first, is that I decided there was nothing to gain by my replacing my M10 with an M11. The second, is that when I’m taking photos of active scenes, I don’t have time to shoot with the Leica the way I shoot with the Nikon D750. His suggestion was to start by using auto-ISO, and then set the camera to Aperture Priority. With all that out of the way, I just compose focus, and shoot, sometimes in reverse order to get in a quick shot before I try for a better shot. I know you won’t agree, as you want full control of everything, and for the shots you post here, I understand why - there is never a rush, and the camera is likely on a tripod. But, for photos like the one I took a couple of weeks ago of an iguana by the edge of the water, I had didn’t think I had time for anything more than to focus. There was no composing, as the critter was too small in my viewfinder. After processing in PL5, I loved the results.
Back to this photo, I wasn’t planning on taking any photo, and when I glanced out the window and saw something nice, I barely had time to grab the tele lens and mount it. It’s not on the tripod because my D750 is mounted on the tripod, just inside the window, waiting for an appropriate time to use it, and I thought yesterday was mostly a waste, as what I saw was not very exciting at all. I wanted to see what the Leica could do under these circumstances, and when I saw the image on the review screen, I knew in my heart that it was just a waste.
I will make a point of not doing this in the future.
Camera was set to 5600K, and I started to change it, but barely adjusted it. I ought to have left it alone. Again, I will open your image, make another VC once it is loaded, and little by little see how you did what yo did.
Don’t they add some “life” to an otherwise very static image? I need to think about this a lot more.
One last thing. I used the “level” tool on the line between “water” and “land”. Knowing how perfect you are, I’m certain you did it correctly, but your photo “looks tilted” because that line goes so high at the right. Looking carefully at the real scene, out my window, I can clearly see that you are “right” and I was “wrong”, but every time I look at your final image, it appears to be tilted. So, what to do about this - make it “right”, or make it look “right”? I think I’ve done this with all my photos for many years, and the reality didn’t sink in until right now. Technically, this is because I’m not viewing that part of the “horizon” at an angle of 90 degrees - maybe 20 degrees. The 135mm lens exaggerates this.
Question - do we want this “horizon” to be straight, or to look straight?
Something new for me to learn.
I can’t agree. The camera is a tool, and I ought to use the best tool for the job at hand. The D750 is much better for this kind of photo, but it’s much worse for a “walkabout”. I need to learn both cameras, so I can use either one effectively. I won’t always have the perfect camera with me for a photo I want to take, so I need to learn how to do the best I can with what I’ve got.
(…but the D750 this time was only six feet away from me, with 80-200 already mounted, on the tripod, ready to go. For the best possible photo, I should have used it instead of, or in addition to, the Leica, but I wanted to see what I could get from the Leica, and post that image in the Leica forum.)
I think that just about sums up your options. It’s very difficult, if not impossible to bring the brightness of the sun in frame down to anywhere near not being blown out.
I have a 16 stop ND filter, through which I can clearly see the circle of the sun without burning my eyeballs out. However the exposure for a camera using that filter would have to be very short and there is no way you could recover shadows from what is likely to be around 30 stops below such an exposure.
30 stops equates to 1,073,741,824 more light in one part of the image than another and I don’t know of any image sensing device that could cope with that, let alone trying to compress it down to the §-8 stops of paper for printing.
There is also the very sound point that you really don’t want to be pointing several thousand pounds worth of mirrorless camera at something that could fry the sensor.
The basic guideline, to my mind, is if you can’t look at it to focus or measure the exposure, it’s likely to ruin your eyesight and the sensor, so don’t even think about taking it.
Which is why I like the Nikon cameras with the built-in level, but you could always use one of these
You might be paying attention to making the “horizon” look level, but you can only see the other side of the bay, which is further away at the right than it is at the left. You totally ignored seeing that all the buildings were leaning, which is where I used the “horizon” tool vertically.
I have two thoughts - I know that the sun can damage a person’s eyes from staring at it, and I’m scared of that, and just don’t let it happen, but ballplayers, or sailors on a ship scanning the sky for enemy planes need to look near the sun, as coming out from the sun was a favorite tactic for those oncoming planes. I know there’s some “wiggle room”, but I don’t want to stare - maybe just a quick glance… and I don’t want to risk damaging my camera either. This sounds like a good technical question for me to ask Nikon about.
Level - if my camera is on a tripod, I likely take the time to level it perfectly, usually with the Nikon level tool. To me, my Leica is designed for hand-held, “live-action” scenes, like what people did with it when it was first introduced in the 1930’s or so. It’s a very different kind of photography. I guess now it’s called “street photography”, and when I was growing up, the name was “candid photography”.
My Leica feels like it becomes part of my body. My Nikon feels like a tool that I use. Maybe this is because of how long I’ve been using the different kinds of cameras, starting with RF in the 1960’s or so.
Now that the cat is out of the bag, which is better/worse - to have the image technically correct, but people are likely going to think it is wrong, or to have the image technically incorrect, but people are likely not going to notice?
I’d like to know what all of you in this forum feel about this. I’m no longer sure how I feel about it. I’m inclined to make the image correct from now on, even if it “looks” wrong… as you just did.
Same photo, snapshot taken about thirty minutes earlier, with a 35mm lens, corrected to make it more “level”, but the camera wasn’t held still, and I never re-shot because I didn’t like what I saw. (I thought I already deleted this image, but it was still in the folder.) : L1004087 | 2022-01-21.dng (26.9 MB) L1004087 | 2022-01-21.dng.dop (12.6 KB)
I have opened my Virtual Copy, with your modifications.
The image at first glance is tilted, but the buildings say otherwise.
Under Local adjustments, I see three, “Water”, “Sky”, and “Buildings”.
I’ve been selectively turning them on and off, to see how they individually changed the image.
Sky: You did what I tried to do, using a graduated filter to boost the Saturation for the top of the sky, and you stopped just before this reached the buildings. As I turn this on and off, it looks like there is too big a “jump” above the transition, and it seems un-natural - although after staring at the image for a few minutes I can not really notice this.
Building: You angled this control line along the bottom of the buildings area, with the long-dash line at the water’s edge. If I understand this correctly, nothing below that long-dash line would be affected by this, and with the pipette on the buildings, only the (dark) buildings will be affected. It makes a tiny, almost not noticeable change, but it certainly does improve the buildings, as I see more detail in them. I’m surprised that you only used Vibrancy - I’ve been doing Vibrancy and Saturation both, but maybe that’s been a mistake.
Water - I like what you did to the water - you brought out more of a reflection from the sky, and a little more detail in the water, both very subtle, but both of which certainly improve the image.
I’m surprised I like this image so much. I almost didn’t take it, because looking at the scene looked too boring, and I sort of liked it when I edited it, and with your changes I am now very happy with it.
Some of you wonder why I like the Leica cameras so much. Part of it had to do with me growing up in Brooklyn, New York, using a German 1936 Contax II camera for everything. My “hero” was Charles Bronson, in the TV show “Man With a Camera”, and I dreamed of being a news photographer.
As I grew up, I found many more people to be my “heroes”; one was Robert Capa. If you look through this page, and see the cameras that Capa used, that parallels my mind’s connections for the “best camera”.
Contax was replaced by Nikon, which was replaced by Leica, which in turn was replaced by SLR, then DSLR Nikon, but there’s some kind of connection to this day to the enjoyment and thrill I get from using a good “35mm camera”, and its more modern versions more suitable for today’s world.
I knew nothing of Leica cameras being for the rich, the flamboyant, collectors, or the “aura” that surrounds those cameras now. I still don’t understand. I saved up for my Leica M2, much later for my M8.2, and finally for my M10. I also saved up for my Nikon SP, Nikon F, Nikon F2, Nikon F4, Nikon D2, Nikon D2x, Nikon D3, and finally having given up on all that, for the Nikon D750. A whole lot of fancy stuff, dropping in value the day I bought them, but for sports photography they were paid for by my magazine work.
I’m done with all that. My M2 works and feels like my first film Leica, and I use it mostly the same way. If you read the above story about Robert Capa, you might get a rough idea of why I think the way I do, and the kind of pictures I wanted to be taking, but never did.
My D750 in my mind is my version of Joanna’s LF camera, shooting serious photos just as carefully, no more of the “action” photos I used to go after. Comparing the D750 to a M10 is like comparing a large Sedan to a Mazda Miata - to me. The sedan is more practical, holds more people, has a larger trunk, is great to drive long distances, maybe with lots of luggage. The Mazda - not. But the Mazda is small, light, nimble, handles great and has more “sex appeal”.
I now return you to my regularly schedule DxO High Dynamic Range Photography, where the D750 certainly out performs my M10.
Have you tried playing with the Chroma and Luma selectivity sliders to see what effect that has on how much of the image is affected? You also need to show masks to see the area affected and hide them to see the effect a change to the sliders makes to that area.
Actually, all I did was to name the gradient LA, I didn’t touch what you did.
It works the same as a normal gradient mask - from the main line away from the gradient the effect is 100%; from the dotted line away from the gradient there is no effect. With Control Lines, many times, the gradient effect isn’t either necessary or noticeable, but it can be more noticeable if you place multiple Control Lines.
To my mind, subtlety is better. The idea is to process a photo in such a way that it doesn’t look processed.
This really is a case of “suck it and see”. In my experience Vibrancy raises the strength of the colour without saturating it too much. Too much Saturation can “blow” the colour - something I check against by using the shadow/highlight indicators under the histogram whilst making any adjustments.
Once again, down to subtlety and judicious use of the Chroma/Luma selectivity together with the placement of the pipette. Very much an iterative process, trying different pipette placements whilst showing the mask, in order to see which parts of the water are going to be changed when you do apply the adjustments in the equaliser.
I don’t have time to fiddle with your image myself.
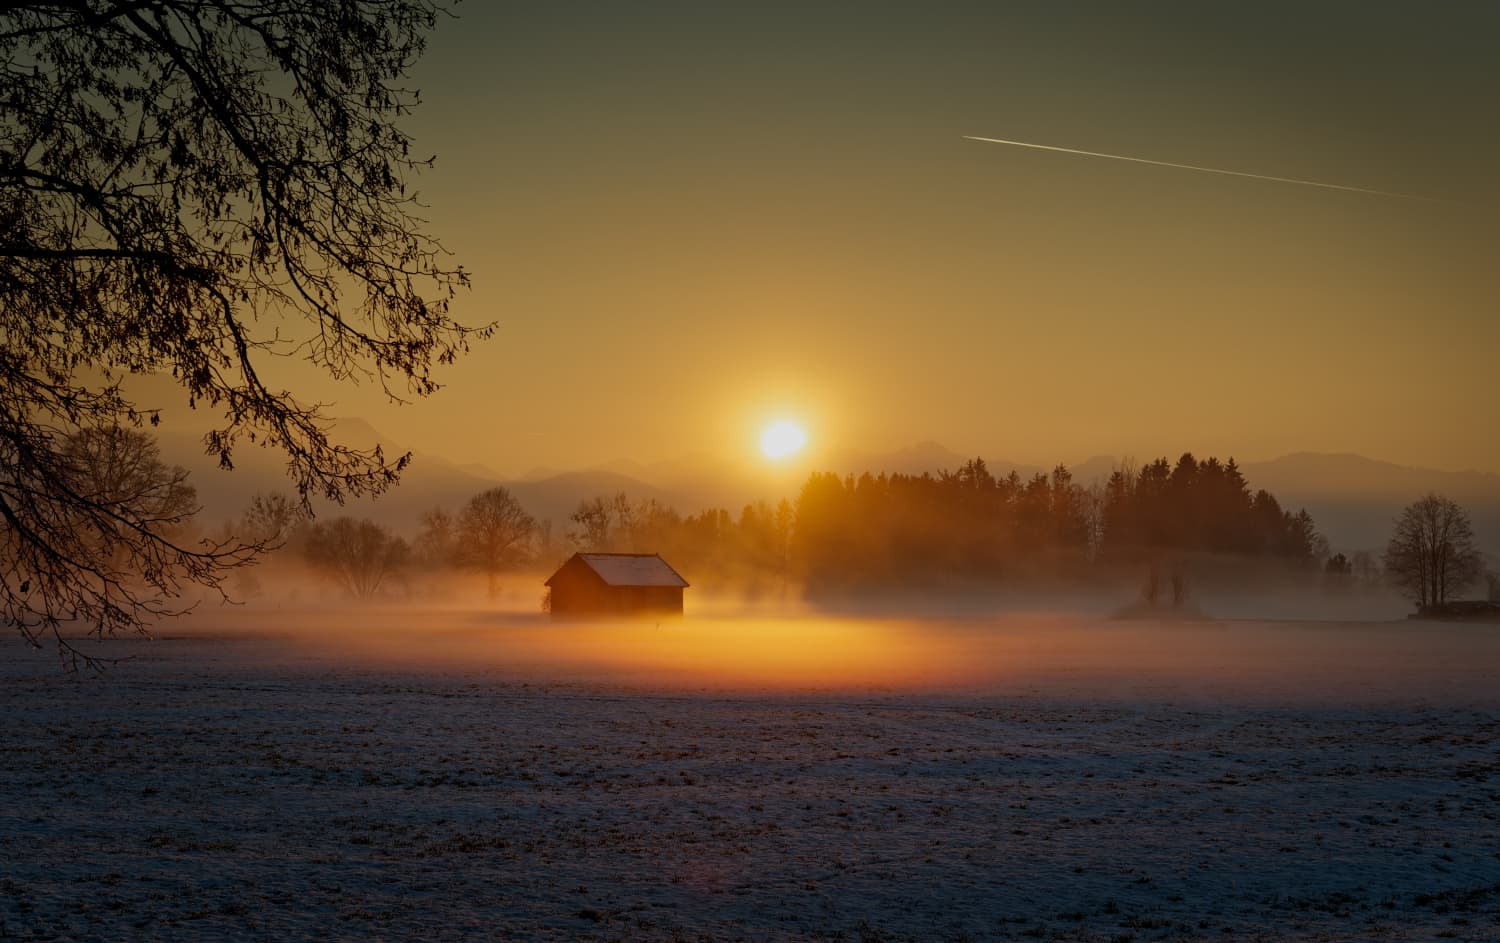
The upper part is great.
The field, lower part, lacks some detail which supports the upper part.
There is a slight faint glow of sunray on the snow.
Maybe that’s enhanceable to connect the field to the back.
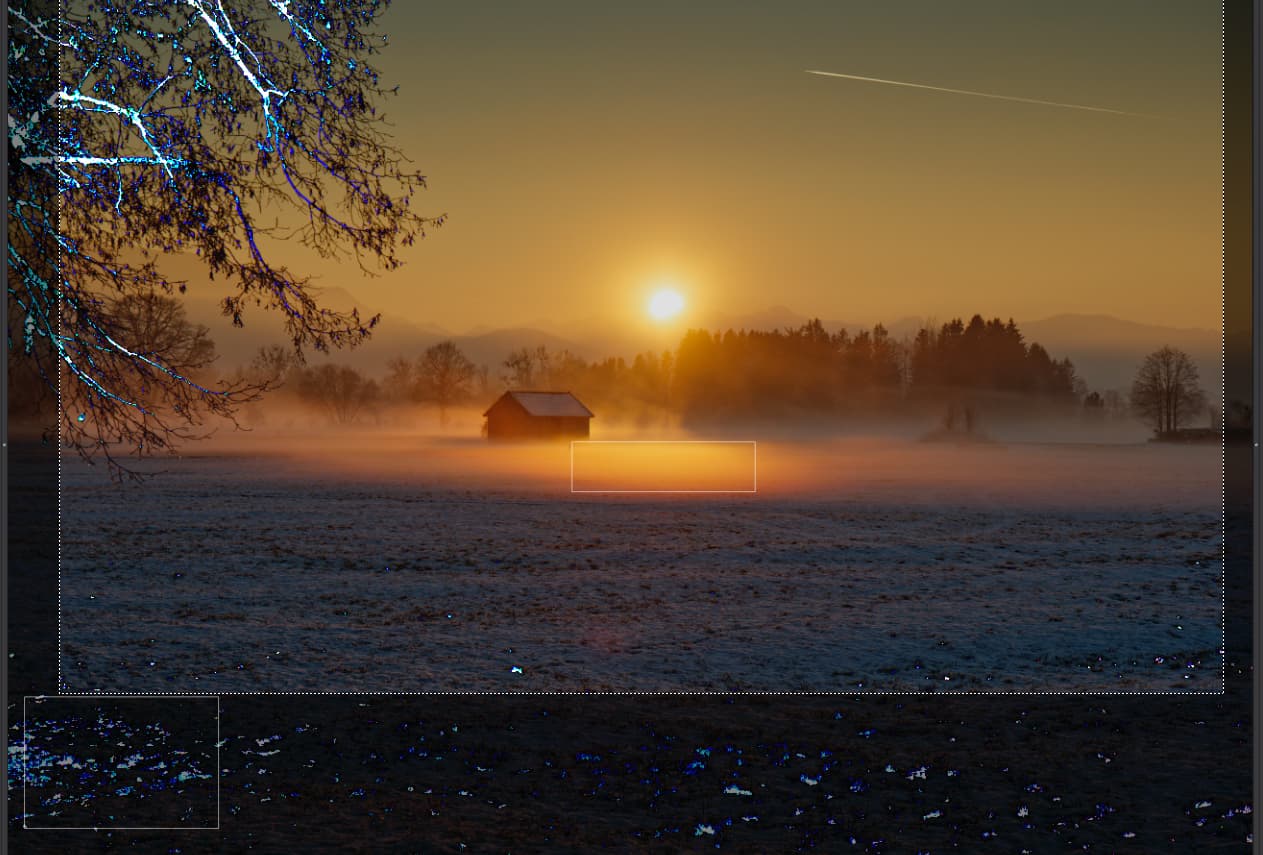
And i think i cut lowest 1/3 (there is in the middle a sunreflection round spot cut of just below that ) of the field to give the upperpart more then 2/3 of the frame.
In tonality i think you nailed it.
So reframe it a bit and your done.
I didn’t think to do that - I will do it later today.
That being the case, it’s my fault. So, I learned a new trick - turn the effect on/off, and make sure it looks the way I want it to look. After a few seconds, I accept changes, but I should do more checking. Turning the correction on/off make it more obvious if I didn’t do things well enough, as I saw here. …how do I rename the corrections, as you have done?
My brain keeps “forgetting” this simple explanation. Today is a good day for me to get this embedded into my brain, as the other corrections already are.


 And then you didn’t quite get it level in PL5