I had my corrections set up to “DXO Standard” by default but I’ve noticed that it makes all of my pictures darker so I have to immediately correct that. I was thinking of just turning off all corrections. What is everyone else doing?
Thanks!
I had my corrections set up to “DXO Standard” by default but I’ve noticed that it makes all of my pictures darker so I have to immediately correct that. I was thinking of just turning off all corrections. What is everyone else doing?
Thanks!
It’s probably the Smart lighting. I would deselect each one of the settings, one at a time, until you find the one that you think is responsible. You can then set up your own version of DxO Standard. My startup preset is something I call Starting Point. It’s based on DxO Standard, with a couple of settings from DxO Standard deselected and a couple of other settings added.
Mark
I used to use the DXO Standard preset for RAW files but since the implementation of the “Export to DNG NR and optical corrections only” option in PL4, I use this in conjunction with my own preset including these corrections. Then I use “No corrections” preset for all RGB files.
This suits my workflow as I treat each individual photo as an unique object and prefer to start from scratch. If I have a group of similar photos I will edit one of them and then copy/paste the corrections to the remaining files.
There’s no right or wrong way to do it. Use an existing preset(including No correction) or make your own, whichever best fits your style of photography and workflow
I presume that @Soundchasr is using the DXO Standard preset for Raw files only. LIke you, Mark, I use the No corrections preset as the default for RGB images.
Mark.
Thanks for this. I was using Standard for RGB which I’ll now turn off and test out.
Should I keep optical corrections on all the time for RAW?
I have created my own “Optical Corrections only” preset, with the four essentials plus DeepPRIME, because I use it all the time, and set that as my default preset for RAW files. I use “No corrections” for non-RAW files.
What are the 4 essentials? Care to share. 
Lens sharpness, chromatic aberration, distortion and vignetting. All of which should be set to automatic if a lens module is installed.
My RAW defaults as a starting point are:
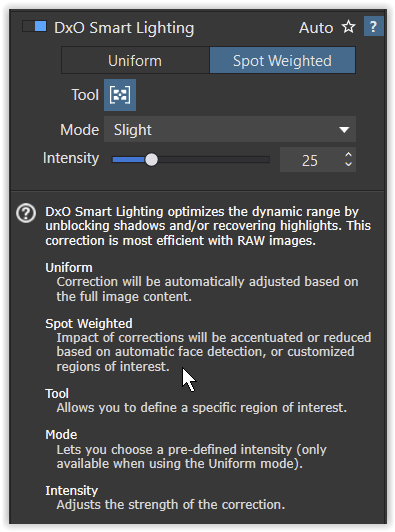
Smart Lighting = Slight
Crop = unconstrained / adjusted for keystoning
Distortion / Chromatic Aberration / Lens Sharpness / White Balance / Vignetting = defaults
Color Rendering = Generic / Natural color, factory tonality
Protect saturated colors = 0, but I often adjust it to 80.
DeepPRIME, Luminance = 15
Custom watermark
I use No Correction throughout.
As a start, I mostly apply my own preset that is something like DxO Standard minus Smart Lighting plus Color Rendering set to neutral, gamma 2.2 as well as a few tools, set to have no effect, but that I often use. I do this to overcome low contrast titles of inactive tools.
1, My own .dcp profile (‘color rendering’) created using the camera I’m taking the images from
2. Lens sharpness (pay attention to the first slider: you may find it’s better to be a little more aggressive with input sharpening in DPL than you would be in e.g. LR or C1)
3. White balance ‘As shot’: recent digital cameras mostly do a great job with “Auto” settings (assuming you exposed correctly)
4. Deep Prime (noise reduction but also output sharpening)
5. Set crop to “unconstrained” (should be DXO default)
6. Turn on Joanna’s ‘essentials’ but if there’s a module for your camera/lens you don’t need to set anything
7. Set Smart Lighting to ~22 and Clear View to about the same.
8. Saturation to 5 and Vibrance to 20 (just personal preference)
I forgot to add to my “essentials”, because I always have the WB on my camera set to 5600°K, that is what I also add to my default preset for RAW files because PL makes an educated? guess and doesn’t always get it right… That way I can tell how “warm” or “cool” the scene appeared when I shot it.
Although I almost always use Smart Lighting, I couldn’t set a default value because I always use Spot Measure mode to set the shadow and highlight zones rather than just a global reading.
I rarely use global ClearView Plus - it’s far too aggressive for the majority of images. If I want to “de-haze” I tend to for global Fine Contrast, possibly accompanied by some Highlight/Mid-tone/Shadow Fine Contrast if needed.
i tend to have it default on mode slight, spot weighted and turn off.
my default starting point is having much “automodes” active so it pops up to a reasonable processed file.
1 Peter’s general Preset 2020v4.preset (7,9 KB)
(come to think of it i need to recheck out come for v5) 2022v4
then i just think which way i like to go en use a 3- DR neutral checker.preset (6,4 KB) if i think there a “color rendering problem”
i start with generic rendering, because if i choose and other then i need to change some “defaults” like vibrancy +18. ( representing the vivid modes of panasonic)
so if i change category is switch to : “optical corrections only preset” and build from there.
yes and no, clearview plus is a "smart kind of microcontrast which apply not equal the same level on a even spread grid. So as Last action in the proces you can use it for a “pop” .
say modest 15% in general. and if you add in locals you must tune down global to 10% or lower
see this:
P1020581.RW2 (18,8 MB)
P1020581.RW2.dop (89,1 KB)
i was testing “software post polarisation filter” against my silkypix v10 dehaze and clarity and blacklevel.
Here is an export of my version of your image, with the minimum of adjustments: only using Fine Contrast, Mid-tone fine contrast, a slight tone curve, a slight Creative vignette and Spot measure smart lighting with a couple of zones for shadow and highlight…
And here is the DOP file with my version added…
P1020581.RW2.dop (132,0 Ko)
thanks, those rw plus VC’s i posted where maximalised to show difference in a test folder.
thanks for your version.
i am middle in the process of IPTC updating of my raw archieve so when i come across this file i will add yours.

You are right, Joanna, that I’m wasting time with my ‘default’ Smart Lighting setting because, like you, I habitually switch to ‘Spot’, and then apply it conservatively. Like you I prefer to use the contrast and selective tone controls most of the time.
There is no single, correct answer to your question, @Soundchasr - but Mark offers a good starting point;
To set this up; select a “RAW” image with PL and apply the 1 - DxO Standard preset to it.
De-select any of the corrections that you do NOT wish to be applied automatically … say, Smart Lighting.
A good trick is to make them “activation ready” - by which I mean; de-activated but with their options/settings applied as you like them … so all you need to do is activate them.
– For example, you could have Smart Lighting activated with the Spot Weighted option selected … which will function like the Uniform option until you define a “spot on interest”, when it will immediately function as Spot Weighted.
– Similarly, you could predefine your preferred settings for ClearView - and have it on or off, by default, as per your preference … ready for immediate activation/de-activation, as required.
When all done, use Menu option: Image / Create preset from current image … and save it with a suitable name … say, “MyRAWStandard”.
Finally, assign your new RAW-Standard as the default preset applied to newly encountered RAW images - via Menu option: “Edit / Preferences”
HtH - John M
I agree with your observation, Peter - but I actually use an approach somewhat similar to Joanna’s;
I have RAW White Balance deactivated by default - because that renders the exact same result as when you have “As Shot” selected.
I have the Manual option selected by default, with Temp = 6000 (a little bit warmer than daylight)
Now, all I need to do is toggle activation of RAW White Balance and I immediately see the difference between my camera’s determination of WB and my reference setting.
HtH - John M
What is spot measure mode?