Hi,
while processing some forest portraits shot on a very sunny October day, and more specifically trying to retrieve the overexposed part of the face, I came accross (or provoked) some unwanted interaction between Control Points and the Repair Tool:
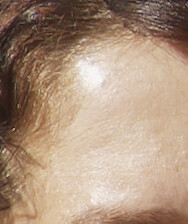
For reference, no local adjustments (I know, it’s not the ‘brightest’ idea to shoot portraits in the bright noon sun ):
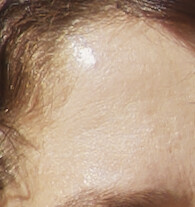
Applied Control Point to retrieve overexposed skin:
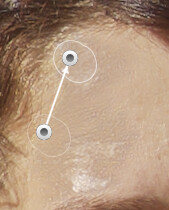
Then I tried to get rid of the hopelessly blown out part of the skin (where I had placed the CP center for maximum effect) with a bit of Repair Tool stamping, which is where the strangeness happened, with the whole area of effect of the CP being modified in a very unpleasant way:
Changing the Repair Tool’s sample origin area also changes the “effect”:
So apparently once repair tool has been applied to an area, the CP centered on the same area uses the new, repaired color / luminance texture for determining it’s area of effect, rather than the original picture content.
This can’t necessarily be qualified as a bug, but in some use cases this is a rather unconvenient behavior. But then again, there might be cases where the opposite is true.
So I guess ideally the user should be able to determine whether the original or the repaired area should be used for CP sampling - any thoughts on this ?
Hi philou,
First do you have dxopl elite and filmpack elite?
If so
Use selective tone highlight and advanged highlight contrast.
Rule of thumb, if you need -50 on selective only to kill highlight blinkies then -25 on both will work better.
(less grey blobs)
Then turn down microcontrast if it’s applied and use finecontrast instead.
Then use a controlpoint to tune down the last bits of highlight bleech.
Use selectivity sliders chroma and luminance to select as much as needed. The larger the outer circle the more it’s feathered.
Use clone/repair tool for the remaining spots.
Sometimes HCL colorpicker on a bleeched spot and resaturate that spot and or replace that color with a certain color range. See if it’s effecting other parts negative because it’s global.
Hi Peter,
I indeed have PL and FP Elite, so I’ll try out your tips, thank you! And it’s true that I need to get into the habit of using the advanced contrast sliders more systematically.
However in this specific photo I was quite happy with the rest of the picture and didn’t want to change anything else there with global adjustments, and while I know that other local adjustment masking possibilities are available, the CP did provide the fastest and easiest way of selecting just the unwanted highlights.
So in the end I put the center of the main CP on another area which I wouldn’t have to patch with the repair tool so that the CP sampling wouldn’t get messed up. But since that new CP sampling area was less overexposed, the CP selection was a bit less perfect, but luckily the chroma / luma sliders helped to somewhat alleviate that.
Hi Mark,
Thanks for the hint - in the end I went for something along those lines: patch up the bad spot with the repair tool and trying to find a nearly as overexposed area for the CP to sample and select.
So working around the issue is possible though can be a bit bothersome when you first try to correct most issues with CPs to then tackle the few spots still overexposed with the fepair tool, only tp fund that this can mess up the previous CP efforts. I guess that’s where layer logic on local adjustments would’ve come in handy, but I realize that it’s not really an approach fitting with PL’s overall way of doing things (i.e. no layers or particular order to apply adjustments).
 ):
):