I can’t find any online tutorials on this, not any specific advice in the manual. When I go into the PhotoLab 3 print dialogue (in Windows), one of the fields is labelled resolution and has a default value of 300 dpi and allows for up to 1200 dpi. I’m not clear whether I am supposed to select a value which accurately describes the quality of the image I am using, or whether this is somehow instructing the printer to print at a particular resolution. Is there any advice as to what value to select to get the best quality?
You really don’t need 300 ppl for most viewing distances, 240 is perfectly adequate. This means you can get a larger print size if you need to.
Normally, you need to allow PhotoLab to manage colours and select a profile you have made for the particular paper and ink combination you are using
1 Like
I wonder who is using the dpi really.
When I print home it’s always print to fit. When, and that usual happens, I send the images to a printservice, then the only thing I’m doing is choosing the print size. The print service warns me when the resolution is to low.
@RobEW,
The values of 300dpi and 1200 dpi are probably from your printer.
George
The truth is that ppi is only really useful in determining the physical size of an image defined in pixels.
Dpi, on the other hand dpi is a measure of how many dots of ink are laid down on the paper. Interpolation translates the ppi determined size of the image into the printer’s resolution
Since a pixel doesn’t have a dimension, there is no physical size. It’s the output device, printer or monitor, that creates a physical size.
Every dot in the printer represents a pixel. So when you print on 300dpi every pixel gets a lineair dimension of 25.4mm/300, metric. As far as I know the interploation is done with resizing the image. Though not sure about that.
George
I’m sorry but that is not so. My Epson SC-P600 has a printing resolution of 1440 x 5760, which would mean the average digital image would take up less than an inch if printed on the 5760 axis.
The ink dots really so minute and the printer will use multiple dots to make up one pixels.
I must say my knowledge is not to big on this issue. But 1440 means the horizontal resolution of the printhead. It’s another way to express the minimal size of the ink dots. The 5760 number is an expression of minimal vertical movement of the printhead, or paper.
As said, I’m not sure about this. But all the editing software like PS is using that simple formule size=amount of pixels/dpi. So a 6000x4000 pixel long side of the image printed on 1440dpi will be 2.77"x4.17". And don’t ask me what that 5760 is doing 
George
I print for other photographers and have to prepare images. What you are getting confused over is the mislabelling of resolution in pixels as dpi when it should be ppi.
Image resolution only applies to the image and is measured in ppi. Printers use dpi to define how many dots are laid down. Think about it - if one pixel was equivalent to one dot, how would you get one pixel that was anything other than the colours of the cartridges.
A 6000 x 4000 pixel image prints to 25" x 17" at 240 ppi, regardless of the printer resolution. What you get from higher dpi printers is smoother colours and gradients.
@Joanna’s printer has 180 nozzles for each of the c,m,y and k inks. 1440 dpi crams 8 times 180 nozzles into one inch. Multiply by 4 (colors) to get 5760 dpi. Combine with relative movements of paper an printhead to get whatever your print needs…
Printing more times with different colors on that place. Every color has its own nozzle on a different place.
From Irfanview, the printer window shows me the possibility to print the original size or different not original sizes. This printer is set to 600dpi so an image of 6000x4000 will become 10"x6.67". From what I remember it will print only 1 page filled with the top left part of the image.
I’m still not sure what happens with different sizes like “fit to page” or different dpi settings.
O yes, what I remember more was that when I send a picture with a setting request of 300 dpi and I print on the original size the printer will print an image of 20"x13.33" though the printer still prints on 600dpi. That’s a hardware property. What I still think, not sure, is that the image is resized to gain the demanded physical size with the native printer setting.
George
Thanks all for a flurry of responses. I’ll have another go.
Rob
Ppi is pixel per square inch, related to the native resolution of your camera sensor.
If you look at a bayer filter image on the web you see it’s 1/4 of the actual wells in a sensor. 1 pixel is one colorcode RGBL (l is your viewings device backlite strenght. Has nothing to do with exposure.)
DPI is dots per square inch. And because printers has diferent ways of making colors this can be a fox hole. Laser printers has tonerdots’s and the smallest toner partical is the smallest dot you can get. Office laserprinters do 600 and 1200 intepolair.
Because the paper moves and the laser writes only one line the horizonal and vertical resolution can differ. Laser is digital coded on/off( the optical layer on the drum and the lazerbeam diameter defines the maximum resolution and paperspeed is fixed(a minimum steps( resolution) by steppingmotor if you need a lower resolution it speeds up and the laser have more “off” moments.) together the give a square dpi resolution.
A inktjet can do much more overlay so that’s why a cheap 40 euro inktjet can give a nicer look then a 5000 euro laser printer of 600dpi which has more dot’s layed next to each other in threesomes and foursomes just in the right blend so you see one color while it is just dots.
Long story short.
If ppi< native dpi of printer,
1 no full paper and smaller image.
2 it add’s extra dots to fill the gabs between the dots.
If ppi> then native dpi of the printer.
The image will be compressed by the printer driver to fit the mechanical limitations.
So it’s no use to have more ppi sent to the printer then it’s native resolution can handle.
So the papersize influence the input resolution wile the printer on it’s max res keeps printing the same dpi.
Often is your develpper application a better place to balance this correctly. Scaling down is this called.
Scaling up means the source is smaller then the imaginary image in the printer.
Hence it add’s dot’s or scrink the image to fit 1:1.
Most printers can also print on a lower resolution then native and when you use a loup you see wider gabs and white paper.
1 Like
I normally use Apple’s own ColorSync Utiity to print externally from PL, having first exported to TIFF, resizing as required at 240ppi. I find this gives me more control and easier to use than the PL dialog.
I’ve just done a bit more research and found, in the manual, the print dialog with explanation.
I have a Mac and here is the print dialog for my printer :
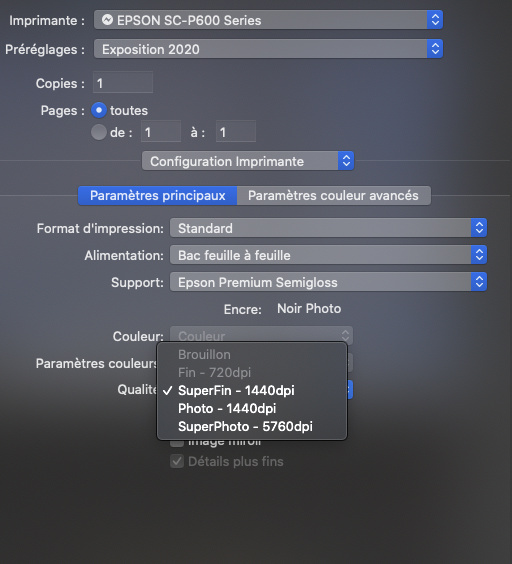
As you can see, on my computer, the setting for dpi is labelled as Qualité and is in the Printer Configuration section of the dialog.
And here is a screenshot of the Windows dialog from the PL manual :
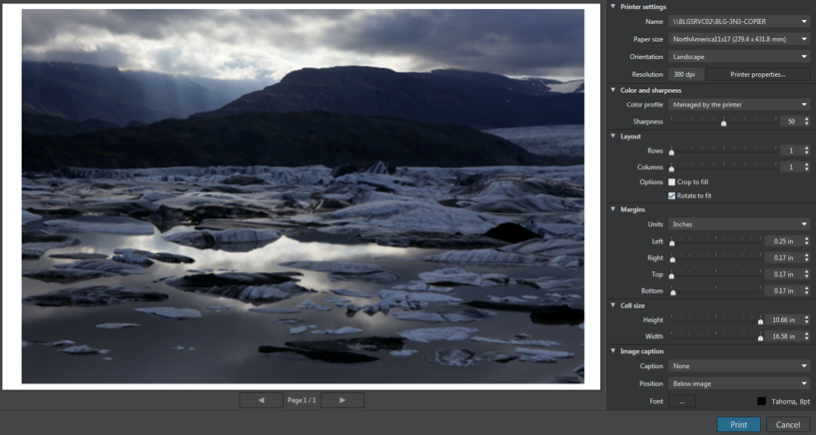
Here, you can see that the dpi setting is under the Printer settings section of the dialog.
This means that it is part of the printer’s behaviour and not part of the image itself. It refers to how dense you want the printer to lay down ink, (on mine) anywhere between “draft” quality and “SuperPhoto”.
If you are going to use the PL dialog to resize the image to fit on a particular size of paper, with certain margins, PL is going to choose a ppi that translates from the pixel size of the image to an area on the paper. This will be done totally irrespective of what quality dpi you choose for the printer.
Epson printers tend to have numbers like 1440, 2880, etc, whilst other manufacturers tend to base their printing resolutions on a multiple of 300. But I must emphasise that this has absolutely nothing to do with the finished size of the image on paper, purely the quantity of ink that gets laid down and the subsequent quality of colour and tonal variations in the final print.
When I print our photo club’s exhibitions, I tend to use “Superfin - 1440dpi” as a best compromise between quality and the amount of ink used and time taken to print.
As I said, I use an external printing utility and, thus, all images are prepared and sized on export at 240ppi to give me the required size to fit on the paper with the margins I want. Usually, for a landscape image, being printed on A3+ paper, to fit behind a mount board in a 50cm x 40cm frame, I export to TIFF with the longest side at 3638 pixels. This then fits (with a 2mm overlap) into an opening in the mount board of 380mm x 252mm. It’s extra work to use the external utility but, to my mind, when I am printing in bulk, for a specific frame size, it is a faster and easier workflow.
In summary, the dpi setting in the dialog is all about the quality of the printed image on a given paper surface; it doesn’t affect the image resolution or size, which, for you, using the PL dialog, will be calculated automatically as you choose the layout and margins you want on the paper size and quality of your choice.
Of course, the poorer the surface of the paper, the lower resolution (dpi) you will need, otherwise you can oversaturate the paper with ink, which not only looks horrible but, also, costs a lot more in ink 
On your printer, I would suggest using 1200dpi on a photographic quality paper.
As for colour and sharpness, if you don’t have a colour-managed workflow, where you have created ICC profiles for your screen and printer, you will only be able to use pre-created printer profiles or let the printer make a best guess at the right rendering. This could mean that the print doesn’t look like what you see on screen and you might end up reprinting a couple of times before you are satisfied.
Bearing in mind the cost of paper, but especially inks, it really is worthwhile spending out on a calibration tool for both your screen and printer and spending time creating profiles, one for each ink/paper combination. Then you would choose to let PL manage your colour by setting the colour profile drop down to “managed by PL” and choose the profile of your choice
Shouldn’t that be dpi? 
Pixel/inch, not square inch. The same for dpi.
George
Look at the size of your tiff file. It doesn’t change when you change the dpi. That dpi is just a request to the printer to print that image as if that setting was used. So if you print original size, not my naming, and you have a setting of 300dpi and your printer prints at 600dpi then the image will be resampled 600/300=2 times to gain the same photo size when it would be printed on a 300dpi printer.
When the photographer sets the dpi field, he/she is wanting an explicit size of the picture. When using original size.
If you want a picture A3 just specify that, the driver is calculating the intermediary size of the image.
The qualification is telling something about the result of the print. But that doesn’t only depends on the dpi.
George
1 Like
This is simply not correct. As I said, exhaustively, in my previous post, dpi is everything to do with print quality and nothing to do with image size. The setting is under Printer Settings and does not affect the image size in any way. Please stop giving erroneous information to people who are struggling to understand the basics.
Ah too long back that theorie of this.( mm2 or inch2 looked ok but i think it’s 600x600 ppi so also 600x600 dpi.)
Are you sure? So it’s liniar x-as writing dots per inch which defines the resolution?
and no y-as, moving paper , dots per inch.
Sounds correct for a scanner that’s line by line with a multifunctional in ppi.
Doesn’t matter for the rest of the post.
Have a look. It’s very basic. Document size = amount of pixels/print resolution. As you can see the print resolution is expressed as pixel/inch. It’s Adobe.
The printer dialog in PL doesn’t let you to print in original size, only some pre-defined sizes. The resolution is showing the native resolution of the used printer. Calculation is done by the printerdriver.
George
For sure, it’s linear.
I still don’t know how the resizing i done.
George