Then your definition of soft-proofing appears to be different of mine. How could sofwtare do a “hard-proof”? Never mind the answer. I’ll stick with my understanding.
don’t know C1 … but a hardproof is a printout and softproof what your software simulates (hence soft) ![]()
And in C1 it’s correctly named “softproof” and displayed very clearly in the main toolbar, no matter which kind of CM construction IanS is captured in.
The “softproof” button has a context menu to select the export-recipe in which I also could select the ICC profile of printer and paper.
(deleted to avoid misunderstanding)
I put “hard” in quotes to try and communicate that it is not the literal use of the word, but one used by people very familiar with C1 including C1 staff, C1 ambassadors etc.
I will try to explain more fully what happens in C1 with their sophisticated soft proofing as it can be applicable to DXO as they develop Photolab.
Most of this thread has concentrated on screen soft proofing due to the paper profile soft proofing not yet being implemented. The main use of soft proofing is for prints and that is what I will discuss further.
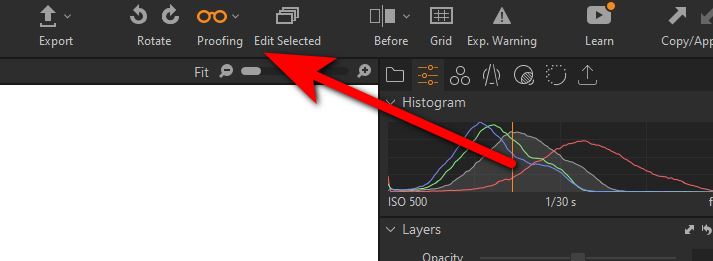
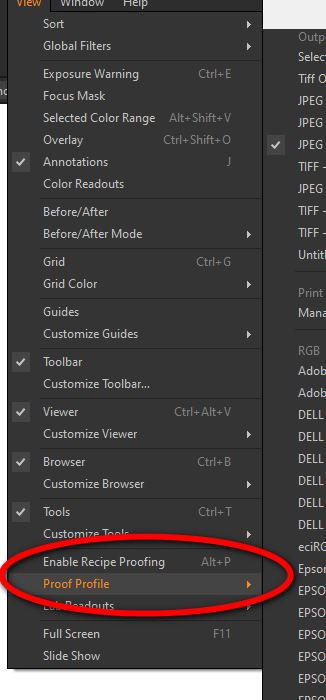
C1 is always colour soft proofing as I mentioned earlier, it is trivial to see that C1 is always soft proofing colour, usually sRGB or Adobe for screen, or when you want to print, the paper icc profile, by loading a black and white icc profile, such as Phase One Gray 2.2 into the soft proof menu. Your image turns black and white without using the “Proofing” spectacle icon ![]() If you activate the “spectacle” proofing icon the image will then change to match whatever “print Recipe” is selected.
If you activate the “spectacle” proofing icon the image will then change to match whatever “print Recipe” is selected.
This is much harder to describe than to do ![]()
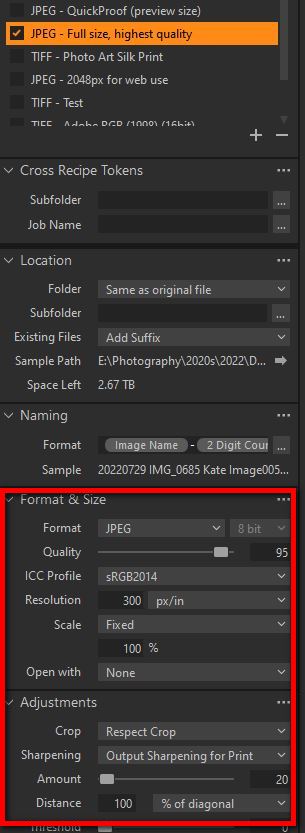
As well as colour soft proofing C1 will soft proof the effect of colour, it can also try to show the effect of print resolution/size, print sharpening etc. as defined in the recipe. In older versions of C1 the soft proofing parameters were embedded in C1’s “Print Recipes”. These are sets of parameters that specify the print size, icc profile, print resolution, etc. Newer versions have been improved and you can define the soft proof space without using the print recipes.
When you only colour soft proof the image is displayed as normal on the screen at the normal size, sharpening amount etc.using the defined Print Profile or the one associated with any recipe that is selected.
When you use the parameters in the export recipe that have a print icc profile, print size, resolution etc and activate soft proof with the “spectacle” icon which is actually labelled “Proofing” rather than “Soft Proofing” in the top menu, what you have displayed soft proofs how the print will look. Trying to includes the actual print size, sharpening etc. This is colloquially referred to as a “Hard” proof so as to distinguish between a simple colour only soft proof and a full print soft proof.
If you watch some C1 YouTube tutorials you will here people using the term “hard” proof to clarify what type of proof they are doing.
I hope this more detailed explanation clarifies my earlier post, sorry for any confusion caused
.
1 Like
Hello,
After letting my brain rest for a whole night, (it seems that the night brings advice ![]() !) of this analysis of your intense and very instructive exchanges, I agree with your proposal and have just voted in this direction.
!) of this analysis of your intense and very instructive exchanges, I agree with your proposal and have just voted in this direction.
Amicalement,
Claude
1 Like
Dear John,
Screens are at least sRGB capable but they are not sRGB. Screens have their own color profile. Apple screens profiles are different from Samsung screens profiles (i.e. color spaces are different even if sRGB capable). What you see in your screen with Photolab 6 and Wide Gamut selected, is the conversion of Wide Gamut in the screen color space, not in sRGB color space.
Therefore, if you export an image to sRGB color space and want to see what will be your image after export, you have to make a soft proofing, Wide Gamut to sRGB, exactly as you would do for printing, Wide Gamut to printer color profile.
Photolab 5 is WYS|WYG for one simple reason :
If in your camera you select Adobe 1998 for your photographies, working color space in Photolab 5 is Adobe 1998. If in your camera you select sRGB for your photographies, working color space in Photolab 5 is sRGB.
Then, if in the export options you keep for export, the original color space selected in your camera, Adobe to Adobe, sRGB to sRGB, that means that you do not change of color space and therefore, no soft proofing is necessary: WYS/WYG.
If you export an image from Adobe 1998 to sRGB as far as the difference of size between these two color spaces is not huge you will not see a big differences… if any.
PP
This is not true. PhotoLab 5 has a working (internal) color space of Adobe RGB, always, and RAW files have no defined color space - the gamut is that of the camera sensor. It’s too easy to confuse what is meant by a working color space.
2 Likes
A very active debate, but sadly missing the DXO team. And they should be most interested in him. Not a good sign…
1 Like
There has been a noticeable absence of nearly all those who responded to these posts to anything since the new version
As you can read here, we need answers and information, and would be happy if someone from the Dxo team would join us here again.
Thank you very much and have a nice weekend
2 Likes
I got this information directly from DxO support years ago when I wondered what was the working color space of DxO Optics Pro (I started using DxO soft with DxO Optics Pro 7 in 2008, Photolab being only a renaming of Optics Pro). But maybe I got a wrong information; it is possible. We never know…
Kind Regards
For recent confirmation by DxO of what I said:
1 Like
It seems you misinterpreted the info you received, Paule - - PL’s Classic Working Color Space indeed is Adobe-RGB … but that does not have the implications that you suppose it does.
The 3rd link provided by Egregious/Greg (listed just above) directly addresses this point.
… and you are capturing RAW files ONLY, then it makes no difference (as explained in the 3rd link above) … BUT, if you’re capturing RAWs & JPGs then your camera will write to JPGs for the Adobe-RGB color-space … which may not look “right” when viewed on a non-capable monitor.
John M
1 Like
That doesn’t mean the issue has been addressed in the update, John (if that is what you were wondering).
Personally, I’ve said all I can for now (other than providing clarifications, as necessary) - and am now waiting, expectantly, to see how DxO will address it.
John M
1 Like
I fully agree and have suggested, during testing, a processing flow diagram be provided by DxO. I don’t think that would reveal any trade secrets.
1 Like
For those who are struggling with the topic of Colour Management and Soft Proofing, I found this article that does a really good job of explaining the workflow of RAW processing in a colour managed environment. There is a very good flowchart too.
Hope it helps!
2 Likes
Why?
Irrelevant for rawfiles.
So as big as AdobeRGB but slightly tilted to the right.
Yes intil every device is updated to Display P3 colorspace capable…![]()
Is like putting a small box with inside your item in to a larger one and send that to the shop.
1 Like
That will only help you if you are using the new WGCS.
Well, it didn’t do any harm with the old AdobeRGB workflow in PL5.