I’ll add another then seeing as we are sharing!
Robin Whalley has lots of great videos on Affinity Photo and plenty on PL and Nik too.
I’ll add another then seeing as we are sharing!
Robin Whalley has lots of great videos on Affinity Photo and plenty on PL and Nik too.
Thanks !
I was not sure 
Well, still much to discover, try, use… 
That’s correct and a little bit like in one of my favorite movies “Groundhog Day” 
I bow to the inevitable, and use a mix of repair and, more often, cloning. Depending on the circumstances, I’ll zoom to 400-600% and go at it. It takes patience, and the willingness to accept something can go horribly wrong (haven’t tossed the computer and screens out the window. Yet.).
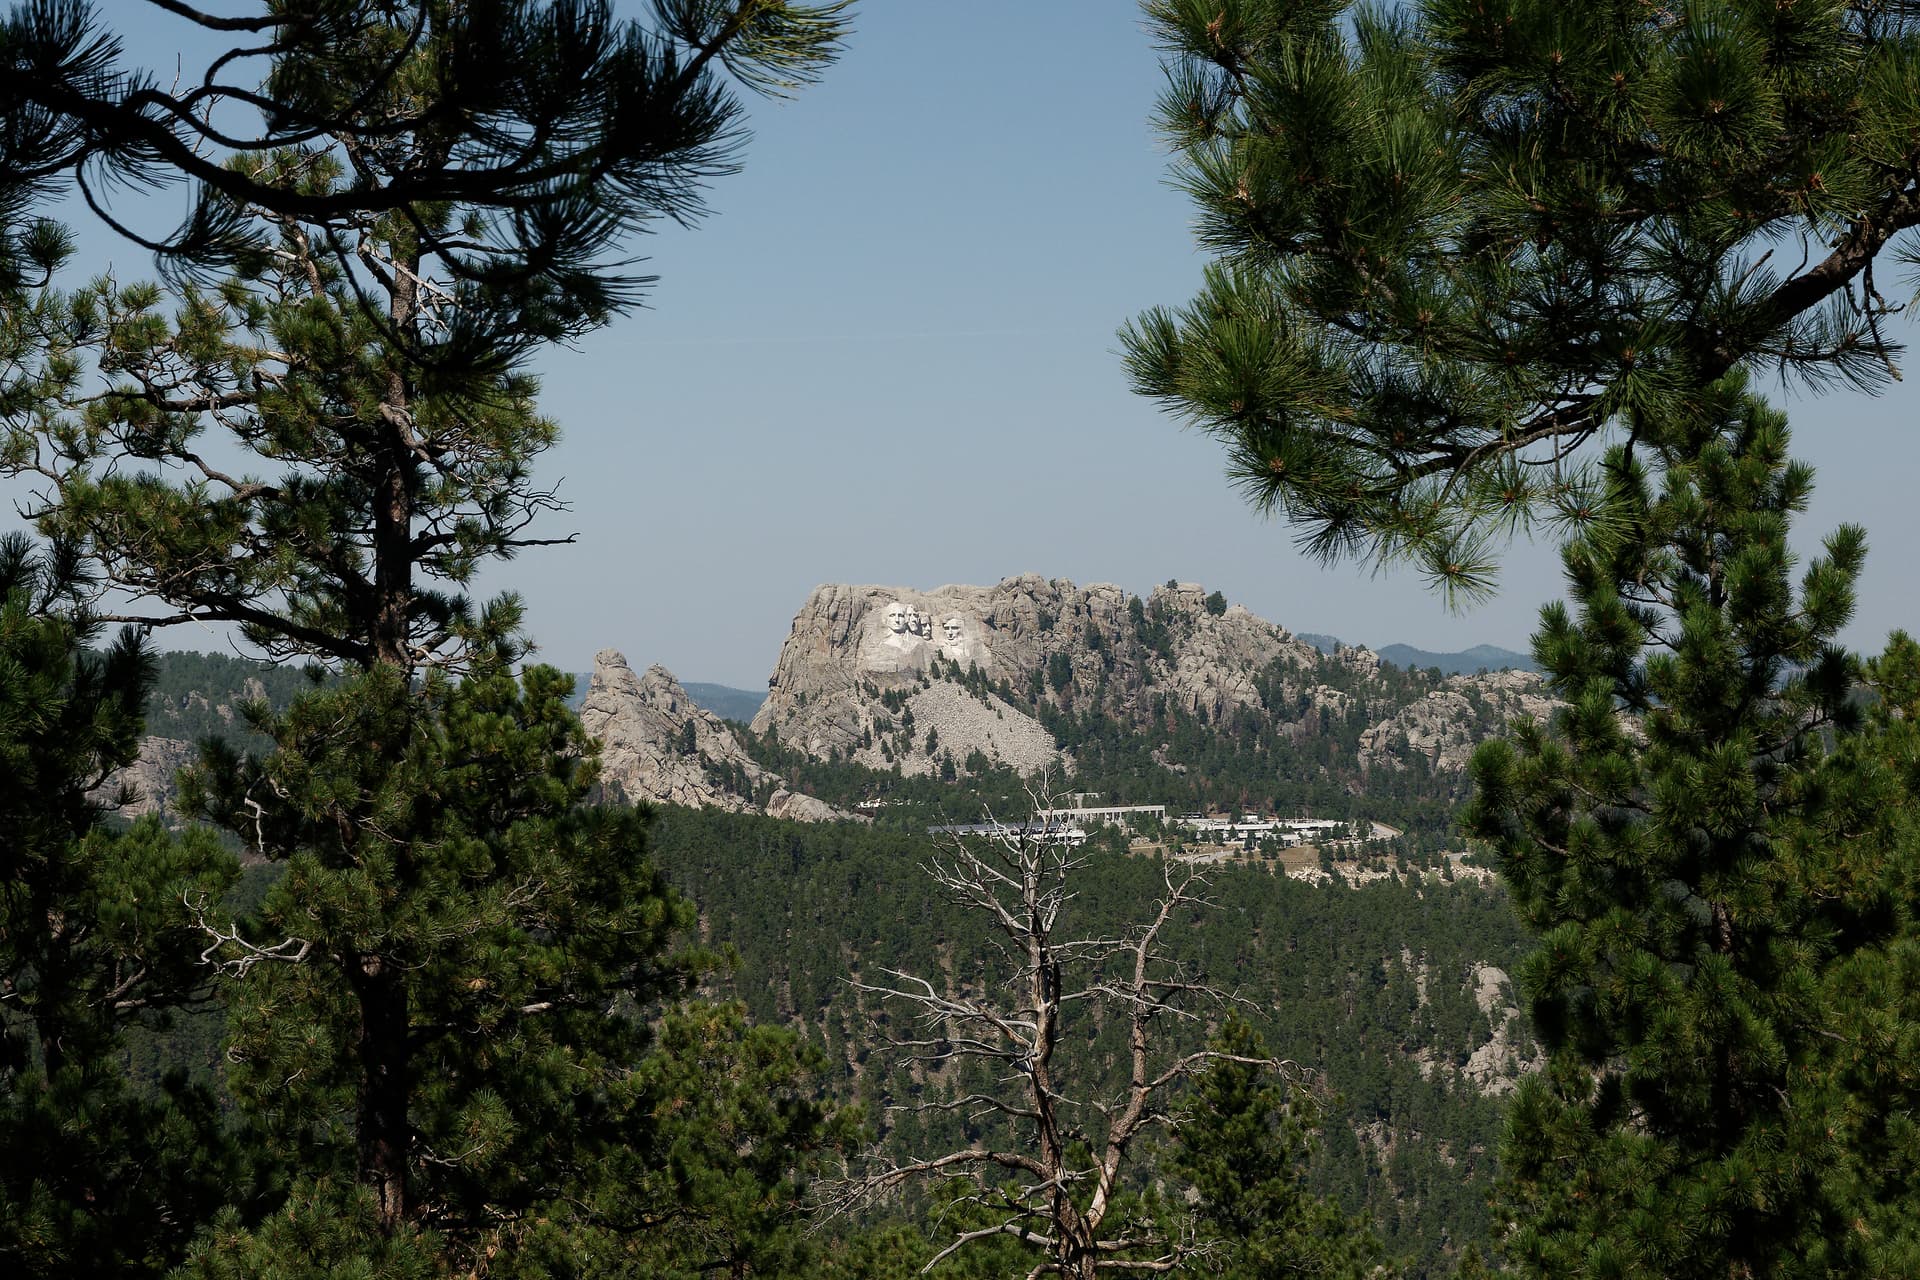
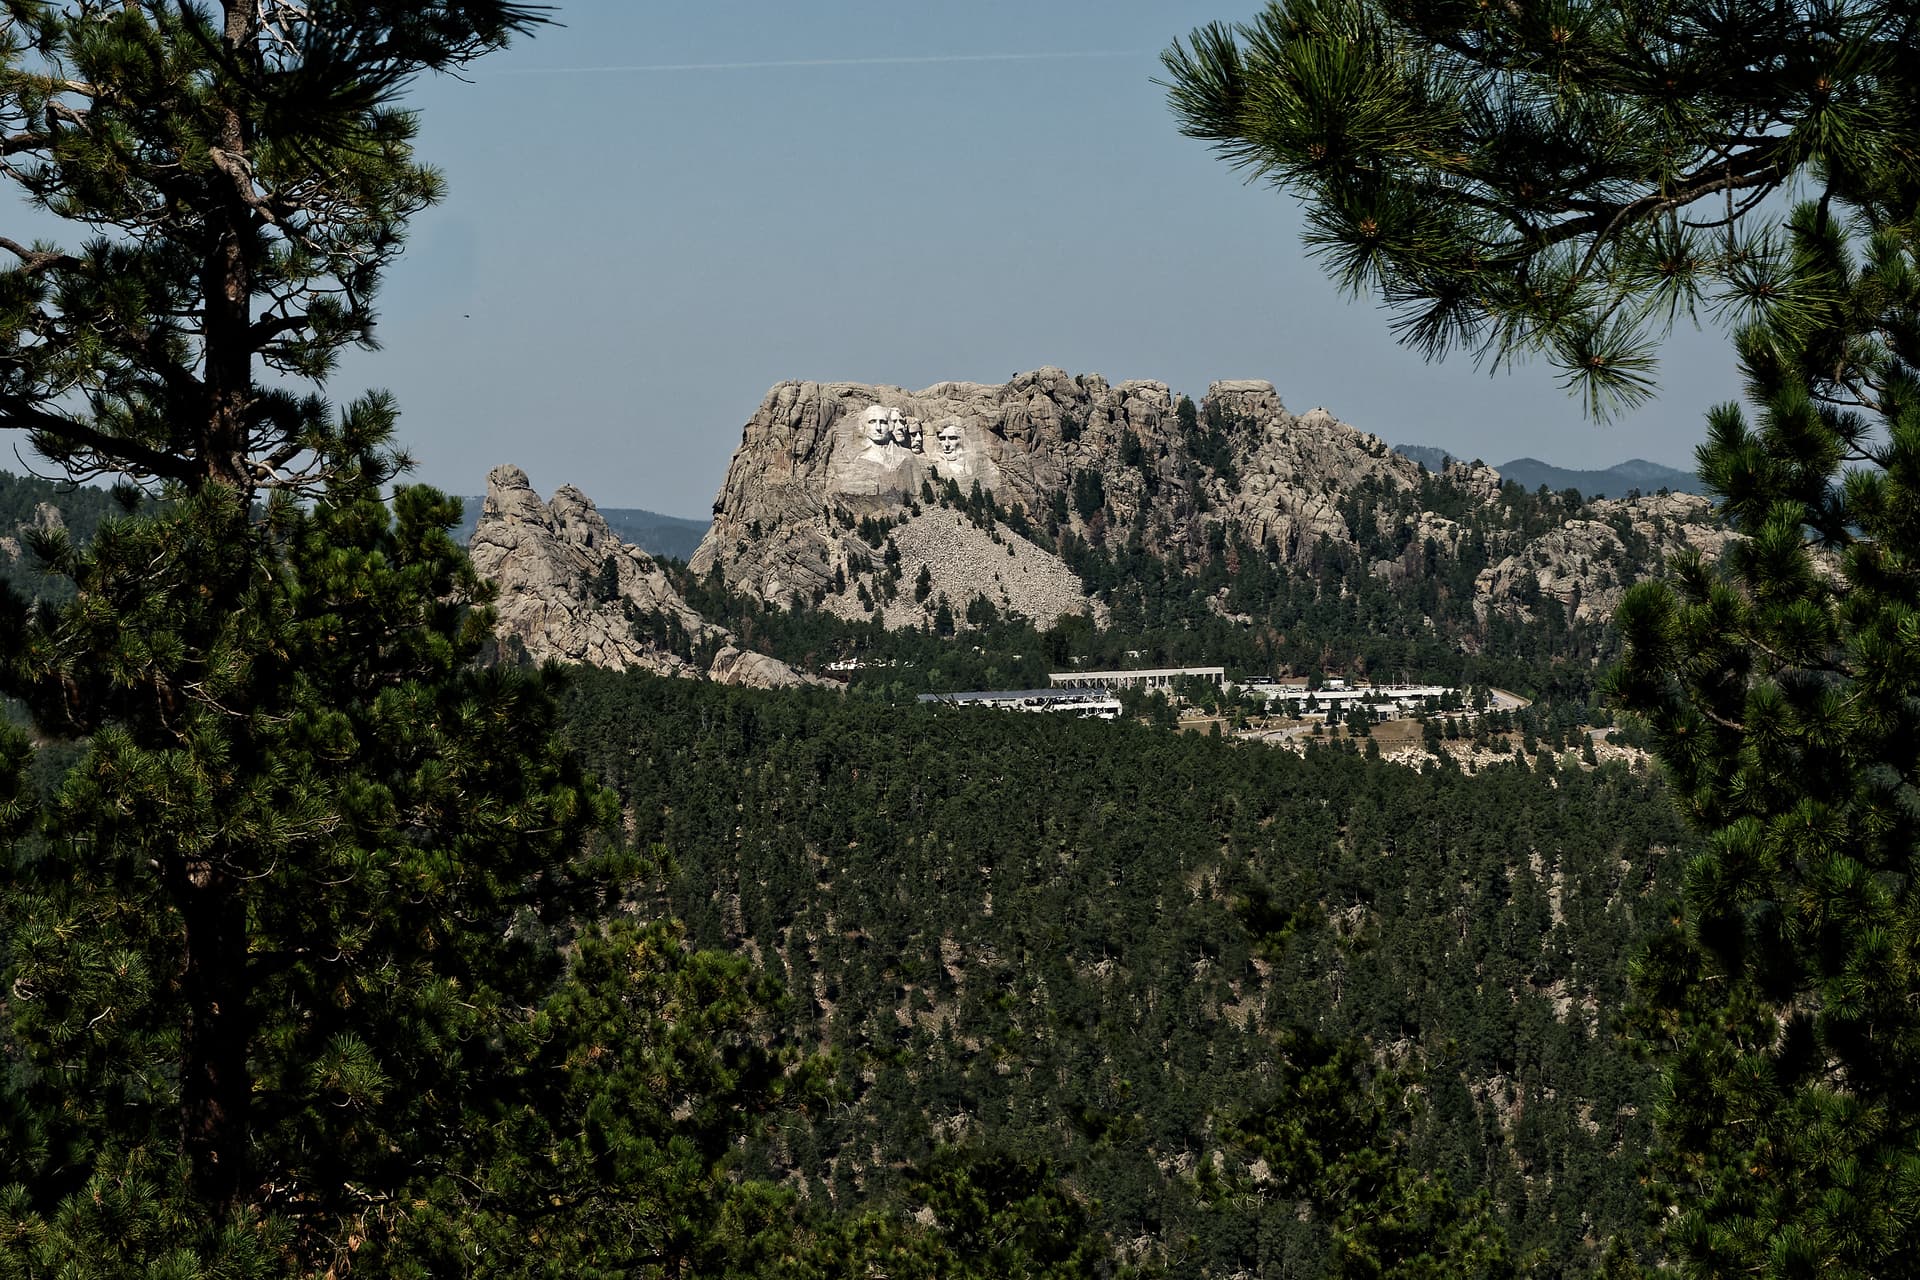
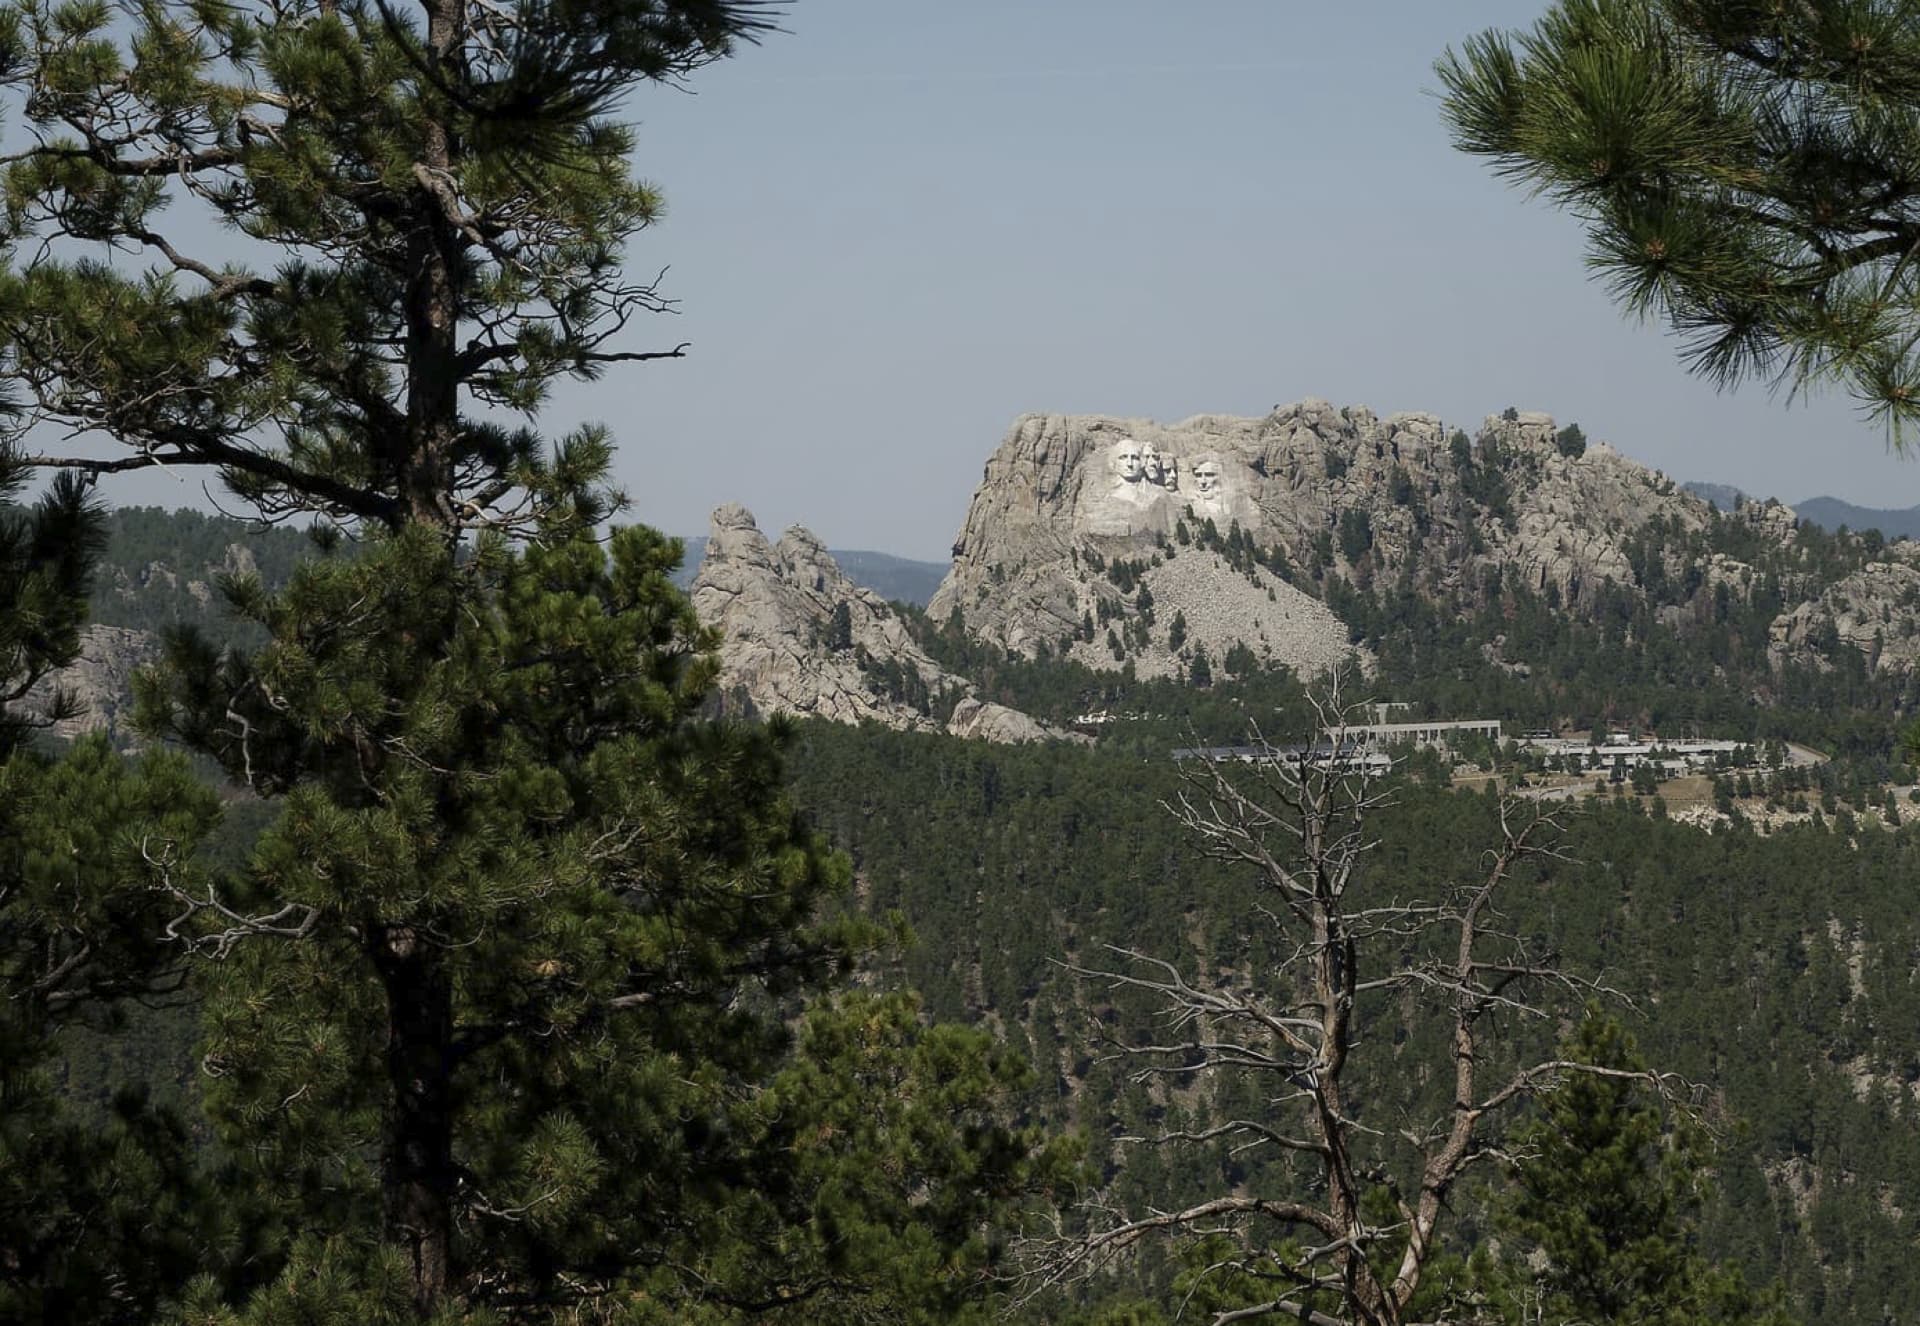
I removed a tree from the foreground, and rebuilt the gateway into the main viewing area. It took a lot of time, of course, and sorting through (mostly) clone masks to get the arch’s lines square. Pixel peeking will show a few “wobbles” - I finally said “close enough - time to get a life”.
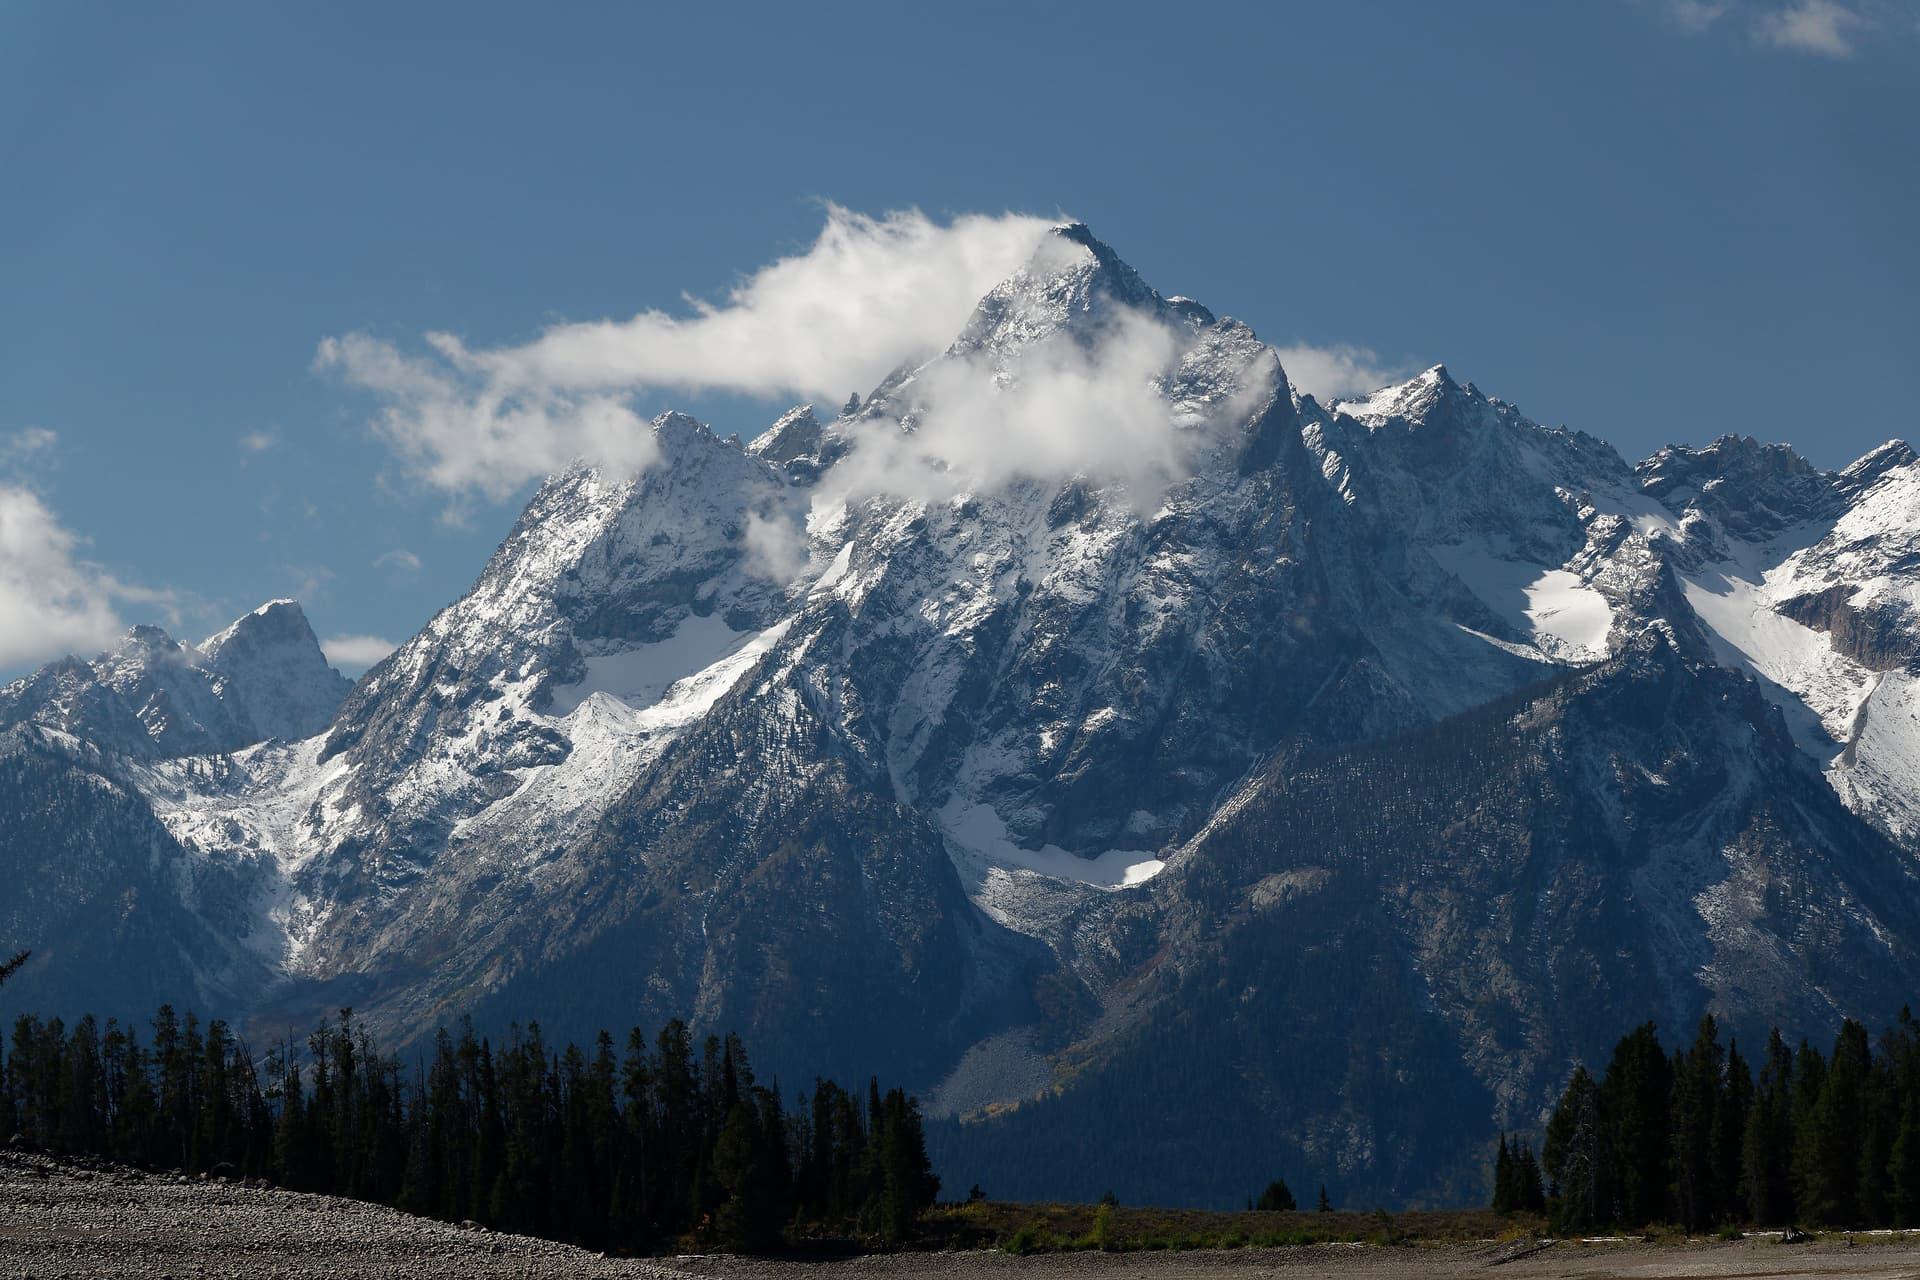
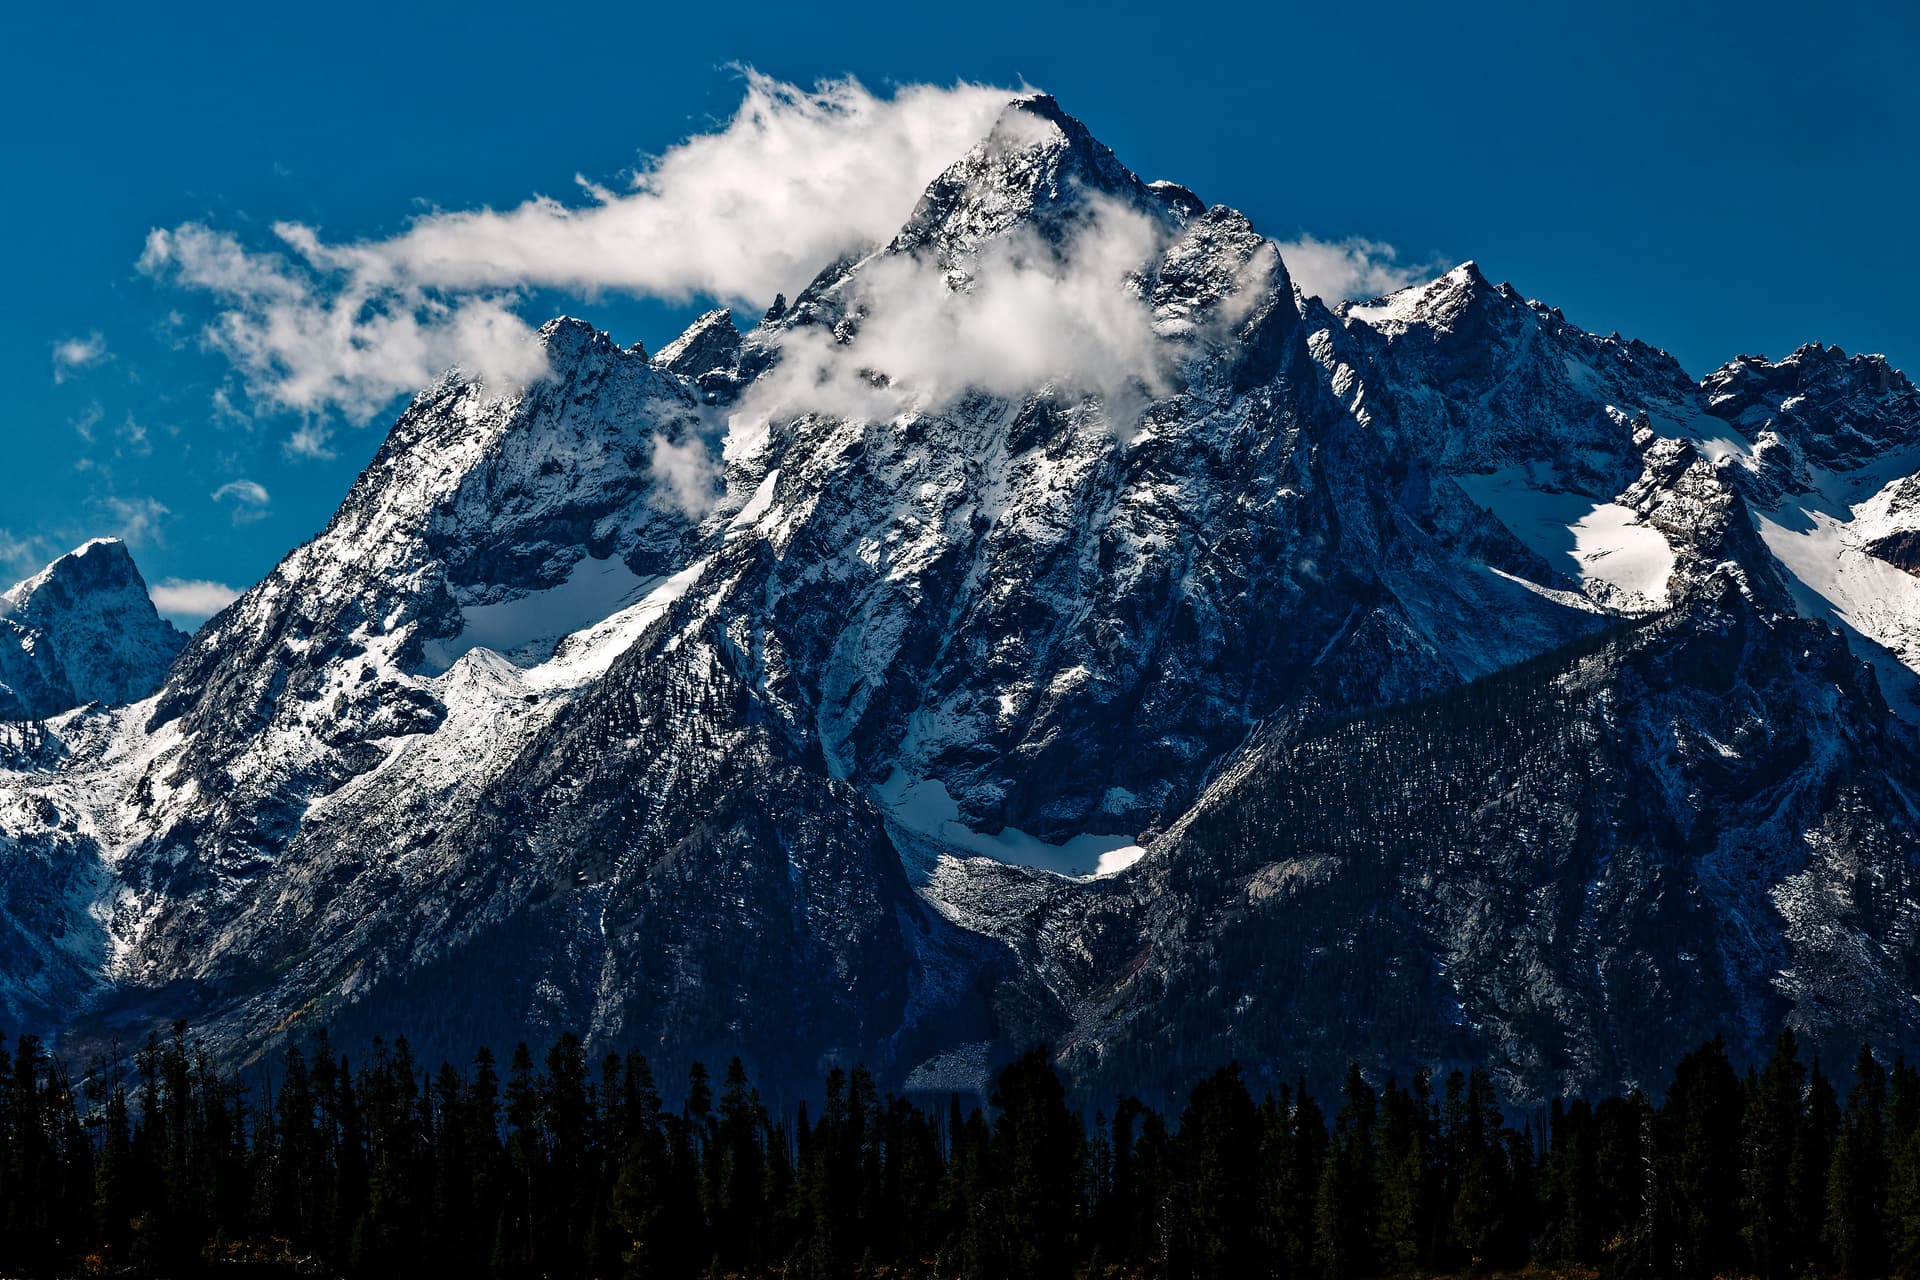
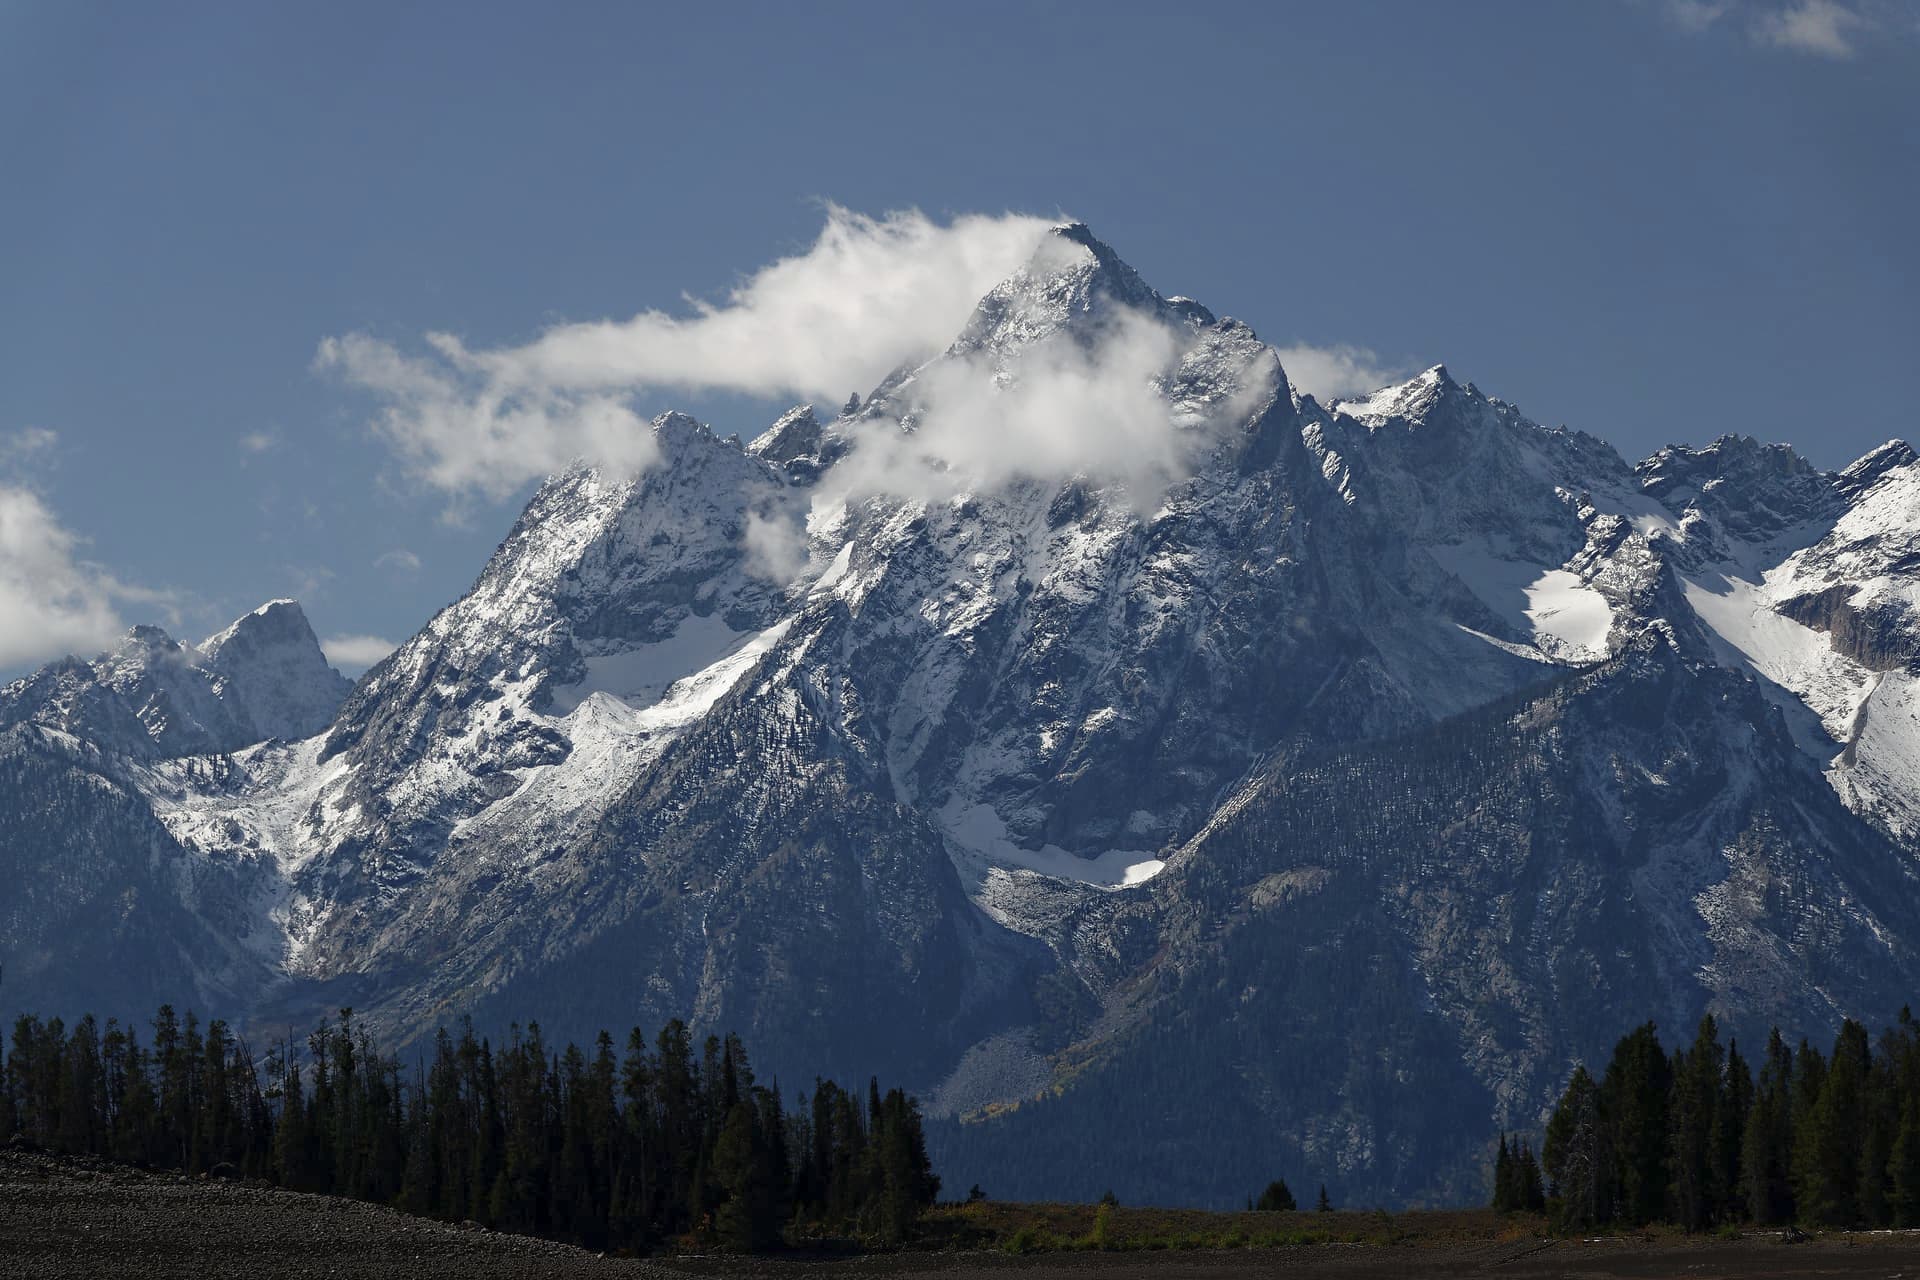
Conversely, more trees were called for here. Duplications aren’t too hard to spot. Taken as a whole, the trees work, and the dried out lake bottom is gone. (Finished with FP6, forgotten which “film” - no local adjustment masking used)
(shot in Grand Tetons)
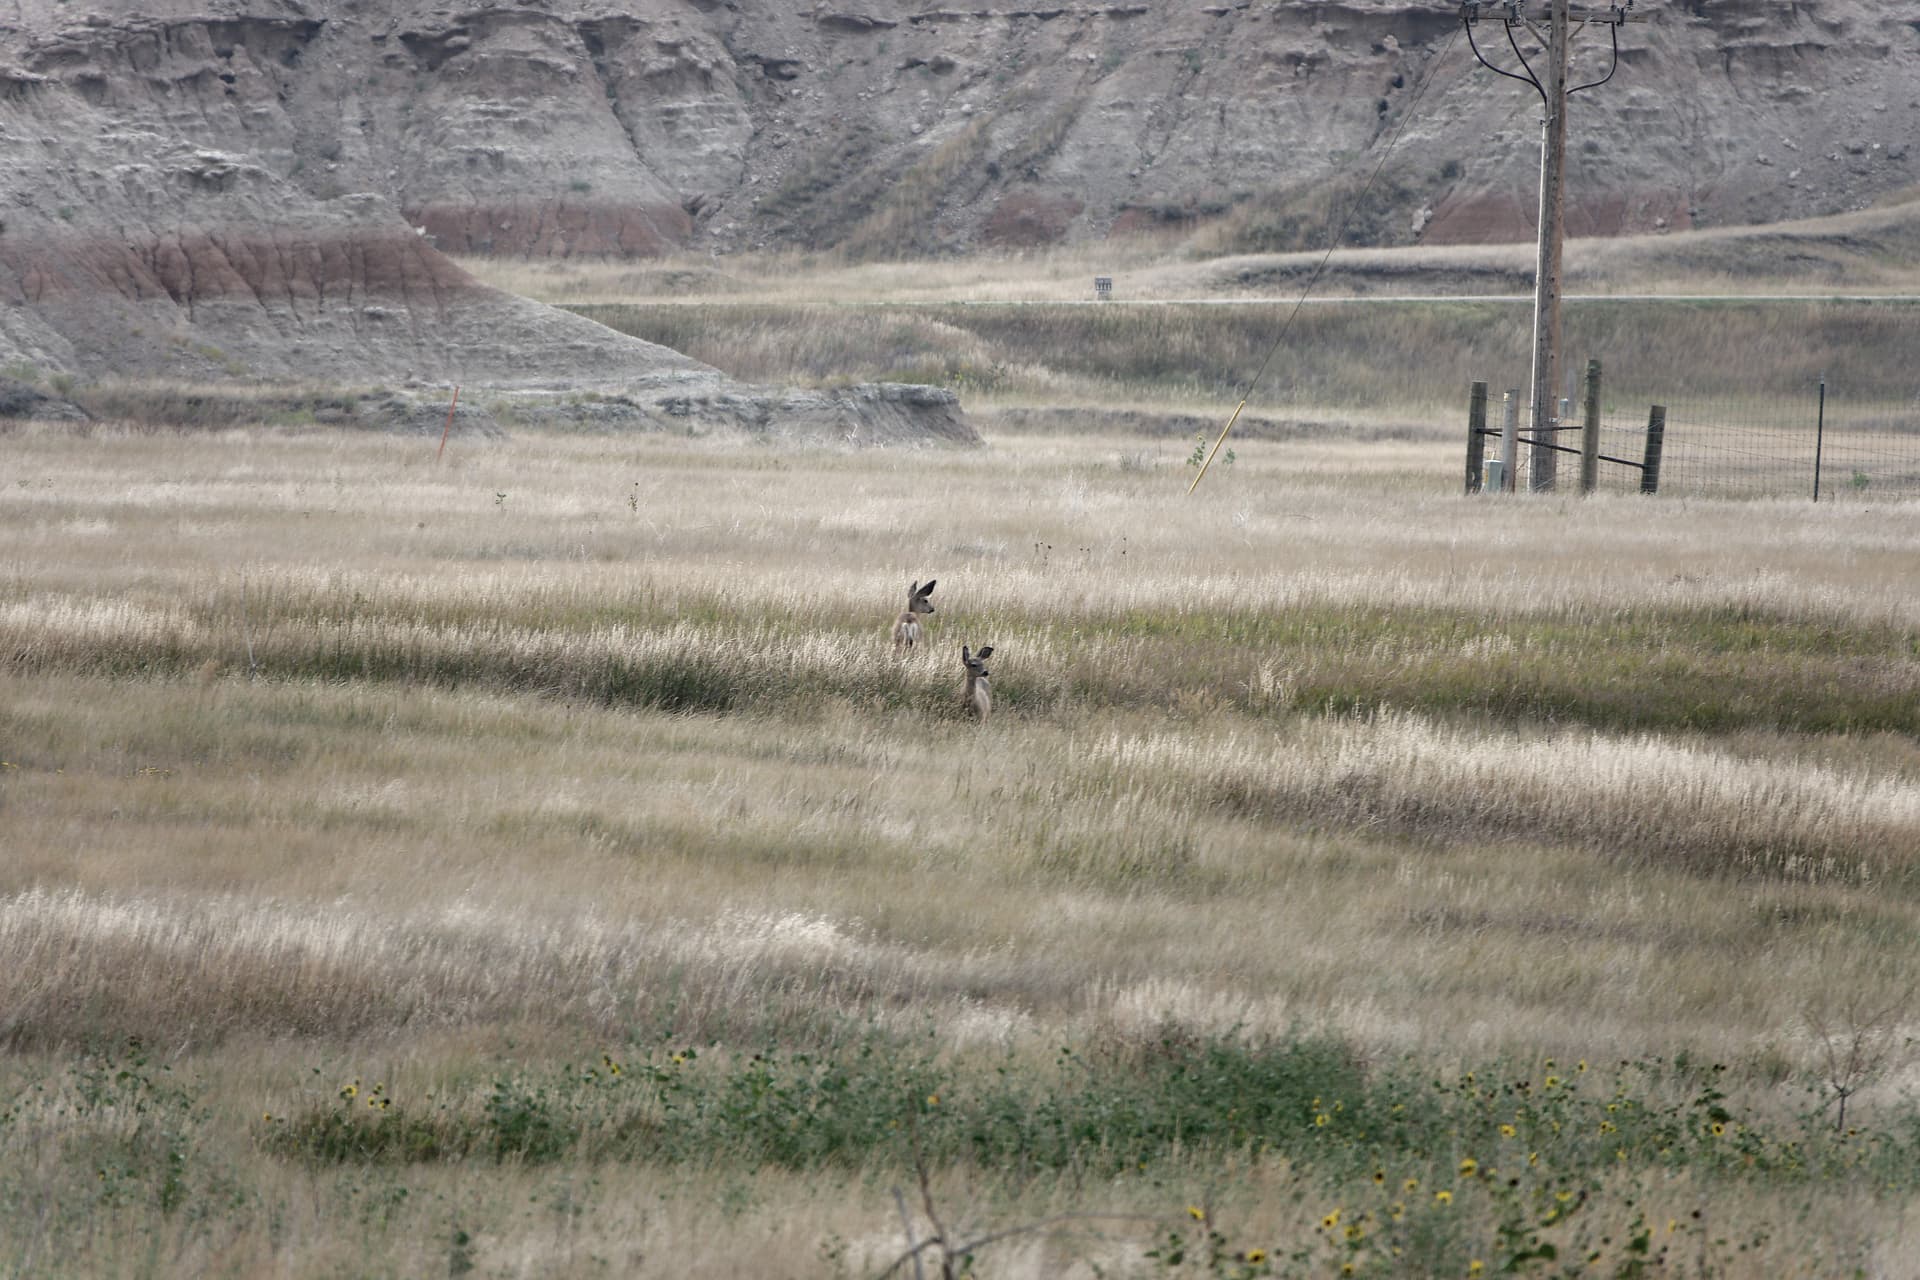
Trying to be more on topic regarding power lines, these mule deer in the Badlands caught my attention. While cropping helped, some of the guy line remained along with a small sign, and an obvious straight line in the ground. The line was a dirt road, and stood out like a sore thumb. All of the unwanted items were cloned out of existence.
working with buildings and sky, it’s almost always important to keep the line, joining the source and destination masks, absolutely horizontal (less often vertically). Usually the sky graduates from lighter near the horizon, and darker moving up from the horizon. Both clone and repair suggestions are just plain wrong. A patch of dark sky in lighter sky is hard to miss. If the source mask is exactly horizontal, and close to the destination mask, the correction is almost always hard to find.The same works for horizontal destination masks. Keep the source mask horizontal and close to the destination. In some instances, building features need diagonal lines. Sliding the source mask as needed, but usually exactly horizontal works best.
It’s possible to a corrected area as a source. Once a correction is made, a source mask using part or all of a correction be used for a further correction. In the Mt. Rushmore photo, I “borrowed” part of the corrected archway’s lintel and columns to correct an adjacent area. Instead of using little bits of a small corrected area, I used the previous correction to source the next area Think of it as bootstrapping corrections. OTOH, moving a source mask well away from the destination mask is more effective. This applies mostly to irregular details in a corrections. In the Mt. Rushmore photo, some of the trees used for the correction used a source mask that was as much of an eighth to a quarter of the image away from the destination. It kept the trees covering the dead tree irregular and not duplicating details adjacent to the correction.
IMHO feathering repairs creates more problems than it fixes. Feathering cloning generally makes smearing the boundary of a correction easier. Maybe it’s just a personal quirk - your mileage may vary.
In general, corrections are a little like jigsaw puzzles - what piece belongs where. Sliding masks around, and redrawing masks is inevitable. One piece doesn’t fit in the jigsaw puzzle, draw one that does fit.
Sometimes leaving well enough alone is the best solution. If it takes serious pixel peeking to find a power line, “if it ain’t broke, don’t fix it”.
(Focus leaves something to be desired…)
Wonder, that PL kept working as you have been doing that plenty of edits.
– From my experience with so many summing, the ongoing work gets tedious, hindering a smooth workflow. For such complex clonings, personally I would go with a layer based pixel editor, where I can keep working fluently without the whole pic constantly being rerendered …
While you have done editing very well (!), I don’t think your originals really ‘needed’ those changes
– and not saying so to avoid work. 
In the Mt. Rushmore photo, that dried up tree acts as foreground and gives some depth, just like those pine trees on both sides. It might have been sufficient to darken the bright tree as well the visitor complex / parking lot …
Your pic from the snowy mountains has a nice 3D effect. Maybe you like to play with it in keeping some of the warmer foreground, while (carefully) bringing up the massive structure …
Please, regard these as proposals / alternatives, not as critique.
Wolfgang
Operationally, the number of masks and amount of… call it pixel transfer does add up. One of the advantages of working in the 200% or greater range is redrawing times aren’t a significant issue. The fewer visible changes, the faster the screen is redrawn. In this magnification range, sliding an individual mask around, to find the best fit, is relatively easy. I zoom back out, check my work, zoom back in, and the fun continues.
The biggest challenge, when working with lots of masks, is finding the control points when a change is needed. The work becomes iterative. Make a change, make another change, adjust the initial change, etc., etc. In some cases, one change overlies another change and they get in each other’s way. The only choice is to remove the overlaying change, change the other change, and create a new mask set for the change just deleted. It’s very much “wash, rinse, repeat”.
I use a low to mid-level gaming Windows laptop, that’s maybe 4-5 years old (from time of the model release - HP “Omen”). I made two changes to it. A 4Tb SSD replaced the original 2Tb HDD. There’s no space for a second drive. As delivered, the C:/ partition was on an M.2 “SSD” internal stick. Strictly speaking it’s an SSD, but with very slow read/write times. Regenerating the OS partitions on the M.2 SSD (removed altogether) onto the 4Tb SSD speeded the machine up by much more than I expected. Anyway, redrawing time is tied to system in use. In my case, working at 100% isn’t a problem. “Your mileage may vary”.
I’ve tried using a few pixel-level editors. The process described above hasn’t brought me to tossing the PC and screens out the window. Yet. Not so for the editors I’ve tried. I’ve dragged some useful products out of them, but, overall, no thanks!
Not being able to operate on the original .ARW file, having to move to TIFF, locks me out of some PL5 options. The tradeoff between a slowed PL5 vs. annoying editing, and changing file formats… I’ll stick with cloning and repairing, thanks. Again, YMMV.
Thanks for the input on Mt. Rushmore, and Grand Tetons pictures. For me, both of them are… call them “informed snapshots”. I thought about the composition, and the post-processing that would be needed, when I pushed the button. Otherwise… meh… fancy snapshots.
The dead tree just plain offended my sensibilities. I took that shot, knowing I’d take the tree out in post - guaranteed. I counted on the live pines doing the framing, and defining a foreground. The trees on the hill, I hope, give some sense of depth, as does the size of the busts. FWIW, they were a couple of miles away from where I was standing. Hurray for a bridge camera with a long lens available (DSC-RX-10 IV)!
I like the idea of “turning down the volume” on the white structures. I wish I’d thought to do it - point well taken. One change I should have made is carving away what looks like a building or large cabin on the ridge line right of the carvings. I stripped out trees that I thought should be cut down, but the remaining lump is… what was I thinking? Back to more cloning, I guess.
Photographing Grand Teton (mountain’s name - 13,775’, 4200 m) was a mix of luck, and challenge. The day we arrived at Grand Teton NP, driving from Yellowstone NP, was …um… memorable. We left in a snow storm, crossing three give or take 9,000’ (2700 m), passes. After we arrived in Grand Teton, we heard the pass road was closed about an hour after we left. Yikes. The luck is that the Grand Teton range had a fresh coating of snow. The next day, the snow at lower elevations was gone. Lucky bit number one.
The second bit of luck was seeing the cloud pennant streaming from the peak of Grand Teton. It reminded me of seeing similar pennants in the Alps, and photos from the Himalayas. No surprise that the clouds drifted away during the day.
So… I wanted to get the pennant, and I wanted to make the mountains as “tall” as possible. I wanted to give them a sense of “brooding lofty peaks, towering o’r the land, dwarfing mere mortal men” (or something equally artsy-fartsy). The vantage points that “worked” were surprisingly hard to find. In Jackson Hole valley? Nothing I could get the van to. Shooting from Lake Jackson, with maybe a good reflection of the “brooding lofty peaks”, was out. Drought has literally emptied far too much of all of the lakes in the west. That’s dried out lake bed at the bottom at the bottom of the “before”. Anyway, I was short on a possible shooting location. Ah hah! “Grow” some trees over the lake bed, and into a channel leading into the main lake area.
The results were OK, the mountains loomed suitably, but the results were flat. Lots of sunny, happy pines hiding the shore, but the mountains weren’t brooding, mostly just sulking… not happening.
I wanted a “Kodachrome blue sky” to give the clouds something to contrast with, and do it with real pop. I wanted something to move the mountains from cranky irritable to brooding, and have dark, possibly mysterious, forest at the base of brooding mountains. Hello, FP6! And the rest is posted above.
Aren’t you sorry you asked about this?