Raw Digger and PhotoLab to prevent blown pixels

With the help of several brilliant people in the DxO PhotoLab file, I’ve been following the advice and can now create better high dynamic range photos than eve before. I thought I was all set, until another forum friend wrote me to suggest I check my finished file with the tool RawDigger. Yikes! I learned a lot more about my file than ever before, and how Raw Digger can help me improve.

I hope two things happen - first, that my forum friends, especially @Joanna read this and try it,

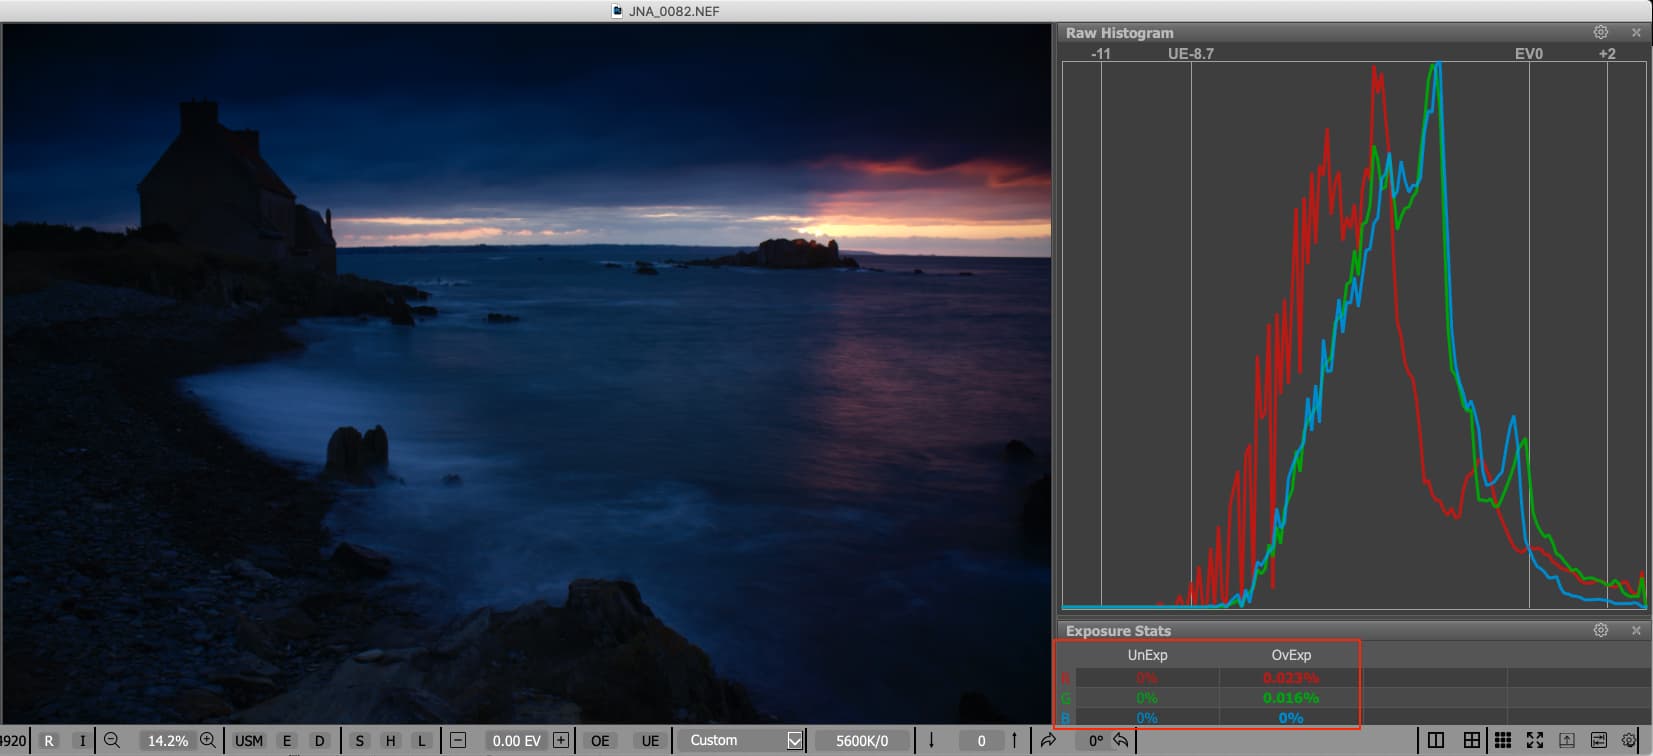
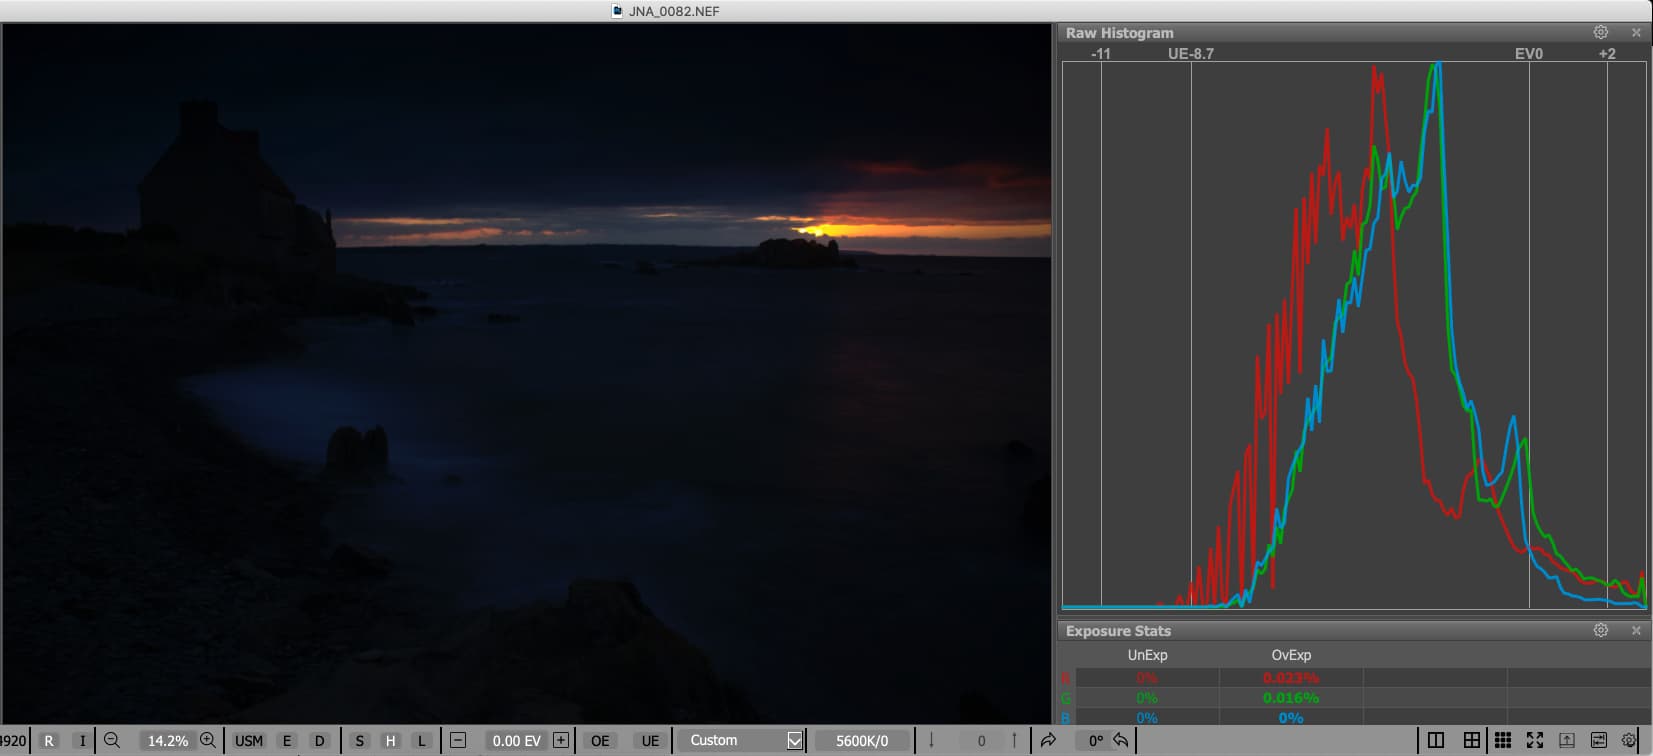
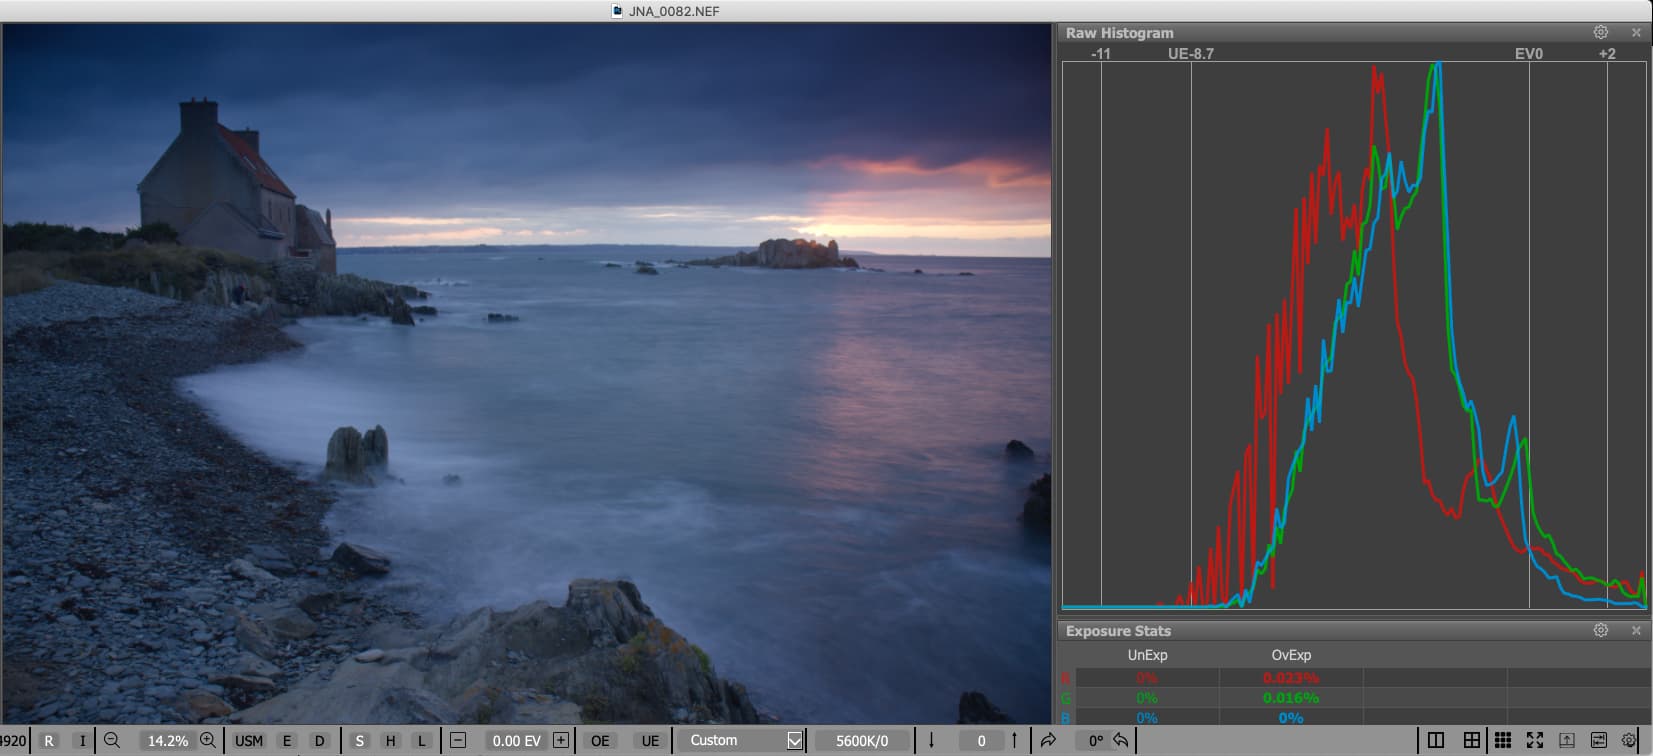
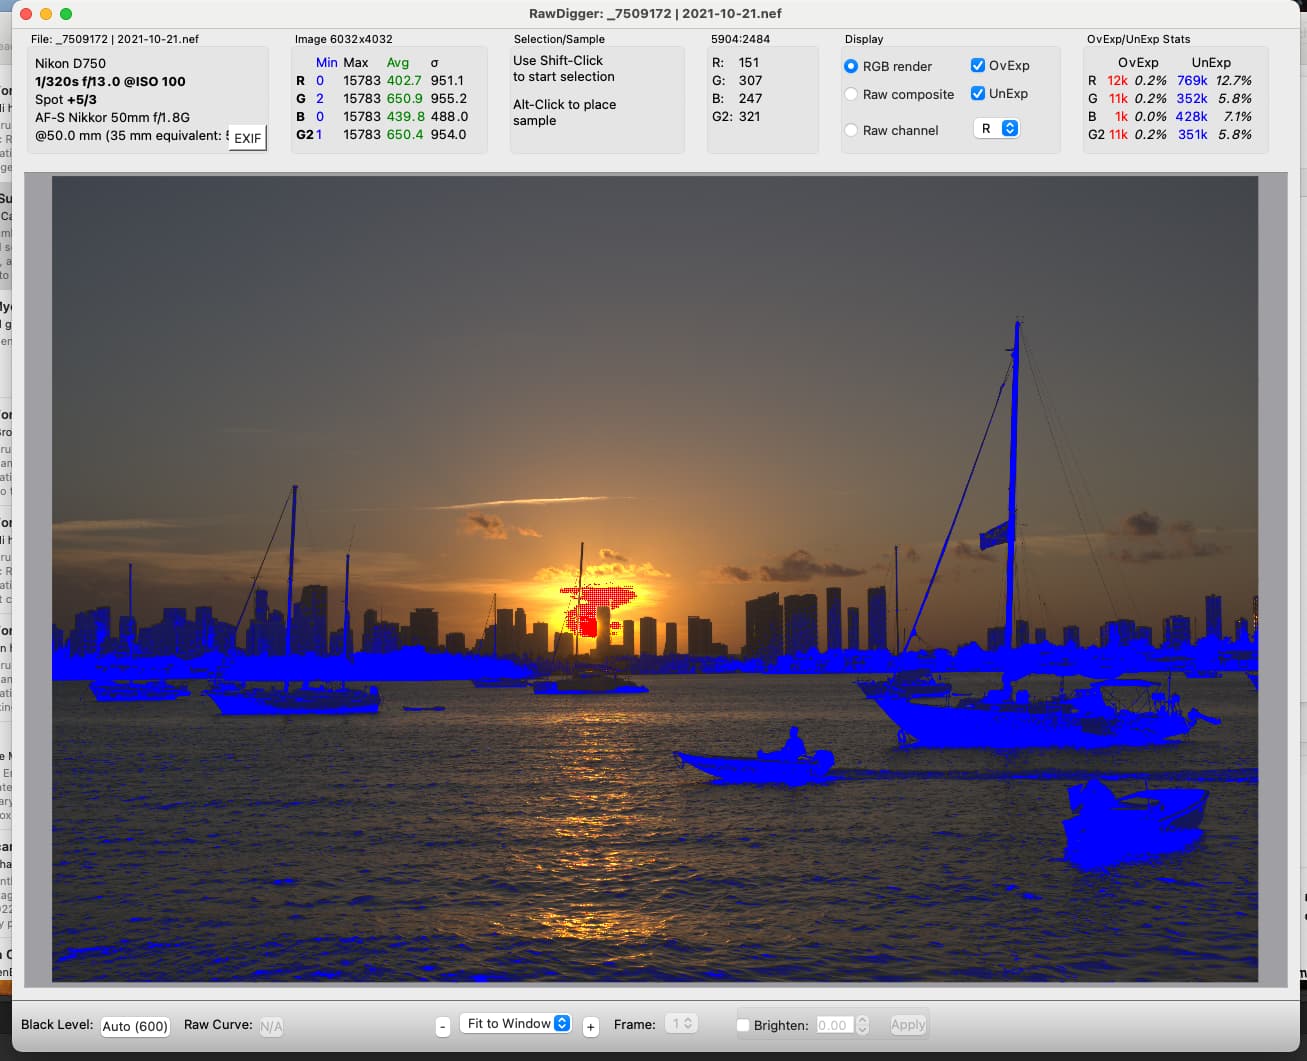
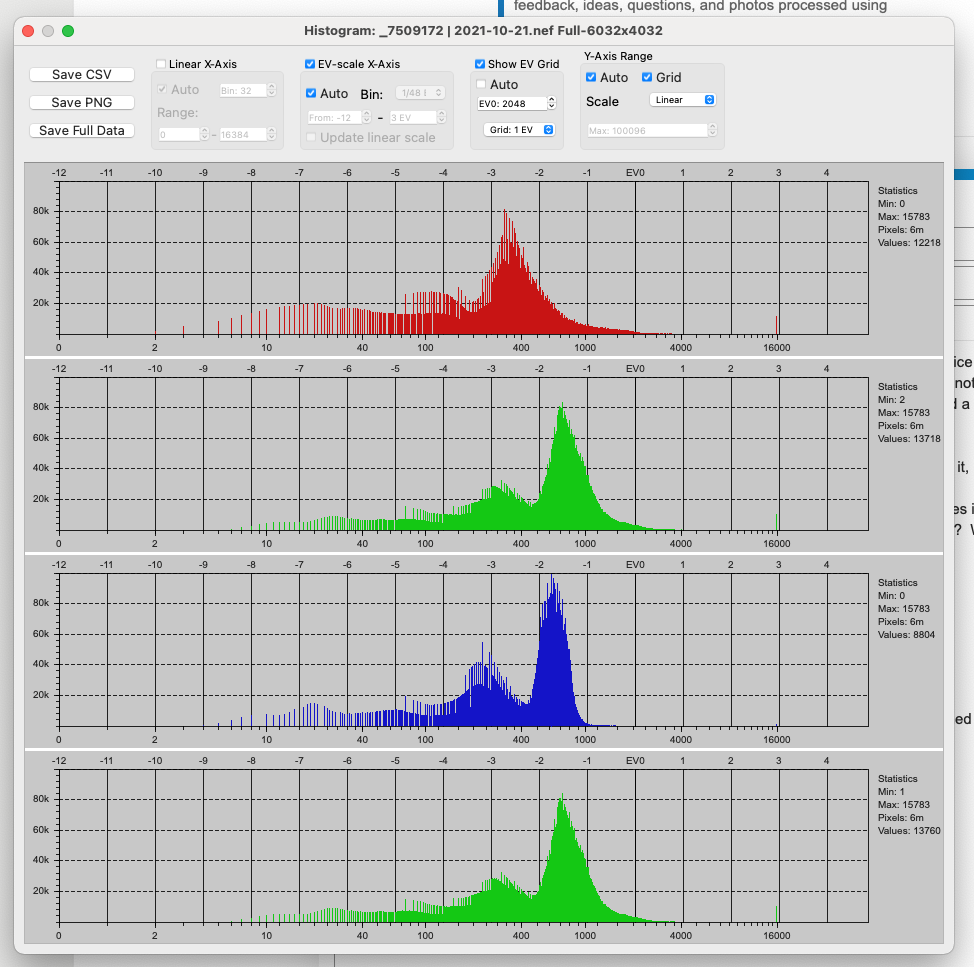
…and second, that the folks who design PhotoLab consider adding some of these capabilities into the next version of PhotoLab. Would it be good to know how many pixels have blown highlights? Would it be good to have a histogram window like the one shown below available when wanted?

Here’s the training video I just watched - there are many more:
Raw Digger

Here’s a link to the software:
https://www.rawdigger.com/download

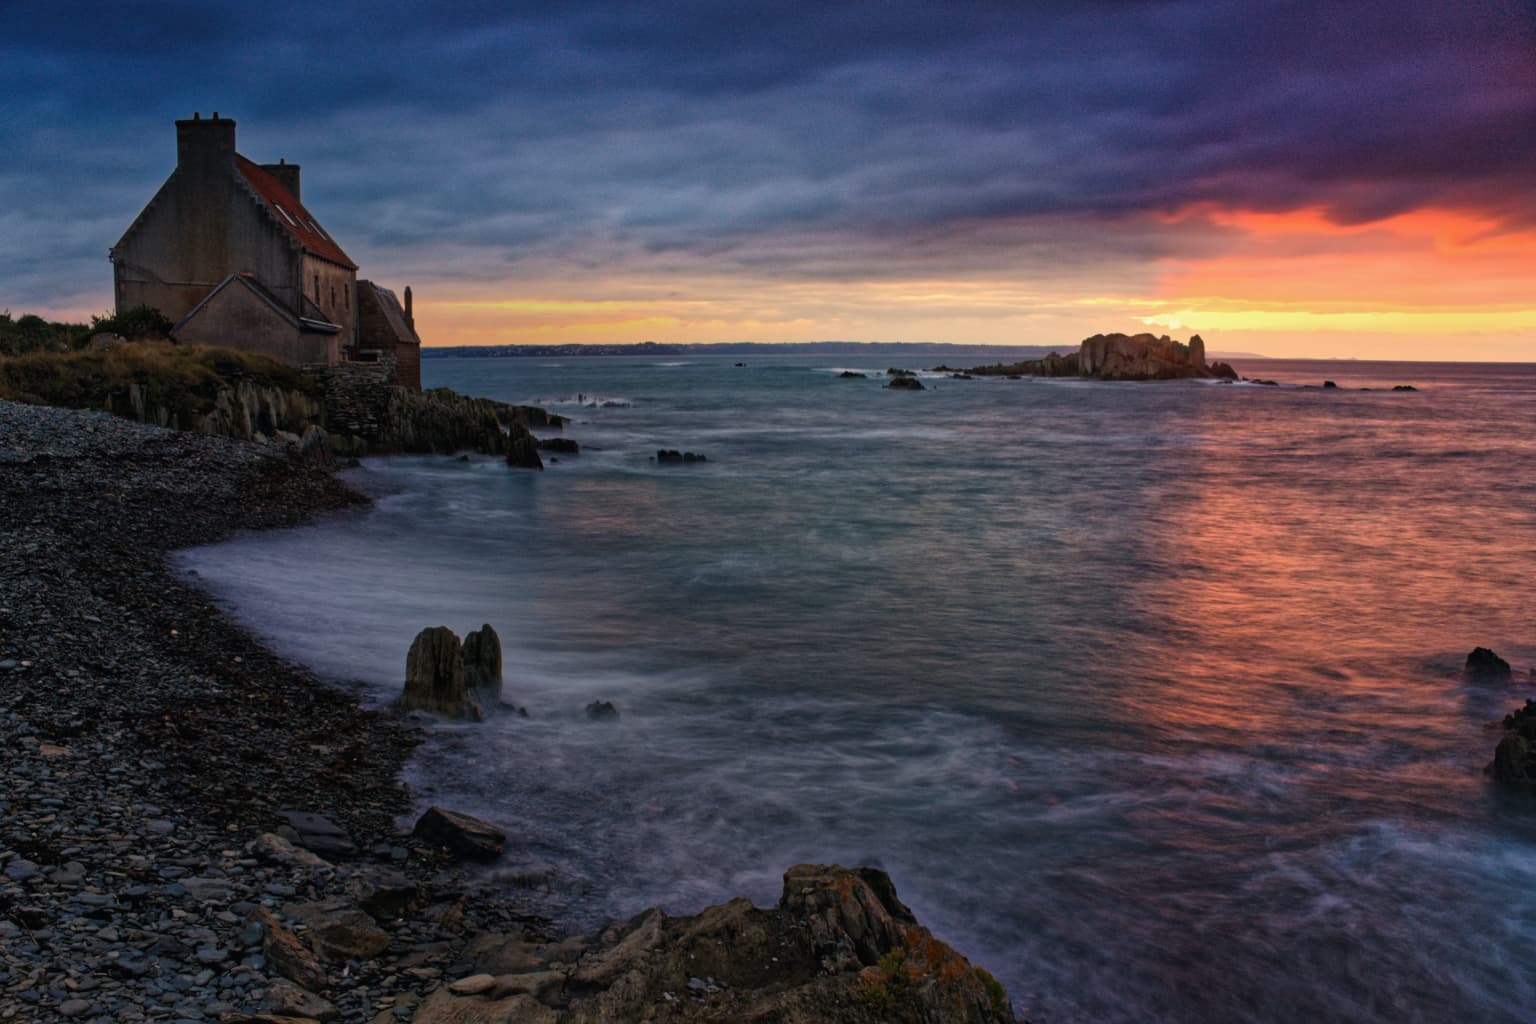
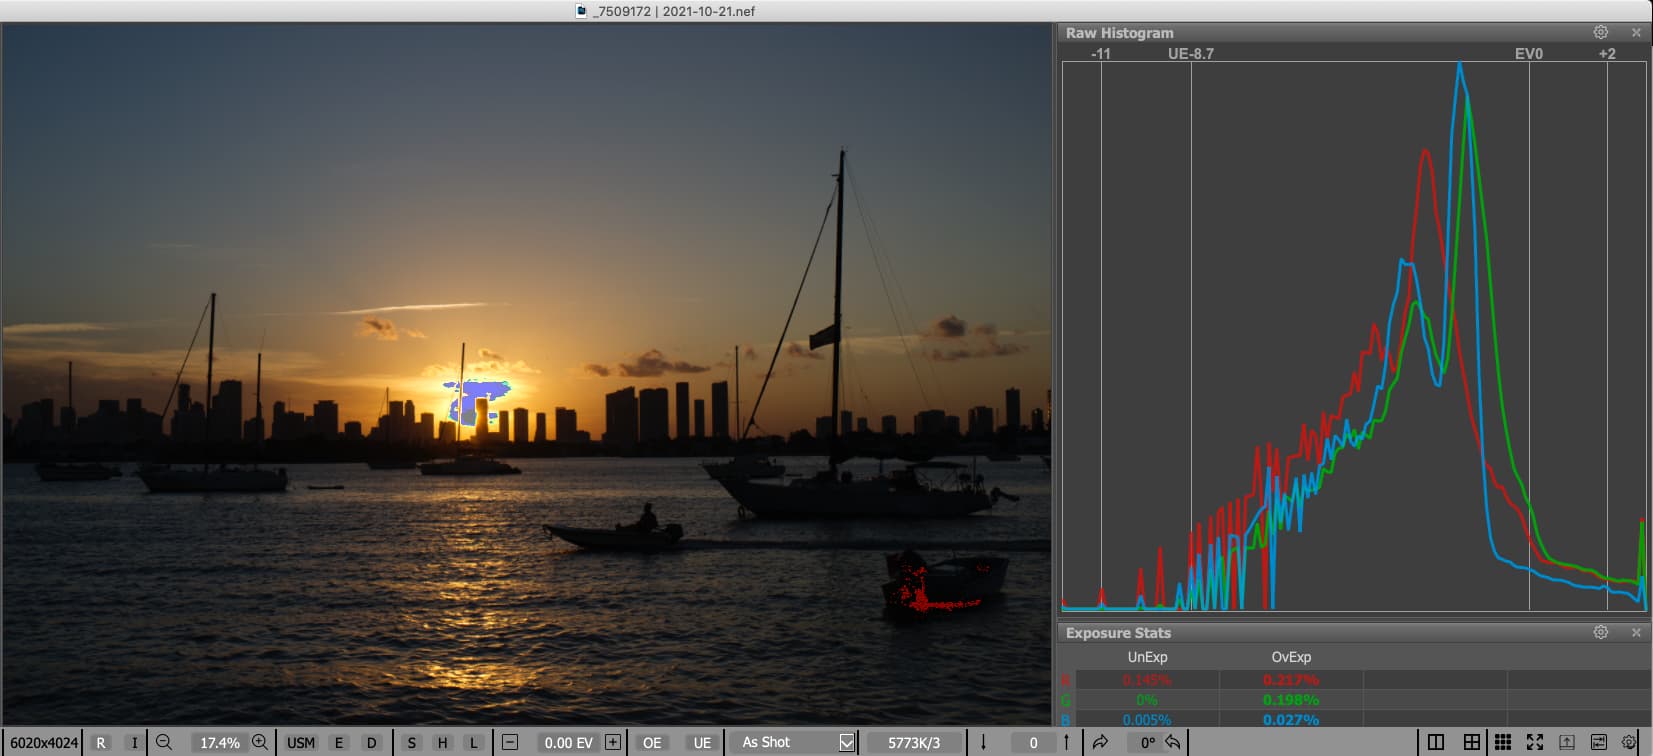
Here’s a photo I edited in PL5, with lots of help for how to capture it, after checking the finished image

All of this would be in addition to the tools we already have in PL5.

I think PL5 already does most of this, and as we change the settings, the information updates. I’m not sure how much we need all the additional information. @Joanna?

I use Fast Raw Viewer from the same company and the only thing I would like to see in PL is a RAW histogram in addition to the current histogram from the de-mozaiced file.

The RAW histogram will show you if the original RAW file has any blown highlights or lost lowlights which will help you decide if you want to continue processing the file or not.

Something else to look into. What’s the difference between them?

Iliah Borg, the author of Fast Raw Viewer and the maintainer of both Raw Digger and Raw Photo Processor (https://www.raw-photo-processor.com/RPP/Overview.html: an eccentric but intriguing raw processor beloved in Russia), wrote one of the most useful articles I have ever read on the topic of ‘correct’ exposure for digital cameras: “How to Use the Full Dynamic Range of Your Camera”. It could equally be entitled: “How to Minimise Noise and Maximise Signal at Any Exposure”.

The idea, briefly, is to find a simply-implemented exposure routine that takes account of — and offsets — the (debilitating) insistence of all camera manufacturers on setting their ‘auto’ exposure algorithms to expose for the most saturated OOC JPEG (a snapshot of which appears on the viewing screen and which to which the camera histogram misleadingly refers) rather than for the optimum RAW image that most users of high-end cameras want to make.

After 5 years of following the practice recommended by Iliah — which needs the lowest-cost version of Raw Digger to make the initial calculations — I can say it rarely ‘fails’ to deliver an optimum raw image measured by useable raw data and minimum noise or over/under saturation.

There are, however, cases where a scene has no significant highlights (the exposure reference point in this method) where a different approach is needed. For example: low-light, low-key, atmospheric shots where you need to maintain a high density of data in the part of the histogram that falls a stop or more below EV0 (‘middle grey’). Here, I find the easiest (but maybe sub-optimal) routine is to allow my camera to set the exposure: perhaps raising EV by a half stop or so.

The latter approach works mainly because recent digital sensors (I use a Canon R5) have a much improved capacity to capture data at the ‘shadows’ end of the spectrum. There is a noise penalty, especially if you/the algorithm has to raise the ISO to get the shot (i.e. it amplifies both the signal and the noise in the sensor output). But that’s where Deep Prime comes in :grinning:

P

Mr. Borg’s method is to expose to the right with a carefully established correction factor describing the difference of middle grey and burnt pixels.

Other ways are a) to use a UniWB setting (can be found in this forum) or b) use what many of us do: measure the whites while overexposing by roughly 2 stops.

There are many ways to find out how to ETTR. Mr. Borg’s method looks very precise and requires RawDigger. Simpler experiments can achieve similar results though.

1 Like

RawDigger is a tool for real pixel-peeping nerds :laughing:

But that is not to say that isn’t an excellent app, which is superb at doing what it does. I have a copy, that I bought out of curiosity, but have rarely used it except when I first wanted to determine the true dynamic range of my cameras.

As for Fast Raw Viewer, it is a much simpler app and very useful, as @KeithRJ mentions, for quickly seeing if a RAW file is marginally blown or blocked or recoverable in PL5. Having said that, having spent the time to get properly familiar with the DR of my camera, I hardly ever use it because it is rare that take anything that is out of range.

For the use you are going to make, Raw Digger is definitely OTT and I would suggest that FastRawViewer would be perfectly adequate, as long was you learn how to set it up for the DR of the camera you are using.

Wow! I glanced over this a couple of years ago, saw all the formulae and closed the page. Even though I use the “place the highlights” method, quickly revisiting the article, I think I may have to read it again.

From that link:
We opened them both in FastRawViewer, applied Shadow Boost to both of them to open the shadows, and applied +1.67 EV exposure correction to shot #4152 (the one that was exposed according to in-camera exposure meter recommendation, so that both of the shots had the same overall brightness).

Is this true??

George

Here’s a series of shots of an almost white, structured wallpaper. The shots have been corrected by one EV in relation to the next shot. The 5 star file is what the exposure meter proposed, corrected for the offset that most cameras have regarding actual and advertised ISO values…


Source: DxOmark.com

As we can see from the histogram, z10 (5 stops overexposed) is definitely gone…

…while z8 presents the full width:

z0 (and z1) show some colour shift due to 5 stop (4 stop) underexposure.

Here’s what DPL shows. I had to use the tone curve to boost the extreme shots. DPL only allows exposure compensation of 4 EV and rolls off slightly, already at ±3 EV…


Note how the steeper tone curve amplifies tonal imbalances.

To my mind, this is borderline. In theory, the D850 will give me detail in +3EV but, for ease of processing, I tend to limit it to +2EV. but that is up to the photographer to decide.

Come to think of it, I haven’t done this kind of test since I swapped from the D810 - I’m going to have to try it.

Here’s the export of one of my favourite sunset photos, taken with the D810, ISO 100, 5 seconds @ f/10, after processing in PL5…

At the time of taking, I used two ND grad filters, one diagonally over the top right sky and the second at around 15° over the top left.

If I open the RAW file in FRV, I get…

As you can see, I only get very little true over-exposure. If I put on the markers, I get…

… where just the sun is too visible between the clouds, but if you include the sun in the frame, you can’t expect anything else.

Looking at the histogram, there appears to be content above the +2EV marker, virtually up to the +3EV line.

If I show the highlights biased view, you can see that the sunlit cracks in the clouds have all sorts of detail…

… and the shadow biased view shows there is plenty of detail, down almost to -12EV…

For this kind of checking for blocked or blown areas, to my mind, this is where FRV really shines.

2 Likes

z9 still shows structure, even though RawDigger shows 97% blown greens.
z8 has 1% blown greens, which does not really matter in this case here.
z7 is within the linearity limits, which is listed in metadata to be at 10’000.

For day-to-day use and reasons of practicality and a safety margin, an upper exposure limit of +2 certainly makes sense, specially with modern, BSI and stacked sensors which can resurrect what looks like blocked shadows.

2 Likes

Who suggested that? RawDigger only reads RAW files. What you call a finished file is usually a JPEG or TIFF export, which RawDigger will not read.

Your screenshot is showing the RAW NEF file without any edits.

Going back to that photo, here is what it looks like in FastRawViewer, with the over and under-exposure indicators showing…

The difference is that my effort from FRV is after I had set FRV preferences to the dynamic range of my camera…

I have highlighted the two important settings for my camera but you are going to have to work out the right settings for yours.

Naw, that’s for “real people”, not me. To me, the file is finished when I stop editing. I should have clarified that, me bad.

I realized that - but as far as I know, there’s no way to send the .nef along with the .dop to allow people to see my edits, in the raw file. I guess I should look at the histogram in PL5, but isn’t that based on jpg? I guess what I really need is a tool that will look at the finished file, show me blown highlights, and perhaps even a “finished” histogram of the image I’ve finished editing, and will post here, or send by email.

Why does PL5 have a tool to display what I incorrectly used to thing of as “blown out” shadows? The most “blown out” shadow is something that is black, and why don’t I just ignore that tool completely? I used to “know” why I used it, but based on what I’ve learned since then, I don’t see how it’s helping me.

On a different topic, our tool for highlights has been to spot meter to find them, then do 1.7 stops over-exposure, and take the image. Worked great on my D750, but not at all on my M10, as there was no spot metering. But now I know that both my M10 in Live View, and the M11 (always) have real spot metering available.

From what you’ve taught me, my D750 will have more dynamic range than my M10 or my Df, and were I to get a D850, it would have more dynamic range than all of them. I don’t know yet what the M11 will do - hasn’t been tested.

It’s less and less likely that I’ll get an M11, not because it isn’t good, but because the improvements over the M10 don’t justify so much of an expense. Also, the M11 works with a new and better Visoflex, but because the new one is made from metal, they had to leave out the GPS. The more I think about it, the more I like the idea of having the images geotagged.

Well, that’s what PL5 does, but it works with the histogram generated by PL, not the RAW histogram, which is what FRV or RD work with. The RAW histogram never changes as far as PL is concerned and PL doesn’t show it ever.

There is a difference between black and blocked shadow detail, although it is subtle. The histogram you see in PL5 is the “finished” histogram at any point during the editing. It is constantly being updated.

According to this article, the M11 claims 15 stops of DR, which is not even a whole stop more than the D810 or D850. What is more, you have to go down to, not only low ISO (as with most cameras), but also to the low resolution of 18Mpx. At which point, I ask myself why I would buy a 60Mpx camera, only to downrate it to 18Mpx every time I come across a high DR image?

If you take high DR images, and a lot of us do more often than we think, $9000 for an 18Mpx camera seems a bit steep. Just think of the D850 and the lovely glass you could buy for it for that money :stuck_out_tongue_winking_eye:

The M11 does this by combining 4 small pixels into 1 large pixel, making the camera better at picking up low light. The technical term is “binning”.

Here’s a full explanation:
Binning

I guess it’s a trade-off - better low light performance, at a cost of lower resolution. For you, this would be unacceptable. For me, being used to only 24 megapixels in my best cameras, it could be a useful tool. (Ain’t no way I’m going to set my imaginary M11 to 60 megapixels, and leave it there - my disk space would vanish, and I couldn’t even post my raw files here in this forum!!!). I can’t remember the specs for the maximum file size, but you’re going to have the same problem with your D850. Maybe you have plans to work around this somehow???

I use FRV as culling application. It has easy quick check functions in order to determine the quality of the captured rawfile. Even a WB control auto mode to see if AWB was wrong.
Edge and detail check to find the image in a burst of images.
Raw digger is a much techy tool.
You can look in detail each channel of the sensor. The saturation levels.
Those tools has no use if you not know what you are looking at. And how to tweak the camera to improve those outputs.
If you are technical interested in all you camera’s how to pull the max out them by use the exposuresettings pure manual based on the rawdiggers viewed data, well then it’s your tool.
If you just want you confirm some things after shooting rawfiles for selection purposes FRV is much easier.

What DxOPL could do with the FRV kind of toolset is a number visulation of the exposure of the rawfile.
Yes a raw histogram and the under -over exposure channel precentage view.
This info helps to see the recovery posibility in the lumination and colorsaturation.
(now you get a color palet in the image where black is full all channel oversaturation and un recoverable , but that’s based on the workspace, the colorspace dxopl uses as working area.)
The other is the saturation protection in auto mode, the higher the slider/number the more the colors are compressed. Yes changed. Like pushing a branch against tye ceiling, it bends and changes its original form.

A true raw channel reading tool in order to show the data which you can work with can be a powerfull starting tool.

Example, you cqptured a red rose with a greenisch background which is out the dof.
Blown redchannel means your f*cked up the capture and will probably lose details on the rose petals. Which is your subject.
Blown/high saturated Green channel doesn’t matter that much , there is no detail in the first place, it’s blurred by out of focus.

Every now and then i re read the definition of those blinky colors sun and moon shows in the image, it’s about counterparts of the colors which shows what’s under or over exposed. Nice but most of the time i just pulldown things until it’s gone.
Problem that can change the tonality that much that the image is “broken”.

I would like a rawfile exposure histogram which is connected on the mousepointer when i want. When i point my mouse to a place on the image it’s shows a crosshair on the histogram’s channels so i can see where on the exposure line i am.

My use of Raw Digger is, in fact, limited to determining the sensor saturation point of a new camera (or, rarely, retesting) for the purposes of the calculation mentioned in Borg article. So maybe once a year or less.

I wouldn’t call this “pixel peeping” since the data doesn’t derive from any particular image (in fact the process uses a series of shots of a ‘grey’ card). Also the least-expensive version of RD is just fine for this purpose. It’s an economical purchase because it allows you to make better use of a very expensive piece of hardware: your camera.

FastRawViewer does give you a Raw Histogram – as our cameras should – of a specific image which is useful as “pixel peeping” because it shows what latitude there may be for post-processing. But the histogram not provide the same degree of accuracy in its (single) histogram panel as Raw Digger; so it can’t be used for the calculations in the Borg article.

BTW, I don’t think anyone need find the math of the process intimidating: you only need to follow a recipe. The formulae may look unfamiliar but you can skip them: they’re illustrative & don’t affect the practical steps that the article suggests.

If, however, anyone can’t be bothered with the measurements, my suggestion would be to just experiment with implementing the recommended exposure routine in the article without making the precise calculations of saturation first. I have found that with cameras/sensors I have owned ranging from M4/3 (Olympus) to APS-C (Ricoh, Nikon) and Full Frame (Nikon, Canon) the desirable EV compensation for the spot-measurement of significant highlights as mentioned in the article is in the range of +1 ⅔ EV to +2 EV (approx). For reasons explained in the article, using the camera’s spot-meter to set the significant (not ‘specular’) highlights to this range has (for me anyway) resulted in much better exposure on a routine basis.

P