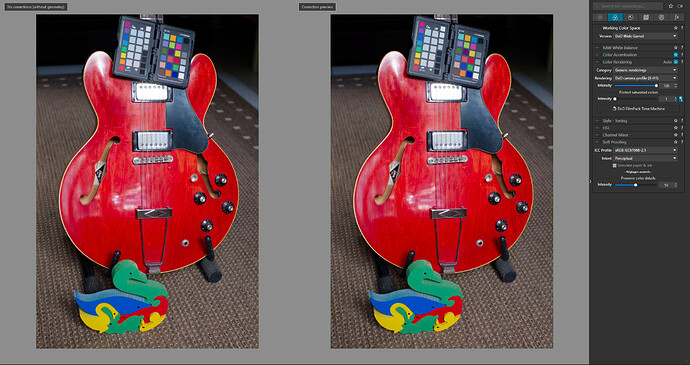
Probable colormanagement bug in PL6

I’m perfectly calm, thank you. But I do not understand what is unclear. I’m using the names of the features in the application.

If you do not know what a output device colorspace is, and how the different colorspaces are connected, then it seems normal you don’t understand what I try to explain. I appreciate you trying to help, but I just wanted to report a probable bug in the color management pipeline.

1 Like

Dirk - Reference to PL’s Color Management pipeline - as mapped-out here - might be useful to you in explaining to us what you mean.

John

Somehow three off use here are having problem with knowing exactly what you mean. Maybe you should try again. If you can’t use the names, use screenshots.

Ok, perhaps you should stop patronizing me with your overwhelming attempt to impress upon me your 66 years of miscommunication experience and pay attention to what the rest of us are trying to tell you.

“Color Rendering” simulates the rendering it does not write into the image anything, its a simulation. If by color rendering you mean ““output device colorspace (using the device profile)”” by your own terminology, than pay attention to the word simulates. Why is there a difference in appearance between wide gamut and classic Working Space should be a hint. The rest was explained to you before.

Color Rendering is a simulation of “output devices” that may or may not be physical devices, mainly for asthetic purposes. You can choose to simulate color rendering as if it was natively captured on a device that is not output device but input device. Including film simulation. What does that tell you? The purpose of it is not primerally to be a color management tool, but subjective way to have more options of how the image will appear while you are working on it and making subjective decisions in real time.

The actual output device can be simulated with soft proofing feature and its not until you export the image and embed a profile into the image that you are really doing color management.

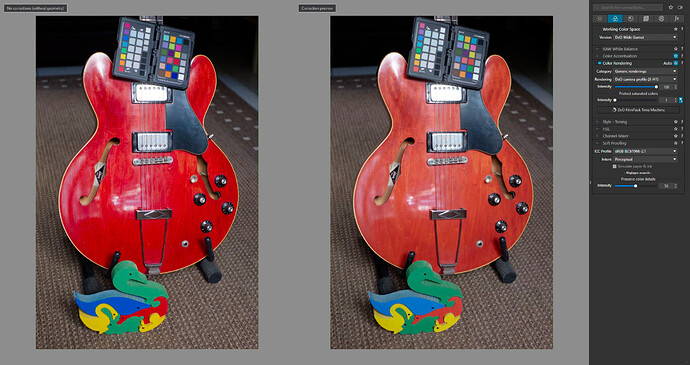
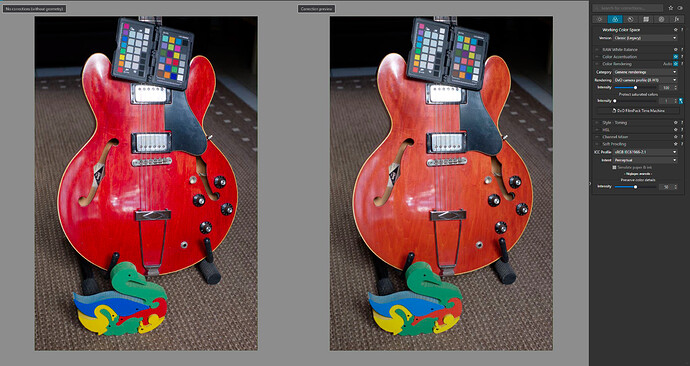
Maybe this is easier to understand:

Classic WCS:

Wide Gamut WCS:

Wide Gamut WCS (Color Rendering module switched on)

1 Like

That is an entirely wrong assumption. A display is a output device and fortunately for us colormanagement applies to displays too. Otherwise photo editing or graphic design would be a nightmare.

That is exactly what I thought might be happening and I posted my screenshot example of the same thing and have been trying to explain to you what has been happening and why. It’s not a bug.

The slider for intensify changes automatically, but you will have to ask DXO team why it does so in this particular way. It’s not a bug from what I can tell or a color management issue, its a matter of preference.

It’s not entirely clear why DXO team decided to use the intensity slider at different values, but I assume it has to do with the arbitrary value of one vs the other color space that is not based on standard. Just a way to start adjusting the image appearance manually.

[quote=“Photo-DKO, post:25, topic:31957”]
That is an entirely wrong assumption. A display is a output device and fortunately for us color management applies to displays too. Otherwise photo editing or graphic design would be a nightmare. [/quote]

You don’t understand. If you want to keep the appearance of RAW rendering as camera propitiatory profile does it Classic (Legacy) and you can either generic rendering options, and whatever your camera model is. Or you can load a custom ICC or DCP profile to maintain the appearance of the what the camera JPEGs would look like.

Classic (Legacy) - Color processing pipeline used by DxO PhotoLab 5 and below. Color adjustments are applied in the AdobeRGB color space (RAW) or in the input color space (JPEG/TIFF).

That also means if you load an image you download from the internet it should keep the same appearance as JPEG and TIFF. Switching between WGM and Classic should also keep the same appearance.

When you work with RAW images and you want to get the most out of it, DXO has created a proprietary DXO Wide Gamut Working color space. I want to stress out here the term working color space. Not color profile, color space.

DxO Wide Gamut - Color processing pipeline introduced in DxO PhotoLab 6. Color adjustments are applied in a wide gamut color space. Conversion from sensor native color to working color has been optimized for highly saturated colors.

DXO PhotoLab is an application mean to develop RAW files and adjust them to your liking before exporting them. Depending on your output device, web or print, you can use a soft proof feature to simulate how they might look, and you can embed color profile during export to ensure color management applies.

“A display is a output device and fortunately for us color management applies to displays too.”

Yes, it does, that would be your monitor that has its own color profile. And it’s separate from DXO photo lab and separate from DXO Wide Gamut Space.

What you claim to know, you don’t. You have a misunderstanding about the way PhotoLab works with color, even if it’s explained in the app itself.

You might have an understanding about color management as a topic, but you have a misunderstanding about DXO PhotoLab and how it works. If you could stop being stubborn for a moment and pay attention to what I’m telling you, you would have a better understanding. Your 66 years is irrelevant for this matter.

Once again color rendering is a simulation feature that can act as a color management assistant feature, but it is not, strictly speaking part of the color management because it can simulate not just current devices, output devices or input devices, but also devices that don’t even exist physical or are not digital devices, like the film simulation. Like I said , it’s a feature to simulate color. Simulation can be what your input was or what your output was or something that does not even exist or it’s not a digital device. That is the beauty of the simulation, it can provide more creative freedom.

It does not hinder color management it’s not a bug, it’s a feature that compliments color management inside DXO Photolab.

Official manual provides more clues.

RAW images

Because RAW images still contain all the luminance information and have never been converted into any color space, they are particularly suitable for the Color rendering correction. This means that many creative opportunities are open to you, as you can see from the contents of the two drop-down menus Category and Rendering:

Generic renderings: Camera Body is the camera default rendering: if you select a JPEG file, the rendering will match the manufacturer’s. In the second dropdown menu, you have the choice between four “neutral color” settings, which differ slightly only in the shape of their tone curves (i.e., contrast levels). Of these, the Neutral color, neutral tonality setting is our baseline for switching from any color rendering to another.

DxO PhotoLab does not take into account the photo styles provided by some camera makers. However, it will try to match the standard original rendering as closely as possible. Note that DxO PhotoLab lets you apply Fuji renderings (see below).

Camera body: When selected, this option reveals (in the second drop-down menu) a long list of cameras of different makes and models which DxO Labs has tested and measured, and whose color renderings you can use.

Color Positive Films: Without the DxO FilmPack plugin, DxO PhotoLab offers by default one single choice, Color-positive films, a selection of generic positive films.

If DxO FilmPack is not installed and activated on your computer, the available analog film simulations will be limited to a very small list of well-known positive color films (Kodachrome, Fuji Velvia, etc.). However, if DxO FilmPack is activated, you can choose among many more different film types (for more information, see the DxO FilmPack user guide).

ICC Profile: Choosing ICC Profile opens a dialog box for browsing your file system to find color profiles that you might want to use. Remember that an ICC profile is a set of data that characterizes any visual device such as a camera, a screen, a scanner, etc. As with JPEG or TIFF images, an Intensity slider allows a progressive change of the image’s original color space into another. At 0, only the original image appears; 100 is the default setting; and above 100, the image is “hyper-corrected.”

DCP profile: See Using DCP Profiles for more information.

Intensity Slider: The Intensity slider enables gradual changes to the rendering of the original image in another color render. 0 matches the original image, 100 is the default setting. If the color profile is Classic (old), values above 100 will allow for extreme corrections. If the color profile is DxO Wide Gamut, the maximum value is also the default 100.

Protect saturated colors: The Protect saturated colors correction prevents some specific saturated colors from being clipped, which may lead to unnatural colors and loss of texture when a particular color channel is close to the minimum or to the maximum luminance intensity (0 or 255). This process is performed automatically; you can fine-tune or modify the result with the Intensity slider. Clicking on the magic wand restores the image to the original automatic setting.

The Saturated Color Protection slider only works if you apply a special color rendering. On RAW files it always works because you have to apply a color rendering system (the default camera renderer); For JPEGs, the device has already applied a rendering, in which case DxO PhotoLab will not apply color rendering unless explicitly requested.

Fuji images

If you are using a Fuji camera, you have the option to automatically apply the camera’s generic or analog rendering. To do this, you will need to activate the option Automatically use Fuji camera rendering for Fujifilm images in the Preferences > General tab of DxO PhotoLab. There are two possible scenarios, depending on whether DxO FilmPack is installed or not:

DxO FilmPack not installed: the rendering will be the generic rendering of the camera, and DxO Photolab will apply this rendering if the camera is set to Fuji film rendering.

DxO FilmPack installed: in addition to the generic Fuji rendering, you will have the choice of all Fuji renderings to apply as you wish. Note that in this scenario, you will also be able to apply Fuji renderings to any brand and model of camera supported by DxO PhotoLab (renderings are available either in the Color > Color Rendering > Rendering palette or in the Presets, DxO FilmPack Designer – Color and DxO FilmPack Designer – Black & White sections).

https://userguides.dxo.com/photolab/en/general-image-corrections/
Is it really necessary to behave in such an agressive way?

Thanks for caring nevertheless…

BTW: input device colorspace (characterized by profile)=> PCS=>Working Color Space=>PCS=>output device colorspace (characterized by profile).

Yes, thank you. This diagram shows exactly where I believe the bug is. When using the Classic gamut, this diagram looks correct. When switching to the Wide Gamut, it seems like the first step after the raw conversion (“assign camera profile”) is not executed until we actually enable the Color Rendering module. So what we initially see is incorrect saturation. This is inconsistent, which is the problem. The Classic gamut is close to Adobe98, that’s smallish for a WCS but more than enough for displays so we should get close to equal results. That’s all. No reason for some to make such a fuss about my observation trying to prove something I’m not even talking about as if our lives depended on it.
It even shows in sRGB screenshots, but I can tell that on a WG display it’s even more impressive.

But well, as the saying goes: if it’s not a bug than it’s a feature ;-(

I will however raise a ticket with support.

No its not. I was responding to your quick attempt to throw credentials at me rather than sticking to the issue at hand. I don’t like that.

As it happens I know a thing or two about color management, (Color Management - YouTube) but I didn’t attempt to use that as excuse for not knowing something.

That is why I responded as I did. If you think we can continue talking about issue at hand, with arguments that are valid to the issue, than we can leave the credentials aside and stick to the issue at hand. I’m fine with that.

Yes. That is correct.

Off course while you are “developing” raw file inside DXO PhotoLab there are various way to to simulate appearance of the image according to presupposed color rendering of other devices. Which is what color rendering panel does.

We can choose to maintain input device colorspace (characterized by profile), for example RAW file with embedded JPEG in Adobe RGB for color appearance.

We can choose to simulate rendering of that raw file to resemble another camera brand or model or even film.

To give us maximum flexibility with minimum data lost, DXO provides Working Color Space in their new Wide Gamut or classic mode (Adobe RGB)

output device colorspace (characterized by profile).can be whatever we choose to be as output. Print, or web compatible. This is decided on the export phase.

That was simply in response to this here:

This called for credentials. When some random guy on the internet starts telling that you don’t understand the actual stuff you’re really familiar with, that’s pretty much the only way to introduce oneself and keep the converstation on topic.

Which is what I was desperately trying to do, instead of talking about “intensity slders” and other irrelevant stuff. Now let’s stop here, I’ll file a bug report, I’m not willing to spend more time on this. I appreciate you taking your time, but (and that’s were said credentials should have been helpful) I really don’t need explanations on what a raw processing/photo editor is supposed to do, please take my word for it. . Thanks anyway and have great day.

2 Likes

Just for the sake of clarity: that diagram doesn’t come from DxO and hasn’t been verified by DxO. It’s a collaborative effort to understand and roughly estimate how color rendering in PL6 works.

The crux of your concern has been extensively discussed in the forum. That is:

By all means, submit a bug report. But as far as I can tell, what you’re seeing is by design. When Color Rendering is off, you get different default color renderings (not a null rendering) depending on the working color space:

Classic WCS: Color rendering off = DxO Camera Default color rendering
DxO Wide Gamut WCS: Color rendering off = Neutral color rendering

The first is legacy behavior we see in PL5 and earlier. The second is a new behavior introduced with the DxO Wide Gamut WCS in PL6. It’s controversial, but DxO has stood by their decision so far.

To further address your original post:

This isn’t true. A larger WCS does allow more saturated colors to exist in the intermediate stages of the pipeline. It does not ensure smoother, more accurate gradients. You might get that from a larger bit depth:

Search results for ‘10-bit #dxo-photolab:feature-requests’ - DxO Forums

I hope that helps.
Greg

3 Likes

Photo-DKO continues to assert that “color management” in DxO PL6 is not engaged until one selects something in the Color Rendering palette. Egregius and several others have shown this to be plain wrong. The OP may wish this were true, i.e., more user control over the initial pipeline, and so anything short of that produces "bugs”. His program would be more old-school, perhaps, and might give a better color reproduction workflow. But DxO PL6 is not that program and was designed for different purposes.

1 Like

Thank you
@Photo-DKO for raising the issue and the guitar photo examples.
and @Egregius for clarifying the different color renderings methods DXO chose as defaults for each color space.

I am NOT a specialist in color spaces but have noticed PL6 seem different than I expected. I checked a few older photos and can better match the colors compared to initial PL 5 work.

I don’t understand the technical reasons why DXO chose different color rendering defaults when switching color spaces, but at least I can manage it better. I am glad I don’t have a complicated workflow that relies on this consistency.

“bug” or not - change is hard, especially when it is not clear what changed and why.

2 Likes

Thank you. This is all that I needed to hear in the first place.

It is indeed controversial and confusing.

This forum can be a very painful experience indeed, it happens often that when you challenge something you get personal attacks in return, instead of answers. In most other forums moderators would have jumped in order to keep things friendly. So thanks again for clearing this up…

Indeed. But I’m not a active user of PhotoLab, I bought it because of the DeepPrime and Filmpack integration, and don’t do any editing in PL itself: I tried hard but here are too many inconsistencies (like this one) that we have to find workarounds for. I use Lightroom and Photoshop, and have a Capture One licence. So it’s not about change in PL itself, it’s just about incoherent behaviour. I renew my licence every year but bugfixes and feature requests take a very long time, if ever they are adressed at all so I’m not close to adopt PL as my main editor. I’m French so I would have appreciated to use a French software, but alas, it’s not yet there.

You’re now pretty close to insulting me publicly. I don’t know who you are and why you feel so entitled, nor why I deserve such a agressive treatment. I re-read the whole thread twice and don’t see where exactly I might have lost my nerves, but I definitely see where you lost yours. You should engage in some anger management, and learn to accept that people might see things from a different perspective than yours. (Eg.: I’m a Adobe + CaptureOne user that came to DxO for a particular purpose in some part of my workflow, you are (I guess) a longtime PL guru so we don’t have the same expectations).

This whole thing could have remained friendly had you not dismissed my initial observation by concluding that the fact of the matter was that I just didn’t understand anything but YOU did, and then engaged in trying to prove why YOU do understand things, instead of giving the clue that @Egregius ended up formulating:

At least that was clear and concise: it’s a known issue. Debatable decision by DxO indeed and difficult to catch if you are a Adobe or COP user.

Matter closed, as far as I’m concerned (although I still believe this inconsistency also somehow propagates when exporting to DNG with “all corrections applied”, or that something similar is happening with profiles and LUT’s at that stage).

3 Likes

There is one specific reason that this behaviour (for W-G) annoys / disappoints me …

  • Previously, with WCS = Classic, one could compare another selected rendering option with your camera’s default rendering simply by toggling Color Rendering On/Off … knowing that, in the Off-state, you would be seeing the Camera Default rendering … it was quick & easy.

  • That’s no longer possible when WCS = W-G … 'cos the Off-state is the very “flat” Neutral Color rendering … which is hardly a useful comparison !
    – Yes, I know I could compare via a VC - but that’s not quick & easy (c/w simply toggling CR).


Dirk - Why is the behaviour a problem for you ? … other than the issue of inconsistency (or, is that it) ?


John M

Dear @Photo-DKO / Dirk
you can switch DXO also to French language,in Win is anywhere inside the settings and on MAC you can choose it in Systemsetting -Language/region Register Apps

best regards

Guenter

Dear @Guenterm ,
I think that @Photo-DKO does not mean to have PL in French but to use a software from a French company which DxO is.

1 Like

So 2 advantages for him :grin:
Thanks

Opening an image and then changing to the next fast doesn’t show me any difference in the left images and a small difference in the right image.
What do you mean by “is color managed”.

George

I don’t think so. Color Rendering is more a part of the conversion, a correction of the result from wide gamut to output gamut.

George

John-M – I could not agree more regarding the “default” color rendering in PL6E DxO WG. After all, when you select DxO Standard as your preset, the generic rendering applied is the DxO camera profile, not Neutral color.

And what about the Neutral color rendering? Beginning with optical corrections only, turn it on, turn it off, set the intensity to 100 or to 0 – all the same! Something seems wrong here, not just confusing. In time I think we will see additional generic renderings made available. In the meantime, why not take this opportunity to switch back to the generic camera rendering as “default”?