I must be doing something stupid and would appreciate help!
I use PL5 as my main PP editor, and generally output everything through Deep Prime (Mac mini makes this fast and practical)
I have recently been experimenting with Topaz Sharpening AI (trial) and must say that the results are very impressive. To get the best results I don’t do any sharpening with PL5 (other than any default). If I output to DNG I get much better results than if I output JPEG .
However, when I output to DNG, I find the exported image is underexposed about 1 stop, and contrast is very low. I can reimport the JPEG output from Topaz to PL5 and correct it, but it is not perfect.
Any ideas why I am having this difficulty? Is it that PL5 is applying default corrections to my RAWs and is not applying those to the DNG export? I have tried both of the options for DNG export, with all corrections, and without optical corrections, and get the same effect.
Further info is that when I open the PL5 export before the Topaz import it looks normal, so maybe this is not a PL5 problem, but hopefully someone is doing this and has found a solution
Hope you’re doing well.
It’s not that often people are using PL5 in combination with Topaz Sharpen (or DeNoise AI).
But your question is interesting to me, as I used this Combo earlier (also DeNoise AI).
I’ll will install Topaz Sharpen AI and DeNoise AI and will make some runs with those (exporting PL5 → DNG. Will let you know.
Many thanks. I will be very interested in how you get on. I would be a bit surprised if it was an unusual workflow, Deep Prime is so good, and Topaz Sharpen AI certainly beats the DXO sharpening. Poor photogs like me need all the help we can get!
Can you post an example RAW file where this phenomenon is occurring? We can check the file and try to duplicate your results to try to solve the problem.
I have recently started using topaz sharpen ai with pl5 and am impressed with the results. I tend to send a tiff to Affinity, duplicate the layer in Affinity and then use sharpen ai as a filter before exporting from Affinity as a final jpeg.
I regularly use Topaz Sharpen AI after processing in PhotoLab, in order to correct any focusing mistakes or situational limitations. It’s such a good pairing! But I export to 16-bit TIFF from PhotoLab, not JPEG or DNG.
Hi Tom
I just tried a photo exporting as dng to sharpen and then as jpg.
Windows
PL 5 - V5.1.2
Sharpen - V3.3.5
Both turned out exactly the same as regards general exposure / tonality.
The dng does look different in C1 for example as it treats the dng as raw and applies some default processing eg tone curve.
I opened both jpg and dng in Affinity photo, removed Affinity’s default processing of the dng and then pasted the jpg into the dng image and screenshot the result. As you can see they are pretty much identical. I hope this helps.
Thank you. everyone, for your kind responses and help. I have just been through the whole process again and include some images. I don’t think the problem is as dramatic as I though last night, but is still there, I think.
this is supposed to be a raw, I am suspicious as it says jpeg, below. Perhaps I cannot upload a RAW?
I have done the same with a 16bit TIFF, if anything the results are not as good as those from the DNG sharpening, but similar in terms of exposure. I will not post them unless anyone wants to see them
Any comments or idea would be gratefully received
Many thanks
tom
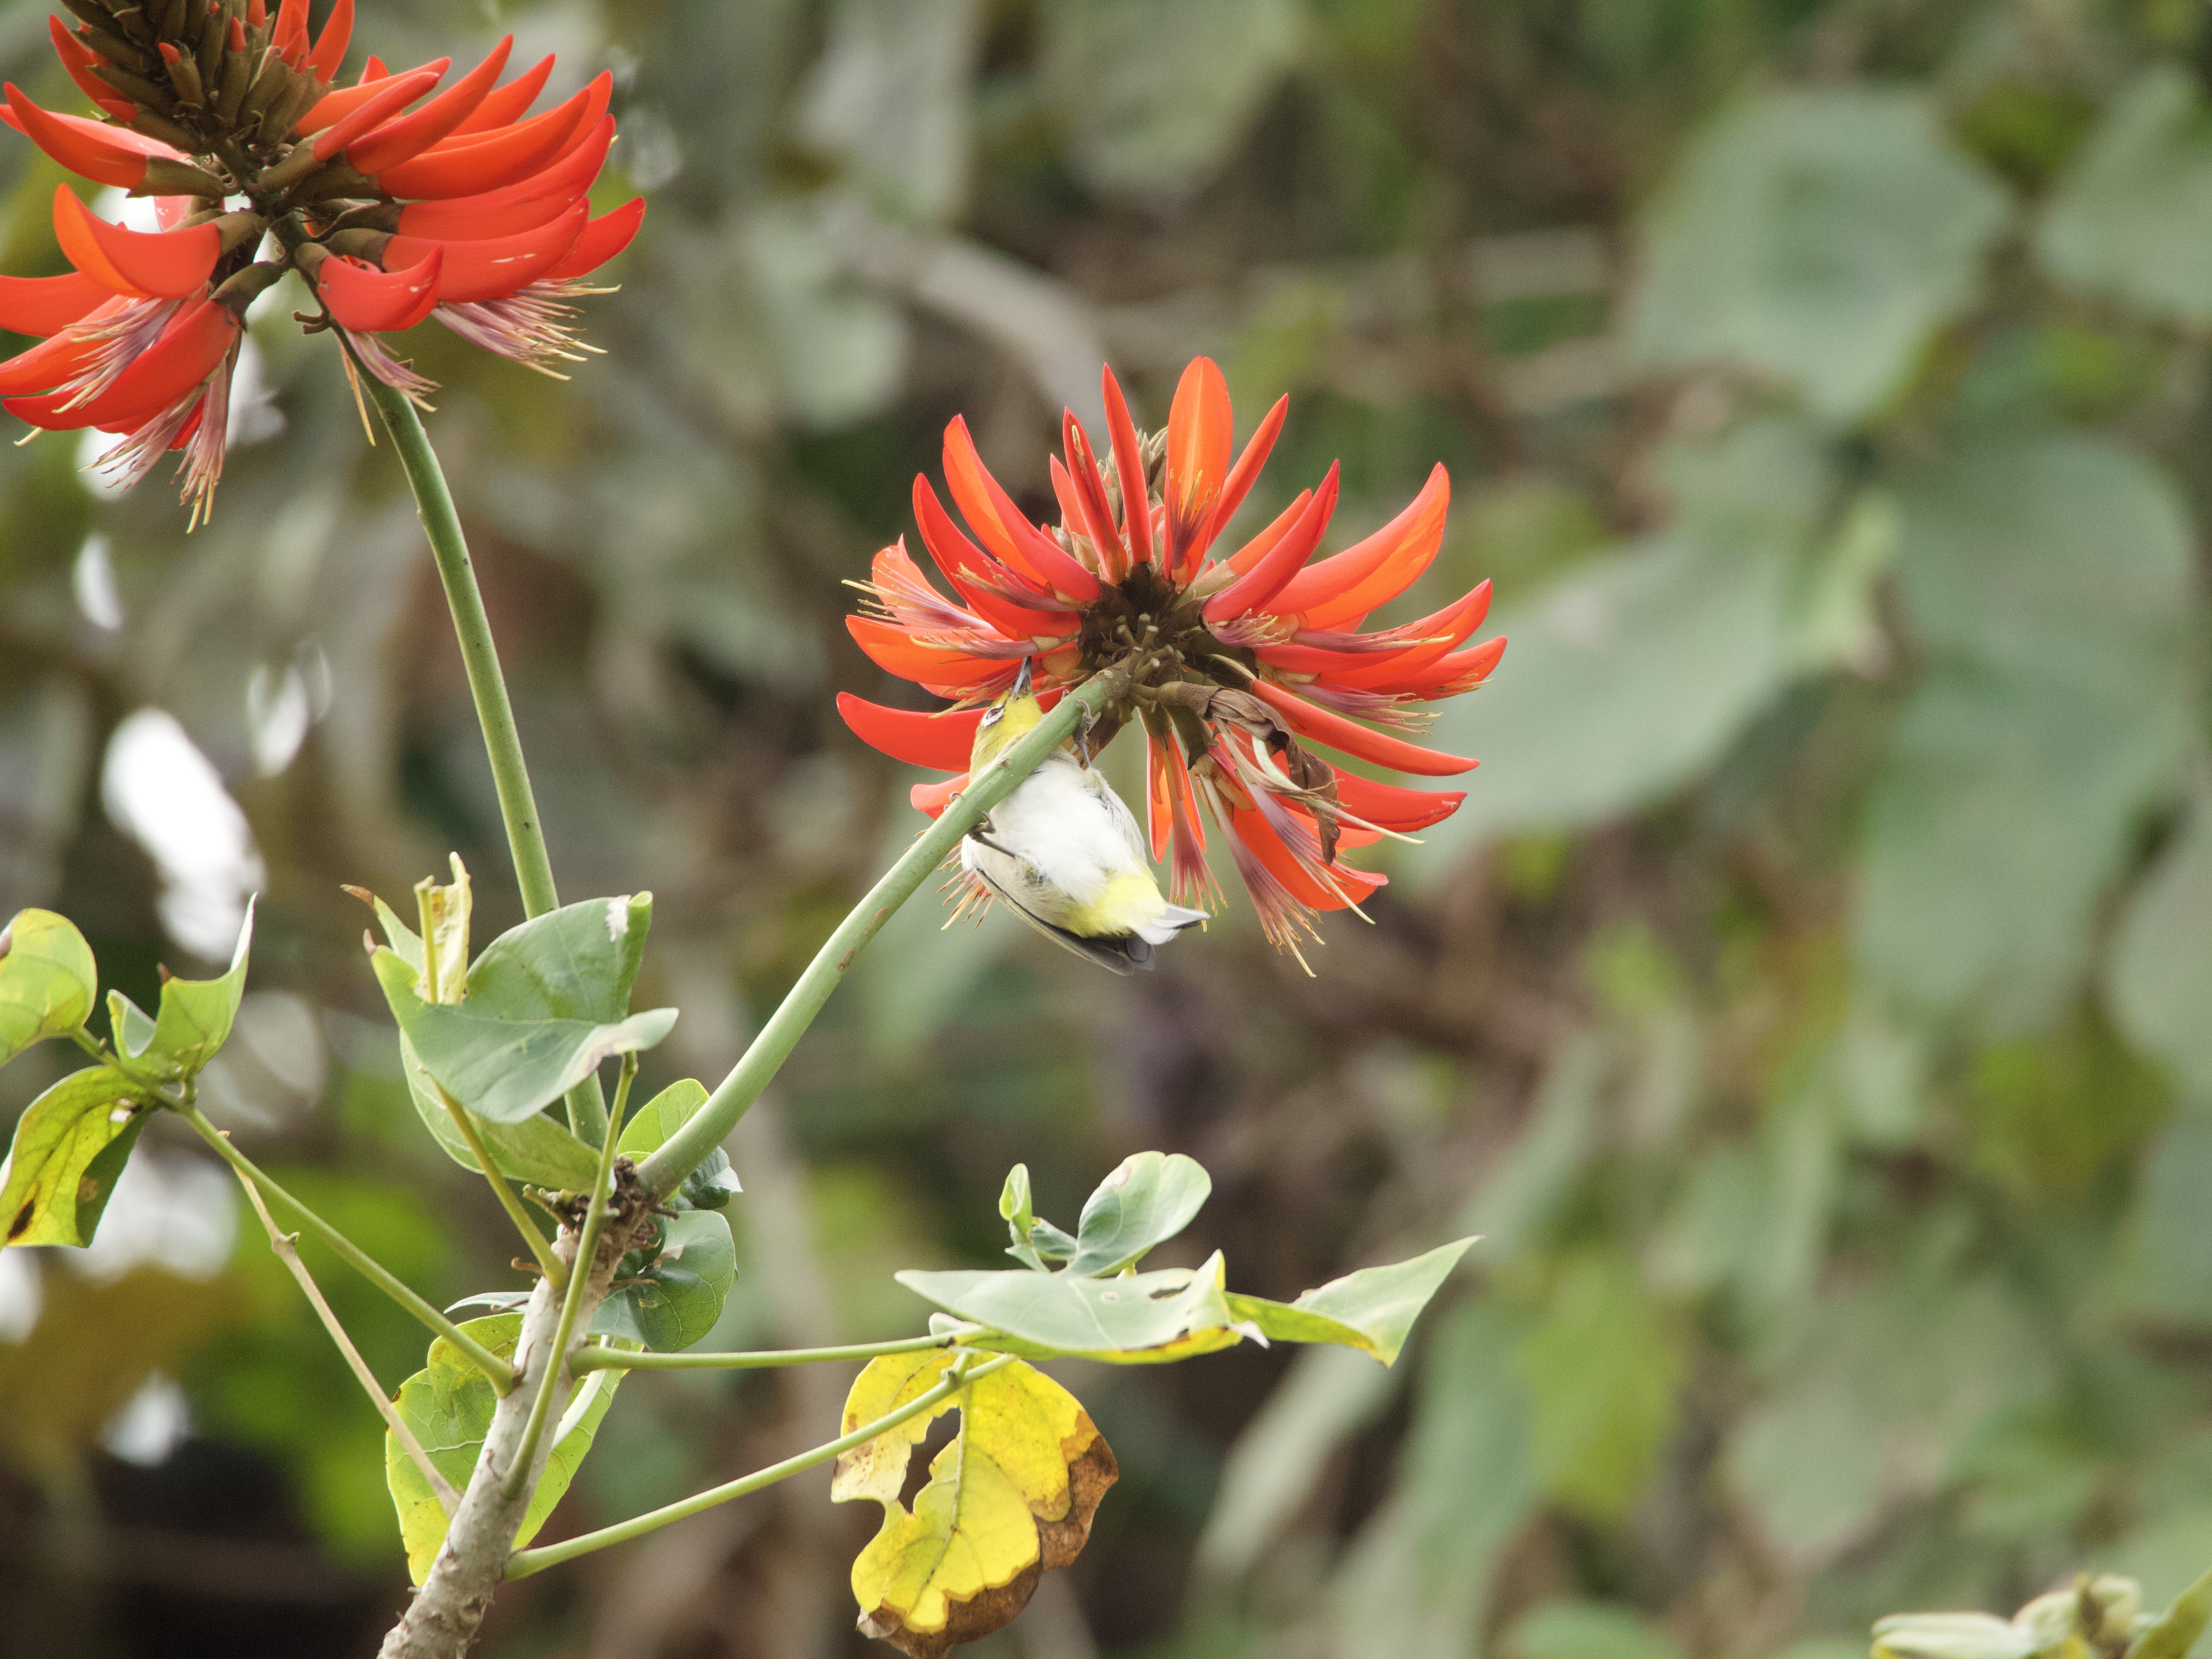
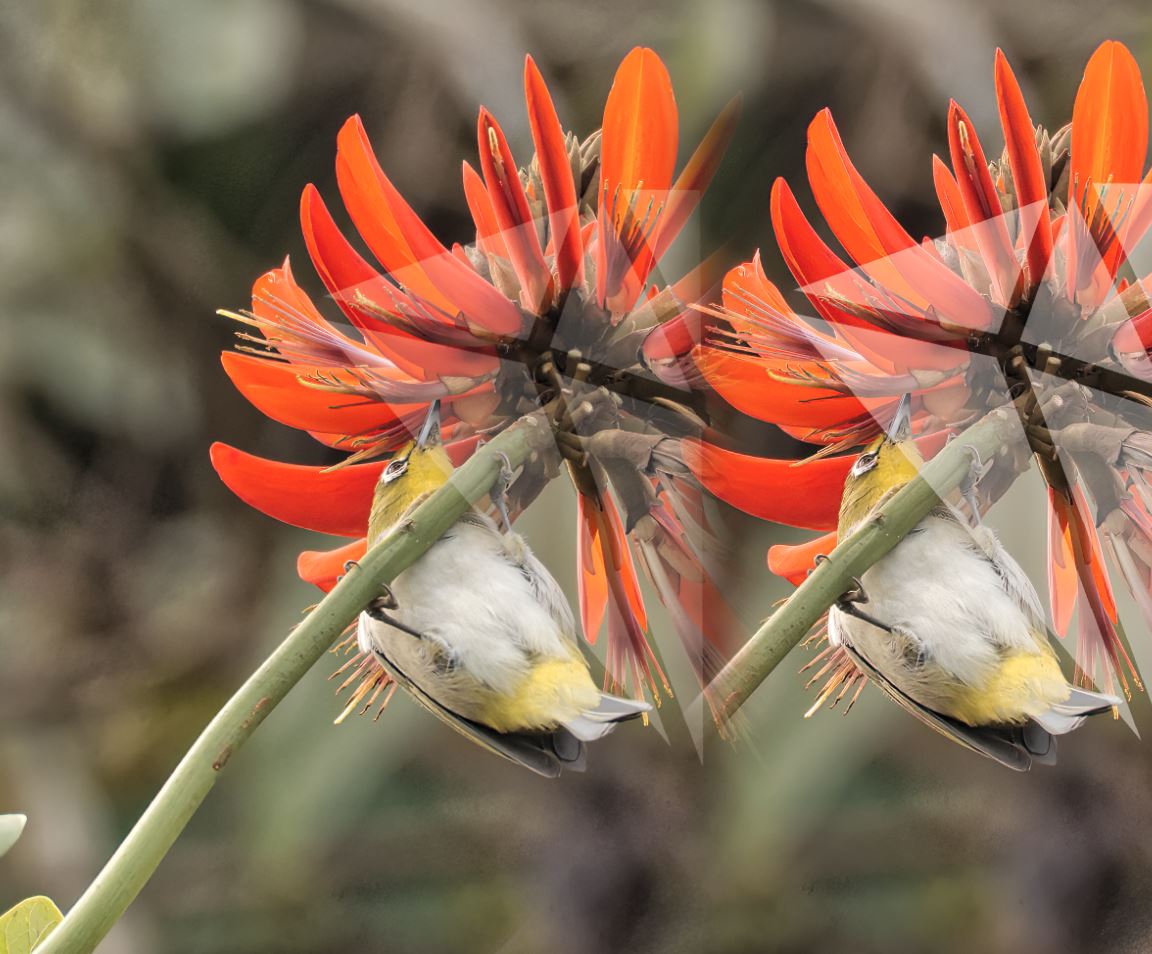
(These were all processed on MAC MINI MI. I only used dxo to adjust original levels a little before exporting, I looked to me that the belly of the bird was over exposed a bit SOOC)
I loaded the two dng’s into Affinity Photo and pasted one over the other as before. I can’t see any significant difference regarding colour or tone. Screenshot:
I informed you I’d install Topaz Sharpen AI (3.3.5) and work in conjunction with PL5 (Now 5.1.3) for some own results. Below initial result from PL5 ->16tiff->Topaz SharpenAI(Auto). I must say I’m pleased with the result indeed (Even more so considering the rather bad original RAW file). Come to think of it, I am now using this flow as my new default. Thank you for bringing Topaz up Tom, appreciated.! If you would let me (or anyone else for that matter) know what you think of this? Thanks.
I experienced the same when exporting from PL5 → DNG, but…
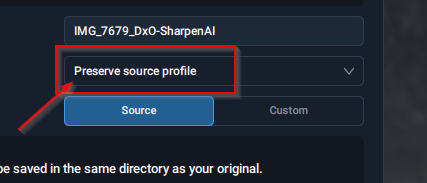
Exporting as an 16Bit Tiff to Sharpen AI AND THEN SAVING with “preserve source profile” did it for me!
(Done same with DNG, but for some reason this doesn’t work out the same. Stick with 16Bit Tiff.)
ADDED#2
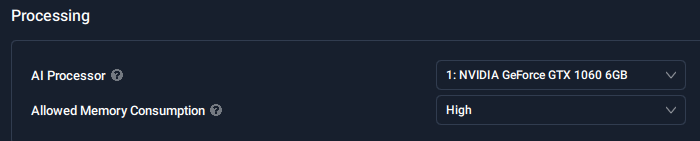
Tom, you might have done this already, but I emphasize you set your AI processor in Topaz Sharpen AI following:
(Select your GPU here as default)
Thanks for the reply and for your experiments. I will try output from PL5 in Tiff as you suggest and with preserve source file (which I have not tried). I will be tied up for the next few days but will do it as soon as I get a moment.
Your output looks good, but without I could find the original so it’s hard to judge the improvement. However I find that sometimes the results are fantastic, sometimes just a little improvement. Sharpen AI auto does not always get it right and it’s worth while trying the other options if it is an important photo.
I am using Mac mini with M1 chip. Both PL5 deep prime and sharpen AI use the M1 graphics automatically. I get output from Deep Prime (20Mp image) in about 6 seconds, and sharpen is taking about the same time per image, It’s a big improvement on my old graphics!
I will feed in any updates as I go along, I certainly plan on including Sharpen in my workflow and bought the license yesterday.
However Topaz does not have a complete editing suite, so I will stay with PL5 as my editor, and deep prime as my NR preference (I have not tried Topaz NR, but generally deep prime gets better recommendations)
I managed to find time this morning for a test with one image, The result is this:
Exporting a 16 bit tiff from PL5, importing and sharpening in Topaz and saving with ‘preserve source’ profile as you suggest (which seems to be the default) works perfectly.
Exporting a DNG from PL5 results in a very dark image in the TS preview, and a very dark image after saving. Nothing I can find resolves this problem
Exporting a Jpeg from PL5 works perfectly like the Tiff, however the result looks more ‘processed’ than that from Tiff.
It does not take noticeably longer to process Tiffs than Jpegs, and I think this will become my standard.
I have to try more images, to confirm my comment above about the final image looking too ‘processed’. Although there are some choices for sharpening level within TS options, it is not as flexible as I would like, I think in an earlier version there was a slider to adjust the level of sharpening processing.
However, it is a very useful addition to my workflow and I am pleased that I bought it
You inspired me … I’m gonna have to check this software and your flow out … I’m still on PL 4 and am going to incrementally upgrade… got the the film pack 6 and I think I’m gonna go with the NIK upgrade this week … and then maybe PL5 … idk though… I really enjoyed the 30 trial for pl 5 but my darn Apple mackbook air STILL has not resolved whatever issue is keeping it from allowing me to preview the Deepprime preview … which bums me out because that’s always a fun part to me especially given the fact that I only shoot with a 1 inch sensor camera in the Sony RX 10 Mark four and contact with a lot of noise so it’s always fun to kind of see though the change I mean I see it once I process the image but I don’t know it’s not the same so I didn’t really get to experience the full affect with Photo Lab 5 because it’s not working on that either… Thank you for the idea though I’m gonna definitely take a page out of your book if you don’t mind
When I first tried Sharpen AI with DxO PL4, I discovered the DNG support in the Topaz products was just not producing correct results in a lot of times. More tools don’t show the dng-output of Topaz as ‘ok’ (sometimes artifacts, sometimes colors completely wrong, etc…). It also looks wrong when processing the DNG with dcraw to get a sort of ‘base output’.
I tried for a while with TIF, but found it too restricting on the workflow.
I stopped using Topaz products then, and it has been quite a while, so I don’t know if this is relevant these days.
I couldn’t get the PL5 DNG output to work with Sharpen. I have a question about it in to Topaz about it, as the DNG looked fine with the other readers I tried. Sharpen was working fine with a Tiff or Jpg output from PL5 (Deep Prime) but the Jpeg output looks too processed after Sharpening.
Pretty happy with this Sharpen AI extension after PL5.1.3.
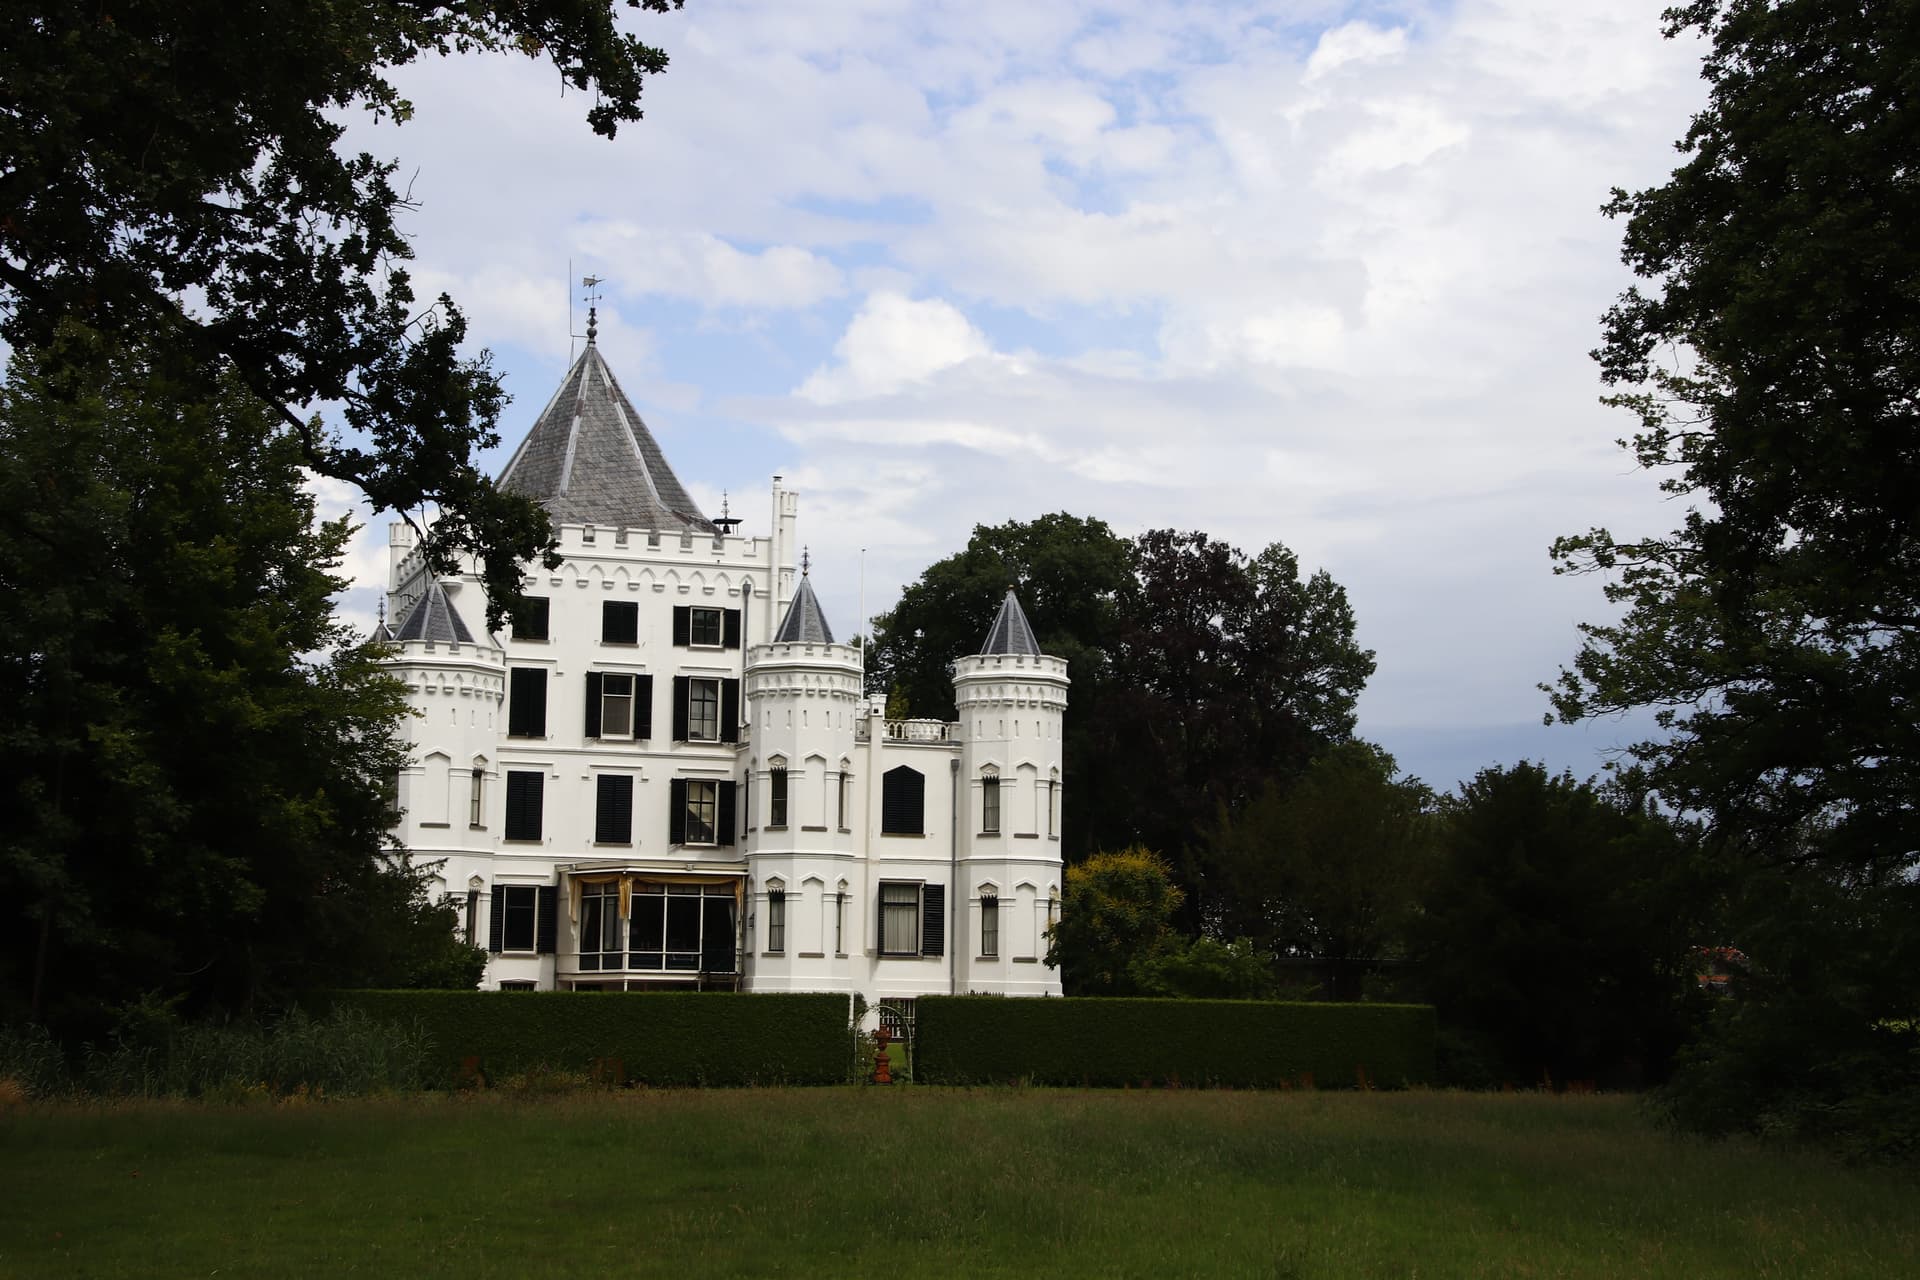
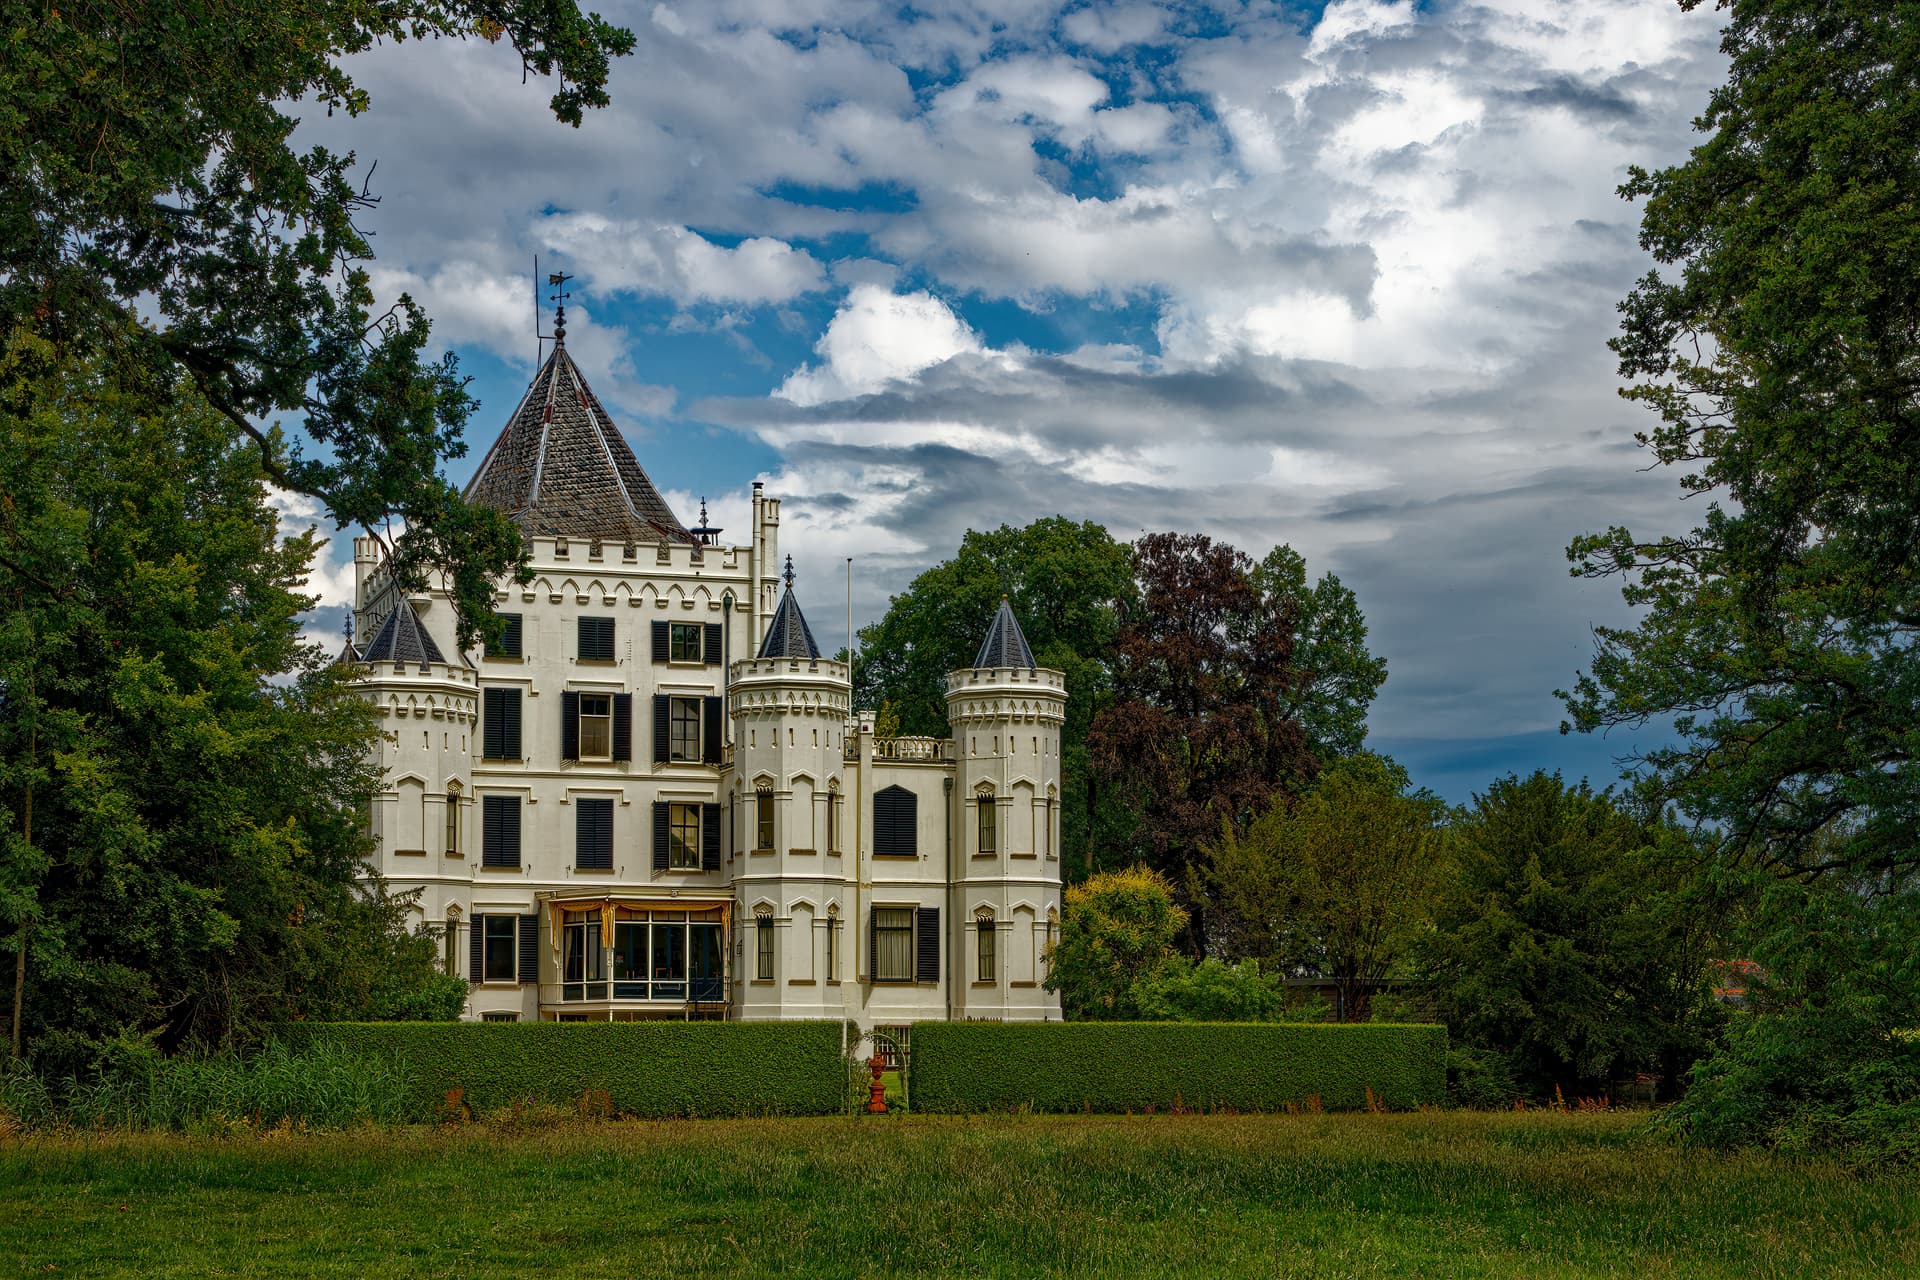
Taste may differ (always), but I like these. 1st original (.CR2) from the camera. .jpg as final result.
Know whar you mean. I too use Sharpen AI, and Denoise AI when I can’t clean up the issue in PL5 with Deep Prime. Different shots need different PP tools.
I love that second image, but I don’t know what gave you that depth. Was in done in PL? SharpenAI-Motion I understand, but what is the HDR from? Was the image taken as an exposure sequence? Or did you just use HDR processing on a single image? And, what HDR processor did you use?
Nice to read you like my .jpg output on the one photo of that specific “Castle”.
The following is my current workflow (also used on this specific photo):
CANON 77D, Tamron 16-300mm
CR2, RAW
1.) PL5.1.3.
2.) Neutral colors as default preset
3.) Deepprime, 88%
4.) Lens corrections used (Lens module for 77D - Tamron 16-300mm put available)
5.) Linear adjustments used.
6.) A bit of finetuning in addition (only related to perspective, horizon, etc.)
7.) Export 16 bit TIFF to PC
8.) Opening TIFF in “SNS-HDR” https://www.sns-hdr.com. (Puts more acceptable HDR to TIFF (Without overdoing such, i.e. no Halo’s, etc.)
9.) Saving from SNS-HDR as TIFF to PC.
10.) Opening the “HDR” TIFF in Topaz SharpenAI in automode.
11,.) Voila