PhotoLab 4 with X-rite i1Display Studio display calibrator

Hi Greg,
yes, I guess he can do so – and I suppose it could work aside to his iMac, he is used to, but …

  1. As Joanna prepared her ‘christmas present’ to explain and guide through the process in full length and detail, I didn’t want to jump in and disturb. Only over time I understood about a second monitor (and just now, that it was not at all set accordingly).

  2. I don’t know about MacOS / iMac. While I tried to pick up some information (MacOS supports this automatic mode and monitor is equipped with a lightsensor), I couldn’t give serious advice.

  3. I never used something like Automatic Display Control, don’t like the display changing for whatever reason plus having an external ‘lightmeter’ dragging around, but instead always looked for stable viewing conditions.

From what I picked up, the iMac has to be set to a certain luminance level (e.g. 120 cd/m²), which then automatically will be changed (reduced), following to the rooms brightness. While this solution should be convenient for office and paper work, I doubt it’s a good one for photo editing. I guess, that as you calibrate to 120 cd/m², the beforehand executed profile is simply getting worse as soon the automatic jumps in. – Maybe one could counteract and calibrate e.g. to 100 cd/m² to spread the loss of quality more evenly, or calibrate to 80 cd/m² to have the better one for the evening. But, that’s all far from ‘precision’ and one can save the effort.

Instead I also would tend to different profiles to choose from – or 2 profiles for 2 monitors. :slightly_smiling_face: :upside_down_face:
Wolfgang

After reading those instructions, and …
I will now do another i1Display Studio setup.


Mike,
thank you for the illuminating answer, and sorry not to be clear.
My question “Are you going to do YOUR thing or are you going to follow Joanna’s instructions?”
was about calibration, while Joanna has already replied in post # 179.

Just remember, to always choose the equivalent calibration target in i1 Studio and vice versa!

have fun + happy New Year,
Wolfgang

Ok Greg, then he would have to do it manually – or so.

Yes, I know ‘software calibration’ and how to with extended screen since long, but was never fond of X-Rite’s monitor calibration software, part of Color Munki Photo (i1 Studio’s predecessor).

While CM Photo and i1 Studio (>> monitor calibration) do a good job, they are price-wise targeted at beginners / enthusiasts and come with a streamlined interface, easy to follow. But at the same time, they lack functions like individual settings for colour temperature and contrast, which is not to cannibalize their pricey products.
8 years ago, I decided for a hardware calibrated Quato IP262ex plus software, which I (still) use for my second screen (15 year old Eizo) and a Laptop. Unfortunately the big screen went wrong after 5 years and got replaced by an Eizo CG2730 + Color Navigator software. This monitor is a joy to use and has ‘buttons’ to choose between 6 calibration targets instantly. – I do hope, this will be my last one. :slight_smile:
Wolfgang

1 Like

From that point of view, I’m doing a little of both. The biggest difference is a luminance of 80 works best for Joanna, and the tech support people at X-rite thought a better choice (for me) would be 120. During the time I had the luminance set to 80, I didn’t enjoy working on the ASUS. Now that it’s at 120 it’s a joy to work on, except when there is lots of sunlight streaming into my room - which I mostly fix by closing the blinds.

For all the other things we’ve discussed here, I’m mostly doing what Joanna suggests - I put all the tips in a file and printed it out. I used to thing that ClearView was one pill fixes all type of thing - now I’m barely using it. I used to adjust the exposure, but now I adjust the black. Stuff like that.

If the photos I posted tonight are acceptable, then I’ll smile, and continue learning PL4.

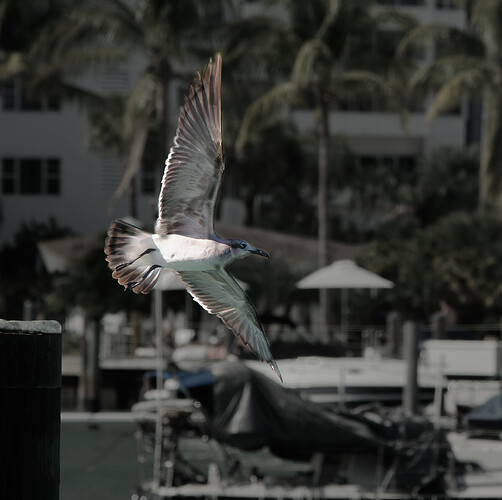
There still are things that I don’t know how to do in PL4, such as the last image of the bird flying. Maybe it’s not even possible to fix, and I have to take another.

It’s not only Joanna who I’m listening to - I read everything here, and try to respond. Some of my pictures other people edit look great to me, and some look awful - to me. I learn stuff from the ones that I don’t like, as things to avoid.

Taking the photos today was fun, thinking of how to improve over yesterday. With PhotoMechanic I deleted 3/4 of the images, as I had better ones. I ended up with ten or so images that I enjoyed, and cut that down to only five.

After seeing the beautiful photos posted elsewhere in the forum, taken from an ancient Rolli camera, I have an urge to take more black-and-white photos, and I even checked out film prices, along with developing. I even dug out my old Nikon F4 camera - with lots of AA batteries, it will probably come to life. It even has a roll of film in it - no idea what it was of.

Happy New Year to all of you!!! …for me, two more hours until this awful year is over.

Where my photography started:

Screen Shot 2020-12-31 at 22.05.31

Well, here’s the best I can do…

I used the AutoMask local adjustment; covering the bird first and lightening it, increasing saturation, adjusting tint. and adding a little sharpness.

Then I copied that mask, inverted it to cover everything else and tidied it up to get rid of some fringing, reducing exposure and highlights, decreasing saturation and adding a tad of blur.

Finally, I cloned out the highlights on the table in the background. Using the Tone curve to reduce them to grey affected wasn’t really working so I removed that, Exposure compensation and Smart lighting.

Here’s the .dop file

_MJM2395 | 2020-12-31-Boats in Sunlight.nef.dop (1,5 Mo)

On the whole, I would tend to agree that this is not that great a shot, mainly due to the confusing background, but that is always going to be difficult to avoid in that kind of location.


Sounds like you now need to calibrate the iMac to match the Asus now :wink: :nerd_face: :hugs:

A completely different question. I have now bought an i1 Display Pro and calibrated my iMac monitor according to Nasim Mansurov’s instructions. My problem is primarily the brightness. I had also before for editing, the brightness always 5 levels reduced by keyboard. As I know now, this is still more than 160cd/m2. I found that to be quite dark. But I got used to it. At 160cd/m2, I now feel the screen even more unusually dark, of course. Also the new color profile, seems to me like with nightshift settings.
120cd/m2 I will probably not use, because it is just too dark for me. Do you guys feel the same way, or is it really just a process of getting used to it?
Or could you say, 120cd/m2 edit only makes sense if you want to print the photo and say 160cd/m2 is sufficient if the photos are only viewed on screen?

P.S.
iMac Retina 5K 27", 2017

It all depends on how bright the room you are working in is.

I print for other people and need to have my monitor at 80cd/m2 because that closely matches the brightness of paper, which reflects rather than transmits.

When a lot of monitors are delivered they are set to some ridiculously high luminance, presumably as part of the marketing hype that says they should be bright, shiny and high contrast.

But, as I have said further up in this conversation, when people send me files, for printing, that have been edited on such bright monitors, they appear very dark on my screen and, unless I re-edit them, will print very dark as well. @Wolfgang and others have also talked about not using monitors that are too bright.

When I first calibrated my screen to 80cd/m2 for printing it seemed quite dull but it didn’t take long to get accustomed to it and now anything brighter seems too bright, especially since I work in a room that is not strongly lit.

@mikemyers and others seem to have settled on 120cd/m2 because they are mainly targeting web displaying of their images and don’t often print. I would have said that 160cd/m2 is definitely too bright. Try lowering it and in a couple of days you will not notice :wink:

1 Like

Dear Joanna, thank you for your reply to my questions. And yes of course, depends on the brightness of the room. As I am editing in the living room, this is changing through the day. Will do like you suggested and try to get comfortable also with 120cd/m2 :wink:

Good morning gregor,

yep good advice. Pictures say more than words :wink:

1 Like

The second one for me is the better choice. The one above is to dark. That is how I see it on my (now) calibrated iMac. On my second not calibrated Dell, the difference is more less.

[quote=“Joanna, post:192, topic:17155”]
I used the AutoMask local adjustment; covering the bird first and lightening it, increasing saturation, adjusting tint. and adding a little sharpness. Then I copied that mask, inverted it to cover everything else and tidied it up to get rid of some fringing, reducing exposure and highlights, decreasing saturation and adding a tad of blur. Finally, I cloned out the highlights on the table in the background. Using the Tone curve to reduce them to grey affected wasn’t really working so I removed that, Exposure compensation and Smart lighting.

On the whole, I would tend to agree that this is not that great a shot, mainly due to the confusing background, but that is always going to be difficult to avoid in that kind of location.

Sounds like you now need to calibrate the iMac to match the Asus now

Two quick thoughts, before I make breakfast. First, I agree with your conclusion, and I’m going to give up on this shot and try for a better one. The background is terribly confusing, and with the bird being half in sunlight and half in shadow, that makes things even worse. You somehow managed to do what I didn’t know how to do, but it’s not enough to save this photo.

About the iMac - if I want to check my mail, or the web, in the middle of the day, I either need to close my blinds or use the iMac which is smart enough to compensate for the ambient lighting. I fully understand why this is completely WRONG and USELESS for a calibrated display, but it’s like using my iPhone indoors and outdoors - or looking at the display screen on the back of any of my cameras. I don’t gain much by darkening the iMac anyway, as I will do my editing on the ASUS. I do know how to do it now - turn off the automatic brightness control and use the i1Display Studio to set it properly… but for now, that would be very inconvenient when using the iMac for all my other computery things. :slight_smile:

Joanna posted two photos in post #93, one in which she got her display to a very high luminance (it’s cute to read how she tricked her monitor into doing that!), and one with her usual luminance setting of 80.

I didn’t understand this at the time, but thanks to all the support in this thread, I can understand what happens when you take an image that is bright enough to look good on an overly bright display, and then see (or print) it on a device that is set to be used at a lower brightness level. The way my brain finally figured it out, was to think of an image that looks good on a TV, then reach for the brightness control and turn it way down. That picture is going to get very dark. The picture needs to be much brighter, so it will look good on that TV with a darker screen.

The way I tricked my brain into understanding this, was to wonder what would I need to do to a photo, so it would look good on a very un-bright setting for the brightness - and the answer would be to make it brighter.

BUT…if this particular photo, designed for a darker display was then shown on the original overtly bright display, what would happen - the answer being that it would be far too bright to enjoy it as a picture.

Until I did all this, I only knew what people were telling me to do, but I didn’t yet understand the reason for it. Now it’s as simple as understanding a histogram - which several months was pretty much meaningless to me. And once again, I learned that by experimenting, taking a photo at one setting, viewing the histogram, then taking the same photo at increasing exposure, and watching what the histogram did, and then taking at decreasing levels of brightness. For me, doing the stuff get much easier when I understand the reasoning for WHY it is that I should do thing one way, and not another.

Sorry for writing so much here I’m just “thinking out loud”.

1 Like

Sounds like my place. Luminance now at 120, living room, changing brightness through the day. When my room gets overly bright, like in the late afternoon with the sun streaming in, the only “fix” I have is to close the window blinds. It’s now 9am in the morning, my room is bright, but the 120 setting on my ASUS is fine - as long as I don’t look at my iMac and then look back at the ASUS. I put my iMac in “dark mode” which helped with this.

One last thing - position your screen display so you’re not seeing a reflection of your overly bright windows on the display. That makes a big difference.

Are you aware that there are hoods available for monitors?
You use a hood on your lens, so why not for your monitor when you have to work in a difficult to control room?

2 Likes

A Whitewall employee who trained as a photographer and whose tips I always appreciated because she knew what she was talking about had told me a while ago to “reduce the iMac display brightness by half”.
My photos were made for the print therefore also still brighter by her. By half I have then but not managed, because it was much too dark for me. 5 steps down (using the keyboard), so still over 160cd/m2 as I know now, was the maximum for now.
Apparently, however, the whole thing is associated with a learning curve and the change of viewing habits, as I have now learned. The possibility to calibrate via hardware is certainly essential.

If you’re not aware of it, try this.

First, on your iMac, there is a camera window at the top, middle. Block off that area with your fingers. Your screen will most likely get much darker, due to the automatic brightness control. You can turn that off, if you haven’t already done so.

Click on the apple icon at the top left of your screen
Click on System Preferences
Click on Display
Turn off the automatic brightness control

Under the “Night Shift” setting, you can turn this off as well using the “Schedule” setting.

You can also go to the Color tab, and do Apple’s built in calibration configuration.

See if that helps, and if you can still see your screen.
For me, there is also a control in that window that allows you to adjust the screen brightness.

If I may interject - don’t use this, it is rubbish

Knowing what I do today, compared to a month ago, I agree.

I think of it now as trying to weigh a certain amount of salt using a bathroom scale.

Joanna - one question - for someone without any calibrator yet, and who uses an iMac, is the “calibrated” display better or worse than what they say before the calibration?

My problem back then was I didn’t know/understand what I didn’t know. Until I learned better (here), I did think my screen was “better” after using the Apple tool. Knowing what I know today, maybe Apple should use a different word instead of “calibrate”. I think I’ll pass that on to them using their forum for suggestions. It is obviously misleading and inaccurate wording.

This is very difficult to say but, on the whole, possibly a bit better.

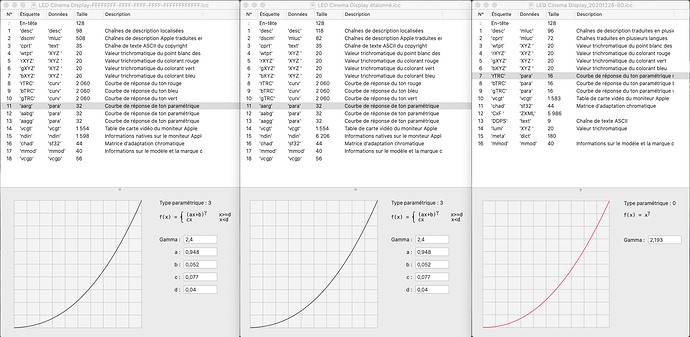
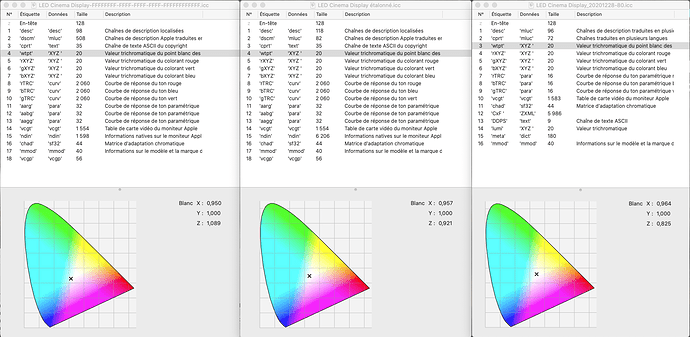
I just ran it on my Cinema display and there is definitely a difference in that the “calibrated” appearance is warmer than the “LED Cinema Display” profile that I am guessing passes for “unprofiled”, but mainly because I selected 5500°K. Although it is not the same kind of “warm” as the i1Studio profile.

I guess only having five stages of “screw your eyes up to try to match a pattern” really doesn’t compare to the 118 colour samples that i1Studio gives you.

Looking at the three profiles: LED Cinema Display, LED Cinema Display calibrated and the i1Studio one, the most obvious difference is that the Gamma is 2.4 for the Apple profiles and virtually 2.2 (which is what it should be) for mine…

The white points are also different…

But this is where the science starts to baffle me, as I really don’t know what is right or wrong here.

Suffice to say, I’ll stick to a “real” calibration any day :blush: