Thanks for your suggestion. If the opportunity arises again, I will remember this.
Be sure to be able to check sharpness in the field. Cameras screens are very small.
On my cameras, if no external monitor, I generally zoom to 100% then clic zoom one more time. If I see a sharp image like this, it is good. I find 100% zoom on c amera screen is not enough to judge sharpness.
Mike,
you can go through a lot of your pics, where I was working on, and you will notice when and how I used ClearviewPlus locally – but not like a ‘secret sauce’ poured over the whole pic.
Experiment to gain ‘experience’ and to know how to make (full) use of the Photolab tools.
.
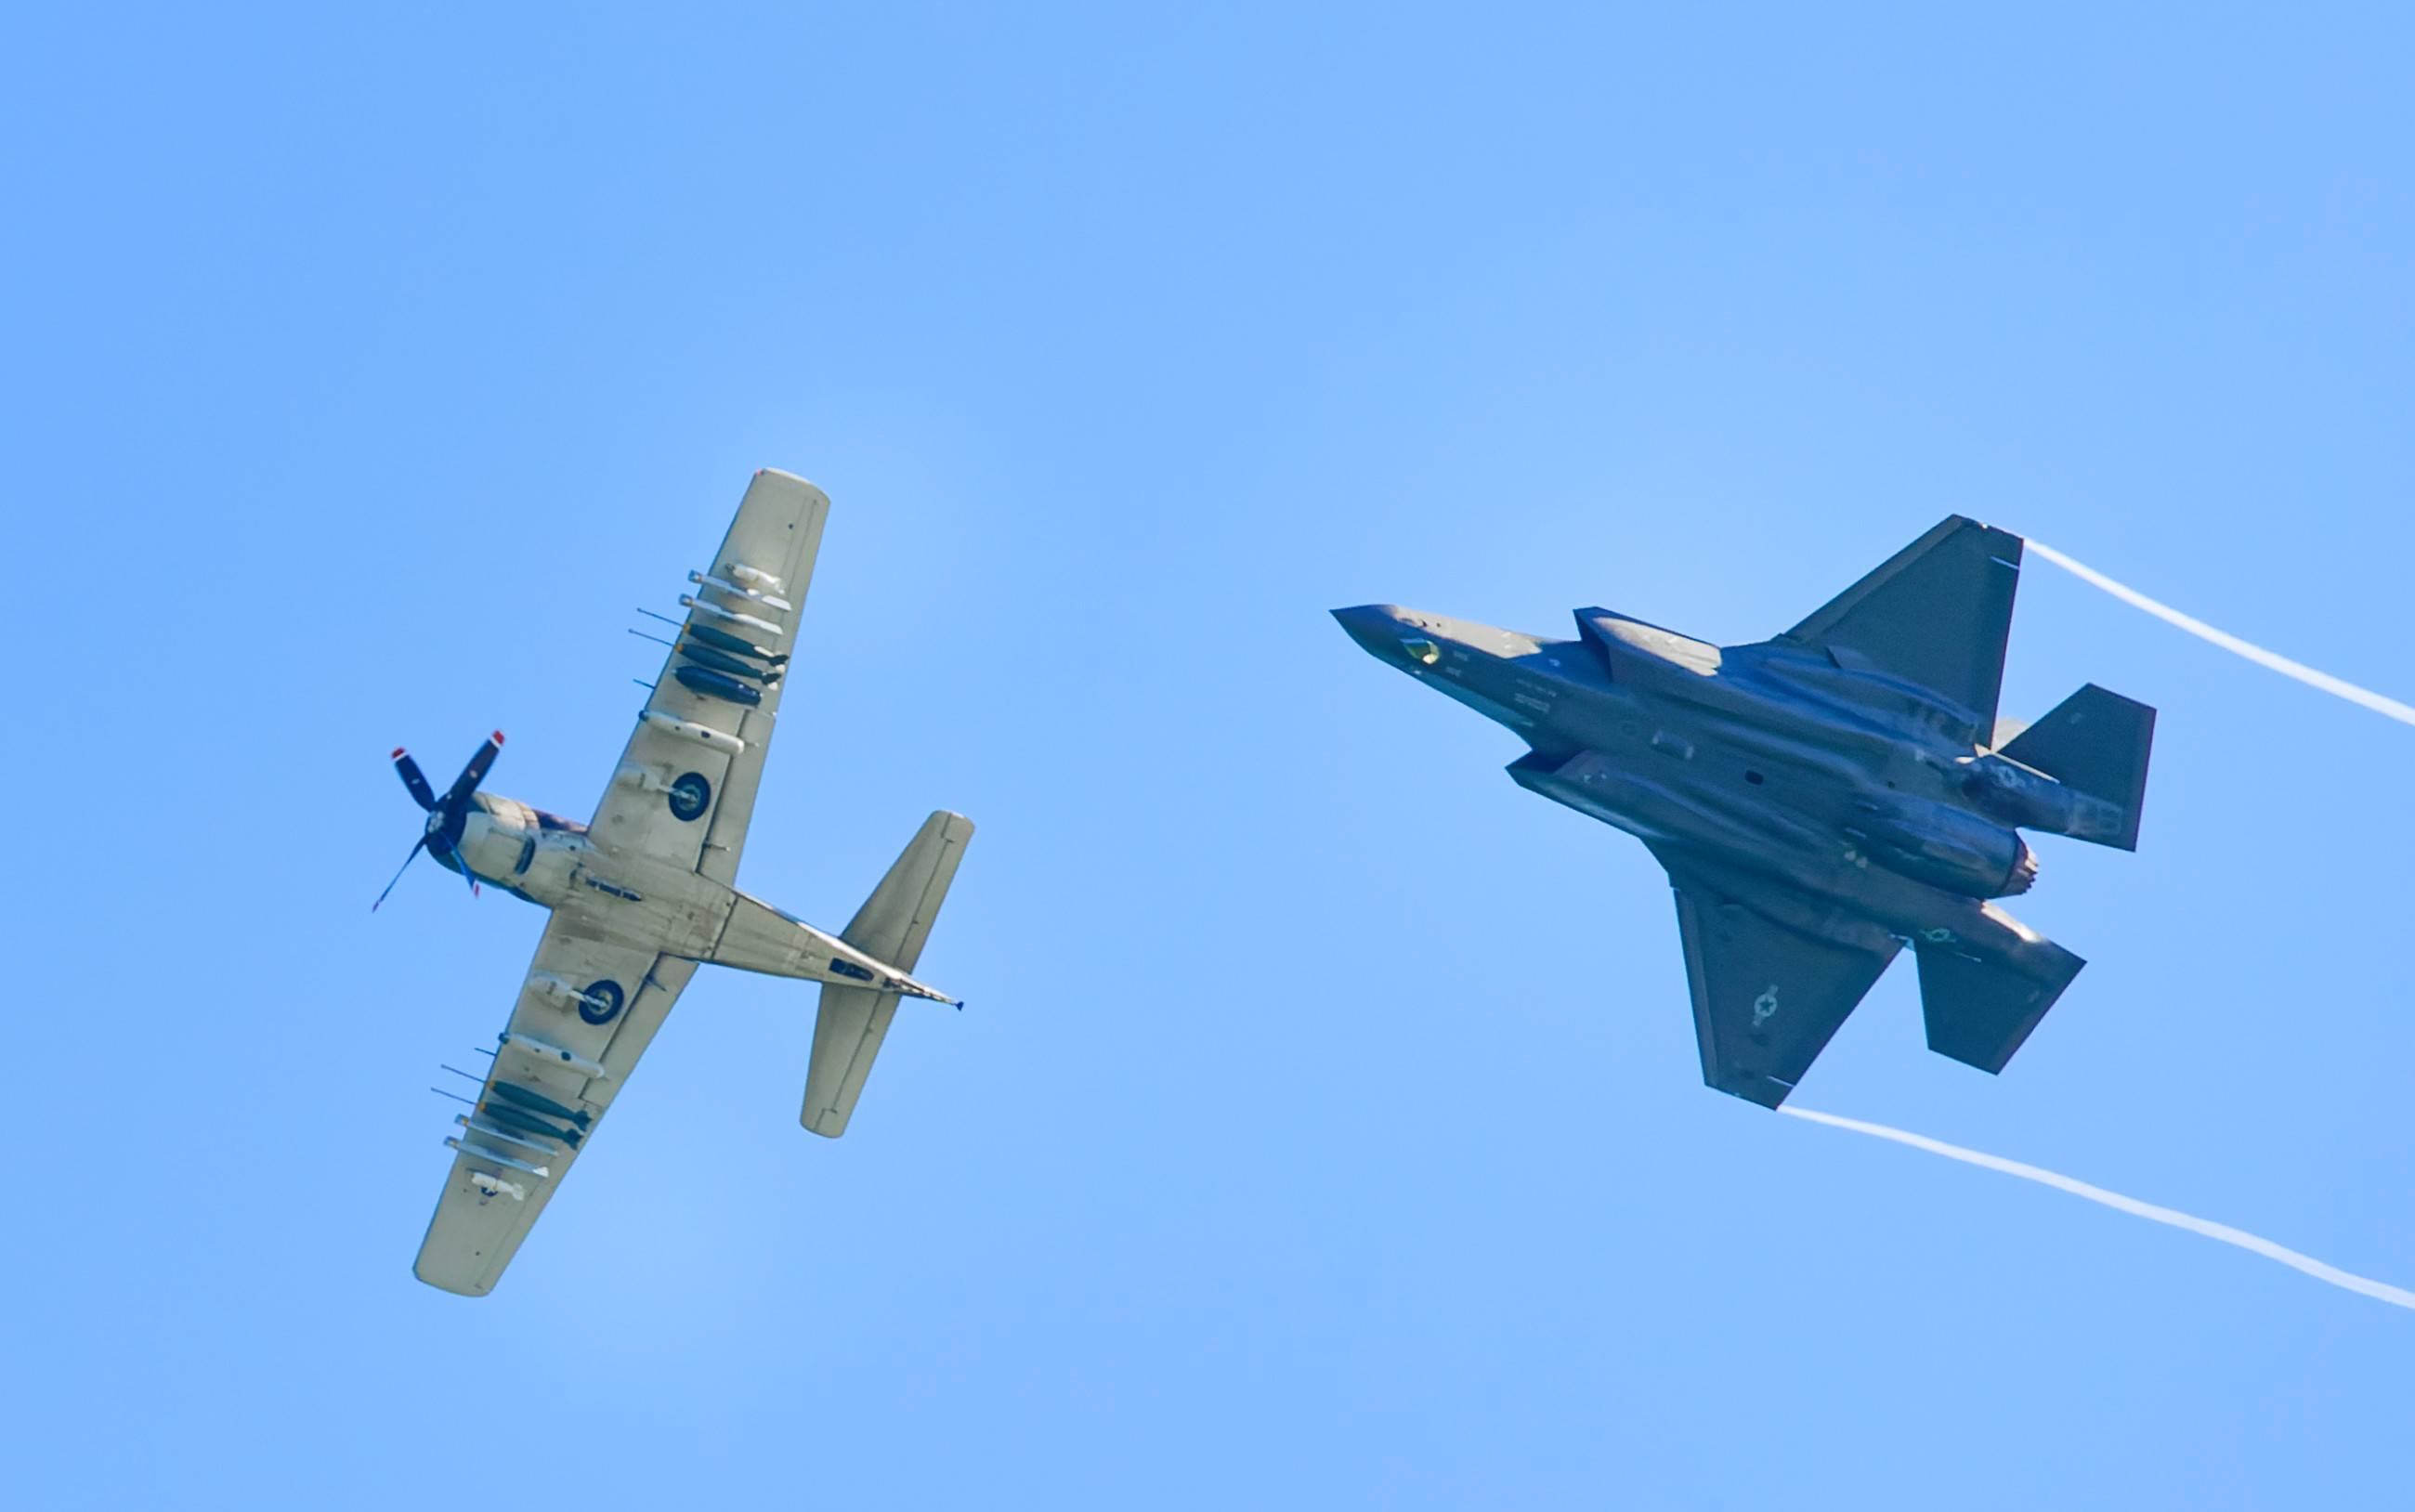
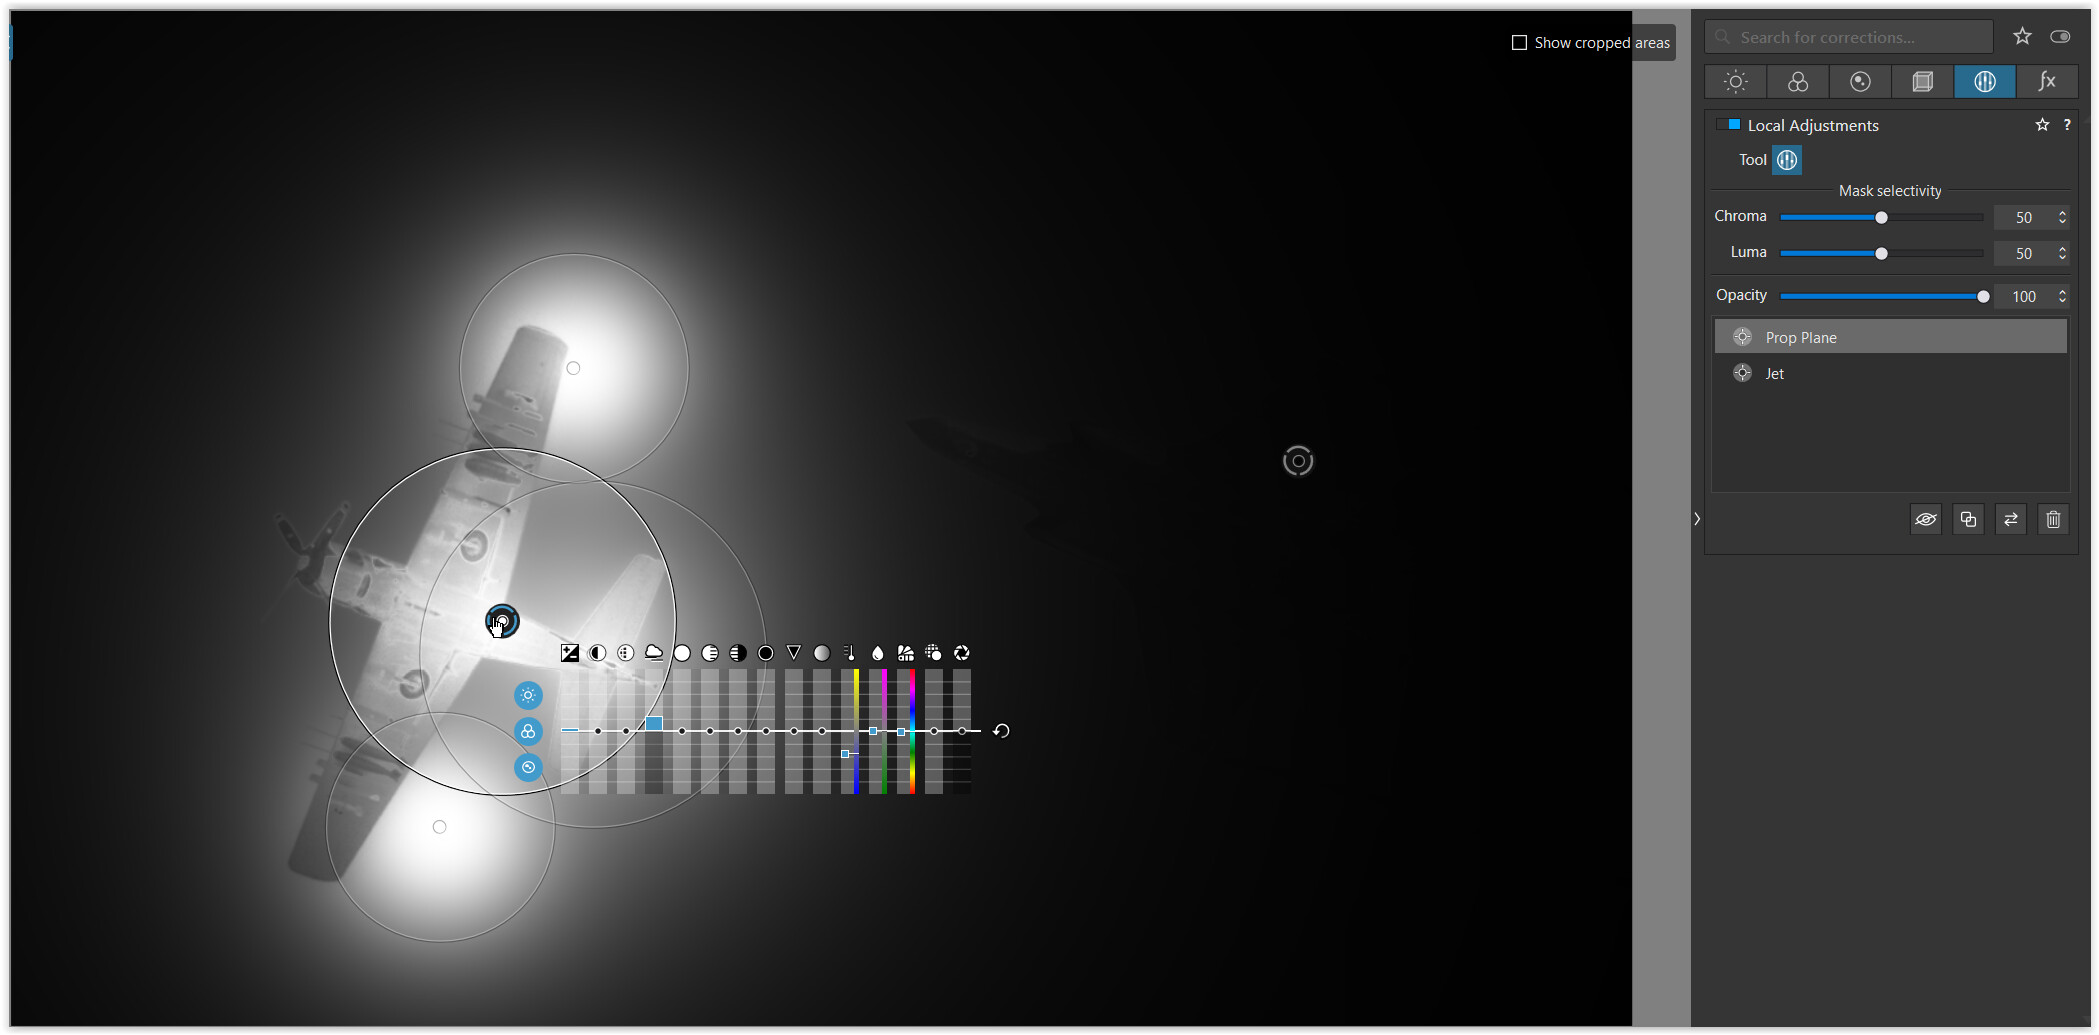
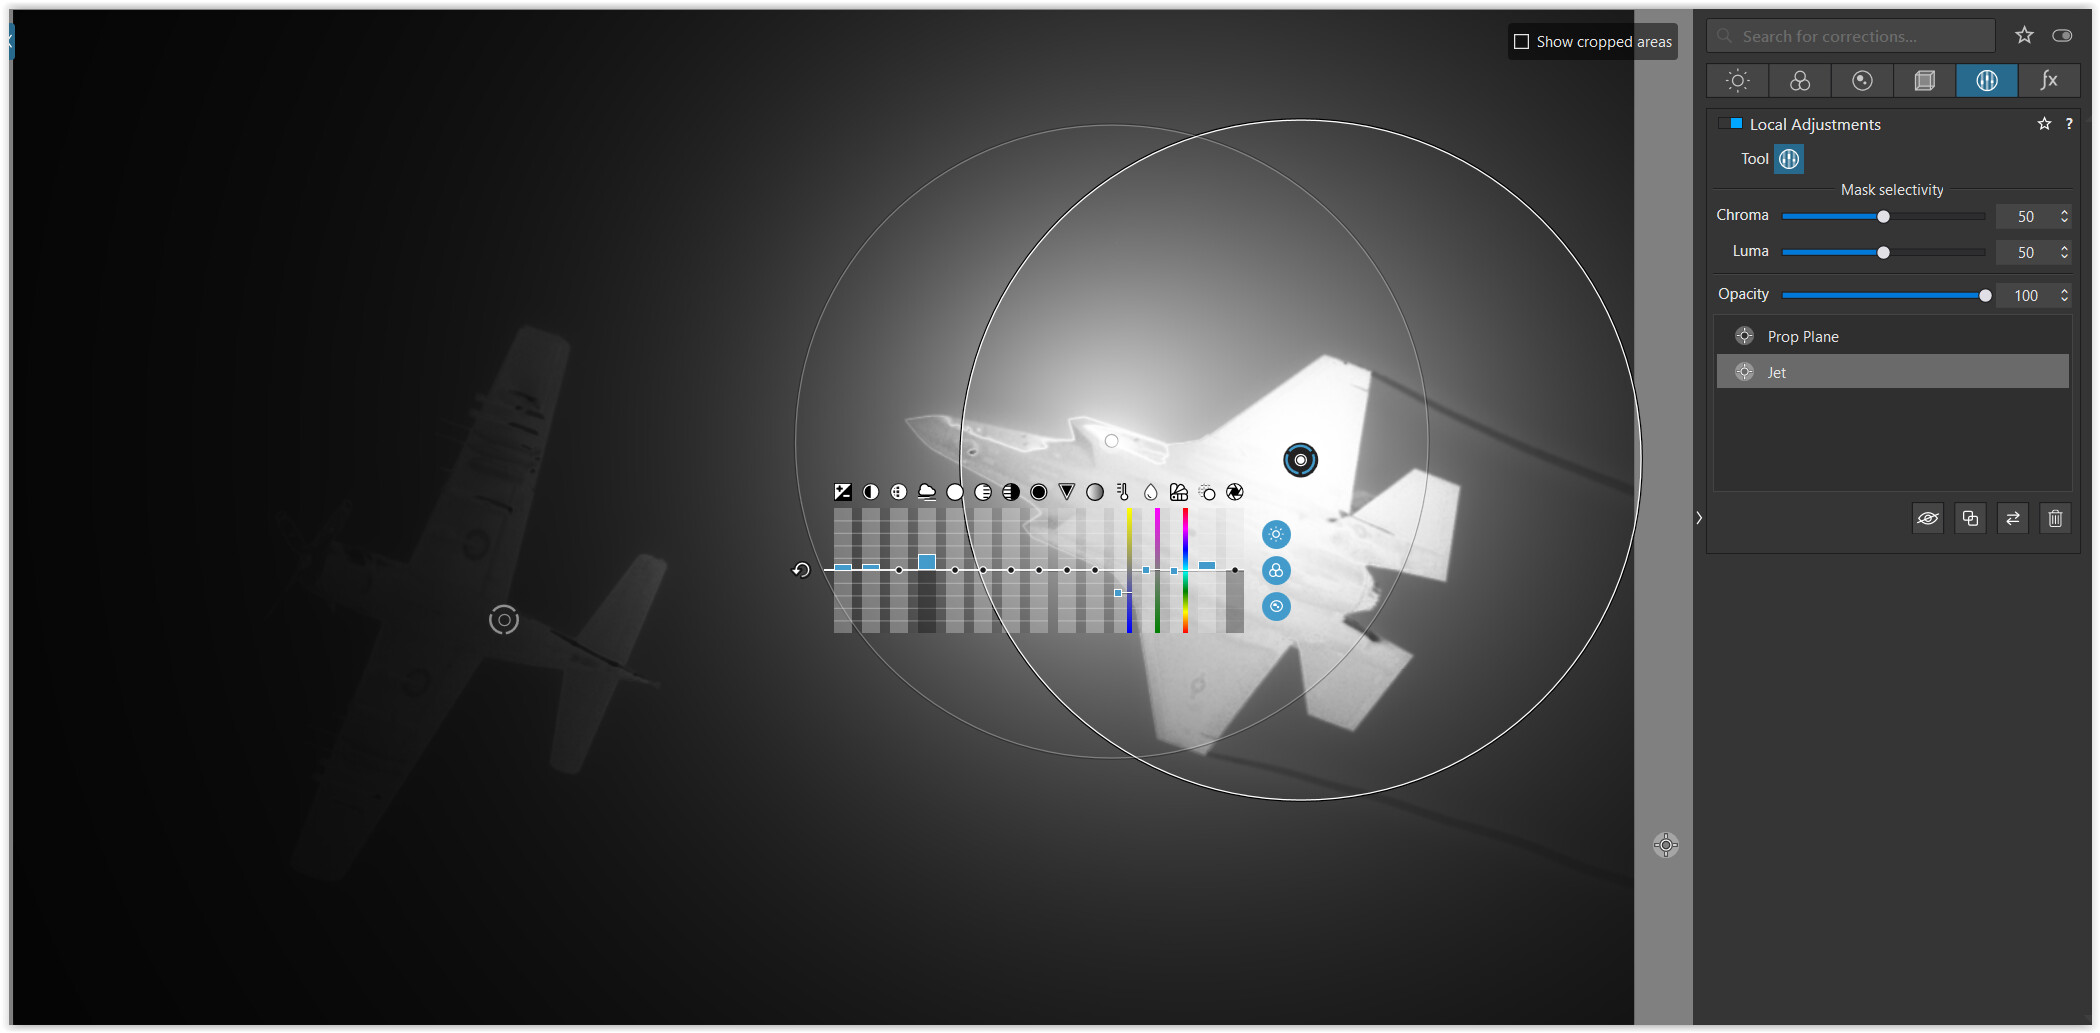
In the case of the fighter jet, ClearviewPlus adds some 3D-effect making it more plastic. As a side effect, the fighter jet now seems to be somewhat closer to the viewer (you ‘see’ more details) than the plane higher up, giving the pic the illusion of some depth.
Just don’t forget to exclude the surrounding sky, e.g. by adjusting the control point’s mask selectivity, adding negative control points etc.
On a carefully calibrated screen you should see the difference even in the screenshot, the fighter jet in the VC2 showing stronger reflections and contrast.
Silly me; for all this time I thought ClearviewPlus was something to applied to the whole image.
I never gave it a second thought.
Once again, I feel like someone opened a hidden door, that I didn’t know existed, or maybe I should say, that I never even looked for/at. My problem is I go looking for things like “Local Adjustments” trying to find the specific thing I’m already looking for, and ignore the rest. I guess I’m fixated on the end result I’m looking for. I didn’t realize until now that ClearviewPlus was one of the choices in Local Adjustments. Boy, @JoJu is going to have fun with that!
It’s like my D780. I spend all my time working with very few of the hundreds (thousands?) of possible settings, and I’m oblivious to all the other stuff that Joanna suggested I ignore. Heck, if I had my way, I would edit the “Menu” screens, to only show things that I now think are useful to me.
(With my M10, 99% of what I need is now on the “favorites” menu, and I rarely need to look further - just like with a film camera. Once the film (memory card) is loaded, I only use ISO and Shutter Speed. The others, aperture and focus, are on the lens, not the camera.)
I used to think photography was “easy” and bullseye shooting was “difficult”. Now it’s the other way 'round. Heck, I used to think “get it right in the camera”. Now I understand that is only a start. …but if it isn’t right in the camera, everything from then on is just applying bandages.
With film, and especially slide film, the camera was the ONLY opportunity I had to improve on what I captured in the camera. Then Ansel Adams changed everything, once I read about his darkroom work, and photography with the camera changed to capturing an image that is to be perfected in the processing - much like what Joanna writes.
Instead distracting yourself, please get the dop–file to see yourself what is happening.
I’m very surprised. I thought in my final image the fighter jet looked great. After seeing your version, using ClearView Plus, my original version (viewed full size) looks awful. Yes, while I don’t understand the reason WHY, it’s obvious that your version now looks like a 3D image showing the depth.
Curious, with the several applications of “local adjustments” to the fighter, you also did the right wing of the propeller plane. Is there a reason why you left the rest of the propeller plane alone?
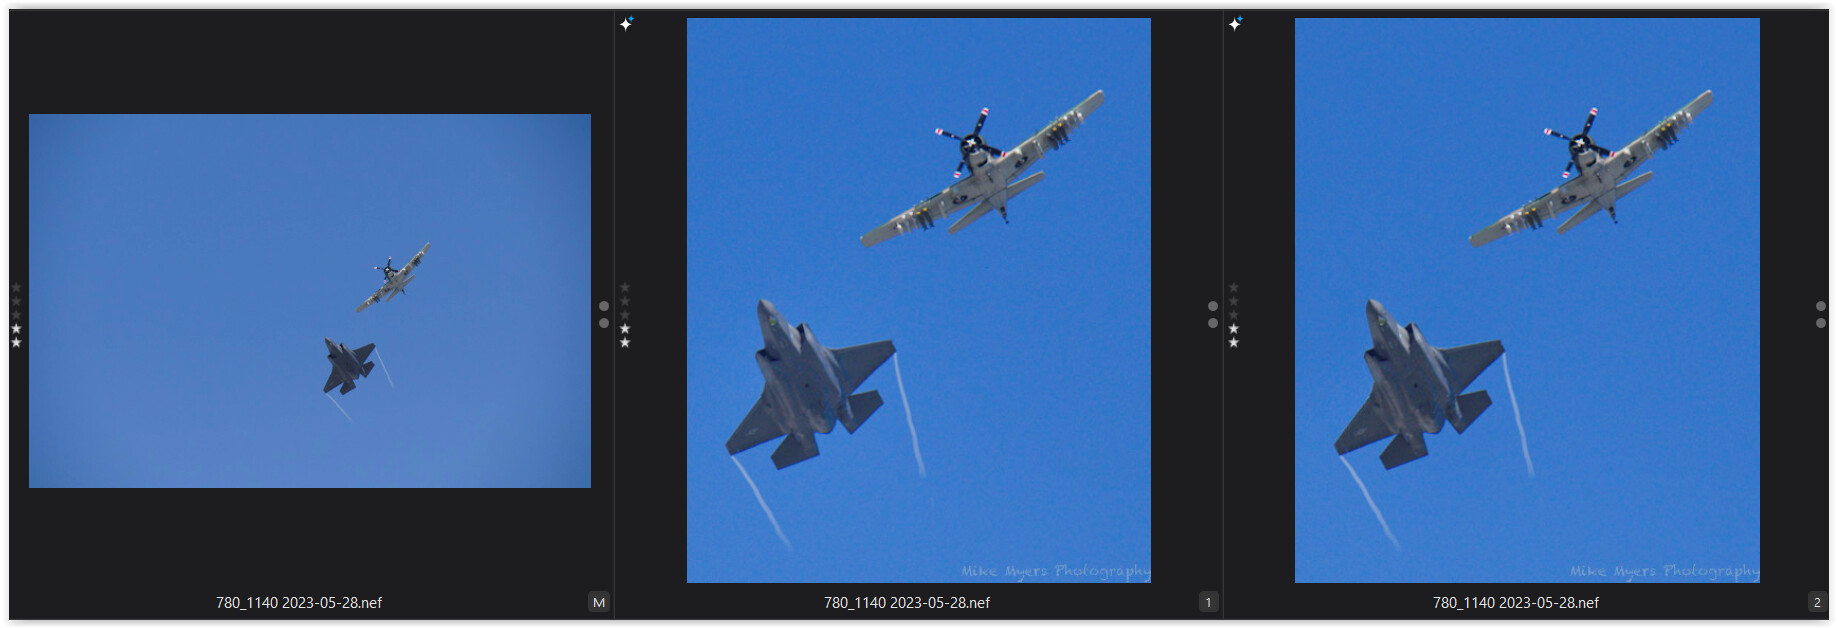
This was the second pass the two planes made overhead. The first time they went by, they were higher, and the 300 lens was half of what I wish I had. I picked one of those images, to try to follow your example. I’m not sure I succeeded, but when I click on “Compare” I think I did reasonably well. Here’s the result - but looking straight up at the planes is boring compared to what I saw on the next “go-round”.
780_1180 | 2023-05-28.nef (28.7 MB)
780_1180 | 2023-05-28.nef.dop (18.2 KB)
I thought about lightening up the jet, but decided not to. Since the image isn’t as sharp as my other image, I thought about raising the ClearviewPlus setting, but it’s already at 26, so I left it alone. The original image has the two planes moving from right to left, but I angled the image to look better on my screen. I don’t like this image as much as the other, but it was a good opportunity to try out what you did with ClearviewPlus.
This is not true – just that the Clearview’ed version looks more ‘plastic’, then making the difference …
Yes, while I don’t understand the reason WHY, it’s obvious that your version now looks like a 3D image showing the depth.
Somewhat difficult to explain … YOU need to experiment with Clearview Plus to then find out, how it affects the luminance values (brights get brighter and darks darker). It’s a bit similar to combine contrast (which just does the same thing) with microcontrast, but within a different pixel radius …
Also, the affected area gets a little darker (the tool is advertised to cut through haze). To balance out, I often lift the highlights by a little, but didn’t so here to not water down the new 3D-appearance.
Curious, with the several applications of “local adjustments” to the fighter, you also did the right wing of the propeller plane. Is there a reason why you left the rest of the propeller plane alone?
You seem to misunderstand the function of a negative Control Point, which I set here on the wing
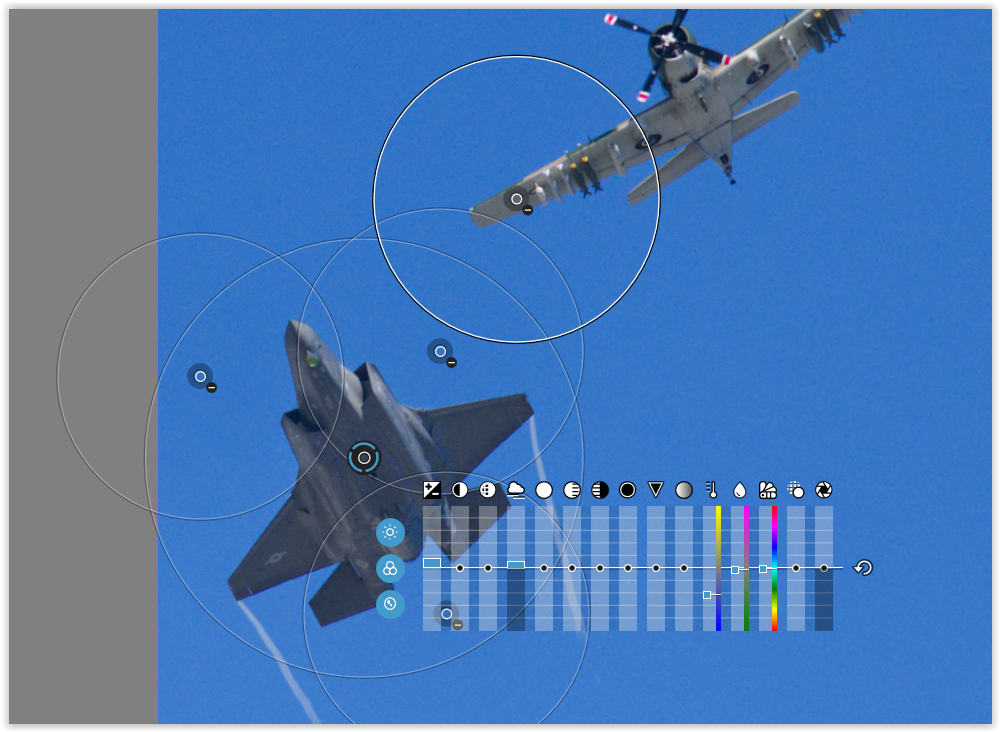
to (also) exclude the wing from the selection – shown in the mask view.
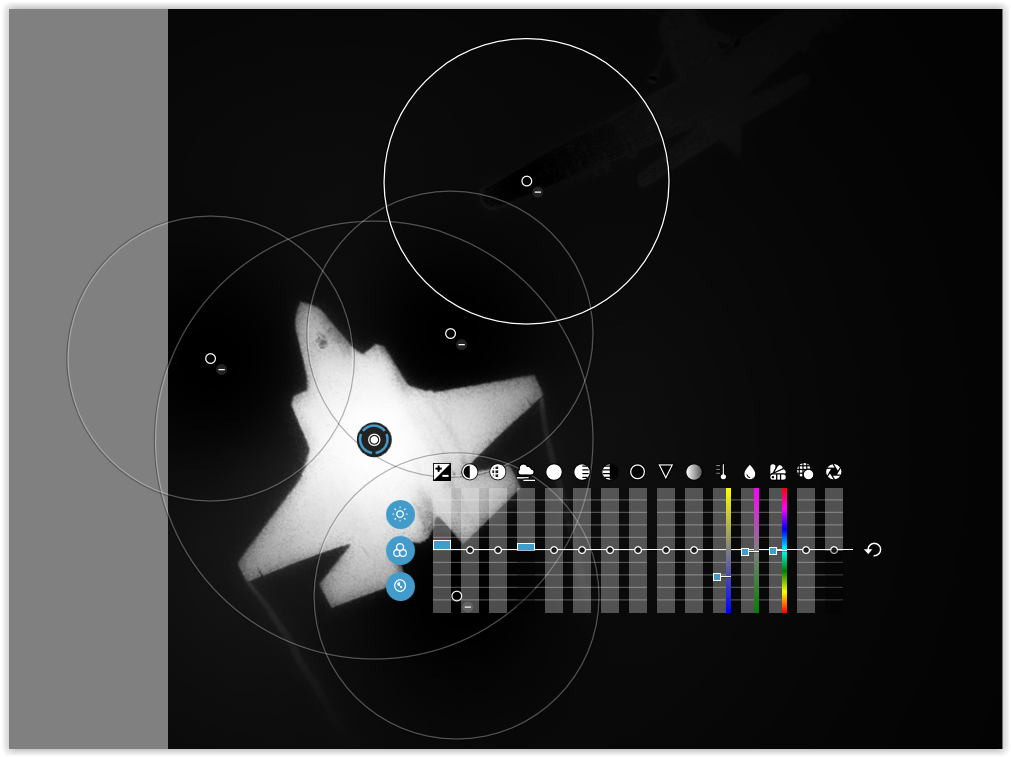
Please countercheck with the mask view of your version (VC1) to see your selection bleeding into the sky and the wing.
Mike, you have to try yourself to get there. Just reading doesn’t help nor does it stick.
The next example … you need to (learn how to) use
check also …
-
Get Greater Control Editing Skies Using Control Points & Control Lines with DxO PhotoLab 5 - YouTube
-
DXO PHOTOLAB 5: Control Points & Control Lines (Understanding MASK SELECTIVITY, CHROMA & LUMA)
-
How-do-I-add-a-negative-control-point-Windows-only-
which is the same thing for Mac using the Option (?) -key -
VC2 → 780_1180 2023-05-28.nef.dop (37,3 KB)
which is a lot easier
In dutch it is the Prutsermode.![]()
(I am moved and the old house is sold, key’s are handed over. But i am not yet out of the woods. Nothing in the new house is finished. The wals are done but the skirting is still in factory packaging for instance.)
1 Like
Worse than that - I didn’t see, or even look for, or recognize that it was a NEGATIVE control point - I didn’t think about it, and didn’t check, and now it is quite obvious, along with the new things you wrote.
Suggestion for DxO for people like me - use the full circles for regular control points, and use dashed-lines in circles for negative control points.
For me, it often comes down to deciding how much thinking I need to do with the camera, and how much thinking about what else is going on around me. When I was shooting for the magazines, I was giving 100% attention to what I was photographing, and I had the camera set such that I knew the images would be acceptable. …but that was “photojournalism”.
Enough of that - thanks to the illustrations up above, I understand better regarding how and why to use control points, and especially negative control points, and even more especially “mask selectivity”. I know of them, but they’re not (yet) a part of me, the way other things are.
As was stated up above, now I need to use them, correctly.
I was just fooling around, ![]()
P-mode i try to avoid because then i have to keep an eye on 2 things wile snapping around.
Focus and DoF setting and shuttertime. Both have a tendens to show blurry pixels just when you don’t want it.
So i use A-mode with i-ISO (this ISO modes is lowering iso and shutter time when there isn’t much movement with the camera and i think inside the imageframe.)
Or i use S-mode and i-ISO.
A when focus and DoF is more important then controling motionblur
S when i suspect to focus on (fast) moving objects which have a need of a minimum shuttertime. I let the camera choose the iso value because that’s the least important part. Auto iso value restricted to 3200 iso (m43’s dropzone after that.)
P-mode i let my kids use so they can focus there mind on the framing.
Birds and such is often with a super tele. 200mm-600mm EFL and then M-mode and auto iso in silent mode is the way to go.
Minimum shutter speed (with motion is dual is2 5 stops image stabilisation useless so 150-250msec is the setting.) when i use my pana 100-300mm Aperture around f6 f7 f8 and sometimes f9 wile f7 -f8 ish is the sweetspot.
P-mode causes surprises because the camera doesn’t know what your up to it’s only guessing. And often wrong.
Easiest way to fast switch setting is use customer setting saving.
Then it’s only one turn on your spasm knob and your always in the correct starting point no matter what you changed along the way. Choosing C1 means loading the stored settings.
I’m often wrong no matter what mode I select, but I intend to start using auto-ISO, as of the three exposure settings, that is the least important to me. What you wrote makes a lot of sense to me, but there are times I’d like to “set it, and forget it”.
Is “photography” supposed to be “fun” or “serious” or an “occupation” or an “avocation” or a “hobby” or a “competition” or a “test”?
All of those…![]() pick your poison.
pick your poison.
It’s fun to fool around and try out new methodes. No matter the outcome, digital so no development cost’s.
It can be serious if you get payed to document things. When you good at that it becomes often your occupation.
It’s alway’s a avocation because you need to move and act to get something interesting.
For most people it’s a hobby (or started as a hobby) which can be consuming a lot of time if you let it expand.
Competition? Test? Only if you want it to be.
For me?
A hobby, mainly fun based wile learning because testing things is fun and you learn something. And that knowledge you can use on day trips.
As for know it’s downscaled a lot. Too much other things to do which are time consuming so most of my skills (instant setting knowlegde) are sliding down the hill which is fine because my images are only for me and family. Now it’s mainly renovation progression snapshots.![]()
When i have more free time again i drag my daughter in to the world of using a camera instead of mobilephone.(spent some time together wile looking through the EVF. So to speak.
And let her see the fun of editing.
Just enjoy and don’t ask too much peoples opinion. (it’s yours not there’s) And most of all don’t go out and demand your self to snap a dozen “photo’s”. Most “photo’s” are sneaking up to you wile you just clicking about things your eye catches.
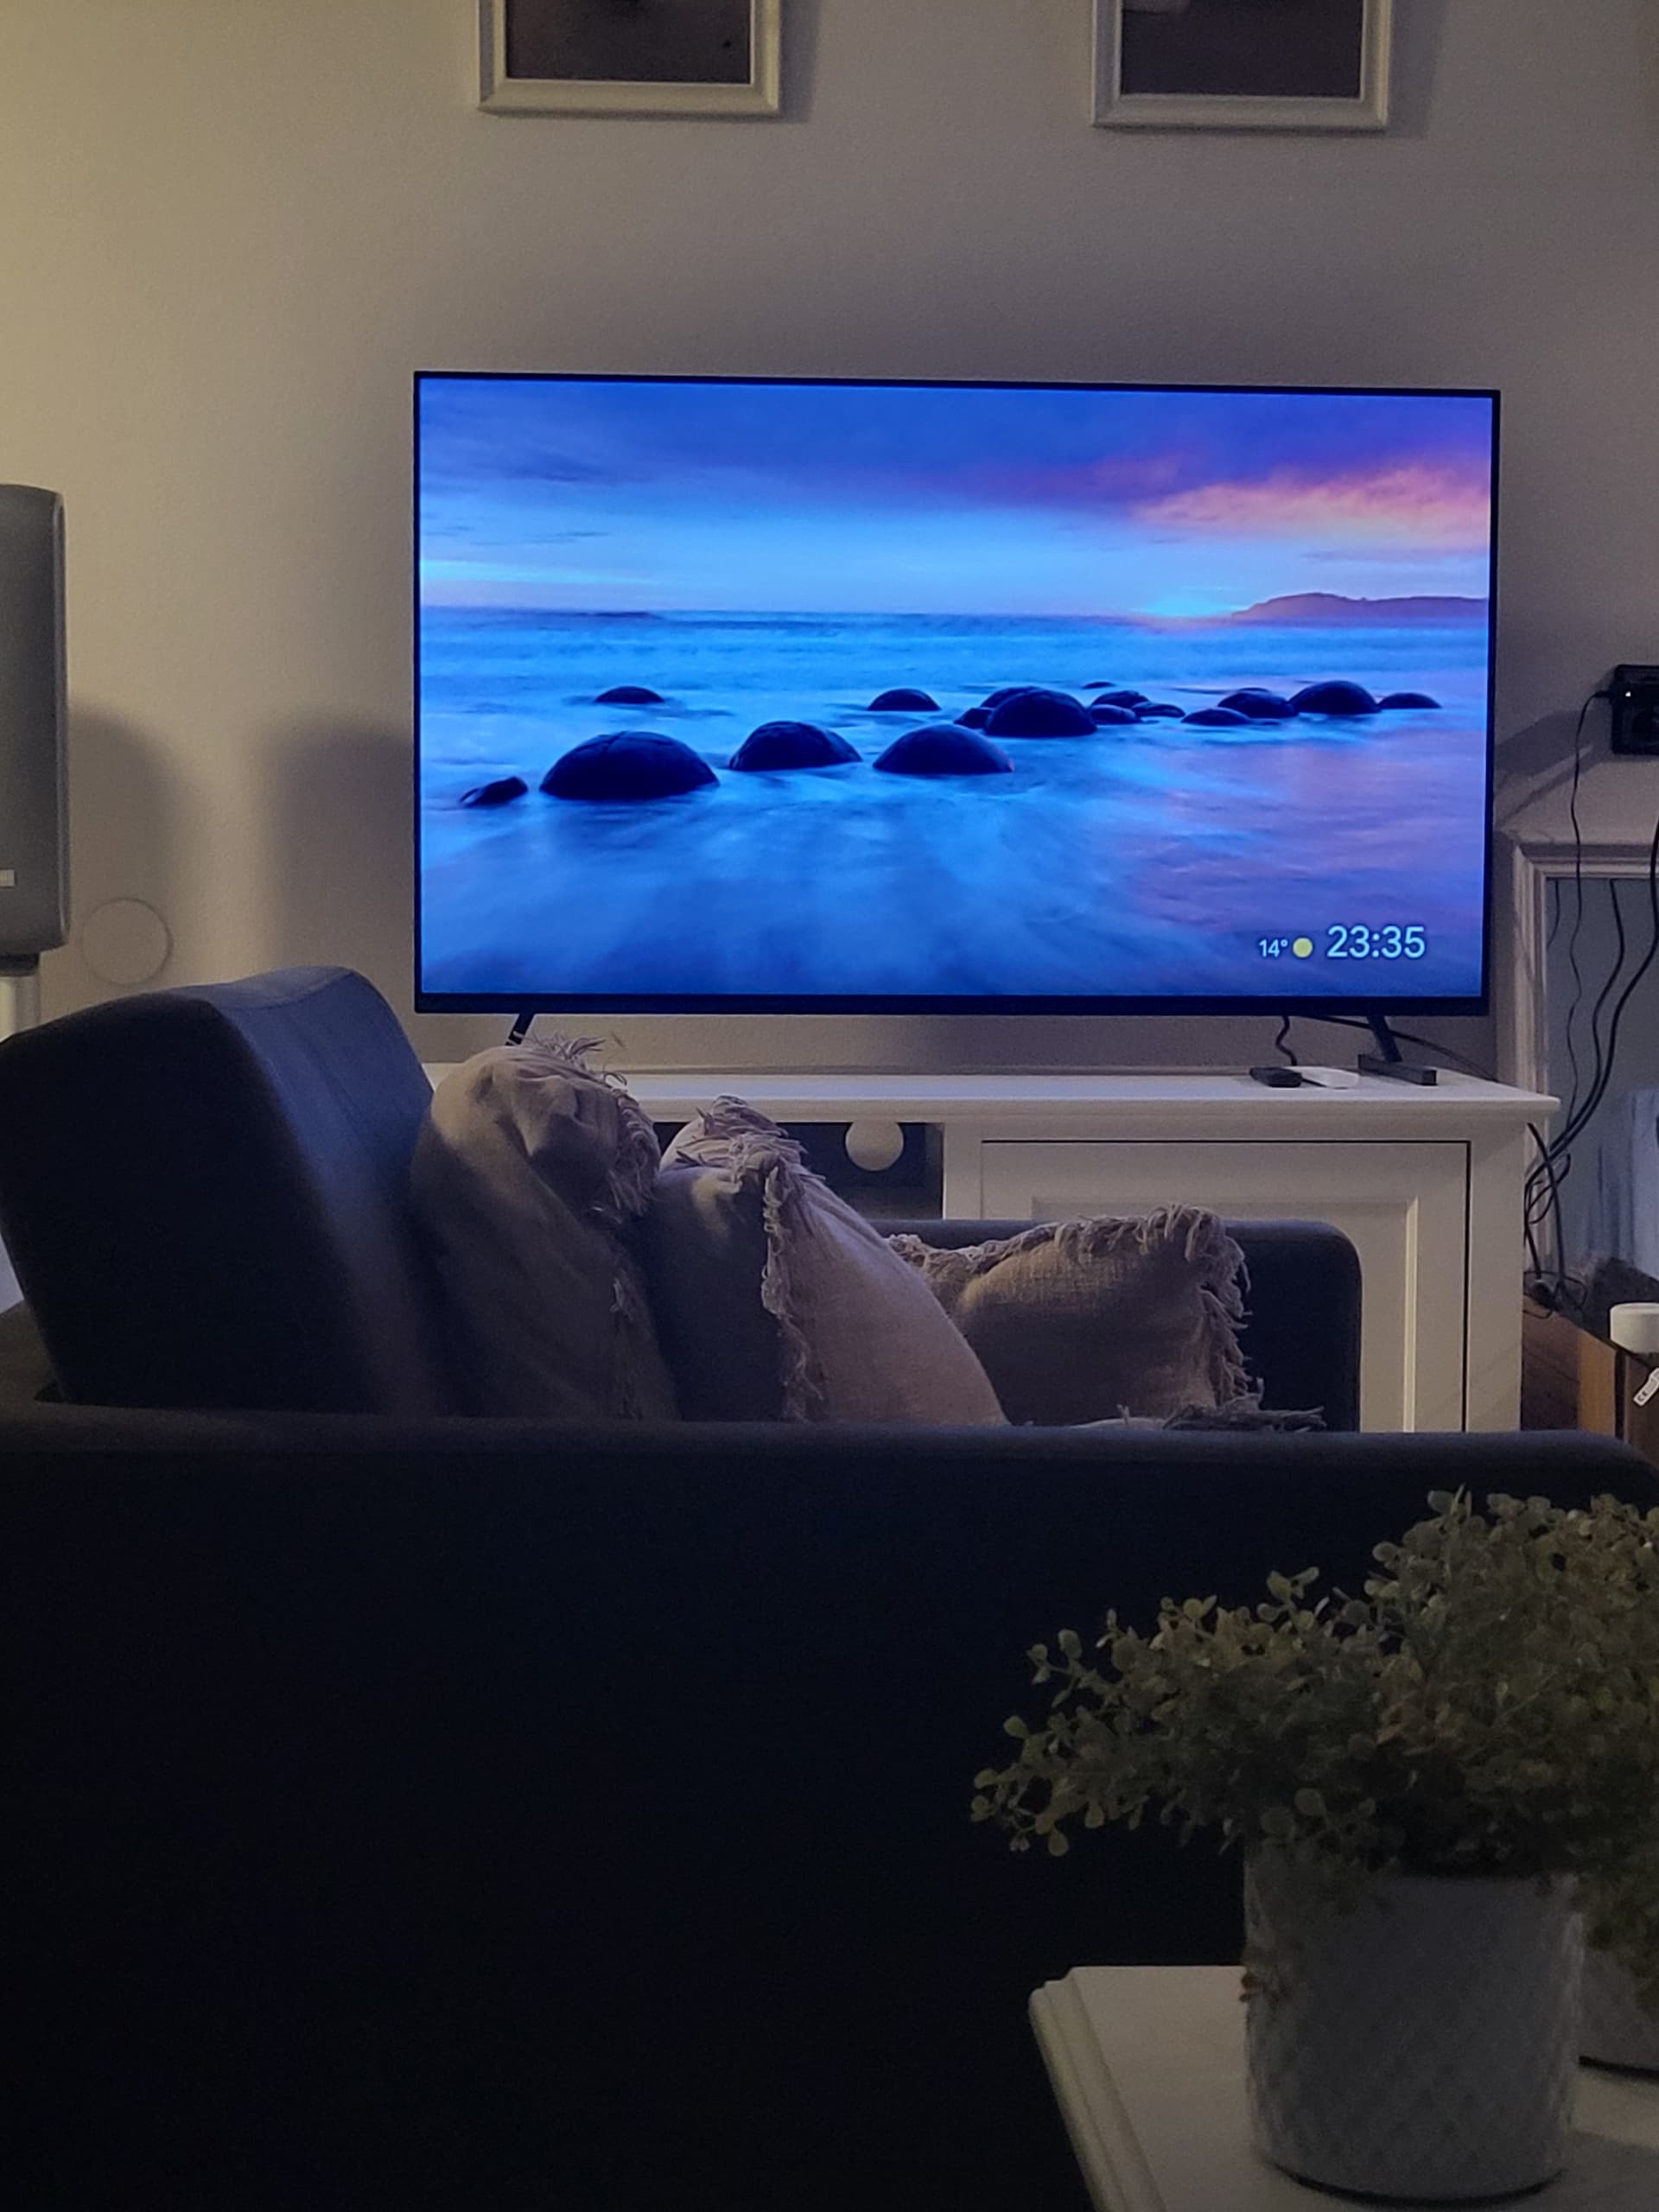
My Sony smart tv has a screen saver which shows nice “photo’s” .
At this moment bill luan’s sunset paradise is now on. And next one is chris hunt industrial piping. Few seconds later Japan fuji by nameless person.
Sometimes i just watch the screensaver enjoying there carefull framed scenery’s. ![]()
@Joanna i think your partisipated with a evening at sea… ![]()
I like what you wrote, with far too many other things taking my time, especially bullseye shooting, but if I don’t keep “doing” I start “forgetting”. I do things I should have done better.
The only good, useful, and helpful feedback is this forum, communicating with all of you, occasionally getting a small compliment, but 95% is constructive feedback. Everyone else says “beautiful” or something similar. I enjoy learning new things, and discovering I’ve been using the old “things” properly.
I’ve got to leave on a short trip tomorrow - should bring up a lot of opportunities to put what I’ve learned to good use. …and “grudgingly”, I’m only taking the D780. My Leica has been begging me to take it along, and ditto for my Fuji. Oh well… I’ll take them out for a run when I return, occasionally, but not “never”.
Why? I thought you didn’t like the camera taking control out of your hands and yet, here you are, once again, trying to convince yourself that you need to use automatic settings.
Letting the camera doesn’t allow you to “set it and forget it”, because you are not setting the ISO, you are just letting the camera decide what it thinks is its best guess.
So, you set the aperture, you set the shutter speed and then you don’t care where the ISO ends up. In other words, you try to take control of the exposure using two sides of the exposure triangle but then abandon that control on the third side.
You might as well just set the camera to P mode and forget about any sense of control at all. You might think you don’t have to care about ISO but, in abandoning it, you have now lost all control of how bright or dark the finished image will end up.
The only way to take controlled exposures is to be in control of all three sides of the triangle.
Like I said, you started, a couple of thousand posta ago, to take control and yet you are now “forgetting” the benefits of that control in favour of an “easy life”. I have to ask just how serious you are about photography, or is it just another pastime?
Why “grudgingly”? You get time to put into practice all the stuff you’ve learnt about the D780 and you still think about taking swapping and switching cameras, so you have to remember how to operate all three instead of simply using the one you are most familiar with.
Concentrate! And have a great trip.
1 Like
We had this discussion several weeks ago, and I posted that there are times when I don’t have the ability or time to set a perfect exposure. So I will set the aperture for the depth of field I want or need, and I will set the shutter to something fast enough for what I need, and the auto-ISO will most likely get me an acceptable exposure.
I am still using (M)anual mode, but there are times when I can’t. It’s either auto-iso or guess. I’m not nearly as good as you at that.
There are a lot of photos that I take which are essentially “snapshots”, with too many things happening and going on, or rapidly changing, and auto-ISO is adequate, and better than (P), (S), or (A) mode.
I don’t have time right now to find your posts - will do that over the weekend, and send a link.
Oops, I forgot to start my earlier post as
For most of my photography, whenever I can, I will continue using (M)anual mode.
Need to put brain in gear before putting fingers in motion. Oops…
ISO isn’t a factor in exposure only a factor in lightnes.(processed image)
And yes iso value has some effect in internal gain of the foton to charge circuit.
Between base iso and “your exeptable noiselevel en DR reduction” iso value you can use auto iso to speed up taking a image wile stil controling aperture for DoF. And shutterspeed for movementblur. Shooting animals is this the best option.
Often long tele so small DoF range and ibis and ois does help to get the tree in focus but not the moving leafs and what’s sitting on the brance.
Exposure triangle is only correct thermology for OOC jpeg’s.
Exposure is aperture, how big is the gap between the curtains, and time, how long are the curtains open.
If you must have a third control for exposure that would be physical size of the sensor.
(aka the size of the window)
The only thing you control with iso is noiselevels and Dynamic Range mostly clipping point whitepoint. So if your scenery isn’t wide range and the light is dimed raising isovalue is the way to go if shuttertime is at the point that not intended motionblur is a risk.
In the old day’s ASA/ISO was a physical/chemical change on the emulsion of the film so you couldend change it without changing the filmcassette. That’s why often people are like to stick on ISOcontrol by them selfs. Habits. But with dxo’s noise reduction your only concern by raising ISO is you can’t “repair” in post is Dynamic Range. Clipped is clipped.
I use auto iso al the time, mostly inteligent-ISO. Which tries to keep it as low as possible. By analizing if there is movement , focallength and scenery.
I only use fixed iso in cases i have time to and it has purpose.
Nightshots, tripod shots but for snapping around auto iso is my game. ![]()
@mikemyers enjoy your trip.
1 Like
If I raise my iso the exposure is going down.So it is a factor.
George
Yes because your OOC jpeg is over exposed and the software is adapting to that.
NOT your raw file.
Please test
Full manual.
Set shutter on fixed time
Set aperture on fixed aperture.
Do a base iso setting and adjust shutter time and and aperture to your liking.(not a bright scene because of dynamics.)
Take a raw plus oocjpeg image.
Then raise iso value and take each time a raw plus oocjpeg.
ignore every indication of overexposure in histogram and such. (that’s jpeg based)
Load this in FRV to see the real raw rgb channels.
You wil see that the rawfile doesn’t change much.
Aka exposure isn’t changed.
I watch the camera settings. When raising the iso I’ve to lower the shutter speed, or raising the aperture. So my exposure is changing.
You can’t use the pixel values to determine the exposure.
In general the pixel values are based on the dynamic range and the used value of the A/D converter. The dynamic range in this explanation is the max. analoge value-min. analogue value the sensor can catch. The calculated pixel value is based on the bit precision you want: typical 12 or 14 bit in a raw file. So the pixel value will be (dynamic value/12)*measured value. Or 14, or any other number.
Raising the iso is lowering the dynamic range or value. All the other parameters remain the same.
George
PS. Dividing by 12 means dividing by 2^12.
1 Like