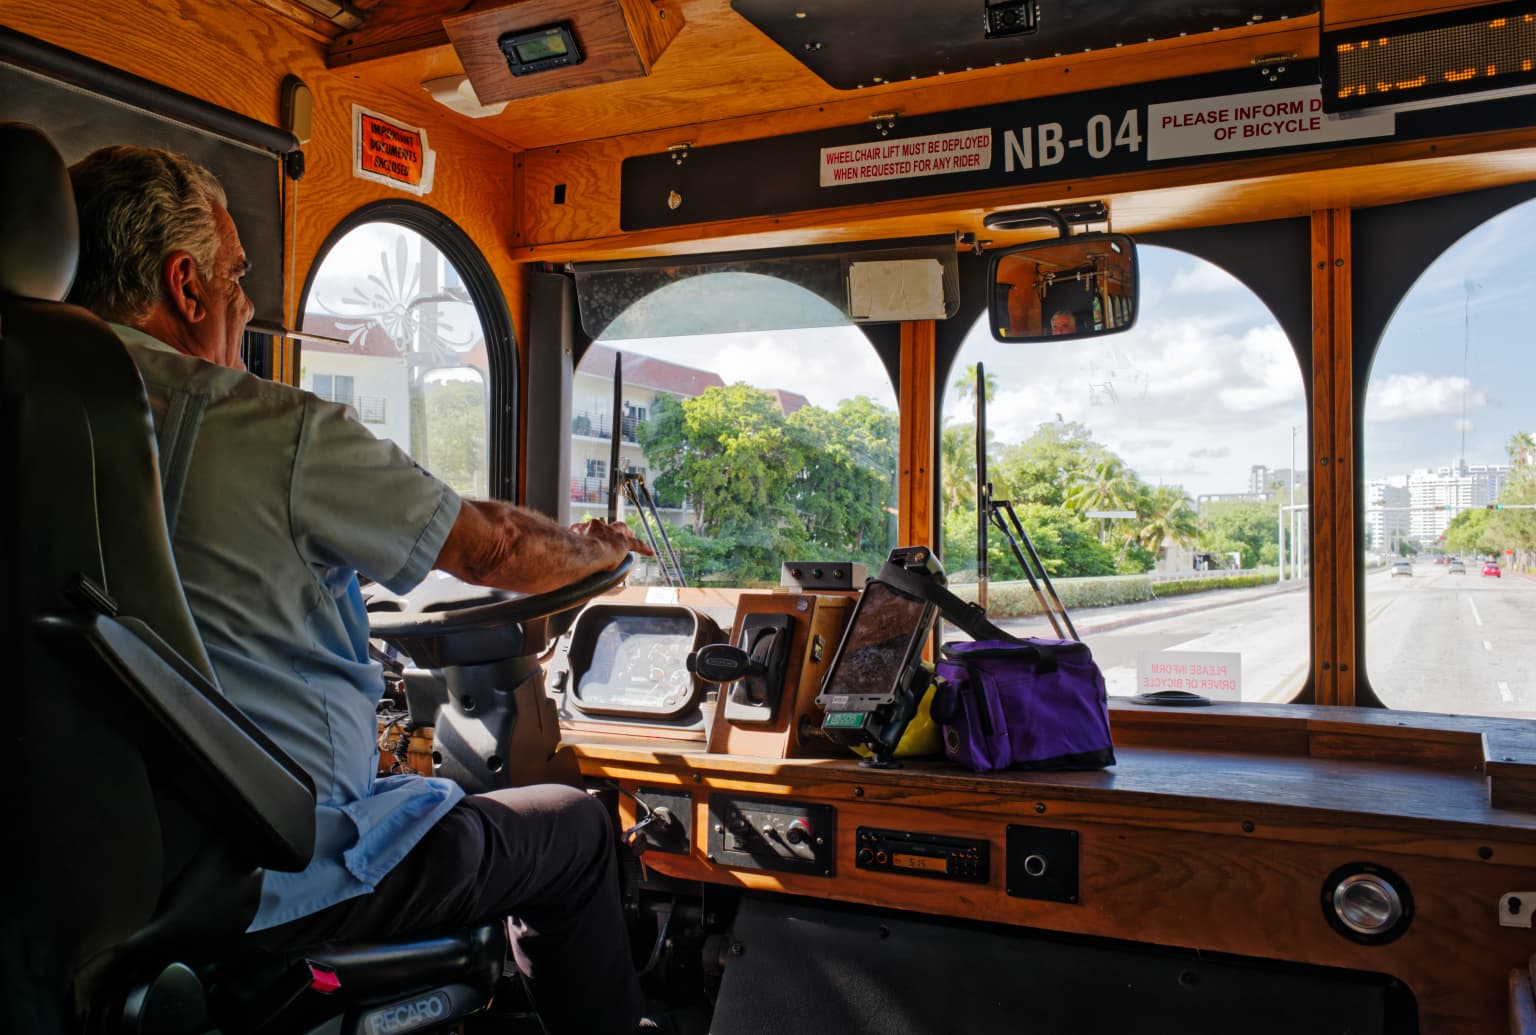
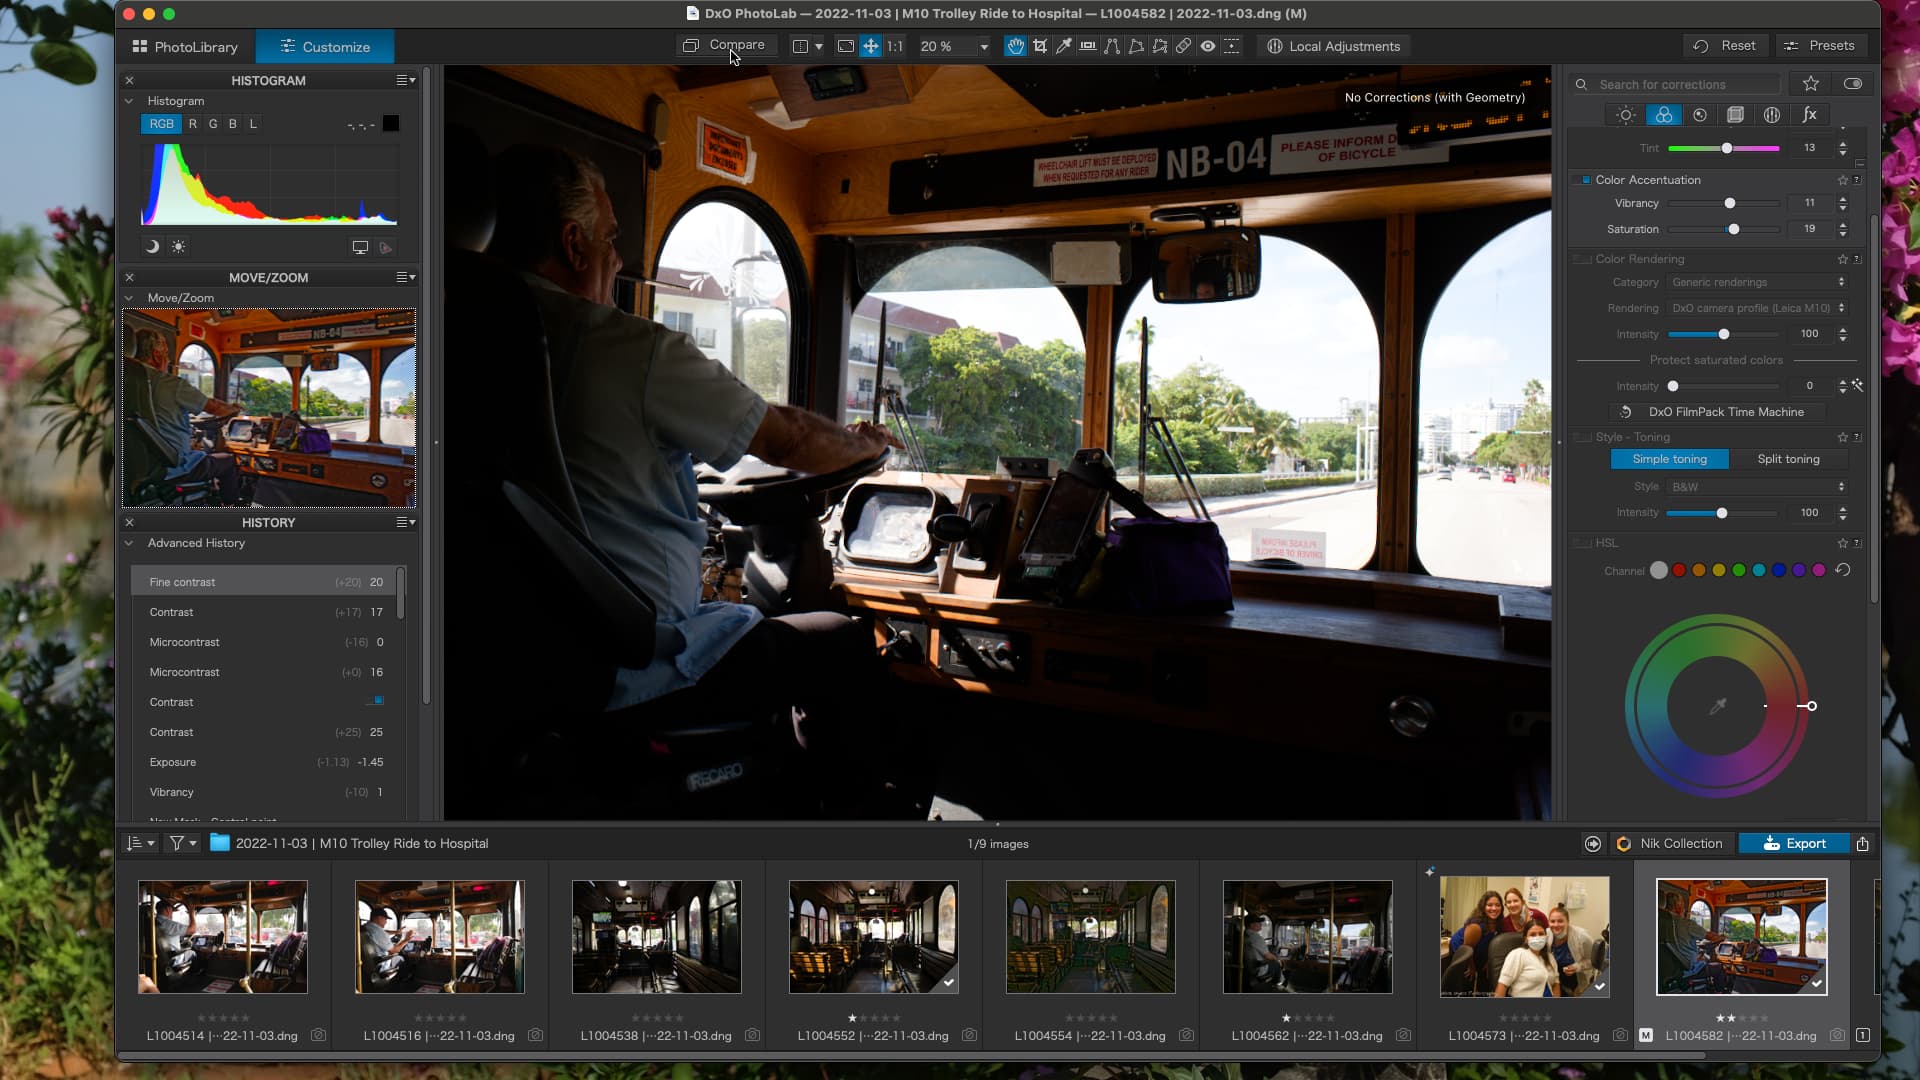
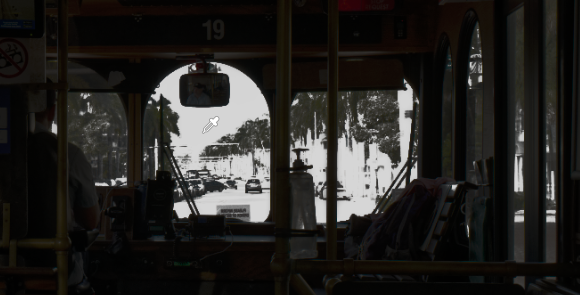
The driver’s face might look “oversharp” but I am convinced it is purely the lighting conditions and reflected light. Nevertheless, I did apply a local correction brush that reduced the sharpness.
i also used a Control Line local adjustment, set to select just the outside, to reduce the exposure only “outside”.
Considering the starting point, what all of you did, especially @Joanna, is pure magic. I thought I got close. Then several of you got closer. Now Joanna has nailed it. Who would have known that all of that color and detail was hidden inside the original image file. I would have been content with any of the recent posts, but that last one makes the face fit perfectly into the image. Congratulations - to all of you!
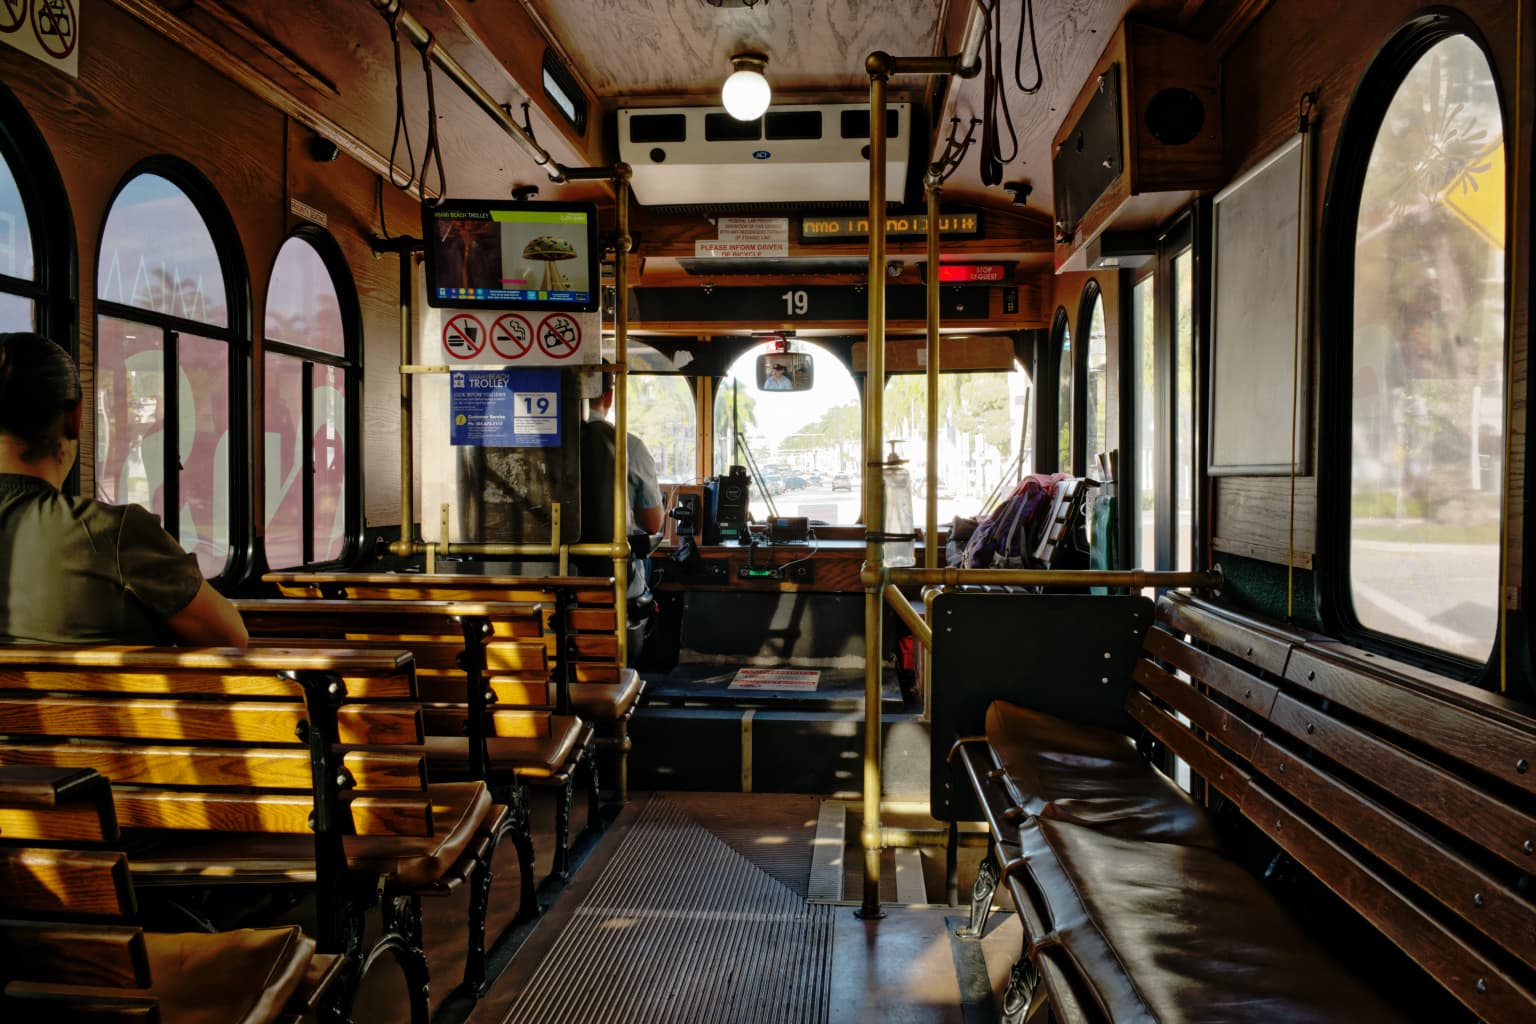
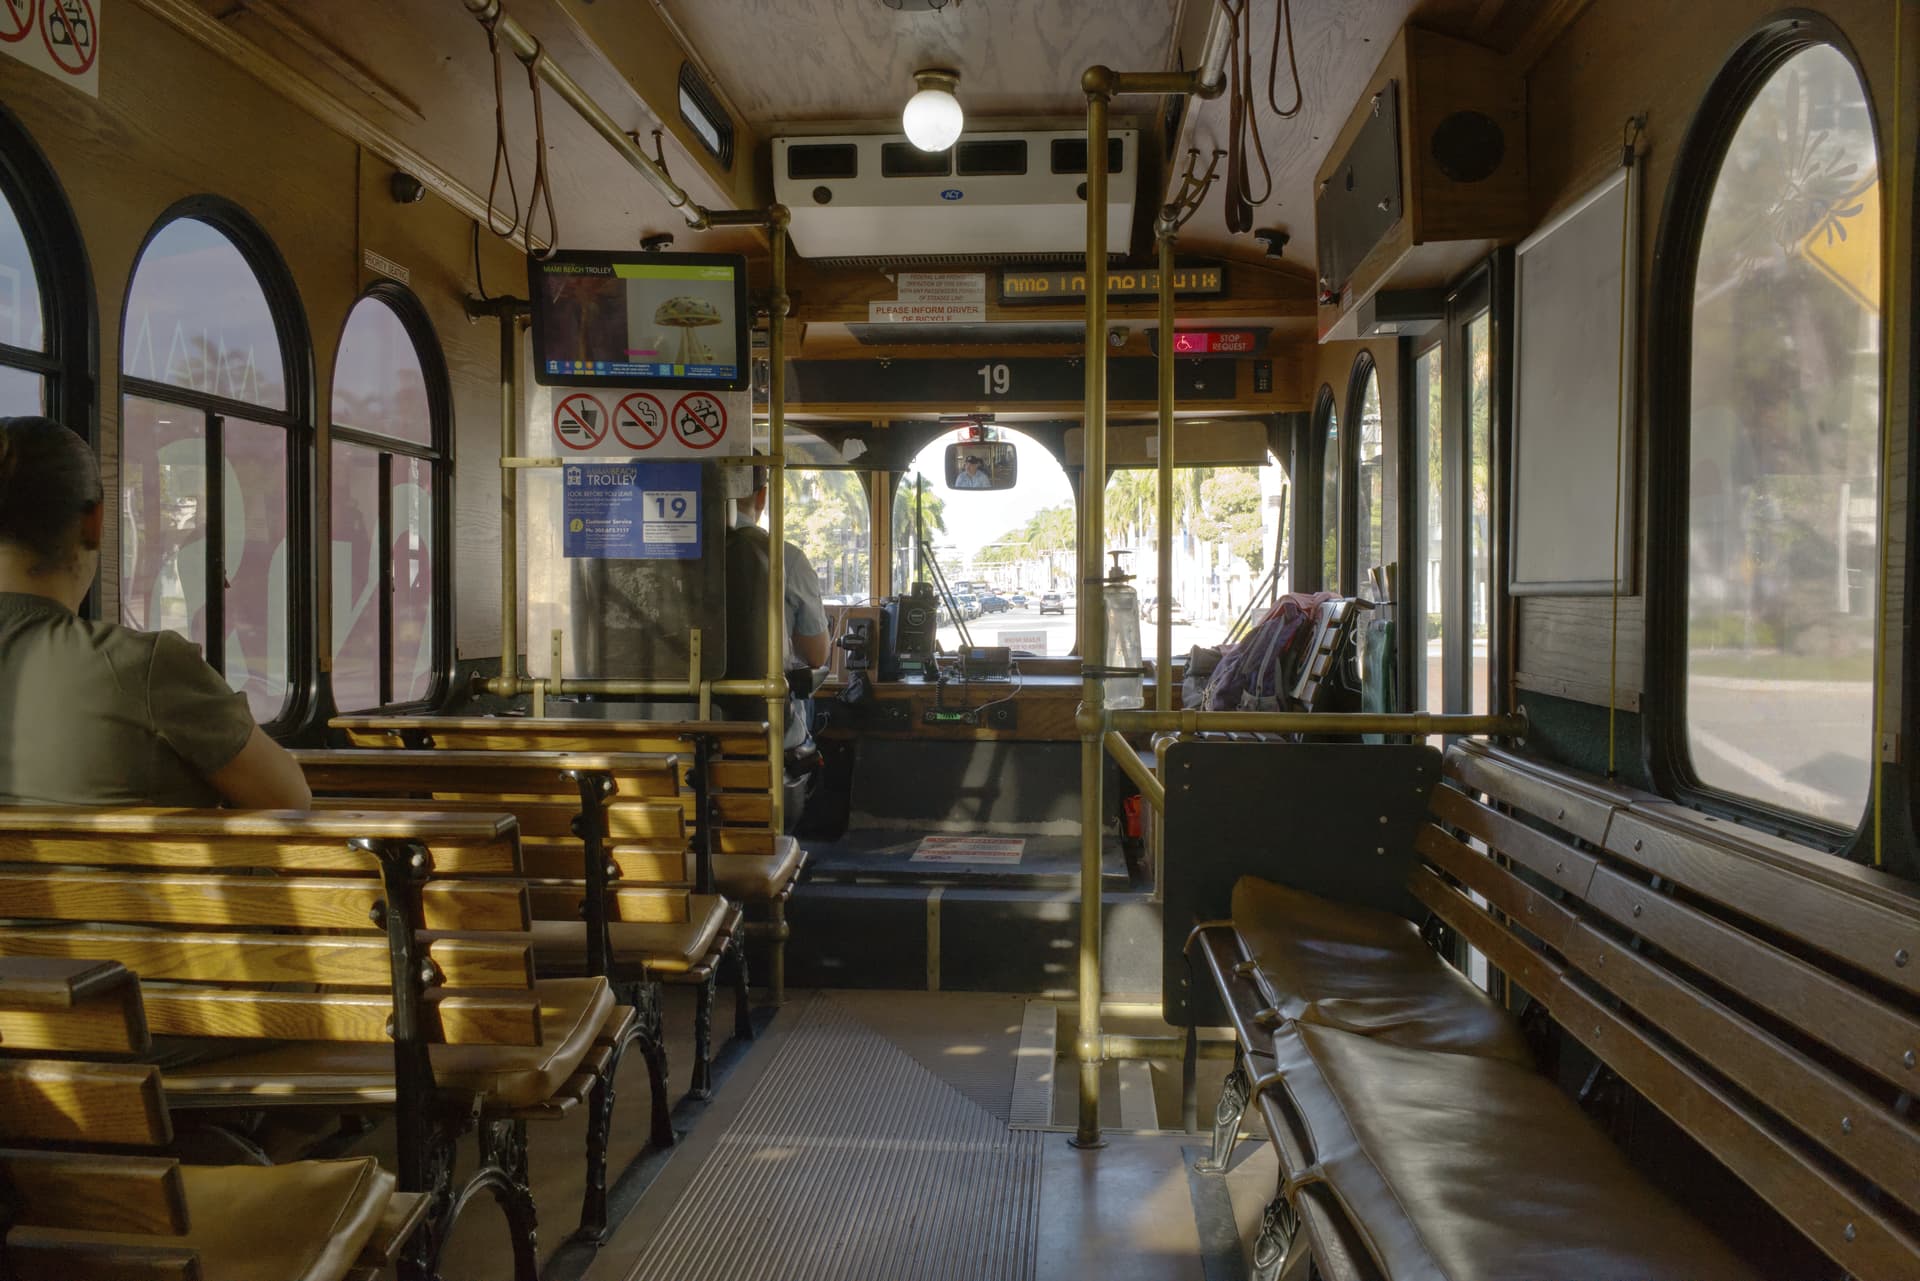
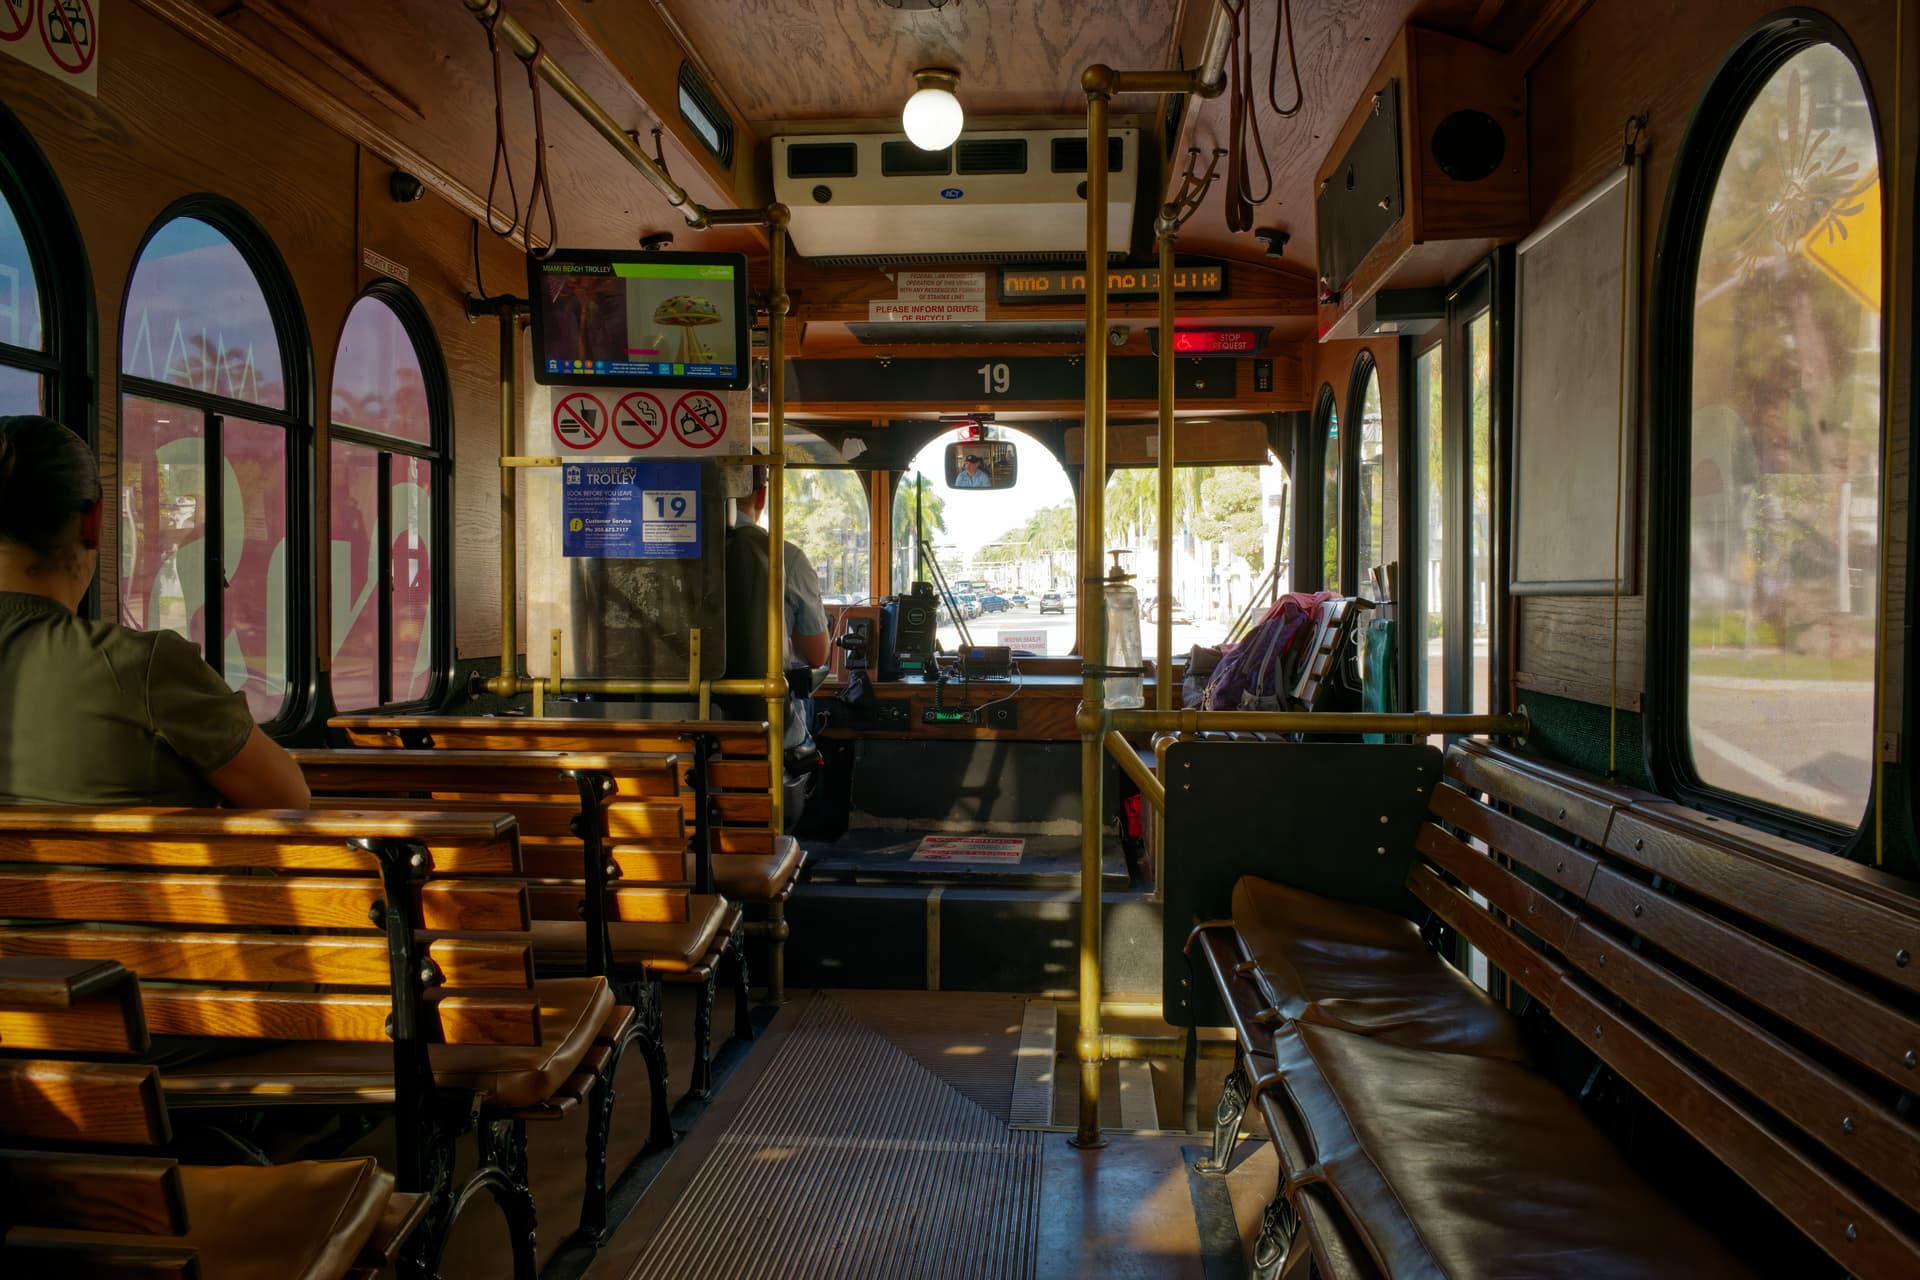
Wow, you and @Grebstad both edited this image. What you did to the inside of the trolley is a perfect representation of what the trolley looks like, even the lack of interior lighting. @Grebstad sent me his version in an email - I hope he posts it in the forum. His version looks “over-done” for the interior - it looks like a trolley that might be found in a museum. It’s beautiful, but your version is more like how my eyes see the trolley interior.
What @grebstad also did, is somehow make the outside views “perfect”, not washed out. The last time I tried to do something like that, while I did get the overexposed views look the way they should, but in doing so, I messed up the trolley interior. As I recall, @Wolfgang did this kind of thing beautifully with masks. I’m still not very good at that - haven’t tried it in a year or so.
I hadn’t expected to see results this nice - to me, it looked like an impossible image to enhance. You’re right though, “You never know until you try”. Amen.
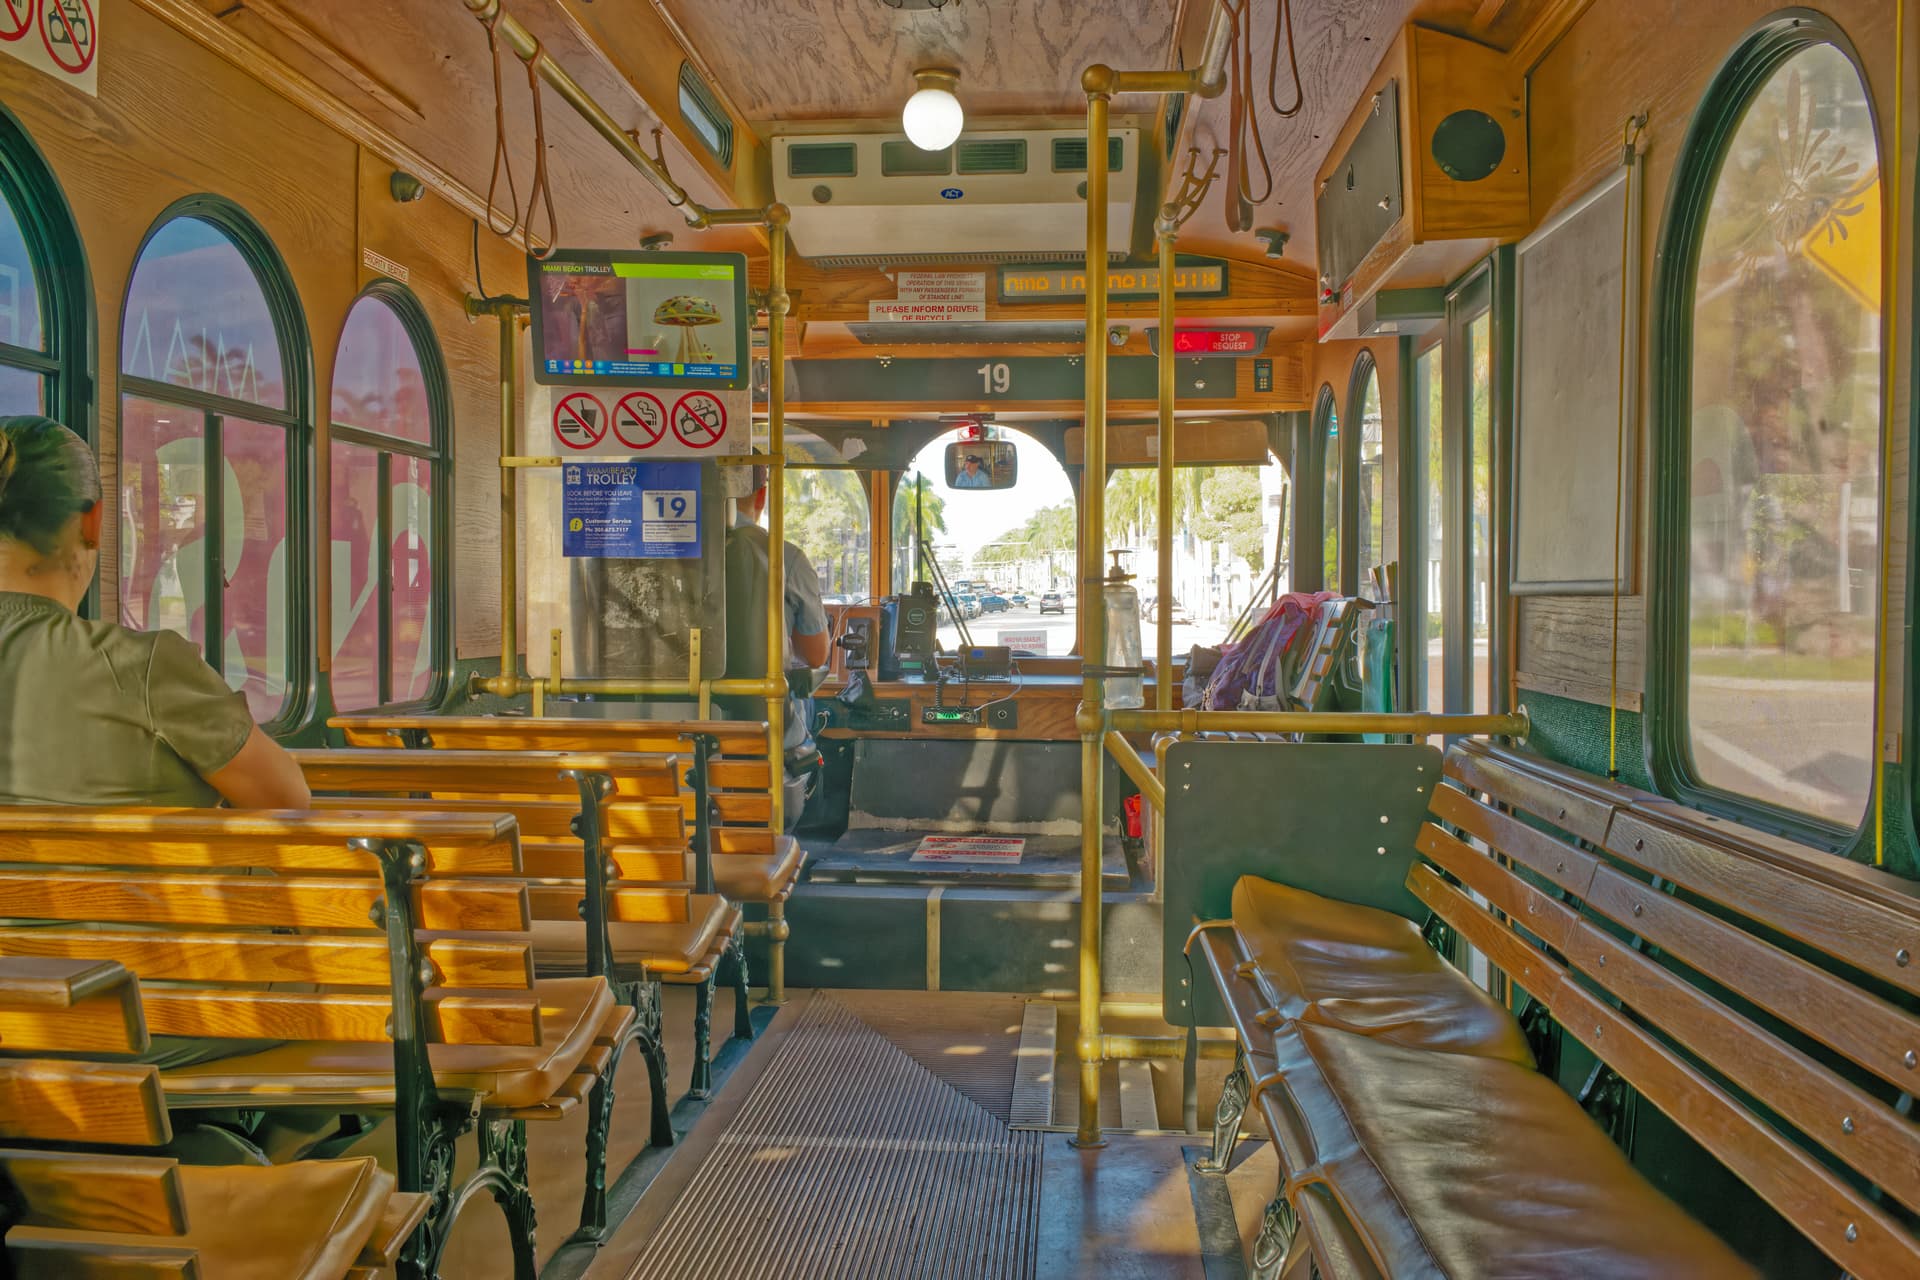
Most of the view through the windscreen is beyond recovery. This version was done using Affinity Photo. I KNOW that’s not what you are asking for / are interested in but it does show that there is more than one way to skin a cat.
Edit: did the first image with the driver too
Again, another approach than Joanna used. In my opinion, the driver looks a bit more natural this way
Exposure compensation to Center weighted, which ups the exposure with only 0.05
I lowered the highlights globally substantially, -50. I raised the shadows a tad, +5
Applied a little bit of microcontrast (+16) to bring back the detail in the woodwork
Set vibrancy to +40 and saturation to -15. This brings the sky to life.
Photo 2: interior
Also a different approach compared to Joanna’s approach. I lowered the highlights globally instead of using a local adjustment to lower the highlights in the windows. I only lifted the highlight of the lamp using control point with the same amount I lowered it globally
I raised the shadows globally to light up the trolley. I also applied a little bit of ClearView (25) globally as it brings a little bit of details back in the windows.
What I want to show you with this is that there are multiple ways to get to a good result
Actually, I have lots of image editors installed on my computer, including Affinity Photo. If there are things that Affinity does better than PhotoLab, I’m definitely interested, regardless of whether or not I was asking about it.
I’ve probably got eight or ten different image editors installed, all of which still work (but probably need updating). I remember getting Affinity when I was trying to eliminate Adobe, but then they made the subscription cost so low, I still have Adobe - but I prefer PhotoLab.
That is probably why I thought your version would be best of all for a movie poster for advertising purposes - it is stunning, and stands out so much. It’s more than I want, but at the same time I need to remember this for times when I DO want exactly that effect.
The combination of what you did fixed the impression of the outdoor parts of the image being blown out and not fixable.
Reminder to myself - I will be on the same trolley in the same area tomorrow, an I ought to try to re-take the same image, but with the exposure set closer to getting the outdoor part of the image looking good. From what @Joanna wrote to someone else, PhotoLab can’t do very much to help blown highlights, but can do wonders to bring back detail in the shadows. I’m more aware of that now.
Good to remember. I sort of get “locked in” to using PhotoLab for everything, and mostly not even thinking about my other software. If for some reason I can’t get PhotoLab to do what I want, my reaction has been to ask in the forum.
In this case, my problem was blown highlight recovery. From now on, I will attempt to use a different exposure, one that does allow me to recover the highlights. Maybe I should be checking this with spot metering when possible.
In my opinion that’s what this forum and its users are great at: helping each other.
There’s not much PL can’t do. It’s a very powerful tool. These kind of exposures are always a compromise. On the one hand you don’t want your highlight to blow out, but having to raise you shadows too much will introduce noise etc. Spot meter can cause the shadows to be too dark. Ideally you want you histogram to be ‘in the middle’.
The newest cameras can be used at incredibly high ISO values, without looking “noisy”. For the D780 and M10, 5,000 and perhaps 10,000 ISO can be selected - and what little noise there is can be dealt with by using PhotoLab. The newer Leica cameras can be used at much higher ISO settings. Scary.
Agreed about the histogram, but what might you suggest instead of a spot meter?
In a shot like the one in the trolley there’s no such thing like “ideally” which is a partly misleading translation of “on average”. Also, it very much depends on what I want to accentuate. If I want to show a dark mood or a very lightish one, then the “histogram in the middle” will be the wrong way to go.
I don’t know much about Leica, spot-metering of Leica and the sensor of the dated M8, but contemporary sensors can show (much to my surprise) more highlights than the “old” ones. That might be also a change in the metering algorithms, so I can’t tell for sure what’s going on. But with a new fp-L I definitely get more details out of the highlights than with the D850.
If you can’t interprete the spot-metering, it will not help you much.
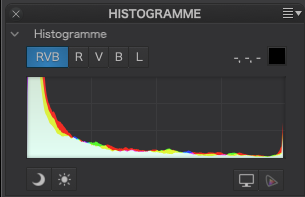
In the middle is not possible in this example. If you want to accentuate the interior, as is the case here you’re tempted to meter on the interior, with the risk of blowing out your highlight. Which also is the case, as you can see in the histogram of the original image. In the utmost right there’s a spike.
That’s what I meant that ideally/on average, you want to be everything in the middle, or as much in the middle as possible. As in, you want to prevent your highlights from blowing out while also trying to prevent you shadows from clipping.
Well, I think it’s a general rule with so many exceptions that I really hesitate to call it a rule. Even if I can “even out” the histogram by using more than one exposure and “averaging” the HDR together, I probably get an evenly lit yet boring picture. For instance, if the trolley would be ebenly lit, be it with post-processing measures or artificial light, it would be a different atmosphere than it is now. Better? Depends. Worse? Depends as well.
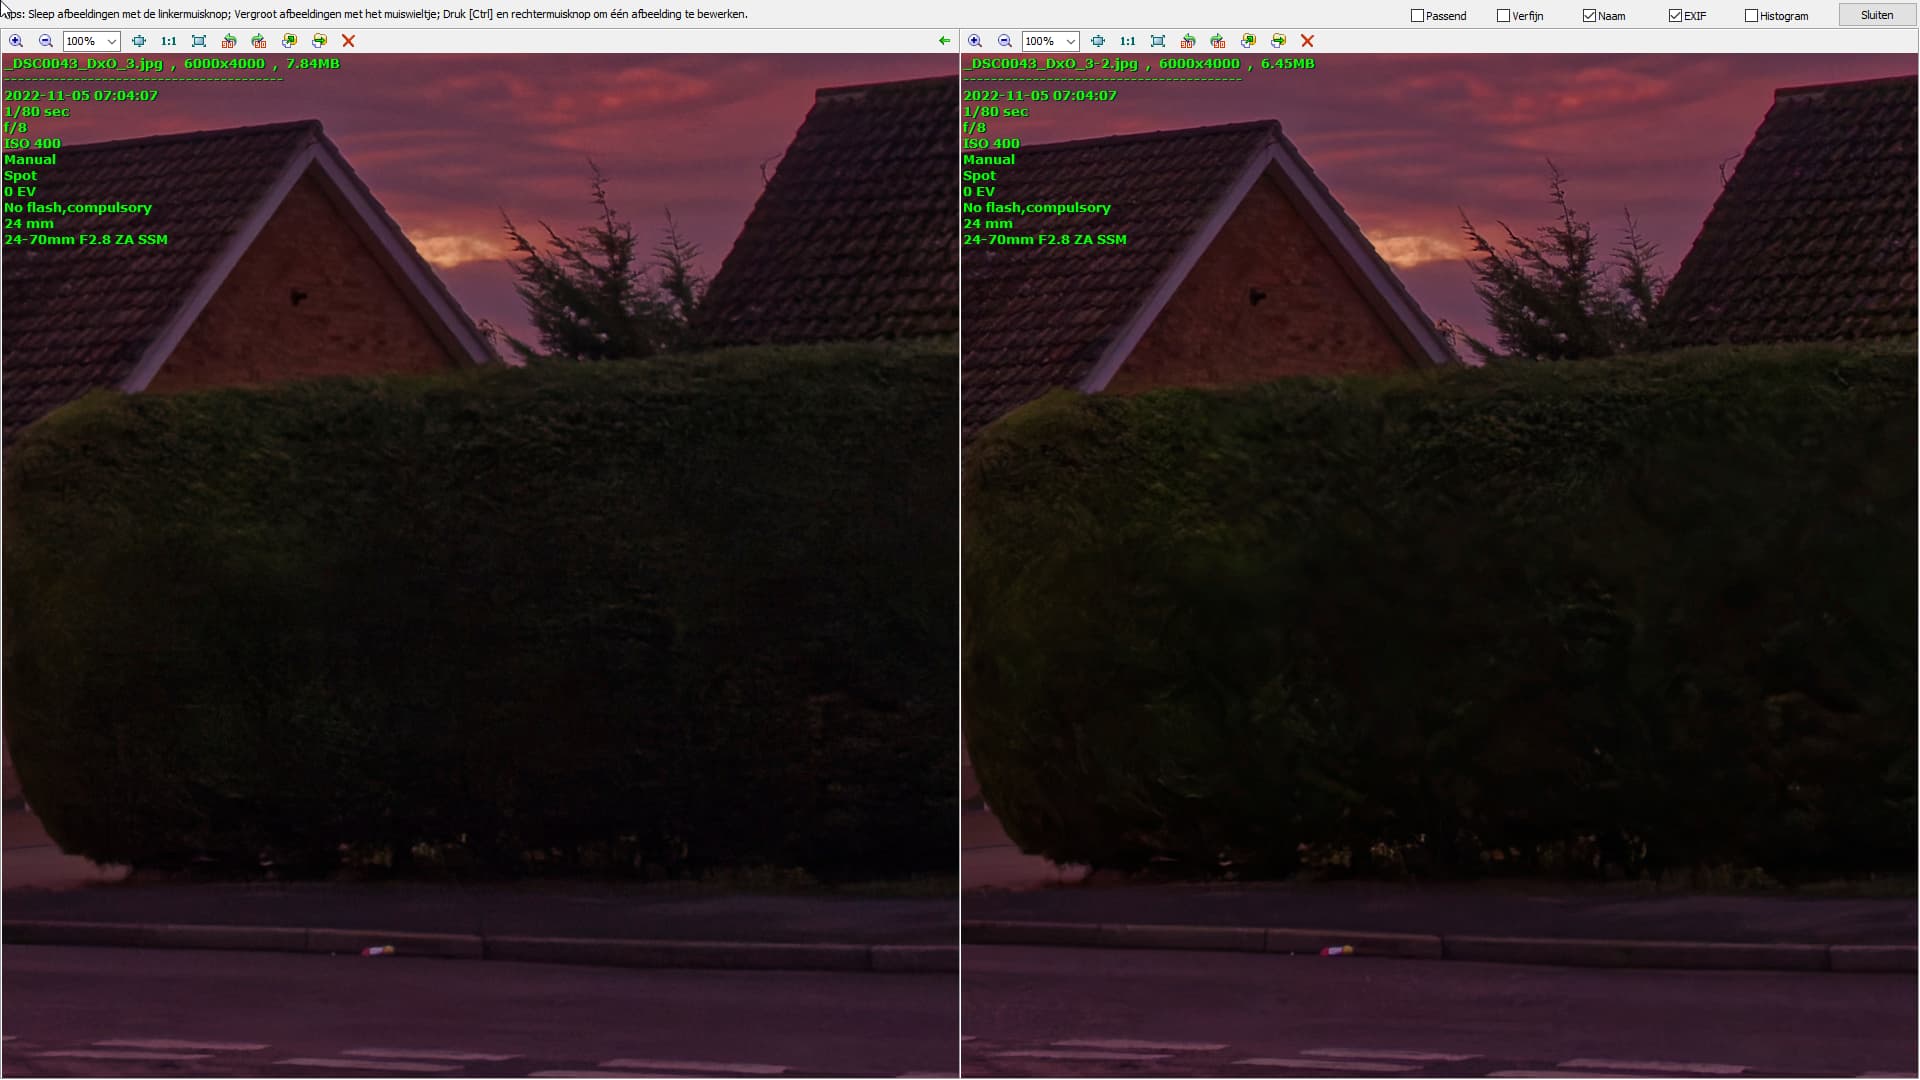
Something to play around with. The spot metre reading was taken from the slightly overexposed highlight to the right of the chimney. Enjoy yourselves. Quite an amazing amount of detail in the shadows and very noisy without deepprime. _DSC0043.ARW.dop (17.2 KB) _DSC0043.ARW (23.6 MB)
I don’t mean even out the histogram. Just prevent clipping highlight and shadows. In case of this trolley, the shadows make the image. That’s the atmosphere you’re trying to capture. Leveling the image out would create something like this (quick and dirty by +100 shadows)
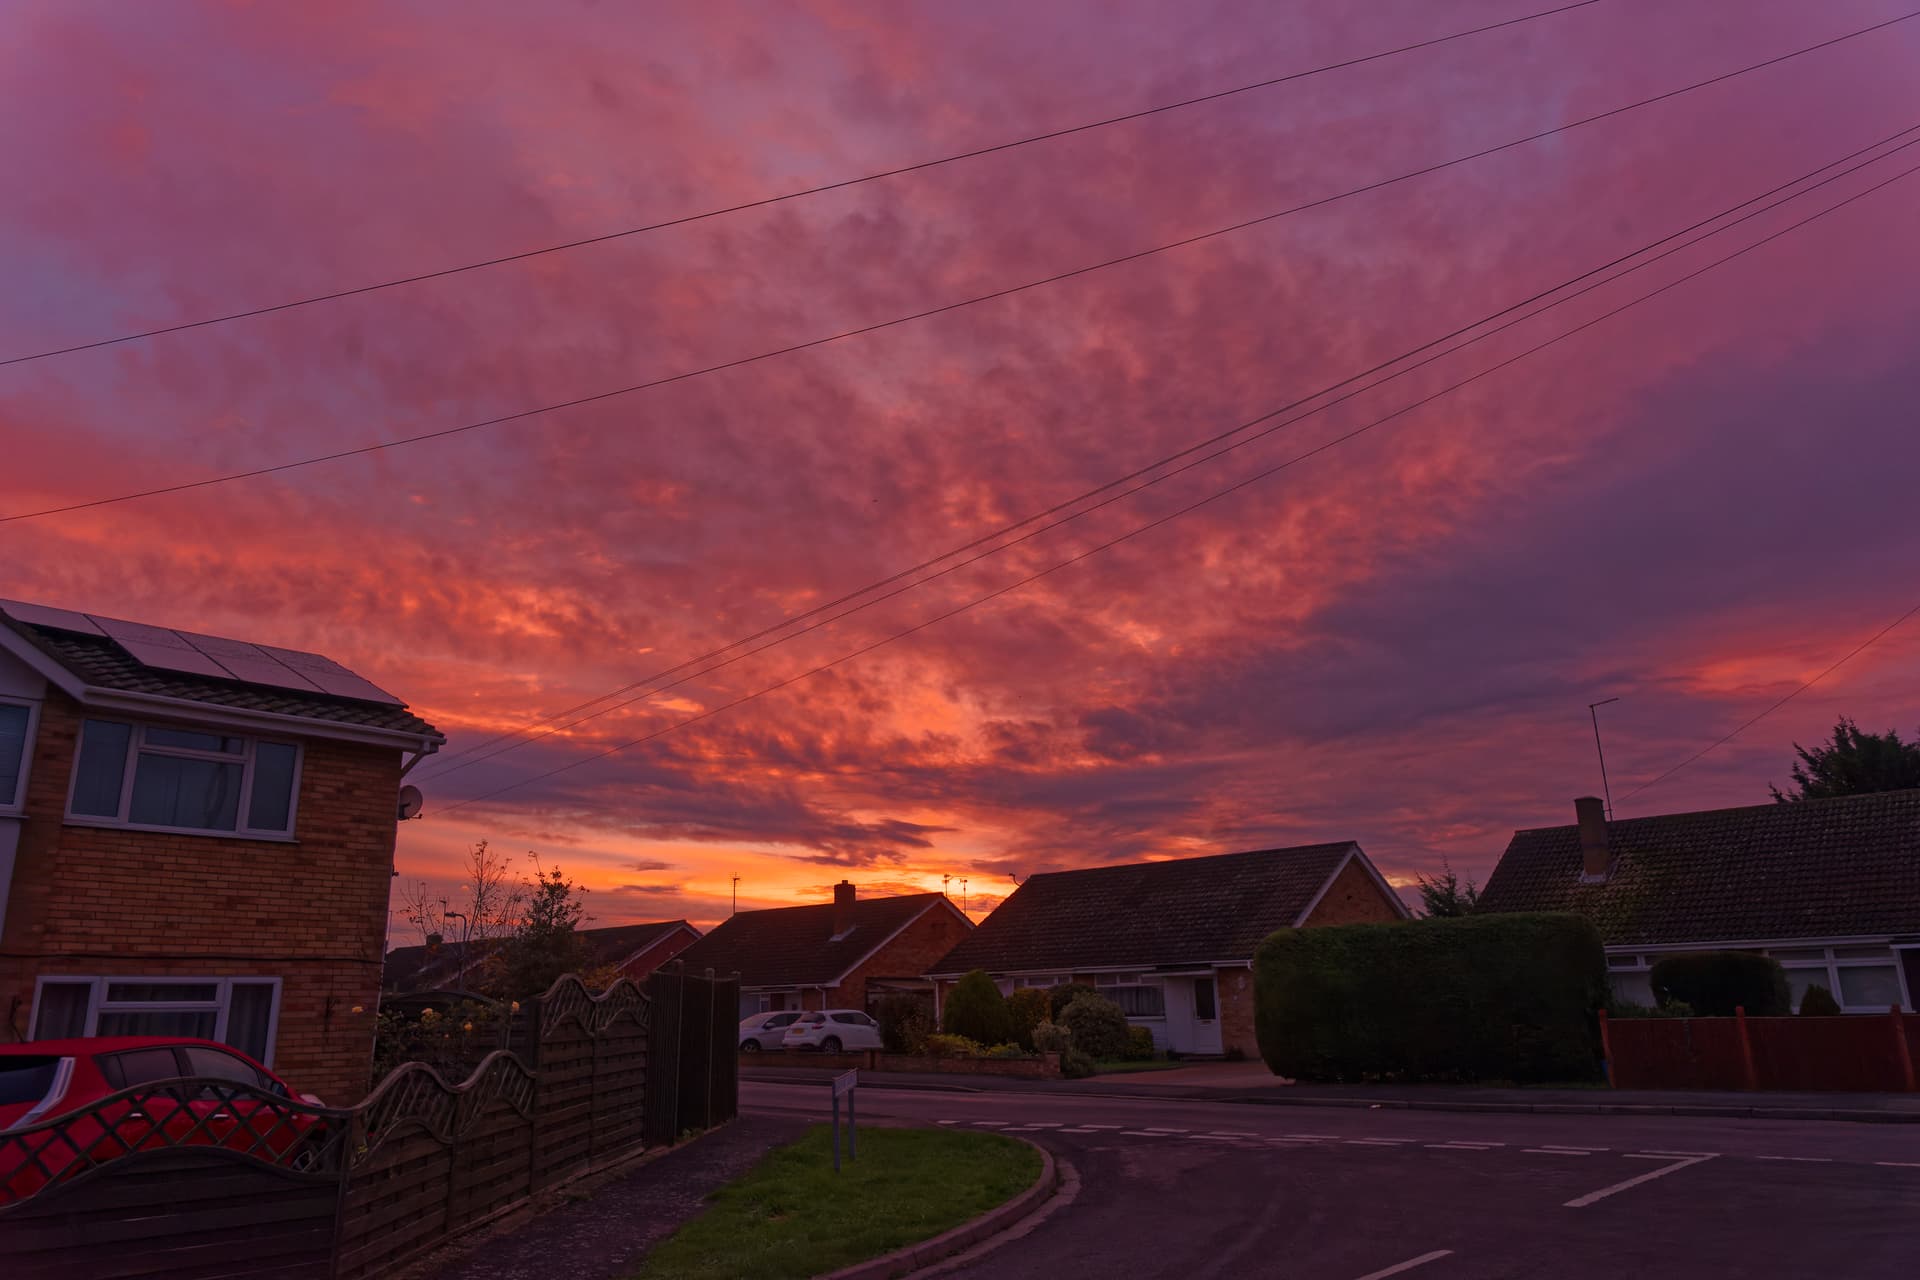
I started with leveling out the exposure by setting the exposure compensation to Center weighted. This would set it to +0.99, I upped it a bit to 1.33 to lighten the foreground. This will make your sky way too bright.
Also, my standard adjustment of vibrancy +40, saturation -15.
Next I added a local adjustment mask, with two control lines. One with the picker on the clouds between the powerlines, one on the bright orange patch above the chimney, at the right top of the most left antenne. Chroma of the mask 53, luma 56 to cover most of the sky but not the houses.
In the local adjustment, I lowered the exposure with -0.96, dropped the highlights (-24) and midtones (-28) and added a little microcontrast (+10). I also added a bit of Clearview, +10 which adds a bit of detail in the clouds. Added more vibrancy (+26) and saturation (+30). Last but not least, I changed the white balance of the mask from 5174K to 6476K which give a warmer glow.
The only things I use Affinity for are assembling panoramics and multi-exposure stacks.
Obviously, there are all sorts of “magic” tools in Affinity but nothing that I need that I can find in PL.
I just did a side by side comparison, using the Apple Colorimeter app and the pipette reads back virtually the same levels for the sky and only slightly different on the vehicles. I added a bit of micro-contrast into my Control Line for the outside and that helped a bit with what details could be recovered but, in the end, where there is nothing, due to over-exposure, there really is nothing that can be done to “recover” blown highlights.
If I show my Control Line mask and maximise the selectivity for both Luma and Chroma, this is what I get…
Everything that shows white in the mask reads exactly the same 252/252/252 level, which is the top of the tone curve, lowered to take out the glaring pure white. But, as you can clearly see, there is no detail in those areas.
I know Photoshop provides a “highlight recovery” tool, that some folks have asked about why DxO doesn’t provide one. The truth is that all the Photoshop tool does is to lower the maximum level, just like I have done here.
With film photography, we are taught to expose for minimal detail in the shadows (usually Zone 3) and let the highlights fall where they will, recovering detail under the enlarger with multi-grade paper and filters.
Of course that applies to negative film, which can have a reasonable dynamic range - for example, Fuji Neopan Acros 100 can easily cope with 14 stops, which is virtually the same as my D850.
But the difference is that, with such a film, the dynamic range is split with roughly 3 stops of under-exposure and 11 stops of over-exposure, whilst the D850 sensor is split between 11 stops of under-exposure and only 3 stops of over-exposure.
Hence, if you are planning on taking a HDR shot in one image, you need to spot meter the brightest part and, at the most, place that exposure at +3EV (more normally +2EV).
Do yourself a favour and take the Nikon, which has an excellent spot meter, along with (did you say you had?) your 24-120mm lens.
Put the camera in manual mode
Set the ISO to 400
Set the aperture to around f/16
Focus on the back of the drivers head
Zoom to max and take a spot reading for the brightest part of outside
Set the exposure compensation dial to +2EV
Check the shutter speed isn’t too slow for hand holding and, if it is, raise the ISO
Frame and shoot!
Ignore what you see on the back of the camera - it will look horrendously dark
All things being equal, you should get much better results.
See my explanation above and never rely on the camera histogram for this kind of shot. You are likely to get something like this…
… which is the PL histogram of Mike’s image before any treatment.
Don’t agree about the histogram. It simply doesn’t work for this kind of image. And there is nothing that can give you as accurate a reading as a spot meter.
The M10 only allows spot metering in either Live View or with the Visoflex finder, which is why I suggest you take the D780.