New in DxO PhotoLab 6.1 ... Specific to Wide Gamut WCS & Soft Proofing

This is a continuation of the discussion started here: New in DxO PhotoLab 6.1 … but, now specific to changes made to PLv6.1 related to the new Wide Gamut WCS & Soft Proofing considerations.

Initially, I was confused by the changes that came with PLv6.1 - and frustrated with the lack of any useful explanation of them. But, I reckon I’ve now worked it out;

– PLv6.0 delivered an “active” implementation, by default;

  • An algorithm to Protect Saturated Colors was applied automatically, at a default “strength”, during the process of Exporting an image to disk. (For more on the “PSCA”, see here)

  • The catch with this approach was that, unless Soft Proofing was activated (which applied an equivalent on-screen algorithm to Protect Saturated Colors) then what the user saw within-PL was not necessarily (depending on the degree of colour saturation in the image) the same as what he/she saw when displaying the exported image on the very same monitor.

  • That is, by default, WYS-was-not-necessarily-WYG.

– PLv6.1 now delivers a “passive” implementation, by default;

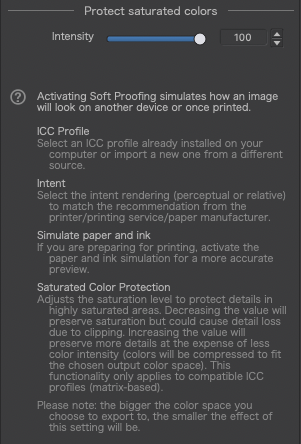
  • There is a new slider in the Soft Proofing UI to enable the user to manually specify the “strength” of the Protect Saturated Colors Algorithm to be applied to the image … By default, the slider sits at a strength level of 50 - and, by default, Soft Proofing is not activated.

  • There’s a new check-box in the Export-to-disk UI to specify whether or not the Protect Saturated Colors Algorithm is applied during the Export-to-disk process … By default, this option is not selected.

  • So, by default, the Protect Saturated Colors Algorithm is applied neither on-screen within-PL nor during the process of Exporting an image to disk.

  • Therefore, by default, WYS-is-always-WYG.

This change results in “no surprises” for the unsuspecting user - BUT, it doesn’t take advantage of what I reckon is one of PL’s key features in getting the best out of its new Wide Gamut colour-space … vis-à-vis; its unique Protect Saturated Colors Algorithm.

John M

3 Likes

Now, in order to take advantage of PL6’s Protect Saturated Colors Algorithm (which, FWIW, I highly recommend), the user must take active control of selections to determine if/when and by what “strength” the PSCA is applied;

The options for applying the PSCA are implemented as follows;

  • If the Export Protect Saturated Colors checkbox is selected, along with a “matrix-based” ICC Profile - then the Protect Saturated Colors Algorithm is applied with the default strength of 50 (Regardless of the activation state of Soft Proofing and/or of the “strength” specified by its Protect Saturated Colors slider).

However

  • If the Export ICC Profile = “Same as Soft Proofing” then the Protect Saturated Colors Algorithm is applied at the specific strength as defined by Soft Proofing’s Protect Saturated Colors slider - (Regardless of the activation state of Soft Proofing.)

    • Edit/Correction: I originally said that this behaviour was “Regardless of the activation state of Soft Proofing” - However, @egregious points out here that this behaviour (except for a nuance that I explain below) is dependant upon Soft Proofing being activated.

.

In either case

  • In order to ensure a WYS-is-always-WYG result - Soft Proofing should be activated (Otherwise, what one sees on-screen within PL will not not necessarily be the same as what one sees when displaying the exported image on the very same monitor).

Personally, I plan to work with PLv6.1 as follows; in the process of creating corrected JPG/TIFF images

– 1. My default Preset (as applied to all newly encountered RAW images) will have the following default settings;

  • Soft Proofing activatedbecause I want WYS-is-always-WYG.
  • Soft Proofing’s ICC Profile = sRGB~ … because that’s my target intention - and, see --2.;
  • Soft Proofing’s “Protect Saturated Colors” slider = 50 … as my default PSCA “strength” setting (which I may change later, for specific images, based on what I see on my sRGB monitor).

– 2. When Exporting-to-disk, I will use the following settings (defined in my Export options);

  • Export’s ICC Profile = “Same as Soft Proofing” - - which will result in;
    i) the Protect Saturated Colors Algorithm being applied at the specific strength as defined by Soft Proofing’s Protect Saturated Colors slider (= 50, by default), and;
    ii) the ICC Profile, as defined via Soft Proofing for this image, being applied to the exported image.

I reckon that will work well for me - but, it doesn’t “just work by default” (as perhaps it should !?) … Rather, one must make specific decisions and take manual actions.


HtH - John M

5 Likes

John, thank you for your work!

1 Like

Imo, DPL should default to wysiwyg settings.

Now, we have many degrees of freedom and some combinations get us wysiwig and others don’t.

I propose that DxO dedicate a chapter in the manual on how to get wysiwig under different conditions like a monitor that is capable of either sRGB or AdobeRGB and the WCS setting of either Wide or Legacy.

If we also take into account that we might actually print, we get another dimension that needs to be taken into account, along with the OS used.

Looking at all of the above, I get the feeling that chances are bigger to miss than to hit. If this should indeed be so, I’d consider this aspect of DPL to be excessively user-unfriendly.

5 Likes

Hi John,

It seems that you are starting the work that DxO should have already done. Thanks.

The default preset that you are describing has to be rethought if the user has a wide gamut display. I’ll look at that as soon as I have enough time.

Does it ? … I’d apprecaite your thoughts on that, Patrick.

John

We have to deal with several tools that act on different cases and steps in the workflow. Any combination could be hit or flop. We’d need some guidance which, caused by the complexity of it all, could possibly be brought “to paper” in a flowchart or decision matrix, possibly implemented top down or bottom up…

I just made a quick test with a default preset being the same as yours except that I used the ICC profile of my display instead of sRGB-. I exported to both JPEG and TIFF (Prophoto) and loaded the files in the Faststone viewer. I’m unable to see any difference between what DPL and FIV are displaying.

I’ll take time to make further tests next week.

1 Like

@John-M, I think that’s a very good work you did and I hope, one day I’m going to understand it. :blush:

But what I would like to know is: I would like to show my JPGs on a screen with a projector (Vivitek DH976). It’s not my projector and I have no idea what profile it is. Of course, the images should look like they do on my SRGB monitor at home. What should I set?

1 Like

Hi,

You should be able to calibrate the projector with the same tool that you have used to calibrate your display. This would generate a profile that you could use in the soft proofing settings.

MfG.

This is because the test image doesn’t have much very saturated colors. With another image containing very saturated reds, I see an expected difference when exporting to sRGB Jpeg. So, no surprise until now when working with soft proofing enabled and using the display profile.

Also, I see the same differences in the exported Jpeg (sRGB) and the display with soft proofing enabled but using the sRGB profile instead of the display profile. So, things are consistent until now.

1 Like

It is a projector in a public restaurant where we hold our monthly photo meetings. I can’t get there. We’re only allowed to use it. :hugs: So far, with PL 5.x and SRGB, everything has always looked fine, just a bit darker than on my monitor at home.

Then soft proof your images with the sRGB profile and after making the necessary adjustments, export likewise using the sRGB profile. This should give the same results.

[Welches Restaurant? Scheint gastfreundlich zu sein. Ich würde’s gerne mal besuchen, das nächste Mal, dass ich dort knipsen werde. MfG]

1 Like

@Pat91: https://www.piazzetta-bierstadt.de/
Termin: Usertreffen Wiesbaden 14.12.2022 - Kalender Termine Veranstaltungen (65135) | fotocommunity

1 Like

Danke für den Tipp.
Schönen Tag noch.

1 Like

My testing shows that the activation state of Soft Proofing does matter. If the Soft Proofing subpalette is not activated, but the export ICC profile is “Same as Soft Proofing,” then the amount of PSC applied on export is 0 (regardless of what the slider in the Soft Proofing subpalette is set to). In my test, what I saw on screen with Soft Proofing disabled is what I got on export. I don’t know if that’s always the case (if you have very saturated reds, blues, and greens), but it was in the test I tried.

For academic purposes, here’s a demonstration of the effects of the “Protect Saturated Colors” slider in Color Rendering vs. the “Protect Saturated Colors” slider in Soft Proofing. The sample I’m showing is rendered with Color Rendering set to:

Category - Generic renderings
Rendering - DxO camera profile (E-M1MarkIII)
Intensity - 60

(This Intensity setting blends the discovered DxO camera profile with the “Natural color” profile that is equivalent to Intensity=0.)

Here’s what I start out with if the Intensity slider under “Protect saturated colors” in the Color Rendering palette is 0:

A CR 60 PSC 0 SP 0

With Soft Proofing enabled, let’s set that palette’s Protect saturated colors slider to 50:

B CR 60 PSC 0 SP 50

And with the Soft Proofing PSC set to 100:

C CR 60 PSC 0 SP 100

Now see what the Color Rendering PSC intensity level does in comparison. First, Soft Proofing PSC set to 0, Color Rendering PSC intensity set to 100:

G CR 60 PSC 100 SP 0

Add SP PSC = 50:

H CR 60 PSC 100 SP 50

Now SP PSC = 100:

E CR 60 PSC 100 SP 100

I ultimately chose a combination of the two. Here’s one - CR PSC = 50, SP PSC = 100:

D CR 60 PSC 50 SP 100

And my final choice, CR PSC = 75, SP PSC = 80:

F CR 60 PSC 75 SP 80 (final)

Never mind the out-of-gamut warnings - they don’t take the Soft Proofing PSC setting into account, only the Color Rendering PSC intensity setting. With this example, CR PSC = 100 doesn’t take care of the OOG warnings entirely. Sometimes it does, but in this case I’d need to reduce saturation further:

Here’s the result with magenta saturation = -26, which eliminates nearly all of the warnings on this object:

Clipboard01

Is there more detail here at the expense of saturation? I’m only more convinced that the OOG warnings are frequently bogus. (All of these images are sRGB.)

1 Like

A great write up @John-M and for a single export it’s a good way of making it easier for a user to understand what’s happing and what’s applied.

But I also see a complexity in this and that’s when doing multiple exports in parallel via the export dialog.

It’s a bit risky to transform or convert a soft proofed simulated view to a hard output. The soft proofing itself should never affect an output file.

But I also understand that the logic in your idea could help a user which might be a more novice within the color correction chain.

Should the checkbox Protect saturated colors in the export dialog contain a slider as well?
That would enable multiple outputs in parallel with different ICC profiles embedded.

This is tricky.

1 Like

Indeed…

…but softproofing contains the PSC slider for the protection of saturated colours, whatever that protection might be. Protect saturatedcolours from fading or from getting oog?

Softproofing is a measurement thing, and, imo, should be a switch in the toolbar rather than in a palette…as should be WCS too.

2 Likes

Even though a Perceptual compression sounds as the option to use so it can preserve the visual relationship between colors.
The slider would not be needed in that case?
Or perhaps the DxO devs are quite inventive and cheeky ones and have come up with a very cool volumetric compression of the OOG color space. :smiley:

My impression otherwise is that the PSC slider is doing more of a Relative colorimetri
compression of the volume containing the OOG colors. And that the slide adjustment adjust the amount of affected neighbouring colors.

I would love to hear DxO tell us some more.

EDIT:

I did a bit of testing.

Exported the same OOG image in Wide Gamut Space in 4 ways, all with sRGB ICC as Same as soft proofing
Softproof perceptual intent PSC 0
Softproof perceptual intent PSC 100
Softproof relative intent PSC 0
Softproof relative intent PSC 100

I then layered the perceptuals and applied Difference to one layer.
Same with the relatives and applied Difference as well.
Both perceptual and relative compounds did show the same differences as the result

There were NO visual differences to the eye and not according to the histograms for soft proofing with perceptual intent.

I then exported the compounded perceptuals and relatives.
Layered them and applied Difference to them as well.

There were NO visual differences to the eye and not according to the histograms for soft proofing with relative intent

So the PSC slider is fully independent of the intent of the Softproofing - although soft proofing need to be enabled for the PSC to be applied for exported images.

TL;DR
The Intent set in soft proofing do not affect the exported image.
The soft proofing itself to not affect the exported image - which is perfectly correct.
But as the user guide explains - the soft proofing need to be enabled for the PSC to be applied for the exported images.

That might be a factor which adds complexity and might require some refinement or change in the UI.
When reading the explaination in the UI - a user might miss that the PSC is applied on Exported imaged only when Soft proofing is enabled.

Protect saturated colors
For exported images

PSC

1 Like