Hi all, i am a new Photolab user (30 days trial phase) and face the following issue: when importing photos, the software applies automatically some kind of preset (?) that underexposes severely and increases the contrast all photos. I can see that software applies automatically a preset as for the 1st second the photo appears to be exposed properly and then turns underexposed without any adjustment from my side. Is this normal? In the presets setting i use the “no correction” and sRGB as color space. My camera is a Canon 6d and i use Lightroom and DPP for many years but never seen this before. Thank you in advance.
Hello George,
1 - Could you, please, provide me with any of sample images to have a look?
2 - By default “DxO Standard” preset with auto corrections is applied. But you wrote you apply ‘No correction’ preset then Before/After images should be equal.
So waiting for your images for the investigation - you can upload them here upload.dxo.com under your name instead of ‘support ticket number’ and let me know when ready.
Thank you
Regards,
Svetlana G.
Thanks for the prompt reply Svetlana. I am at work right now but i will upload them as soon as i get home.
Hello George,
set the preset used to “DXO standard” in the settings and look what happens
Best
Sigi
I get the same effect. Images start ok and then turn dark. This effect came in somewhere in the late OpticsPro versions.
In RawDigger and/or FastRawViewer, I see that my Canon files have an offset of about 4’000 for black and a linearity limit of about 10‘000 (according to exiftool), so maybe that DxO has other ideas of what black and white should be. Every raw developer has a different interpretation of what „no correction“ is too.
Just adjust the sliders until your result meets your expectation and after a while, you might be happy with the proposed presets or start creating your own.
If you decide to buy, go for the elite edition which offers better options. You‘ll want them if you get serious.
I recorded my screen and uploaded it - ticket number is my username. Let me know when you have a chance to check it.
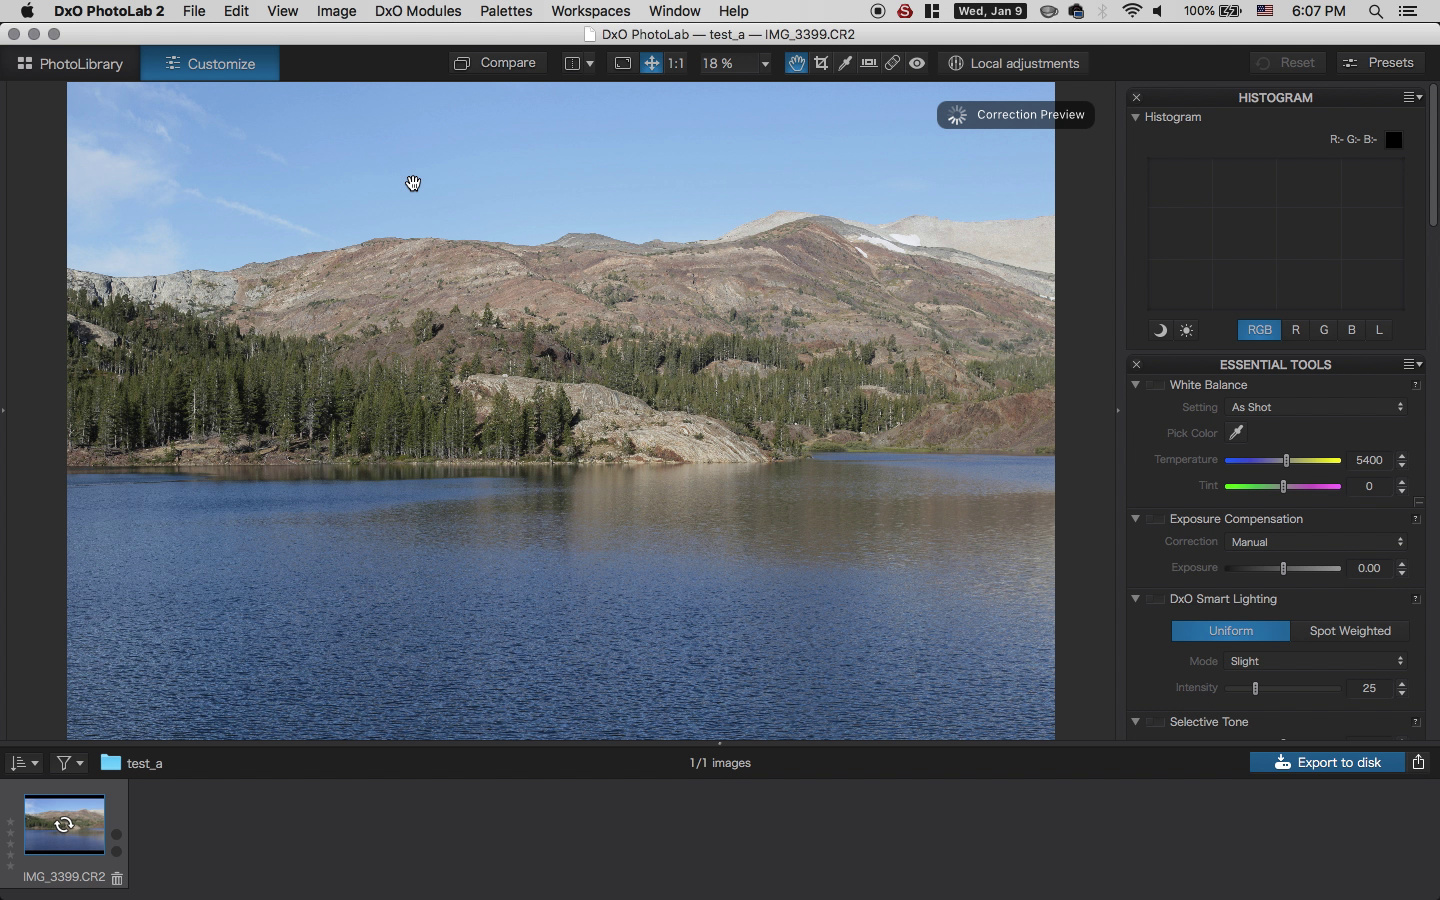
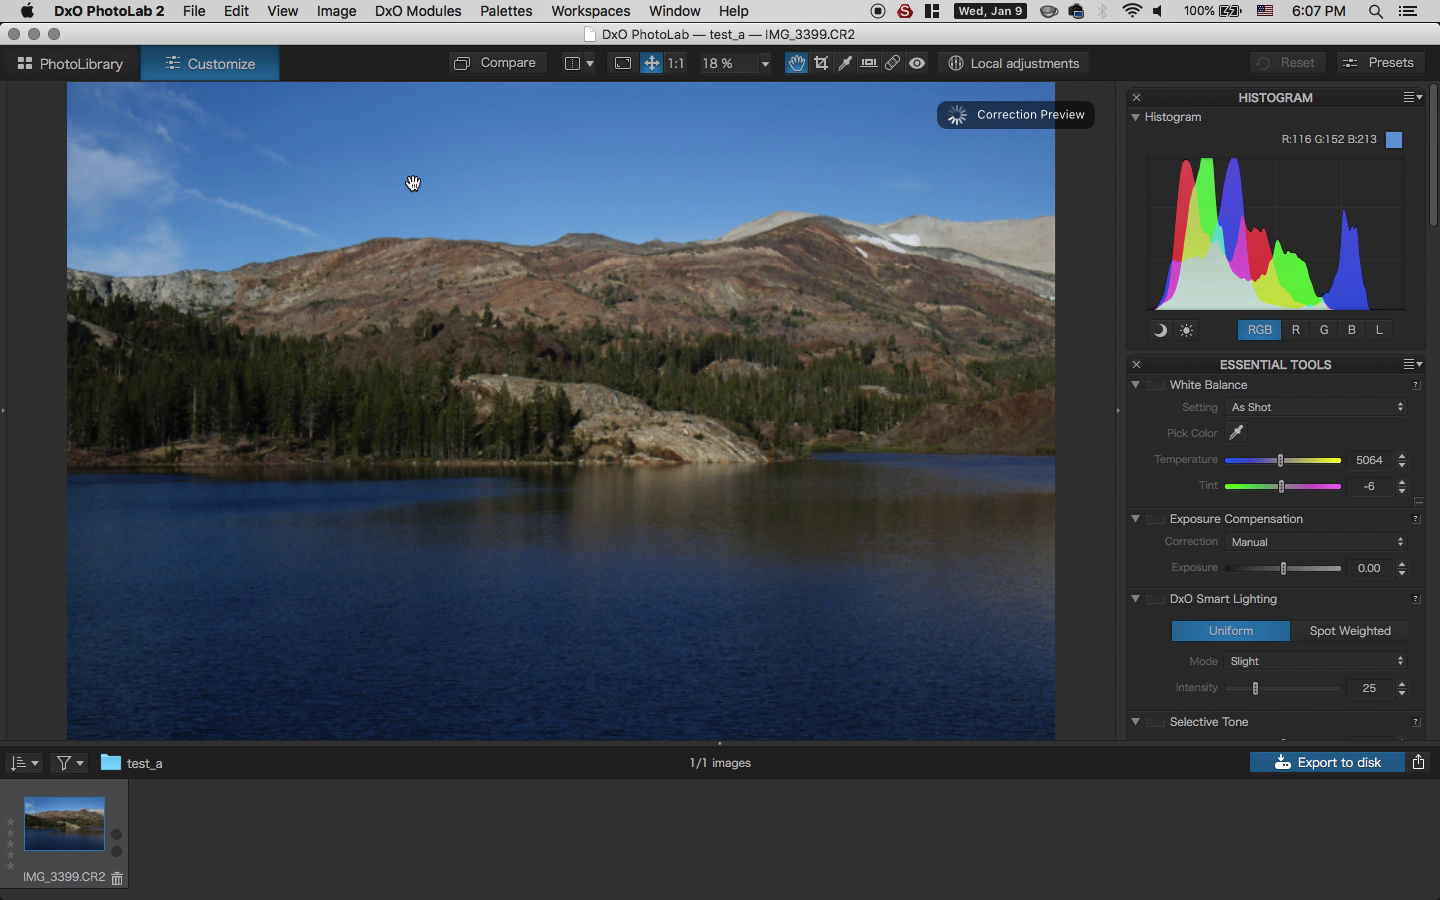
Thanks for the reply. I am attaching 2 pictures before/after (again, I have selected “no correction” in the presets settings). As I captured the print screens, I noticed that in the first picture PL doesn’t read the histogram.
before
after
i got the same issue with auto mode. two raw applications which where different and DxO was around 1/2 EV darker. i think it expose to the middle instead of ETTR.
i use the Smart Lighting and the boxtool instead of auto exposure correction.
is much better.
edit: windows version. example:
i think its interpretation of the rawfile,
ive abandon the Auto Exposure Compensation (it’s sets to often in - xx.xEV wile +xx.xEV has a better result.) and go primary for Smartlighting and boxes plus manual correction in global exposure if heavily underexposed/overexposed)
Which Picture Style do you use? Do you have Auto Lighting Optimizer enabled? Both will change the JPG preview in the RAW file which is most likely what DxO displays in the first instant.
I also suggest you try FastRawViewer as it will allow you to inspect the “RAW histogram” so you will see if you leave to much unused on the right side, in the lights.
Or do you have Highlight Tone Priority enabled? This will underexpose the RAW by one stop. DPP compensates this automatically, but DxO most likely not.
1 Like
So Well 
@tsoumi If you can provide us 1 of the picture you use in the Screen Cast it could be great.
Anyway, I’ll explain how the pipe of display a preview is done when a picture is discovered for the first time :
- The picture is loaded
- When it is loaded, we display first the screennail If we don’t have any cache file of this picture.
 the Screennail is an embedded picture generated by the camera when writing RAW file. It is used for example to preview the picture on the camera’s LCD screen, in file managers.
In some cases depends of the camera, if you choose some parameters like B&W the screennail could be B&W
https://forum.dxo.com/uploads/default/original/2X/8/8688ebb0741e1980fcbdd7f21c2c8c8182448ac0.mp4 - We compute a first low res version of the picture with correction, when it is availalbe we display it in preview, (the blurry one)
- We compute the final version and display it in preview.
In your case, I think that the stored picture in the screennail is “overexposed” compare to the Raw data that we retrieve.
You can use Exiftool to extract embedded pictures for example this command line :
exiftool -a -b -W %d%f_%t%-c.%s -preview:all YourFileOrDirectory
Hope I was clear
PAt
Thanks for the detailed reply. I usually shot only Raw, never jpeg. Nevertheless, I tested some jpeg files and indeed there is no change in the exposure. I uploaded the raw file along with an export from the exiftool - I have used as ticket reference my username. Please let me know when you have a look.
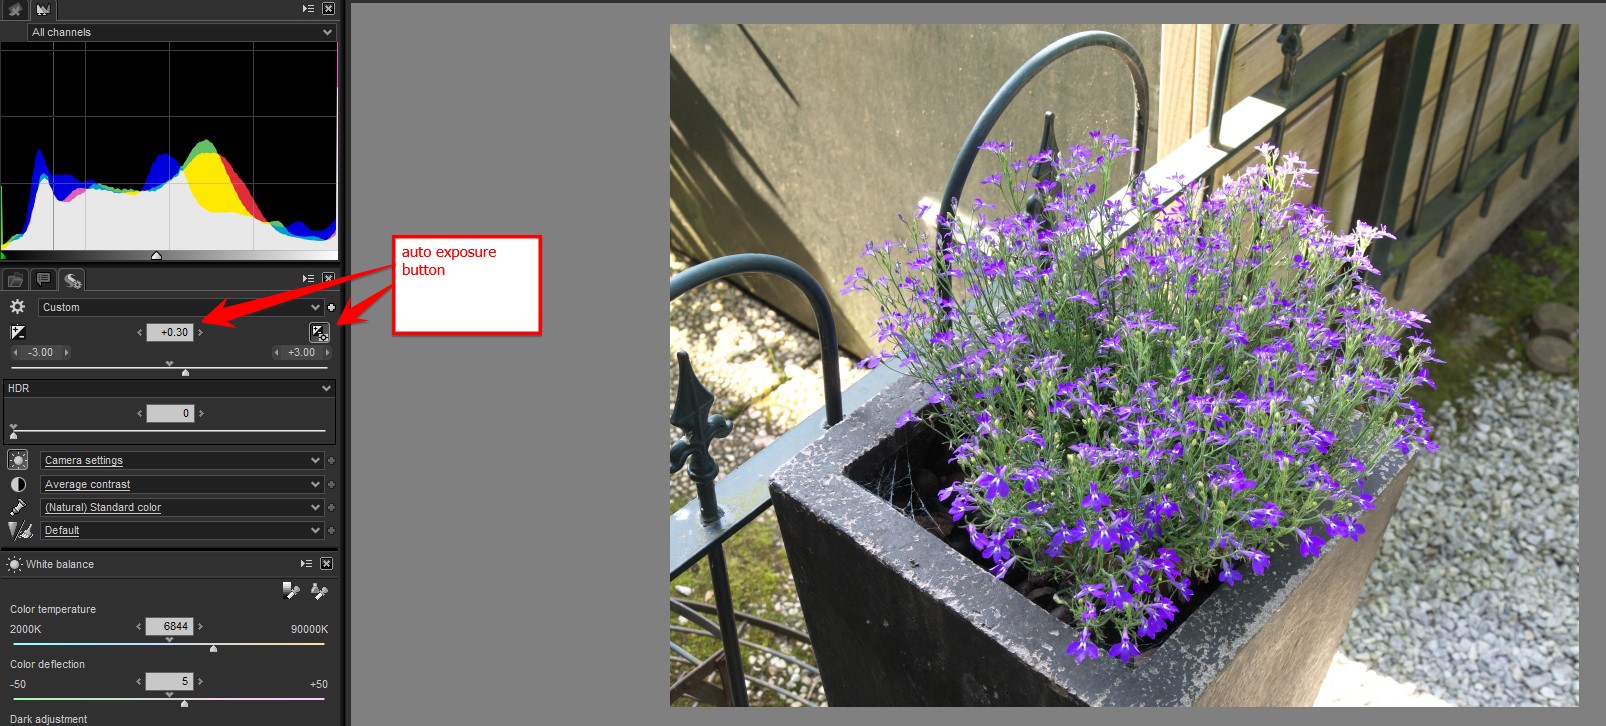
I must say that I have been experiencing this issue for quite some time as well. So much, that I have created myself a preset DxO Standard +0.30 ev (and I often have to increase this exposure compensation even more). I apply this preset automatically upon opening my RAWs in DxO.
I have Highlight Tone Priority enabled on my EOS 7D, so indeed: that could be the cause! I’m now definitely going to do some tests with and without Highlight Tone Priority.
I never knew that this feasture would underexpose the RAW by one stop! Thanks for mentioning this. It might be the solution to my problem.
Hi all,
sorry for digging out the old thread, but I’m facing the same issue.
I’m evaluating DXO PL 4 in the 30 days trial and notice that most of the time, the photos are underexposed when opening them without any manual processing. The DXO Standard preset is applied.
I use a Pentax KP and shoot DNG raw.
Since the only thing you mentioned for a solution is the Highlight Tone Prio by Canon, which my Pentax doesn’t have obviously.
Is this normal behavior that DXO underexposes in their standard preset? I really love the corrections being applied (tone, contrast, lens etc). But the underexposure kind of is a show stopper to me. Very often, I don’t want to do detailed editing but simply want to export to jpg directly and quickly. But if I would end up with the majority of photos being underexposed, this wouldn’t be an option to me 
Hi Jimmy, I have not noticed any (unexpected) underexposure issues with DXO, but there are a number of minor things I don’t like about the DXO Standard preset in the context of “how I like my photos to look”.
Seriously though, this is not an issue, as you can setup your own presets, and configure DXO to use your preset instead of the standard one.
I never use the DXO standard present myself, I have a modified version of it that gets automatically applied to all raw files that I import that provides a better starting point for the kinds of photos that I take.
Thanks for the answer. But to be honest, I find it a little weird that the processing looks like it does. And it lowers my confidence in the software in general unfortunately. As mentioned, I’m evaluating it currently and would love to get a solution without tweaking the preset myself and e.g. apply some default overexposure. Sounds tacky to me.
Turn off smartlighting.
(it flattens the tonallity and supresses highlights in most moments as the ETTR is good.)
Try no corrections preset or optical corrections only.
The dxo standard preset can be to conservative in blacks and highlight’s
My first step is
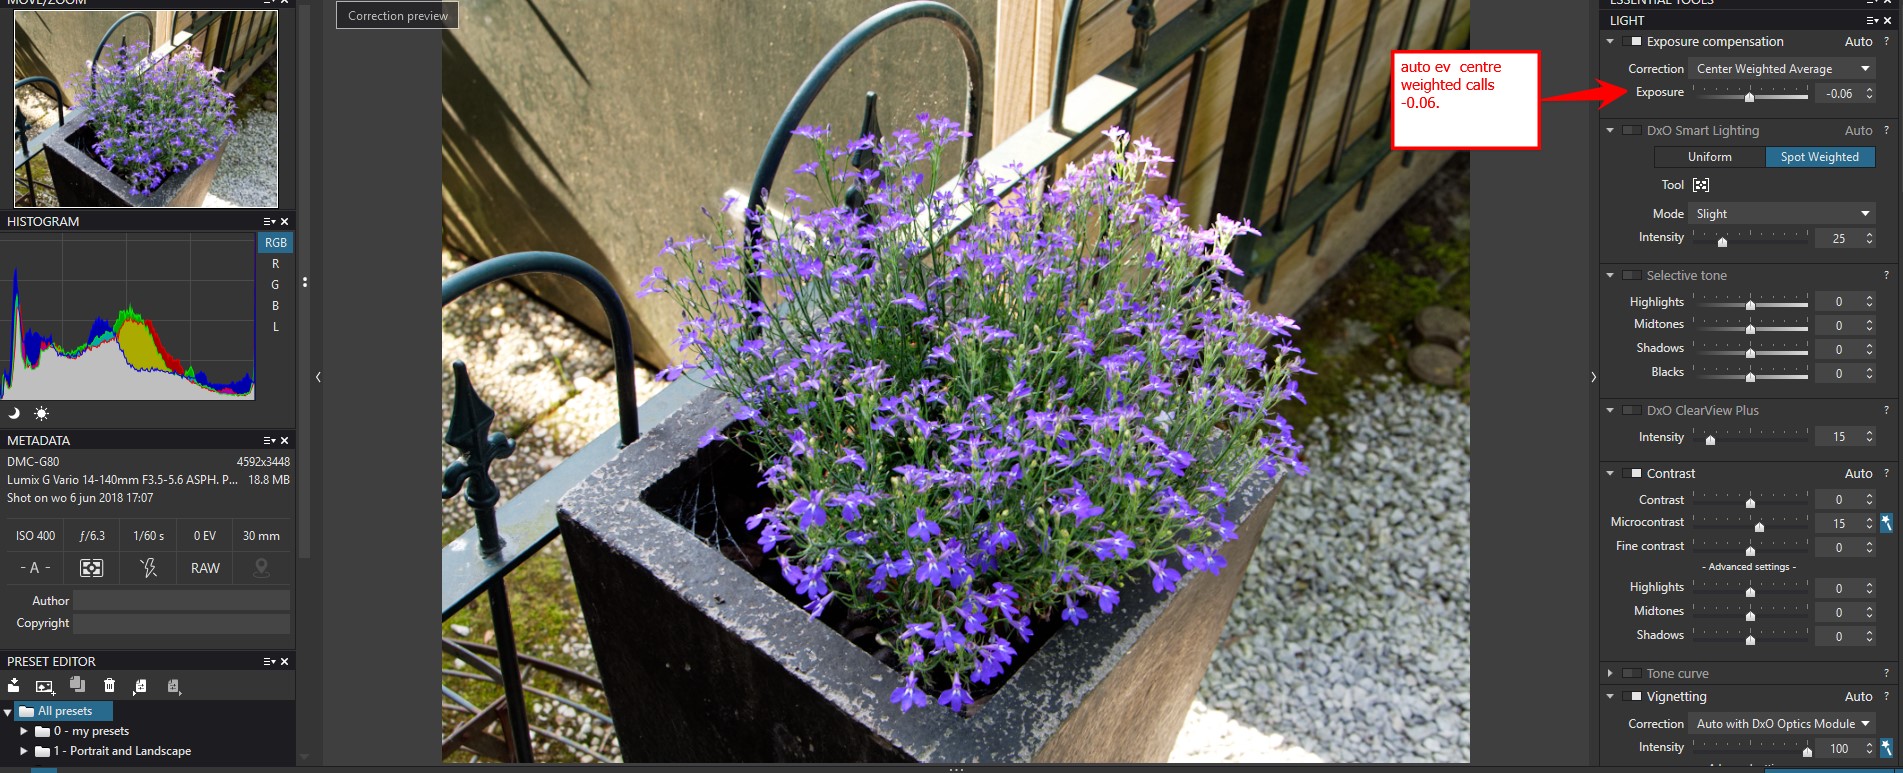
Use auto exposure centre weighted. See if it’s go minus or plus when activated.
When it goes minus i use smartlighting and boxes to set highlights pinned and push exposurecompensation back up wile watching histogram on the bright side.
Then is centre weighted lumination balanced.
From there i start correction of constrast and color tonality.
Vibrance, saturation, contrast, blacklevel.
4 Likes
Thanks for that. Very useful to know.
1 Like
Making a preset suited for your camera (and your own idea of a image) and set this one as default for imported files is a very easy way to create a good base for easy export.
As i said the dxo standard is a middle of the road fits all setting. And the blacks and highlights are compressed by the smartlighting setting.
To understand smartlighting you need to use the box (face reqocnition) modes.
Get an image an make some boxes, move those boxes around to highlights or shadows or points of interrest like a face or your focuspoint.
See what happens with the overall tonality of the histogram and thus image.
I suspect you are used to LightRoom.
They do a lot “under the hood” which makes every image “the same as any other shooter puts in” there auto preset is pritty and neat but it doesn’t show the potential which is in the rawfile.
Give it some time to adjust your point of view.
And ive wrote a contrast how to use all kinds of contrast adjustment. Which shows that knowing how does help alot.