List of Bugs in PL4.1.1

,

Hi,

I have noted several bugs (or unexpected implementations?) that are making the work with the program a bit troublesome:

1. It is inconsistent how to enter a manual number in the zoom field. There is a dropdown menu that allows to choose several zoom levels, 25%, 50%, 75%, 100% and 400%. When I enter a manual number with my keyboard, some zoom levels are accepted and some not. E.g. I enter 20%, it works. But for example when I enter 70%, it jumps to 75%. Ok, that is close enough at least. But some numbers are completely impossible. If I enter 300%, it jumps to 100%. Worse, if I put 200%, it jumps to 20%. I do not understand the system behind that, it is very inconsistent. I am especially missing zoom levels in between 100% and 400%, and I do not know how I am able to select these.

2. In a similar fashion, I am also not able to enter any manual value in the white balance field.

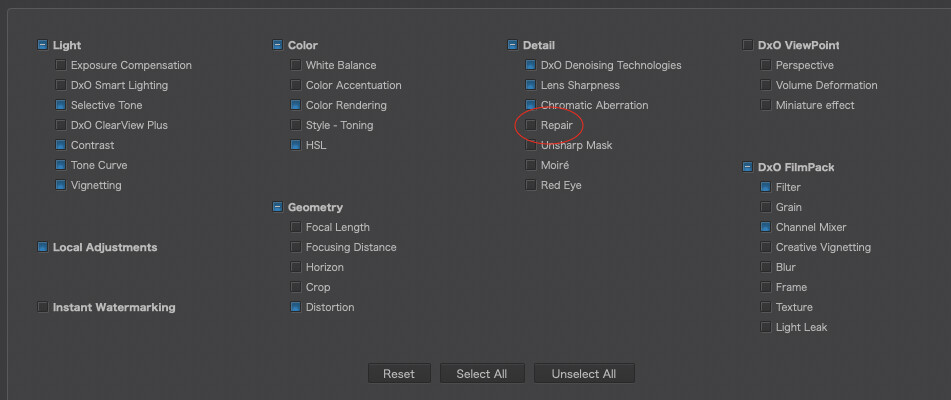
3. The repair stamp is a global setting. It should be a local setting. When I copy only global settings from one image to another, it also copies all the repair stamps. This was quite surprising, I did not notice this at first and was wondering why I am having some artefacts in the images, as the repair stamp will have of course have different effects on each image, depending on the content and the position of the stamp.

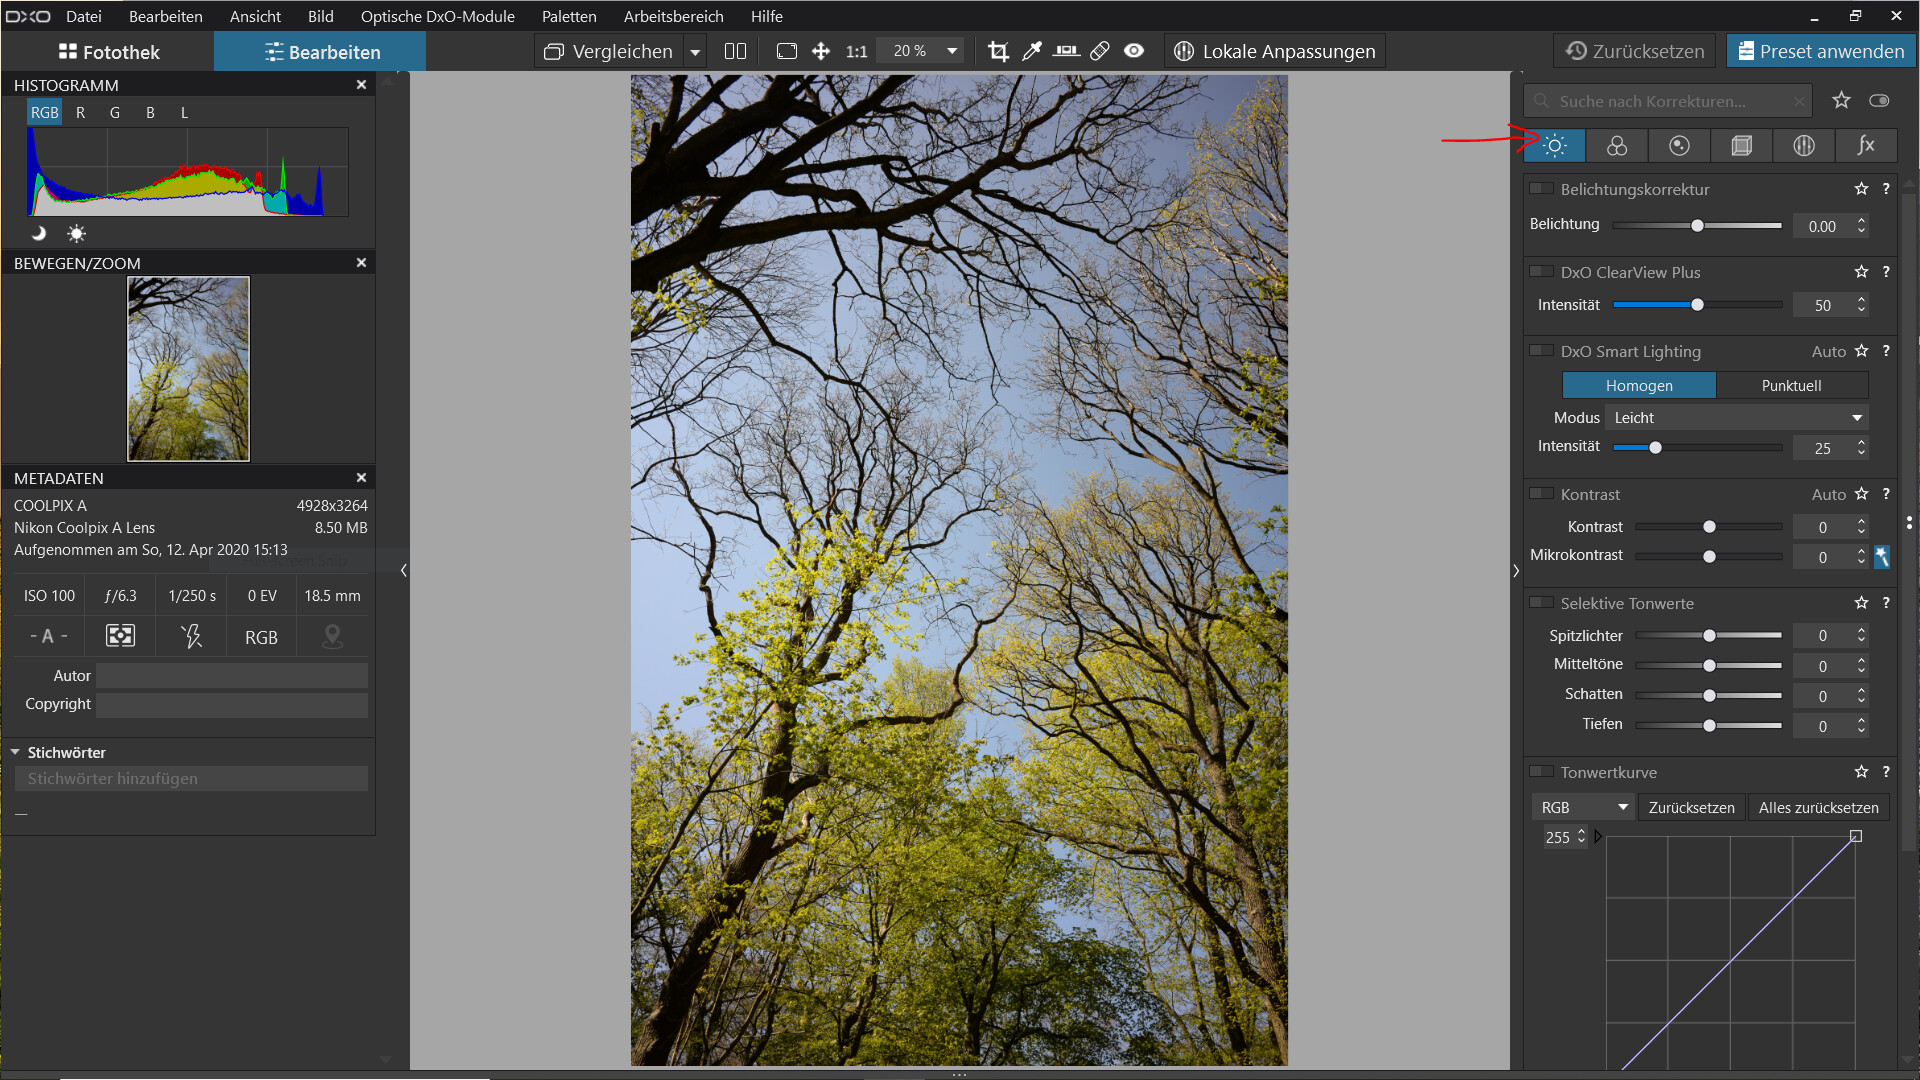
4. Automatic settings get applied without user intend. When I adjust the contrast to +5 with the small arrows next to the contrast slider, suddenly the microcontrast slider changes automatically and suggest a value of +16. At first I thought that I must have pressed that automatic adjustment button next to the microcontrast slider by mistake, but I could repeat this behaviour and I am definitely sure that I only click on the arrows to adjust the contrast, not microcontrast. This does not occur all the time, I do not yet understand why this happens some time and some time not. But it is very annoying, as the use of microcontrast has a big (sometimes undesired) effect on the image. Not a bug, but a feature :slight_smile:

5. This has only happened yet when I do some extrem adjustments. E.g. when I reduce the saturation in the HSL color wheel of the white channel and turn all the tone values down to the minimal values (midtones, shadows, depths, etc.), and do some other adjustments afterwards, at zoom to 100%, the image becomes blurry. When I zoom to fit the screen, the image looks normal. Any other zoom level is blurry. The only way to fix this behaviour is restart the program. This behaviour can be reproduced.

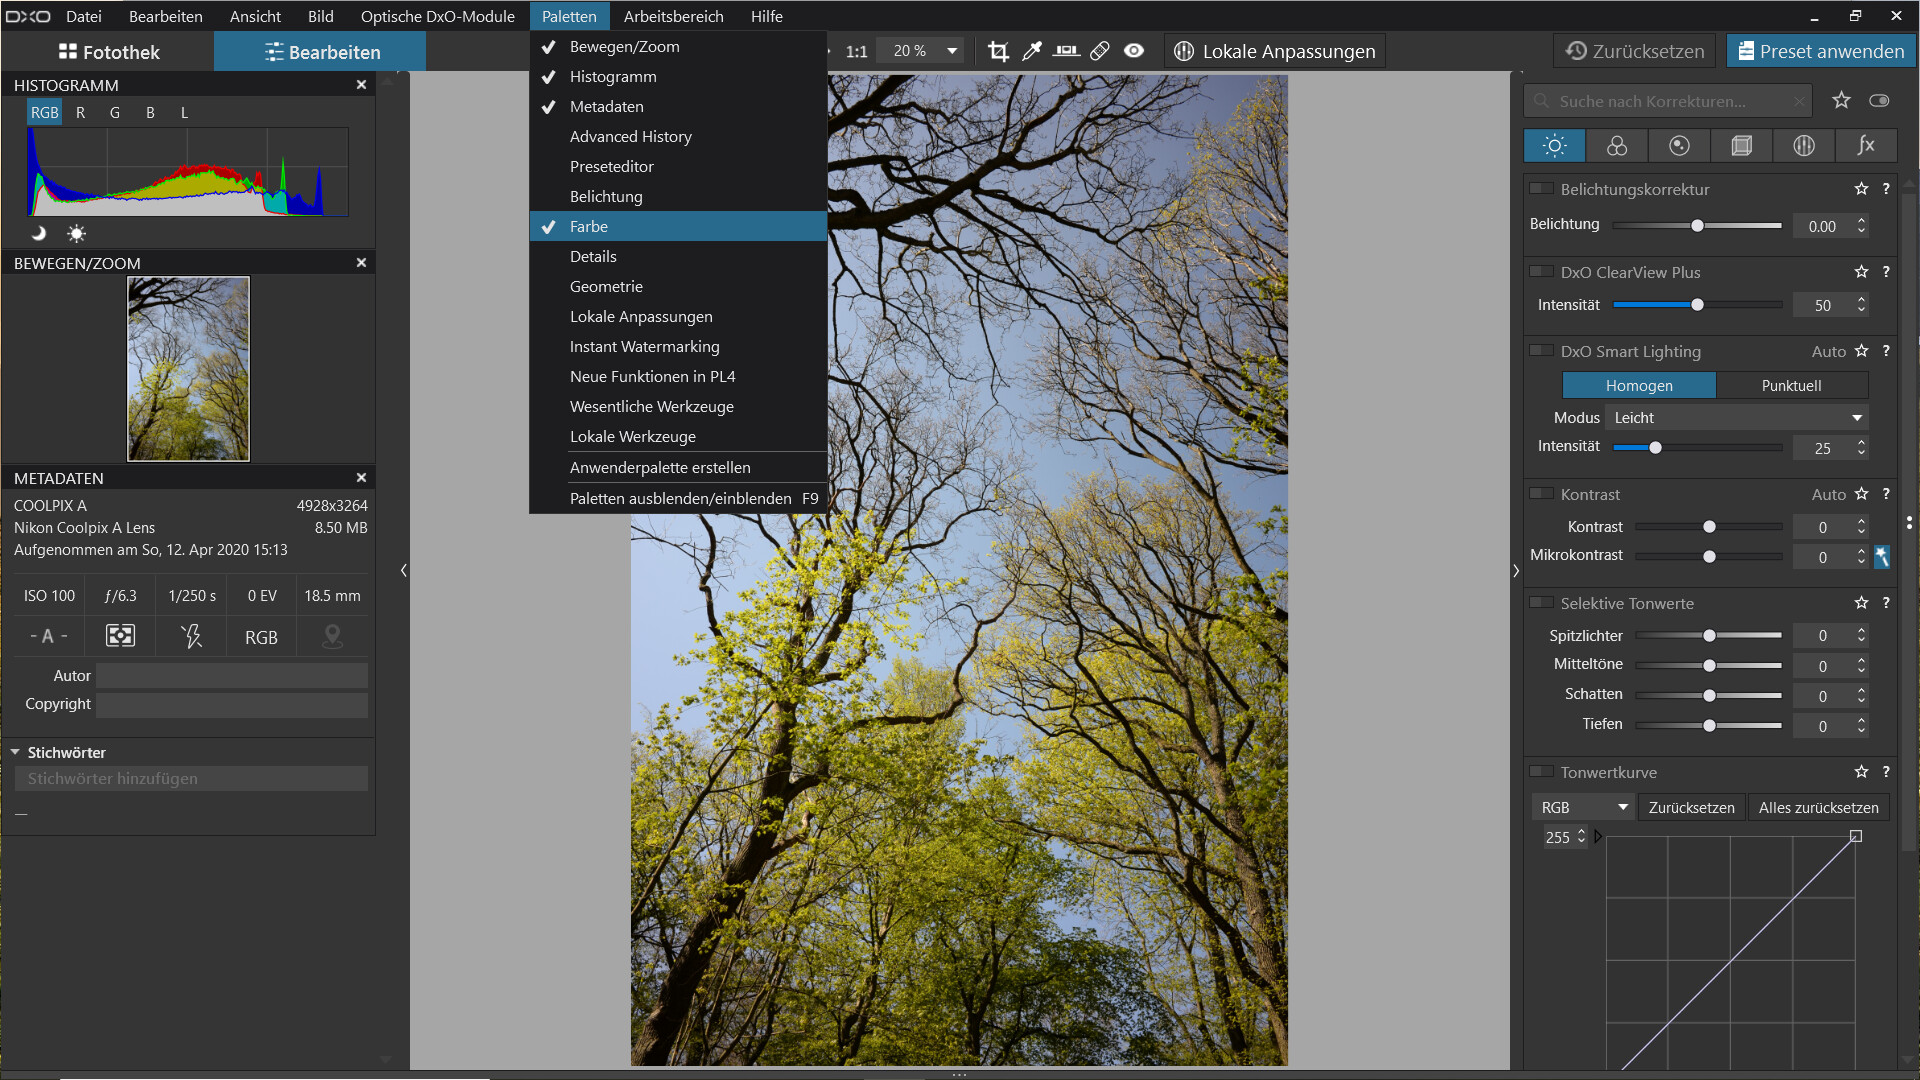
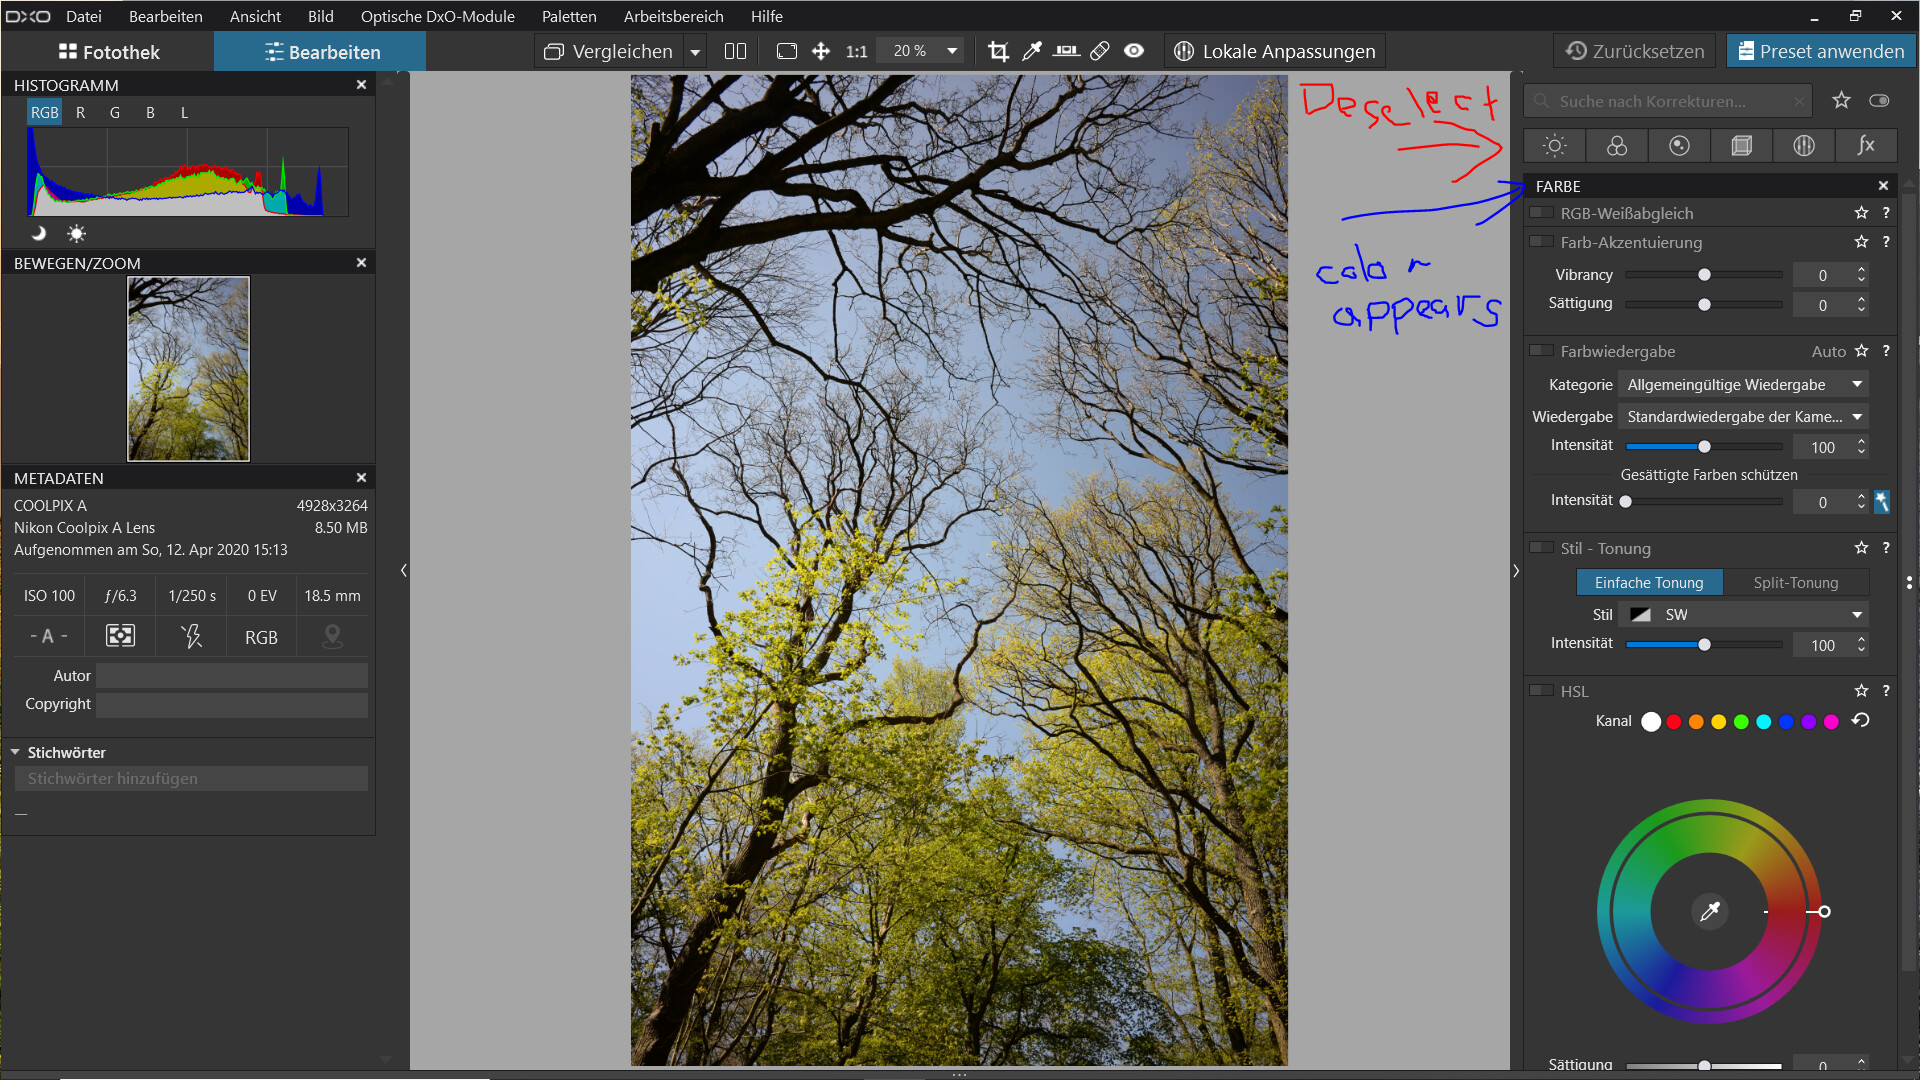
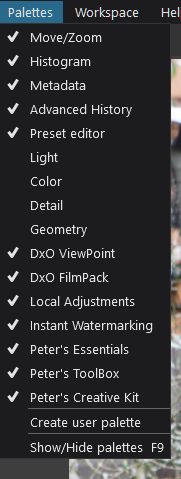
6. OK, this one I do not understand at all, and it even becomes more weird the moment I am writing this. Most of the palettes in the menu do not work properly or I do not understand them. Only 5 palettes of the menu are appearing when there is a hook next to them in the menu: “Move/Zoom”, “Histogram”, “Metadata”, “Advanced History” and “Preseteditor”. When I activate any other entry, e.g. “Colors” or “Geometry”, nothing happens, no new palette appears, it has absolutely no effect. Then I noticed just now, when I go the the menu next to palettes, “Working space”, that I have several options there, DXO standard, advanced, new features in PL4, and custom. I was in custom. There, all the palettes have no effect. When I go to to DXO advanced, suddenly all the tools are in one tab on the right, as it was before in PL3. And now I can activate and deactivate the different palettes in the menu. But this is all in one tab, and when I click on a different tab on the right from, all those settings disappear again. I feel like there is a mix of the GUIs from PL3 and PL4 going on here? I have uninstalled PL3, just for your information. Also there is the option to add another custom palette. This has no effect. Something is completely wrong here. I believe this has worked in the beginning of PL4, but is wrong in PL4.1.1.

7. There is no way to exit the fullscreen mode (F12), except pressing the key F12 or restarting the program. This has been quite frustrating at the first time to find out how to leave that fullscreen mode again, as there is no way to find any information about that F12 shortcut, once you are in fullscreen mode. The natural way to leave this mode would be to hit the ESC key or give some instruction on how to leave this mode when you slide your mouse up to the top of the display.

8. When in local adjustment mode, the keyboard shortcuts change surprisingly. Normally, to reject an image is crlt+9. However, when I am in the local adjustment mode and press the key “x”, the image gets rejected. When I am not in that mode, the key “x” does nothing. At first I was worried I have deleted that image by mistake, as my filter was not displaying rejected images. I am not sure if other shortcuts are also behaving differently when you are in the local adjustment mode, but that is a very unexpected behaviour.

I think those are the most important bugs that I have noticed so far, I hope these can be fixed. Despite these, I must say, it is a joy to work with the program. There are many things that I would like to see improved, but that would be another topic.

4 Likes

I think #2 has to do with the “K” in the white balance field:

#4 is because the magic wand next to the Microcontrast slider is enabled by default. Setting Contrast will then activate all of the contrast sliders, applying automatic and preset values. To overcome this, simply create a new preset with the magic wand deselected.

2 Likes

You are right, when I delete the K in the temperature field, it works.

#4 Thank you, I was not aware of this, I will adjust my preset then. How does this automation work? For example I noticed that there is also the magic wand activated for the vignetting intensity. In which cases does the algorithm decide not to apply a full vignetting correction? Is there some documentation about that feature?

The official documentation about how the Vignetting correction tool behaves is here:

Advanced image effects (dxo.com)

There is also a brief discussion about the vignetting autocorrection here, which adds a little more:

1 Like

Which is, of course, why you can paste only selected corrections…

Capture d’écran 2021-01-16 à 17.12.36

Just uncheck the Repair box…

Thank you, I am aware of this option, but that is rather a workaround. It does not change the fact, that repair is a local adjustment and not a global one.

2 Likes

There are Magic wants activate’s who just apply a “preset” accordingly to DxO’s idea of probably the best value for the rawfile and lens of that type not really reacting on the image it self and there are pixel related, as how the image is.
hte optical lens module is used for the sharpening settings and i think also for the microcontrast preset of that type of image. (it’s iso value reacting doh. )
small test: shoot a tripod frame in 200 and 1600 iso sharpening by microcontrast is lowering.

6#
the quick buttons working completely aside your own custom workspace.
in alphabetic order.
Easiest way to have a custom workspace is create a personal palette, drag your tools in there in the order you like and hide the original palettes after that.
when using the quick buttons you activate those palettes temporaly.
afbeelding
by using favorites as extra hide function you can shrink the palettelist again to hide no often used tools.
see this video


1 Like

Thank you OXiDant, I have understood it now. This is like the most complicated and unintuive way to create a user interface I have ever seen :sweat_smile:. But once you have understood it, it is actually quite powerful.

You really have to understand that to enter that custom user palette, you have to click on an open tab again to deactivate it, and then below that tab, your custom tab appears :astonished:. This is really something you can only discover by accident. Maybe it would be nice, to have another tab called custom or something like that. Otherwise I am sure that many users will never find out about these possibilities of customization.

We each have our own expectations but for me working in PhotoLab for for over three years I’ve always found it very intuitive. The interface is simple and not cluttered with multiple ways to accomplish essentially the same thing such as in ON1 which is very unintuitive.

Mark .

1 Like

Then don’t try and use Photoshop :stuck_out_tongue_winking_eye:

3 Likes

what you can do is make a custome workspace:
open the palletes and tools you like to start with and save after that the workspace:
see this video
i have a all closed version and when i need a closed start then i just click on my workspace.
you can even make different workspaces for global and local adjustment and “creative” adjustment.
one click and your toolpalette is modified for the task.
that’s the real power of this UI.
make your own preferred look.

1 Like

That still count as a bug or, at least, bad UX.
As muchs as I love PL.

Mark, in general I agree with you, I would not be using this software if it was that bad, I actually like the interface how it is now with the tabs quite a lot.

But I still find that the customization is very weird and it has a buggy impression.
For example, go on your Exposure tab, the “sun” symbol should have a blue background now, so you can see that you are in that tab. Then go to the palettes menu and check or uncheck the entries “Exposure” or “Color”. Nothing happens!! How is anybody supposed to understand this behaviour? And then, click on “Details” in the palettes menu. Now the scrollbar on the right tab is moving downwards. What the heck is that? To understand what is actually happening, you need to either go to the workspaces menu and activate your own menu, or you need to click on the “Exposure sun” tab again to deactivate it, and then below that, the palettes appear.
On top of that, there is no consistency, as some palettes are appearing without problems on the left side, for example the histogram. So somehow I would expect, that the other palettes also appear somewhere.

As I said, once you have understood that system, it is very powerful and allows for a lot of customization. But I think there would be better ways to make this customization accessible.

1 Like

#3

is no glitch but default. You might do a serie (HDR, …) and will be happy to copy your repairings (dust spots, …). When no need, deactivate as explained.


#5

E.g. when I reduce the saturation in the HSL color wheel of the white channel and turn all the tone values down to the minimal values (midtones, shadows, depths, etc.), …

… it doesn’t make sense to do so. You simply cut off luminance
(don’t understand why you want to do so).


#7
full screen mode is < F11 >. There is a question mark In the lower right corner.
When activated it explains … < ESC >.


#8
Local Adjustments also come with an ?-online help, which shows you the special hotkeys for when LA is activated. Otherwise from the top menu Help >> Shortcuts you can get a list of available shortcuts.
<Strg + 7>, <Strg + 8> and <Strg + 9> work as expected, while < X > is not listed (no idea, where that comes from).

Well, you have to get used to the user interface.
– I’m also missing things like <Strg + 0> for full size and <Strg + ALT + 0> for 100%

have fun, Wolfgang
( Win / PL 4.1.1.4479 )

Maybe its your terminology which is partly causing some confusion. There is no Exposure tab. Are you referring to Exposure Compensation? And what do you mean by Sun symbol? There is also no Exposure palette. Selecting or deselecting palettes from the Palettes menu adds or deletes palettes from the current workspace and works as expected. What were you expecting the Palette menu to do?
As you delete or add palettes the scroll bar will of course adjust as palettes are added or deleted . Again, what were you expecting to see?

Perhaps you referring to the new filter bar with the six icons? They are presets with each one representing a different palette. They have nothing to do with the palette menu.

Mark

Sorry, that was a mistake with the translation. In the english menu, the tab is called “Light”. It has a sun symbol (a circle with lines around it).

The scrollbar is coming up and down, without those menus appearing or disappearing.

I mean these tabs-

The icons on the top right are part of the new filter bar and have nothing to do with the palette menu. The palette menu only adds or removes palettes from the right and left sides of the screen. The filter bar is separate functionality and each icon only shows features from a specific palette. The filter bar is not affected by the palette menu. Generally most people do not regularly select of unselect palettes from the palette menu but rather set up a workspace. I suppose you could select or deselect them to dynamically reduce clutter but I don’t believe most of us do that. I rarely, if ever, use the palette menu.

Mark

OK, I agree that there can be two opinions on that matter.

Well, it was just an example. There is obviously something going on inside the program that is not supposed to happen, if the only fix for me is to restart the program. Not only that one image appears blurred after that, all other unedited images appear also blurred. No matter what kind of combinations of sliders I adjust, the program should be able to deal with that.

OK, I meant the mode with F12, the fullscreen interface. There is no question mark in that mode.

Please try it out. X is not listed and does nothing as long as you are not in the local mode. But when you go in local mode, it does mark the image as rejected. This is definitely not an expected behaviour.

My only intention is to make the company aware of these issues, so that the program can be improved. I thought that is why this forum is called feedback. Of course they are free to take that feedback or not, as I am free to buy their product or not. But in the end, I hope everybody can profit from that feedback.

Maybe that is where the confusion comes from. I also never used the palettes menu. I just saw that it was there, so I thought, ok, let’s try it out. And this is the only thing that I was describing, that when you have that filter bar active, and you click on any of the palette entries that are supposed to appear on the right side, they do not appear.


They only appear when you select the currently selected tab from the filter bar once more, so that it becomes deselected. After that, you can see these palettes.

But how are you supposed to know that you have to deselect the light tab in order to see those palettes? That is my point. It is not easy to find out. In my opinion, one solution could be to have an extra icon in that filter bar, that would be called, “palettes”, or “custom bar” or whatever. Because since when do you deselect a menu in order to activate another menu? If OXiDant had not described to me in this thread how these palettes work, I would never have found out about it.

All the palettes on the right side disappear when you select one of the filter icons and reappear when you deselect a filter. Any changes made in the palettes menu are available once you deselect a filter. Filters by definition are subsets of data. Deselecting a filter to see the effects of a palette menu change on the visible palettes seems pretty intuitive to me.

You can read more in the downloadable PDF manual.

Mark