Just curves, with clipping.
And without clipping
There’s no raw data available in a jpg.
George
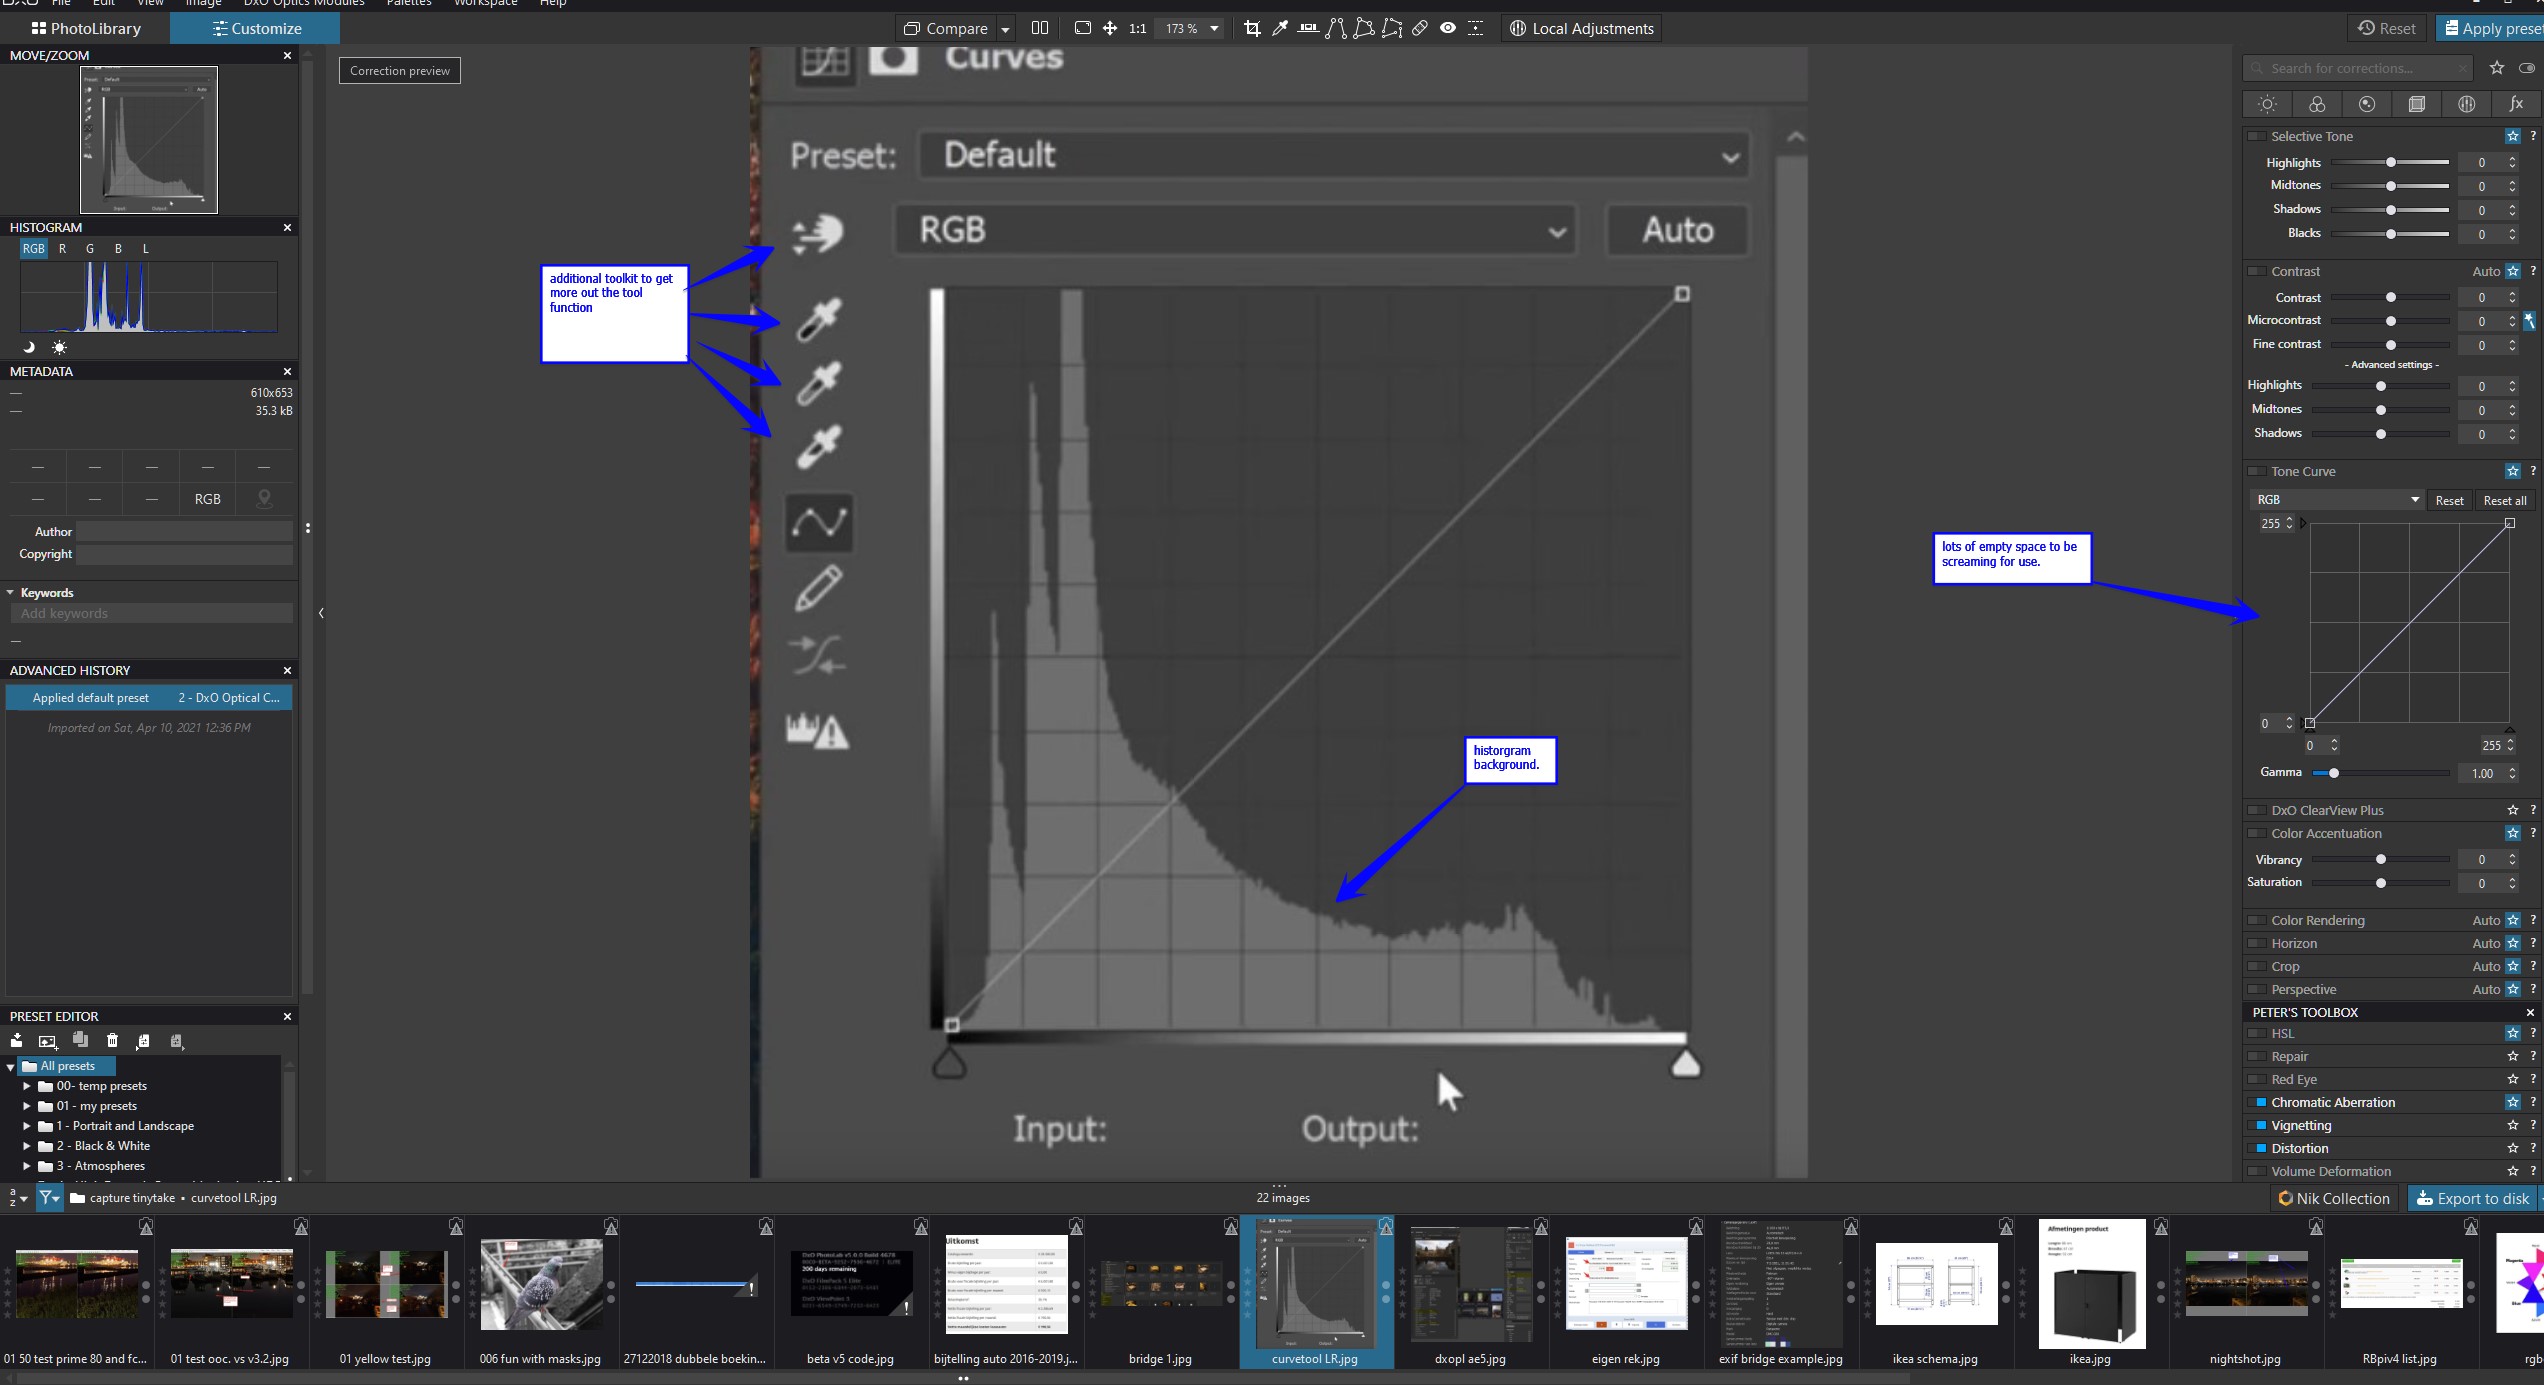
I am trying to grasp why we want an other new tool like levels instead of shining a light on that curve tool shown in the video to get the attention of the DxO staf.
1 the present tonecurve tool of dxo is at least not finished.(edit as in you could get more out of it.)
2 the video showes a tool which looks much more usefull in detailed work.
I say shows because i didn’t work with it and can’t tell if it’s better or not but i looks much more controllable.
3 levels is something what you can implement in the Histogramtool.
A quick fix tool.
Make it latent and to be visual on command over the histogram.
Whitepoint and blackpoint, eyedroppers for on image selectable whitepoint and blackpoint.(edit, would be working great with the clipping warnings that are already in the histogramtool. Turn on clipping warnings, eyedrop on whitepoint and re-set blackpoint after that for details exposure correction done.)
When you need more detailed work open curvetone tool and work further on that tool.
My “problem” with adding seperate tools is more screenspace occupied and more mouse movements due working in more different tools.
Ik am fond of tools who has more then one functionwindow and a customisable userinterface so everyone can create there one workspace.
So my idea is fit levels in the present histogramtool so it’s more then a viewingwindow in the screenspace and expend the curvetool in adding the histogram as backscreen and add some extra tools as shown above.
This don’t cramp up my screen more by more toolwindows and i have instand acces to quick exposure and tone changes.
Edit, one thing must be thought of a tool must not be overcrowded with options so you lose oversight and can’t find the one you are looking for without clicking through serveral tabs.
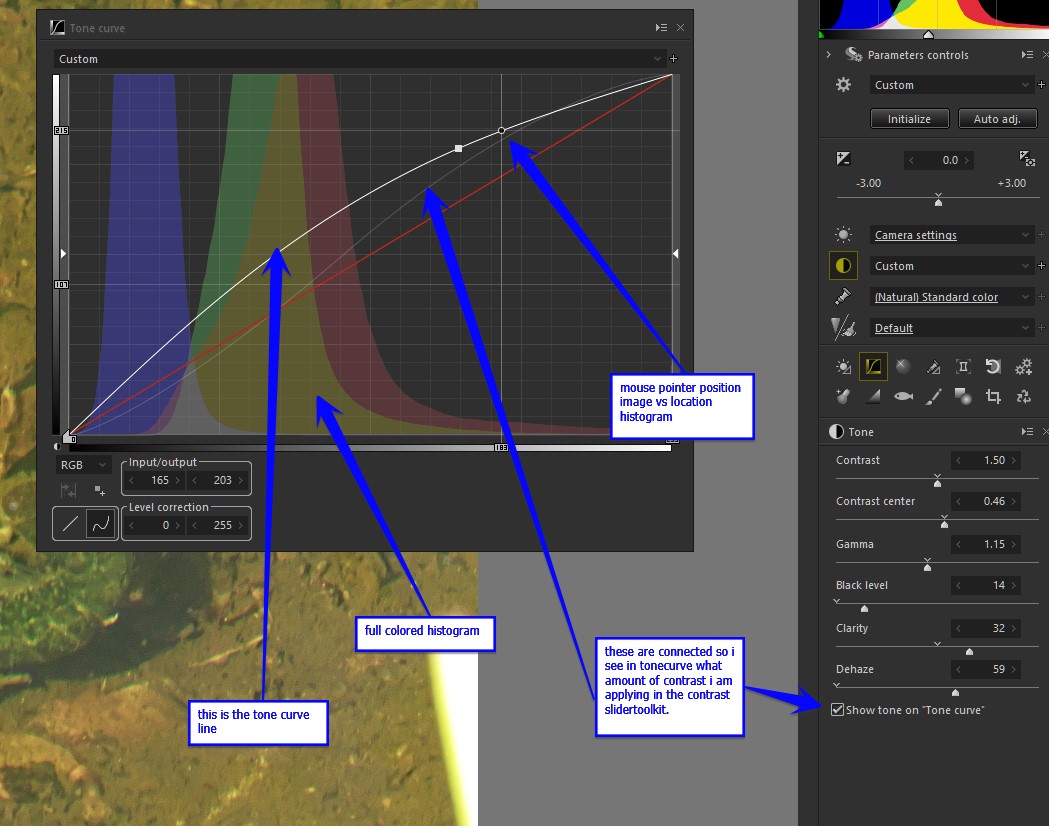
Edit 2: (some picture’s to clearify my idea: (@John-M i hope you still are liking it.)
(@pjglad : i only respond to you because of the video not because i want to convince you.)
Yes !  … And I don’t see any need for a “new” Levels Adjustment ( especially if there were to be enhancements to the Tone Curve tool along the lines you propose) - - because it would just create more unnecessary overlap between tools.
John M
Hi @MikeR,
thank you for providing us with some examples.
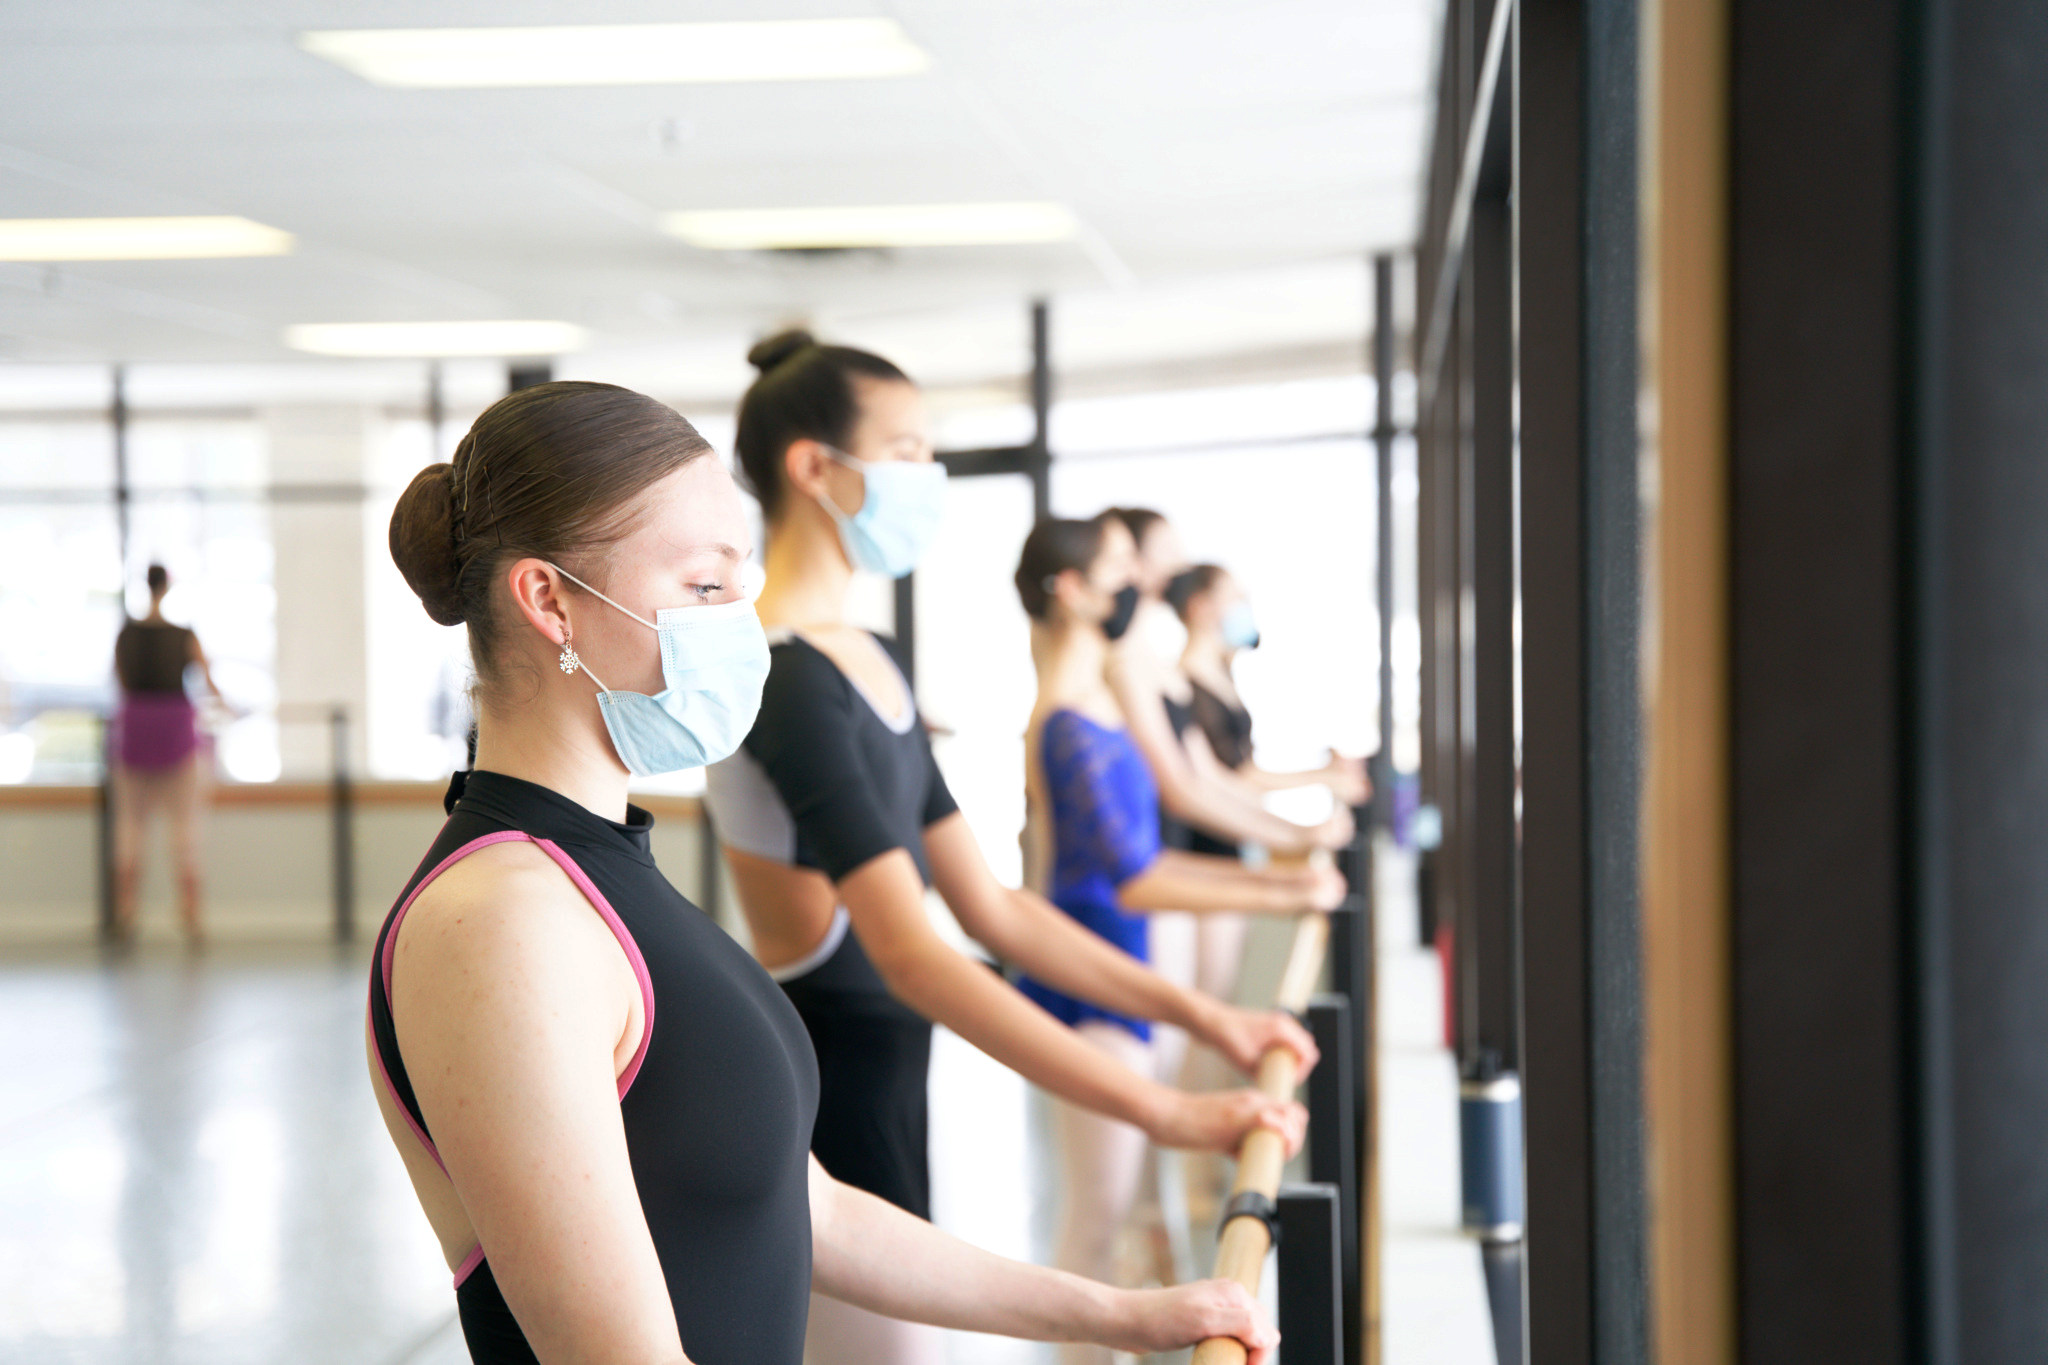
Inspired by you and @George, I took your ‘original’ 2021-02-27 11.47.01-00 A9M2.jpg and tried a lot of
stuff in PL, like reducing Exposure, playing with Contrast and/or reducing Highlights.
But apart from setting the Exposure to -0,05 to ‘break’ the clipping, everything else gave a funky result, not at all satisfying (also played around with my old PS / LR).
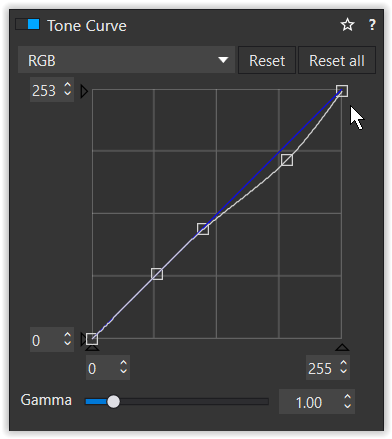
Setting PL’s Tone curve tool to -253 ‘broke’ the clipping as well – the gradiant tool in PS did it at -254
and LR at 99,6/99,2%.
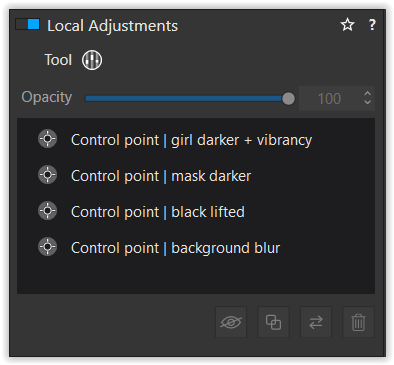
Then, to keep the pleasing impression from bright light and wide open lens, I simply corrected the Tone curve – complemented with a few Control points. 
2021-02-27 11.47.01-00 A9M2.jpg.dop (21,5 KB) → original + virtual copy
have fun, Wolfgang
The highlights aren’t present in the JPG. Only in the RAW
sure – I would like to try the raw-file in PL4 (can’t open it otherwise)
Can you please provide the raw image file? A jpeg does offer much less latitude than a raw. TIA
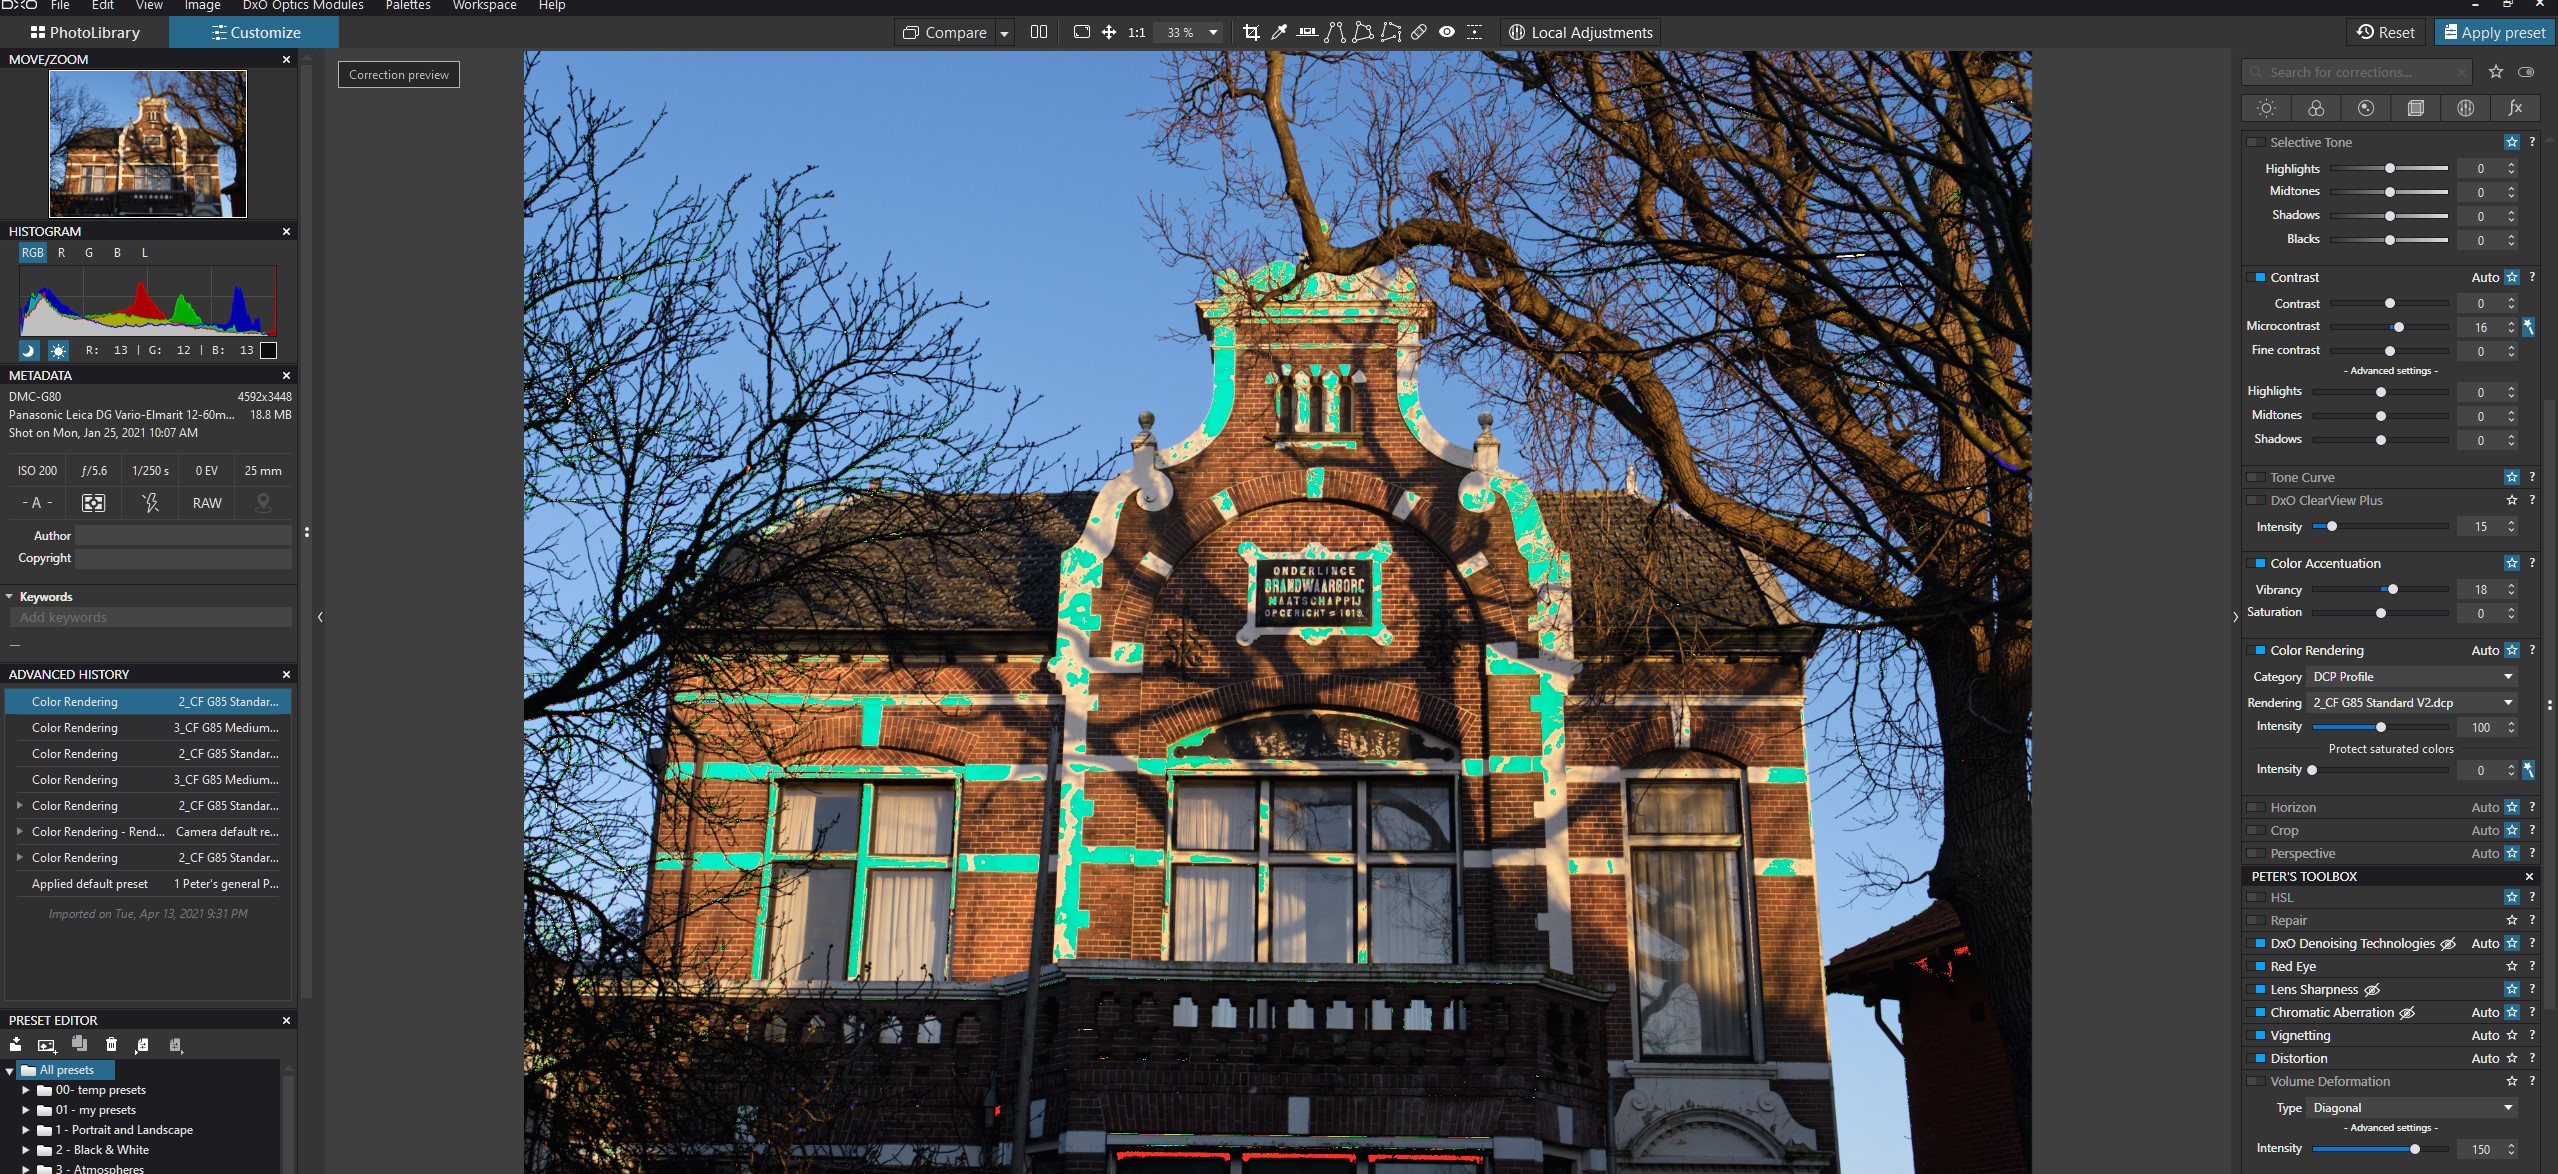
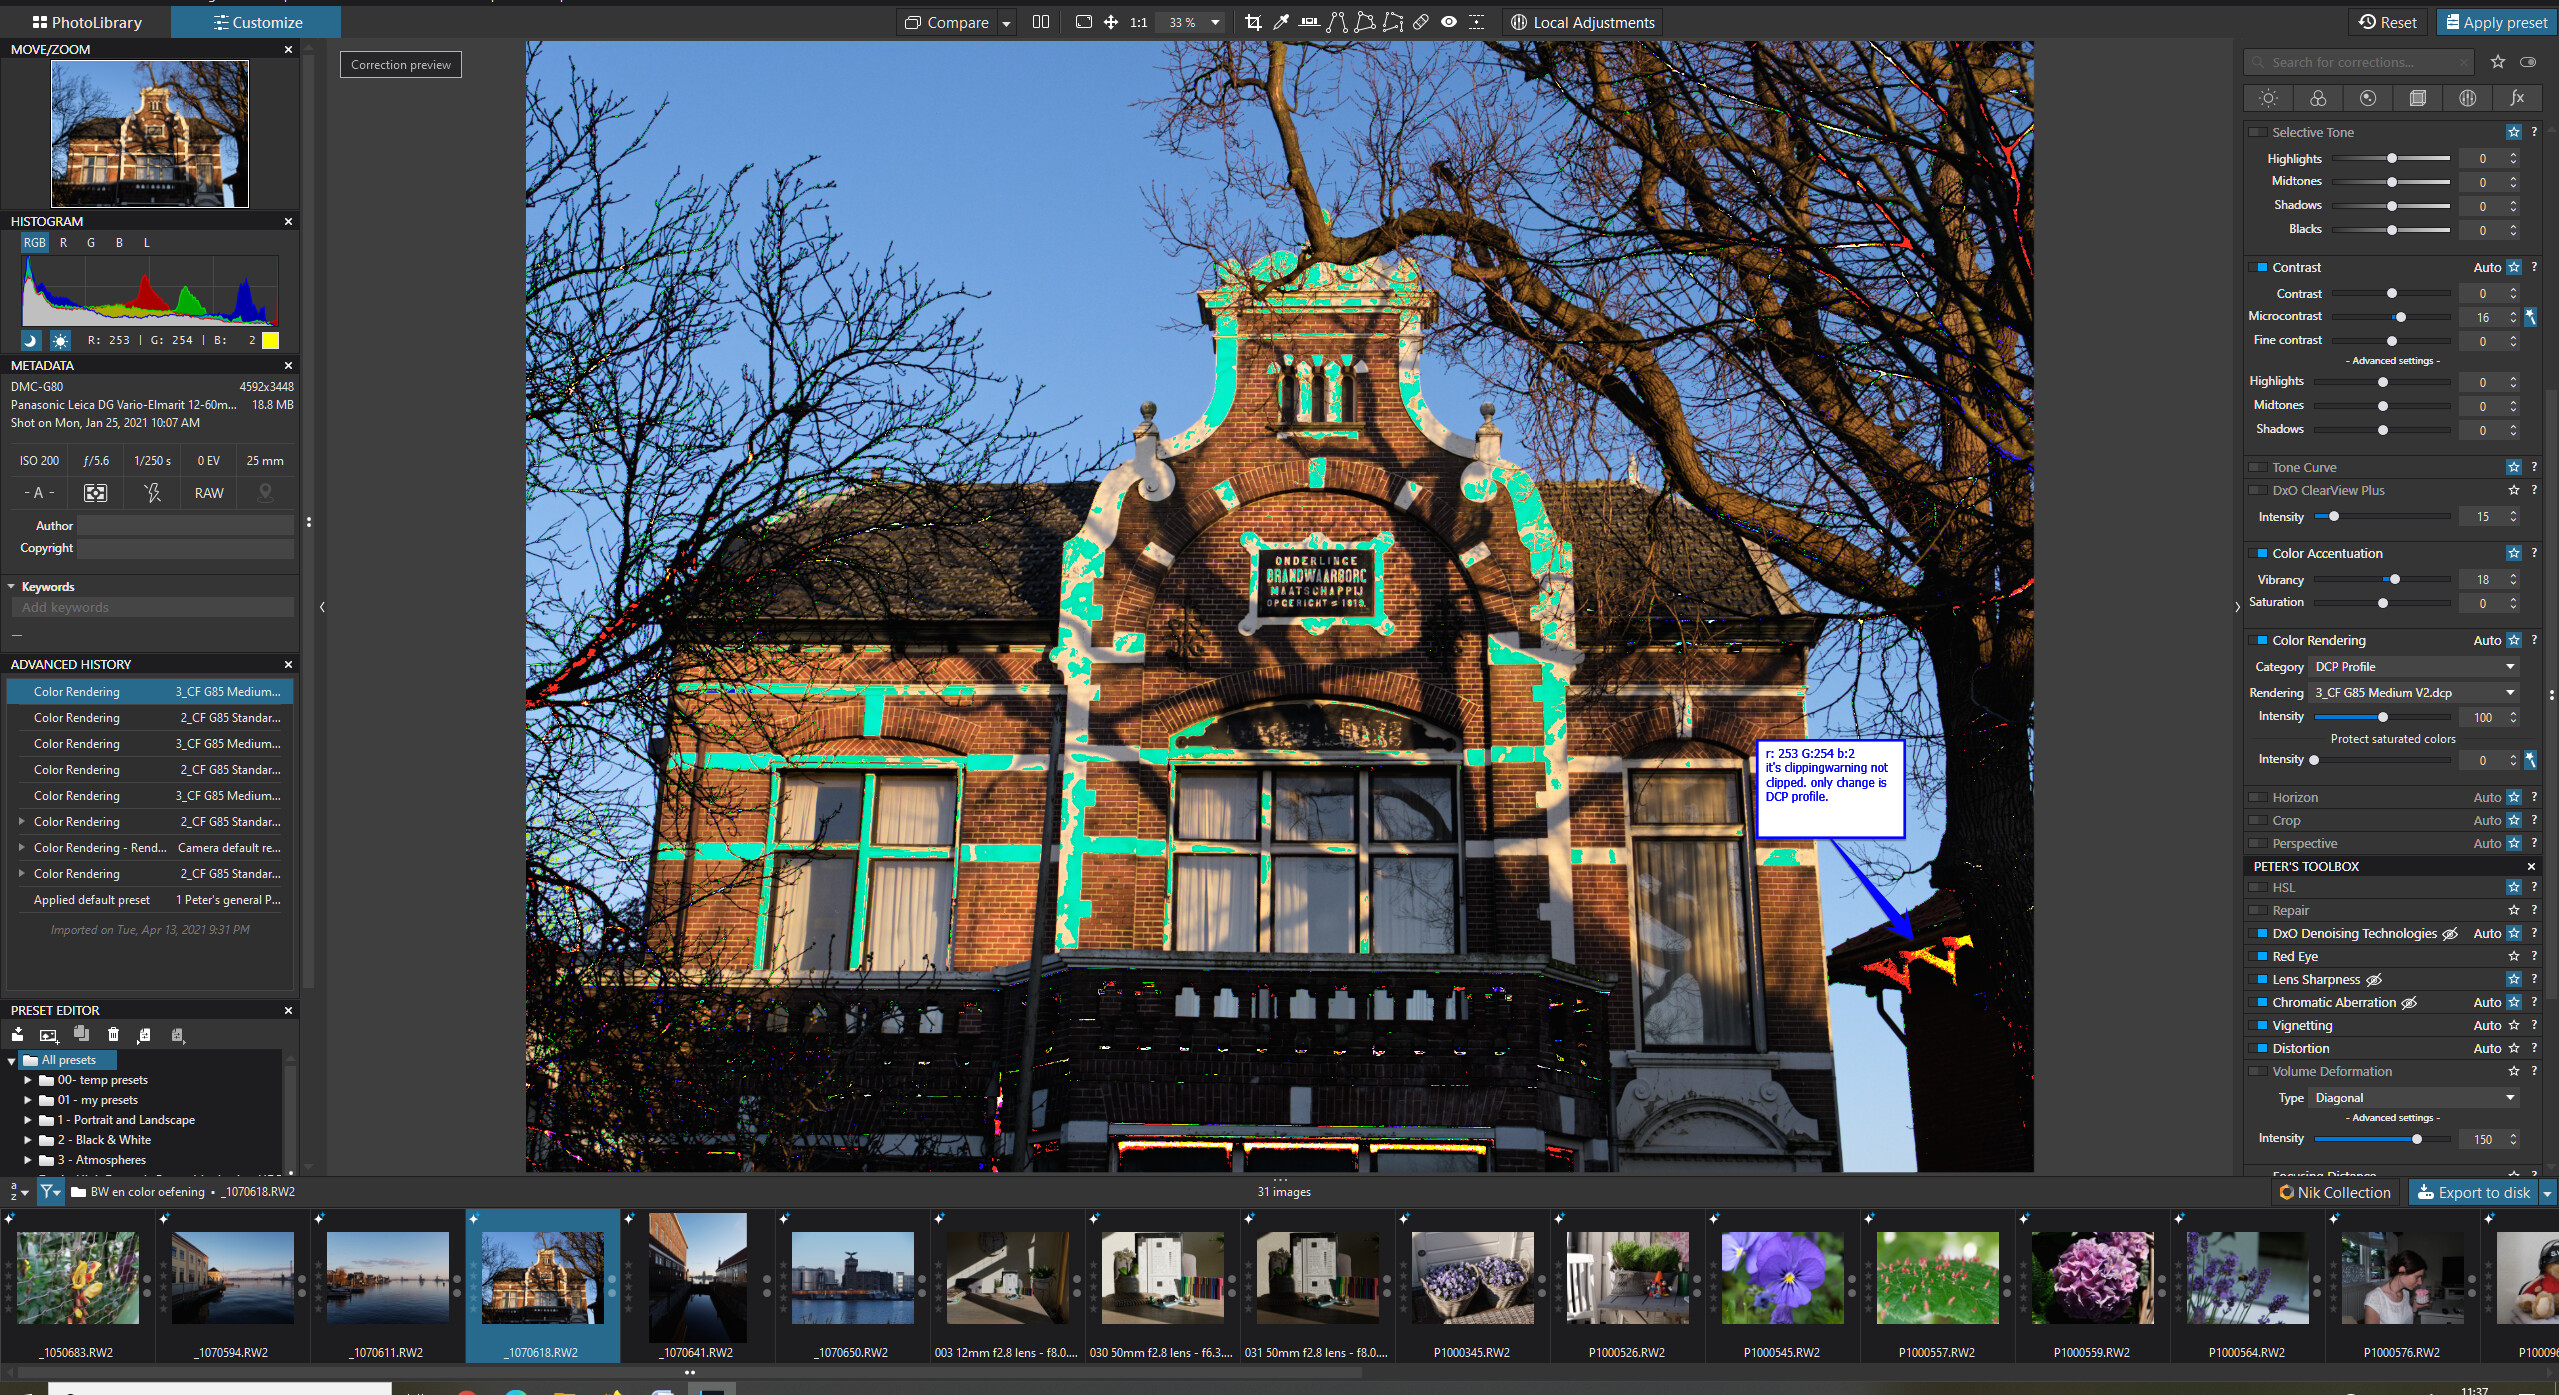
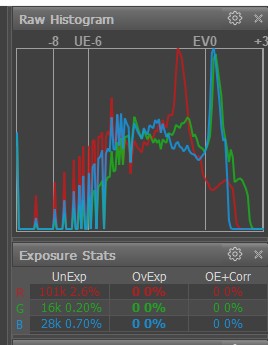
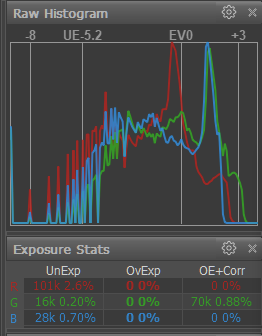
Update: @MikeR has sent me a copy with private mail and RawDigger reveals some clipping in the green channels mostly and some in the red and blue channels. Nevertheless, I find it to be a nice and moody image. Thanks for sharing.
After having edited the RAW file of this dancer photo(set to me privately by @MikeR so I can’t post any results) I agree that the highlights can’t be recovered using the tone curve alone. Having said that, it is my opinion(and I’m not a DXO engineer, so take this with a grain of salt) that the tone curve in PL4 is not designed to be used a a solo tool for highlight recovery. It is designed to be used in concert with the other tools(exposure compensation, smart lighting, selective tones and advanced contrast, etc.) in order to help with highlight recovery, but not to do it all alone. For example, on this photo I can easily recover the highlights in the ceiling using smart lighting spot-weighted on the ceiling at about level 46, then drop the highlights down slightly in the RGB tone curve to make a very pleasing rendition of this photo.
If the addition of a levels tool would simplify this process for some users(I’ve never used a levels tool and don’t personally find the former process to be difficult at all) then I will vote for it, though probably never use it.
Experimenting with the raw-file, I came across that PL’s Smart Lighting ‘saved’ the very highlights, as long they were NOT clipped in ALL channels – a viable solution (and only tested with SL’s standard setting +25).
To visualize, I activated the Highlight clipping warning and compared the coloured indicators’ size and position, while switching Smart Lighting on / off (status registered with screenshots).
When additionally reducing the Tone curve’s maximum to +253, there were no more blown out highlights visible. – Well, that worked with this pic as the difference between +255 and +253 is hardly noticeable by eye, plus the raw file gives a really pleasant rendition – no comparison to the ‘overexposed’ JPEG.
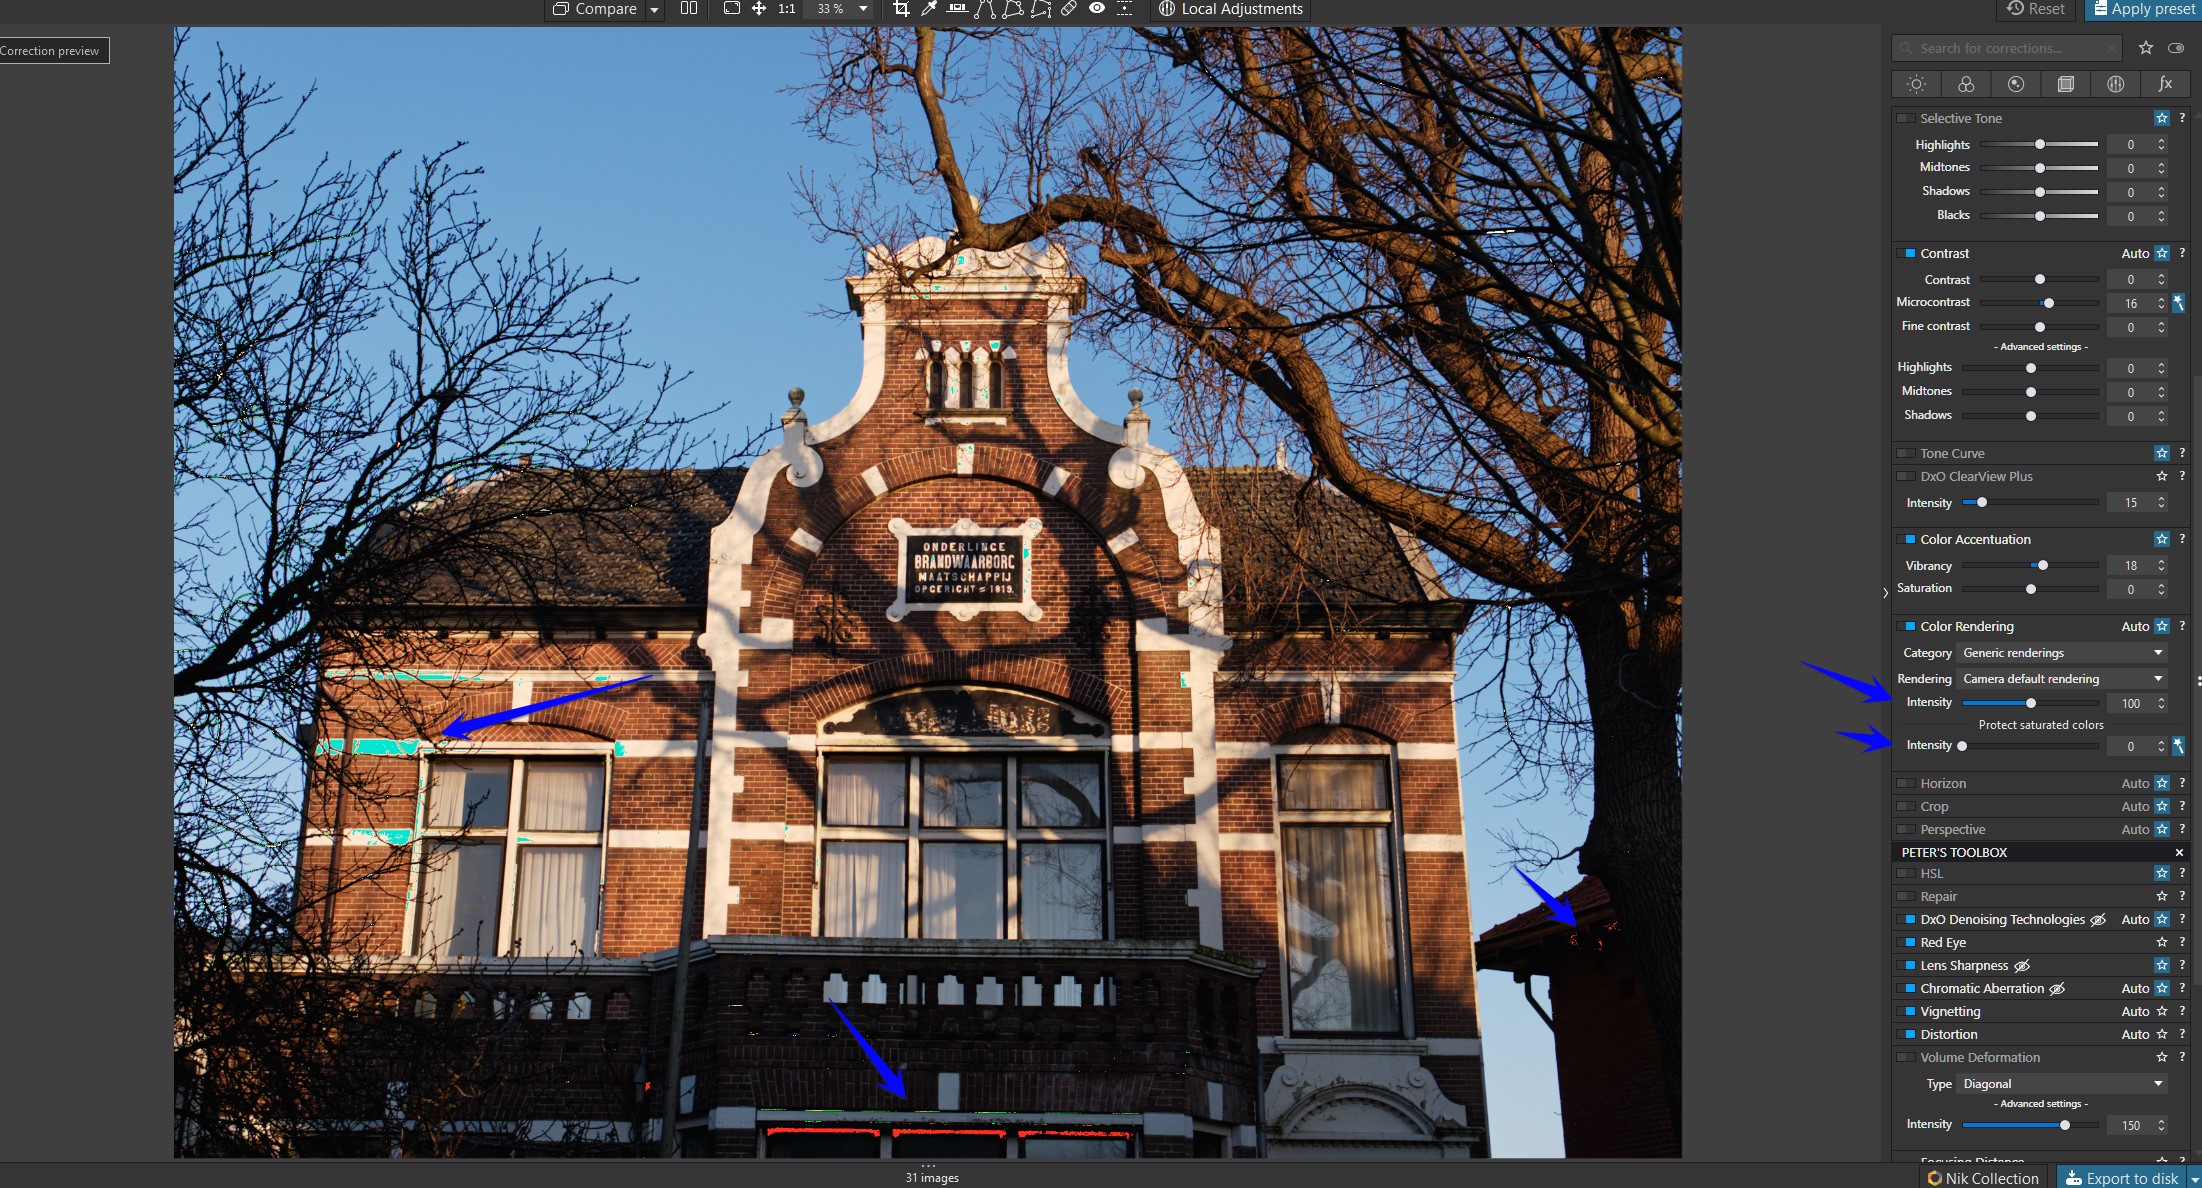
Aside, I noticed that the applied camera-lens-profile caused to much vignetting correction. If not an
inconsistency with the combination of the very lens and profile, the camera might have applied a correction without PL registering it – maybe a question for DxO.
have fun, Wolfgang
[also checked with own files and Smart Lighting in the first place]
I don’t think Smart Lighting is working on the raw data but on the rgb raster values.
Try the same experiment with exposure compensation. That’s one that’s working on the raw data. Use a picture with no clipping and no preset correction. When ok you can go nearly to the max, but the image is unusable.
As far as I know only exposure compensation, gamma correction and color temperature are using the raw data, though the first two are also available in a jpg. And (Deep) Prime is working on the raw data.
George
and others, i digged up from my stored answers of dxo staff in this forum:(can be handy to reread.)
Citaat : But anyway, as your question seems mostly to focus on the handling of lights, here is a partial short answer: Vigneting is corrected first (optical correction CA, Denoising Prime, WB before demosiacing)(as it depends on calibrated data ), then exposure, smart lighting, selective tones, contrast, clearview, microcontrast and then custom tone curve.
an other piece of info i stored is:
Citaat Light changes are mostly (ClearView excluded) done in linear RAW sensor color space (before color rendering) to be at the closest of how picture would have looked if you would just have increased or decreased light in the scene
Linear raw is demosiaced, RGB pixeldata, so effectively inside AdobeRGB colorspace.
What’s before and effectively in camera colorspace(wider then adobeRGB) is:
Citaat You nailed it, applying white balance before demosaicing makes sense as a good demosaicing should have in mind to avoid wrong color creation, hence it’s good to define what is grey before ; noise is structured by demosaicing, so it’s more efficient to remove noise before demosaicing and that’s what PRIME does ; removing chromatic aberration before demosaicing also makes perfectly sense because trying to interpolate a color channel based on information from others color channels that are shifted because of chromatic aberration is a mess ; etc.
(btw someone else "nailed it"not me)
Conclusion every light adjustment is bound to AdobeRGB.
And i assume because it’s non destructive when you pull something down in the AdobeRGB you can pull in some more data from the “leftovers” inside the camera"s colorspace which is bigger. (the non demosiaced rawdata.) because unles you made a Tiff or lineairDNG or Jpeg the used material isn’t clipped in sRGB or A-RGB.
It’s a foggy material to understand.
But best way to deal with is screen sRGB <=> workspace DXO (A-RGB)<=> Rawfile’s space.
Every adjustment made in screen colorspace is dripping through to rawlevel.
The blackpoint and whitpoint and thus color hue saturation and luminance is bount to your workspace settings. So smartlighting is lifting blacks and lowering white’s to fit more data in the 0-255 range while exposure correction is shifting rawdata inside and outside the range of 0-255. pushing down near blacks drop off the table in favor of the raw-whitedata, pushing up the near whites bleech out => drop off the table in favor of the lifting of details in nearblack’s of the rawdata.
it’s like having a 1meter ruler measuring details on a 1,5meter surface. if you squeese in details outside the 1m inside the rules reach all details change in form and size. (That’s what smartlighting and selective tone and contrast advanged sliders (and clearview) does. stretch and squeese.)
curvetone and levels are also bound to that.
an other player is the camera rendering profiles:
@OXiDant
It’s hard to understand those stored answers without knowing what the question/discussion was. And I think the used color space is irrelevant. The camera catches the light and is converting it to digital values. That’s done in the native/input color space of the sensor. That data is converted to an output color space of your choice.
George
No it isn’t, box1 before demosiacing=> camera/sensor colordata. No WB point set. Box2 after demosiacing=> defined colorspace with WB and tonality
Not every data of box 1 can be placed in box 2 unless you pull and push.
The toolkit of dxopl is placed in box 1 or box2. Understanding in which box it is placed helps to understand how to use it.
Not in a matter of what do i want to achieve. If you export to 16bit tiff or worse 8bit tiff it’s no longer nondestructive and you clip of lots of data. No problem if you achieved endresult is wel inside this data. Otherwise wrong choice. So in that matter it is rellevant.
Levels lies in box 2. WB lies in box1. Tonality tone curve lies in box2, colorsaturation hue and lumination levels has there origin in box1( calculated rgbdata lies in box2). That’s something you need to know and remember in order to get the most out every tool.
Color space and bit depth are two completely different items.
But I still don’t know the context in which your stored answers are given.
George
True, bit depth is amount of steps and variations you can use to digitalize a hue.
One bit black or white. Two is 11 white,10 light grey. 01 dark grey 00 black.
The color space is stil white to black and analoge almost endless in variations.
Still the srgb colorspace is digital in your screen so they are related.
It’s in this thread,
Smart Lighting solved most of the overexposure (= 1 or 2 channels) and Tone Curve maximum set to +253 pulled the ‘irrepararable’ (= all channels) clipping down – most importantly (!) with a pleasing result.
Now, I played again with the given raw-file and could NOT ‘cut’ the leftover all-channel-clipping by reducing the exposure (like I did with the published JPEG), but could pull it down with the Contrast’s Highlight slider – for whatever reason.
Wolfgang
Follow this thread and your get some extra information.
About clipped channels.
If you have FRV or Rawdigger you can check if a rawfile has clipped data channelwise.
The recoverable whites and blacks and saturated colors are out the chosen colorspace but stil inside the rawdata’s colorspace. If not you can’t recover only replace.
By using the clone or repair tool you can use donor places to fill the wasted spots/area’s. Basicly add detail back in to the place.
Sunspots, reflectionsflashes that kind of things.
With feathering and opacity you can smooth the edges.
Just making it a little bit grey.
The color space is what your output device,monitor, can produce and is determined by the wave length ranges. Your image doesn’t have colors. It just says how much of the ability the output device has must be used.
Your link is about the sequence of the edits. My post was about on what data the edits are done: the raw data or the rgb data.
George
It is a rabit hole, but ok i jump. Correct sensors data is exposuredata stored in a tiff like file, the rawfile. The lightwaveselectivefilter before the sensor blocks and let through light on the wells in a certain patern, all combined is just luminance. Empty no charge is black, full of charge is white. By “tagging” the wells R,G or B accordingly to the filter patrone you can replicate the color of the light hitting the wells.
Sec spoken a rawfile doesn’t have “colors” and no White Balance. ( that’s calculated from the greytints. Black and white are no color as in in need of a WB.
So everything near white or near black isn’t usable for WB calculation. The midsection gray is used for this.
The thread was about secuence of editing his answer’s(at least that’s what i took out it.) are about what’s done where. Before or after conversion to RGB data.(demosiacing)
As i wrote above, demosiaced data is rgbdata. So you(technical) edit alway’s on rgbdata even when you open a rawfile.
You need a WB, a black point and a whitepoint in order to edit colors and luminance.
The raw to rgb converter is the “blackbox” of DxO, there unique algorithm. The place you work in with tone contrast and brightness/luminance is alway’s based on RGB channels.
Even when you alter deepprime, Chromatic abberation, WB it 's like some turn knobs on a black box. We don’t know what’s done under the hood. You just poke around in the greysoup of exposurevalue’s and dxo’s algorithm does it’s job converting your commands in rgbdata.
Yes, operating with Tone Curve to cut the leftover ‘all-channel-clipping’ resulted in a little bit of grey (but very acceptable – see #48), while the Contrast’s Highlight slider had an visually negative effect on the otherwise beautiful rendering of the skin tone.
Wonder, what can be done with a level adjustments tool, what @MikeR is longing for.
Wolfgang