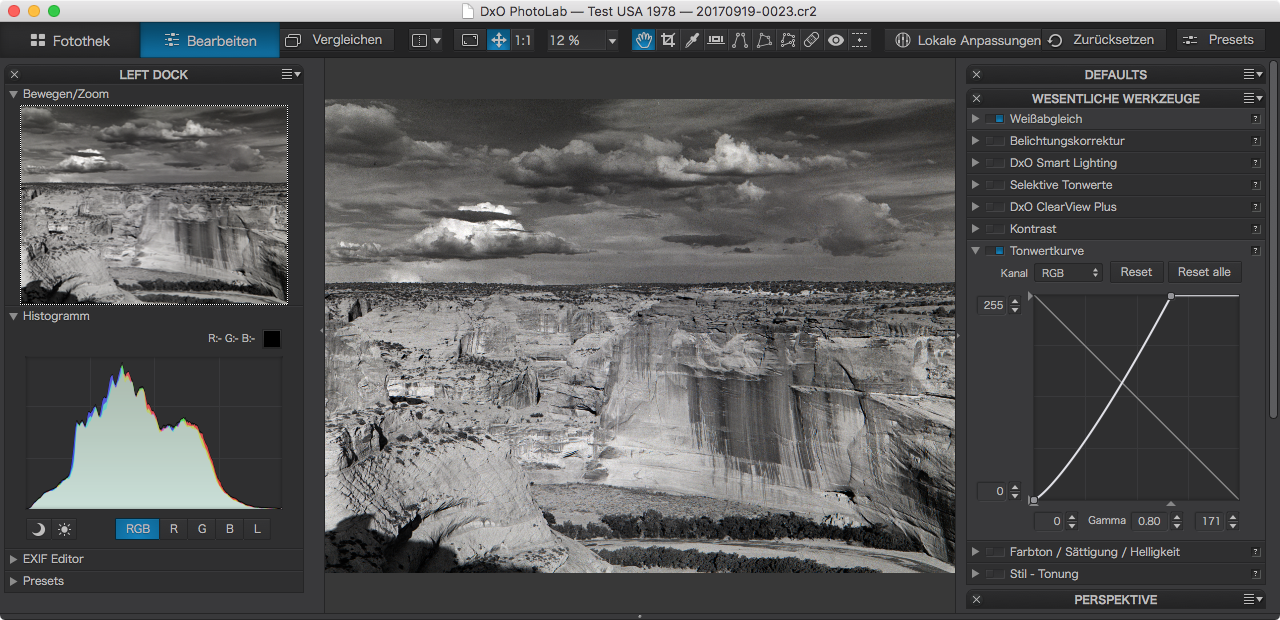
Photo Lab does not have a specific Levels adjustment, or at least does not have one I could find when I looked. The closest thing I could find was the Tone Curve…
Does adjusting the black and white ends of the Tone Curve do the same thing as adjusting the black and white levels? And does adjusting the middle of the Curve do the same thing as adjusting the Levels midpoint? Or are those adjustments different?
Yes, adjusting the ends and middle of the tone curve are essentially the same as adjusting the ends and middle point of levels. Of course, the tone curve gives you much more adjustment capability than levels.
If you’re not comfortable with the tone curve it would be worthwhile going through a few tutorials to learn the ins and outs, and you may never use levels again (I never use levels in any other software if there’s the ability to use a tone curve instead).
Unfortunately, the implementation of the tone curve in PL is missing a couple of very useful features that would make it easier to use – a histogram overlay and a targetted adjustment tool. Hopefully DxO will add these in an update.
The Tone curve is a very interesting and versatile tool.
In November last year, I suggested to have a histogram overlay in the tone curve (which would make it a lot easier to working for those who use this tool). In fact, it should be “underlay” rather than “overlay”.
What is a “targetted adjustment tool” ?
N.B. This is not only for Macs but also for Windows
What, specifically? The only additional adjustment capability that I can see is the ability to adjust the individual R, G and B channels and I think that capability also exists in tools like CaptureOne. What other functionality is there in Tone Curves?
Oh, I am comfortable enough using it, and it seemed to me that it allowed me to make the same histogram changes that levels did, but I thought that perhaps there was some difference. I am relieved to find that there is not.
What is wrong with using the existing histogram? Why do you need an overlay or and underlay?
I just added the Tone Curve adjustment under the histogram and use them together.
I imagine you moved the tone curve to the left hand side as I did. That’s perfect way to make the Tone Curve much more useful. PhotoLab should come out of the box with that configuration. Straight up Levels would be a nice add as well. Perhaps Levels could be part of the histogram itself.
I do not see why I can not just put the cursor on the middle of the histogram itself and drag the whole thing left or right, or why I can not place the cursor on the ends of the histogram and drag only that part. That is what seems logical to me.
One thing level curves are incredibly useful for is identifying even the smallest dust goobers on your sensor. To do this for a blue sky background, for example, activate the tone Curve adjustment and place a handle about 1/3 of the way up the diagonal line and pull it upwards to appoint slightly above the mid horizontal gridline. Next, place another handle two thirds of the way up the diagonal line, and pull downwards to be low the one quarter horizontal grid line. The result will be an orange sky with despots standing out as bright white objects against this background. Using the healing tool, you can very easily zap all of these, and paste them to all images in your workflow.
Backgrounds of other colors require different manipulations of the curve, but all are basically two handled operations, and simply playing with it while viewing the preview will reveal a combination that highlight your dust spots. Once you have zapped all of your despots, simply turn off the tone curves adjustment and your image will return to normal.
Hope that this helps.
P.S. I have come to DxO from Apple’s Aperture, so I agree let the tone curve superimposed over a histogram would be helpful because you can see the effect that your adjustment is having on the appearance of the image as a function of color channels all in one place. It’s not really a big deal, but I had gotten quite used to it.
The tone curve can sometimes provide the levels kind of adjustment. however you cannot recover highlights with the tone curve. There is no way to adjust the curve ABOVE 255. Your RAW file will have 1.5-2.5 stops of information above 255 (more or less depending on other adjustments) but there is no way to access this. If you pull the maximum level down it just clips. This is really useless.
If you are trying to INCREASE contrast with the levels tool, the tone curve can do that. If you are trying to DECREASE contrast and recover highlights you can’t do it. You have to do it with a combination of tools.
Finally a levels tool that processed before the tone curve would be a great way to make the contrast/brightness capability of the levels tool independent of the tone curve.
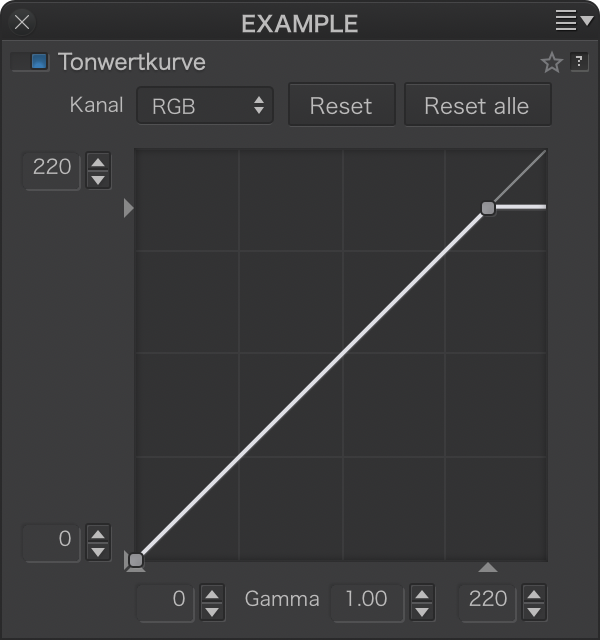
Beware: The tone curve’s horizontal axis is labeled 0 to 255, but these values just stand in place of whatever range a camera offers in its raw image file.
My EOS 5D Mark III delivers values between 0 and somewhere near 14’000, but black level is at 2048, so 0-255 corresponded to (the most significant bits of) the range between 2048 and 14’000… Black- and white levels can vary too, and the camera writes the respective values into the file’s metadata fields so that an application can interpret input data sensibly.
There is nothing above what is called “255”. 255 stands for whatever your camera delivers as “white” (x-axis) and what DPL will present as “white” (y-axis). I’m not saying that 0-255 is BS, it is simply a range of numbers. Adobe Lightroom calls it 0-100.
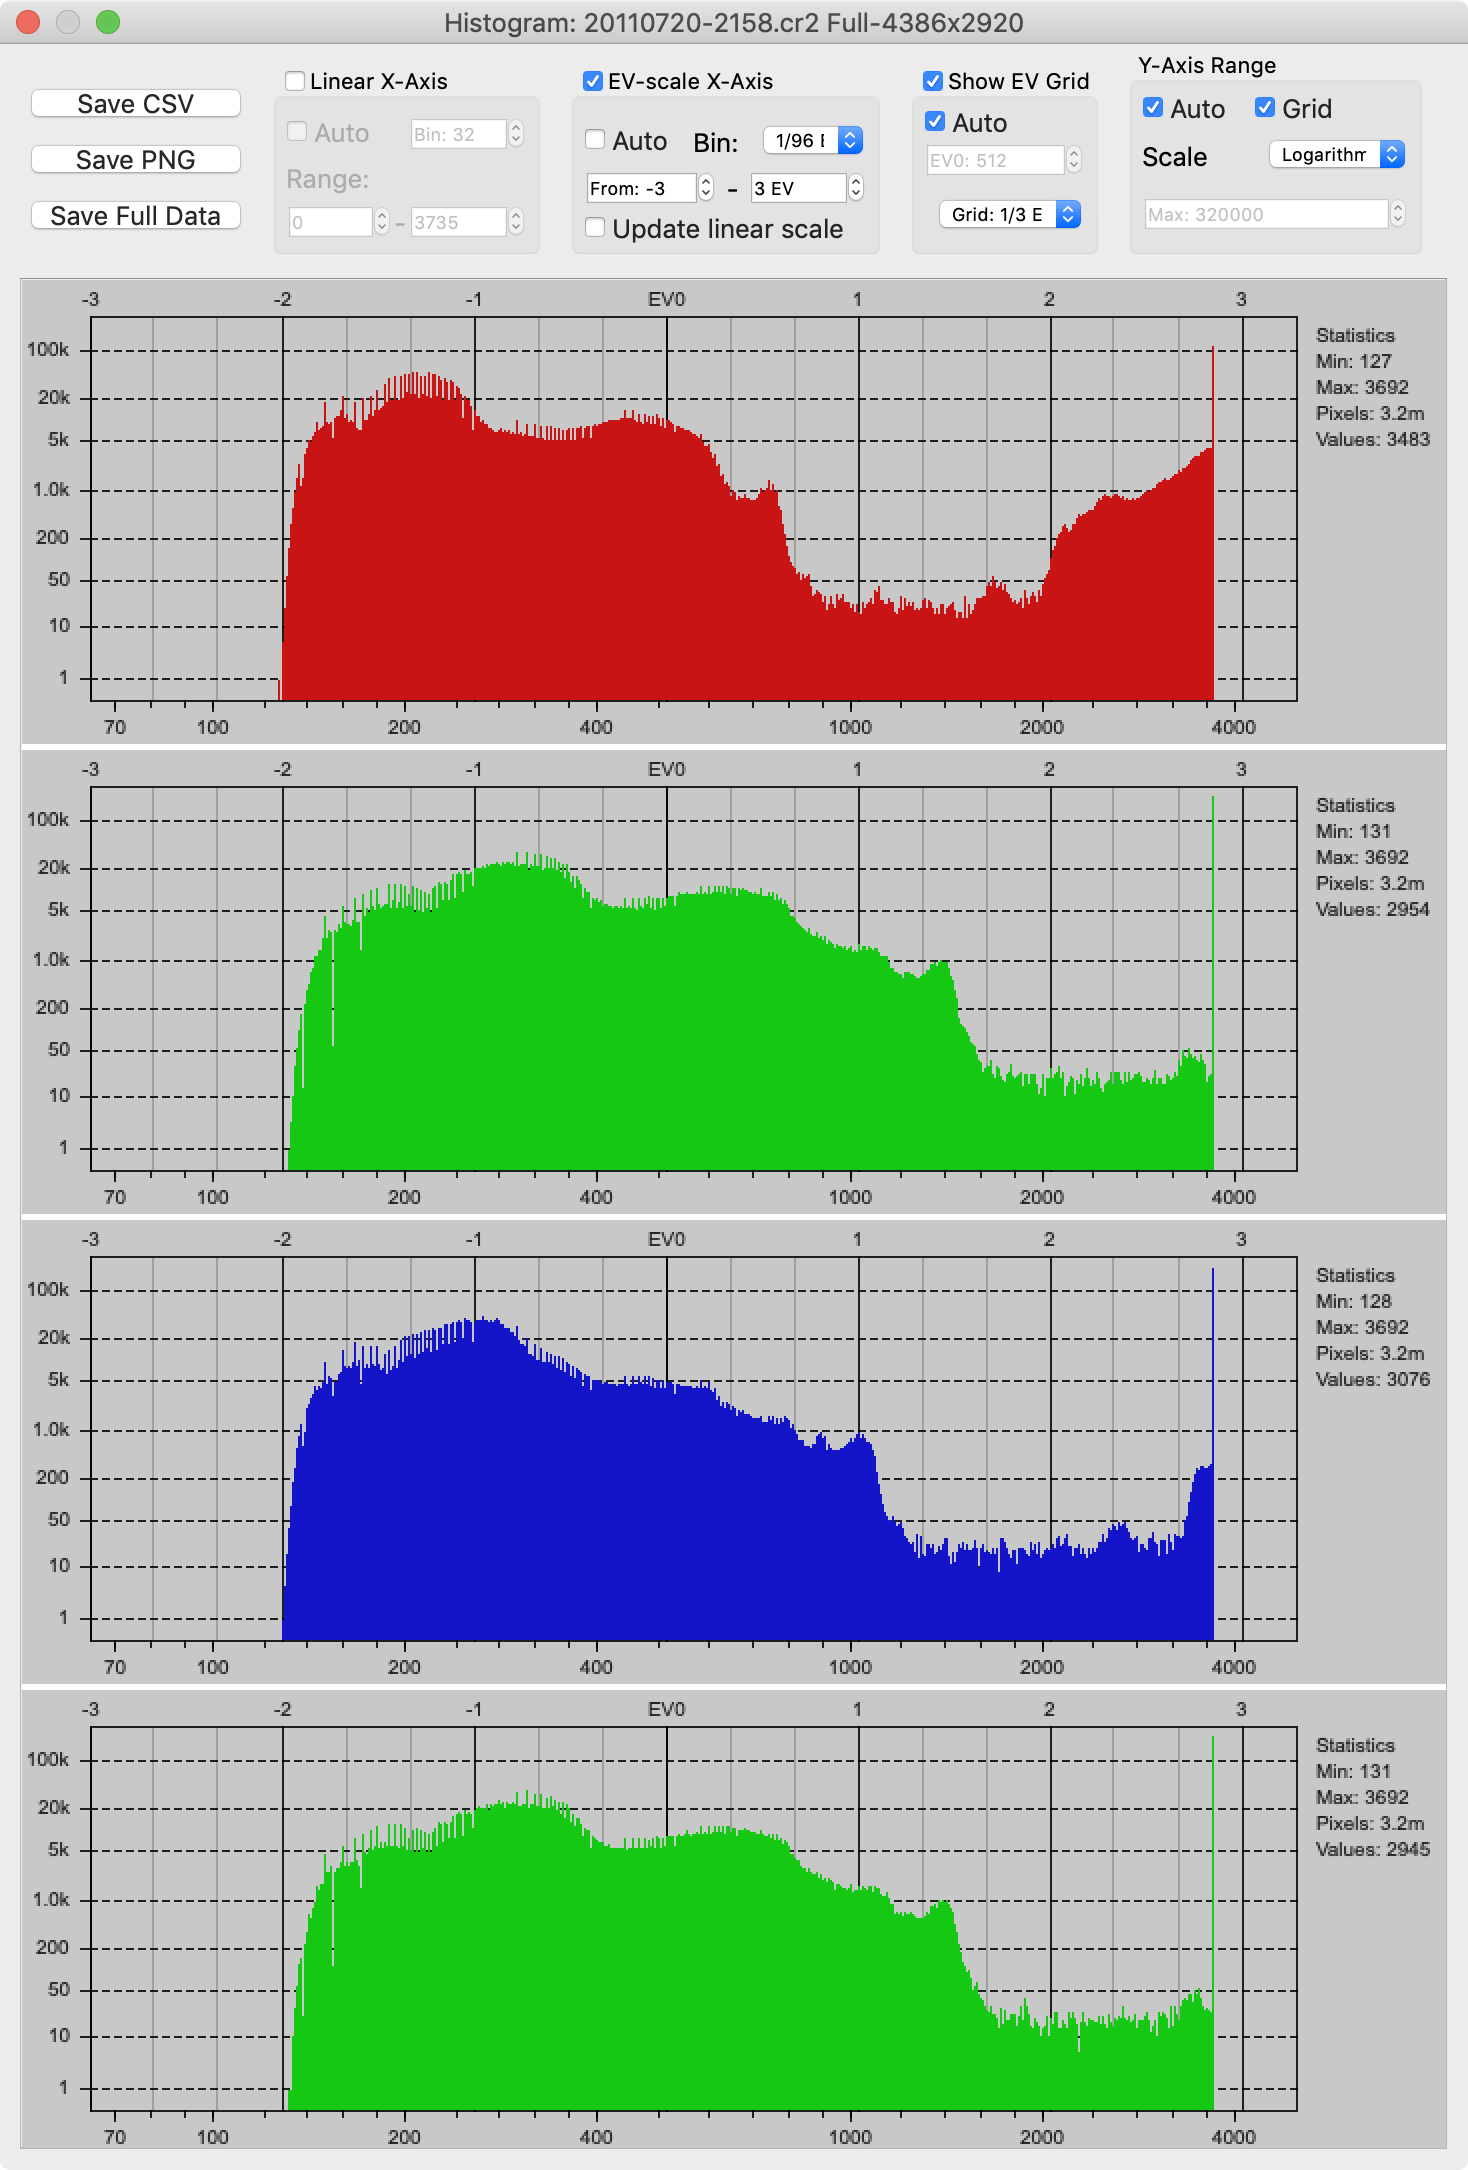
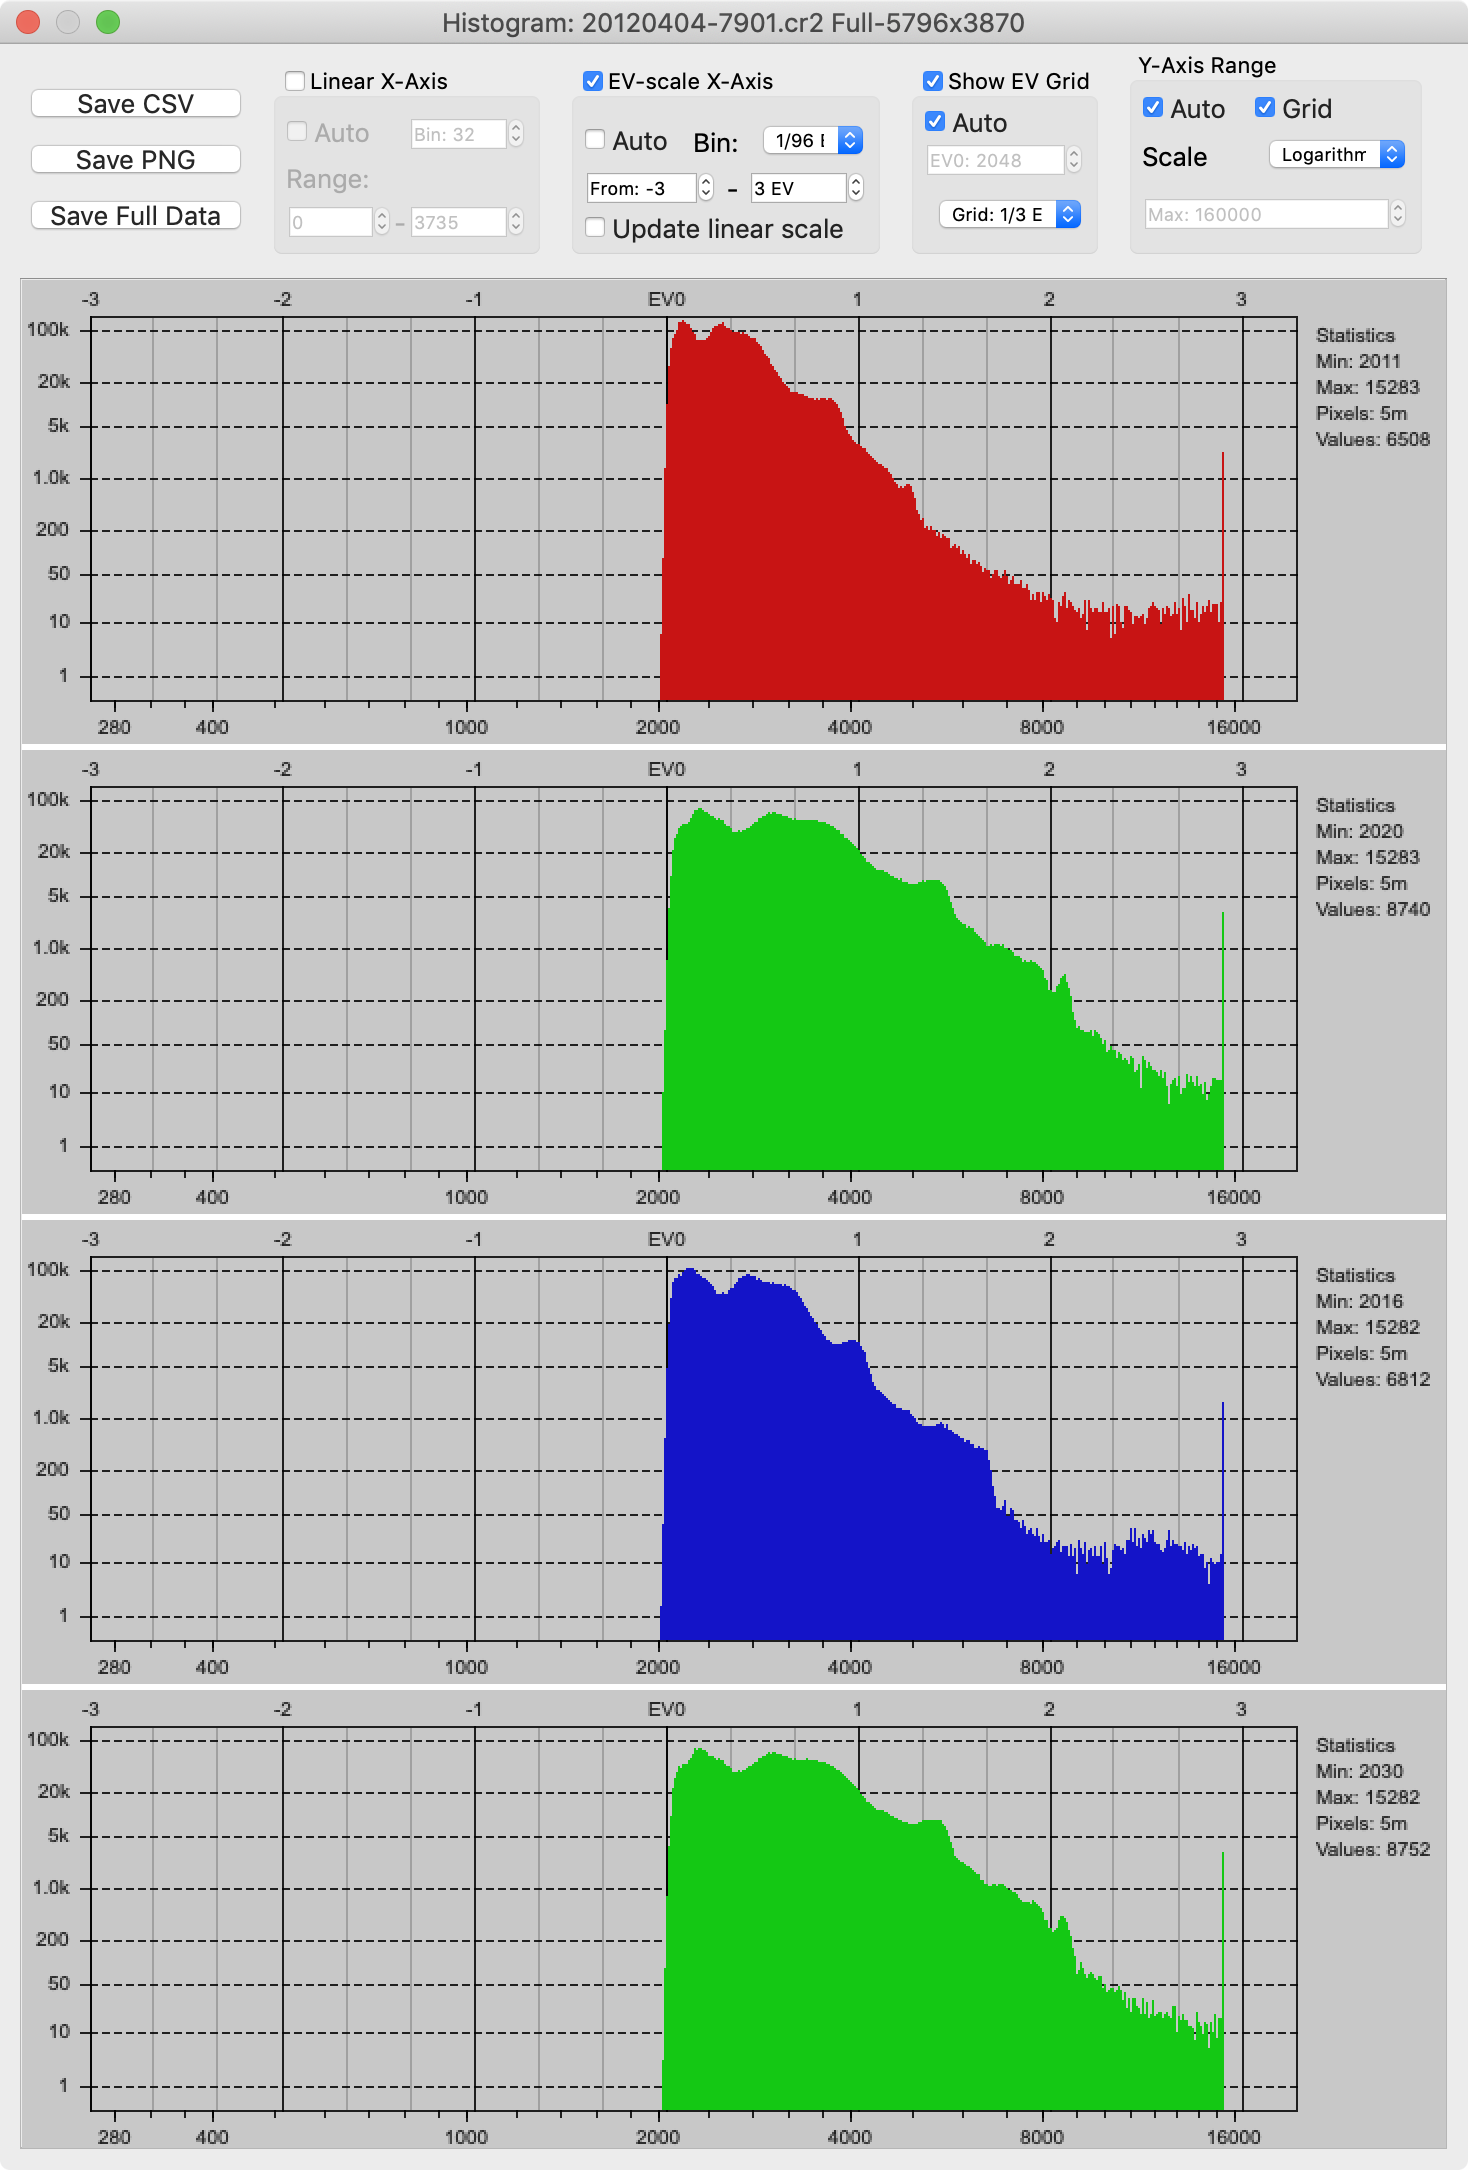
Here’s a couple of raw image histogram of shots with clipped highlights. Clipped highlights display as y=255 in DPL, whereas the value in the camera file is way above “255”. Check out the values for black and white in each of the histograms, both are translated to 0-255 in DPL.
You can imagine there is highlight detail in the raw file that wouldn’t be present in a JPG file of the same capture. However when you load that RAW file with no adjustments at all, you can lower the exposure by 1 or 2 stops and recover the highlights.
You can do it with exposure/contrast you can recover those highlights with selective tone.
Try to recover those highlights as you would with levels by using the tone curve. You can’t. The tone curve doesn’t pull levels down from the raw file above the JPG clipping point.
If you take an image that’s overexposed by 2 stops you can recover some blown out highlights with selective tone. Try to recover those highlights with tone curve.
I want to be able to recover those highlights with a levels tool. Not with selective tone.
@MikeR, with ALL channels in your raw file at maximum (R 255, G 255, B 255), there is NO more information except pure white – NO chance to recover anything.
When bringing down the clipping point you get a certain degree of grey, but no texture.
You’re missing the point. When you bring a raw file into DXO DXO renders it similar in brightness to the JPG file. Values on the histogram and on the tone curve from 0-255 represent the current rendering. The raw file actually goes to 1000 or 1500. Or some number well above 255.
When I bring the 255 level down to 240 I want the information from 256 to 1000 or 1500 to start coming down. JUST LIKE IT DOES WHEN I MOVE THE HIGHLIGHT SLIDER.
Are you familiar with Fast Raw Viewer or it’s siblings?
If you know the tested DxO mark DR you can see if there is clipping present.
Most have around plus 2 stops headroom against ooc jpegs.
If you have filmpack elite then move contrast highlight and selective tone hightlight the same level.
Much less grey blotches.
Exactly. Simply moving the highlight slider to the left shows there is detail above 255 in the RAW file. I simply want to be able to recover that with a “levels” like tool.
You’re missing the point. When you bring a raw file into DXO DXO renders it similar in brightness to the JPG file. Values on the histogram and on the tone curve from 0-255 represent the current rendering. The raw file actually goes to 1000 or 1500. Or some number well above 255.
When I bring the 255 level down to 240 I want the information from 256 to 1000 or 1500 to start coming down. JUST LIKE IT DOES WHEN I MOVE THE HIGHLIGHT SLIDER.
The camera captures an analogue value and digitizes that to a digital value. When using a 8 bit conversion than 255 is the max. There’s just nothing more then 255. But when using a 12 or 14 bit conversion then the numbers can be more but 100% is still 100%. For 8 bit 100% is 255, for 12 bit 100% is 4096 and for 14 bit 100% is 16384.