Google on “the Mexican suite case”.
On to start with https://www.rencontres-arles.com/en/expositions/view/648/the-mexican-suitcase
George
Google on “the Mexican suite case”.
On to start with https://www.rencontres-arles.com/en/expositions/view/648/the-mexican-suitcase
George
As PhotoLab (still?) doesn’t appear to have AWB available as an option, you might find it worthwhile to let the camera fill in the AWB data in the NEF, giving you another easy option when setting WB in post.
If you mostly shoot outdoors (yeah, me, too), you can create a profile set to “daylight”, then set that to your default profile in preferences.
Letting the camera calculate AWB for you does not affect the RAW data, other than the embedded JPG in the NEF, but if you’re using PL and might sometimes want AWB, you need that data.
I know what you mean, and I agree, but it would be better not to word it the way you do. That’s like saying if I don’t know how the carburetor, the brakes, and the transmission work on my car, it’s impossible to drive.
Using my Nikon I don’t need to know much of anything to take photos. The camera wants to do everything for me.
I certainly agree that the better I understand the things you are all talking about, I can sometimes use that knowledge to make better photos. I readily admit that I do NOT know many of these things, and apparently quite a bit of what I thought I knew was WRONG.
Yesterday I tried the 3D focusing on my Nikon for the first time, and in my opinion the results were lousy. Maybe it’s because a bird is too small to trigger the 3D system. With a 70mm max zoom, 1/500th second, ISO 400, I expected to get images as clear as I usually do, but not a single image of the birds worked. It’s not the camera - my shot of boats waiting at a drawbridge was as sharp as I expected. The 3D just couldn’t lock in on something as small as a pelican maybe 20 feet away. In a couple of hours, I’ll try my 50mm lens with a built-in motor, so it’s much faster to respond. I need a longer lens so I don’t need to crop so much - my 80-200 would be find, but it is too slow, and I can’t afford the better one with a built-in motor. I’m not thoroughly unhappy with my results from yesterday, but I expected more detail. I got tired and bored editing them - whatever the reason, I didn’t capture the images as sharp as what I expected.
What I wrote was in the traject of color management. You don’t have to know how the carburetor etc. works, but you have to know you need gasoline, input, to drive, output.
I don’t do bird shooting. But don’t forget that 3D focusing is partly based on predictable movements. The best results with a linear movement.
I
I just saw your link. It are great moments. The sharpness good be better but everything is in it. I don’t know why. I’m just a hobby photogapher.
George
hmm, this is 180 degrees backwards from @Joanna 's aproach.
create a wb set on 5600k and make this part of your import preset. so you can still use AWB of the camera. some how i find your aproach "more foolsave in a way of the backup is still there.
camera’s awb setting. "
Good thinking.
i use sins a short time FRV’s AWB module to get a wb number as suggestion.
gregor,
Your statement contradicts what @wolf said regarding Photolab’s importation of RAW files:
Regards, Joseph
I will attempt to tell the pelicans to move in a linear movement. Actually, they mostly did, but the camera never “locked in” on them. To me, the “moments” are good, but the sharpness is horrible. I did better with my Leica, focusing manually. It’s an old lens, and not very fast to react. If I go back in half an hour or so, I’ll try my 50mm with built-in focusing motor.
…been there, and back. Hardly any pelicans. Oh well…
To snap birds in flight is not an easy task and you might want to search the topic to get hints on how to improve your tech. Lots of hints out there…
Thank you! Thats, well, just ducky!  Reading it now.
Yes, we (peli)can!
gregor,
IMHO the statement from @wolf was clear enough. I do not understand how PhotoLab does the conversion, but the color space setting in the EXIF data of the RAW file is definitely ignored at this stage.
I am eager to read @wolf’s clarification.
Regards, Joseph
I read all the links - some things I’m doing right, others I need to start doing better, and some just plain aren’t possible - disguising myself as a pelican and going out into the water with my camera sounds like a potential disaster in the making.
Yesterday’s images, and four images from today are posted here:
I did play with some of the PL4 tools, but to me, all these images are just “snapshots”. Only the one image at the end of sunset yesterday might be worth spending time on. I hope to get a similar scene tonight, around 8pm, with a crescent shaped moon about to drop down behind the skyline.
If that comes out as intended, I’ll post it here.
Color space setting in the exif is ignored in the conversion process. That jpg is a result of the exporting process of that converted raw image.
The working color space is AdobeRGB but what you see is in the color space of your monitor.
See the color space setting in the exif as the printer setting in an image: they both belong to a dialog. Changing them doesn’t change the file but has influence on the exporting process: jpg colors on your screen and print size.
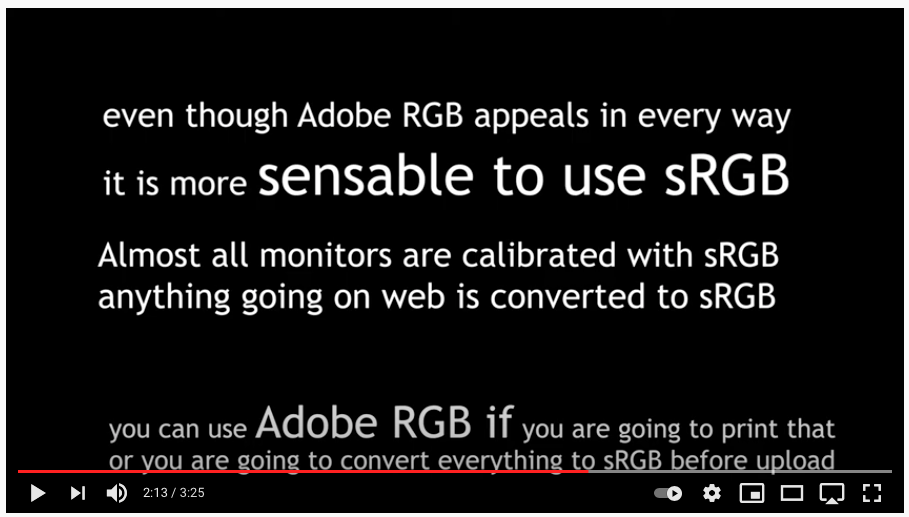
Using a larger color gamut does not mean a higher precision. AdobeRGB contains a higher gamut but its higher precision comes from the higher bitdepth.
George
I don’t see any contradiction.
George
That jpg you mean is the result of the export of the in camera converter.
George
All raw files are converted in pl to AdobeRGB being it’s working color space.Independent of what the exif says. On the route to your display, these images are converted to the display’s color space. This last happens all the time with good software. If you open a jpg with AdobeRGB and view it on a sRGB display it’s converted to that color space. If your software is color aware, I think it’s called that.
Only when exporting, creating a disk image file to be shown, the pixels are getting those values that suits the color space as mentioned in the exif. If that’s AdobeRGB, so bee it. And when I view that image on a sRGB monitor with a color aware program, than that image is converted to sRGB. If the software doesn’t do that, you might see wrong colors.
It doesn’t make any difference. The sequence is convertion to a rgb image in the adobergb colorspace, export to disk with the wanted color space.
George
It is allways adobergb. that’s the working space.
George
Home again.
You still miss the main point. A raw file doesn’t have a color space, anyway no output color space. When converting from a r,g,b image to a rgb image the pixels are given a value based on the AdobeRGB color space. That is the working color space.
Only when exporting to a diskfile the pixel values are changed to a value that fits the wanted color space.
George