Initial Camera Settings for PL4, Nikon Df

My English is not the best English, to say it nicely. But what I kept writing was not different from what Wolf wrote.
As far as I know the main lines are the same for all raw converters.

Color spaces are based on what the monitor can show, they are connected to each other. Look at the diagram. The main variable are the wave lengths of the light. Adding a color space to an digital image is taking care that that image has pixel values so that the monitor produces the right colors. I mentioned it before: a digital image doesn’t have colors, it’s the monitor that has colors
.
I also have my own questions about changing color spaces.

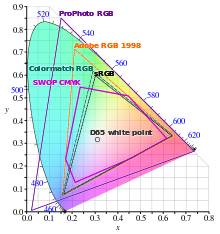
As you can see the sRGB colors are covered for 100% by the AdobeRGB colors. So it must be perfectly possible to show those colors in a AdobeRGB color space. On the other hand showing AdobeRGB colors in a sRGB color space will be inpossible when there are colors involved that are out side the sRGB color space. Then some solutions are used that always will alter the colors. Look for rendering intent.
So why using AdobeRGB? First of all there’re monitors,displays that can reproduce those colors.
Second is the practical use of AdobeRGB. When using a larger input gamut,range in wavelength, and divides that in the a/d converter in 255 pieces, then every piece in AdobeRGB will be larger then that of sRGB. The solution is to use a 16 bit division or 65535 pieces. And that’s where the profit in editing is coming from. It’s NOT due to the wider gamut.
Just my thoughts.Maybe I’ve to correct them.

George

1 Like

Hi George,
you explained it very well and why to use 16 bit for editing, preferable in the largest available colour space. If not pressed for time, one really should stick with RAW and not try to edit JEPGs heavily, as they come in 8bit ‘flavor’ only.

In that long post, I tried to illuminate the practical side of what happens, when people don’t know (yet)
how to handle stuff, and kept away from important bits and pieces (like how to fit colours into different
colour space / media, printable colours, softproof …).
It took me quite some time to grapple colour management, but with printing the rubber meets the road.
have fun, Wolfgang

The above answers my own questions - I will leave the camera set to AdobeRGB, as I’m doing almost all my editing now with PL4. Thank you - unless someone tries to change my mind, I’ll leave the camera this way unless/until I have a very specific reason to do otherwise.

I just wrote Joanna that I am setting my cameras to AdobeRGB. I don’t understand the above graph, I need to look this up on the internet and learn it. My photos are viewed on my iMac, in mySmugMug gallery, in emails, and in PL4. Are there any reasons for me NOT to use the AdobeRGB setting?

(I don’t know how to ask it properly, but I always thought I should use sRGB for viewing images, and AdobeRGB for printing images. Since I rarely print anything, and most people just view my images online one way or another, is this an issue?)

Hello Mike,

I would stick to Adobe RGB because of:

  • it is the working color space in DPL
  • it gives you more bandwith while editing in DPL compared to sRGB. There is just more info in the file to put it simple

Based on all the editing you do in DPL you export that “master” file as a 16 bit tiff, still Adobe RGB.

When you want to upload to Flickr, send the file to a friend etc… you

  • take the master files and create a jpg in sRGB out of it

I see the jpgs as “throw-away” files. I personally do not keep them. I only keep the raw and the master.
Based on the master I create jpgs for whatever purpose needed.

This keeps my life simple.

1 Like

This post explains what PhotoLab does depending on what you throw at it (read the whole post).

In combination with the principle “only change color space at the latest possible process step”, the following should be best in the scope of PhotoLab:

  1. Set your camera to AdobeRGB
  2. Customize your image in PhotoLab
  3. Export with profile set to
    a) “as shot” for serious printing
    b) “sRGB” for everything else

Notes

  1. you need a really good monitor in order to see differences between a shot taken with sRGB vs one taken with ARGB - and software with proper color handling.
  2. I do not consider usual household or office printers fit for serious printing.

This is only meaningful for the jpg or tiff made in the camera.
A rgb image isn’t mentioned. But I think it will be opened with the embedded settings of that image. Not sure about that.

Your photo’s will always be viewed in the color space of your display. If you’re lucky, color aware software is being used. When the embedded color profile is different from the displays it will be converted to that color space. If not you will see wrong colors.
What ever you will do with your pictures is up to you. But again: the selected color space does not affect the raw conversion.
George

2 Likes

Yes and not quite:

  • OOC JPEGs have been cooked in the selected color space pan, so, yes.
  • Selected color space also influences
    ** PhotoLab’s working color space for JPEG and TIFF
    ** PhotoLab’s color translation when exporting a customized RAW to JPEG and TIFF

It’s a detail, but it is somewhat important, because PhotoLab does not say, what color space was set in camera. There is no such info in the EXIF Tool (on Mac).

I like “simple”. What I’ve been doing is even easier than what you describe - PL4 can export an image in ‘jpg’ at whatever size I need. Then I email and/or post the images.

In the "righ"t color space? :smiley:

George

If you mean “ICC Profile”, that has “As shot” selected, and since my camera has been set to AdobeRGB I assume that’s how PL4 is exporting my images. That is the default setting, so I left it that way.

Because of all these discussions, I went out today to take outdoor photos with a 40-year-old Nikon E-Series lens, with no auto anything. Manual focus, manual aperture setting, I had to decide everything. The camera was set to AdobeRGB, processed in PL4, and exported using the same export settings as were used when the camera recorded the image - AdobeRGB. Everything seemed to go according to plan, except for White Balance. I set the camera to 5500K, and the images looked more “blue” than I remembered, so I used the white balance tool to adjust them.

I tried to follow the guidelines from everyone here, as best I knew how.

I’m very curious if the image from this morning is “acceptable” to everyone here. I know it could always be tweaked, to look different, but is this image, as-is, an acceptable starting point for an image to be processed in PL4 ?

(With the help of a technician at x-rite, I downloaded and installed my display calibrator, but I have a few more questions to ask them on Monday before I finish the setup. I might also post the question in this forum - it’s pretty generic I think.)

I’ve scrolled through what feels like hundreds of posts. It looks like there is a big misconception about RAW files, particularly with regards to color spaces, but also with a few other things.

User George has given the right answers. None of this matters with a RAW file. Let me describe a simple way of thinking about RAW files that I have found helpful.

RAW means raw.

A RAW file contains the raw sensor data. We know this and yet ignore it. RAW = raw, i.e. no processing.

To turn the sensor data into a color requires processing; therefore, a RAW file cannot have a color space. Or a white balance. Or anything that requires processing.

Here’s what happens when you take a photo:

Photons hit the sensor and are converted to an electrical charge. This charge may be boosted by a gain circuit (driven by the ISO setting) and is then converted to a number using an analog-to-digital converter. Some camera manufacturers may include some other small tweaks, but that’s basically it: the RAW file is a collection of numbers, each representing an electrical charge.

Color space? White balance? This is all done starting from the RAW data. In a RAW file, you can’t lose or gain any amount of color by selecting a color space in the camera. All the information captured by the sensor is in the RAW file. There is no way to get more (or less).

A JPG image is a totally different. It is a processed image that is created from the RAW data—it is never used to create the RAW data.

Converting the RAW numbers into something that looks like an image is always a somewhat arbitrary procedure—there is no absolutely right way to do it. Many software programs will use the metadata to guide the process, at least for the initial presentation (many also apply an automatic minimal amount of sharpening and maybe a few other things). What you’re seeing is not the RAW file—it is an interpretation of the RAW data. You can’t view a RAW file—it’s just numbers.

This default presentation seems to fool people into thinking that their camera settings affect the RAW file. Well, some do, obviously—the things that affect the RAW image are things that affect the number of photons falling on a pixel such as shutter speed, aperture, ISO, etc.

In-camera white balance and color space settings do not affect the number of photons reaching a pixel and are thus not relevant to the RAW file, other than that they are stored as metadata along with the sensor data. Software can use or ignore this metadata.

3 Likes

I’m going to address another common misconception: the one about ISO. There’s nothing wrong with ISO 400 (or ISO 100 or ISO 6400), but people have the idea that lower ISOs generate less noise (technically, I should be saying “have a higher signal-to-noise ratio” or SNR). This is incorrect: for any given exposure, higher ISO values have higher SNR (i.e. they are less noisy).

Note the qualifier “for any given exposure”. In this case, this means shutter speed and aperture. Keep the shutter speed and aperture the same and I guarantee that the shots with higher ISOs will be no more noisy and usually less (they will, sadly, also have less dynamic range, which is why we don’t shoot using high ISOs all the time).

The misconception is so common, I wrote a white paper to address it:

https://drive.google.com/file/d/1p2i6eCjTrjIbqsNGFHb_fDpA9_t5_ilr/view?usp=sharing

Before you tell me I have it backwards, read the document.

Let me add that this does not apply to any truly ISO invariant camera (none exists although some come close). In such a camera, by definition, the ISO setting is irrelevant and the noisiness of an image depends solely on the exposure. However, even in such a camera, there are advantages to using the higher ISO numbers (except where you have a generally dark image with a large dynamic range).

There are certain environments (such as in photographing birds) where the choice of aperture and shutter speed are constrained. In these environments, the best setting for ISO is automatic.

What I was taught, and what I believed before things got so confusing here in the forum, was essentially what you wrote. A raw file was a “capture” of the data on the sensor at the moment the image was taken. The amount, and color of the light, is converted into data, and that data is recorded in a file.

The camera gets information from that data, and creates images we can look at. So does a computer later, when is loaded with that data. None of the things tools we use to edit an image have any effect on the raw data. Changing the light (varying the aperture) will instantly have an effect, along with changing the shutter speed.

It makes sense that any “gain circuitry” driven by an ISO setting would have an affect on the sensor, making it more or less reactive to light. At the extreme, if the gain circuitry were set so the sensor would not react to light at all, there would be no data. The “image” extracted from that sensor data would be a black rectangle. If the gain circuitry was designed the other way, so the sensor was overwhelmed by the light hitting it, the image eventually extracted from that data might be a white rectangle. In this crude terminology, I can imagine how the raw file will lead to a lighter or darker image later on, when it is interpreted by software to make an image.

Once any gain circuitry is set, if someone were to measure the light settings of every pixel, one at a time, that is the data that leads to a “raw file”.

…just like in the film days, when film that was known to be underexposed could be “pushed” in the development process, to get more useful data from a negative.

To be honest, we ought to talk more about what happens as you change the ISO dial from 100, to 1000, to 10,000, and maybe to 100,000. Does the raw file change as we might expect it to change?

Sometimes as in shooting birds like you noted, the shutter speed needs to be quite high, and the aperture needs to be giving me a “sharp” bird image over a “less sharp” background. I usually don’t care what the ISO ends up as, and with the noise filter technology built into PL4, that is much less. important than it used to be.

I used to allow the ISO to be whatever I needed to make the image “work”. Following your suggestion and leaving the camera in “Auto ISO” sounds like a very good option to me, at least most of the time.

A correction to another common misconception: the ISO setting does not affect the sensitivity of the sensor. It applies a gain to the signal coming from the sensor. And it only applies a gain—the signal will never be less, only more.

Clipping can occur when a pixel is saturated with photons. It can also occur when the ISO gain raises the signal above what the analog-to-digital converter (ADC) can record. This is why increasing the ISO drops the dynamic range and why you have maximum dynamic range when using the base ISO (i.e. no gain).

By the way, I should add that there is no benefit from using non-native ISO values. Many cameras have, say, a native ISO up to 6400 (using gain circuitry) and then non-native values like 12800 (using digital multipliers after the ADC). The latter are no better than raising the exposure in post and they don’t provide the noise-reduction features of the ISO boost.

It matters because idyn, Active D’ighting change the exposure.
Thus the rawfile’s data.

How do you call the wavelength range a sensor is sensitive for?
Bayerfilter is letting redisch, blueisch, greenisch through. So that’s the colorspace of the sensor.
Break the bayerfilter off and infra red can be effecting the sensor to.

So it’s a camera’s colorspace with no whitebalance.
Black is no photon charge, white is saturated charge. As in colorless charge. Greyscale based. The bayerfilter creates r,g,b, numbers. => a color is computed out of that.

Nope, ISO doesn’t drive a (electrical) gain. ISO is just a number.
(i was in this the same assumption earlier, like that ISO is defining the sampling size of the analoge signal of a well. But it isn’t i was told by a guy who really seems to know about this stuff… I need to find the conversation for you because the details are over my head.
Edit: Definition of ISO:“A raw file has no lightness, it is just exposure measurements.”
“ISO defines the relationship between exposure and lightness such that an exposure of 10/ISO lux seconds should result in an object rendered with the lightness for 18% grey”
So there is no connection between ISO and electronic amplication. Just a number"

Yes, agreed, and in this rawfile there is a number which defines the ISO.
So the rawdeveloper knows which lightness there should be coupled on the numbers.

Whitebalance? True agreed, No wb in rawfile latent image,that’s bound to the exifdata’s camera’s setting.(also part of the rawfile.)
The colorspace set in camera is for oocjpeg not for rawfile.

Agreed.

Do you know the theory of a latent image on a photodrum of a laserprinter?
That are numbers converted in a laserbeam strenght writing on a charged turning drum.
Laserlight is decharging the charge. “burning” a latent image in the surfacecharge.
And four of those drums turning syncronised catching kcmy toner.
The toner is mixed with a carrier, magnetic material with a coating, and together it is called “developer”.
Only the correct color of toner in those four developerunits will show the correct image visible for us on paper. When i stop the proces every drum has a part of the image stuck to it charge. If one of the charges is off the endresult is off. Blackbalance in this case.
Back to the rawfile, in the numbers is a location for every pixel. So there is a latent image in a rawfile. Every pixel of the sensors resolution has r,g,b,g numbers attached.
If you process only the grid you see a unfinished latent image. Like on the four drums before the toner is atracted on the surface.

But yes, if you strip the metadata, exit data from a rawfile then what’s left is just exposure. Charge levels. Controlled by the shutter and aperture.

As I said, only the things that affect the electric charge coming out of the sensor matter. Photons affect the charge and exposure affects the photons. ISO gain changes the signal before it reaches the ADC, so that matters as well.

I believe we are in agreement. I also believe everything I said in my prior post was correct.

The RAW file records the raw sensor data. Color information is not stored there. But, yes, if you know the characteristics of the sensor, you can use that to determine how to convert those numbers to colors. The conversion is as good as the sensor characterization.

I think of a colorspace as a way of mapping a value to a precise, specific color. Mapping a RAW number to a color is not precise in the same way. It depends on the accuracy of the sensor profile. Adobe might use one profile, DxO might use another. Given a value and a colorspace, DxO and Adobe would agree on the color; given the same RAW file, they might not.

If a sensor profile were an absolute thing, then one could call it a colorspace.

Using ISO to mean an ISO standard definition to relate exposure to lightness, you’re correct. However, in a camera the native ISO setting is implemented using a gain circuit (non-native ISO is done by a digital multiplication after the ADC). For instance, go to https://photopxl.com/noise-iso-and-dynamic-range-explained/ and check figure 3.

No, every pixel has one number attached. It will be either a red, green or blue channel, depending on the color filter above the pixel. For four pixels, the pattern is typically (but not always)

R G
G B

But that’s four pixels, not one. Check out https://www.cambridgeincolour.com/tutorials/camera-sensors.htm or many other sites.

The way ISO is implemented on most cameras, raising the ISO lowers the exposure that the camera can accept before the highlights clip. Thus the top end of the DR ratio is reduced, reducing DR.

Changing the ISO doesn’t affect the full well capacity of the sensor at all. However, if it results in a change of voltage gain before the ADC, it does affect the level at which the ADC clips the highlights. Suppose the ADC is set to accept a maximum voltage of one volt, which let’s say represents 10,000 photoelectrons in the sensor. Now we double the voltage gain. One volt now represents 5,000 photoelectrons, so the highlights are clipped at 5,000 rather than 10,000.

Not my text by the way. I quote a guy who tried to explain it to me.
As you see, he talks about gain on the ADC. What is effectivly done is changing the charge, aka voltage to a point it can be read properly by the ADC.
Say we change iso 4 stops wile exposure is stable, then we we don’t overexpose the sensor (that’s stil the same exposure.) we only overflooding the ADC inputchannels, clipping everthing higher then max accepted voltage. That’s why the DR of the camera is getting smaller.