I don’t see PRIME being applied at a zoom of 200% or higher. What you are probably seeing is HQ fast. When you are in edit, the visible NR results on the screen are from HQ Fast regardless of whether you’ve selected it or PRIME. PRIME NR is only viewable in the preview pane or in the output when exported.
Yes i was that thinking also. and it follows the strenght slider of Prime.
So that’s HQ preview working the the image on your screen.
i think its on purpose that it follows the slider in strenght.
#1 - Yes, it’s useful to lower the sliders for PRIME, because any noise reduction requires a balance between removing noise and preserving details. The “magic wand” can remove so much grain that some of the detail is also smoothed out. It can be good to at least lower luminance noise reduction so that some fine grain remains in the shadows.
#2 - The degree of noise reduction you’ll want to apply varies. 40% can be fine in a well-exposed image, but some very fine detail could be softened slightly. The higher the ISO (or the farther shadows have been lifted in exposure), the more noise reduction you will probably want, but don’t expect detail to be preserved perfectly without keeping some grain.
A significant problem we can encounter with PRIME sometimes (maybe rarely) is artifacts in the noise patterns: in particular, light-colored blotches, worms/maze patterns that the maze adjustment can’t handle, and posterization/banding. Using the healing/clone tool or other local adjustments where these artifacts occur can help. Or turn PRIME off and stick with HQ. (I use Topaz Labs Denoise AI or Sharpen AI after using DxO’s HQ mode when I’m not happy with PRIME.)
#3 - That’s right, when PRIME is selected, HQ noise reduction continues to be applied to the main preview window. The effect of PRIME is only visible in the small loupe preview window. PRIME is only applied to the whole image through exporting. When PRIME is enabled, the preview and loupe windows give you a comparison as well as a general idea of how much noise reduction is being applied.
Agree completely although I think the issue of artifacts with PRIME is far less noticeable than with all other software I’ve tried. I usually keep the luminosity setting between 20 and 30. The reduction of noise with PRIME on high ISO images can be so satisfying that the loss of some of very fine detail may occasionally be an acceptable compromise, especially in very noisy images where some of the fine details may be lost in the noise anyway.
To this good analysis I would like to add about the magic wand that it adjusts the corrections depending on the DC’s own performance measured at each ISO values and applied by areas.
DxO NR (HQ and PRIME) considers a dark area of an image like a high ISO own photo. So It therefore applies over each a different NR adjustment.
I did know that but i was a bit surprized that when i change the luminance slider value in PRIME mode the HQ denoising value in screenpreview, normal image, is also changing.
Not that it is a bad thing, it’s good that i can create a overal view of denoising controlled by the luminance slider of PRIME using HQ.
Second thing: Why is chosen for a default 40%? Lots of people are using less at base iso and well exposed images. 20% or so. I know in the manual they speak about use PRIME for high iso and or noisy images. But they referre about the processing time not that it is HQ is better at low iso value’s.
@Pieloe, yes i did recall that it was explained that the algoritm is not equally sweeping noise but only where the “dirt” is laying around. Shadows and higer iso.
So in that case a 40% active level doesn’t hurt on noisless images. The broom stayes in the corner then.
We have debate this slider(almost no change in value on different images) thing earlier and because it works before demosiacing it has no iso value influence other then the actual level of exposure of a pixel. (not brightnes/lightnes which we see on screen)
I am just curious if i need more carefull in having prime at default running for all images.
And the preview window is that small that i don’t like to use this box moving around to look if i can turn down default 40%, which i assume is carefully chosen by dxo technicions.
Did i allready say i am lazy about that?
My understanding it only applies to noisy parts of the image, so images with very low noise / no dark areas would not get a 40 strength treatment.
But I also find this confusing so some explanation would be welcome.
How do other users handle the NR setting for their default processing preset (the 1 - DXO default or your variation). I hear some people always apply prime at a lower setting etc.
I would like to figure out a good baseline from which to work from.
Is their any downside to always using Prime versus HQ at equal settings (e.g., 20) besides performance penalty or are their quality considerations and is HQ sometimes the better option with everything else being equal?
Yes, i like to see some more detailed comment, preferable by the DxO staff, about the default choices there are made connected to the help aid function as the magic wants.
Edit; like smart lighting i think it’s 25% at default, i use 15% as default.
Chroma, CA, low frequency noise and luminance 40% things like that. Just how are they came to that preset. which criteria are bound to those settings.
are they for officious images who need such a tool be active or does almost every image need such a treatment in the bases? If i can understand the “Why is this chosen” i can go from there making decisions based on those primary decisions.
I would be interrested if we have a rawfile which has nearly no noise , like a well lith testchart, good ETTR exposed and then a ETTL if there would be a difference in slider value’s and sharpnes in the image.
Because reading the older post’s it seems that the PRIME software is targetting the area’s who have more risk at noise by lower rgb value’s like shadows and dark colors and leave the brighterparts allone.
(Would that be the cause of the Sky issue some people have?) Sky is brighter mosly then the surrounding area’s in the image.
Edge detection: microsharpening those edge line’s of objects wile cleaning the luminance to keep the detailing. (denoise and sharpening are each others counterparts.)
Not that PRIME isn’t working well, it does a great job, i try to understand the effects of the value’s of the sliders on the processing strenght of PRIME.
(I can think of a test of exporting tiff’s in different settings of denoise and reload them in dxopl to see the effects.)
Why al this trouble? Well, it itches me i want to understand (more or less) the working. inside and why this PRIME TOOL display is such non responsive visual. (
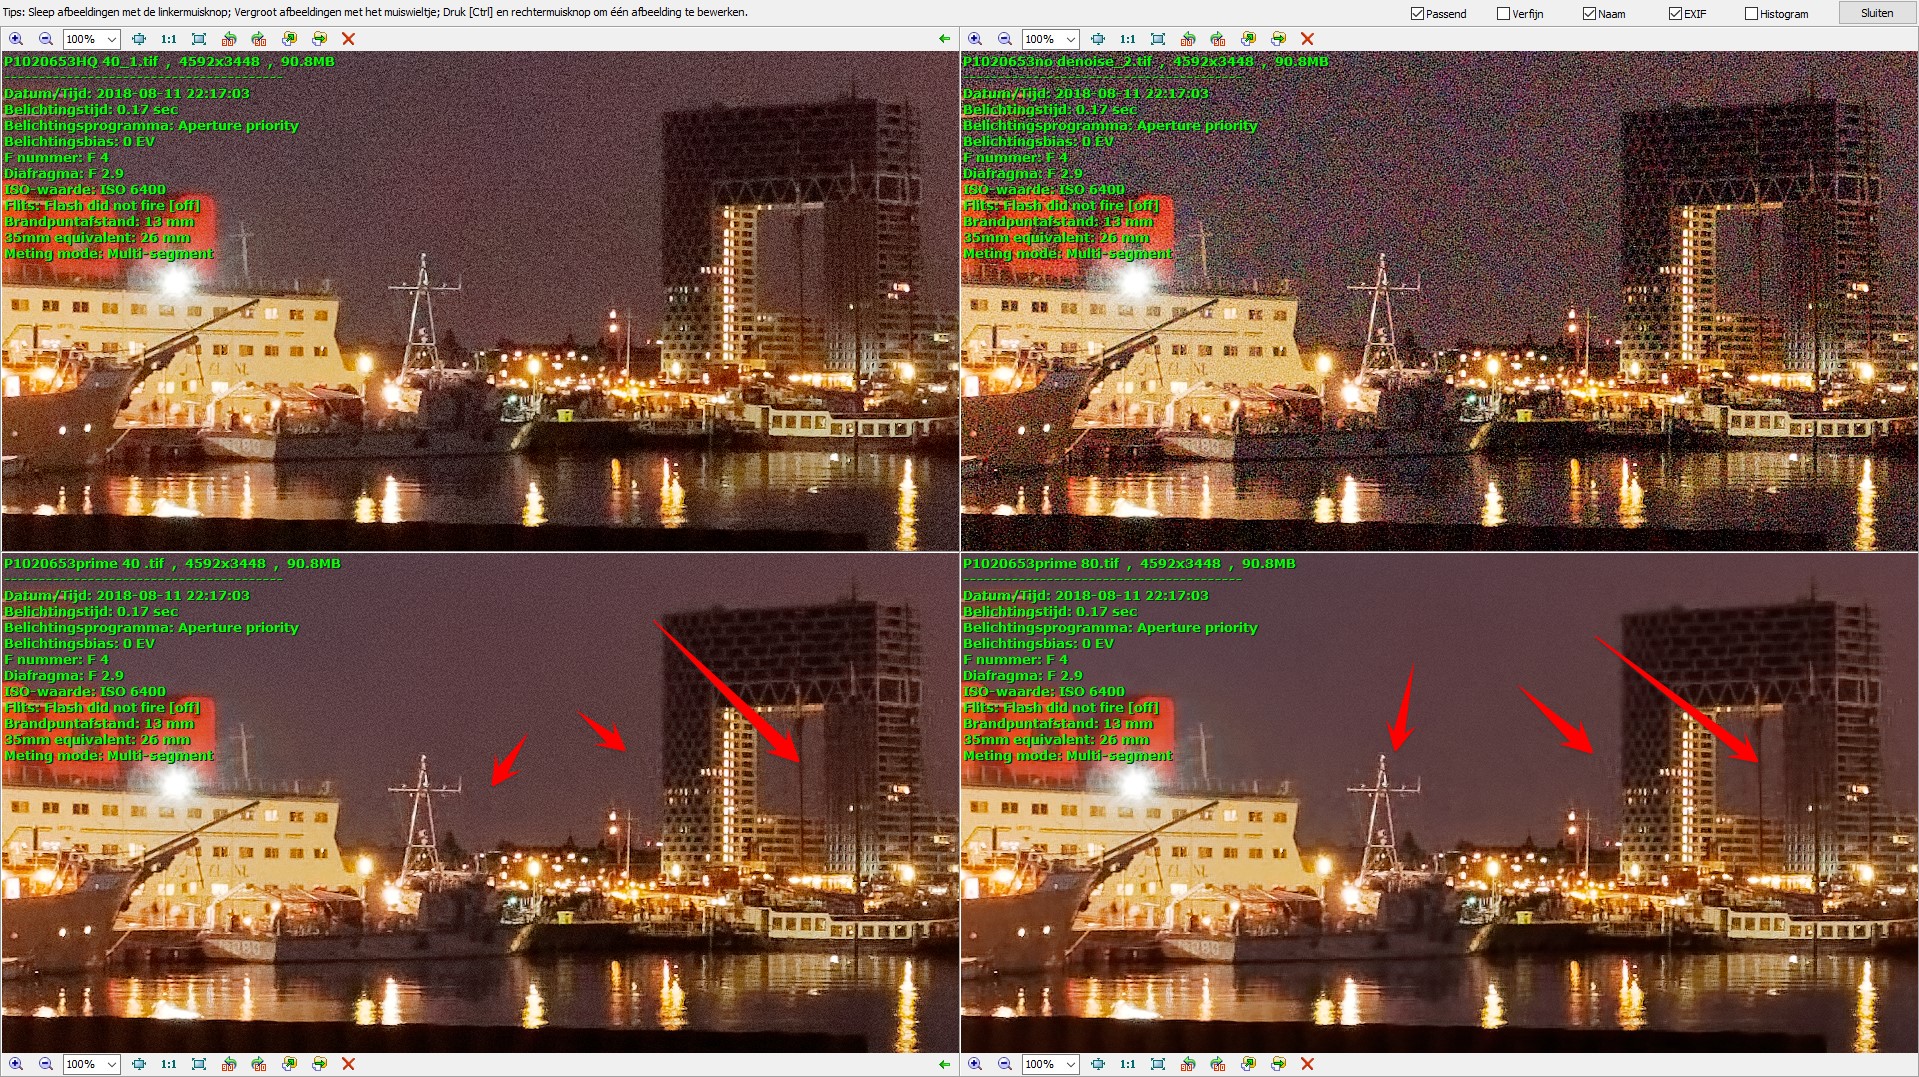
Ok, i made a project of 200 iso 3200 iso and 6400 iso. (they are different objects, i don’t have a studio where i could control light so i get well exposed 200iso to under exposed 3200 and 6400iso.
(if some one have and will make time for creating raw files with a test setup much apreciated.)
My images will be a random test if i can “see” that PRIME is intelligent under the hood wile the sliders are stationairy. ( only working to sweep the noise away and not in good lith area’s so no equal layer of denoising.)
selection:
***** master: auto exposure comp and 25% SL. my preset with prime at 40% (basicly the “my most used preset”
VC 1 * this would be default HQ version, same as above my preset and auto EX comp actived.
VC2 **, this would be the no denoising applied., samer as above my preset and auto exposure comp activated.
i will all exported as 16bit tiff adobe rgb. then reload in to dxo make 100% crops of “noisy places” and export with no further denoising as jpeg.
If PRIME is intelligent then we will see a flat line in detail until 40% isn’t enough and the noise is creaping in correct?
HQ is a faster less sofisticated denoising so we will see more noise bumping up wile the iso is higher.
the no denoise is the baseline.
any thoughts about this?
(@Pieloe is writing that PRIME is charting the latent image(build in exposure levels measurements) in pixels on Exposure level as 200iso - 6400iso pixels so a darker pixel is a 3200 iso and a midrange pixel is 800 iso and bright one 200 iso and nearly black is 6400 iso. And it target the lower levels which are marked as high iso with more aggression to eliminate “noise” wile the higher levels which are marked with 200-800 iso less so the detail is less compromised.)
IF that’s true, i can do 70% PRIME on a well ETTR image and see no difference with 40%.
(DxO is having 40% as default. ) because it only targeting noise in lower sections.
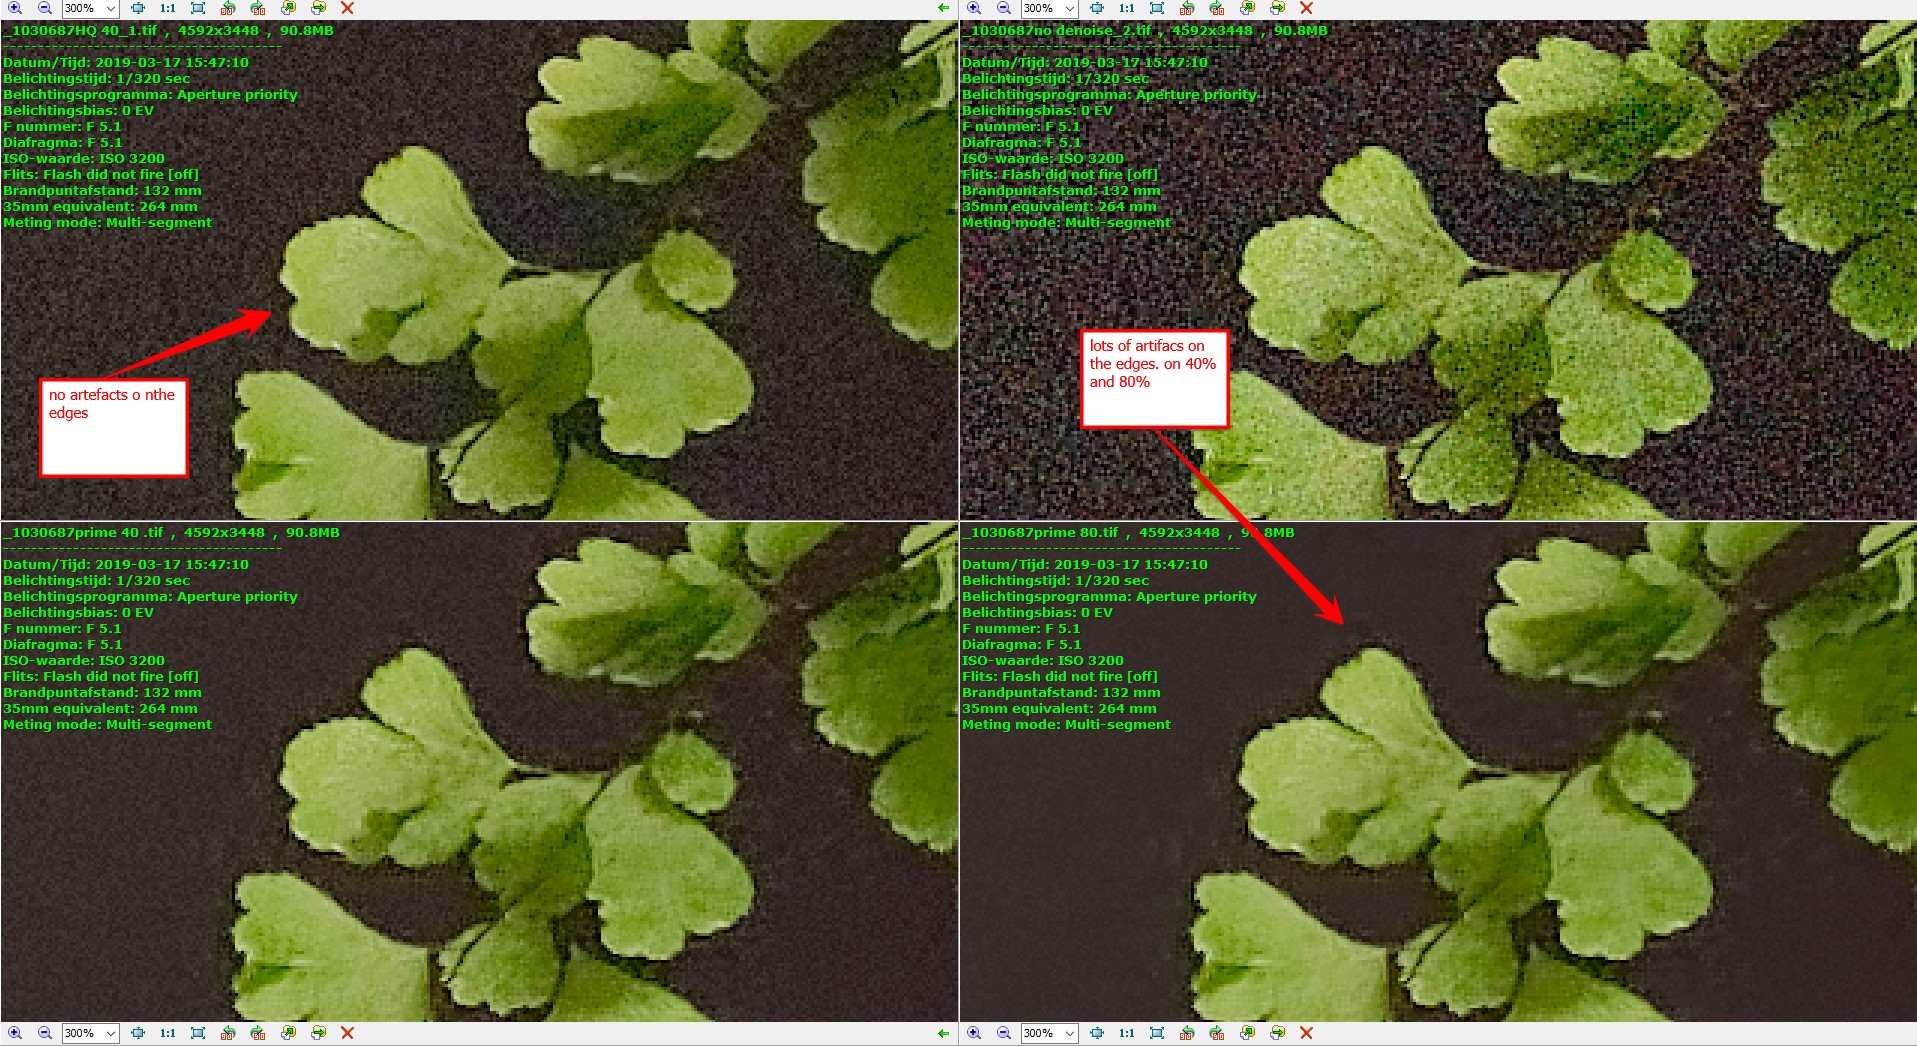
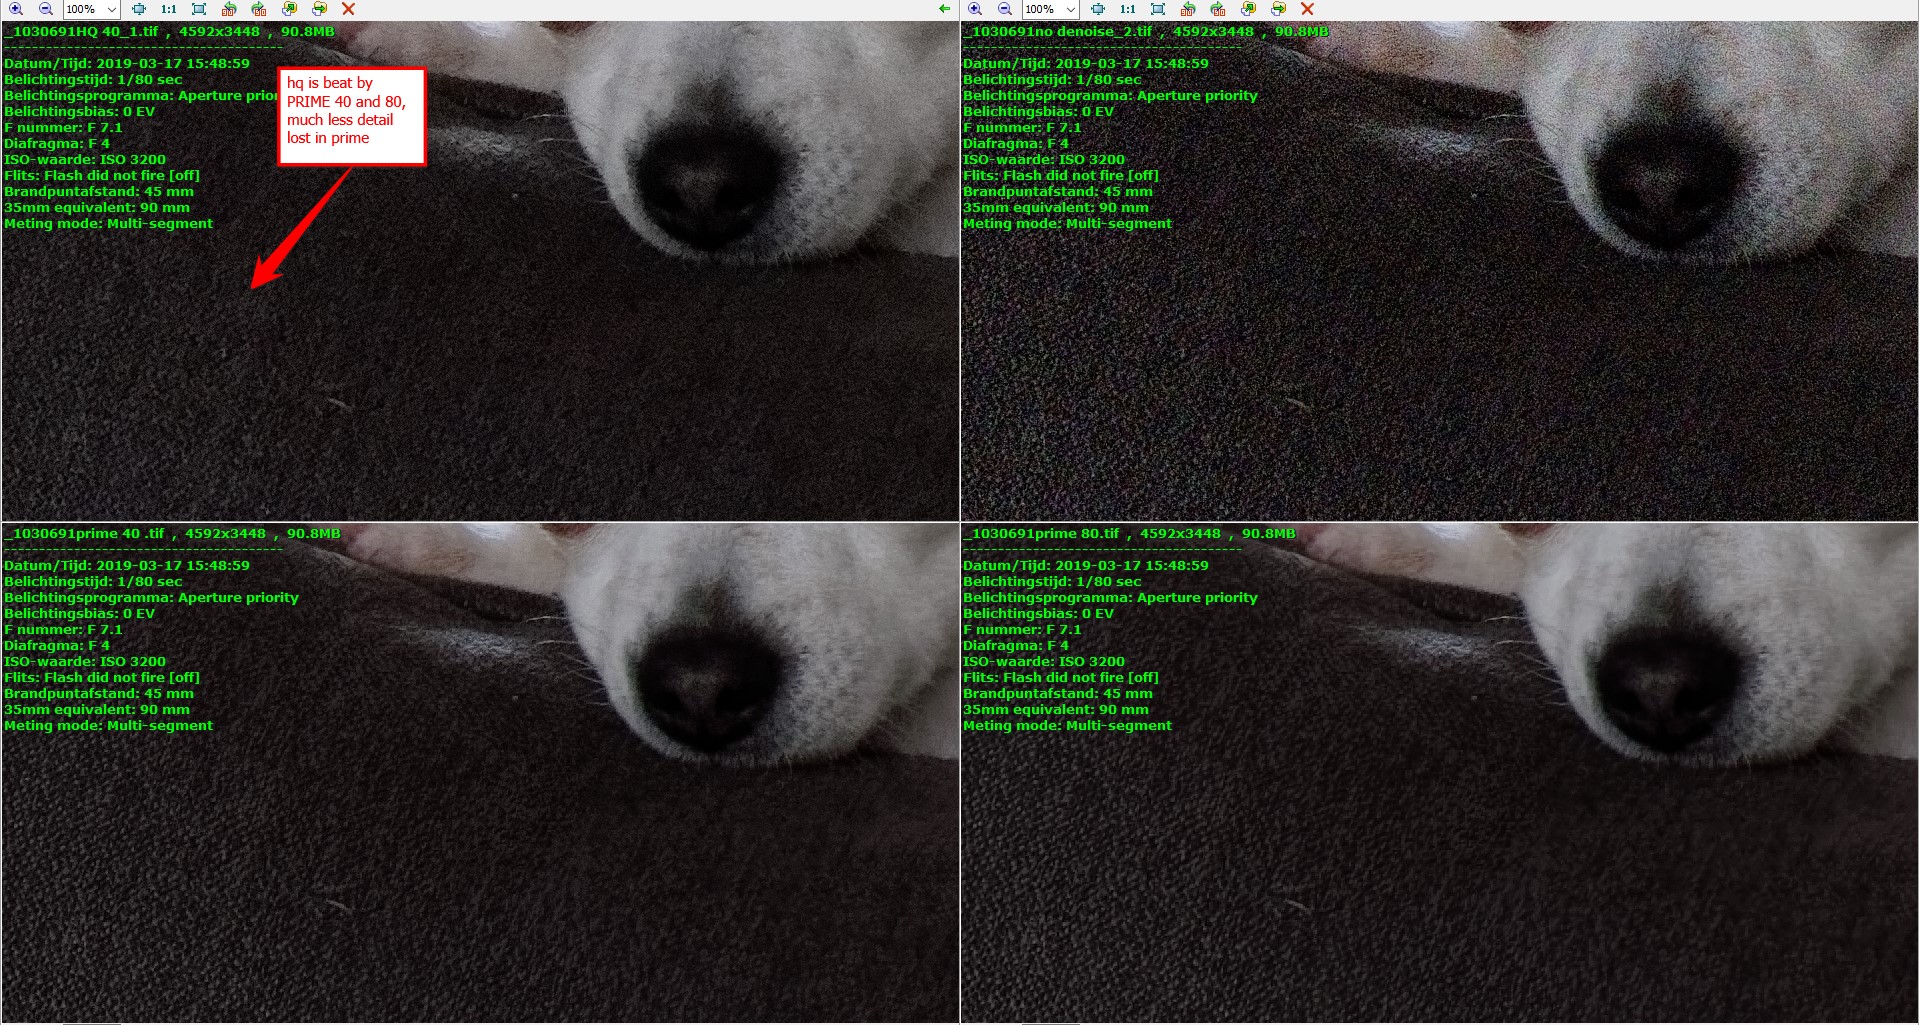
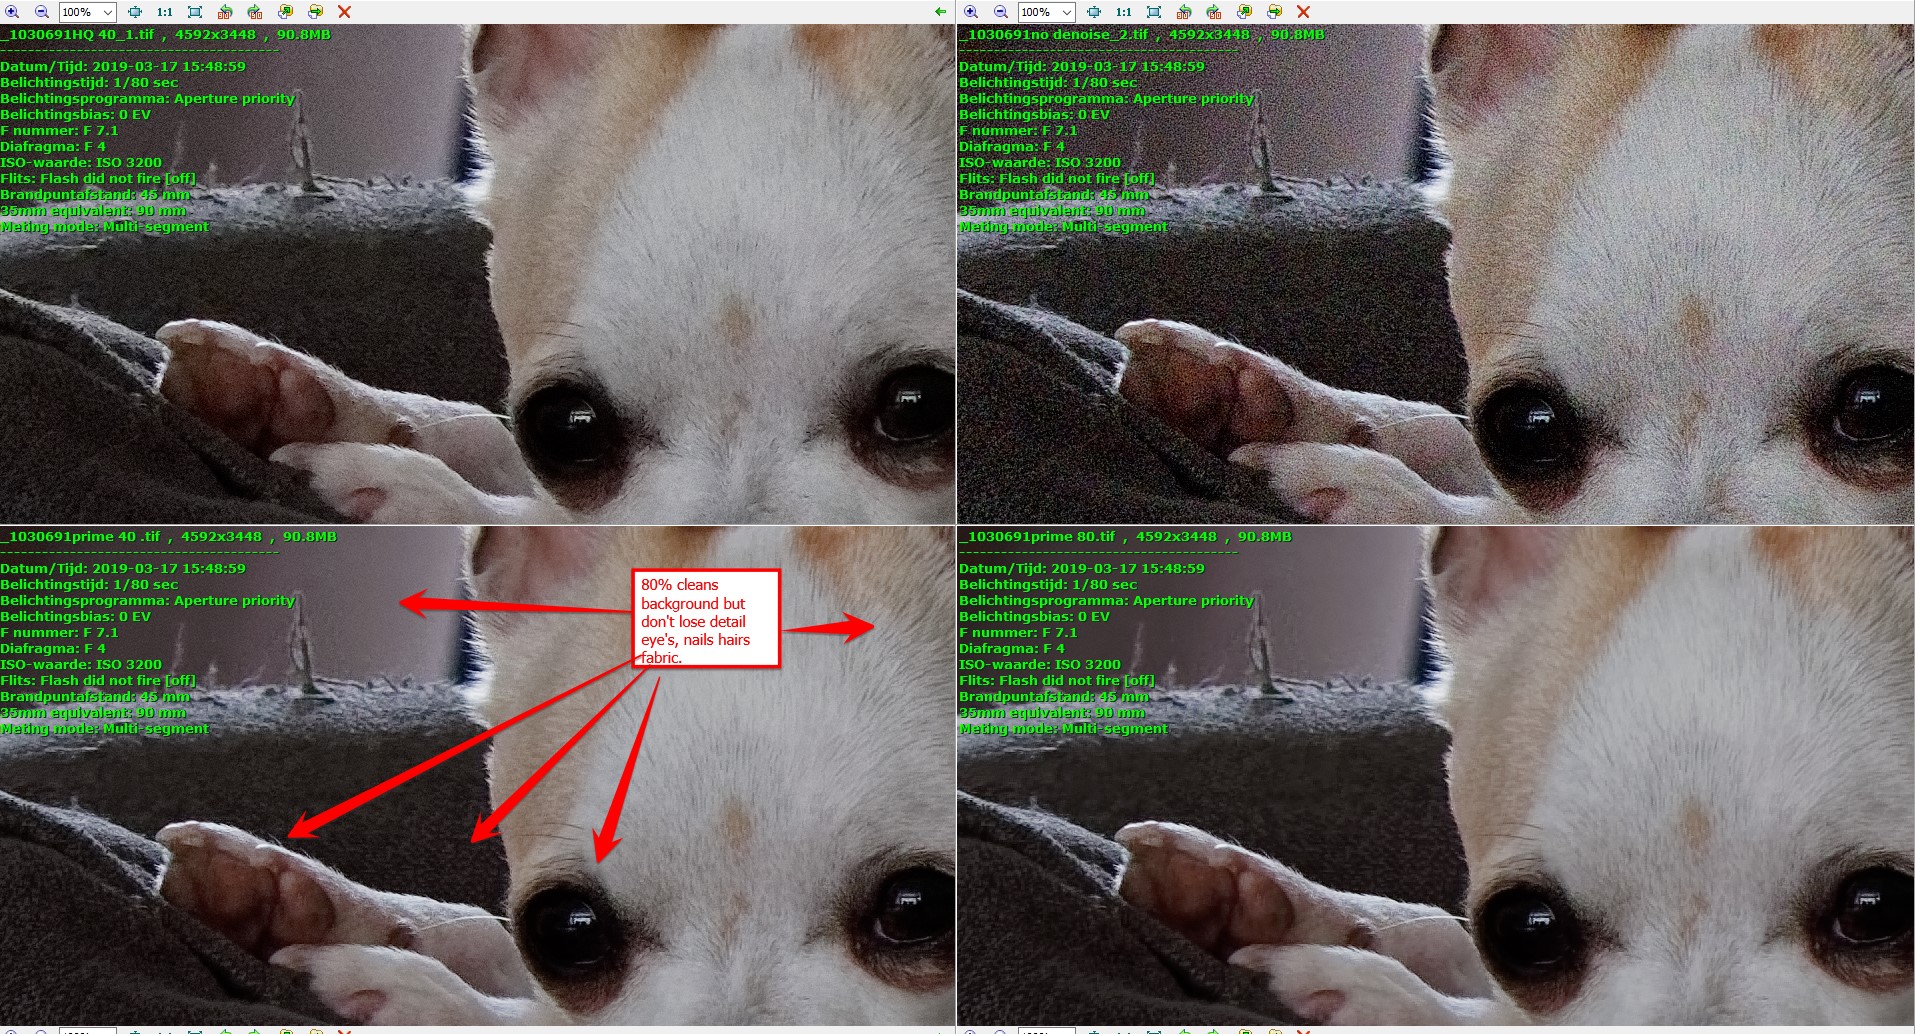
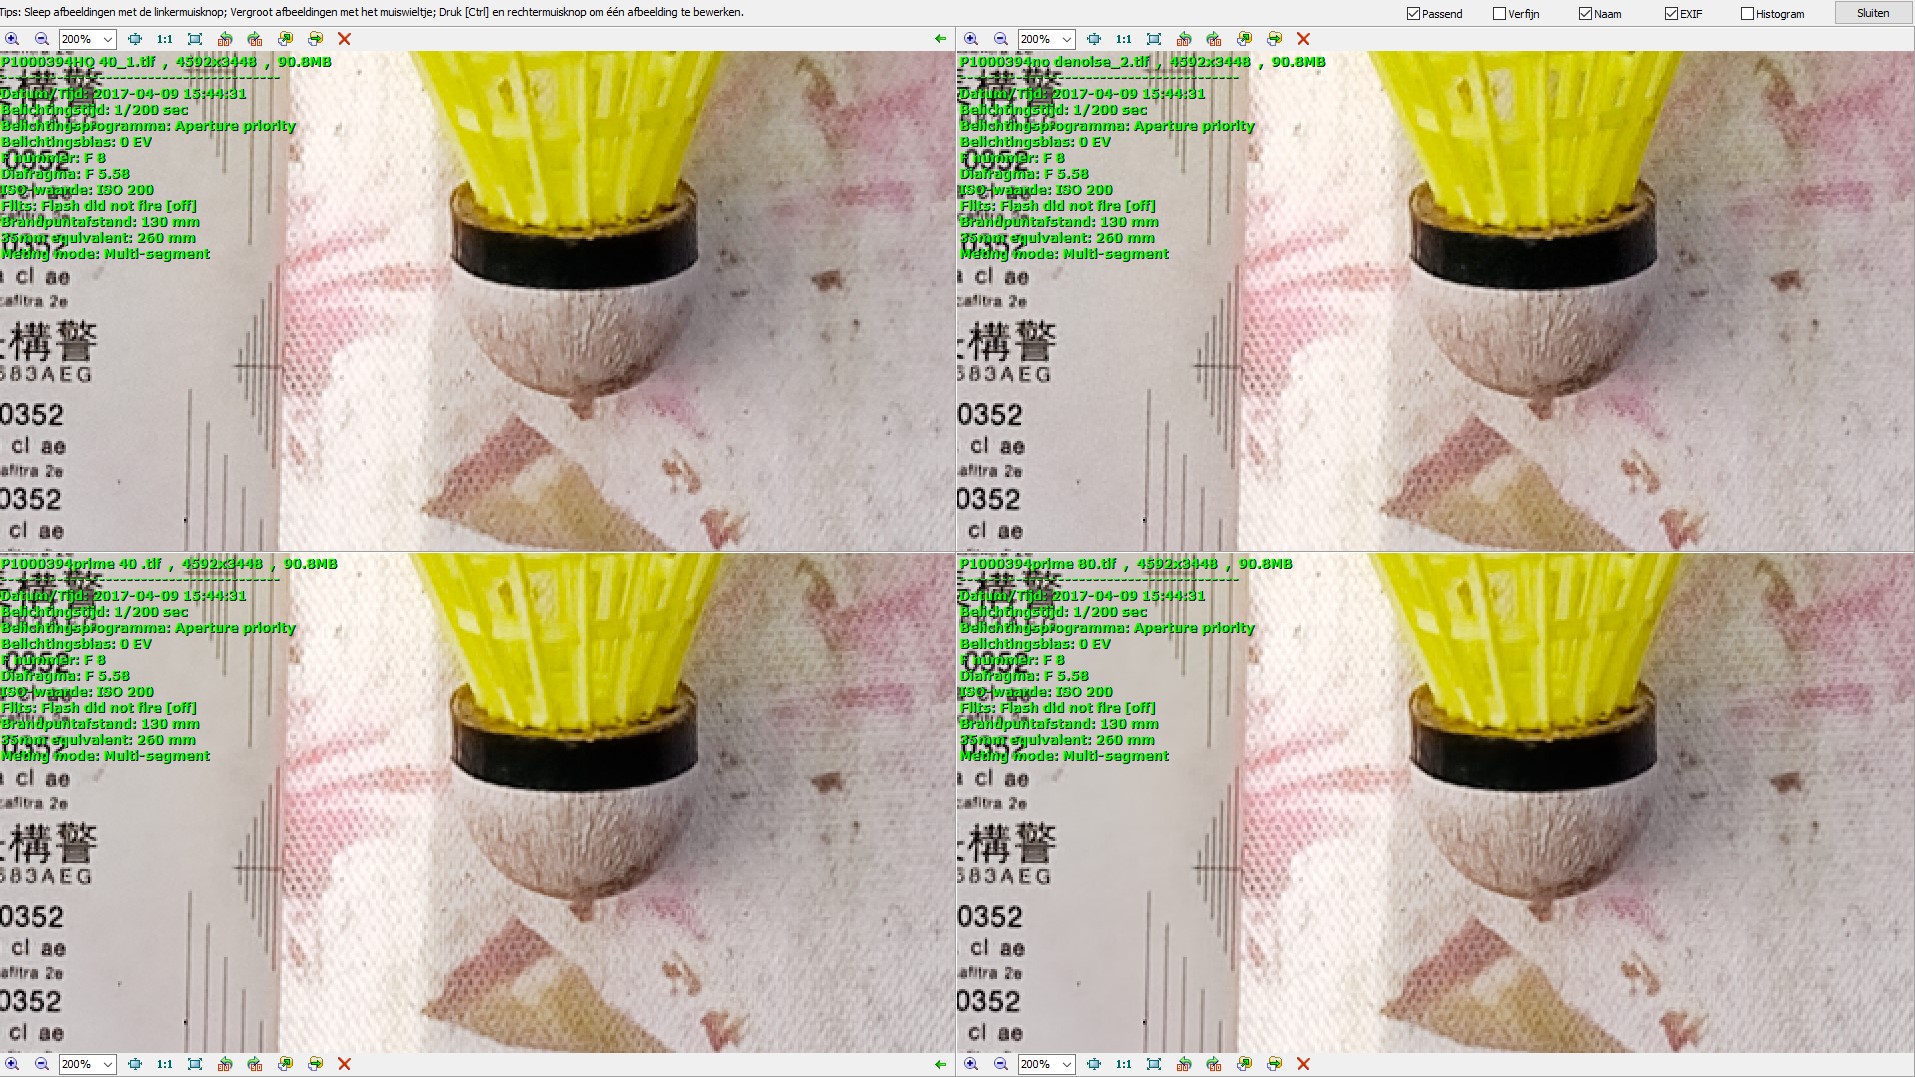
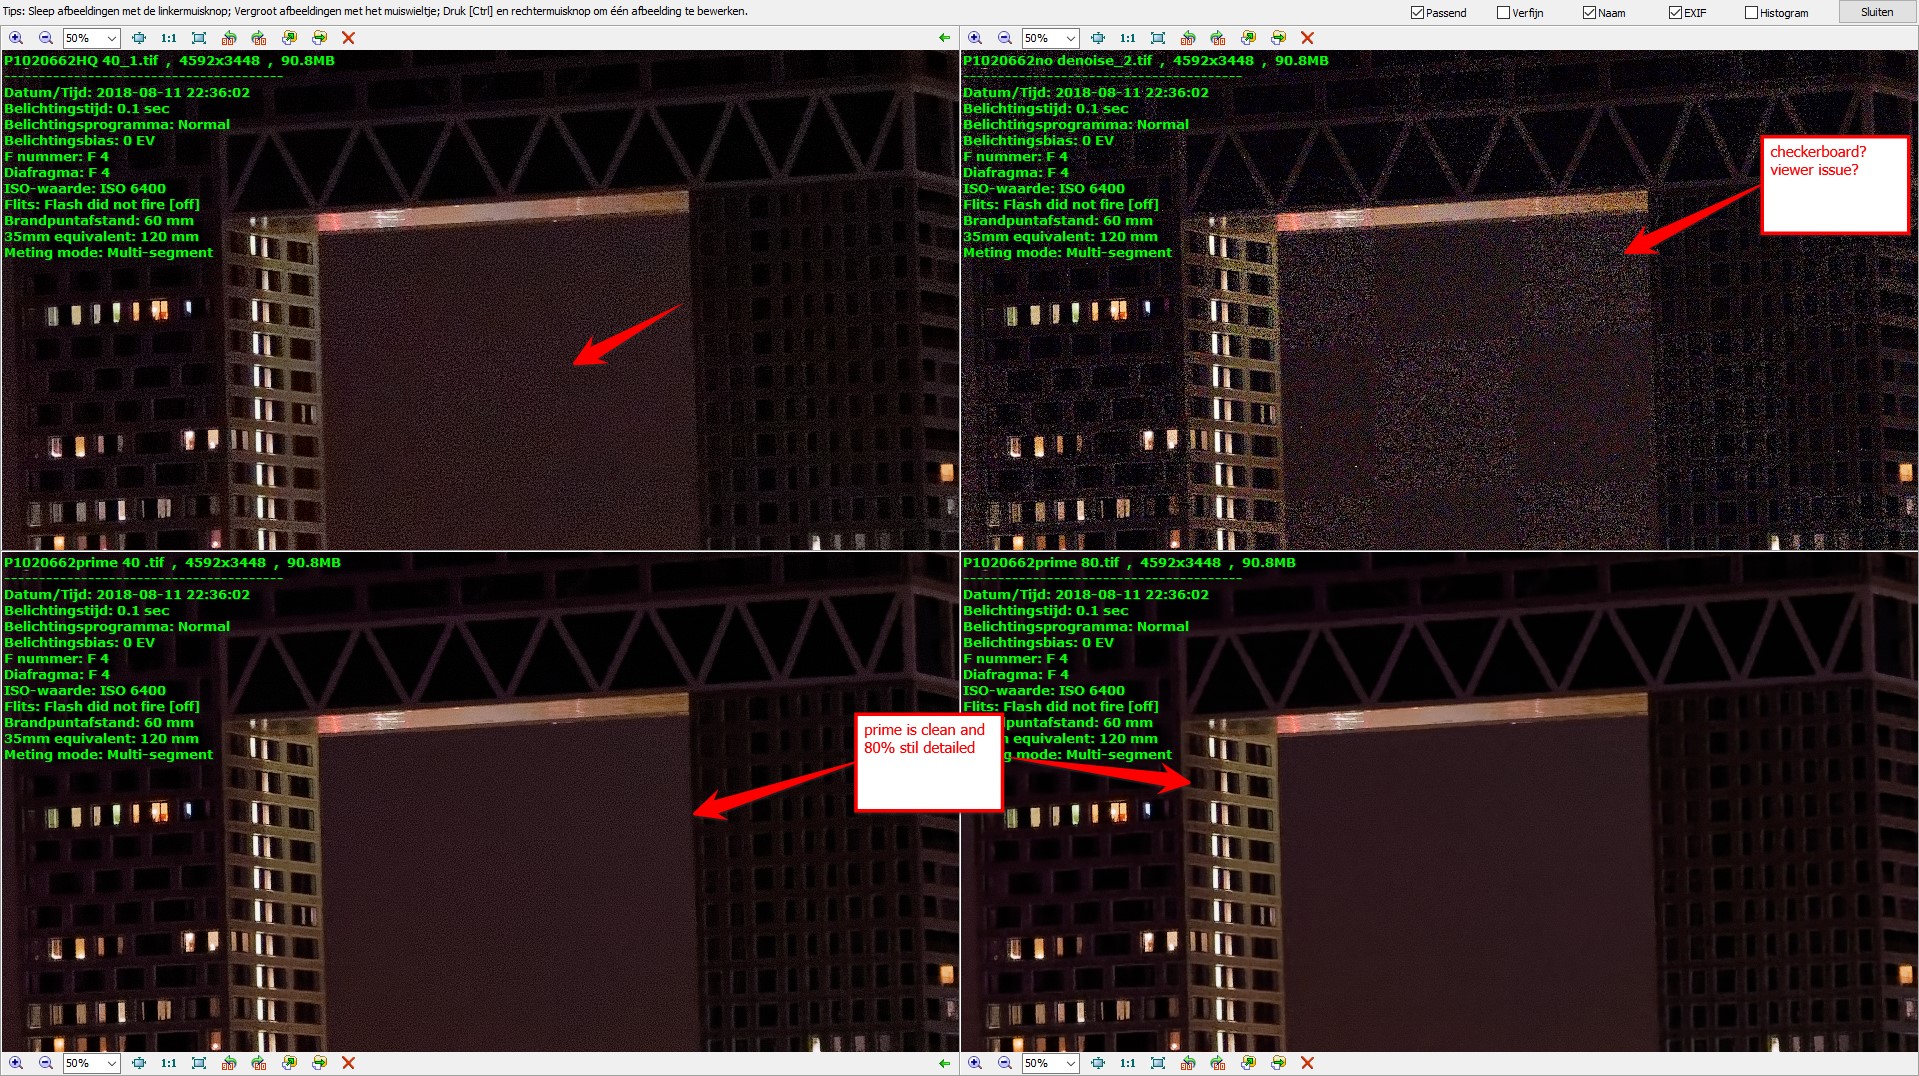
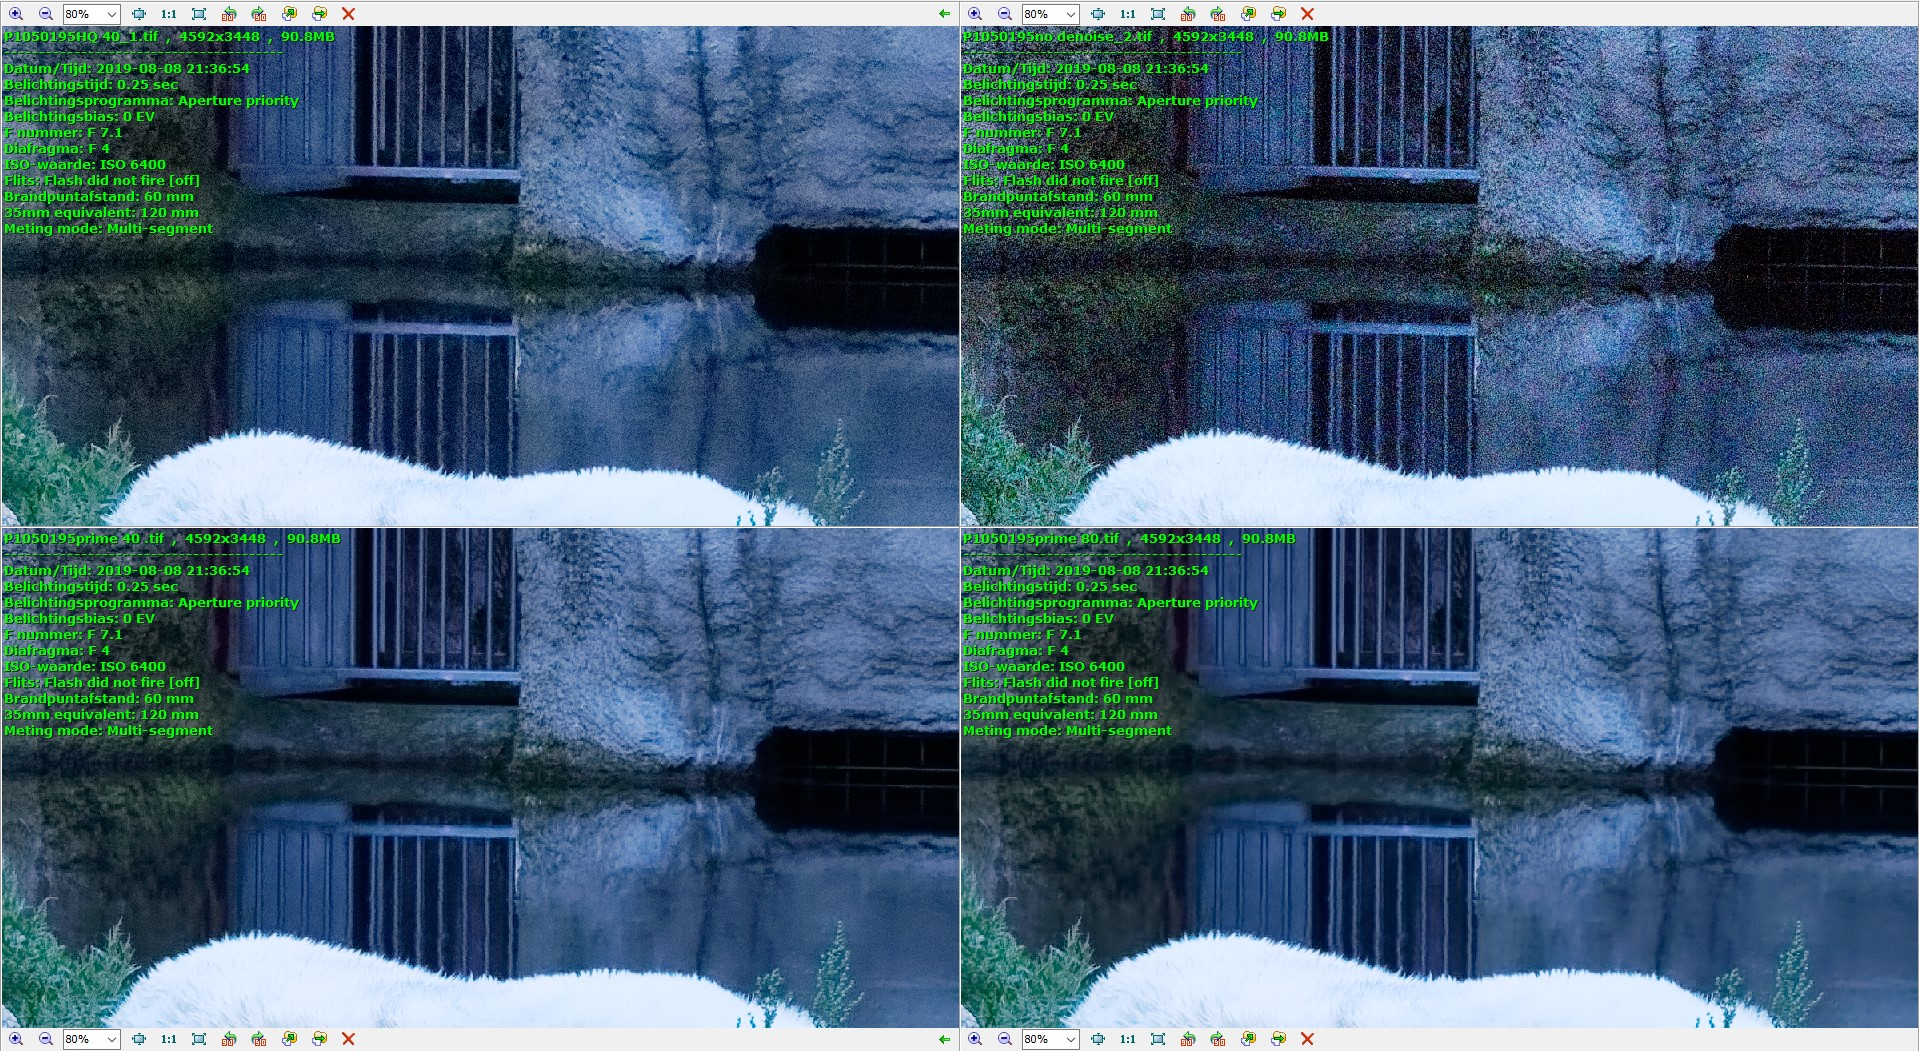
Edit: used Fast stone image viewer to view the tiffs at 4 types at 100% and sometimes 200%
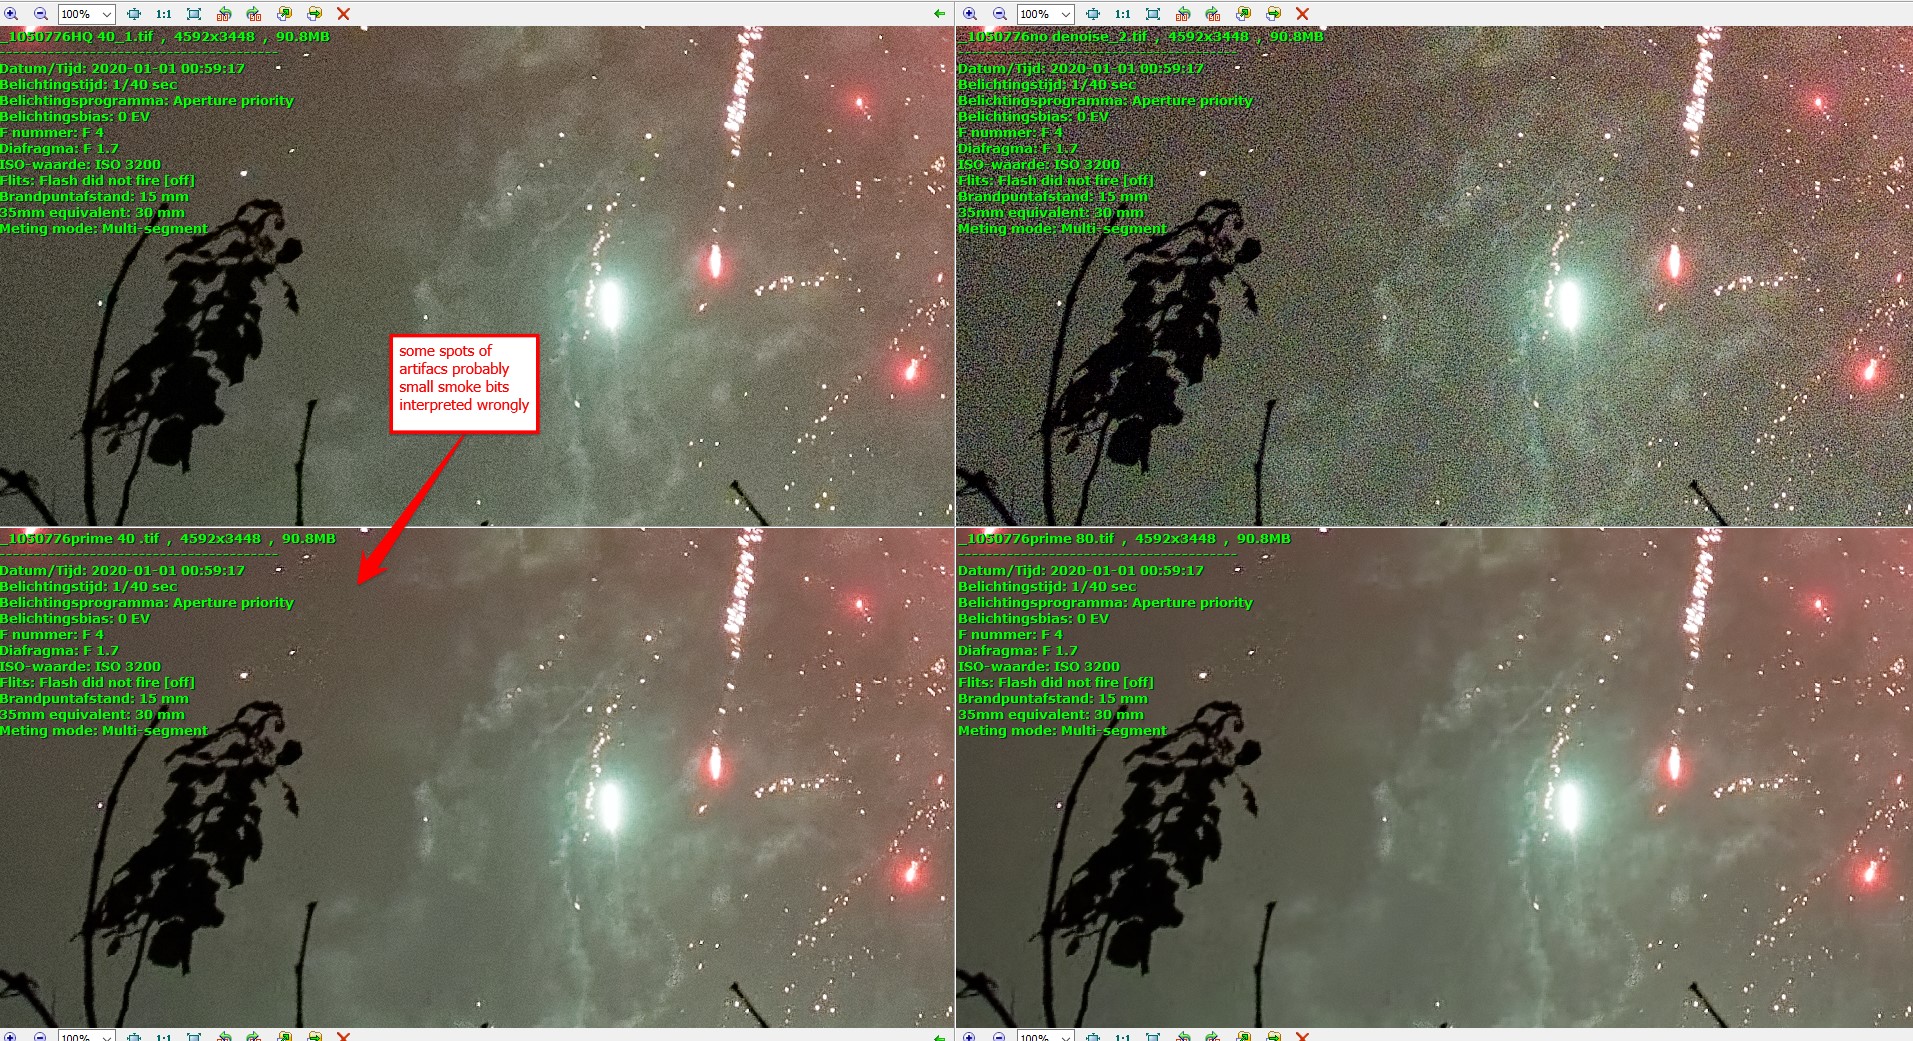
sometimes i discovered artifacts where Prime did a wrong choice wile HQ had no problem.
loss of detail in 40% or 80% almost no difference only the plane pieces where cleaner/ less noise.
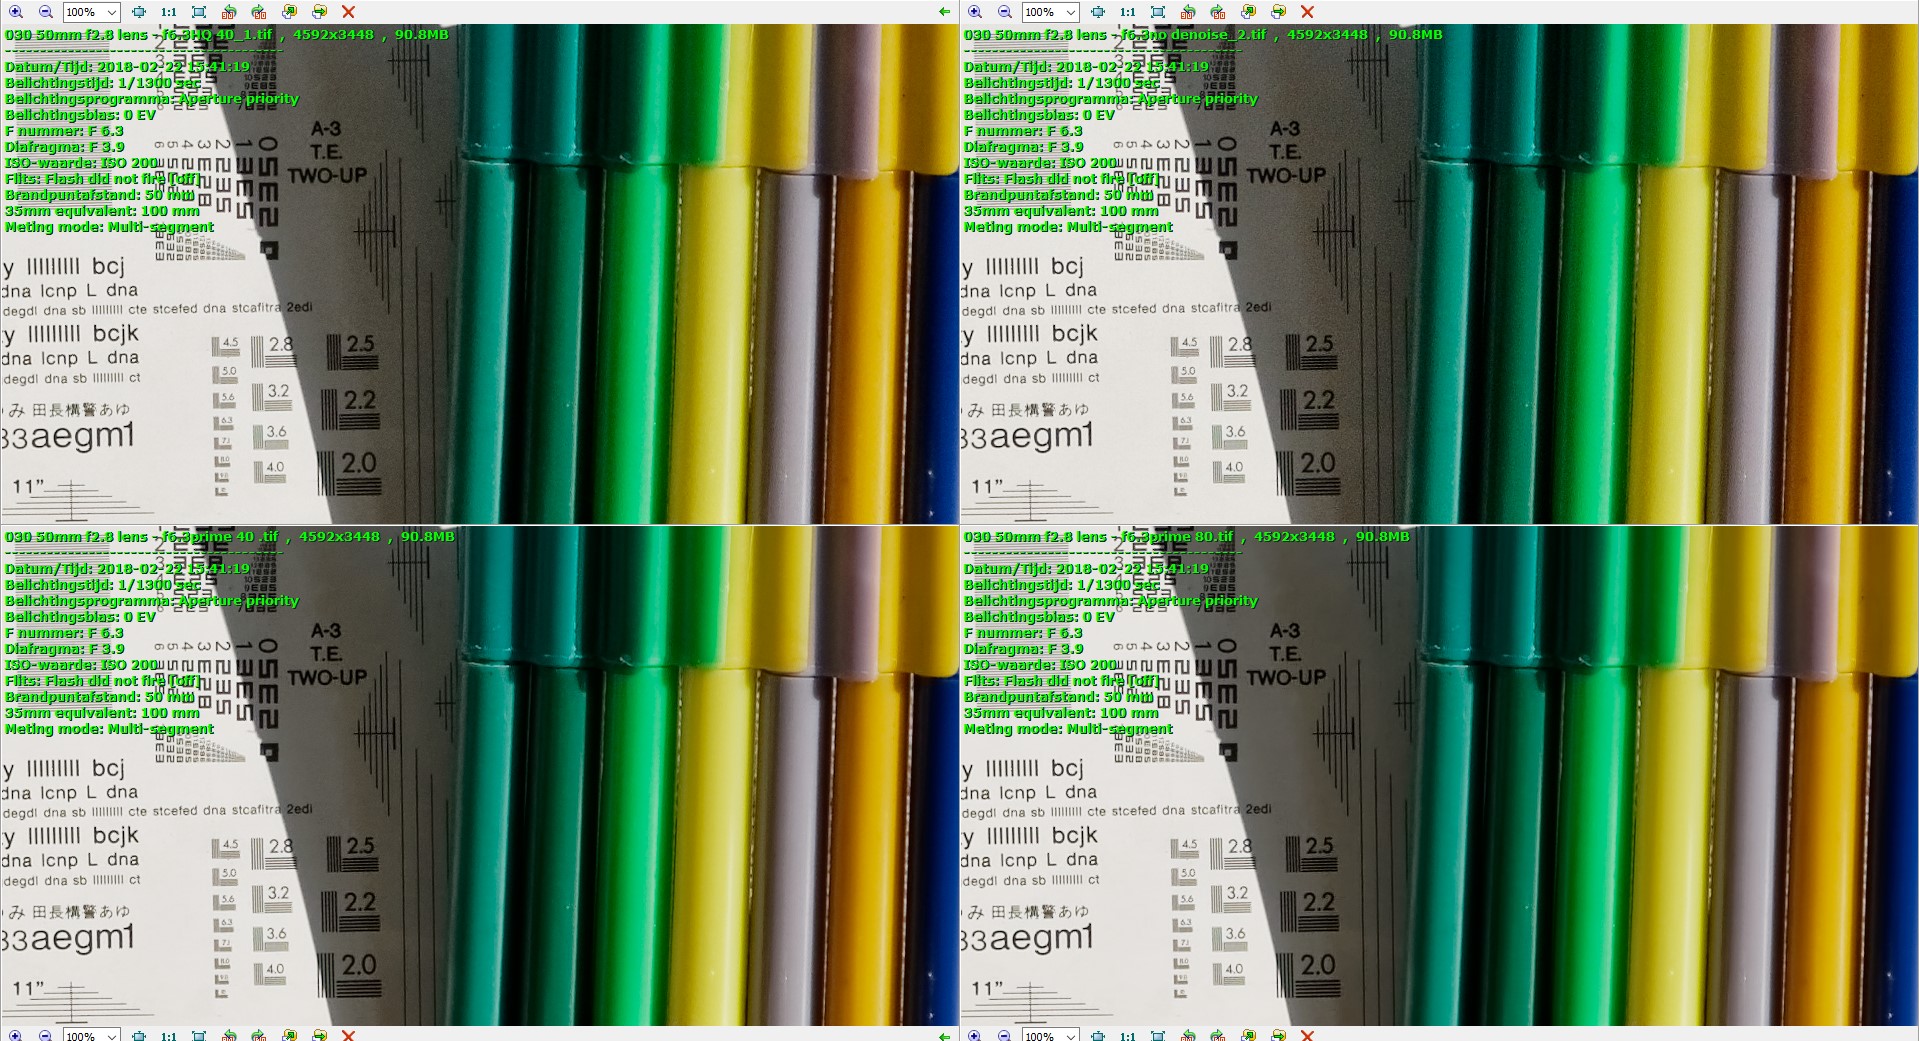
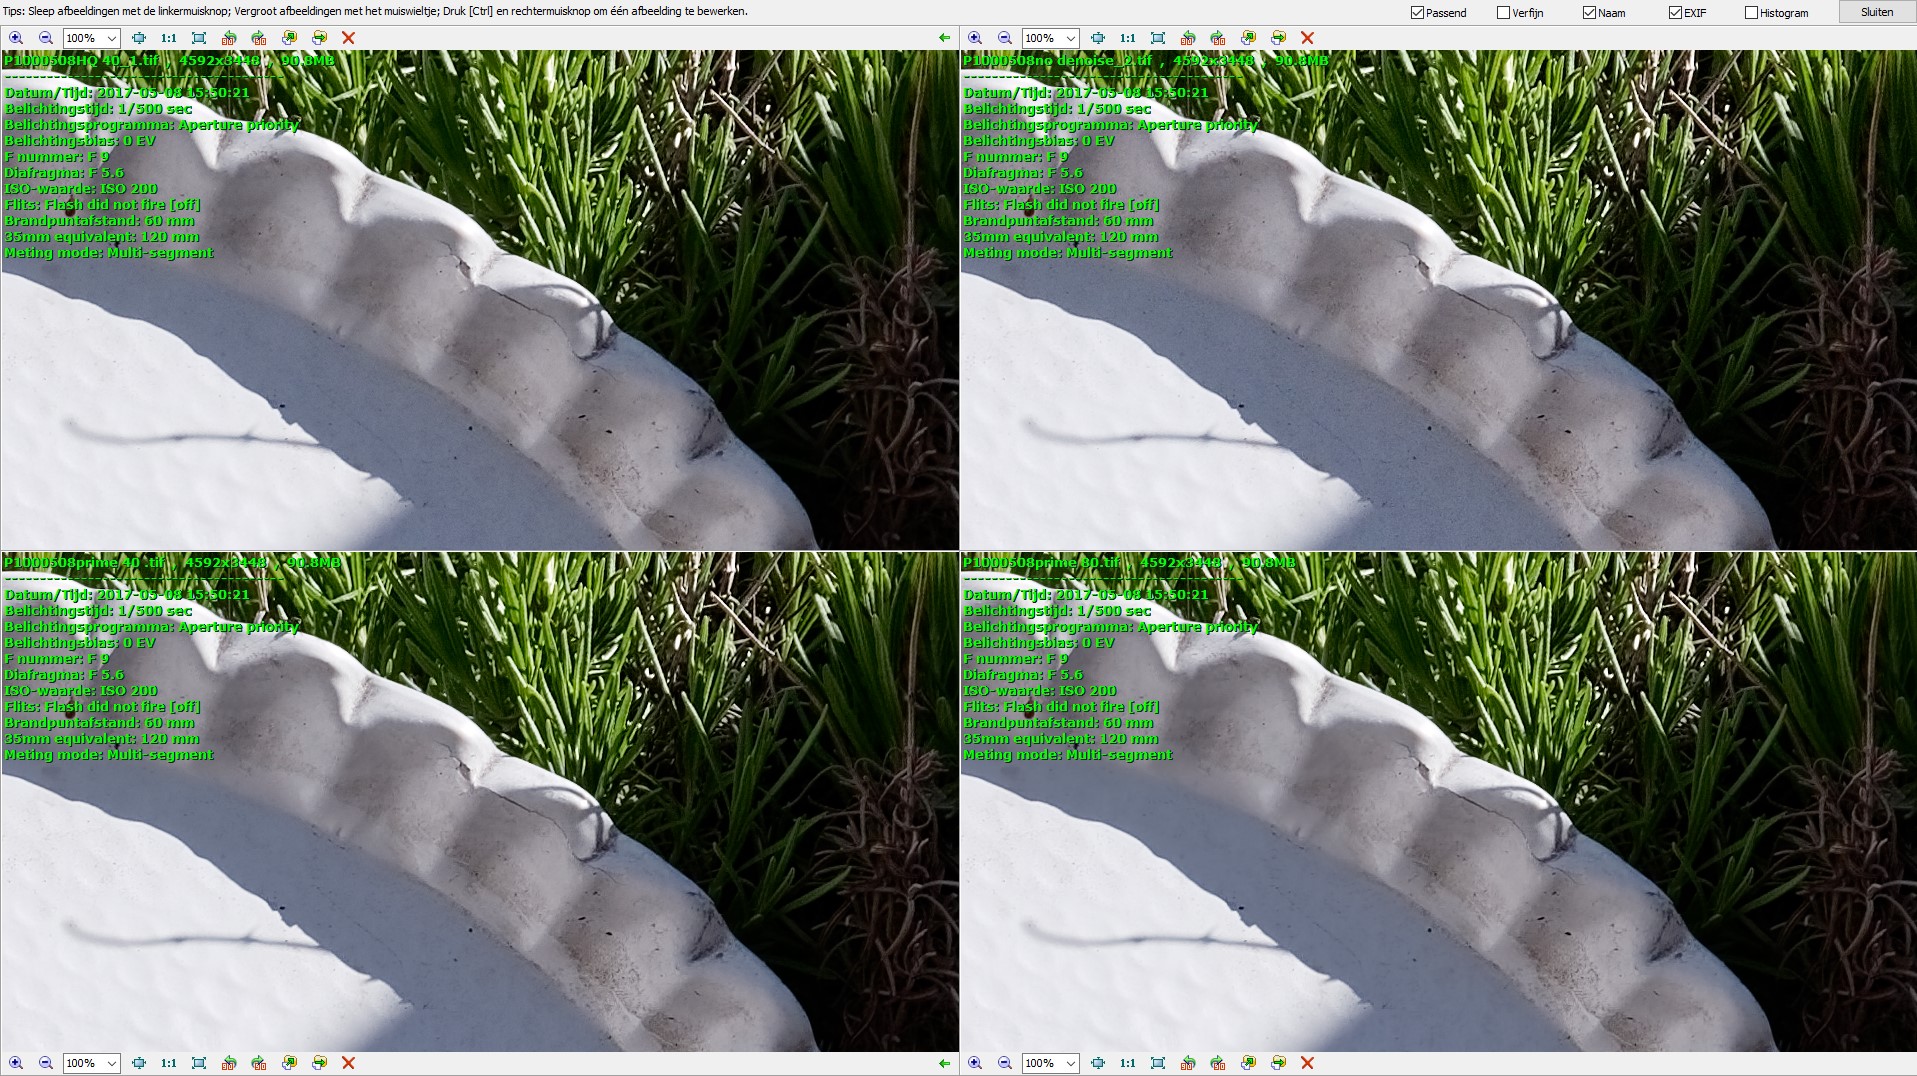
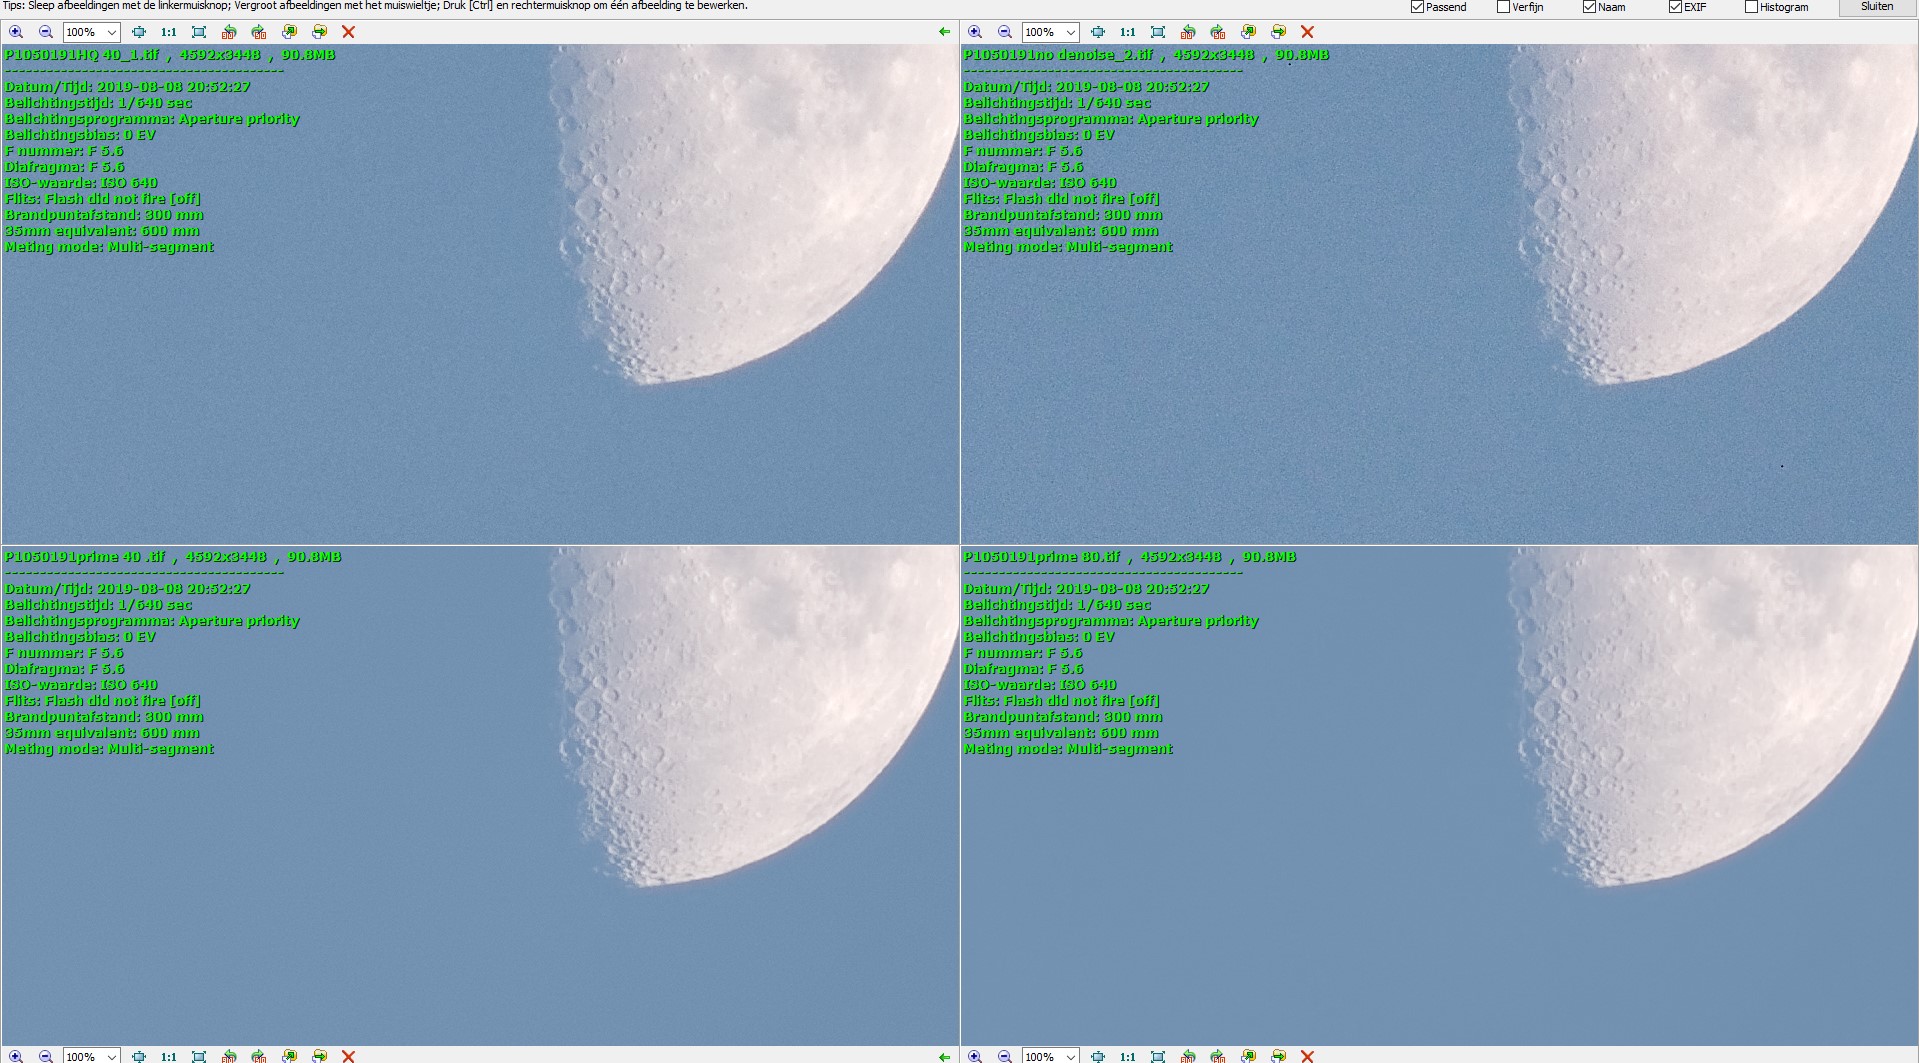
200 iso well litt exposed? no need for Prime but doesn’t hurt either. even a 80% didn’t show from hq or 40%
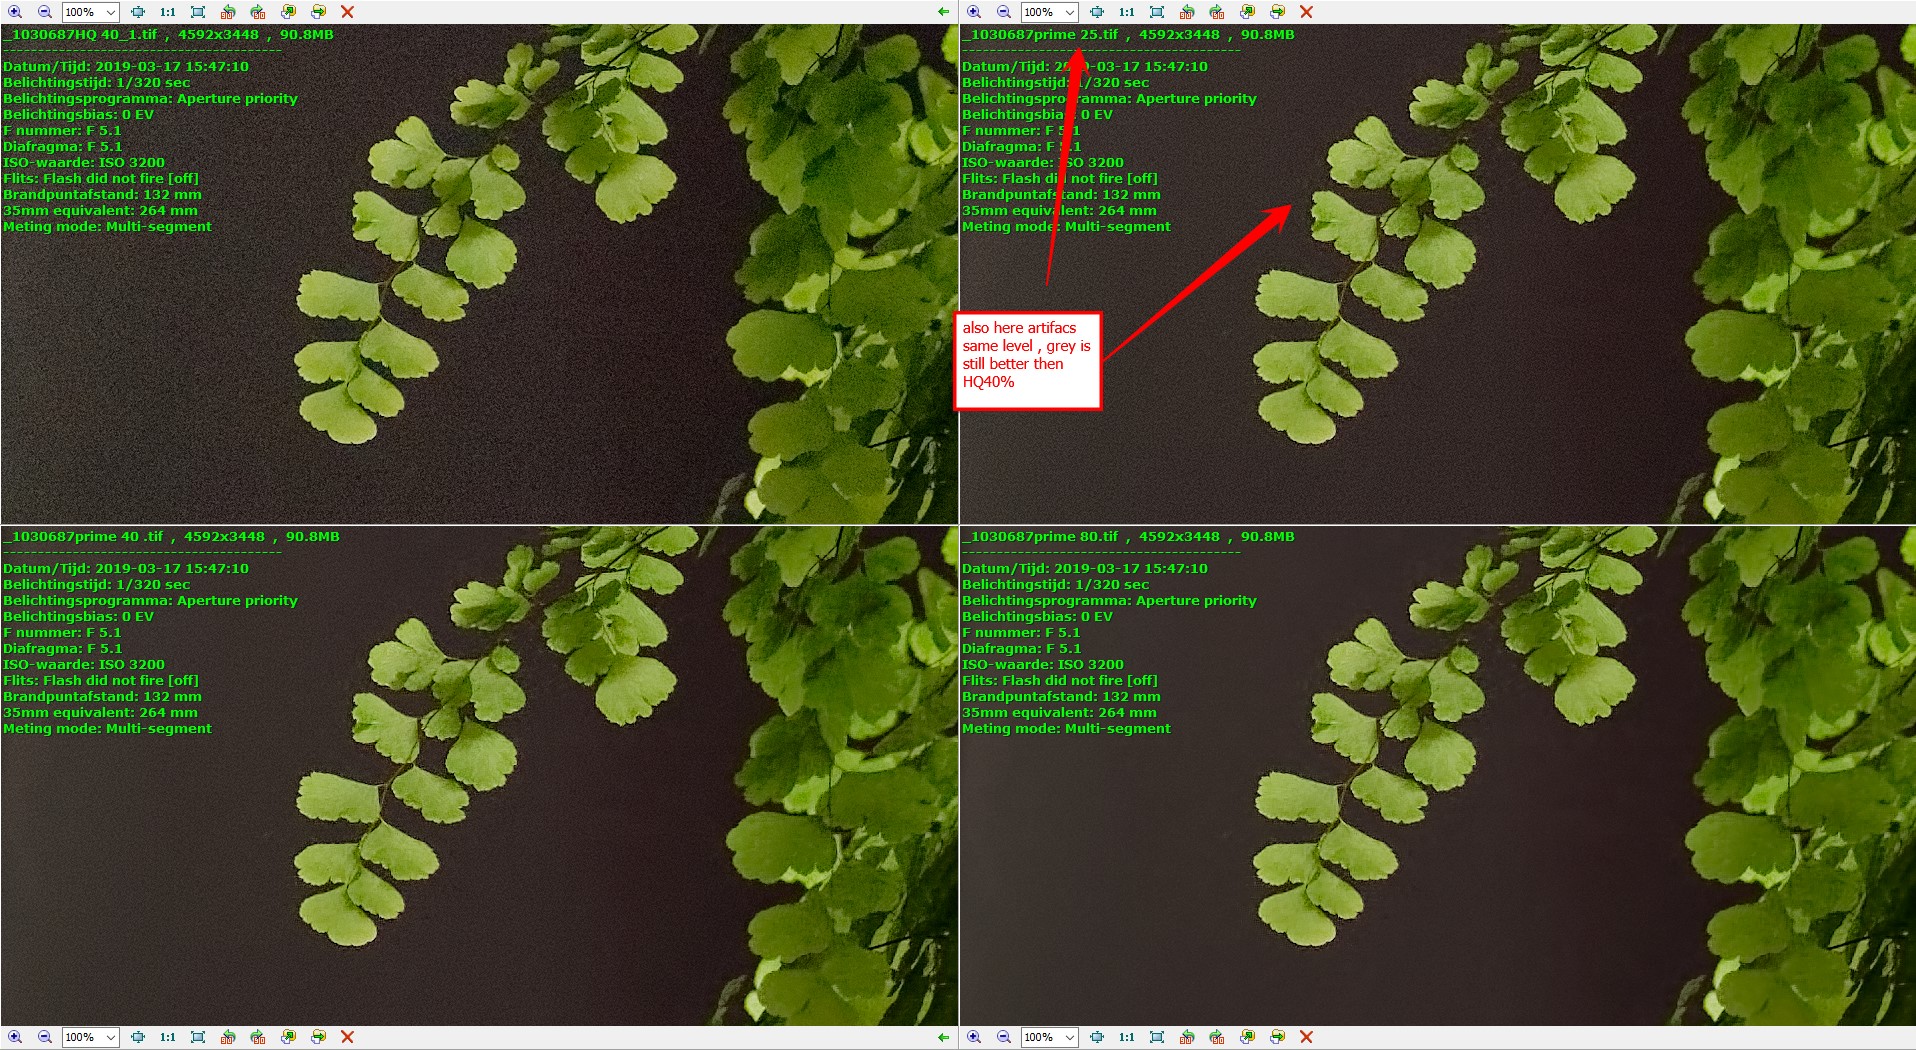
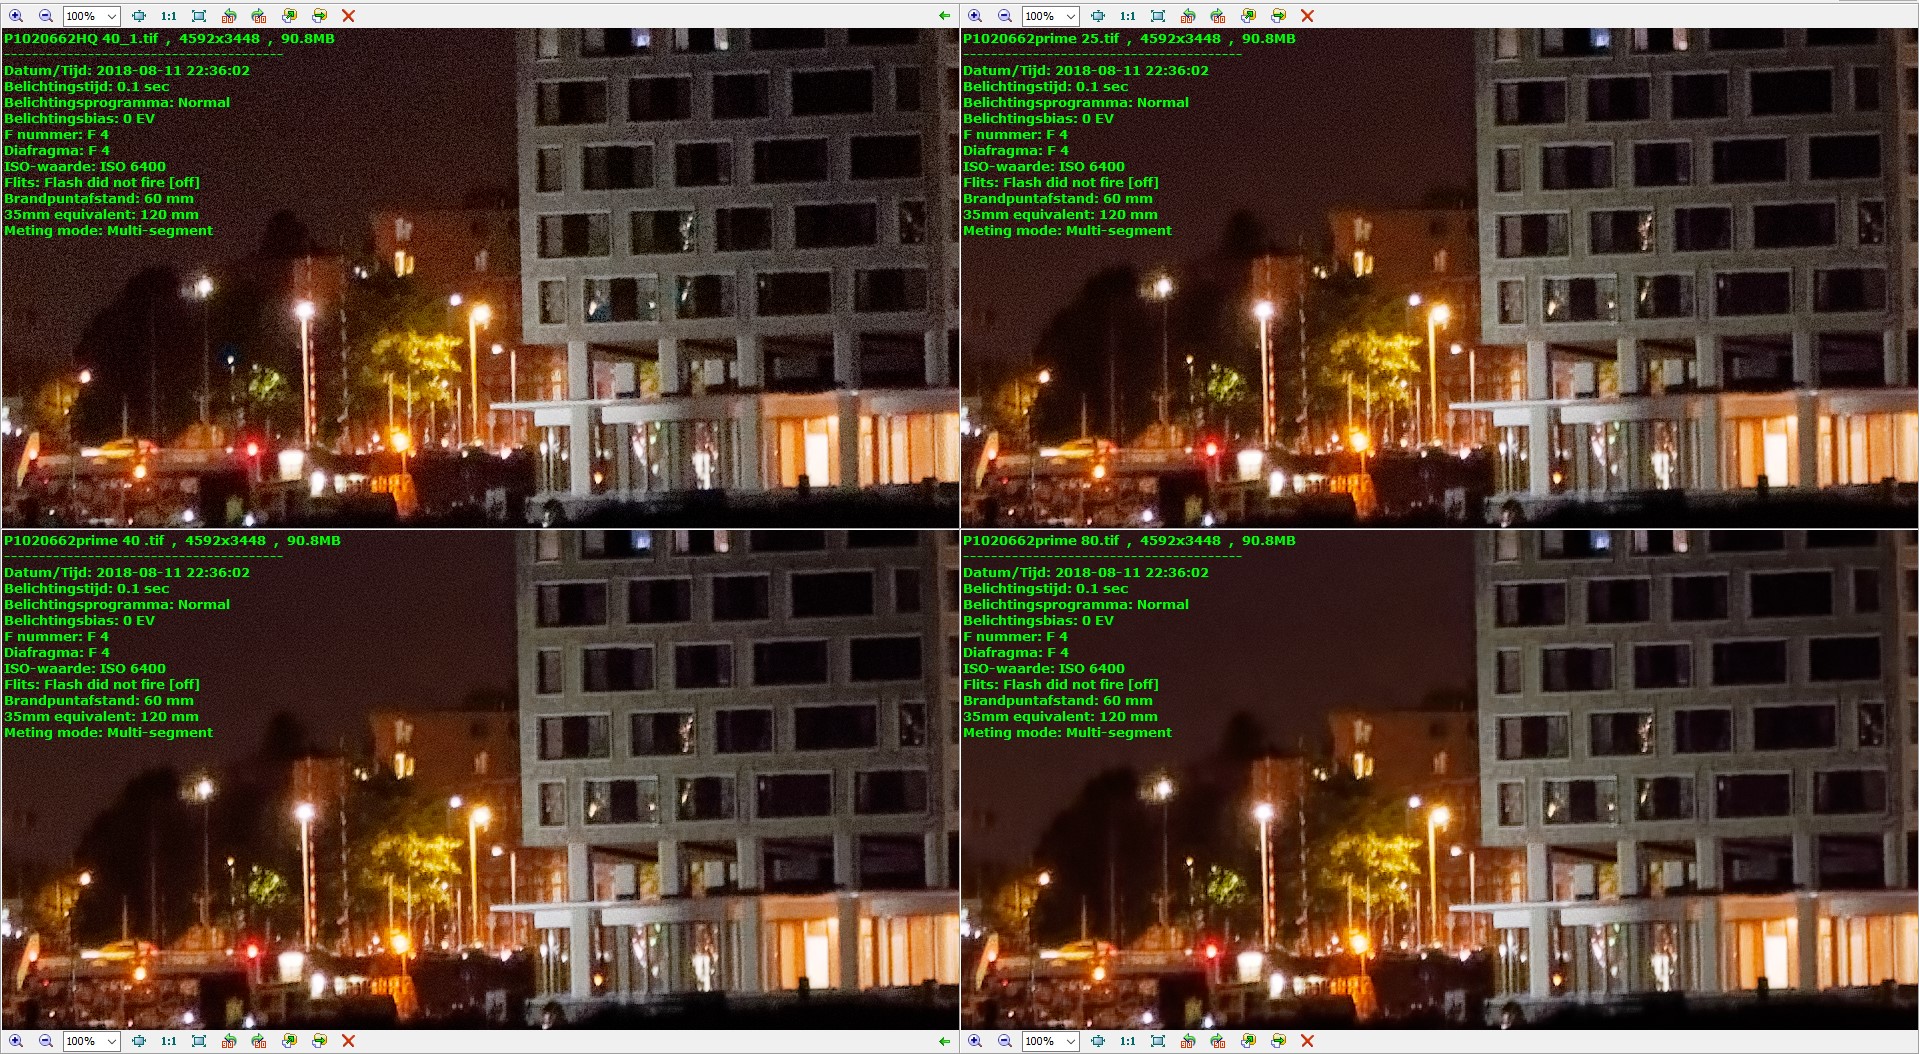
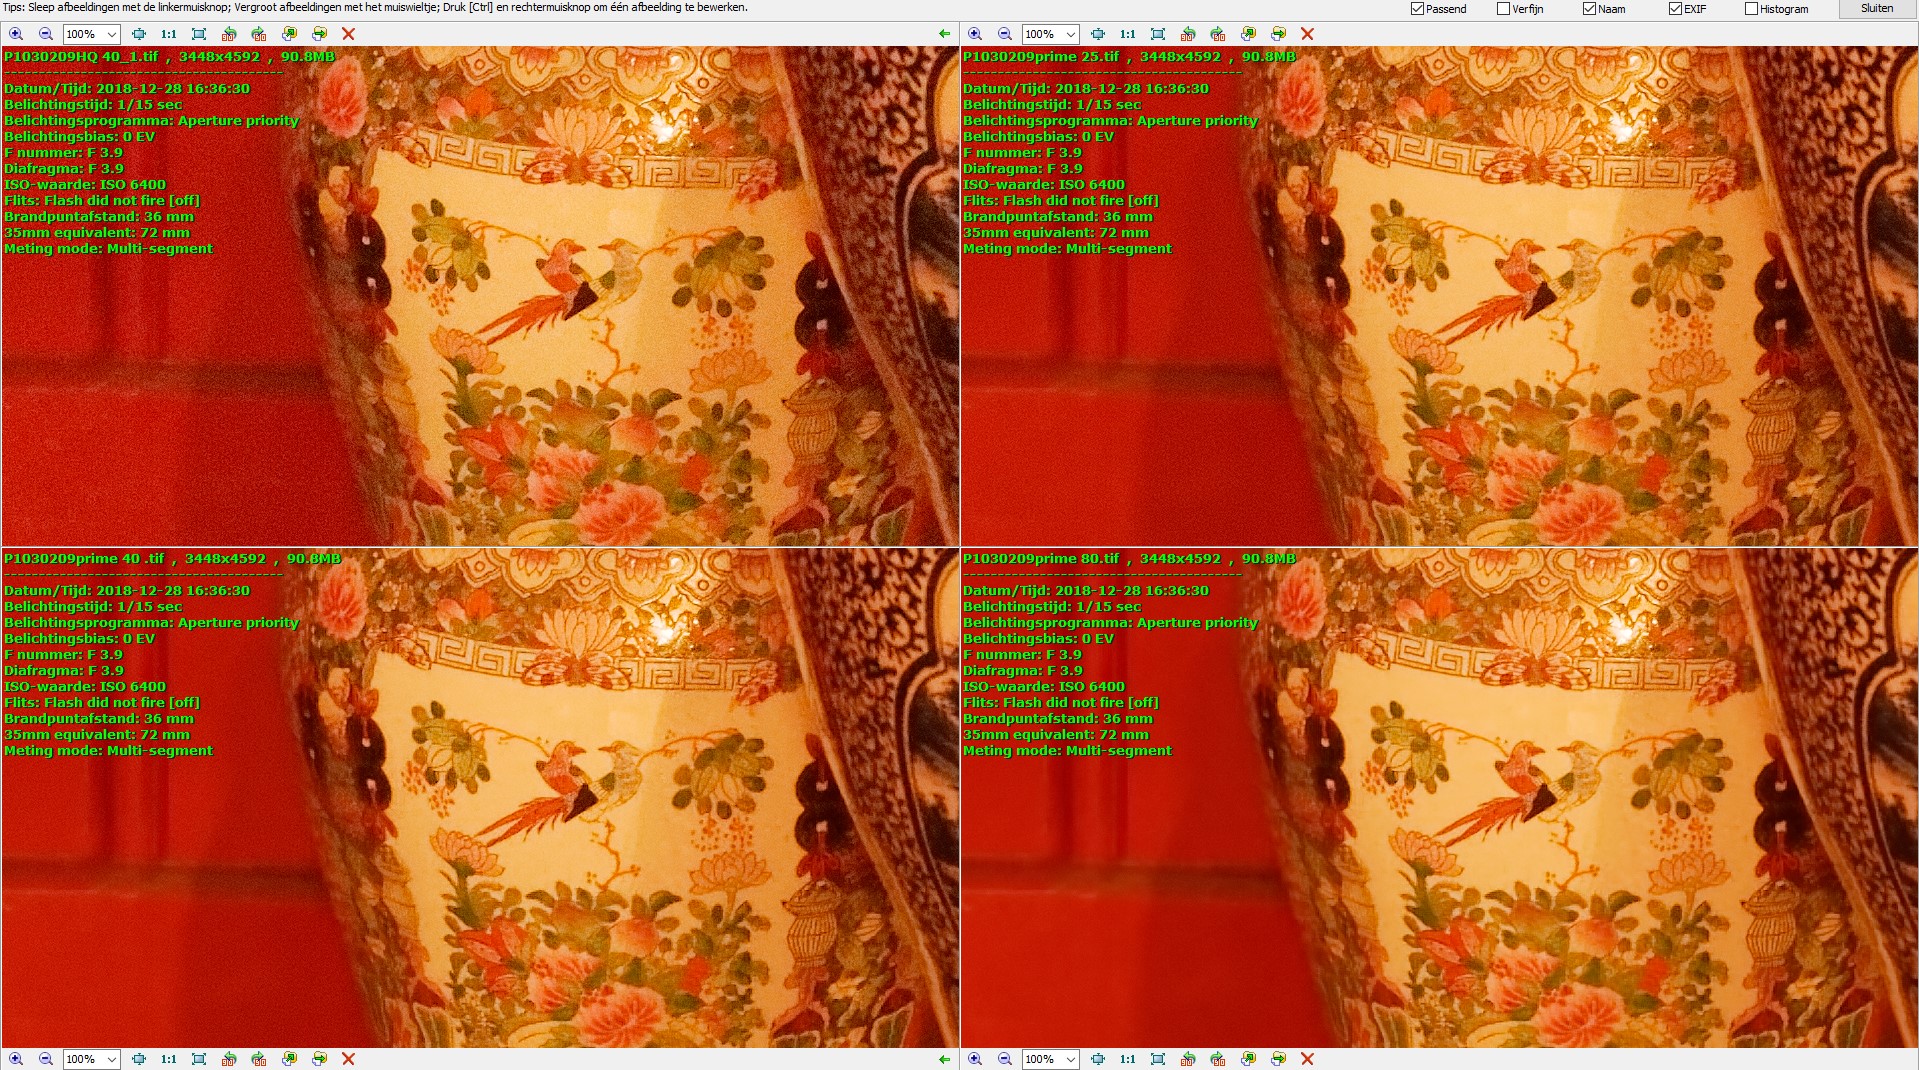
some screen copy’s. (if some one want s the tiffs for it’s own look please say so i will upload them.)
i still don’t grasp why 40% is default and not 25% aldoh 80% isn’t ruin the good exposed in any way so it’s not smearing along wile noise is removed even the high iso’s are not bad. in 40% 0r 80%
which threshold is bound to the 40%? (i think it’s answer is a “bakers secret” )
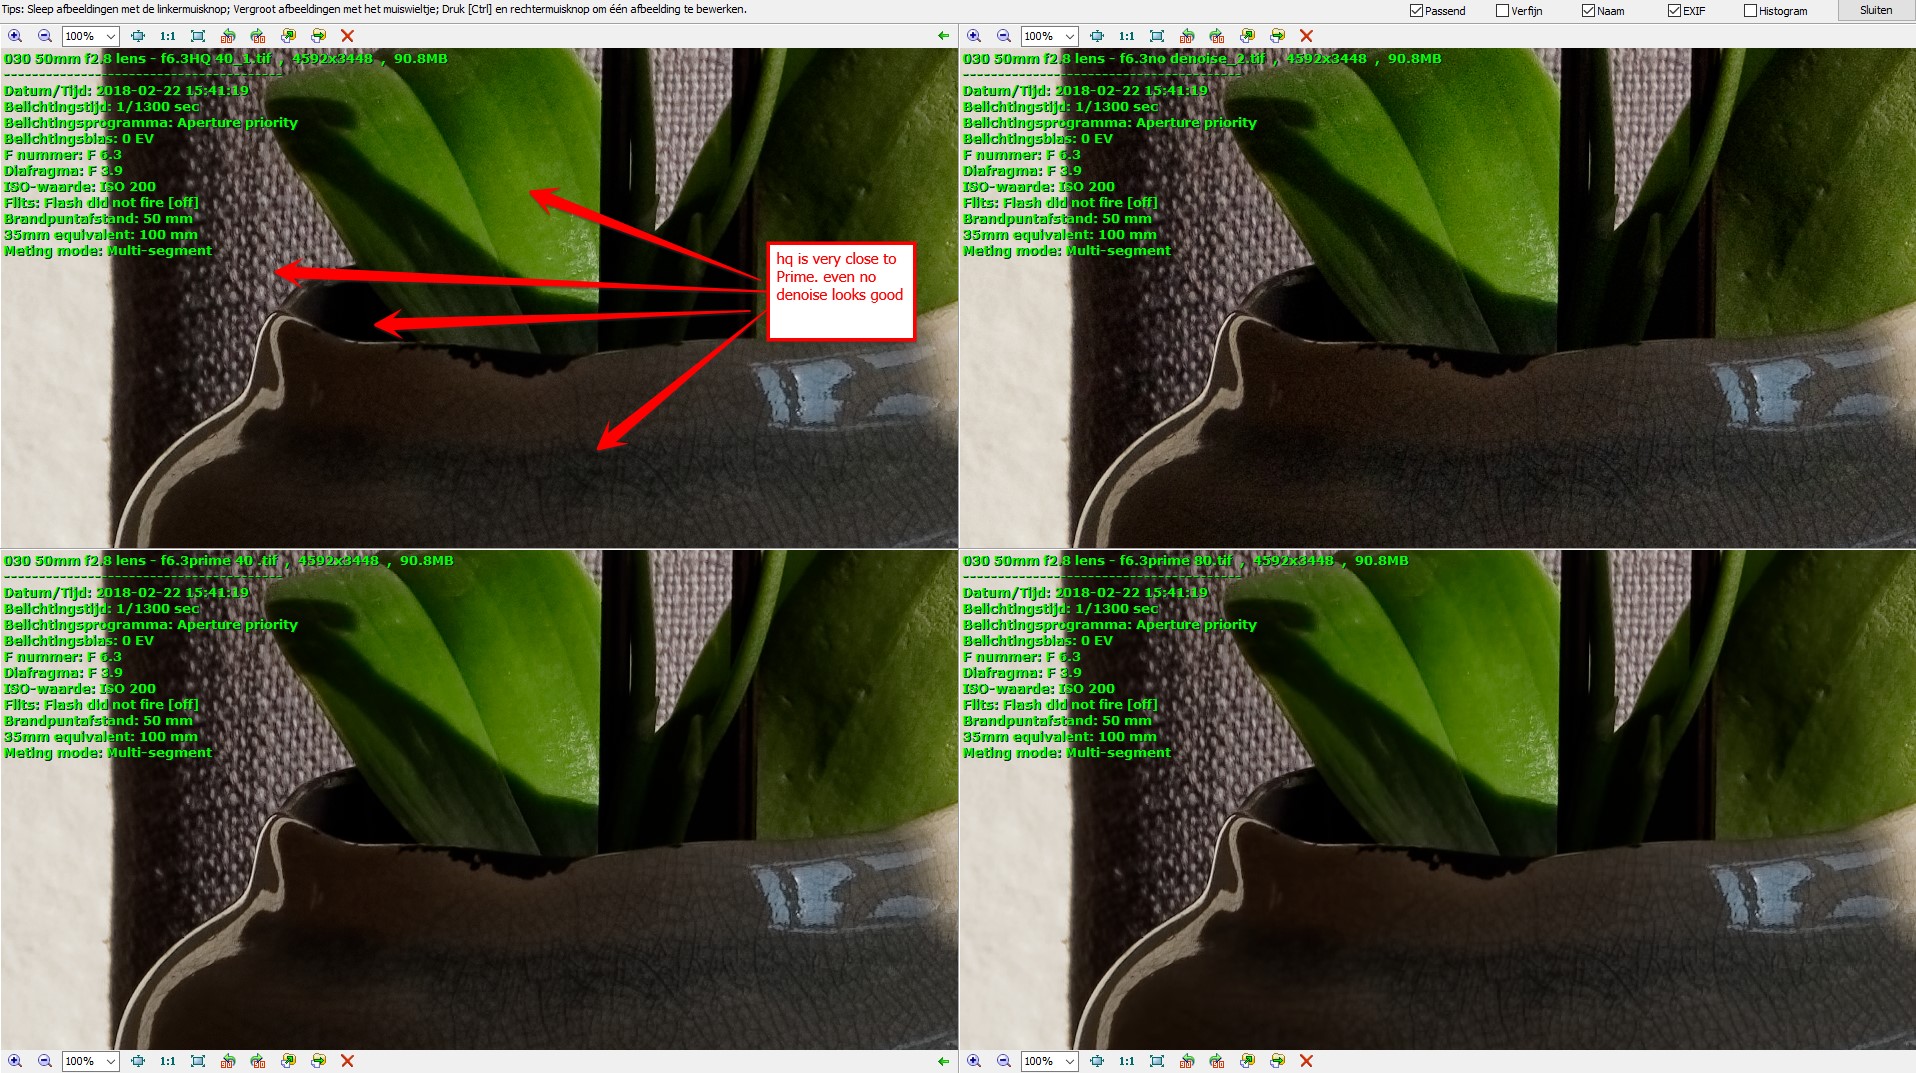
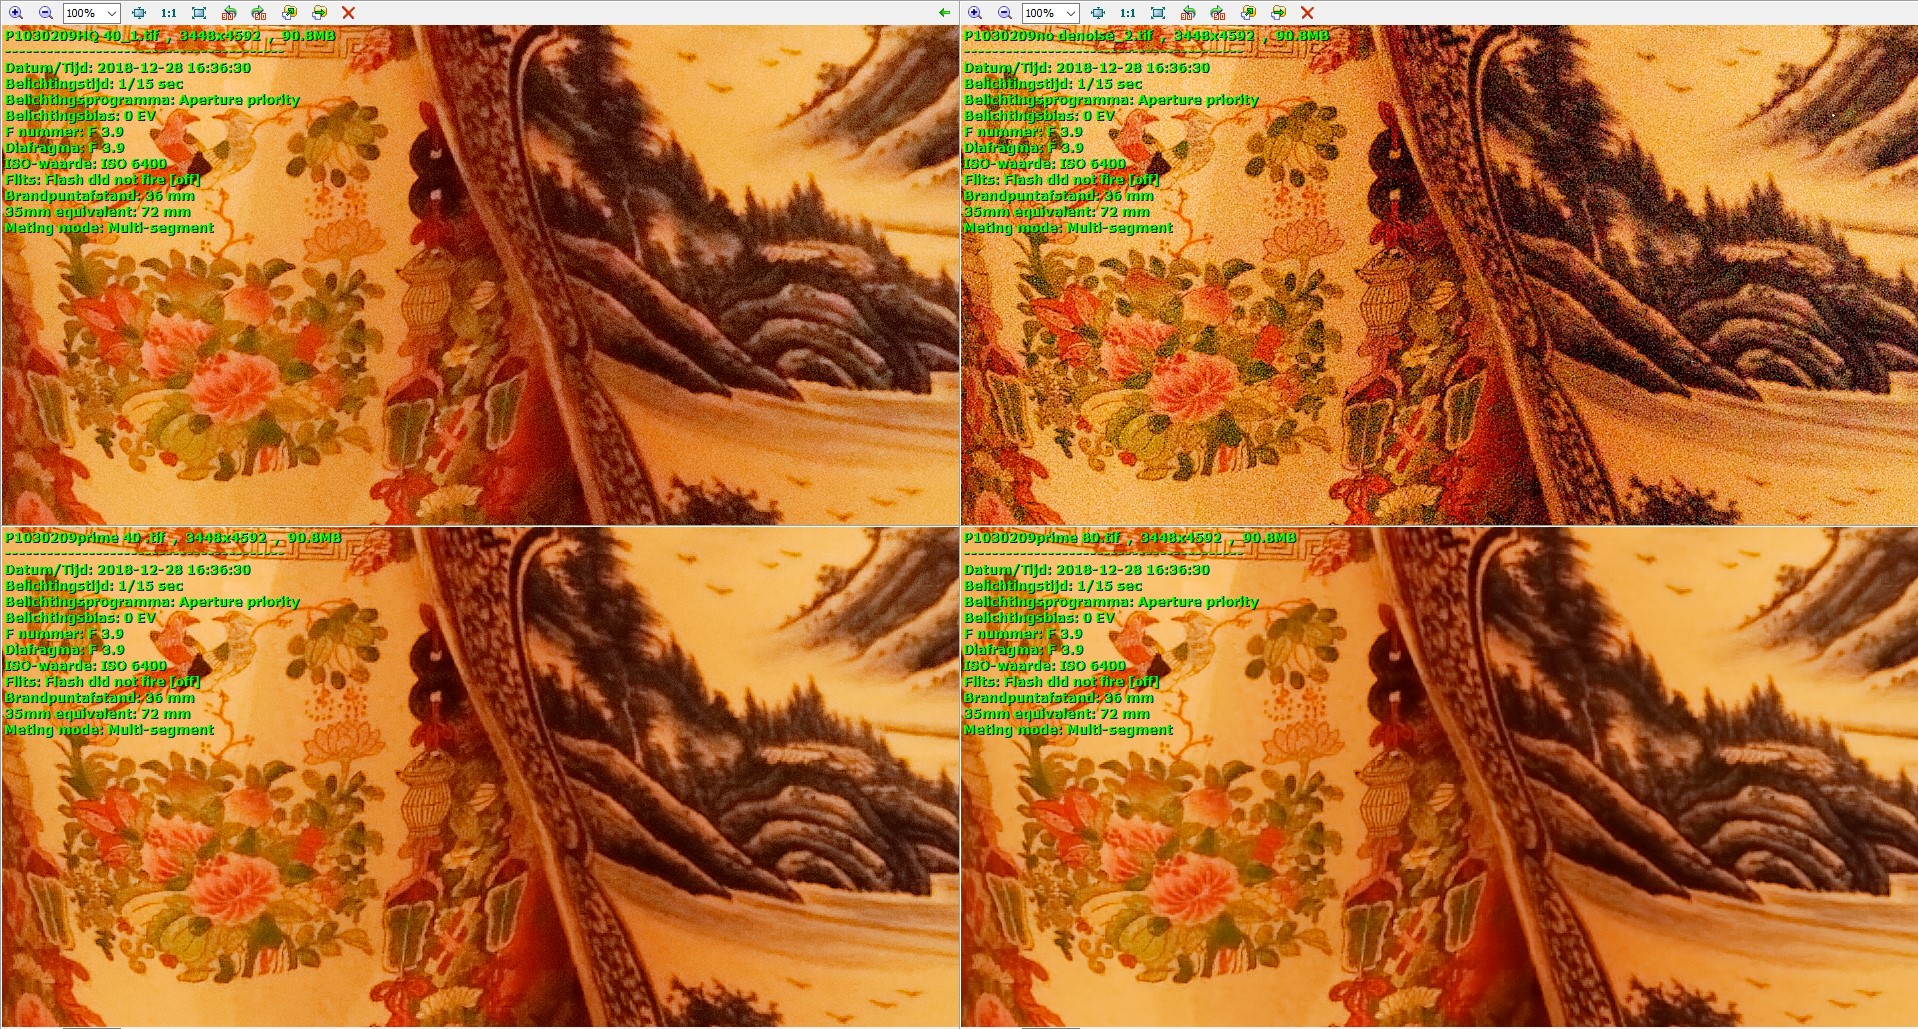
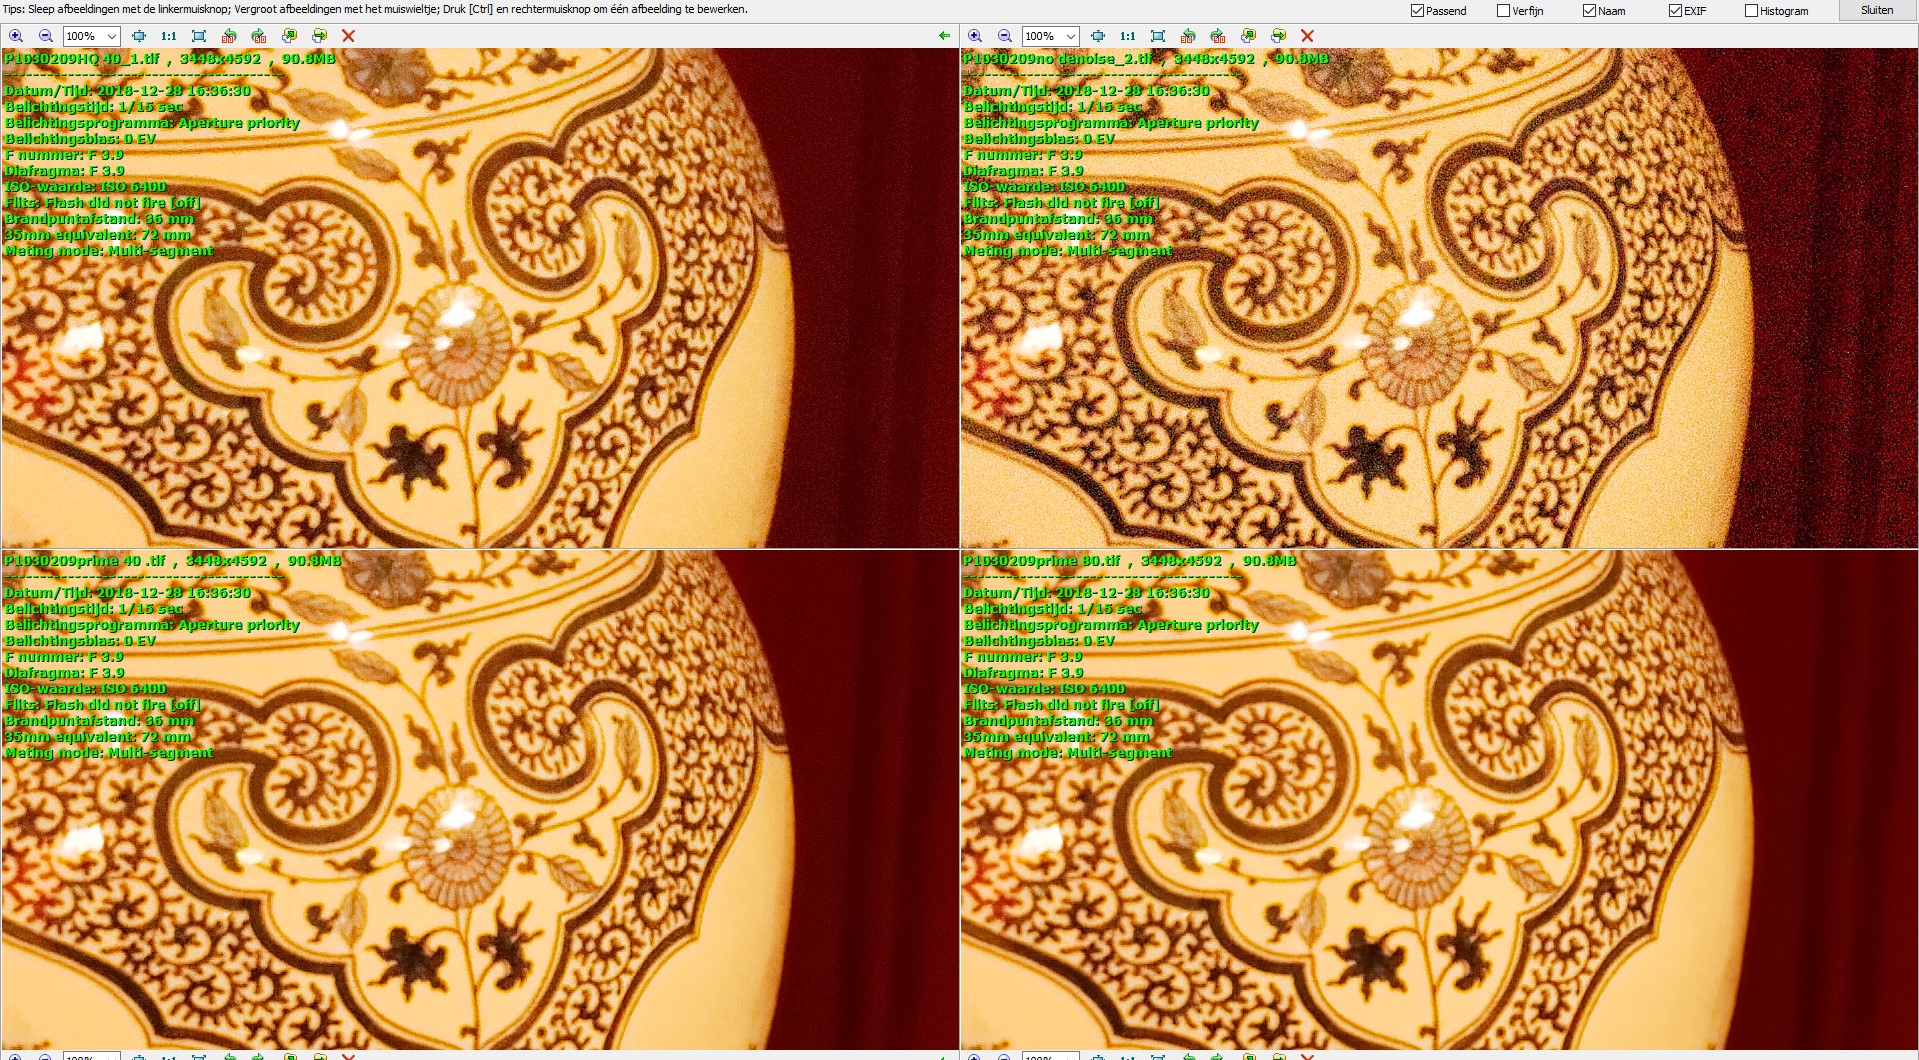
The artefacs on the plant leafes edges are more or less the same on 25% and 40% or 80% ok 80% is little more visible.
Taking the vase, the 80% looks most crisp. So i believe you can bump up PRIME if you need and just check for mishits. (could test HQ and dfine2 after that to see if artefacts appear also. )
lazy as i am i think i take the 40% prime as default and not hq40% in my preset.
if i discover problems i turn to HQ and Dfine2.
My take-away from your examples, Peter, is that we should experiment with the PRIME settings for specific shots, depending on ISO values, etc - - rather than simply depending on the “magic wand” setting.
Yep! The lower iso values doesn’t benefit from PRIME much. Maybe the iso invariant sensors do.
Then you can underexpose in a lower iso and lift in post which have the same outcome as well exposed in higher iso. And when the post software is better then the camera’s iso valuation the lower lifted version is better.
When using m43 sensor the average iso value is a bit higher then apsc or ff so i am hasitating to set my preset prime lower then default. But indeed i think you can have 10% for 100 til 300
20% 300-600 30% 600 til 1200 40% 1200- …
And for every exposurecompensation stop in post add 10%
(Lifting shadows is causing noise in those parts.)
(I still like to know why 40% is chosen as default in HQ and PRIME. There is a threshold which they visualized with the default setting)


 )
)