How to manually identify a lens used on a camera known to PL4

You should always apply the four default optical corrections if you have an Optics Module available.

What I am demonstrating here is how to apply those four corrections if you don’t have one or if you want to override the Module.

I can’t remember if I’ve posted it here before, but here is a preset that only applies the four optical corrections only if they are not ready there. It’s a partial preset so it shouldn’t undo any of your previous edits with any of the other tools.

Optical Corrections only.preset (1,1 Ko)

To get used to this, I think I will always apply the Optics corrections, and manually turn off what I don’t need. Once I am used to this, I will select your Optical Corrections only.preset once I know how to add it.

I need to learn what these things are, and what they do, and if it takes longer for me to get set up, so be it.

Thanks again.

(How do I get to see your new photos, when you create them? Do they go into the gallery you showed me some time back, or do they just get printed?)

Quick question - how do I apply a “partial” preset? Do I apply the standard pre-set first, and then use your partial preset to over-write what I’ve already set?

I didn’t know I could do that - I assumed that once I select a preset, I’m “done”, unless I make additional changes manually. So, do I first use a standard preset, and then select your partial preset to over-write parts of what I had just selected with the standard preset?

It all depends on what you have already adjusted before applying any preset.

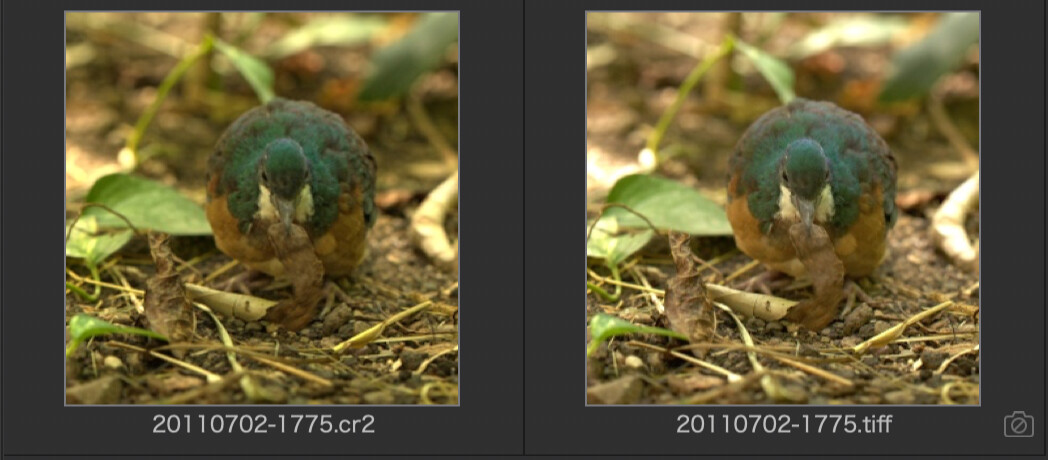
But first what does the difference actually look like?

The “2 - DxO Optical Corrections only” preset is a full preset - so called because it is going to change every tool on every palette, even if it is only to turn some tools on or off without actually making any adjustment.

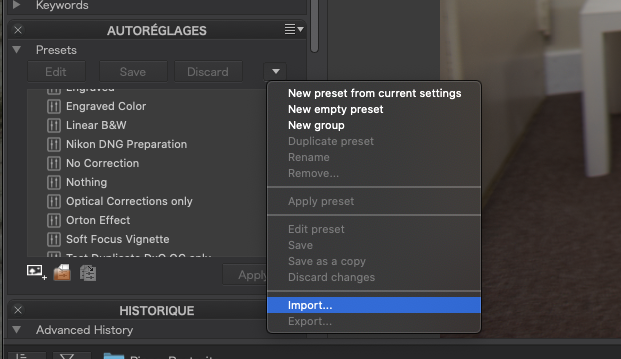
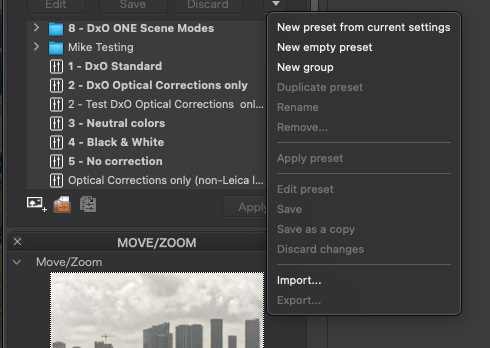
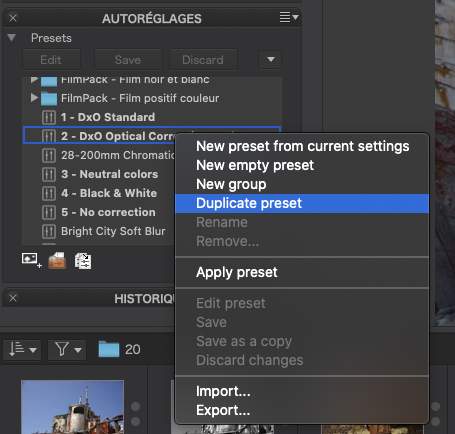
For example, I took the “2 - DxO Optical Corrections only” preset and duplicated it (because the system presets are not editable)…

Capture d’écran 2021-02-17 à 18.24.14

Capture d’écran 2021-02-17 à 18.25.28

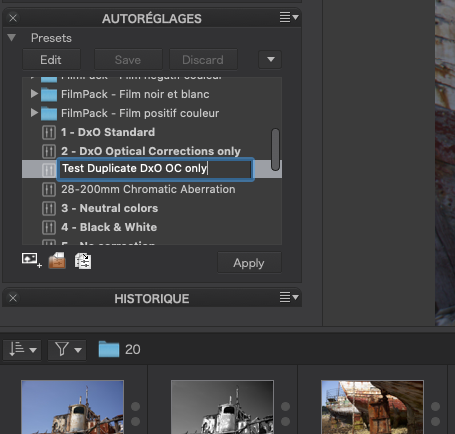
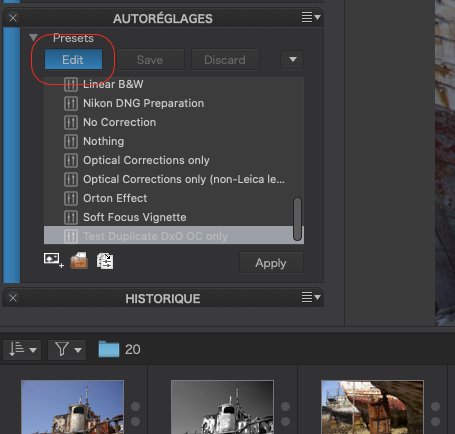
Then I selected the copy and hit the Edit button…

Capture d’écran 2021-02-17 à 18.29.22

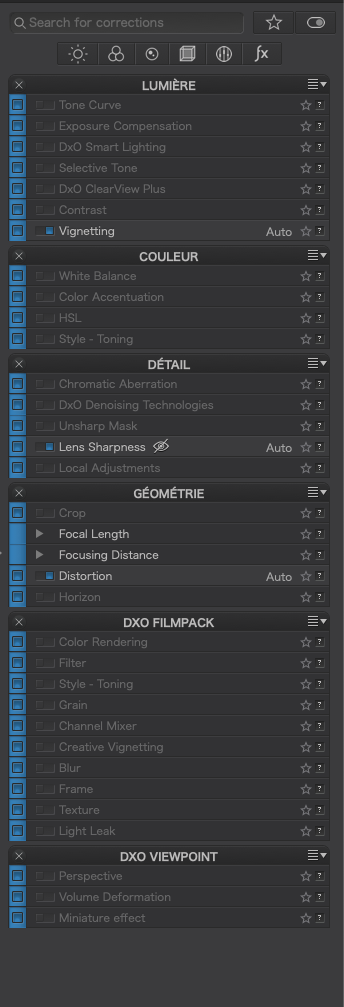
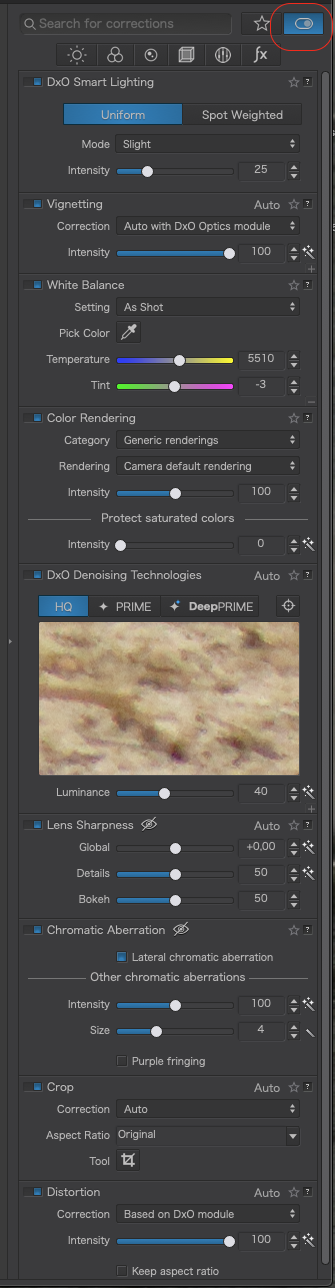
You can see already that there is now a blue stripe down the left of the palettes in the left sidebar - as there is on the palettes in the right sidebar…

For the sake of this example, I collapsed all the palettes and tools

This blue stripe on the right hand palettes indicates that any tool so highlighted will be altered when the preset is applied.

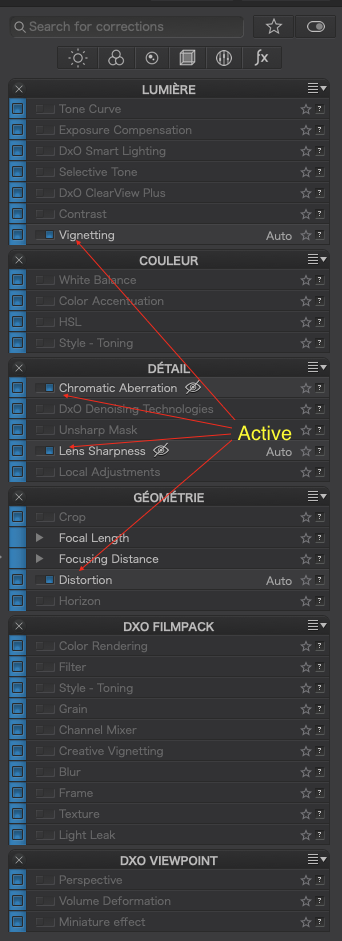
In this shot, you can see that all tools will be affected (indicated by the blue stripe) but that only the four tools with the little blue square next to the title will actually end up being activated (marked on the screenshot). The problem with applying this “full” preset is that it will deactivate all but those four tools, so that any changes you have made to those tools will no longer affect the image until you reactivate them by clicking on the little blue square.

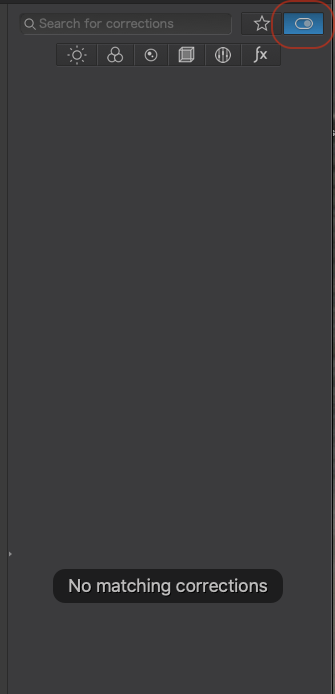
If you compare that with what you will see when you edit my partial preset…

… you can see that a limited number of tools are going to be affected. When you apply such a preset, the only tools you are going to see changes on are those that have the blue stripe on them.

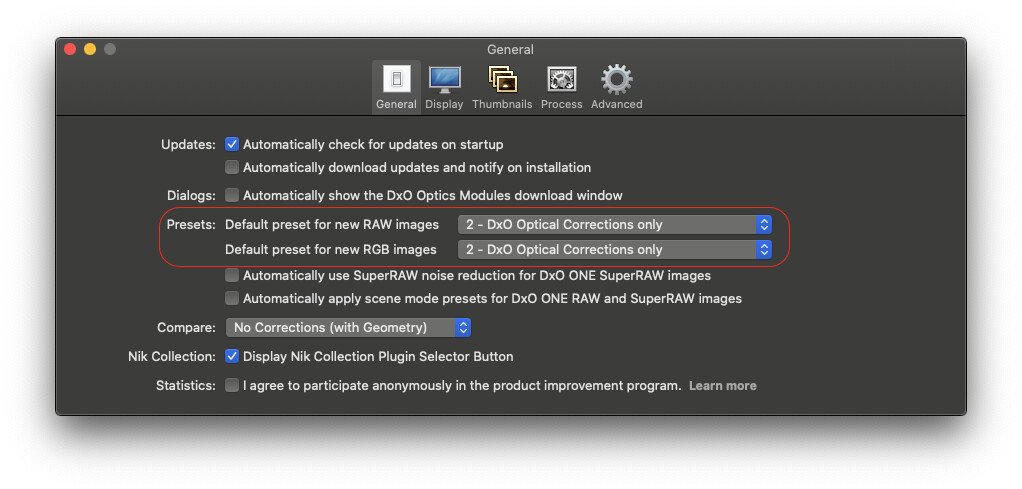
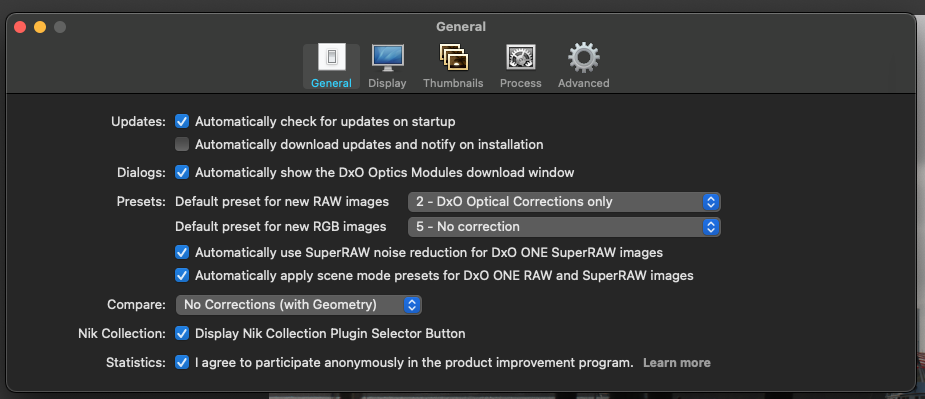
The “2 - DxO Optical Corrections only” preset is really only intended as a default preset due to these blanket changes and you could set this as your default in the Preferences…

This is its primary purpose and it really isn’t good for your sanity to apply such full presets after you have already done any significant editing.

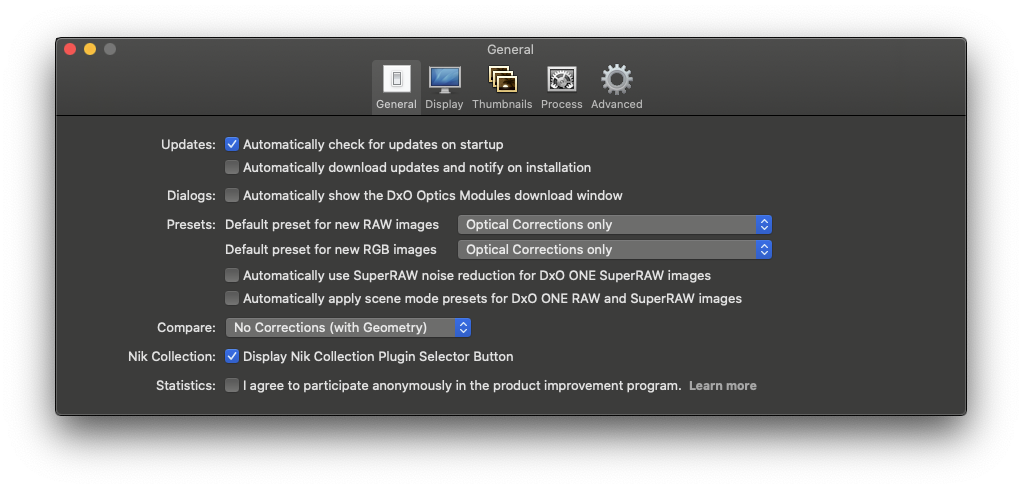
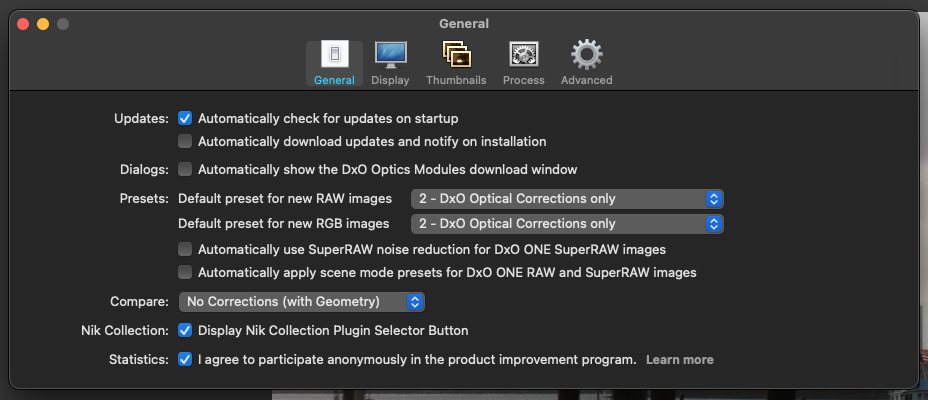
You can also set my partial preset to be the default…

You won’t notice any difference when opening a file for the first time because it only affects the same tools as the DxO one.

What will make a difference is that you can also apply my partial preset “after the fact” and it will only affect those four tools - all the other tools that you might have used so far in an editing session will not be affected.

Does that clarify things or further confuse? :blush:

1 Like

As I read this, very slowly, I thought I understand what it was and did, but I lost track of the reason for doing it at all. In the words I just copied above, that explains it, and is the reason for doing it.

I do understand now that as I am working on an image, I now CAN apply your preset, which won’t change all my other settings - but in what circumstances would I want to do so?

What I’ve learned from you and others here, is that when I open an image in PL4 I start with the “most basic” things (cropping, making image level, overall settings), then make the changes I (think I) know are needed, and then go through every option I know of in PL4 to decide if I should try it.

At some point what you’ve just shown me (us) is suddenly going to be very useful/helpful. I don’t think I’m acclimated adequately with PL4 to take advantage of it - yet.

You are a very good teacher. What you just posted seemed clear as mud, until I went through it line by line, until I understood it. So to answer your question, yes it certainly does clarify something that I was lost about prior to reading your post!

Don’t forget, the first time you open an image, the default preset will be applied. Apart from geometry, if there are certain tools you “always” set to the same values, then you can add those to your own custom full preset and make that your default.

Which preset are you currently using as your default?

Did you find how to add the preset?

Strange, I selected an image I had not yet worked on, and in the History tab all it says is “Applied Default Preset”. I can’t find something to click on to tell me exactly what my “default preset” is doing. I tried searching for it, and while I found lots of info on how to change it, I couldn’t find a way to identify it. When I click on Presets, that is no help.

I am pretty sure the Optics Module is changing my image, but since I left my Leica set to the number I entered for the 50mm Summicron, and I was using a 90mm Summicron, that was incorrect. I need to search for the setting for my old 90mm Summicron lens, and enter that manually into the camera when I use that lens.

Maybe I’m blind, or maybe it’s hidden too well for me to find. At the left side of the screen, I found m “Preset Editor”, but no place I have yet looked does it tell me what my “default preset” is and does right now…

Indeed, that’s what always happens to an image that has never been opened in PL before.

I know you wrote “doing” but could you first tell us what your default preset is?…

As to what it is doing, possibly the best way is to click on the Active Corrections switch on the top right corner of the right hand palettes.

Here’s what “5 - No correction” does…

Here’s what “1 - DxO Standard” does…

… which is a very good reason why you should never use it.

I would highly recommend that you use either the DxO or my Optical Corrections only preset. Then you know the image is as it was when it left the camera, apart from the essential corrections for the lens being made.

If you are using the correct lens, and the correct Optics Module is available, then you should use the Optical Corrections only preset.

If you are using a non-supported lens interchangeably, then you might be wise to set the No Corrections preset as the default and apply either my Optical Corrections only preset for supported lenses or my OC for non-Leica lenses preset…

Optical Corrections only (non-Leica lenses).preset (1,0 Ko)

Aha! Preferences > General. Why didn’t I think of that!!! I need a new brain.

My preferences were:

I have now changed them to be more like yours:

Yes, if I use a non-supported lens from now on, I will do this.

Now I need to find the appropriate setting for my M10 to use my old 90mm Summicron…

If I buy new Leica lenses, they are all coded, so the camera automatically knows what they are. My Leica lenses are 50ish years old, so they have no coding. Here’s what I need to do to configure my Leica M10 camera for a specific lens:

The first thing I do is go to the menu, and select the option for manually entering the lens I have decided to use. I get the following screen, and I select Manual M (since I’m using a Leica M series camera).

On the next screen, for my 50mm f/2 lens, I have already selected that in the camera, and I manually entered the number for my specific lens, which according to the charts from Ken Rockwell is a 11817.

What I need to do next, to use my 90mm Summicron (f/2) is to select one of the two choices on this screen, and most likely it will be a 11136 or 11137. Still need to do this.

(Unfortunately, as far as I know the camera only “remembers” one manually selected lens in the settings, so I need to do this every time I put on a different (old) lens… or just leave it at one setting forever, as I’ve been doing.)

Also, Leica kept changing their lenses, and the lenses were given new ID numbers to enter in the camera, so the camera would know exactly what lens I’m using. Ken Rockwell made charges for all this, but it’s probably available elsewhere as well.

OK, now that all this has been covered, I need to go backwards and find your write-up on how to do this. Downloading should be simple, but then I need to put the download in the appropriate place.

Thank you!!! It’s scary, but I actually think I do understand what’s going on - now.

I suddenly realised I hadn’t answered this message :crazy_face:

In case you still haven’t done it, here is what you need to do…

Capture d’écran 2021-02-22 à 18.04.18

Simply click on the dropdown menu in the presets palette and import it from where you saved it. DxO will copy it to your presets folder for you and you should see it arrive in the palette.

I thought I knew what to do, but I didn’t know how, and what I thought I needed to do was completely wrong. A few minutes ago, I saved it to my ‘downloads’ folder, and the rest was trivial, based on what you have already shown me:

Screen Shot 2021-02-22 at 15.07.09

The file is now where it belongs. :slight_smile:

Mike.
I hope this last bit of info will be helpful:

Correcting lenses without DxO Optics Module - DxO

Short read that shows which items Optic Modules correct with brief explanation of each. The tips others have provided are certainly greater in depth from a management standpoint, but this short bit gives clarity on the items you can alter when a lens is not supported and after you have used a default preset that doesn’t alter your images.

Thank you Rick, that will help me with the preset Joanna gave me for use with unlisted lenses.

My single biggest problem with PL4 is similar - my camera (Leica M8.2) isn’t listed. Without that, there is no way for me to get the raw images into PL4. I can manually fix any errors, but without getting the DNG image to open at all, I’m dead in the water. An “as-is” camera listing, for unknown cameras, might be able to get the images INTO the PL4 system. If they weren’t “accurate”, so be it - I could adjust them manually.

How does PL4 know what camera I used? Is it something saved in the EXIF data? If so, can I manually change that into something that PL4 will accept? I find this very frustrating. I understand that PL4 won’t work with an X-trans sensor, but the Leica M8.2 isn’t all that different from a Leica M9, other than the M9 having more pixels.

Why can’t I use this page:

…to change the lines in this view from Leica M8.2 to Leica M9 , correcting the image size as well?

Yes, DPL takes the info from metadata stored in the file and yes, you could venture into changing some of that info… BUT:

  • Information related to camera and lens exist in more than one place in the file
  • Information is not clear text in all these cases, often it is a numerical value
  • Entries can vary depending on what tag it’s attached to (i.e. EF24 and EF 24, see below)
  • DPL might rely on more than one entry

How can I say such things? I used exiftool to display info stored in one of my Canon files. I then searched for words like “lens” and “EOS”, which brought up more than one entry per search. Using iHex (a hex editor), I found that the number of hits (using the same search criteria) is different, which means that some info is not in cleartext. Good luck changing entries under these circumstances.

Here are the search results for illustration:

If it doesn’t work, I’ve got nothing to lose. I will find the “obvious” EXIF data for my Leica M10, and with an EXIF editor, replace those two values into the RAW (DNG) image from my Leica M8.2 image. If it opens inside out, I’ll know this is not very wise. If it does nothing, as is likely, I’ll assume that the other information you found might be keeping it from working. But if I get out of my bed on the right side, and say a few kind words to the God of Photography, maybe my image will show up, and maybe it will even be useable (grin).

I can fully understand why DxO would not approve of this (hey stupid, wait until we provide the official camera information), but there’s a better chance that it will snow here in Miami Florida, than there is of DxO providing specs for a ten year old camera that has been superseded many times by now.

Contrary to all the horror stories about the M8 cameras, as far as I’m concerned it is a lovely camera, not full frame, and with a very different sensor from what Leica now uses, and without the anti-IR filter built in, people’s black clothing changes to purple… the reality is that there are a lot of people who very much still enjoy it for what it is. I like the results - but now I’m too spoiled with PL4 to use other software - but I guess I can dust off my Adobe Lightroom and use that again.

I may be wrong, but the only reason DxO wants us to use these official files is so PL can correct for camera errors. But to me, which is worse - an un-corrected image, or no image? :slight_smile:

This is what I’d do instead of tweaking metadata… WB in Lightroom and send to DPL as 16 bit tiff…

Makes sense, but how does PL4 know what camera I used?
If I change Leica M8 in the EXIF data to Nikon D750, wouldn’t PL4 assume I took the photo with my D750?

I understand that once I change it to a TIFF, PL4 will work with the images regardless of what camera captured them. I suppose if I could find a utility to transform Leica DNG files into TIFF format, I would be all set. Yes, I can use Lightroom for that, until when I decide to stop paying for Adobe.

…you can always use DCRAW, if you’re comfortable with the Terminal… Although Dave Coffin has stopped developing it, DCRAW supports many camera bodies as shown here: Decoding raw digital photos in Linux

If you want to try it, I’ve got it compiled and installed on my Intel and M1 Macs here (press shift-command-period to reveal hidden stuff)

dcraw.zip (203.9 KB)

After installation, open Terminal type dcraw and then enter. This will show available options. Check out -4, -T and -h for starters… Use -h to get a half (linear) size image in almost no time and absolutely no demosaicing artifacts. Converting my 60 test images takes 33 seconds on my MacBook Air. Command used: dcraw -h -4 -T *.cr2

Original and conversion by DCRAW, both slightly edited.