It sounds like You are trying to avoid “sunstars” - if I understand this correctly then shoot with a larger aperture - such as f/11 or below.
@JimScott, actually I like sunstars and try to balance between them and too much lens flare (which pretty often doesn’t work out, as you can see…).
In LR the transition between the center and the rays is smooth, in PL I get artifacts - or I have to really spend time on the transition.
1 Like
This is the point - in LR I am done in less than an minute while PL takes quite some time.
Edit: @freixas, yes, your version contains way more details and sure looks better overall. Thanks for your edit - would you share the dop file?
I don’t understand the request 
For you, the brown color on the sun stars is a good answer !?
I tried PL with and without
SmartLighting
ClearView
Microcontraste
HighLight Fine contrast (FilmPack)
I have good results and never seen this ugly Lr look.
Pascal
I know I might seem like a bit of a bore but, as a very techie type photographer, coming from a film background, I am finding it quite incredible that folks are still trying to discuss highlight recovery by discussing images that contain irrecoverable highlights.
Let’s take having the sun in the image for starters.
If you wanted to take a photo of the sun, clearly defined as a circle, you are going to need an ND filter of around 16 stops. Since the best DSLRs only have a range of 14 stops, this means that you are trying to image something that is beyond the range of any sensor yet made and, if you were to attempt to get a well-defined circular sun, there is zero chance that you would render anything else in the image as anything other than black.
To put 16 stops in some kind of context, it might seem like a small number but, in fact, it is on a logarithmic scale and is the equivalent of something being 65,536 times as bright as something else.
So, you are trying to create an image that contains an area that is around 65,000 times as bright as the area of sky next to it. Your eye can’t survive looking at it for any reasonable period of time without going blind. The sensor can’t cope with being exposed to it for to long without pixels getting irretrievably burnt out. And you are expecting an image editing app to be able to recover detail?
It’s not just the transition between the sun and the sky next to it, you also have to consider diffraction and flare caused by such a bright light passing through the lens.
Allowing such a bright light to pass directly through the lens will induce diffraction. What you are seeing with “sunstars” is simply the light diffracting off the blades of the diaphragm; two rays for every blade in the diaphragm. Increase the size of the aperture and the rays will get less but diffraction through the more circular opening will now create a less distinct haze, which is going to be many times more impenetrable than any distancing haze.
Then there’s the issue of flare. If a point source of light hits the interior of a lens, it’s going to start bouncing around off any imperfections in the glass and junctions between lens elements and each other or its mounting inside the lens body. In fact, even indirect contra-jour lighting is going to cause a haze over and above anything in the distance. Whether it’s just distinct internal reflections or more general flare from light coming towards the camera, all this adds up to a lack of detail and contrast in those bright areas that can spread to the rest of the image as well.
To avoid flare, and subsequent loss of detail and contrast, when the sun is outside of the image, you can use a compendium style lens hood :
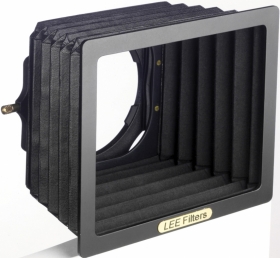
… which can be precisely adjusted to shield the lens from the direct light hitting the inside of the lens.
For those times when the sun is visible in the image, you are going to have to accept that anything you do to “improve” the image is going to be limited by the laws of physics and that, in some circumstances, there isn’t an app in the world that will achieve perfection.
1 Like
@Pieloe, well, if you don’t understand the request, that’s fine with me. You stated that users are not willing to share raws they struggle with. And as this topic is not about ugly browns or the art of Photography, but about highlight recovery, I think it’s legit to post a picture, even if it is everything else than a masterpiece.
Thanks @Joanna - when I go hiking with my family, I take some pictures, edit them and I am fine. I am totallly aware of lens flares and again, this is not the topic.
My attitude my be different, too. I don’t go out for photography or to take “the picture”. I go hiking with my family and take my camera with me, not the other way round.
So:
I just want to recover blown out areas in a similar way and in a reasonable amount of time like a x years old piece of software (LR 6) does.
But as this does not seem to be feasible, as some other users stated, too, that’s ok. Let’s see what future versions of PL will bring.
You’ve got the point 
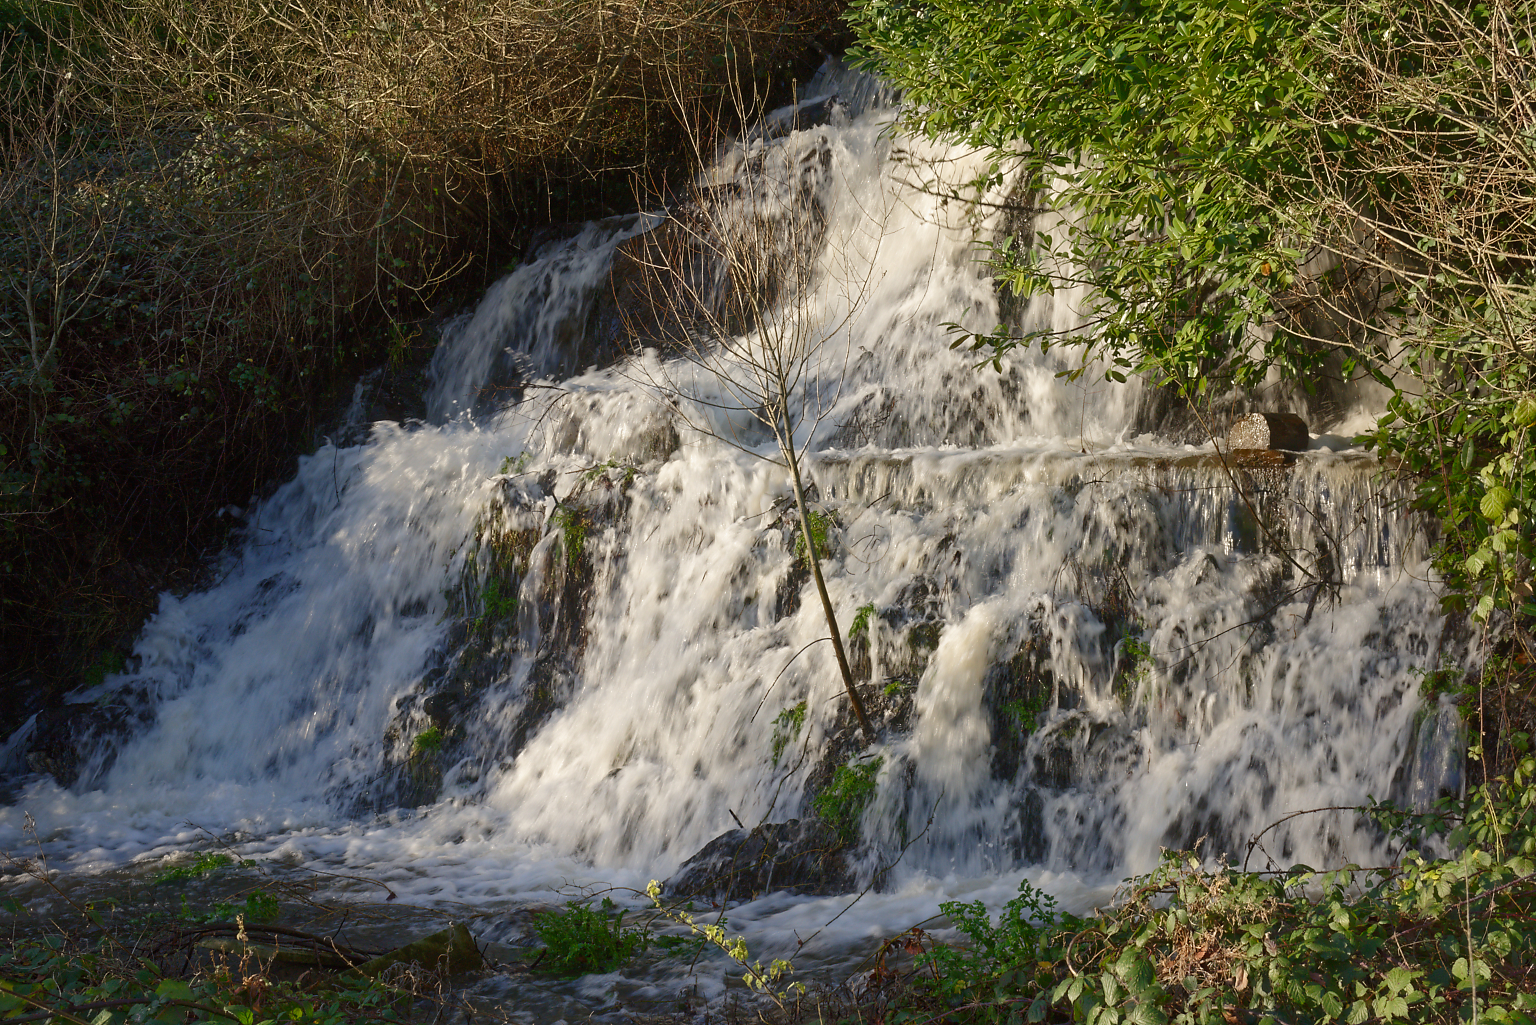
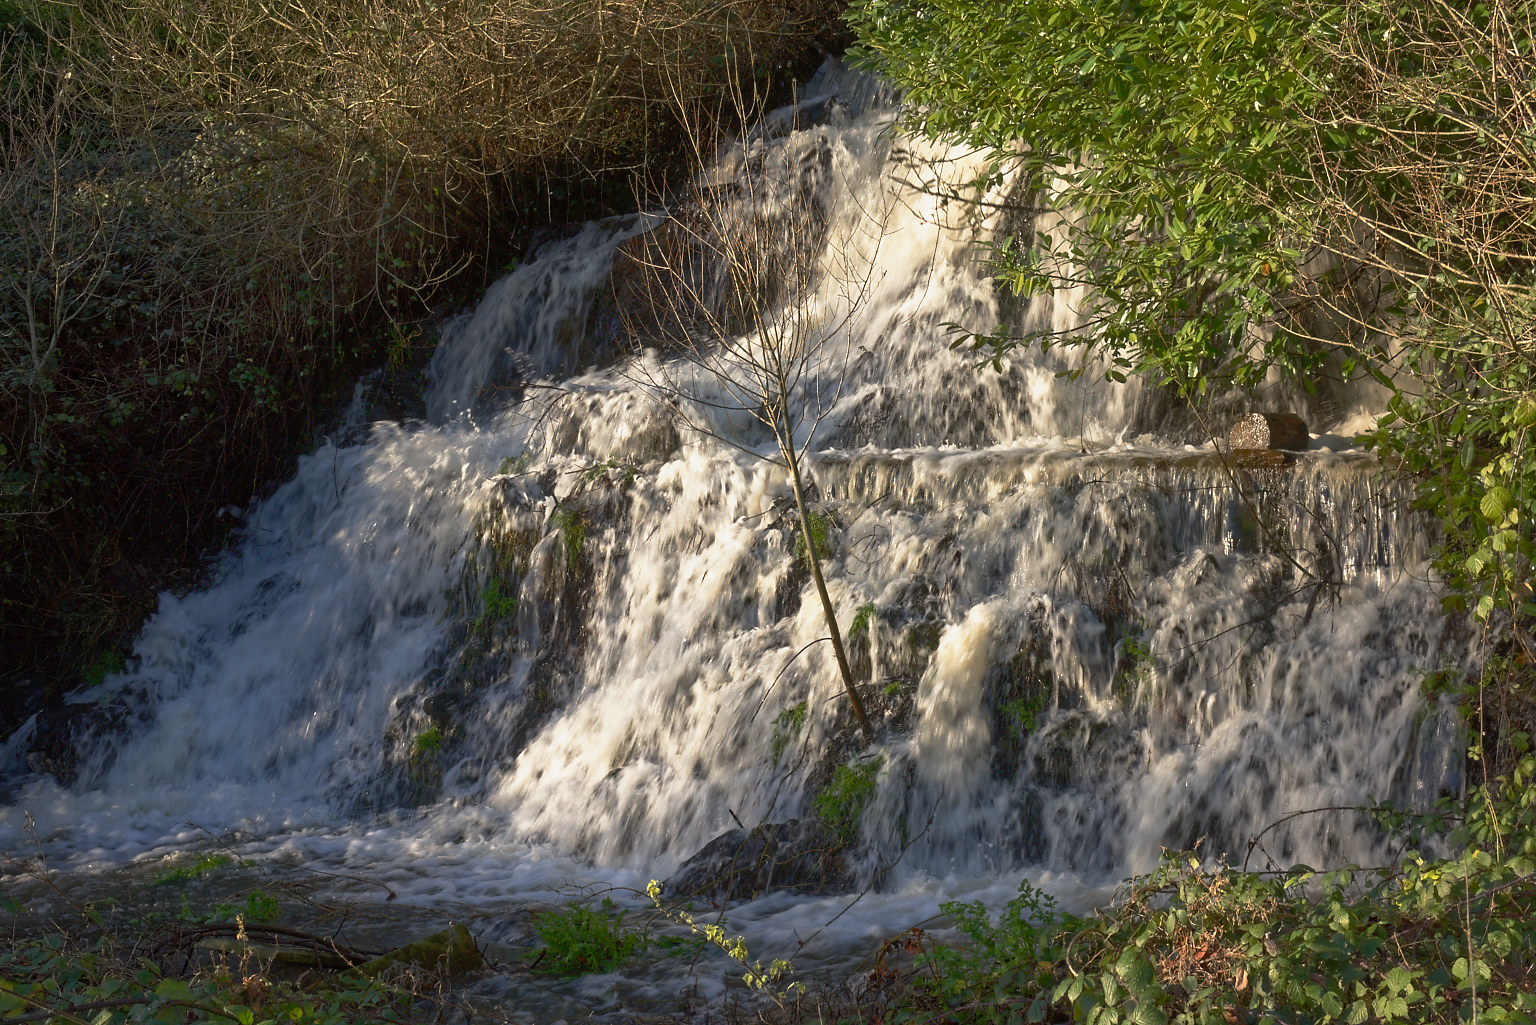
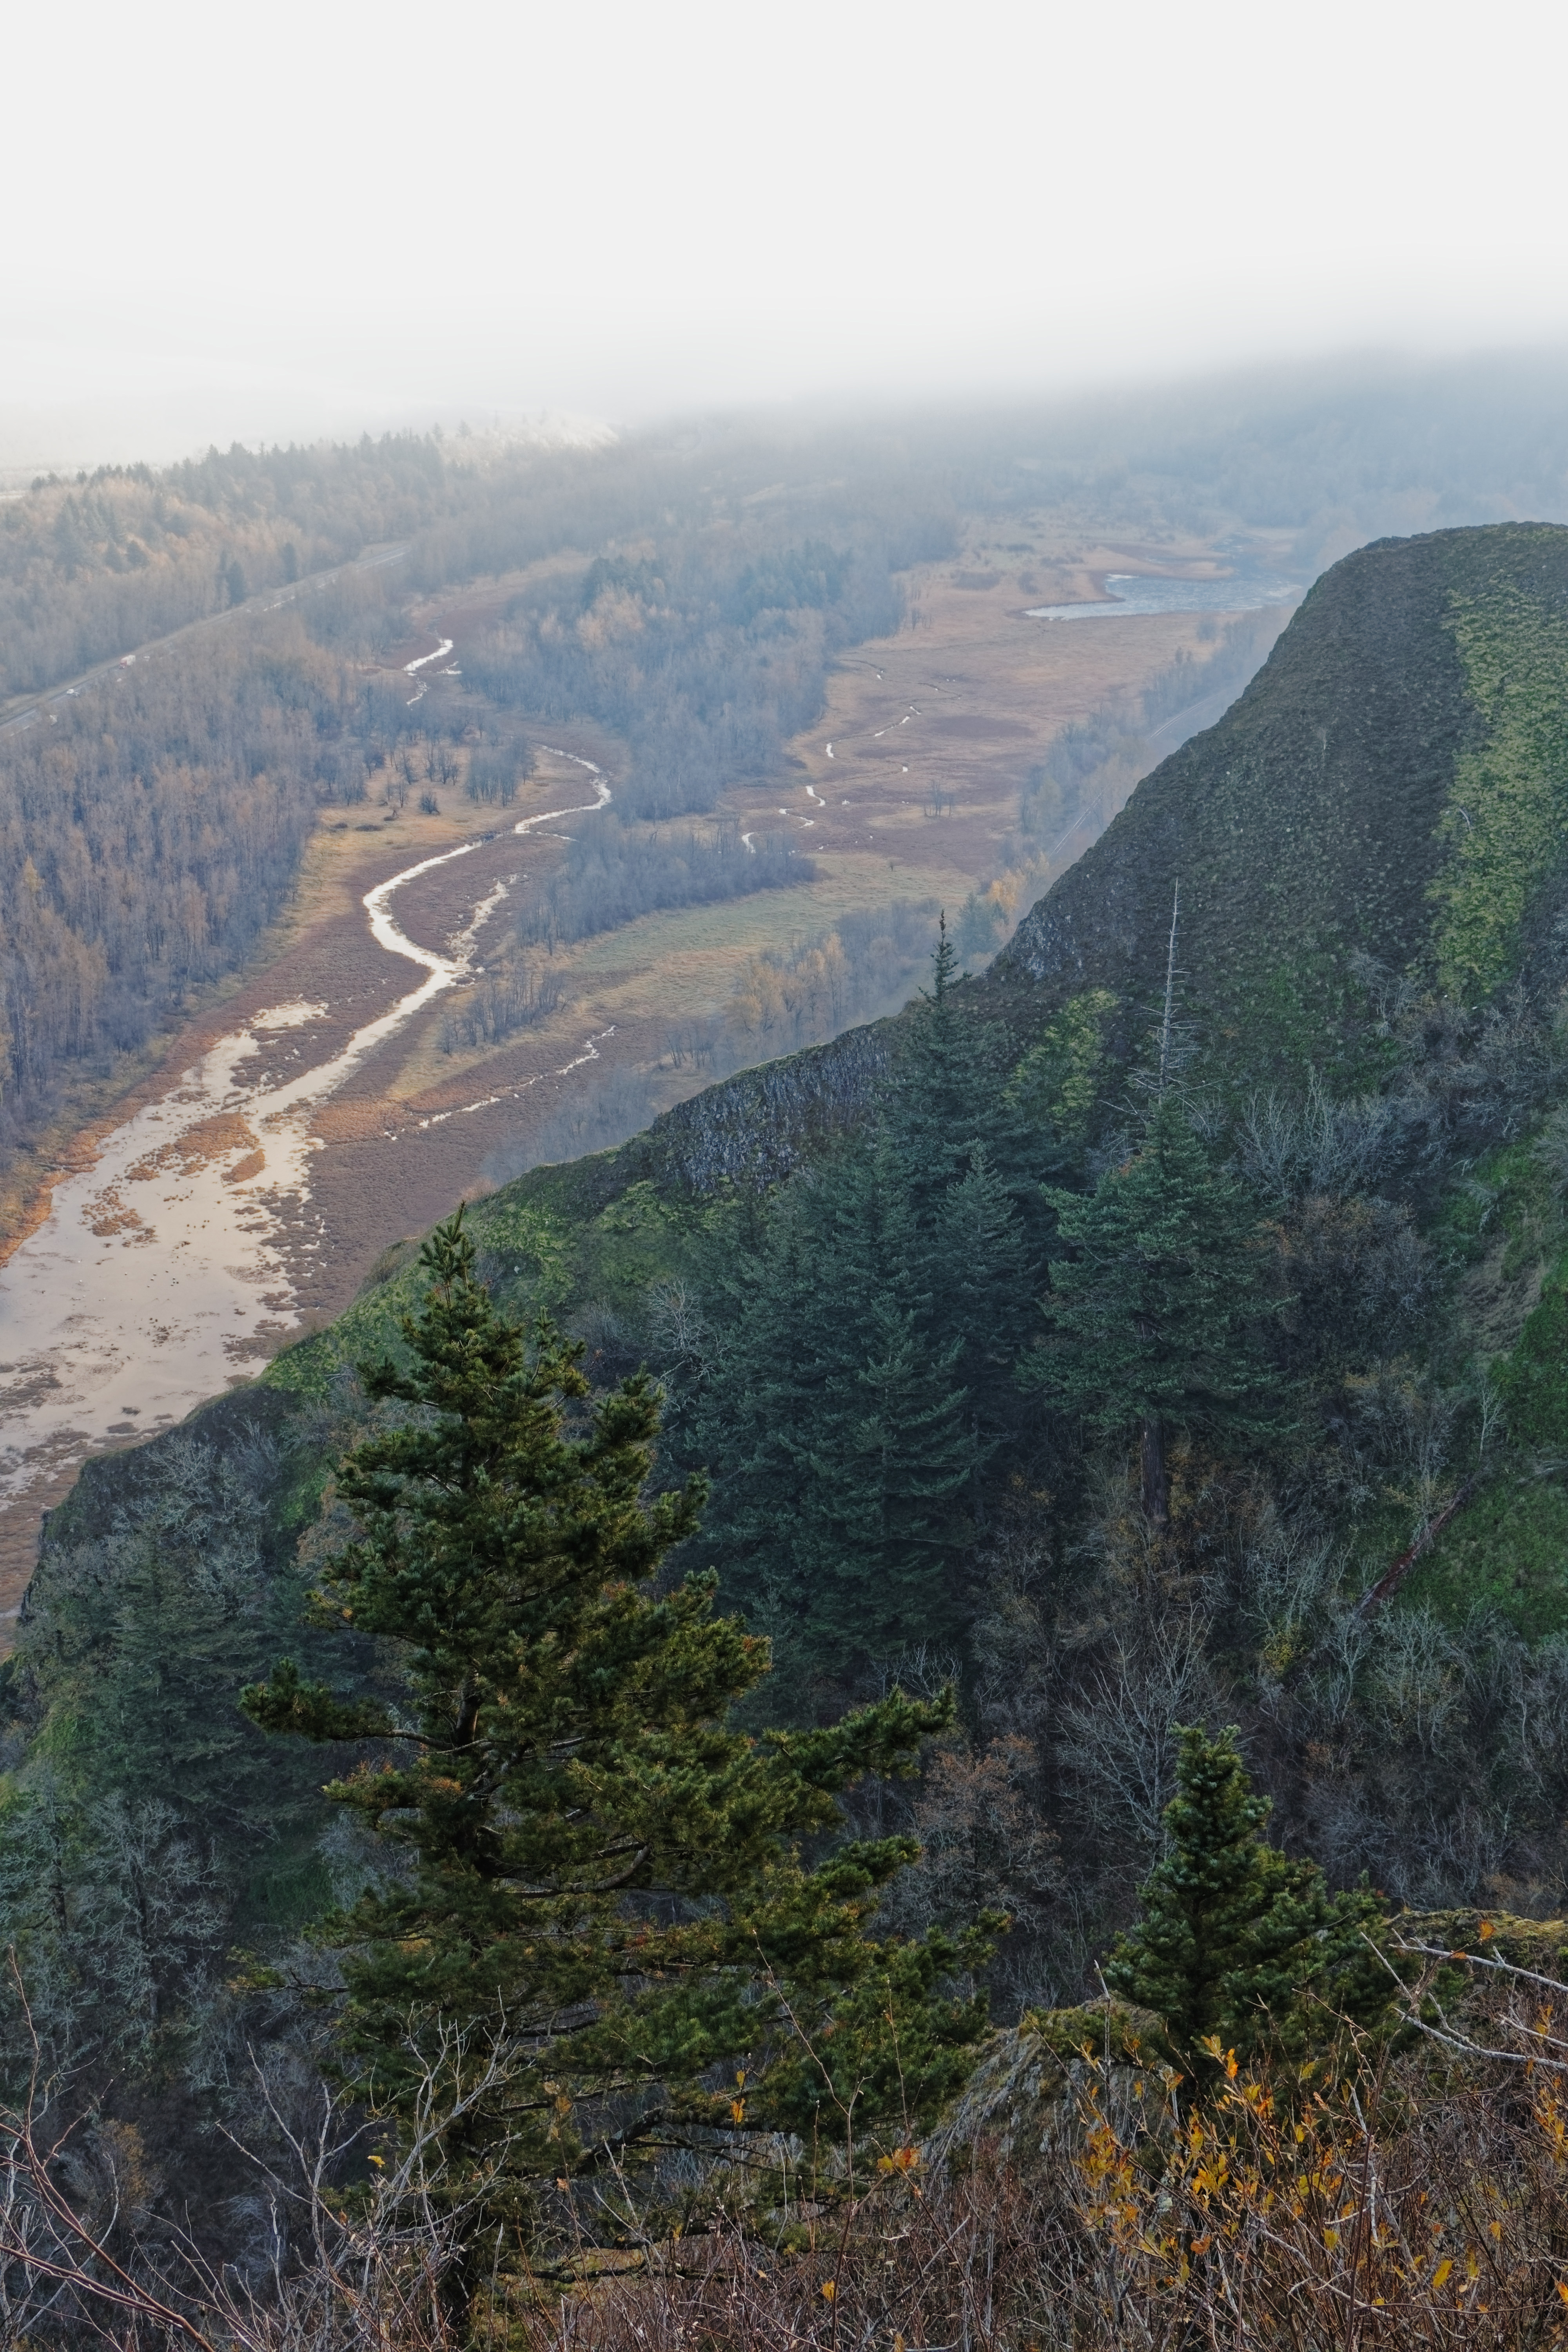
Where are higtligts details in this image apart in clouds and the sun stars ?
Too much time for me to post image extracts.
But you can try it:
1- “DxO Standard” preset and Shadows +25 for image balance = 10"
2- ClearView +50 for more details and highlihts recovery = 10"
3- (FilmPack) fine contrast highlihts +75 because you want a lot of details = 20"
in this case you reduce ClearView (+30) for more natural effect = 20"
In a minute time, I have the image like the testimony of this great day.
Notin more.
Pascal
1 Like
The point is - photo editing software is not magic. It can’t recover something that is not there. The images you are showing as examples include the sun, which means that you will have flare and lost highlight detail which cannot be recovered. The best any software can do is try to improve the contrast at high levels (ClearView+) and highlights contrast if you have FilmPack.
But, whichever software you use, it simply cannot recover details from a pixel that has been blown out, full stop, period. What you seem to be finding is that LR6 does some “magic” that pleases you with one slider that takes a bit more knowledge and a different algorithm in PL.
-
Stop taking photos that include the sun!!! You risk damaging your eyes. Even if you use live view instead of the optical viewfinder, you risk burning out the sensor in your camera because the sensor is exposed for as long as live view is switched on.
-
Take time to learn the tools that PL provides. They are not the same as other apps but, as @Pieloe points out, and I can confirm, it takes very little time to process an image once you are familiar with how PL does it. I personally could not go back to Adobe stuff, not just because of the price but simply because PL does things so much better.
1 Like
Yes, you’ll certainly damage your eyes if you look at the sun thru an optical viewfinder - - but, that won’t be a problem for an electronic viewfinder, nor for the sensor, as - being a digital device - it will simply ignore signals that exceed the capacity of the “signal-capture” electronics (recording them as 255).
John M
1 Like
Errr… exactly the sun beams and the sky is, what I was talking about, but nevermind…
That’s out of question - the amount of details PL is able to squeeze out of raw files is unbelieveable. Even for a a shoot-against-the-sun-redneck like me 
1 Like
And …?
Did you tried my settings ?
It is very disappointing to give time without feedback
Pascal
In that case, you could try using the tone curve.
Here’s a shot with a straight tone curve :
… and here’s the palette :
Here, I’ve modified the tone curve and upped the exposure :
… with the palette for that :
The difference is subtle but there is actually more contrast in the highlights, due to the part of the curve that is more vertical
1 Like
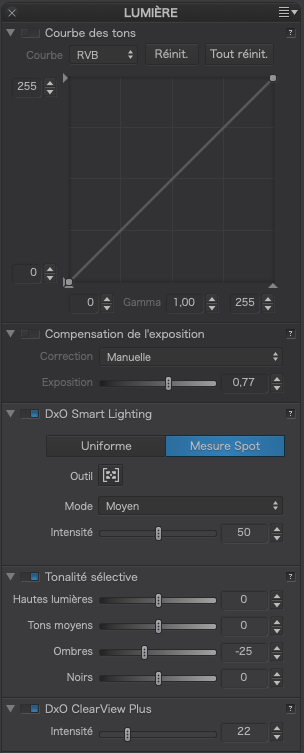
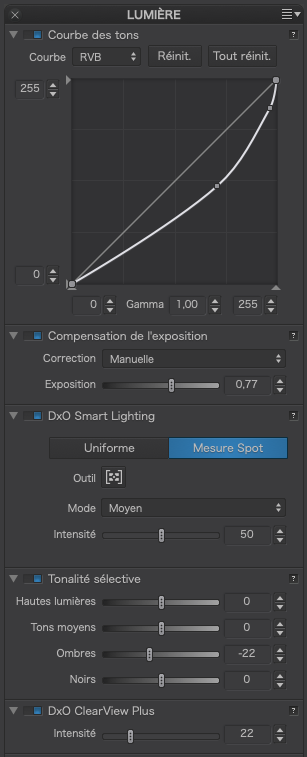
ok i did a quick run on your image:
first 25% smartlighting box on fog up line and box on tree to establish a range.
then let center weighted average exposure comp take it’s part. (-0.58)
clearview global 15%
highlights -28 on both tone and contrast.
shadow 16 and 19 contrast.
local adje left corner graduated filter til edge of ridge
final tone curve top and botom correction.
test raw DSC_0326.NEF.dop (6,9 KB)
ended up with space in left and right of the histogram.
it’s a bit “saturated” and dramatic but i would be happy with this shot because any more “detail extraction” would be screwing the facts to pulp and you get a unrealistic HDR kind of image:
detail extractor of nik Color efex pro 4 v1 31%.
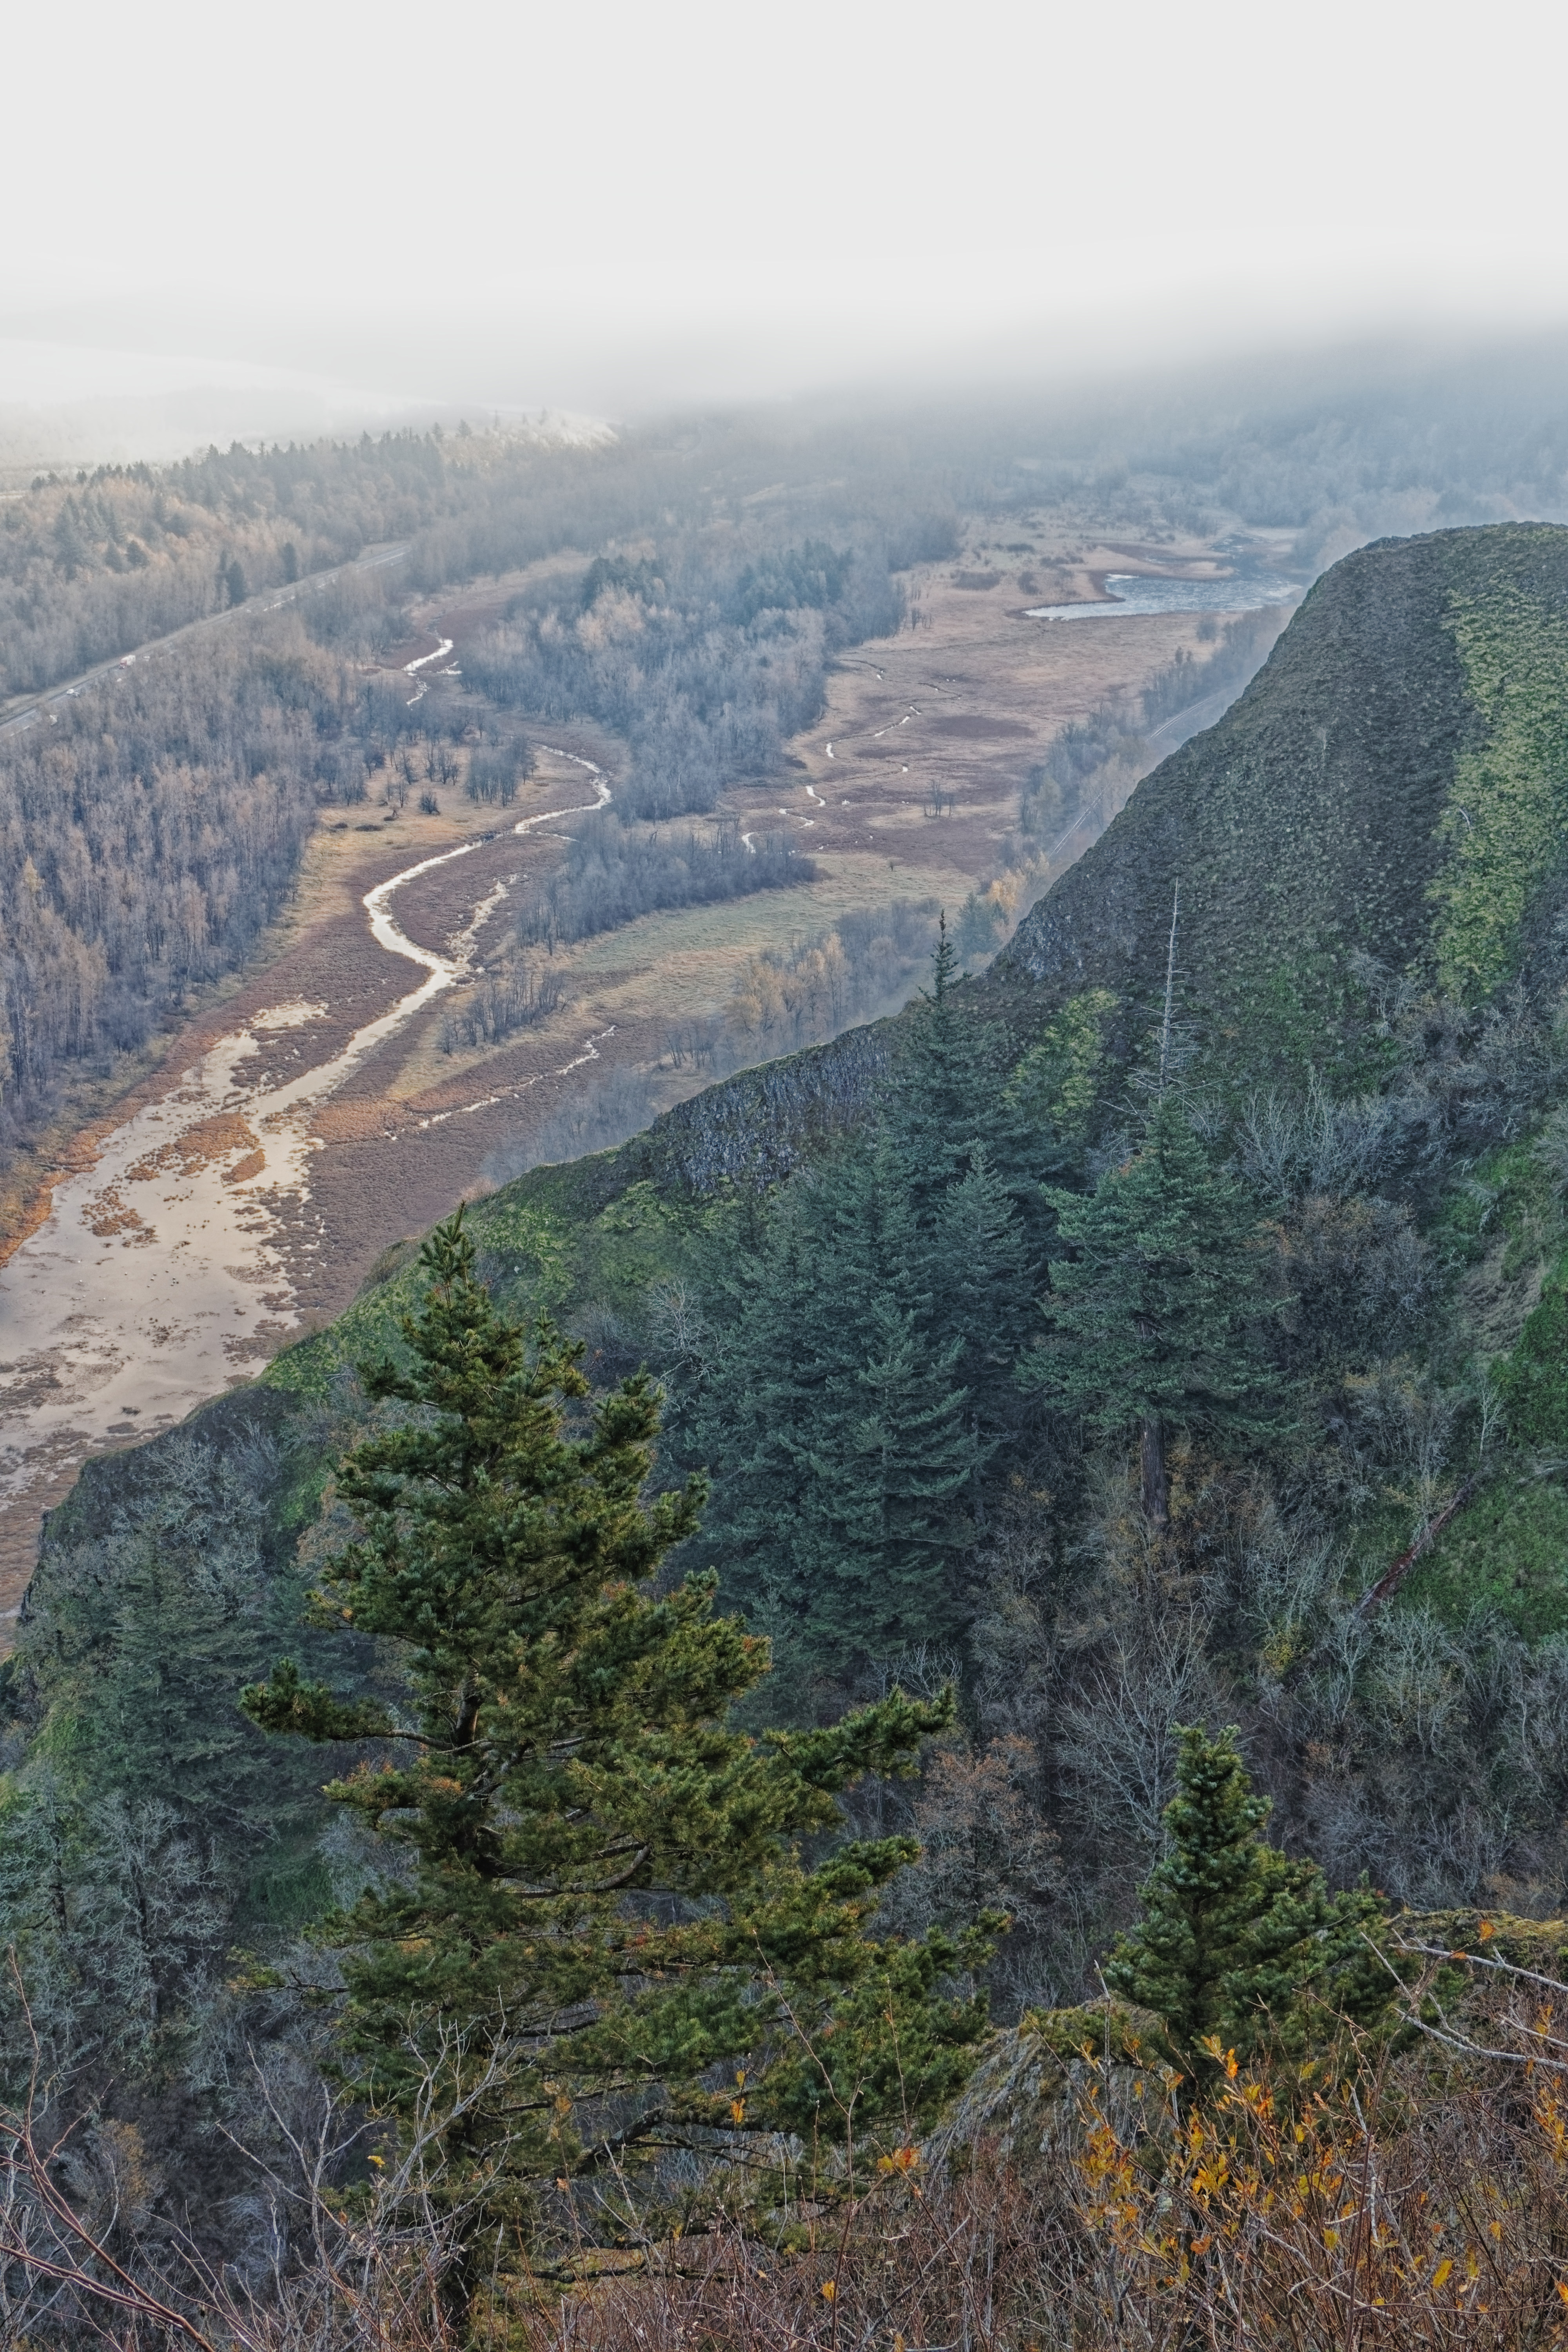
Of those images, I like the first one of both PL and LR edits. I think those overly sharp contrasts take away depth in the images. Moreover, there is a halo on the ridge. The ACR version seems to be brighter, too.
If all channels reach maximum values, no algorithm will help unless some artificial intelligence :). The question - how algorithms treat the situation when, for example, only one or two channels are saturated. What can be recovered from this residual data? It can be assumed that there is nothing there, and you can also try to recover something, even on the basis of surrounding areas and the residual data from one or two channels. I have the impression that LR can cope better (and easier) in such “extreme” situations.
I already have quite a lot of experience in PL and I really like it, but I am still convinced, that highlight recovery in LR is simply much easier. Getting similar, naturally looking effects in PL requires a lot more work and treatments.