David, that’s what I think, too. Lightroom is also way faster to operate on my system.
The “bad HDR” in my picture above ist just a demonstration of the ability to recover highlights / shadows, nothing more. The results of LR (6.14) do look more “natural” for me sometimes, though.
hi geno,
I wasn’t so fussed about your psuedo HDR result— I did grasp what you were trying to show.
It is the however the sort of result (perhaps not quite that over-emphaised), when I am trying to seperate white and black feather detail in DXO. There is always a little area of white, that just 'bounces back as pure white". Yet, in Fast Raw Viewer, it shows that the percentage on the NEF is somewhere down in the 2-3% and therefore readily retrieveable.
Now I am partly happy to put the end result down to perhaps my inexperience with the program, but a quick tug on the Tone Curve in DXO has nowhere near the ability that I find in Lr.
I’ve even changed my exposure method to drop the exposure by around 1 to 1.5 stops. Giving me a darker result, but I figured that Prime would handle the noise factor (which it does, but I still get the niggly white areas)
I’ve used Nik tools since the very beginning, and hoped that DXO would offer a better workflow for me, but at this stage, I only use it for occassinal images, and then send back to Lr.
I’ve contacted Tech Support, but have to say that their reply didn’t really offer any workable results.
The Smart Light feature has next to no effect on the areas in question, and I suspect, but don’t know for sure, that it mostly wants to be a ‘shadows’ slider.
Just have to wait and see what the new year brings.
All good.
I mostly work with a smartlighting at 25% and boxes and exposure compensation to level exposure.
Poking around with the sliders and controlpoints/localmask is the third step. I try tonecurve before that.
I agree that highlight recovery isn’t very quick and easy. The smartlighting is too agressive in higher mode imho.
With 2-3% you talk about the Overexposure value in FastRavViewer? I find that already a lot, especially if it is in important parts of the picture.
So far I could recover everything in PL that is recoverable with the Highlights inspection in FRV.
Specular highlights are pure white, there is nothing to recover. Therefore I think the picture above is not a good example for highlight recovery. Specular highlights will also appear in feathers if the shot is taken in direct sunlight.
2 Likes
I found Smart Lighting not overly smart, either. Yes, it does a bit, but if you push it, it produces ugly halos around high contrast edges, e.g. a mountain ridge.
But especially for bird feathers would expect PL to deliver excellent results regarding details. Did you try to work with control points?
Hi Calle,
Really? I find FRV pretty good at indicating what is and is not retrievable.
I photograph a lot of water birds, mostly black and white. Raptors such as Black-shouldered Kites. No specular highlights in there.
I’m not commenting on the pic that was displayed rather my experience so far of not getting all the retrievable whites.
I sometimes use RawPower for its simplicity, but its just another step in the workflow. If I was working with just one or two images from a shoot, its not big deal, but I might have 25-30 from a mornings shot that I’d like to retrieve, so was hoping that DXO would step up to that.
Partly I agree it is my lack of experience with the program that can be leading to the problem I’m having, but so far no one has set out a real ‘workflow’ to deal with it.
After 40+years of making a living behind a camera, I think I’ve got the basic idea of exposure sorted out.
Thanks for your insight.
Hi geno,
I’ve yet to see control points being able to deal with the washed out whites, They simply turn it into a fairly flat grey. Looks like I shot in JPEG. 
That halo around the high contrast areas, is another reason I don’t use it.
Now I figure that I need to change my photo subjects, to get the best from it. Go back to doing cars for magazines, I guess.
All good
I agree
Raw Digger one of my fav tools on a rainy day.
It offers so much useful detail.
Greetings once again.
Please don’t take what I am about to say as being in anyway arrogant or aggressive; it’s merely what I found works for me 
Thanks to DxO, I went back to how I expose my “HDR” shots and moved the exposure further to the right in order to avoid as much blown highlight as possible, knowing that DxO was well able to recover shadow detail from way lower than I was used to, especially at lower ISOs.
Here’s a totally untreated image, taken with my Nikon D810 :
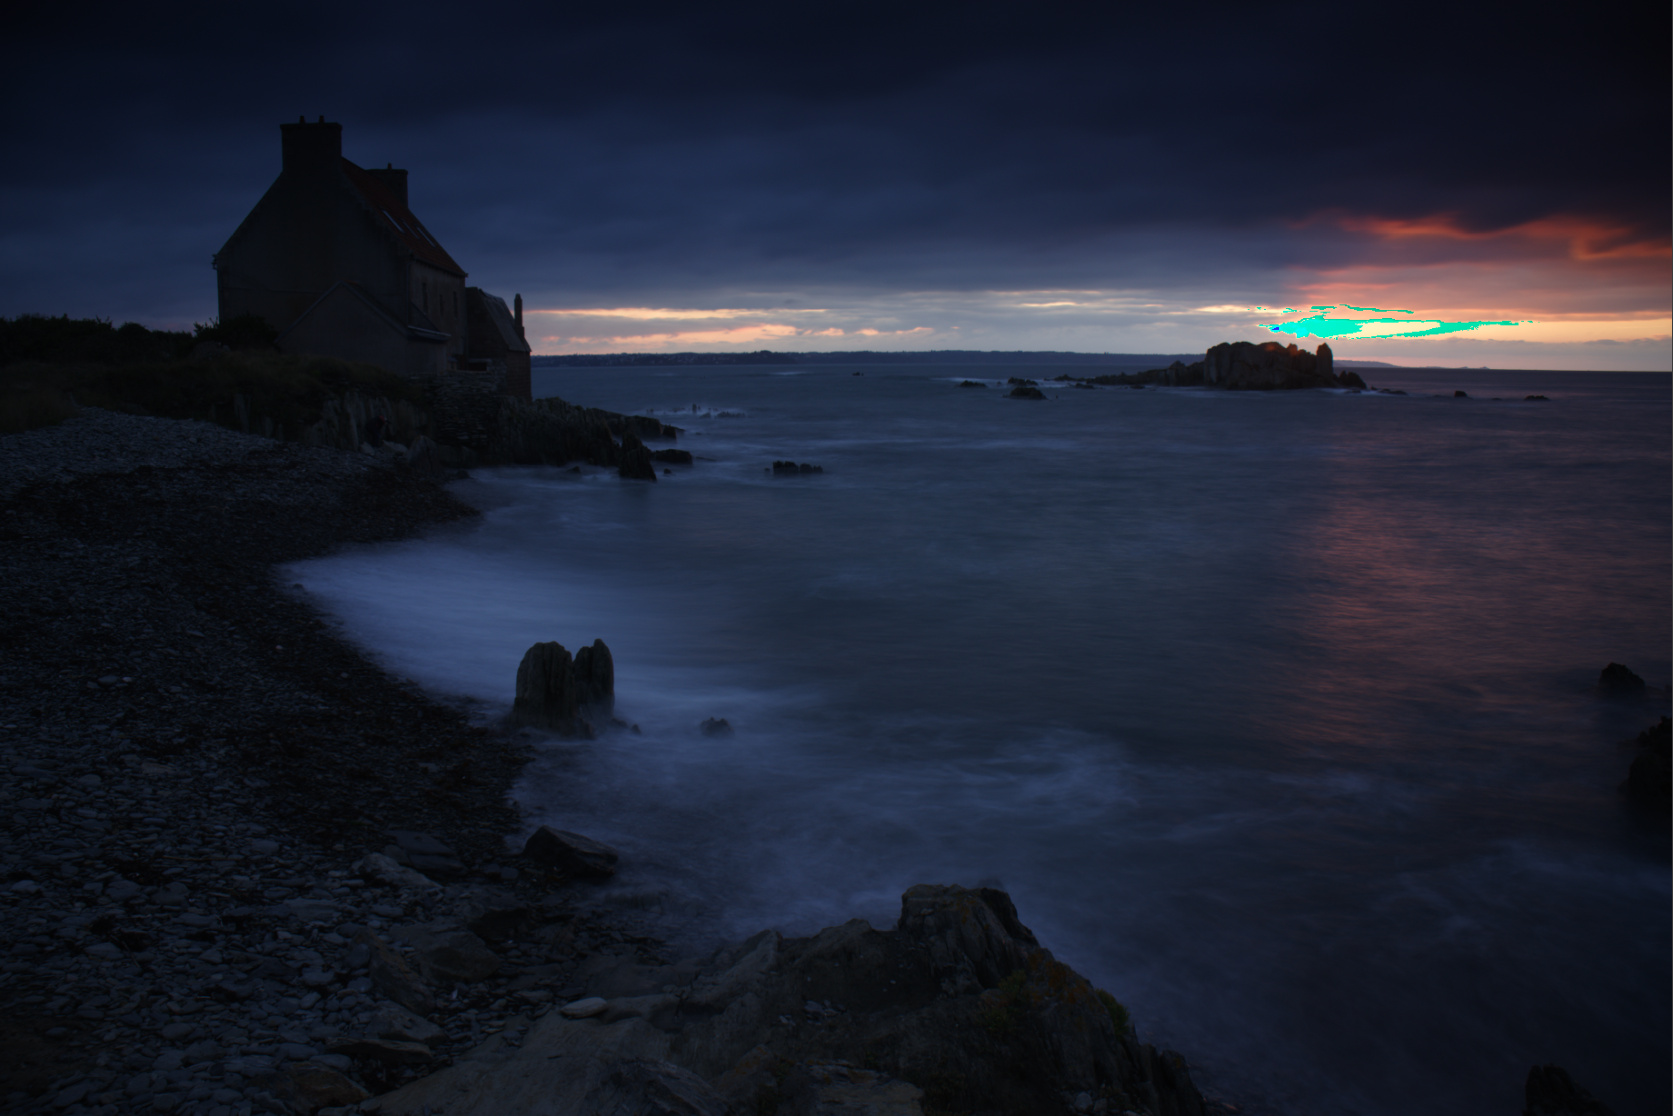
As you can see, there is very little over-exposure from the area that I took a spot meter reading from and increased it by 1⅔ stops. This I know, from much experimentation, is the clipping limit for my camera at 100 ISO. There are no under-exposed areas.
Since that part of the image is virtually a glimpse of the sun, I consider it to be a specular highlight and know it is irrecoverable.
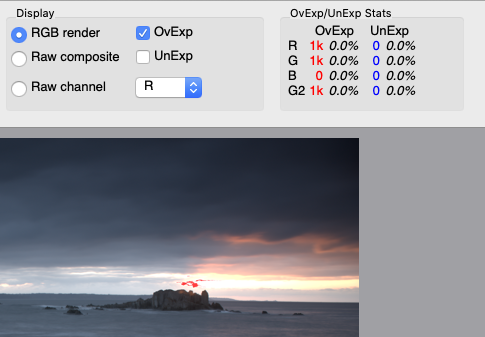
Here’s what RawDigger shows :
And FastRawViewer :
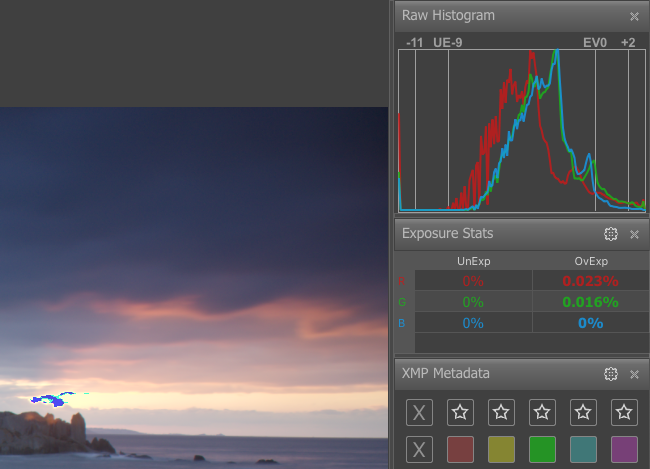
So, it looks like DxO is slightly more aggressive in its assessment of what is over-exposed and, in this case, the difference is not worth worrying about.
Here is the final edited version :
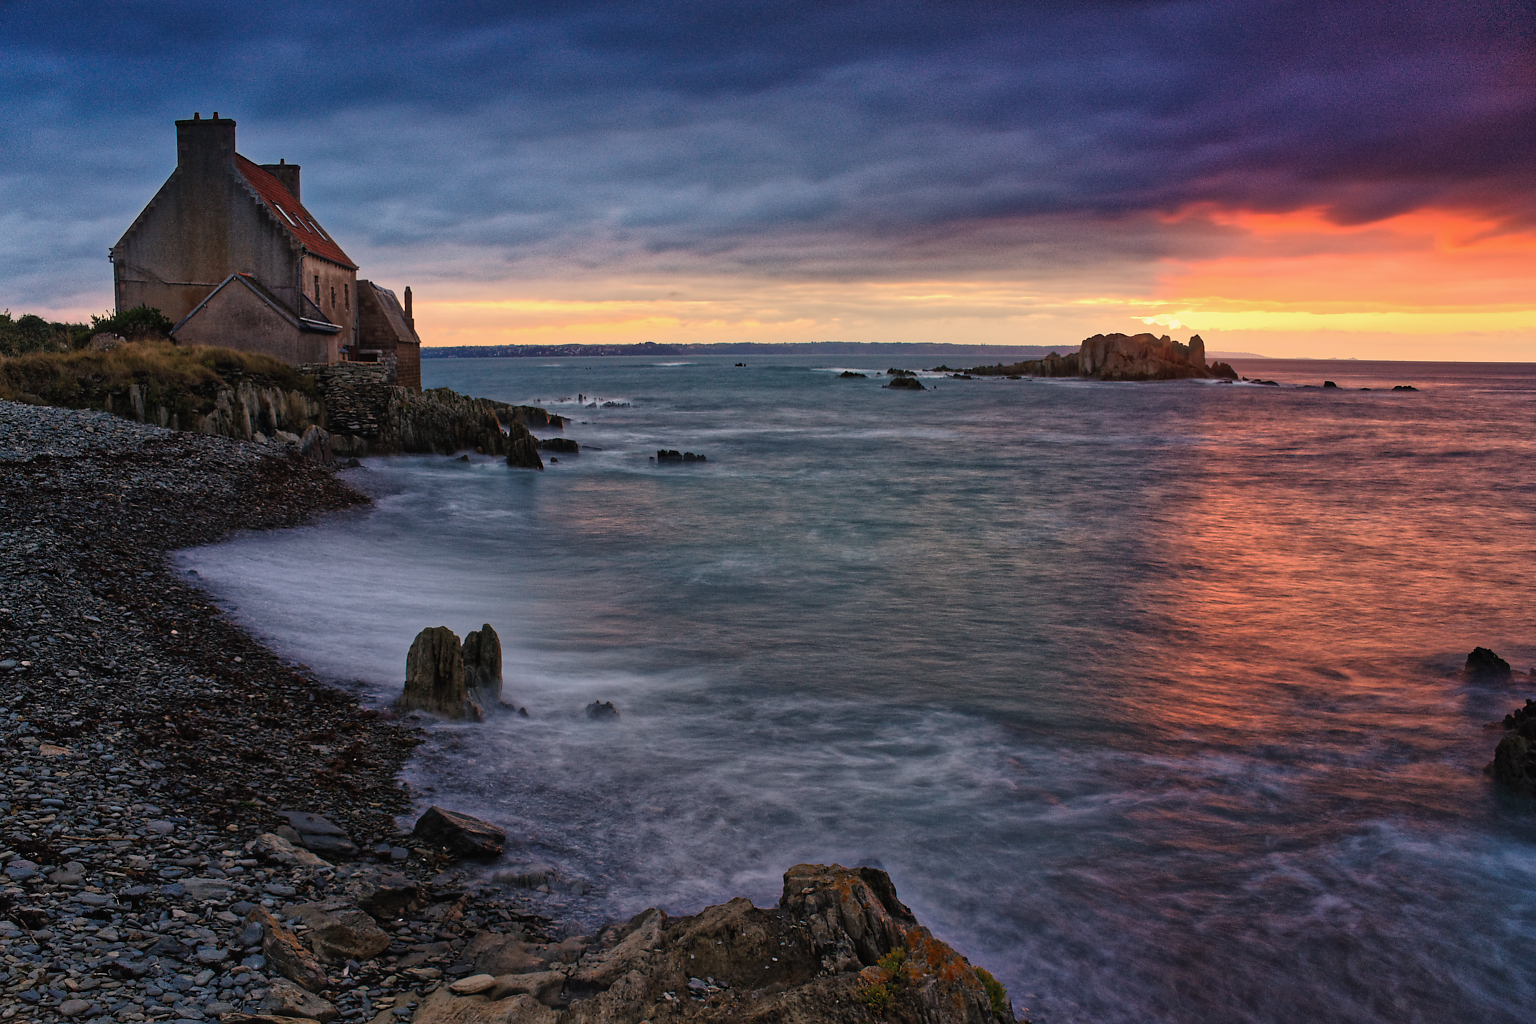
The only thing I needed to do to “recover” the over-exposed part was to lower the upper limit on the tone curve to 250 and reduce the red and yellow saturation a little. I set Smart Lighting to 50 and find that this is a very good starting point when editing such images.
Of course, there are quite a few corrections, local adjustments, etc, to arrive at the final result but, in summary, I would say that, if you are having problems with highlight recovery, the answer is to reduce your exposure, basing it on a spot reading of the brightest part and over-exposing by between 1⅓ and 2 stops. At least, that’s what works for me 
7 Likes
David wrote:
i find all the ‘workarounds’, for DXO to recover highlights simply adding unneccesary steps to a work flow. OK for just one image, but when I have to do it for much of a morning’s shoot, I become bored and look for alternatives.
Lightroom does it with just two sliders and the Tone Curve.
I can only agree with David.
I only move one slider in C1 (or Lightroom) and highlights are recovered.
When I was trying Photolab 2 I was disappointed with Photolab ability to recover highlights. Forum members gave me lots of advices how to recover highlights in Photolab: use curves; move those rectangles from SmartLight around the photo, use ClearView, use local adjustments, pray, put on your lucky underwear before doing some highlights recovery and I don’t know what else.
So; why those Selective Tone sliders are there? Why is there Highlights slider if it cant recover highlights?
At the moment I’m on Capture One 20 Pro (and Lightroom) and also trying Photolab 3.
Photolab is very nice software and in general I like the results it gives me. They fixed HSL (nice work) and some other things …. BUT…. those Selective Tone sliders are still the same. They didn’t fix them. Highlights recovery is still the same pain.
Why? Tell me; is there some sort of agenda like: we hate Lightroom and C1 so highlights slider in our software won’t work the same way, period. Is this the case?
They say Photolab philosophy is different as other RAW developing software.
Is this the reason why all those ‘’famous’’ photographers are using Lightroom and if not they switch to Capture One and not to Photolab?
Perhaps my lack of experience using Photolab? Yes indeed; I would say so. I started with ACR and move to Lightroom and soon also got C1. From ACR to Lightroom was no pain – they are the same. Using Lightroom and C1 at the same time is also no pain for me. They say learning C1 is difficult but I have no problem using C1.
Using Photolab with different philosophy? Yes; it’s pain for me because it does not work as I expect it to work. I don’t get this and it’s not in my workflow to ‘’first lower exposure to recover highlights and then mess with I don’t know what to recover the rest of the image’’.
Whatever. Photolab 3 goes ‘’uninstall’’ from my PC till they fix those sliders.
Sorry if I sounded rude. It was not my intention.
1 Like
I just came across your thread from April. Absolutely agree with you.
Edit - some of my text got lost somehow…
Looking closer to highlight recovery in LR shows always warmer colours in brighter areas. In PL not so much, but midtones become darker. Choose your poison.
Regarding C1: Tried it, but I actually did not find it to be very unintuitive to operate. Initially I wanted to buy C1, but achieved better results with PL quicker. Again, this is not to say Software “A” is better than “B”, but personal preference.
If DXO could just get those sliders to operate more selectively…
3 Likes
Did you try to set a control point (“U-Point”) on those blown whites on the feathers and reduce the exposure in the Equalizer just a bit and maybe pull dow the Highlights slider?
1 Like
The u-point is almost a hit or miss on white feathers, keeping them white while recovering what you can is sometime if not often hard to do in PL,
1 Like
geno wrote:
‘’ If DXO could just get those sliders to operate more selectively… ‘’
They could do the ‘’switch’’ and make them two way: ‘’DxO sliders’’ and ‘’Normal sliders’’.
Regarding U-Point …
just another workaround because highlights slider is not working.
Like I wrote; it’s beyond me why they don’t want to fix them. Aparently someone in the developing team decided this is the right way how those sliders should work.
I personally can’t understand this logic – if I move Highlights slider to the left I also must move Midtones slider to the right to compensate but the result is not so good.
I don’t know what I’m stil doing here. I’m not DxO user at the moment, so….
I’ll come back when Photolab 4 comes out to see what’s new.
Totaly off topic but I can’t find a way to log out of this forum.
Top right click on your icon, then your name and you’ll see logout!
Have you tried the highlight contrast slders instead of the levels one?
Typically, PL creates its histogram not from the RAW file and not from its internal image in AdobeRGB, but from your monitor’s ICC profile. Yes, this is crazy. The RGB values displayed under the histogram are also from your monitor’s color space.
In Preferences, you can change it so that PL assumes you have a monitor calibrated for AdobeRGB. If you do this, your histogram and clipping might closer to what the other programs show. Your colors may be all screwed up, though, unless you have a high-end monitor and it truly needs no calibration to display AdobeRGB.
Of course, there is no standard for the clipping indicators; clipping might be indicated only where a pixel channel is at the maximum value or it might be where it is within some distance of the maximum.
I believe these are part of FilmPack. If you don’t need all the different film renderings, then you get to pay $79 just for a couple of features that should be a standard part of an “elite” raw processor.
3 Likes
I can’t find this in the DxO preferences. And I have a properly calibrated monitor, not Adobe RGB.
Whatever your opinion on value for money, I would/could not work without FilmPack; it has so much more than just a couple of sliders, even if you ignore the fil renderings.
Preferences -> Display -> ICC Profile Used for Display (normally set to Current Profile of the Display Device).
Having a calibrated monitor makes absolutely no difference. The histogram is based on your choice for this preference. Working from the same image on two different (calibrated) monitors will give you two different histograms and two different sets of clipping areas.
If you set the preference to use AdobeRGB, then the histogram will be displayed the same for everyone. The colors will be completely screwed up unless you actually have a monitor that displays AdobeRGB without needing and ICC adjustments.