Explain the DNG color differences between dxo5 (legacy) and dxo6 (wide gamut)

I think that this is where we differ. My understanding is that a linear DNG contains demosaiced data. Therefor it cannot be the raw sensor data. I found this interesting diagram here
image

This is a real sensor, the Nikon D700 and you can see that it’s color response cannot be expressed in any standard color space. That means that if you are demosaicing you have to decide what your going to do with the out of gamut colors. PL5 put them in (I assume Adobe RGB) and PL6 can now put them in a wide gamut similar to CIE XYZ. What is contained in Linear DNG is RGB and it has to be in a color space similar to the triangle shaped color spaces we see in the chart.

If most software uses a default internal working space of Adobe RGB , then we might expect the linear DNG RGB output to be similar.

But so far we have different processing pipelines:
camera raw ==> DxO wide ==> some RGB color space in DNG ==> dcraw output.
camera raw ==> DxO legacy (aRGB) ==> dcraw output.
camera raw ==> dcraw unmoisaiced output

I don’t really know what dcraw does to a linear DNG file when you select raw colorspace with -o -0 (i.e. do not demosaic) but when you do that to a camera raw file you should get the un demosaiced data and not RGB.

2 Likes

Raw file does not have a colour space. Its de-mosaiced into a color space.

? No.

You have values for your sensors . Some of those values are for red, some for green some for blue (x trans is different or course , rgb sensors are different of course ).
So you end up with a pixel knowing ONLY the red , geen or blue value. Not all three.

‘Filling in’ the missing data , is demosaicing. And it has nothing to do with what the numbers actually mean or what colour space they are in.
The simplest demosaicing algorithm - with the least artifacts :wink: - is to simply render the data to half size , so you don’t have to 'fill in ’ data or try to ‘invent’ data. But it also gives a half height and half width image to what you are used to.
Anyway, this works perfectly fine without having to know anything about what the sensor data really means. You don’t even have to know the black and white point of the camera model.

Of course the sensor data has a colour space. It are numbers representing colors, so it has a colour space. It’s different for every camera model , even maybe camera to camera, and its of course not one of the universally standard colour spaces , but of course it has a colour space!

Look at the steps above that I posted (or for fun try reading Snigbo’s articles about processing a NEF raw file by hand in imagemagick. You’ll grasp all the steps needed).

The simplest form is to apply a camera matrix to align the white point of the sensor data, and then to just ‘assume’ it is a certain known standard colour space (like linear rec2020 or something).

But if a camera is calibrated , there is a known input colour space and a profile to assume it is, and then you can ‘convert’ to the working space.

All this has nothing to do with demosaicing. This are all steps you also have to do on a linear DNG file. A linear DNG file is the sensor data demosaiced, and the black and white points scales to be between 0 and 65535 (that last step isn’t even required , but is what dxo does to normalize the black and white points ). Nothing really else, so the data needs to be handled in te same way the data from a raw file needs to be handled : assume calibrated input profile and convert to working profile (or apply camera matrix and assume working profile ), apply tone and apply edits , convert to output profile and render.

Why ? I think your are sprinting over a few steps. Because what you describe has to do with getting the file displayed. And demosaicing has nothing - yet - to do with displaying an image. It’s ‘filling in the blanks’ of the sensor data , basically upscaling the captured channels of your sensor.

If you have a 24mp Bayer sensor , it means it produces a 24mp monochrome file . But actually, just a series of numbers . Some are meant for red , some for green , some for blue.

So you basically get a 6mp red channel , two 6mp green channels , and a 6mp blue channel. These four channels are ‘upscaled’ (smartly interpolated) to a single 24mp r,g,b data set. You can sort of call it an image , at this point.

That interpolating has still nothing to do with dealing with things like out of gamut , what the values actually mean in CIE XYZ space . That all comes later in the pipeline , and comes after a linear DNG file is written.

Again, think about sigma foveon sensors or canon sraw files. They already contain a r,g,b value for each pixel . No demosaicing needed. But all the things like black point , white point , white balance , input profile / calibration , camera matrix , working profile … They all still are needed and apply .

I tried to find confirmation of that, and have failed so far. Nor have I found any information saying that Linear DNG data is usually RGB data in the CIE XYZ space. The nerd in me is extremely frustrated by the lack of technical information out there. How come no one has made a cool YouTube video showing hexadecimal data for different formats? (Maybe because their audience would be just me :P)

Anyway, would love some feedback or information from a DxO engineer, a DarkTable developer or anyone with deep technical knowledge of these formats.

By the way @jorismak, have you sent a support request on https://support.dxo.com and provided them with sample files? Might be the best way to get DxO people to look at whether they have a bug in their pipeline.

It’s a bit smaller than ProPhoto RGB, and similar to Rec.2020, based on some graphs provided by DxO to reviewers. Here’s a visual comparison:

You know… you are actually right there! I’m always one explaining on other forums that it’s a community forum, and not the official method for reporting bugs.
I guess something here is true too. It’s meant for DxO’s own feedback… but a forum post is not the same as an official support ticket, as a paying customer.

Thanks!

reported as a ticket, should’ve done that sooner!

1 Like

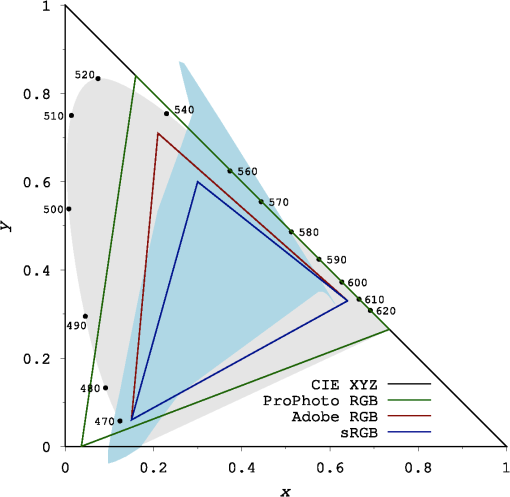
I never said that. That’s absolutely not true.

It’s 3 channels of numbers. R, G, B data per pixel. Normally in the same colour space as the raw sensor data was. You might call that ‘unknown profile’ or whatever.

If a raw file had the value 25% for red somewhere, the linear DNG will have 25% for red in the same spot. Whatever that 25% means for colour.

If a raw file had no value for red at a certain pixel (because that is what happens, there are ‘gaps’ so to speak), that value will be filled in / demosaiced in the linear DNG file.


Want to get technical? Get a bayer raw file.
_DSC1309.ARW (47.0 MB)
I’ll use this. It has clipped skies, so I know the white-level easily :slight_smile: .

Load it into DxO PL5 and set it to ‘no correction’. Or load it into PL6, set it to ‘no correction’ and set the gamut to ‘legacy’.

Export it as DNG with ‘optical corrections only’.

Now, we’re going to extract the 4 raw channels from the bayer file (original raw file). With the 4channels tool from the libraw project, you extract the raw numbers that are inside the raw file, written as R, G1, G2 and B.

4channels _DSC1309.ARW
It creates files such as _dsc1309.arw.R.tiff.

It is not orientated right (needs to be turned left). Also, it’s something like 2012x3012 pixels. That’s because raw converters often crop out the edges for the demosaicing.

Also, its black level is corrected by 4 channels, but the max is just whatever my sensor can produce as maximum readout. Let’s see what it is with ImageMagick:
magick _dsc1309.arw.R.tiff -format "%[max]" info:

It reports a maximum value of 15864. Since all channels are clipped in this file, this is also the maximum value my sensor can produce. I want to scale it between 0 and 65535 instead of 0 and 15864.
65535 / 15864 = 4.131051437216338880484114977. So we multiply every value with 4.131051437216338880484114977 to get it to sit between 0 and 65535.

So, we’re going to multiply it, rotate it left, crop it to 2000x3000 in the middle. And save it as a separate tif file.
magick _dsc1309.arw.R.tiff -evaluate multiply 4.131051437216338880484114977 -rotate -90 -gravity center -crop 2000x3000+0+0 +repage -compress none from_raw.tif

Right… now let’s look at the DNG.
Use dcraw_emu from the libraw project to ‘render’ the DNG.
BUT…

  • we don’t want to apply any white balance multipliers (-r 1 1 1 1)
  • we don’t want to apply any camera matrix (-M)
  • we don’t want to convert it to any other profile whatever (-o 0)
    and we want to write it without gamma correction to a 16bit tiff (-T -4)

dcraw_emu -T -4 -o 0 -r 1 1 1 1 -M _DSC1309.dng

You could look at this file now. It’ll probably look pretty green. It’s the raw numbers from the bayer channels, done nothing to it except let them sit between 0 and 65535. You’re looking at numbers, not colours, so to speak.

We take that file, take only the red channel, and average it down to 50%. This returns it to 2000x3000.
magick _DSC1309.dng.tiff -channel R -separate -scale 50% -compress none from_dng.tif

Now, compare those files. Name me noteworthy differences. Because in my test file here, they are (exactly) the same.
Look at the statistics of the numbers, like the mean:
magick from_arw.tif -format "%[mean]" info:
magick from_dng.tif -format "%[mean]" info:

7036.49 for one, 7059.74 for the other. To take that into perspective, if the numbers would be between 0 and 255, the difference would be less than 1. So… the data is still the same.

In other words, I declare the set of numbers to be identical, within the margin of error. Even the demosaicing algorithm used by DxO did so very little to the numbers that the mean doesn’t really change.


The data in a linear DNG files are (supposed to be) the same numbers as in your raw file, but ‘with the gaps filled in’. That’s demosaiced. Nothing done, nothing converted, nothing ‘colour space’, nothing ‘profile’… demosaicing is just interpolating the missing data from a bayer or x-trans sensor. Not modifying that data.

This is needed, so that lots of tools can read that data, and handle the numbers exactly the same as they would handle the numbers from a real RAW file, except the demosacing step.

This is all different to a ‘non-linear DNG’ (which DxO can’t write, but is what Adobe DNG converter makes for instance), which contains the true bayer data from your raw file, leaving even the gaps in. That’s why it doesn’t increase in size, but DxO’s DNG do: They interpolate data, they ‘fill in the gaps’ which are then written to file, growing the file bigger.

DxO has been doing this correctly for years. Which is awesome! It creates a workflow that others try, but can’t really seem to recreate. DxO even created PureRaw as a cheaper product just to embrace this workflow.

Now DxO Pl6-wide-gamut has changed this… and I don’t think it was meant to be that way.

3 Likes

And I haven’t said that you said it. Bit of miscommunication here. :smiley:

That said, I thank you for the detailed explanation! I learned a bunch, including about specific tools and workflows I can use if I want to data-peep at some RAW files.

2 Likes

I believe that filing a bug report with DxO is appropriate. I don’t know what is going on.

I took a sample.cr2 file, I ran the following:
dcraw_emu -T -4 -o 0 -r 1 1 1 1 -M sample.cr2
4channels sample.cr2

Just comparing the the shape of the Red channel histogram in the demosaiced file I can see that it is different from the camera raw Red pixels. This is as I would expect, since in the process of demosacing, red is reconstructed from adjacent pixels. But I don’t think this tells us much about why you are getting a green tint from wide gamut.

The pixel values do not represent red, green and blue because the light hitting the sensel is not red, green or blue but a mixture of colours…

Deciding how to process the data, and allowing for this, is part of the reason why not all raw converters are equal.

This diagram show the bayer sensor filter dye transmission curve.

Not saying you are not correct… but does that have anything to do with the wide-gamut option introducing colour casts in the DNG data??

The DNG is in range 0 - 65535 of values, the valuesin the files written by 4channels are in the range 0 - ‘whatever your camera uses as white level’.

Try a 4channels -A sample.cr2, it doesn’t scale it properly, but it at least says the maximum value your sensor records. 65535 / sensor-white-level = multiplication factor needed to bring it to 0 - 65535.

If you made the DNG with ‘legacy gamut’ or PL5, they should match up quite well. Doesn’t tell us anything about what is happening with the wide gamut option.
But it’s a sort of proof that a linear DNG is just your original recorded sensor values, with ‘the missing gaps filled in’, and nothing colour-space wise is done.

Your red channel from the DNG contains the original values…, and new ones from the upscaling… but in that upscaling they don’t have to know the colour space, or the ‘meaning of the numbers’. It is just numbers and smart interpolating algorithms… Although I bet there are demosaicing algorithms who want to understand the colour meaning of the numbers, so they can make better upscale decisions. But that still doesn’t mean they have to convert the data in the DNG.

The simplest form of demosaicing is taking those quarter-resolution R, G1, G2 and B channels… and then averaging the G1 + G2 channels to get a single G channel, and then just making a RGB image from that, without any upscaling / reconstructing. You get an image that is quarter-resolution to what you expect, but it’s there. Results are not bad and quite OK, and easy to compute… but the file is less resolution :slight_smile: .

One step up - but also still dumb - is just to simply use a bicubic resizer to upscale the 4 channels to ‘full’ resolution, and then average the G1 + G2 to get a single G channel, and then using them to create an RGB image. Results will not be that great, and I expect issues with moiré and CA. But it works as a demonstration :slight_smile: .

I did that, but other than scaling, the shape of the histogram was the same. By “shape” I mean not values per se, but undulations. It’s a different looking curve. I’m not trying to find the differences in DNG, just trying to understand what changes demosaic does to “raw” color response. My conclusion is that gray scale out from 4channels (each image is from only the same color filtered sensor pixels) will not match the same color channel demosaiced output

May I have a look at the CR2? Because that would be the opposite of proof my point :slight_smile: , but also very different as what is happening with my file.

It’s your cr2 file that you referenced at pixls.us

If you export with ‘optical corrections’ only from DxO, with the legacy gamut selected, they align up pretty well again.

If you use the ‘all corrections’ mode, the highlight-recovery system in DxO kicks in to (attempt to) repair the sensor-clipped highlights, which can affect the histogram pretty drastically. If you crop the top half away for example, they are much closer (although I have a sort of black-level difference somewhere… but the ‘shape of the histogram’ as you said, is pretty much the same).

2014-05-30_19-47-01_raw_legacy_1.dng_test.tif (8.5 MB)
from_raw.tif (8.5 MB)

Again, this is purely academic. It’s proof that a linear DNG does contain the ‘same colorspace’, the same sort of data as the original RAW. And that demosaicing does not (have to) mean ‘bring it into another colorspace’ or ‘do stuff with camera profiles’.

Of course, if you start to add algorithms the recover parts, refill parts, change color, apply different profiles, etc… it can all change.

You did get me experimenting again.
And look at this, this is the green channel of the DNG files created by DxO. One in ‘all corrections’ legacy mode, one in ‘all corrections’ wide-gamut mode.

It appears there is not so much difference at all… except in the highlights… which are ‘repaired’ in the legacy version, but remain clipped in the wide-gamut version?

legacy_green.tif (8.5 MB)
wide_green.tif (8.5 MB)

Maybe there is no real export difference, except in clipped highlights? In wide-gamut mode, the highlights-repair doesn’t kick in, because it thinks it has more than enough room left? :man_shrugging:
This would indicate that ‘the bug’ is maybe not in the DNG export itself, but in the highlight-repair in wide-gamut mode.

I am an amateur and have not so good understanding of linear DNG. But I assume in general the relation to color space requires a color profile. Other it is not possible to correct representation in another programms/devices. The base for conversion is not present. In my modest opinion DNG must not be relate to any color space. Or it must be possible to choose a color profile during export, or probably use any one as default. Additionally it is unclear to me what is the difference to export to TIF and export to DNG with the specified color space? What is advantage of DNG in this case?
Moreover the default value “Wide Gamut” is causes really problem by post processing:

I am seeing this issue on my MBP M1 and latest version of Photolab.
I am not liking the color rendering when Wide Gamut is enabled. It is definetly different then when using Legacy Gamut.

Here is my experience between wide gamut and classic working color space and exporting the exact same file with exact same setting and exporting with Denise and optical corrections only

this image came from a Fuji GFX100s

Somewhere in the exporting of DNGs from Photolab 6. Images were displayed in Adobe bridge.

Exporting the files as jpgs eliminates the color shift but then there is a density shift instead between classic and wide gamut

Note: Wide gamut is displayed on the left and classic color space on the right in both screen grabs