I started a new thread, as I didn’t want this image to get mixed in with all the other topics. I am SO very happy that DxO now supports the Fuji X-Trans Sensor, and I can use my Fuji X100f in raw mode.
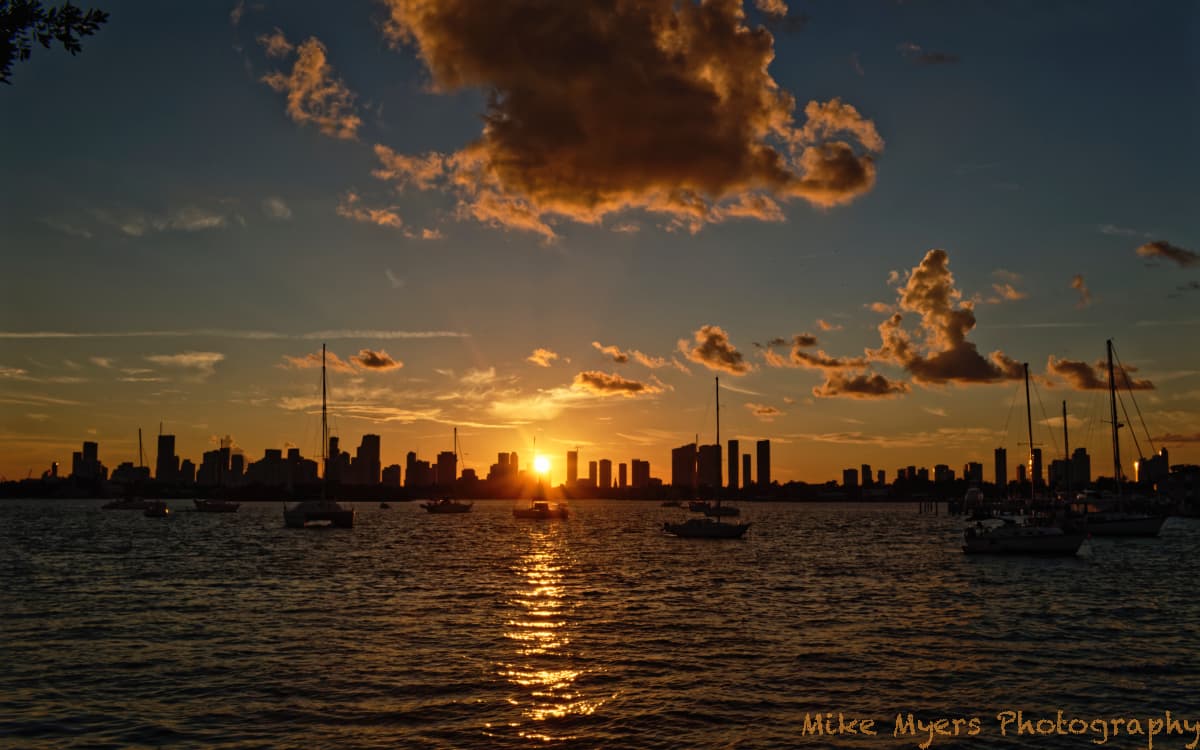
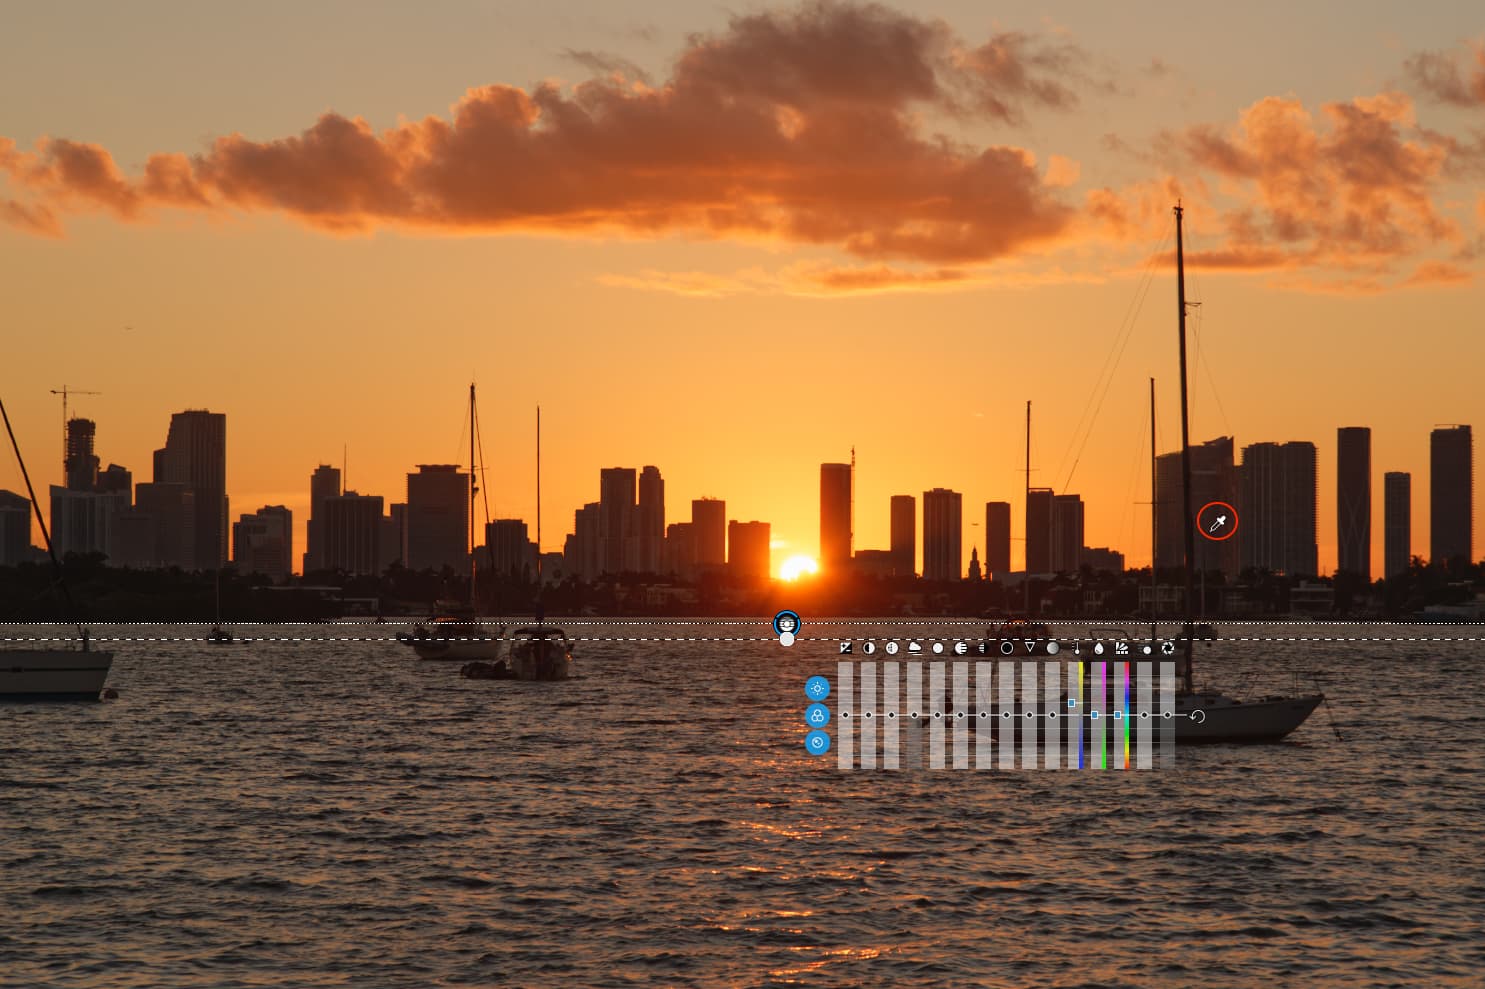
I took two photos today, one of a “normal” scene like I enjoy taking, and another one of my view of sunsets over Miami. I struggled with the camera, as while I was used to it in 2018, I haven’t really used it since then. On the positive side, I am thrilled with the result from the Fuji, which for reasons I can’t explain is far prettier to me than my similar shots with my Nikon D750. I was less than thrilled that I forgot to set the exposure to +1.7, and I forgot how to turn the flash off. I need to spend more time with it.
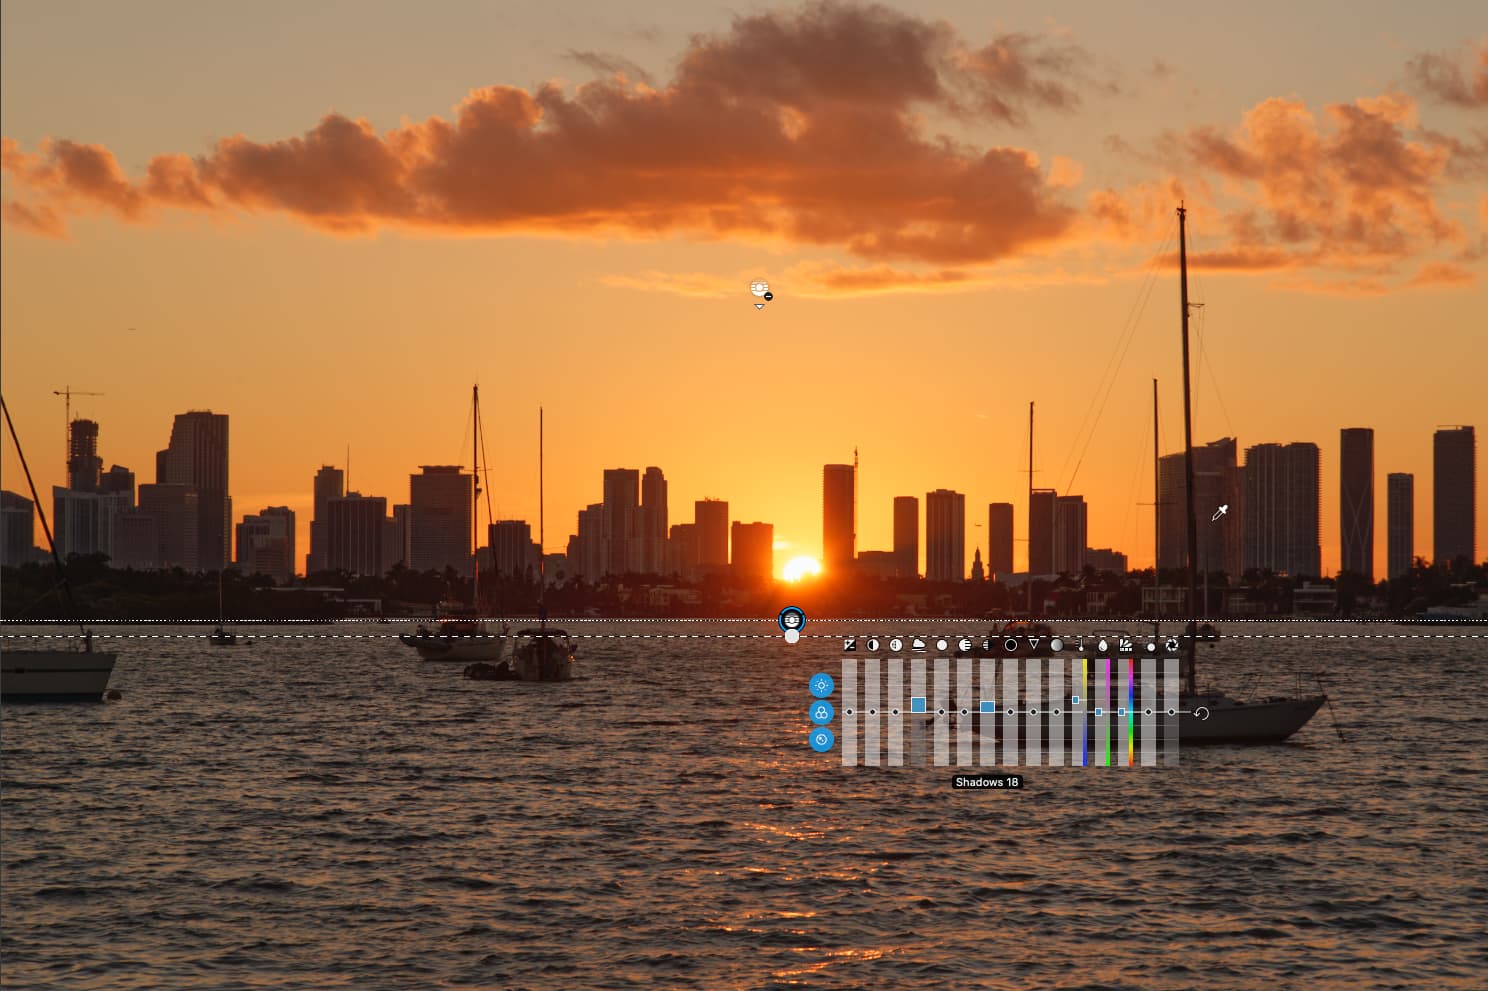
Starting with the sunset photo, the huge cloud at the top was moving towards me, and by the time I stopped shooting, most of it was gone from the frame. I started with the sun a little higher, but the images were pathetic, so I started bumping up the shutter speed and ended up with 1/2000th of a second at f/10 to almost get rid of the clipping. ISO was 400, but I now know I can back it off to 100 or 200.
Using the “G” tool for grid, I got the image level - I wish there was a way to simply rotate up/down until I like it, but no big deal - the horizon tool gets it done.
Hopefully I used the Smart Lighting properly, as that’s how I got the buildings to change from dark black, but I wish they were a little bit lighter. I started to crop out the tree branches, but them put them back in.
I know you guys will make this effort look too “simple”, but from my point of view I love it, and that it came from my X100f makes me think the DxO “beta” test is doing just great! Thank you to all the people who made it possible. OK, I will post my image, and then upload my “normal” photo as taken by the F100f.
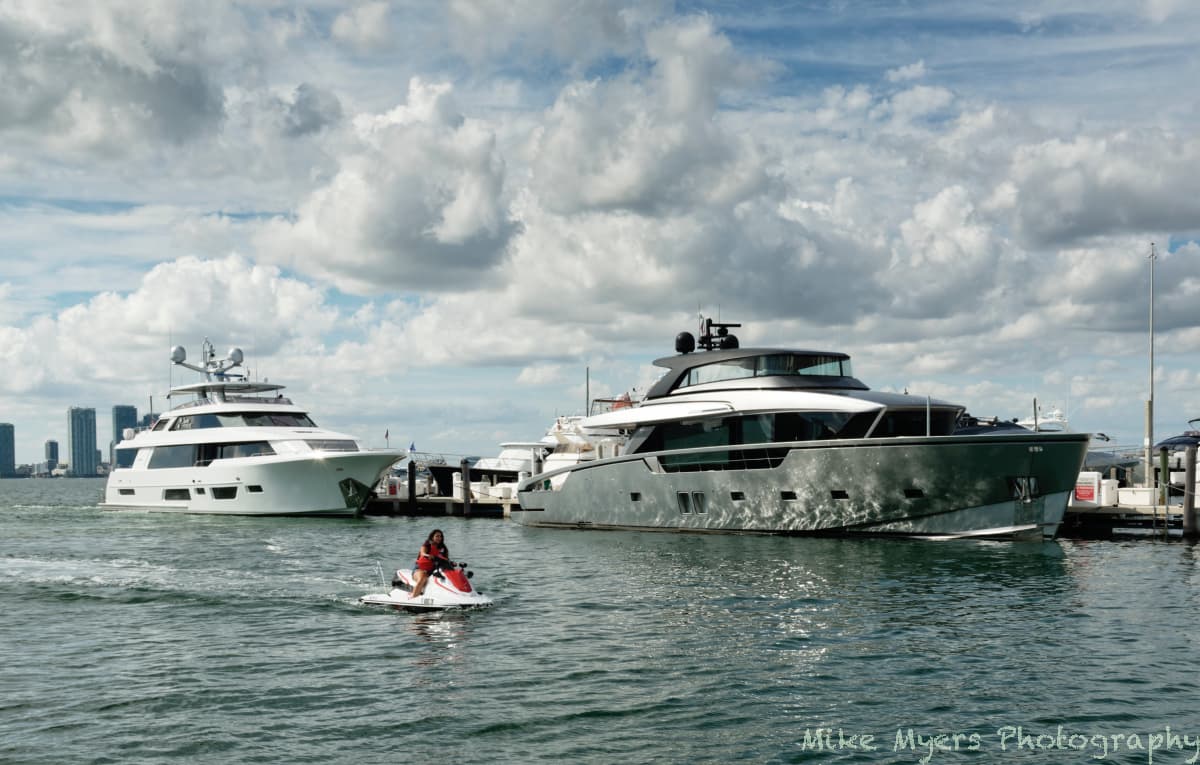
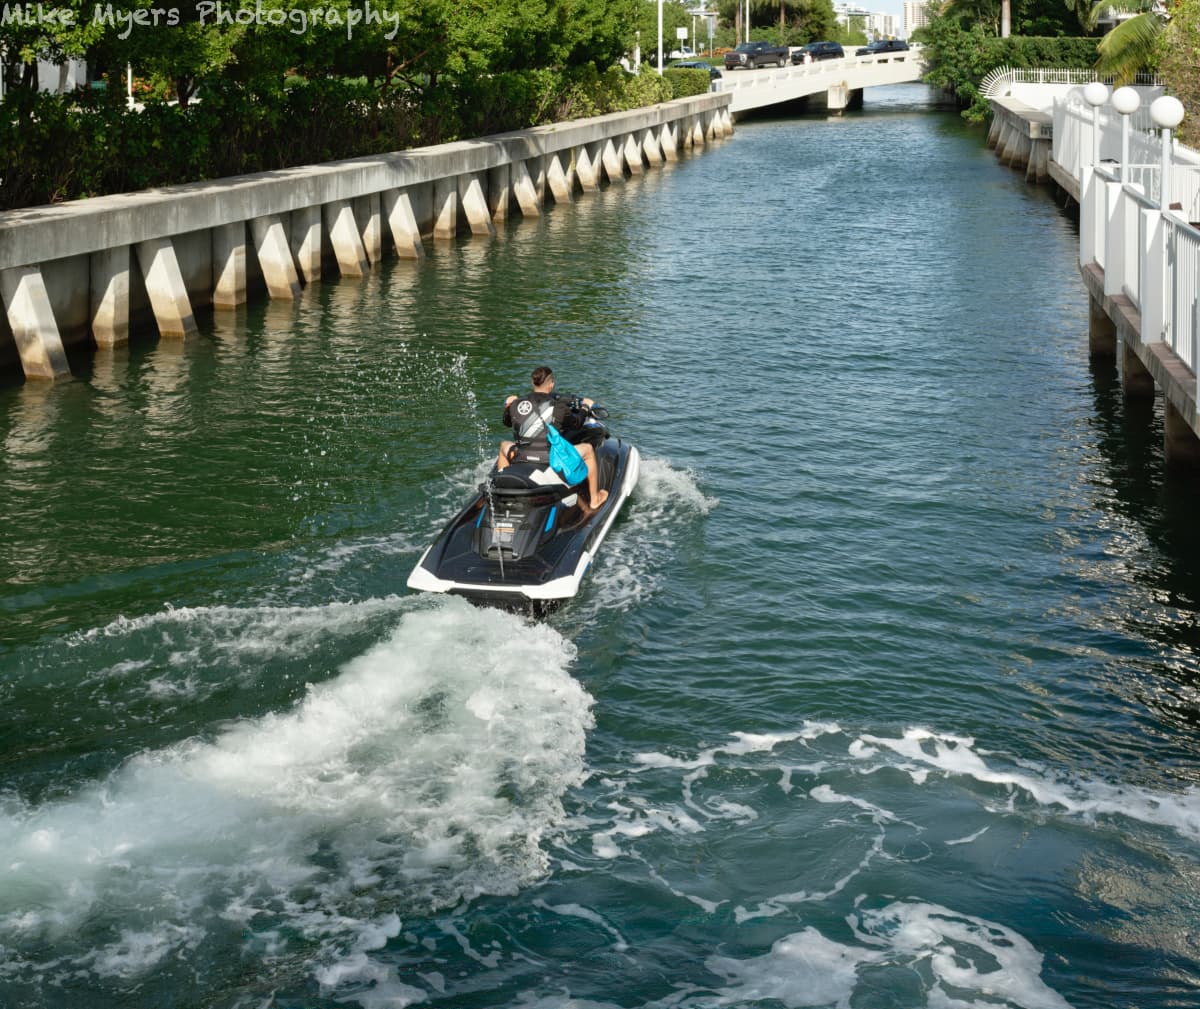
Another photo from the Fuji X100f, taken mid-afternoon today under a beautiful sky. The yacht at the right was docked, and the white yacht behind it was docking. I saw the jet-ski coming along, and waited for it.
If there are any flaws in PL5 for the X100f with X-trans sensor, I sure can’t find them. I’m not sure about all my Fuji settings, and need to relearn the camera, so it’s as “stock” as my Nikon, and not doing anything to enhance the photo.
In the meantime, I’m back, or I should say my Fuji is back.
However, after this post I need to go back to learning the Nikon better, but I wanted to thank all the DxO people for a job well done!!
Coming from you, that’s quite a compliment!
As to exposure, it’s “me” that is selecting the exposure, not the camera - maybe this is why?
I think I need to go back to my Nikon for a while longer, maybe much longer, but it’s nice to know I can get similar results with the smaller and lighter Fuji.
can work in both manual and aperture priority mode
supports centre-weighted and spot metering
can adjust exposure compensation
has lenses that “connect”
supports a remote release
can have all its “smarts” disabled
…and, providing you know the essential controls off by heart, there shouldn’t be a camera around that you can’t take decent photos with.
Of course! The problem with AI is that it might claim to be intelligent, but that “intelligence” is definitely artificial and, in reality, nothing but a set of rules that someone else has decided gives what they think is a good picture.
It’s the photographer who is the real intelligence behind the cameras, as you are now starting to prove. All you needed was to learn how to ignore the AI and take control.
Horses for courses, as they say. The Nikon is undoubtedly the most flexible, provided you don’t mind either carrying a few lenses or limiting it to one lens per outing. The Fuji is a superb pocket camera and, from what I can see, has much more functionality than the Leica, apart from not having the same range of lenses. You just need to choose which one suits which style of photography.
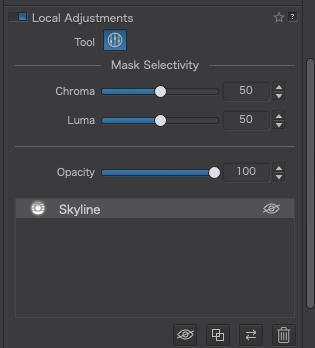
It might be a good idea to make a few more shots with HDR, to really get the hang of local adjustments, especially now they have those Luma and Chroma selectivity sliders - that really do make a great difference. It will also allow us to add a few real world examples of how to use them to the forum for the benefit of other folks.
Then, all you need is some more purposeful images to continue learning how to optimise them in PhotoLab. Try imagining you are preparing for a small exhibition and work towards having 20 images that either tell a story to just go together well. The important thing with this idea is to learn how to use your eye, your camera and PhotoLab to create a consistent look and feel rather than just a collection of snapshots. As you are well aware by now, post-processing is about much more than “cleaning up” images, it’s about creating images that match what you visualised before you pressed the shutter.
I seem to enjoy that kind of challenge, and unlike before, I now feel reasonably comfortable about doing so - long ago either the highlights or the shadows suffered, but now I am starting to feel comfortable about dealing with both, simultaneously. You mentioned “Luma and Chroma sliders” - while I’m starting to get an idea of what they can do, I can’t yet “visualize” how they will help me.
About helping other folks, for years and years, I’ve read people ask questions, and get answers, and filed those answers away in my brain for future use. I suspect that others here are reading these discussions, and as I learn, they learn. I sort of expected you would be overwhelmed with questions by now, but I don’t doubt that others are learning from your answers to me, just like I learned over the years watching and seeing how other people’s issues were (sometimes) resolved. And I guess I can add now that I don’t always go along with those answers. The more I learn about “behind the scene” answers, the better I can apply them myself.
…and you’re also right about something else - I used to think if I set my camera to “automatic ____”, the camera would then select the optimum setting for ______. I no longer believe or think that. As you so nicely put it :
…and what that leads to is likely NOT what I think, see, or want. I’m getting closer to learning how to get my pictures to show what I want, even if it goes against “the rules”.
With one exception, that fits how I’m thinking lately. The exception is the “consistent look”. The way I think, every image I capture has to stand on its own, and show what I was thinking and feeling at that moment. Maybe by my next lifetime I’ll have a “consistent style”, but I’m not ready for a consistent look, and I’m not sure I ever will be - I think I’m learning “the tools” here, and trying to apply them to whatever task I’m working on at the moment - and days, weeks, or years later I see things differently in retrospect. Maybe I’m already working towards what you suggest, without even thinking about it, as the type of tools I have and use makes a huge difference in the results.
I did something else over the past two weeks, and it will be interesting to see how it affects my photography. I was given a damaged Apple iPad, and after fixing it up, I decided I would try to understand why others like the iPad so much, when I always thought of it as a needless toy. So, I’ve now got an 11" 2018 iPad Pro, with a wonderful screen (ignoring that it has cracks in it), and a very powerful CPU. I wanted an image editor for it, and DxO isn’t an option. After reading all the reviews for so many supposedly good image editors, I selected one that was developed specifically for the iPad, no porting - “Pixelmator Photo”. Everything is done on-screen, with an Apple Pencil. It isn’t going through menus and making adjustments - everything is done directly with the “Pencil”. When I’m away from home, without a computer, it seems like a nice challenge to learn how to create on my own those things that PhotoLab has made so useful and relatively easy to accomplish on a good computer. It’s like “painting with light”. At some point, when I have time, if I get an image looking good, I may want to feed that into PL5 to complete. But enough of that - my main goal right now is getting to where I can “think with my camera and PL5”.
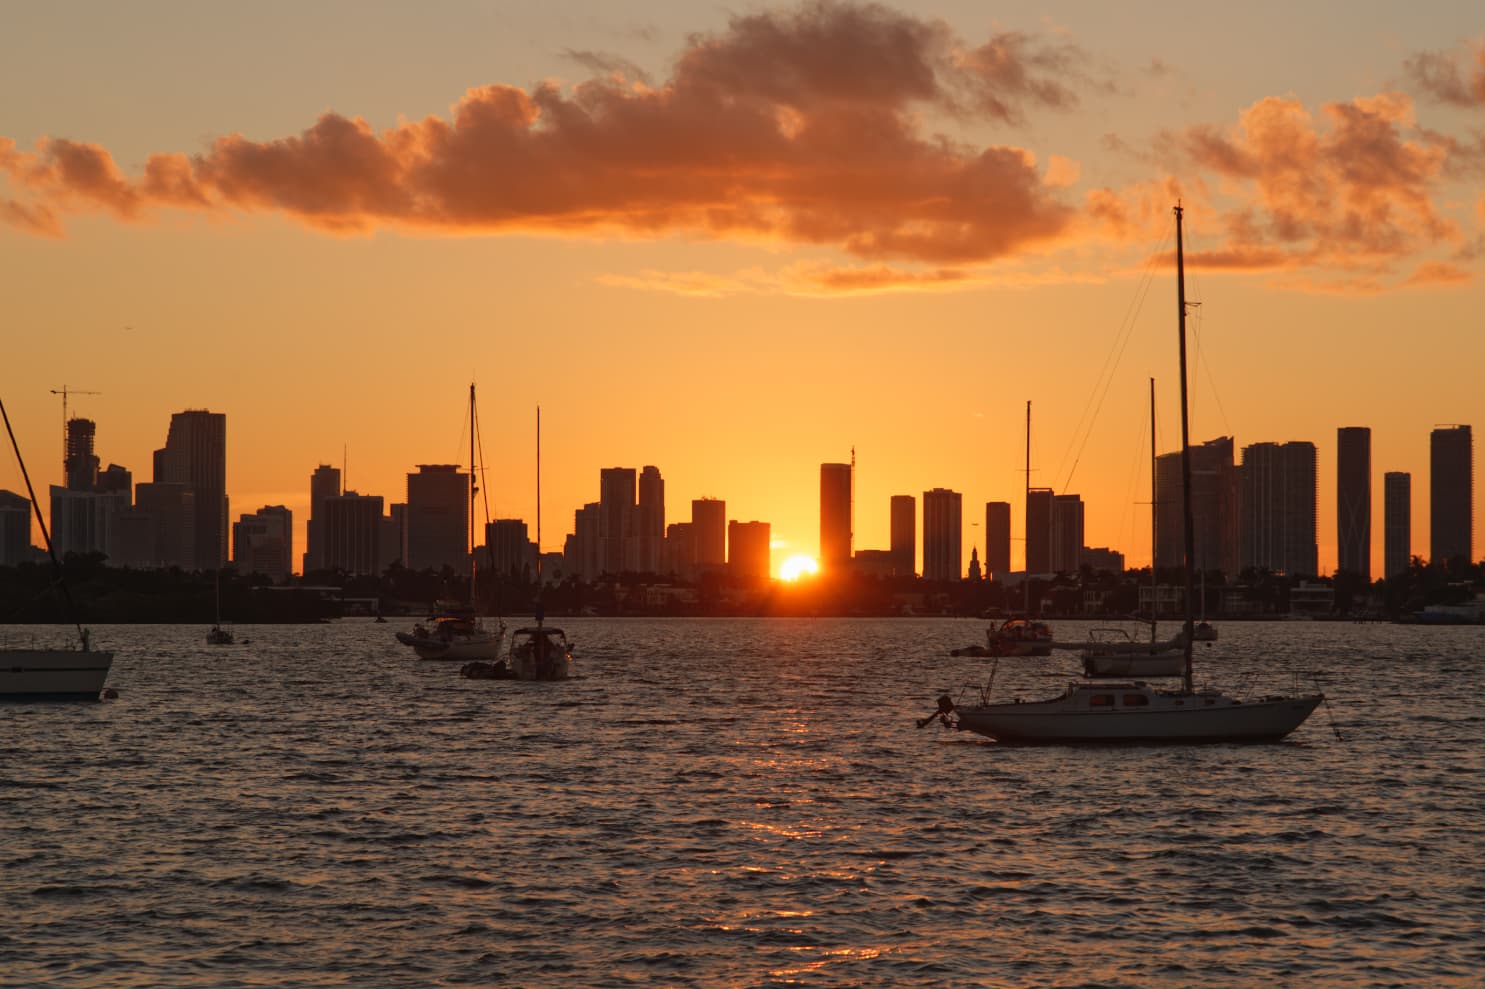
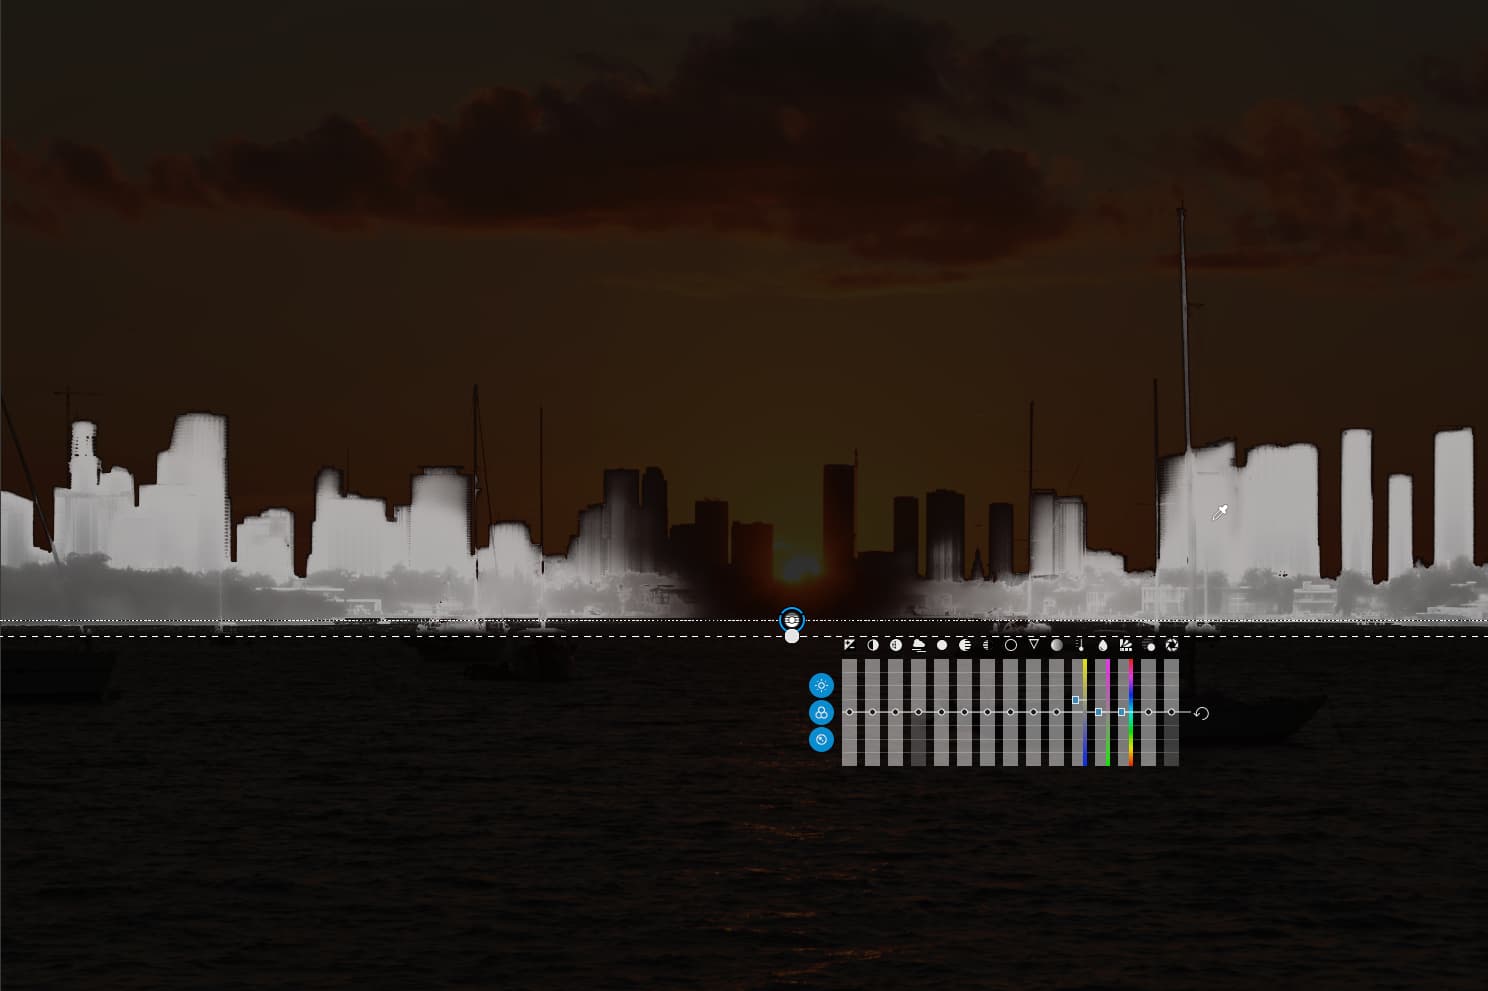
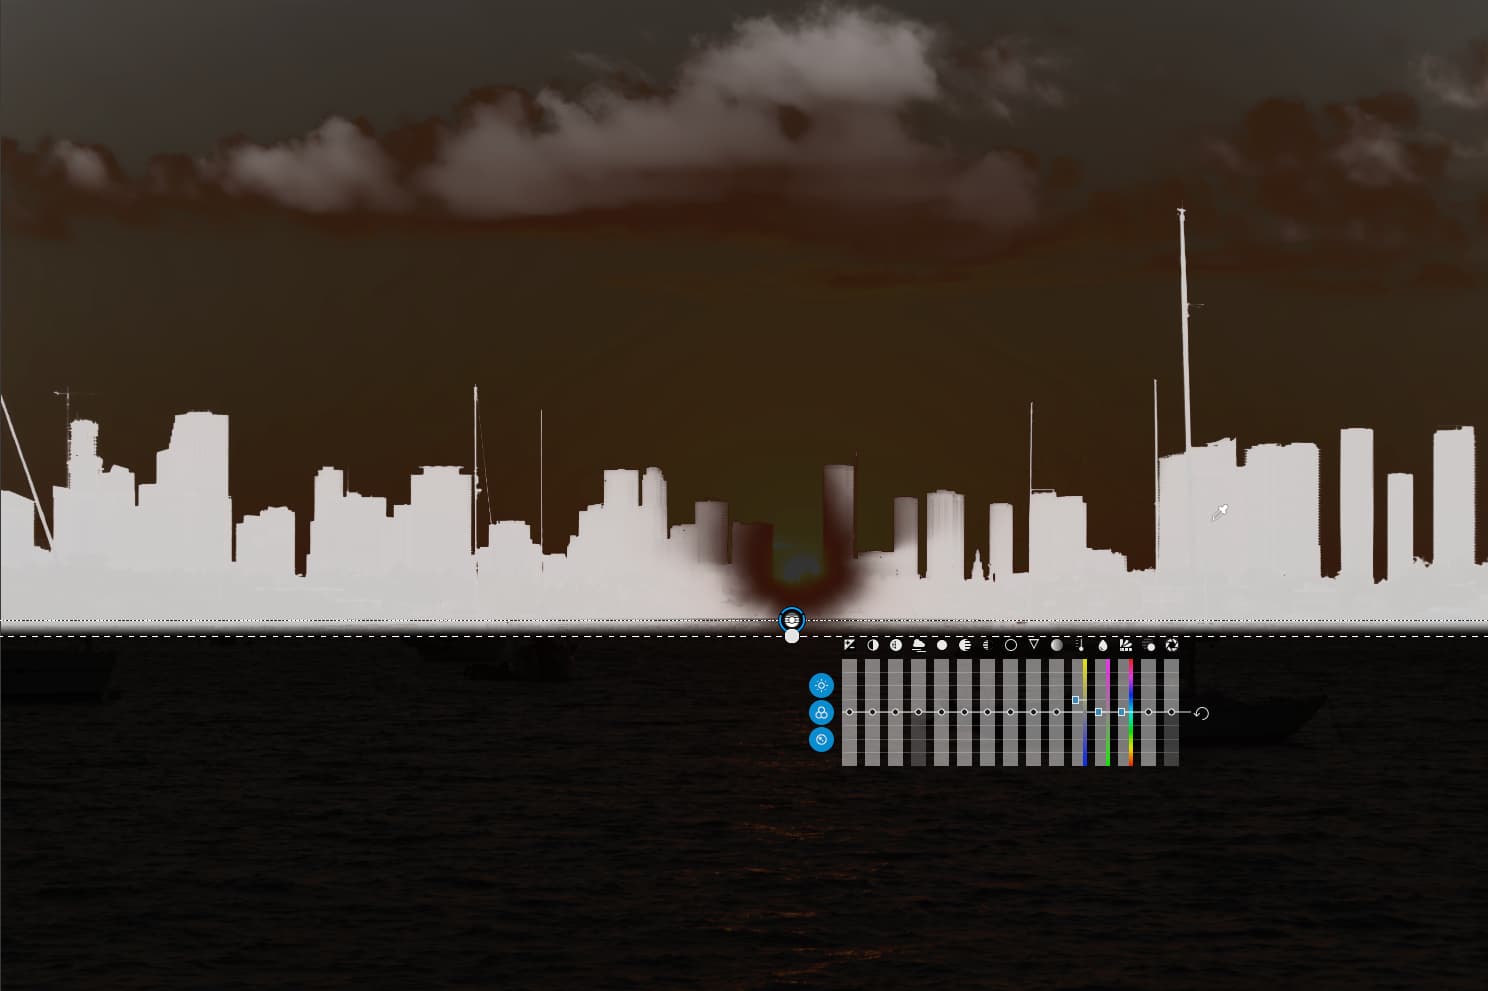
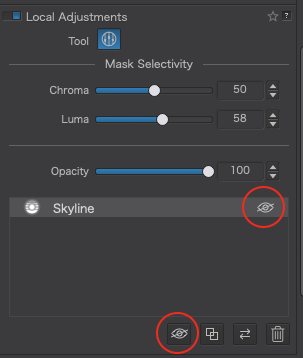
After doing the basics, I decide I want to raise the detail in the buildings on the skyline. So I add a Control Line just below the buildings with a very short transition…
The bright areas are those that will be affected by the adjustment and the dark areas will not change.
The first thing to do is to adjust the Chroma and Luma sliders to refine the selected area which, at the moment, also includes parts of the clouds in the sky.
If I take both sliders down to 0, then there is no selectivity and the whole area turns white to show this…
That’s much better but some of the clouds are still selected. So, I change to a negative Control Line on the bar below the image and draw a mask that starts just below the clouds and transitions downwards…
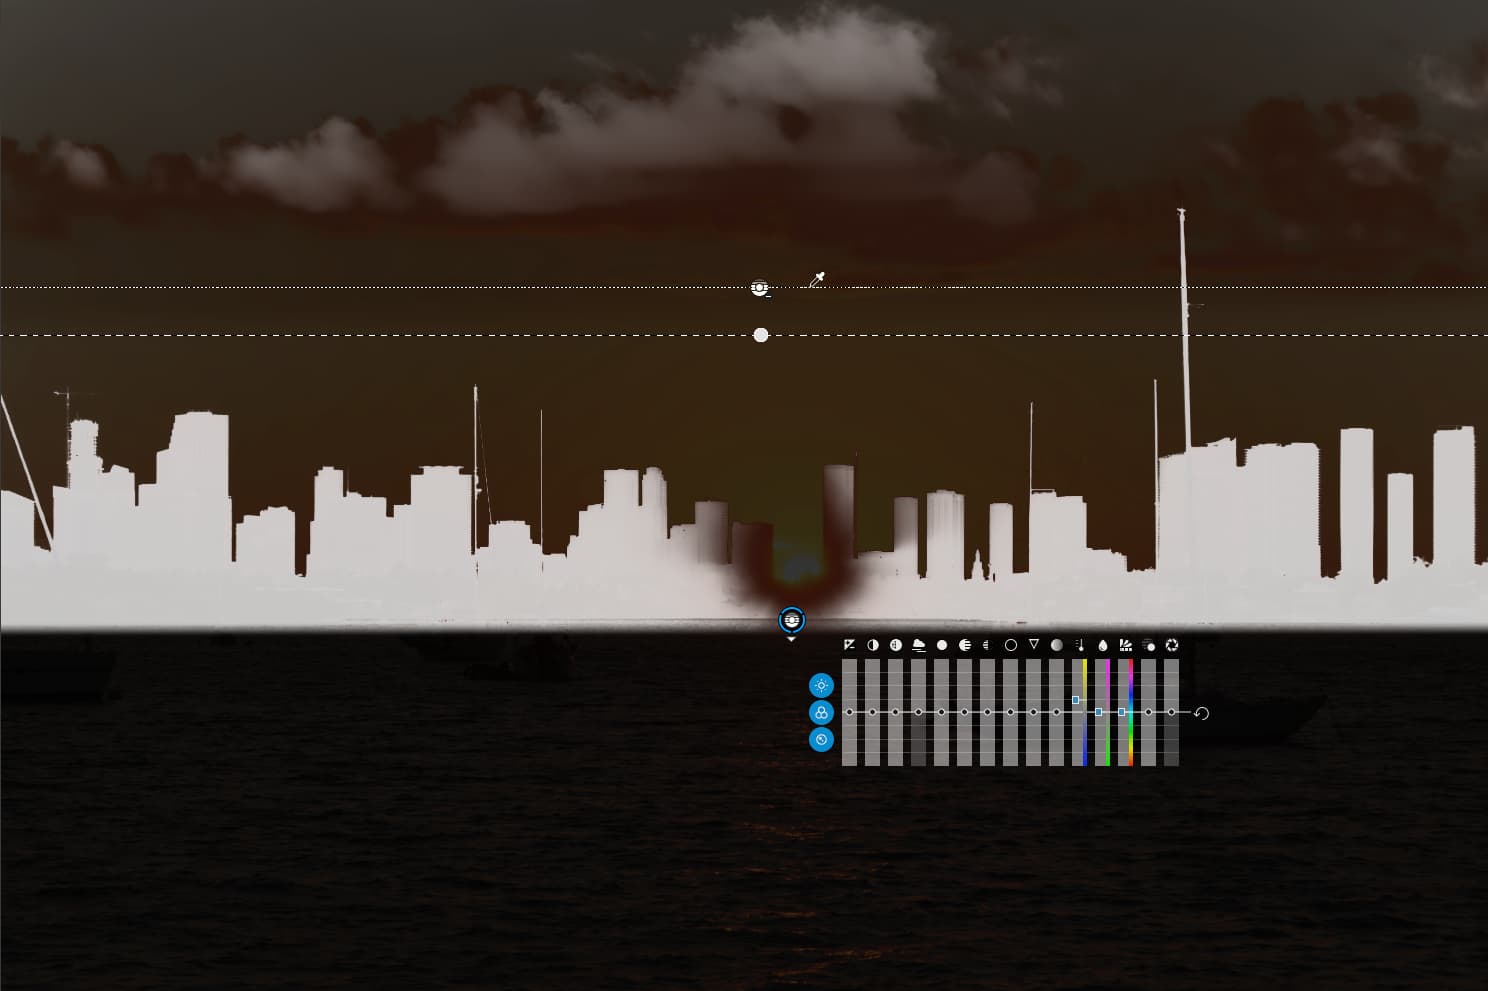
This has now “deselected” the clouds and the mask is now mainly black apart from the buildings.
Now I can switch off the masks on the bottom toolbar and start to adjust the shadows and ClearView Plus sliders to gently raise the level of detail in the buildings and only the buildings.
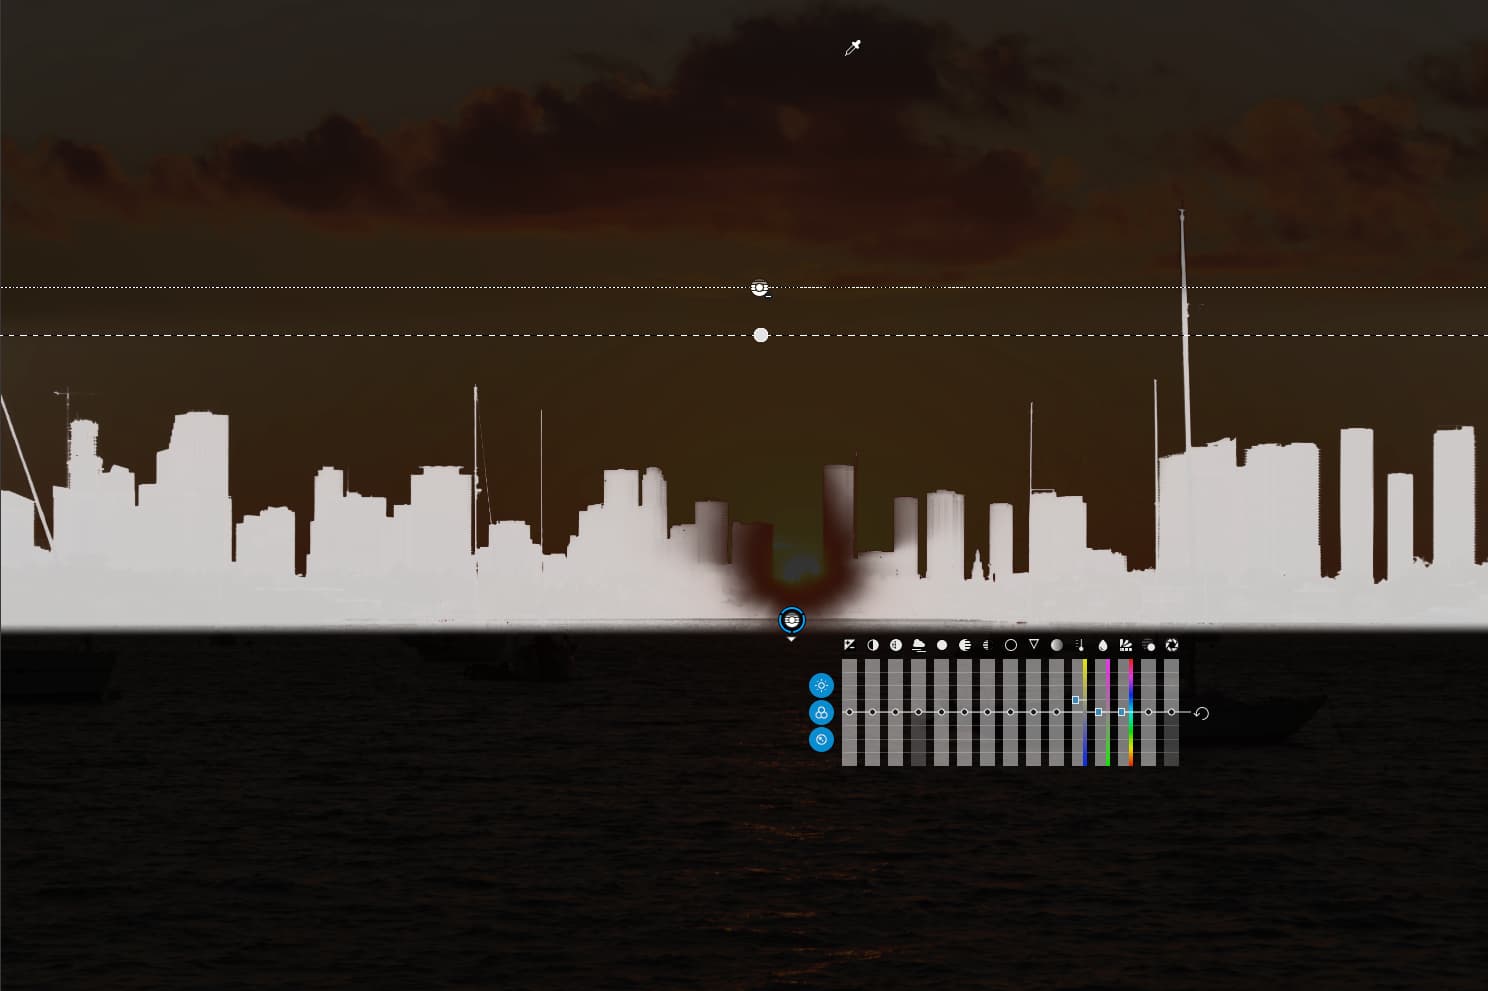
While I am in Local Adjustments, the Compare button at the top of the image allows me to switch between the before and after appearance of all the affected areas. If I want to see the difference for just one adjustment, I can show or hide just that one adjustment using the “eye” in the LA palette…
You have just demonstrated what I posted an hour or so ago in a different thread. PhotoJoseph did similar things, and I came away from the webinar with a sort of useful idea of what it can do, but no idea of how I would/could actually use it.
What you’ve done here is to completely show my how this new tool can help me improve my images! I need to start using it, so it becomes part of my toolbox vocabulary, for what to use, and when, and how. At this moment in time, it makes perfect sense to me. It even seems “intuitive”.
Thank you!!!
(DxO ought to have a way to point people directly to your post, so as to help the most possible users who are struggling to figure this out, as I was.)
Apparently this is a large collection of photography tutorials, which includes and emphasizes PhotoLab. So this is the link you are referring me to: https://tutodxo.com/en/control-line/
I have problems integrating what PhotoJoseph, and now your article, are showing me, into my mind. I prefer seeing an original image, then an explanation of what needs to be done, step by step, and then seeing a corrected image. PhotoJoseph did show that in his video, but it didn’t “click” in my mind as something I could then start to use. I apparently learn new tools very slowly. Even here in the forum, Joanna explained everything, and a few hours later I tried to do it on my own, but it wasn’t working. I needed to understand where to draw the control line, and that in my case it was drawn from top down, not left to right, and until Joanna started talking about the “pipette” thingie, I had no idea what it was, or where it was, or what to do with it once I found it. I thought I needed to modify the effects of my control line by somehow changing the control LINE - wrong. All I needed to use was a control POINT in the needed locations.
I see a lot of things on this web page that will help me understand PhotoLab tools better, so I’ve got a lot of reading yet to do.
I’m a slow learner - there are currently two images that I took that are being discussed, my iguana photo, and my early morning photo of Biscayne Bay. I think I now understand what and how to edit that second image, and only now am I ready to try Wolfgang’s suggestions on the iguana photo.
For me, “doing” is what teaches me best. While “reading”, and “watching” are helpful, it doesn’t become part of my “vocabulary” until I do it myself. It’s like my cameras - I can read five or six books/articles on my camera, but it won’t become part of “me” until I start doing it/them.
Thanks - I will get back to your website later today.
Enough “Doing” and my fingers start to know what to do before I think it out in my mind!
I went back to my Fuji X100f this afternoon, on a walkabout, and the only interesting challenge I found was this Jet Ski going through a canal, as I was on the footbridge waiting for something interesting to happen. I tried to edit the image, got disgusted, hit Reset and started over. The easy part was to make the vertical lines on the sides vertical. The water was much too bright, and I wondered if a control line might work - I put the pipette in a bright spot in the water, and I got the effect I wanted, except that the spray behind the jet ski now was too white. A control point fixed that, and the “change in brightness” is due to a shadow of the footbridge I was standing on. I tried DeepPRIME expecting it to fail, but it worked! There’s actually a lot more detail in the image when viewed at full size, but on my screen it’s gone. As to the composition, I half closed my eyes, and moved things around until I liked it, but with all the goofy shapes and lines, it’s hard to get it "balanced.
I’m very pleasantly surprised at how well PL5 works on Fuji images! I see no need to use any of Fuji’s editors, when this is so easy and so powerful. PL5 as far as I’m concerned is perfect for the Fuji.
I’m wide open to advice on how others “see” this image. For me, it’s the summary of a dozen or so compromises. Feel free to re-edit it however you wish - go wild, if you want to!
Changed the perspective to place the guides on the nearest “verticals” to the edges, changed the X/Y ratio to restore the lamp goes to circular and and reframed a bit tighter.
Placed a couple of extra Smart Lighting zones over the blown highlights to bring them under control and this meant I no longer needed the local adjustments on the water and spray.
Not the most interesting of subjects (to my mind) but perfectly exposed.
When I place both versions side by side, at first it’s hard to find the differences. To my eye, I realized you cropped out meaningless stuff at the bottom, and a little more at the top.
After looking at your version, you cropped the sides too. All of this resulted in a stronger photo, with the things I now see as distracting no longer in the image.
By changing the perspective, my mis-shaped lamp globes are indeed looking more “round” again, something I had to struggle to see, but now that I do see it, I think I’ll be a lot more careful in the future about changing perspective, stretching the image to “fit” nicely.
During my walkabout, nothing I “saw” looked worth photographing, and when this happened right in front of me, the camera was all set ahead of time. The exposure is due to the Fuji, not me, as it seems to always do well at that if I don’t interfere. The whole day was like this - boring. It was sunny, but not “bright sunny”, so no infrared photography, and while I did take some sunset photos with the D750, it wasn’t a very inspiring sunset. In hindsight, that’s good, as while I thought I checked all the Nikon settings, I forgot to put it back on raw. Now I can’t remember why I even turned it off ‘raw’, but I think it had to do with my trying to save everything in one of the three settings, so it could be instantly recalled. I need to forget that idea, and have a check-list. Had I gotten to the photo location five minutes sooner, I’m sure I’d have caught this, but I got there just as the sun was dropping behind the buildings. One more thing learned.
Even a “nothing” photo is something I can learn from. Had you not pointed out the un-round globes, I might not have noticed that for years or decades. I do know doing stuff like that by adjusting perspective twists photos un-naturally, but I hadn’t thought through all the implications. Now I look at my version of the photo, and it’s quite obvious - uggh.
My take on this - try to take at least one “nice” photo every day, and do my best to make it look as good as possible, and check the next day (especially if I post it here) to find new things to be aware of. If I do that, when I try to take a really special photo, it will benefit from the things I’ve learned on my not-very-exciting photos.
Joanna, on my drive home from the bullseye shooting range, I spent much of the time trying to figure out what I did wrong, that caused you to need to correct the no-longer-round lamp bulbs.
I think the first thing I did was make the image level.
Then I used the parallel bars tool to make the verticals vertical.
Then I did some fine tuning.
As far as I know, the only thing I did that could “twist” the globes the way I did, was the use of the parallel bars, which would certainly mess with the geometry, especially if I then rotated the image. But you accomplished all of this too, and your bulbs look perfectly round to my eyes.
Is it the order in which I did the corrections? The parallel bars would certainly mess with the geometry of the globes, and my then rotating the image with the horizon tool could twist the bulbs to one side or the other, which might be what is causing the globes to look “noticeably wrong”.
Nope. The is no horizon correction in your version.
Which is what I did, just at different angles.
You used a 23mm lens, which caused most of the distortion at the edge of the frame anyway. Then, in using the parallel bars tool, you stretched it ever so slightly down and to the right on the right side. The correction I applied to the X/Y ratio was only 4, so it was not really serious, just me being hyper hawk-eyed
No, the ovality was there to start with, due to the focal length.
Me looking over your shoulder and being ever so slightly OCD
My fault - I did that on my first edit, but things looked awful, so I started over again. Now I need to start over again, after what I’ve learned from you.
This gets complicated. The Fuji has a fixed 23mm lens, but it uses a crop sensor, which makes the 23mm lens behave more like a 35mm as I recall. I treat it as if’s a 35mm, which fits into my brain better.
The more hyper-hawk-eyed you are, the better!!! I wasn’t very observant. I thought the round globes would still be round, but that was not true, and any time I twist an image as I did, rotating and stretching, I need to be especially careful that things in the image still look “real”.
That means everything I thought I figured out this morning was incorrect. Let’s pretend the lens was a normal 35mm lens on a normal 35mm camera. Had the globe been centered in the image, it wouldn’t have mattered which way I aimed the camera, as long as the globe was centered. But in my image, the globe looks distorted, and in your image, the globe looks round.
Thinking that way, it proves your point, as you explained. Had it been a 16mm extreme wide angle lens, things that are off center often look distorted, and that is the problem. I accept that. …but why does the globe appear to be more circular in your image than in mine?
I think the explanation might be, that had I used a “fisheye lens”, nothing would be distorted. If I look at some spot on the fisheye image, the smaller the spot, the more accurate it will look, and any distortion will apply to any place in the image, even the exact center. But, if I replace the fisheye, with an extreme wide angle lens that covers a huge area, everything away from the center will appear more and more distorted. (I know what I’m thinking, but it’s difficult to put it into words. …and our eyes act sort of like a fisheye, and since the retina (film) wraps around the eye, everything looks real to us. Maybe we should invent/design a spherical sensor to go behind our camera lens?
(Maybe if I take a sunset photo tonight, weather permitting, I’ll use a fisheye type lens…)