What do you mean, Mark? It’s just another option, isn’t it? It can give more precise control over highlights and shadows, midtones, and white and black point. The thread I linked to addresses Selective tone’s highlight and shadow control ranges.
Peter;
Well; that’s an excellent tutorial. This trick with double action (highlights + highlight contrast) is a good one. I didn’t know that. Thanks a lot.
Equal adjustment – I will remember this.
But there is lot of variables. So I need to double all my actions? We have Selective tone tool with Highlights, Midtones, Shadows and Blacks slider and then Contrast tool with Highlights, Midtones and Shadows sliders. How to control all this to get a good image?
Why there are no such DxO tutorials on Youtube? You know; a famous photographer or someone skilled (like PiXimperfect for Photoshop) is sitting behind computer and showing step-by-step how he develops his RAW files. I can find tons of such videos for LR, C1P and Photoshop but nothing similar for DxO.
Are there no such DxO users?
I think Smart lighting sometimes also does not have enough separation. Sometimes I put the box on highlights but midtones are also affected. Sometimes when I put the box on shadows this also affects midtones.
It’s somehow complicated. Where to put those boxes? Move them around – which box where? How big should they be? Lots of variables. For me more complicated then sliders.
‘’ (i think LR does this “equal adjustment of Tone and Contrast” in one slider.) ‘’
Yes, I think so. I guess this is part of ‘’behind the curtain’’ AI thing LR is doing. I hope DxO will implement something similar in the future to upgrade Smart lighting.
Highlights slider all the way to the left….
I know; you get this nasty look. I think I have seen somewhere – if you move Highlight slider to the left then you need to compensate and move Midtones slider to the right.
The same logic I tried with Shadows and Blacks slider but Shadows slider also affects midtones so I guess I need to do double compensate? Move Shadows to the right and then move Blacks and Midtones slider to the left to compensate?
That’s why I’m confused. You need to do this compensations because sliders interact. Then why they need to interact? Odd logic if you ask me.
And about sharpness;
It is about final time they give us sharp image on screen. When the image is ‘’Fit on screen’’ it should be sharp. It’s easier to work with sharp image. How can I adjust and not see sharp image?
It would be even nicer if we get a preview, how the image will look after ‘’export to disk’’. I do export to disk and look at jpeg. Sometimes is too sharp and sometimes not enough. So I just export to Photoshop and there I do resize and smart sharpen and export to disk.
Odd sofrware. Some things are excellent like Prime noise and some other things but sharp image on screen is not possible. Is this part of ‘’Dxo is not Lightroom’’ thing?
Every other RAW software can show sharp image when fit on screen.
Oh, now you mentioned it i used the tonecurve lowered the highlight tip and curved it a bit t get contrast, made a blackpoint dip for clarity.
and i tought it where a dryer andwasingmachine but it are glass tables, probably blueisch. 
Any way, contrast centre balance that’s what the tonecurve can give you and some control on the shadows and highlights and everything in between.
Me i am not an expert in that curvetool, but ive seen some youtube video how people are completely turnover a image with that single tool. If i remember well tou have the possibilty to select RGB and the channels separetly.
So if you change the Rchannel somewhat from the others you could suppres the red and thus the orange but if that control is possible i don’t know.
You have lrgb and l, r, g, b. Control so colorbalance is posible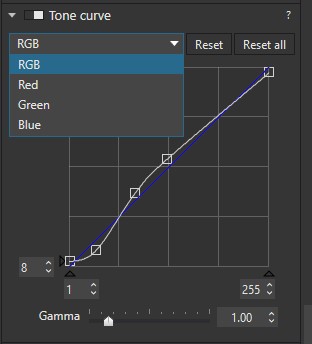
just check you can 
no only with the “twins” highlight, midtones and shadows.
ive played with blacks because i was thinking it worked like SP7pro’s “blacklevel” which create "clarity"dehaze. it isn’t.
But dipping down botompart in tone curve is. i find it a difficult to master tool but using it to support clearview is workable.
this one: he is a expert in NIKcollections
landscaping images.
and
home site of dxo
bit of playing with the tiff, video
See the effect on the edges of the rows.
Don’t know, i think it’s philosophy you need to zoom in at 75/100% to tune the sharpening and see what your doing, same as HQ denoising.and CA. and it safes processing power and thus time.
The optical Module is a powerfull part of DxOpl, much more then just a distortion correction, lenssharpening is also applied which works together with PRIME.
every tool has some secrets which you can find if you look in to it but its frustrating at first but along the way you find the manual control and multiple ways of tackle a problem quite good.
Watch some webinairs and other stuff to get a glance of the tools in use of experts and repeat on your own speed and images. Your will be fine. And remember it’s a tool not “God’s hand”. 
Edit, highlight slider plus contrast version adjustment, the contrastslider adds or deminisch the detailing in a bright plane, so fine adjustment after the start of equal can help to give a white blob some texture.
1 Like
Thanks again Peter.
I need to find this image with stripes so I can play with sliders to get a feeling how exactly they work.
I also use Curves tool. I usually don’t do some complicated things. Sometimes I do S curve to enhance contrast. Sometimes I use them to adjust white and black point (like with Levels tool in Photoshop); this gives the image more shiny and punchy look.
You can do a lot of work with Curves but it’s not a simple tool so it needs time to get used to.
I’ve got lots of information from this thread – lots of knowledge to digest. I guess I’ll have to dig in and try. Practice makes the master. I hope I’ll find the way how to develop RAW files with the same speed I can at the moment with Lightroom.
There is one thing I STILL DON’T UNDERSTAND FULLY and this is exporting RESIZED jpegs directly from DxO to hard drive.
Here is my workflow:
-First I develop a Raw file. For example: I crop if needed, then I adjust Smart lighting, then I move some Selective tone sliders, then I adjust Micro contrast …etc. Now the image is just the way I like it.
-Then I click on ‘’1:1’’ to zoom on 100% to see the sharpness. I adjust the sharpness if needed and now the RAW file is developed.
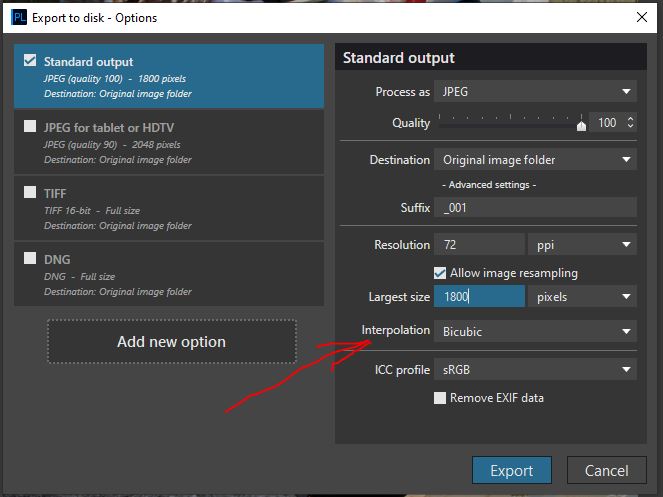
-The last step is to export this RAW file to hard drive as RESIZED jpeg. I click on’’Export to disk’’ and export window opens. I adjust all the settings but …
HERE IS MY PROBLEM:
There is ‘’Interpolation’’ setting. If I set’ Bicubic’ exported jpeg is NOT sharp. If I set ‘Bicubic sharper’ exported image is OVER-SHARPENED.
HERE IS MY QUESTION:
Do all of you have the same problem and what you do?
look for: Luminosity 255-0 in steps.tif (
The export settings is backlogged as looked for improvement .
I am not using those different settings and don’t resize to special use so don’t know if it’s bad or not.
I do screen viewing only, FHD or on the future 4k tv screen, so i store as good as possible.
Like old homevideo clips which deminisch in modern viewing screens to a thumbnail or blown out of sharpnes by tv software. So store as big as possible resolution and i work from there if i would resize for any reason. So can’t help you with that.
This has been under discussion here and here. Also here by you, so again you are spreading problem discussions across multiple threads which only slows down the work and risks reducing forum participation by customers. Why not keep each problem in its own forum topic?
Egregius;
Looks like I forgot about that.
I hope somebody is working to fix this.
‘’ The export settings is backlogged… ‘’
What means ‘‘backlogged’’?
In there “to do list”
Peter; I forgot;
thanks for the file.
Regards
1 Like
I was just playing with ‘Luminosity 255-0’ file and looks like Highlights slider affects all midtones and also affects shadows in small amount. It’s hard to see on those two jpegs I’ve attached but I can see in DxO when moving Higlights slider that it also affects shadows. I find this somehow strange.
First image: no adjustments
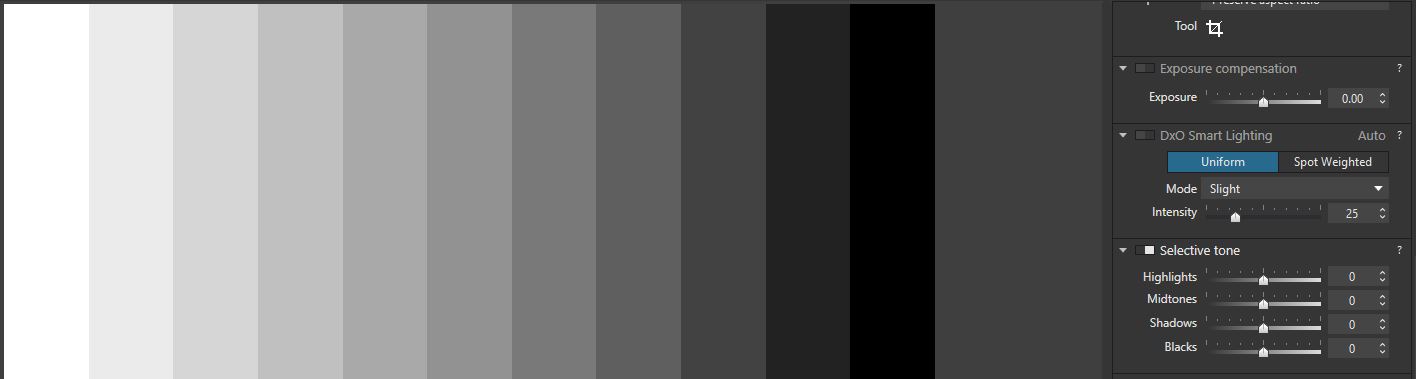
Second image: Highlights slider -60
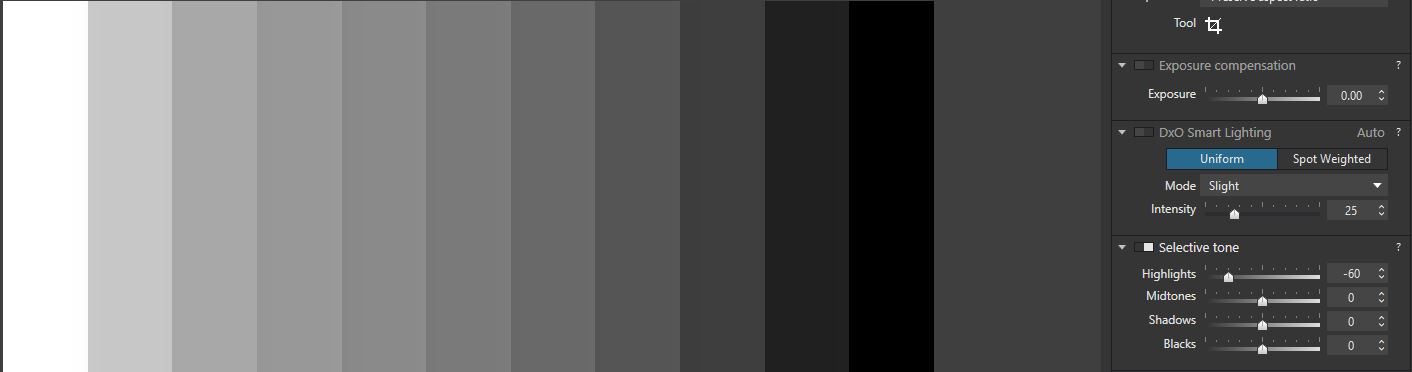
Play with this image and see the histogram changing.
George
Looks like you can see also in the histogram.
What do you think?
I can see on the photo in DxO when moving Highlights slider - it affects 3rd column from the right and a little also 2nd column from the right. I suppose there are shadows because Shadows slider affects this area.
But for sure it affects all midtones area. It behaves more like Whites slider.
Highlights slider: -100

Highlights slider: +100

1 Like
To offset this, head to the Color Balance adjustment (Cmd/Ctrl+B). To offset an orange tint made by tungsten lighting, shift the Cyan/Red slider to the left and the Yellow/Blue slider to the right until your image looks like it was shot under daylight.
Hi bellia;
Thanks for your contribution to this thread but I don’t have problem with tungsten lighting.
The problem is shadow lifting. Whenever I lift shadows in DxO I get those orange faces and dull image without contrast. This has nothing to do with light. I have lots of photos shot under daylight but when I lift shadows I get orange tint.
As we all somehow discovered in this thread Lightroom adjusts contrast and other things by itself so when I push shadows in Lightroom I don’t have problem with orange faces.
But when I push shadows in DxO I get this orange tint and the image is dull and without contrast. To solve this I have to make some additional settings.
I hope now you understand what this thread is about.
But no worries; I accepted this so I use DxO only for my high ISO images or images done in less demanding conditions – no harsh light and no deep shadows to push – no highlights to restore and no shadows to lift.
For demanding photos made in harsh light (like sun and shadows) I just use Lightroom.
Sorry for the late answer,
yes more people are observing the rather wide reaction of highlight and black and shadow.
That’s why i pointed you to this 0-255 lightnes ladder. By loading this in LR and DxOPL you can discover your problem. (don’t know why the sliders are behaving as they do and or if it’s wrong or not. i am not a Adobe LR photoshop user nor a professional user of editing software.
I take this behaviour as it is and use my “equal correction mode” as default startpoint. (from there i decide if i need more or less texture. (grey spots? less texture, washed out colors? more texture. done by the contrast sliders or vibrance adding,
sometimes i local correct contrast/vibrance with a mask/controlpoint.
it seems that the sliders are overlapping and that if you need to control only highlight you need to counter push the midtones up wile suppressing the highlights forcing the effected area to be smaller.
Again if this is time-consuming or non normal behaviour i can’t tell or value, i am a free time enthousiast and just stop if i am in a need of time for anything else.
That "orange"effect is this a "color"thing or a “luminance” thing?
what does the channel mixer in filmpack with your skin? (B&W) (this is effecting luminance as i am reading it right and not contrast or saturation.)
As I indicated earlier I can often work around the limitations with local adjustments, However, it certainly would be useful if the global highlights and shadows sliders did not affect the mids as much as they do. Since this has not been addressed to my knowledge by DXO staff, I wonder what the purpose is for this wide overlap.
Mark
I am sure they read this kind of threads so completely unaware they arn’t i think.
But yes it’s interesting to know why they chose this kind of overlapping.
And if it’s working great as equal correction, maybe a checkbox to connect them with each other in first modes.
It’s only when you have filmpack by the way you can use this technique. So maybe it’s more usefull to have a tone slider working as tone and contrast together and with filmpack you have a extra possibility to add or lose extra contrast.
It’s clear that most ex LR users have become custome to a different kind of highlight midtone shadow adjustment.
So indeed the why is interesting.
I also haven’t seen a response from DxO about why Selective Tone operates as it does. There is a votable request to change it here. And a different one here. Hope that helps.
It’s OK.
I will use DxO for high ISO images because of excellent Prime noise and maybe for photos made in light without deep shadows and bright highlights.