…as I see it, values > 100 turn colours into their complementary colours…
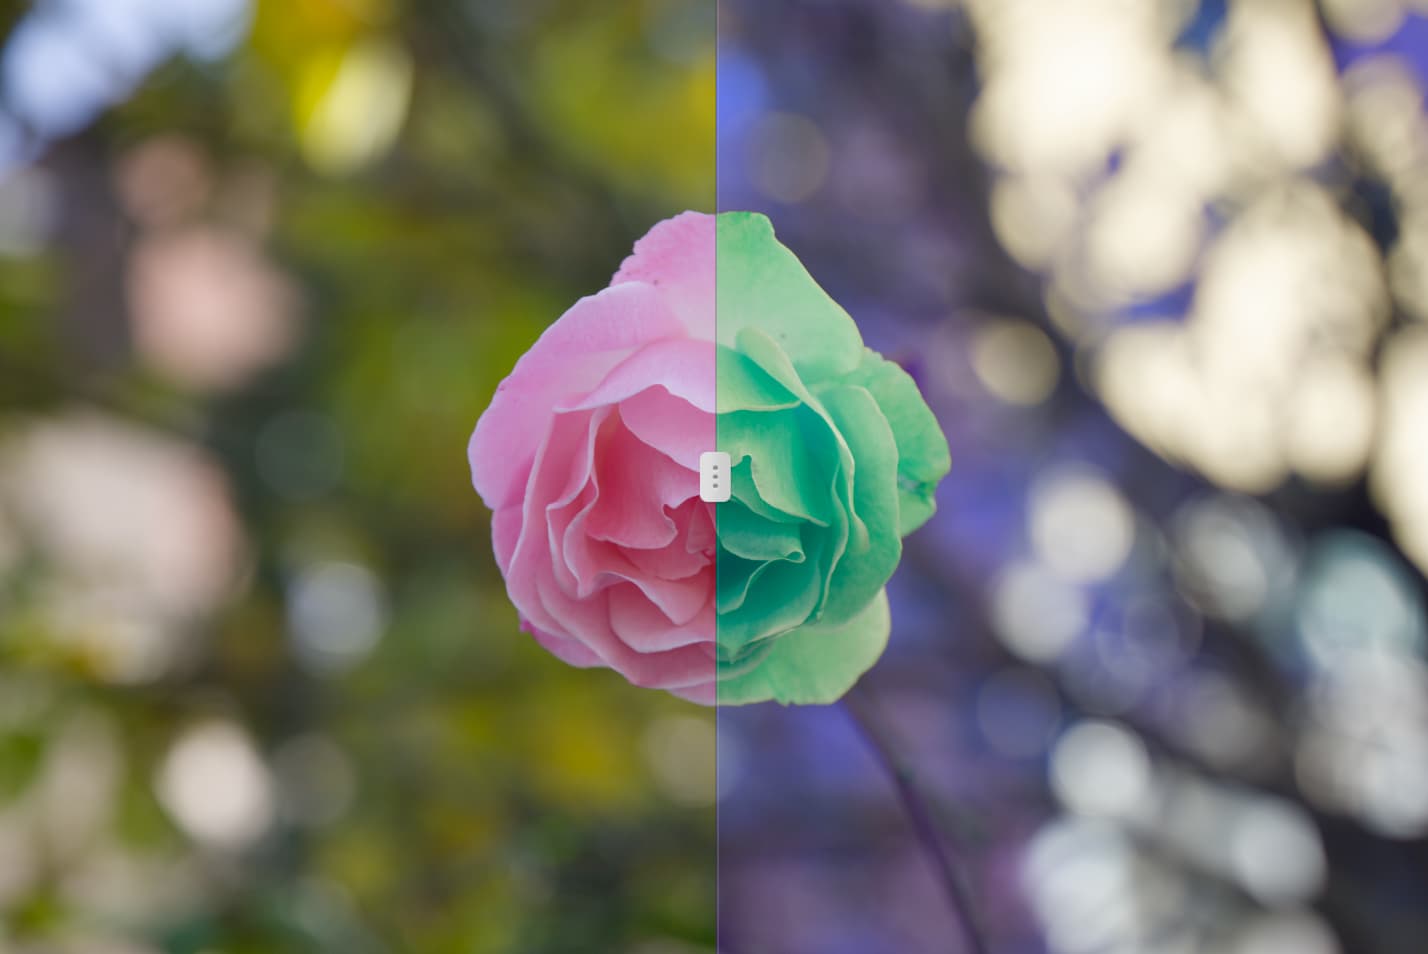
Is that a bad thing?
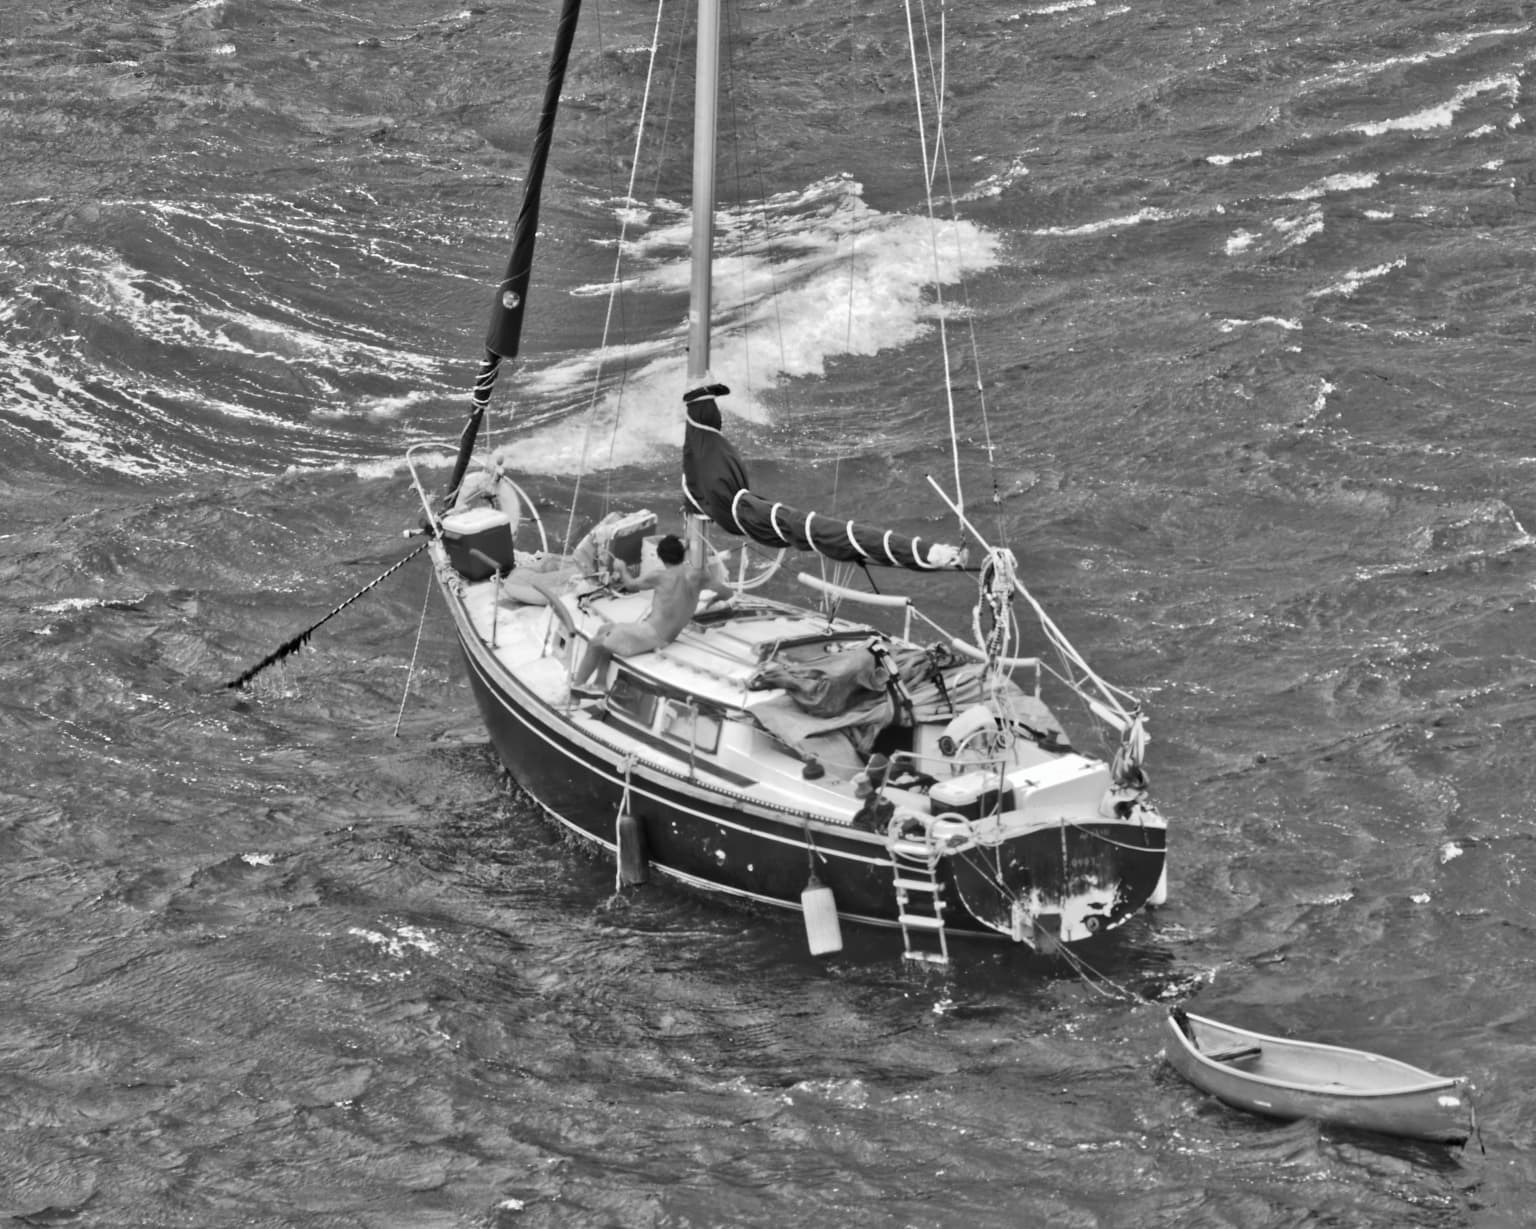
Here is an export of my version…
-
you used the digital version of Fuji Acros instead of the "Fuji Neopan Acros™ 100” version from FilmPack - the digital version is nowhere near as subtle as the “film” version.
-
using a red filter was a bit excessive for the colours in the image as it darkened far too much of the image - I used an orange.
-
you didn’t need to reduce the exposure
-
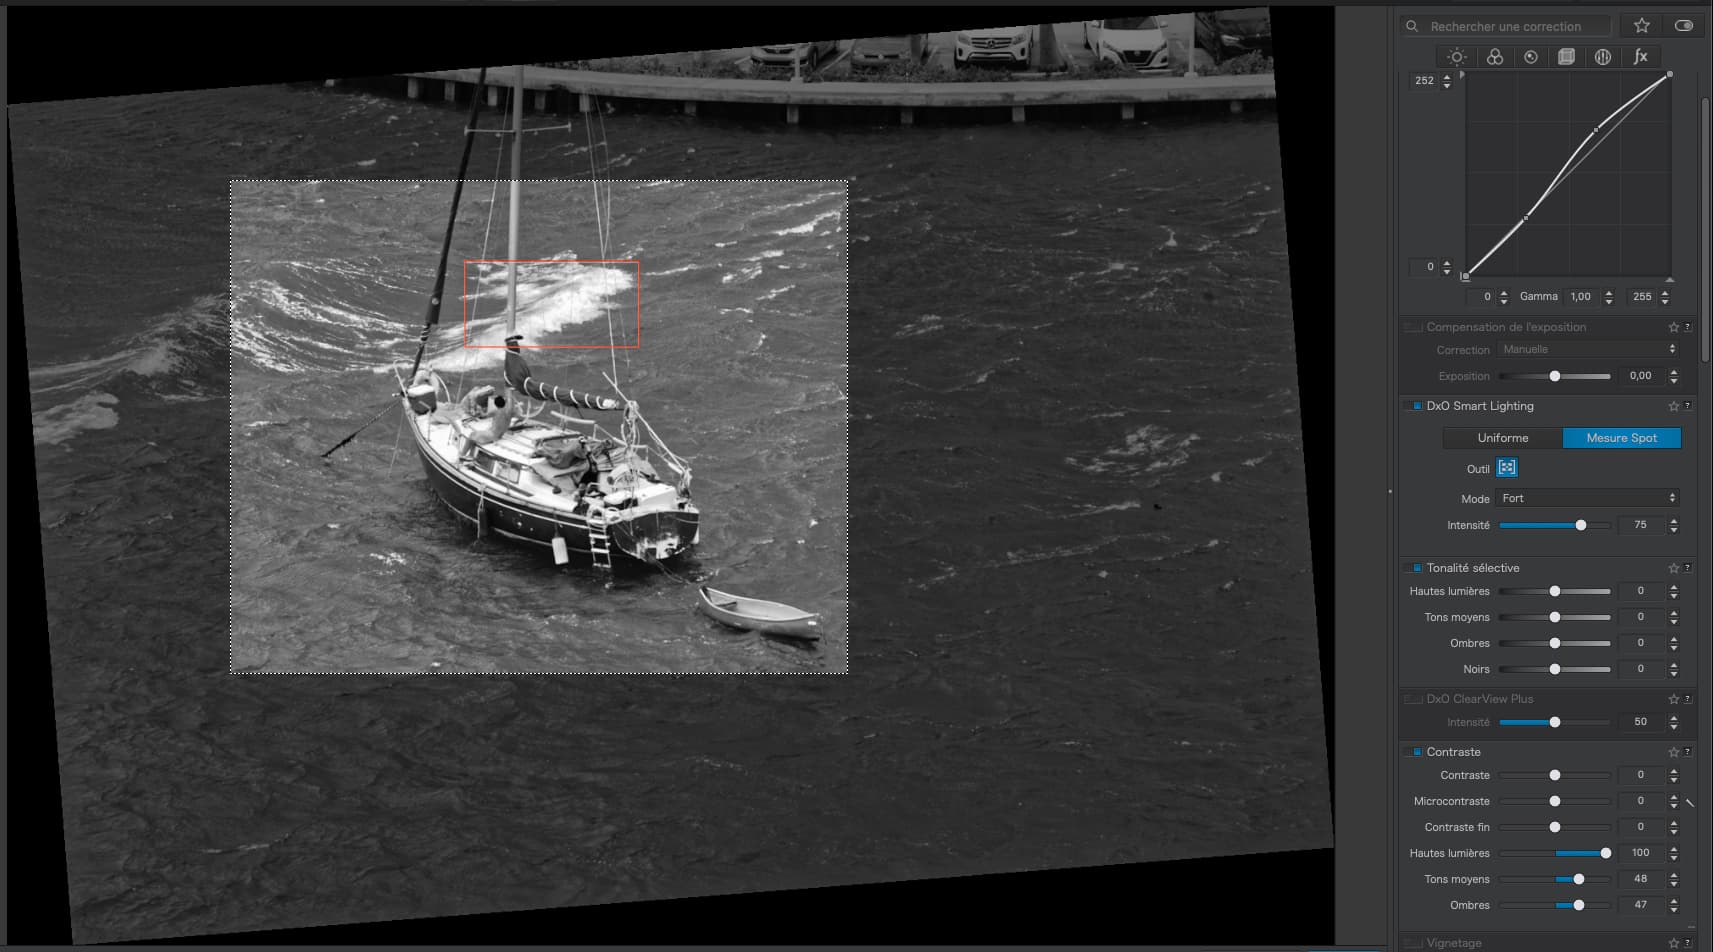
you only used the Uniform mode for the Smart Lighting - using the Spot Measure mode and placing a zone over the wave foam allows you to reduce the exposure on just the foam and the boat deck without reducing the overall exposure, which made it too dark.
-
now the tone curve increases the contrast in the waves better
-
use just the highlights slider of fine contrast to pick out the detail in the foam on the wave crest without over cooking the “crispness” of the whole image
And here is the DOP file with my version added…
L1004396 | 2022-09-28.dng.dop (52,6 Ko)
I didn’t see the FilmPack version shown in the selections - next time I will search for it specifically. I guess I need to open up the full list of choices, rather than looking at the thumbnail images. I’ll do this tomorrow, doing it your way.
I tried several choices - red had the biggest effect. I liked it at the time, but I prefer your orange filter with the slightly lighter effect more.
At the time, the darker image looked more “menacing”, but now, on my calibrated screen, in only normal room lighting, moving my slider back and forth, I prefer your slightly lighter version more. I thought “dark” = “menacing”.
At the time, I wanted “too dark”, but your way makes for a better exposure.
Yes, that’s what I wanted, but I used “fine contrast” to get the effect. I’m confused here, as I thought the tone curve simply adjusted “brightness/darkness”, and had no effect on contrast. Obviously, it worked well the way you did it.
At the time, I adjusted back and forth, until I thought the “crispness” of the image was something I liked.
I need to think about this some more. I thought making the image darker emphasized the “menacing” waves and water. I still feel that way, but your way looks more like a proper exposure. Your version looks more “correct”.
Also, I sometimes “straighten” the masts of ships, so they are vertical. In this case, the boat was leaning to the right, and on a whim, I rotated the boat even more to emphasize that. I guess you didn’t like my attempt to make the boat less “stable”. Since the boat was rocking back and forth, either would have been “realistic”, but the boat leaning more made it seem more unstable, adding to the effect I wanted. I’m wondering why you moved it back? Your version is technically correct, and your version looks “stable”. My version looks un-stable, which I saw as a way to put some “action” into a static image.
I liked my image when I finished.
I like your version even more.
But the boat leaning over to the right I thought made the photo more effective.
I never knew about this. If all I want is to convert my color dng image into B&W, are there any advantages to doing this, compared to using the “Film Pack” method? It seems to me that Film Pack gives me a lot of potential control that might be more useful?
Using the Colour Rendering tool in the palette…

Using the context menu on a thumbnail…
My idea was to show you how to make “well exposed” images, full of detail - in much the same way as you would in a film camera.
Dark and brooding might suit some subjects but I didn’t feel this was one of them.
The tone curve should be your first port of call and, then, use fine contrast if needed.
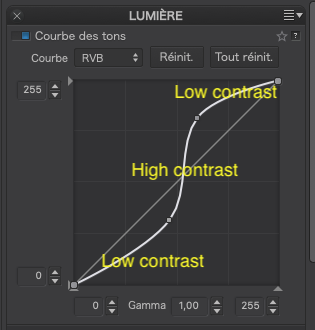
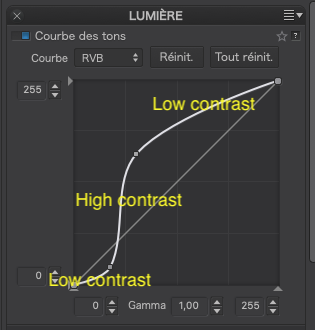
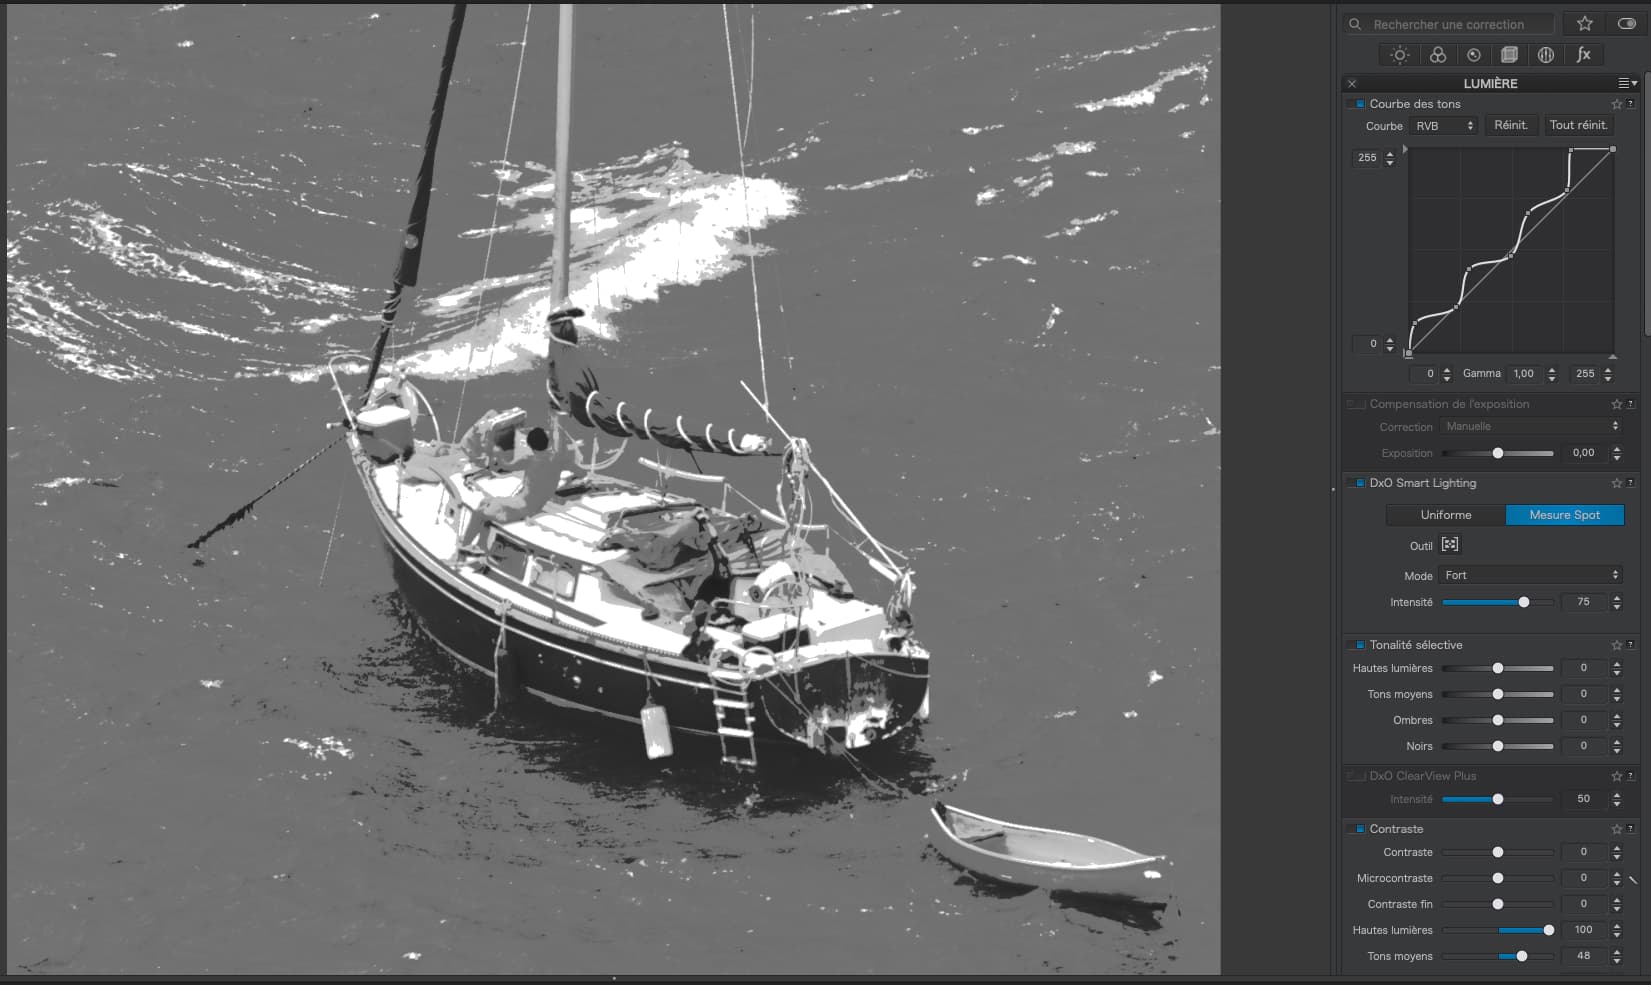
The idea behind the tone curve is to be able to modify, not only brightness, but also, contrast. The steepness or flatness of the curve denotes whether the part of the tonal range is high or low contrast.
Here are some (extreme) examples of increasing contrast - it is unlikely you would use such a steep curve unless it was for an “artistic” image:
High contrast toward the highlights end…
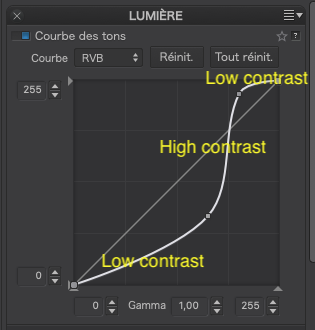
High contrast in the mid-tones…
High contrast towards the shadow end…
Of course, you can go extremely B&W…
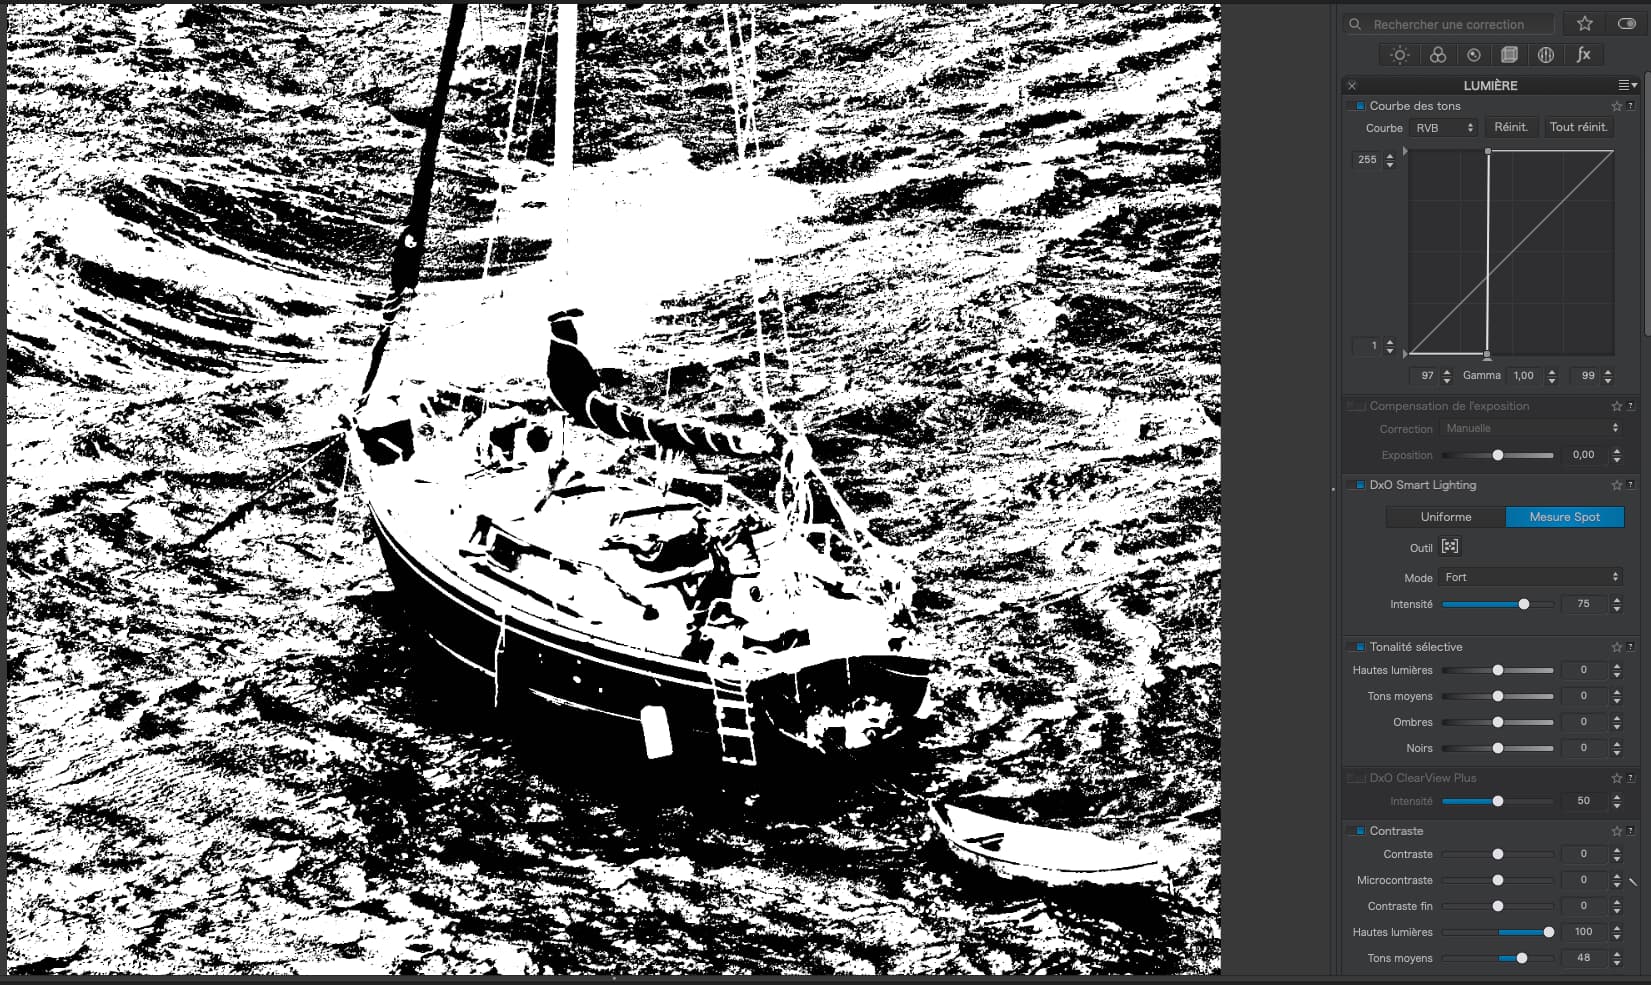
… or possibly a bit Andy Warhol…
It all depends on your desired end result. But, to start with, I would recommend you work on getting the most “realistic” rendering out of a B&W before going all “arty farty” ![]()
Different strokes for different folks - I changed it because I was getting a bit seasick ![]()
![]()
1 Like
@mikemyers
The advantage is that it’s always there in the basic product and doesn’t demand a plugin and it’s very very easy to use.
You don’t need Filmpack or NIK’s Efex Pro to achive what Filmpack or NIK are able to do - but for sure they are convenient and very concistent in their behavior but you can always build your own presets if you have the skills and some time to spare.
As you can see, there are a lot of ways to do it in Photolab and with the plugins there are even a lot more.
May I ask why you straightened the mast? It’s a storm. ![]()
George
PS
I just read your answer.
Ha!!! That was the goal, and I guess it worked. Since the boat was rocking back and forth quite a bit, I guess I could have taken the photo when the mast was at the greatest angle, but to be honest, I was watching for the “white water” and wanted to capture it in a position I liked.
What I did was totally against “photojournalism”, but I’ve changed. Tilting the boat more, and making the water dark (and menacing) was me having fun at creating an image like what I had in my mind. In every way, what you did is technically better, and the result is a technically better photograph.
About the examples above - yikes!!!
For the purpose I had in mind, sailboat in storm, whitecaps, boat rocking, the less “stable” the final image, the better. The way I cropped it was to get that effect, with the boat off to the right. The photo is no longer “balanced”.
…but thank you! I learned a lot from what you did, and how it changed the photo in so many ways.
![]()
I think lots of people here are creating “art”, but your images strike me the artsi-ist, as being something I would like to be able to create. The photojournalism hat was like dragging a heavy load behind me, slowing me down. The way I have been thinking since I spent two months in India is being “free”, no restrictions.
You will probably be pleased - I sold my second D750 this morning, and shipped it off to the new owner, who is sending me a second payment. I then called BH Photo, and discussed the used Nikon D780 cameras they had in stock - three of them. I bought a used one in “like new” condition. I have no idea how it compares to your D850, but I should be able to come closer to what I was trying to do before. The D750 is from 2014. The D780 is from last year, and includes features from Nikon’s latest “mirrorless” cameras, not to mention 4K video which I probably won’t use very much, if at all.
My enthusiasm for my M10 Leica is as strong as ever, but mounting a 135mm lens and using the rangefinder is a pain, and if I mount the Visoflex on top, it’s changing the M10 into a poor substitute for a DSLR. So, I’ll have my M10 for “street photography”, and “walkabouts”, and I’ll have an improved D750 for use when the M10 isn’t a good choice. The new camera arrives this coming Sunday - then I need to learn it, and find some appropriate places to aim it, without copying what I’ve done for years now.
Take a look on Nikon’s site - they have a comparator.
What I most love about the D850 is the 45Mpx, which allows me to crop much further if absolutely necessary.
The main problem that I see there is the lack of compatibility for lenses - with DxO’s modules not available for some
I started looking for it on the nikonusa.com website, but had no luck. Can you please send me a link to this?
I also couldn’t find a spec for “dynamic range”. I did however, go to:
https://www.kenrockwell.com/nikon/d780.htm
…where he has many sunset photos taken with the D780, all with perfect exposure straight from the camera. He did much better than I could do with the D750.
B&H is very fast - they sent me a notice that it will be delivered in three days, Sunday my time.
That is something I would like to have. I could always buy the new Leica M11, for a mere $9,000 and get 60 Mpx. Weight, D780 = 840 grams; weight, D850 = 1015 grams. If I was younger, or stronger, or something’er, maybe this wouldn’t matter. Weight of my Leica M10 = 660 grams.
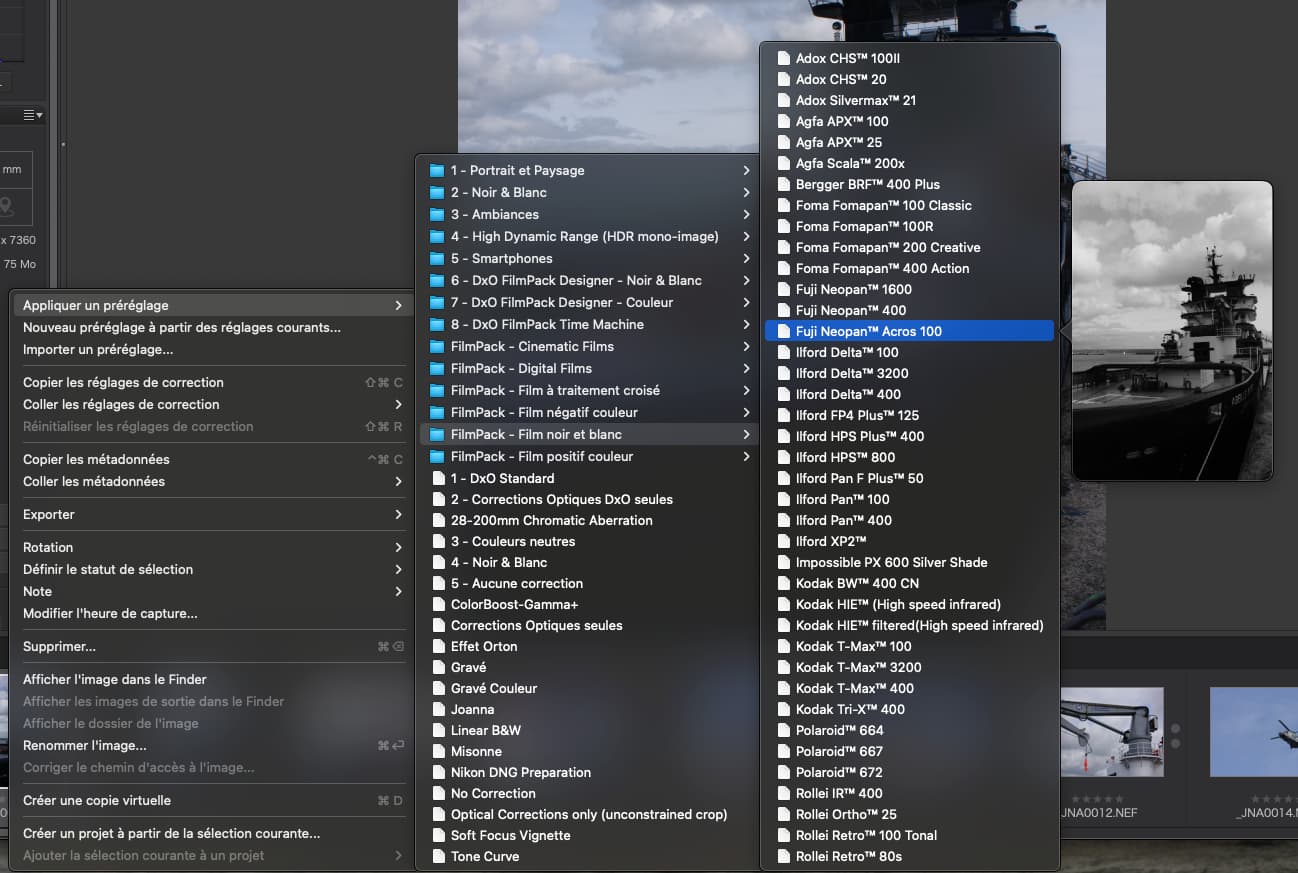
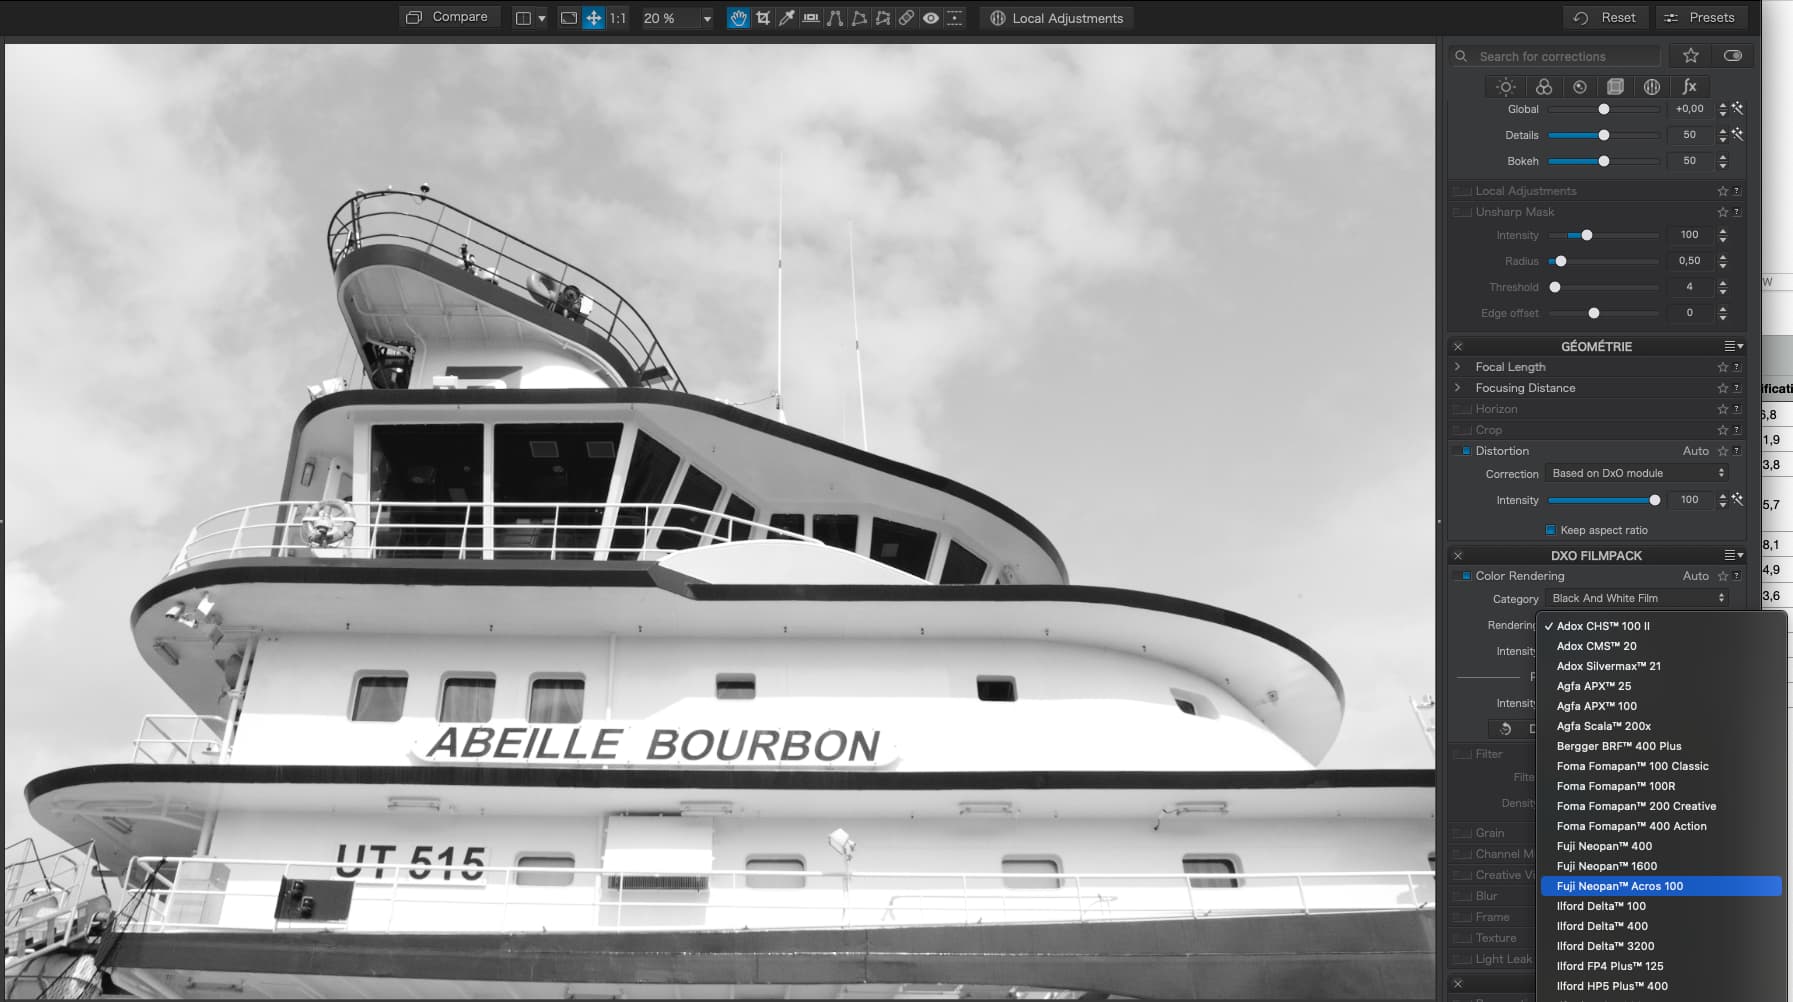
I’m very good at finding things that don’t work for me. My question is how do a select a Preset for a specific b&w film in DXO FILMPACK.
I picked another one of my photos of the work-boat pushing the barge. I wanted to use the FilmPack’s “Fuji ACROS” film, but there is no place in the long list of things that are shown under FILMPACK that I can click on to view all the films, so I can select Fuji ACROS. So, what am I doing wrong, or what am I missing?
Files:
L1004328 | 2022-09-26.dng.dop (14.1 KB)
L1004328 | 2022-09-26.dng (29.9 MB)
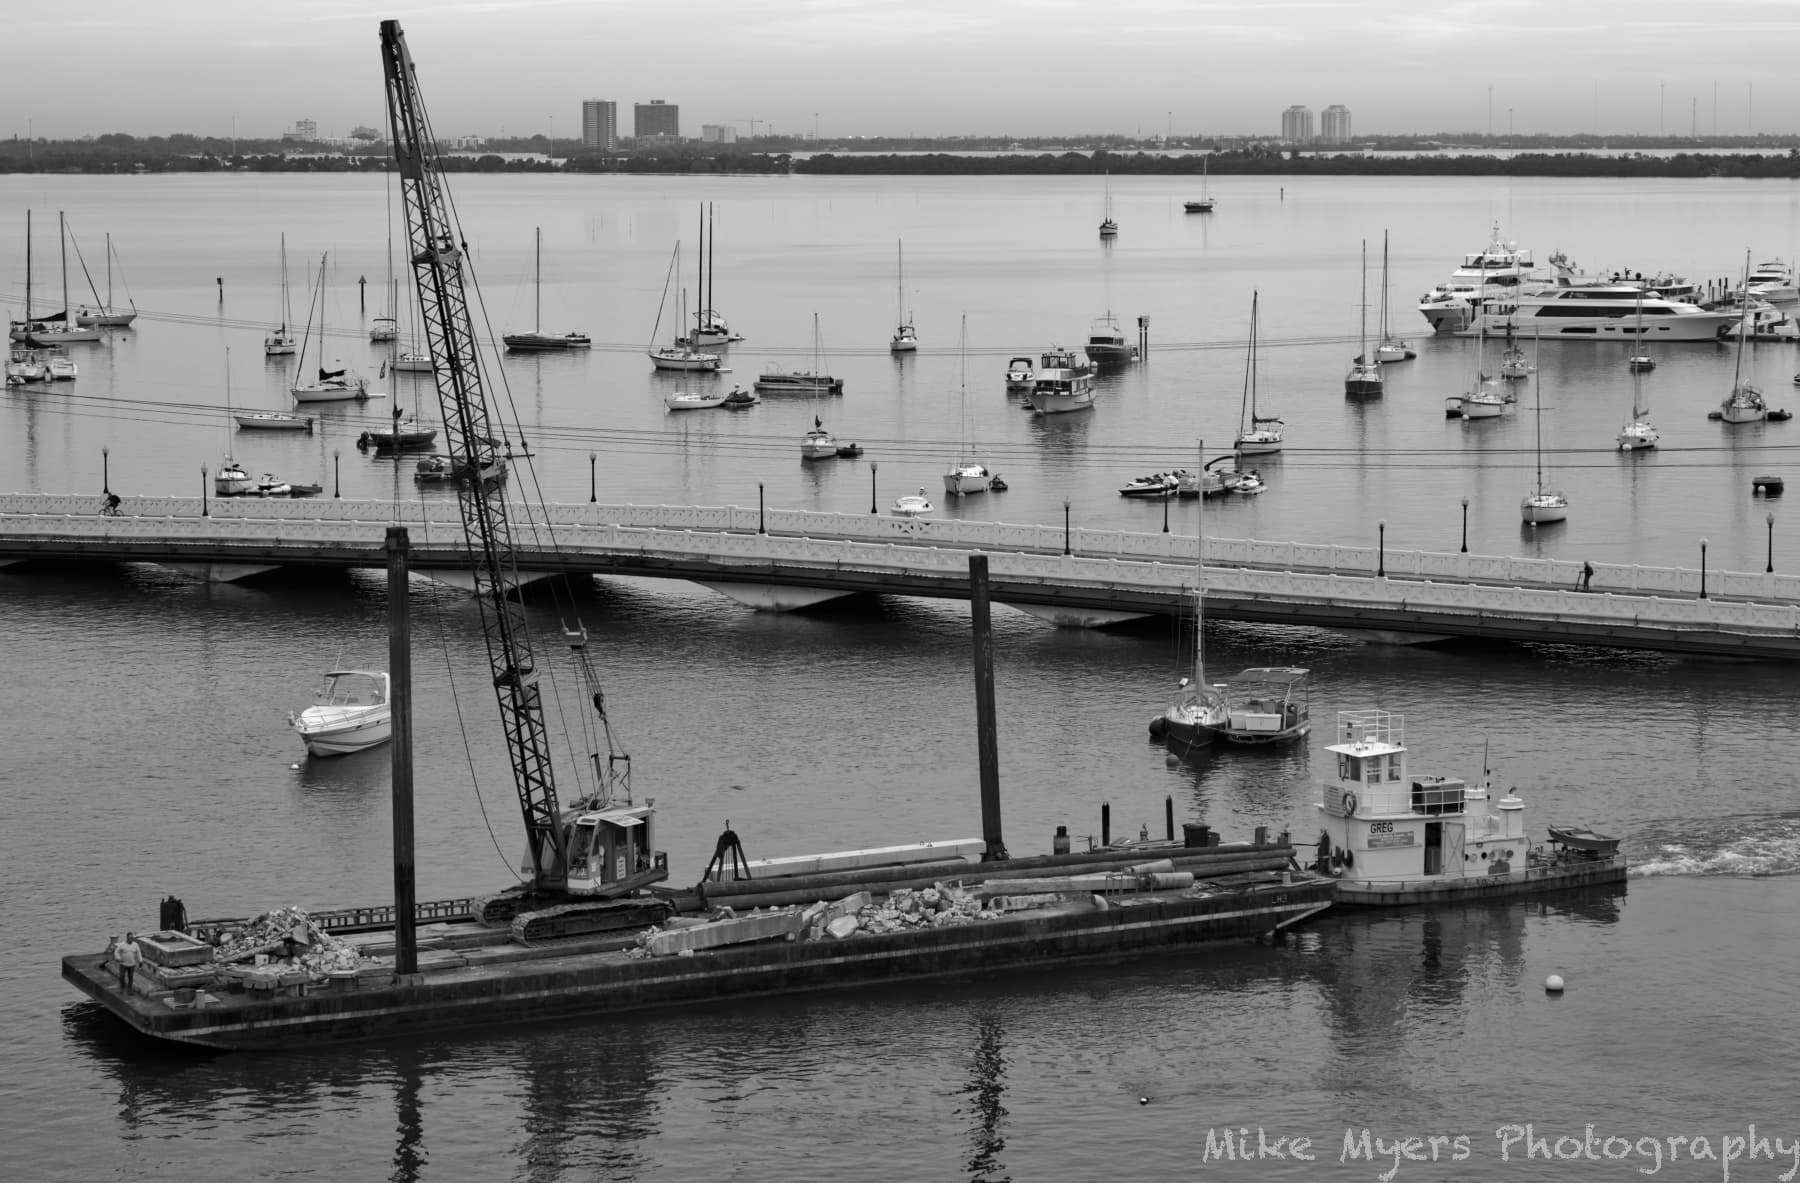
It’s not a very good photo, too cluttered, and it’s never going to get much better, but I’m trying to select the PreSet from FILMPACK, and I don’t know how.
(I did change some of my other settings, based on what I learned from the sailboat photo, but this is just a practice photo so I can learn how to select a specific film for my “Preset”. What am I missing?
I did some searching, and found this, but I don’t think that’s how I’m supposed to do it??
https://forum.dxo.com/t/photolab-presets-for-filmpack-5-film-types-are-now-available/9255
Thanks - I couldn’t find anything, but I guess you’re better at searching than I.
To me, it looks like a tie, and for shooting into the sun, if I’m using ISO 100 or 200, the D780 should be better than my D750 was - and Ken Rockwell’s photos illustrate this. Of course, Nikon may introduce a D880, and improve even better - which along with the larger sensor would put it back at the top.
Back to this forum, I struggled with sunset photos last year, and even using all the suggestions in this forum, it took a lot of work to get a good photo with the sun in the picture. Again, Ken Rockwell’s photos make it seem effortless now.
I don’t want a “mirrorless” camera, even the Z9 from Nikon, which I couldn’t afford anyway. The M10 struggles with dynamic range - which I found when looking at other people’s photos in the Leica Forum. I’ll have to try this myself early this coming week, and see what the D780 does in my hands.
I too had difficulty find the DR. DxO Mark don’t yet list the D780 and the best I could eventually find was 11.2 stops, which is a good 3.4 stops less that the D850.
-
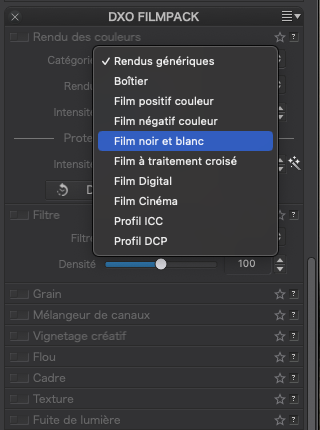
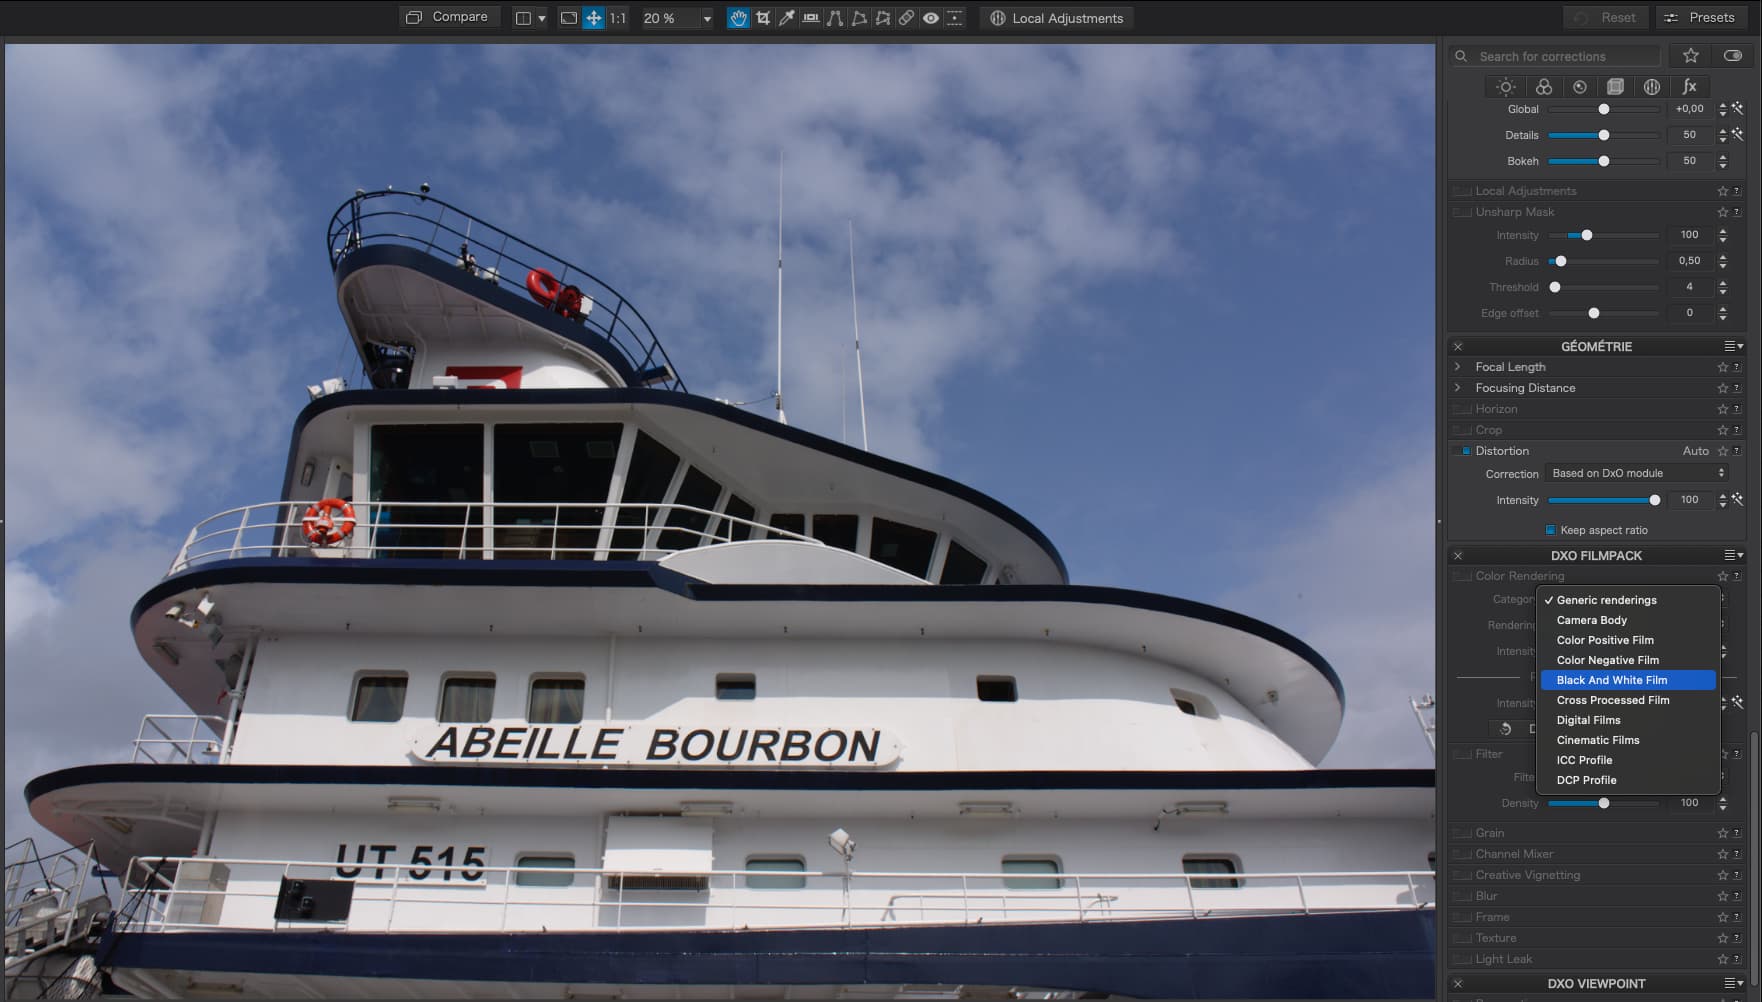
Go to the Color Rendering tool on the FilmPack palette, or whichever palette you have placed it.
-
Drop down the Category and choose Black And White Film…
-
Drop down the Rendering and you should see a whole list of films with the Fuji one amongst them…
1 Like
Check this here:
https://www.photonstophotos.net/Charts/PDR.htm#Nikon%20D780,Nikon%20D850
The D850 is 3/4 of a stop “better” at ISO values below 800. At higher ISOs, the D780 “wins”.
Typo? More than three stops would be quite a thing!
Maybe I’m blind. Here is a screen capture -
Which of these choices do I click on?
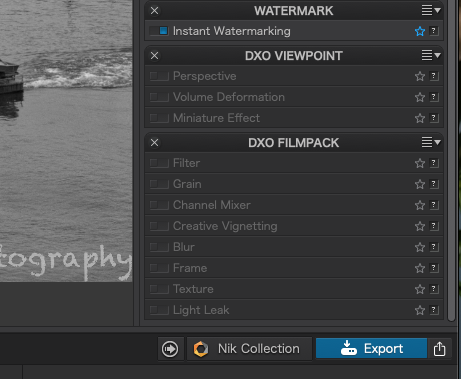
I do see something for “Color Rendering”, but it only brings up these choices:
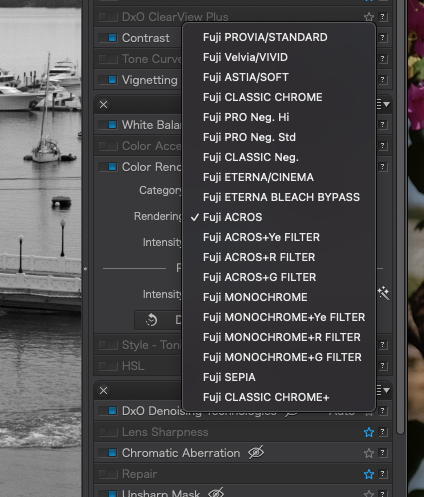
I’m sure this isn’t the proper list, as it should have many more choices to select from???
When you say there should be many more on the list, are you referring to the Fujifilm types or other film types? If you referring to the Fujifilm types, this particular list represents the same film types available in-camera for Fuji X-trans bodies. There are other choices besides the Digital films in the drop down list . There are color positive films, color negative films, black and white films, etc. You just need to look and try one of them They cover a wide variety of additional film types from various manufacturers. Select the other options available in color rendering and you will find everything that’s available. There are close to 100 film types available altogether.
Mike, you need to try a little experimentation on your part to find things. I would think you would find that much more satisfying than having to ask us a question at every turn. Keep in mind, that none of us were born with this knowledge. Most of what we know about PhotoLab, besides the user manual and perhaps some other training material, came from experimentation and trial and error.
I’m certainly not suggesting you should not ask questions if you’re stuck. By all means, please do. I know, that we all may learn differently. However, It seems when you hit a roadblock you don’t spend very much time trying to figure out your way around it and immediately turn to us for help. Unfortunately, you’re lack of willingness to experiment on your own and you’re need for step by step feedback from us is likely one of the main reasons it’s taking you so long to master much more than the basic functionality of this software.
If we were not available to help you, what would you do? Would you just give up and move on to other software, or would you try to figure it out yourself?
Mark
3 Likes
I agree with you, but it’s as if I’m using a different program. Please help me make up my mind. ![]()
I did the same thing before, but @Joanna responded:
" 1. you used the digital version of Fuji Acros instead of the “Fuji Neopan Acros™ 100” version from FilmPack - the digital version is nowhere near as subtle as the “film” version.”
I’m obviously searching in the wrong place. I didn’t know there were two versions, one “digital”, and one “film”.
You don’t need to do all my thinking for me, but please do give me a hint on how to get to the version @Joanna prefers, the “film version”. Since Film Pack appears in my Workspace, I assume there is something to click on to access it, but nothing seems to make sense. There must be a difference, or Joanna wouldn’t have pointed this out. I thought I was doing the obvious thing to select this…
“Everything is easy once you know how to do it!”
Mike, I did tell you how to get to the other available filmtypes. They are all available in the color rendering section. What part of what I wrote is confusing to you? Just choose from the other options available in that drop down list other than the Digital filmtypes
Mark