Control points seem to have built in gradients in that the center is always ‘fully selected’ and the outer parts closer to the circle tend to fade out. This seems to create uneven hot spots. This works fine for some applications but not so well for others. I know we have control lines and new selection controls, but they are no intended for smaller object selections. It would be nice to have some gradient controls over this effect as well as more shape options than strait circles (requested in other threads).
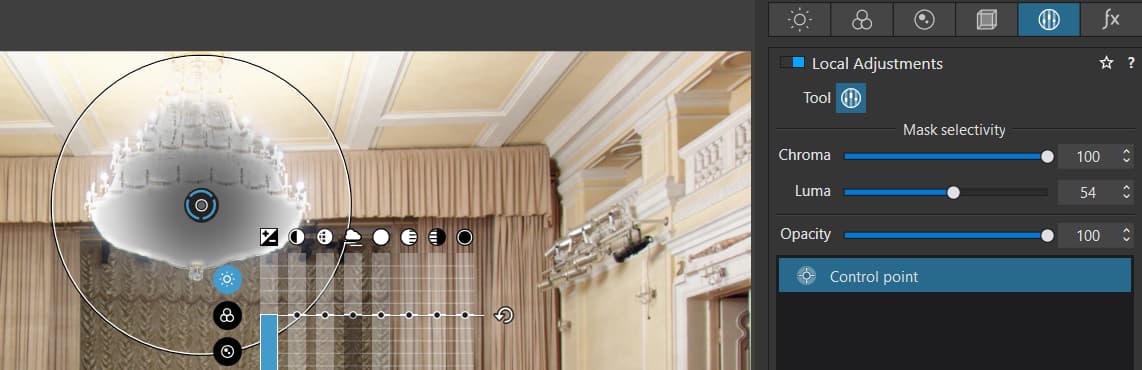
In PL5, you need to master the Chroma and Luma selectivity and then you get a much more precise mask.
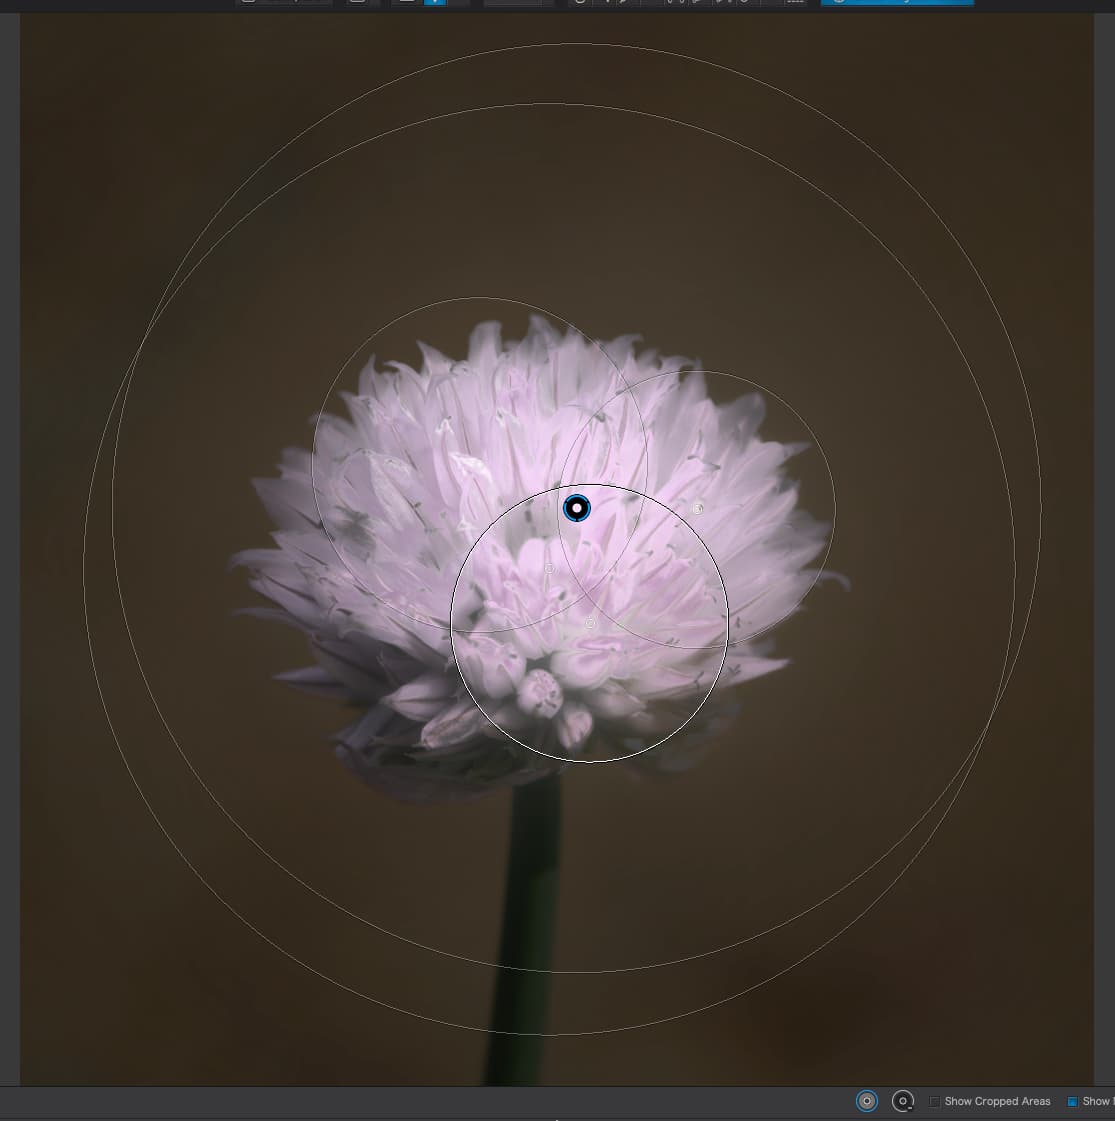
In this example, I want to only select the various shades of purple in the flower and ignore the background, so I adjust, primarily, the Chroma and, to a lesser degree, the Luma selectivities.
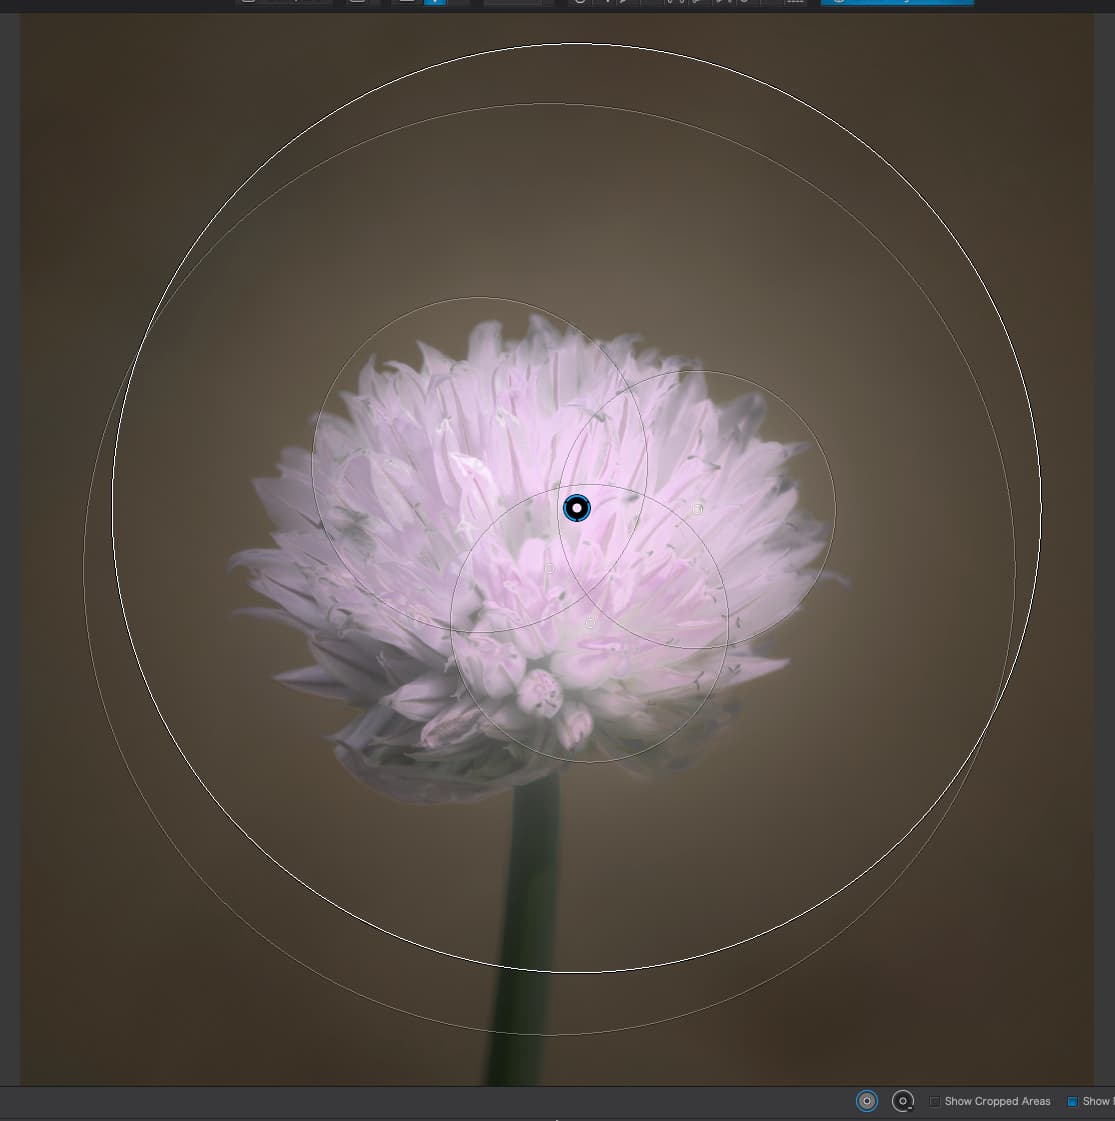
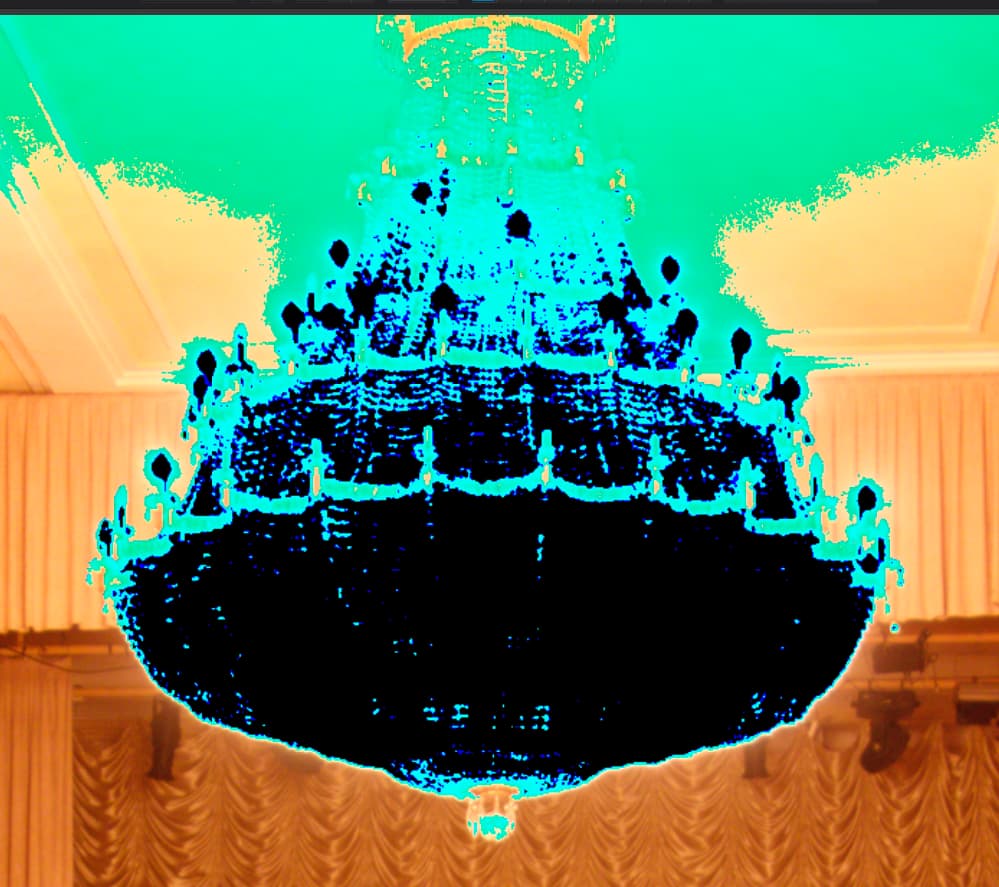
Here is the mask…
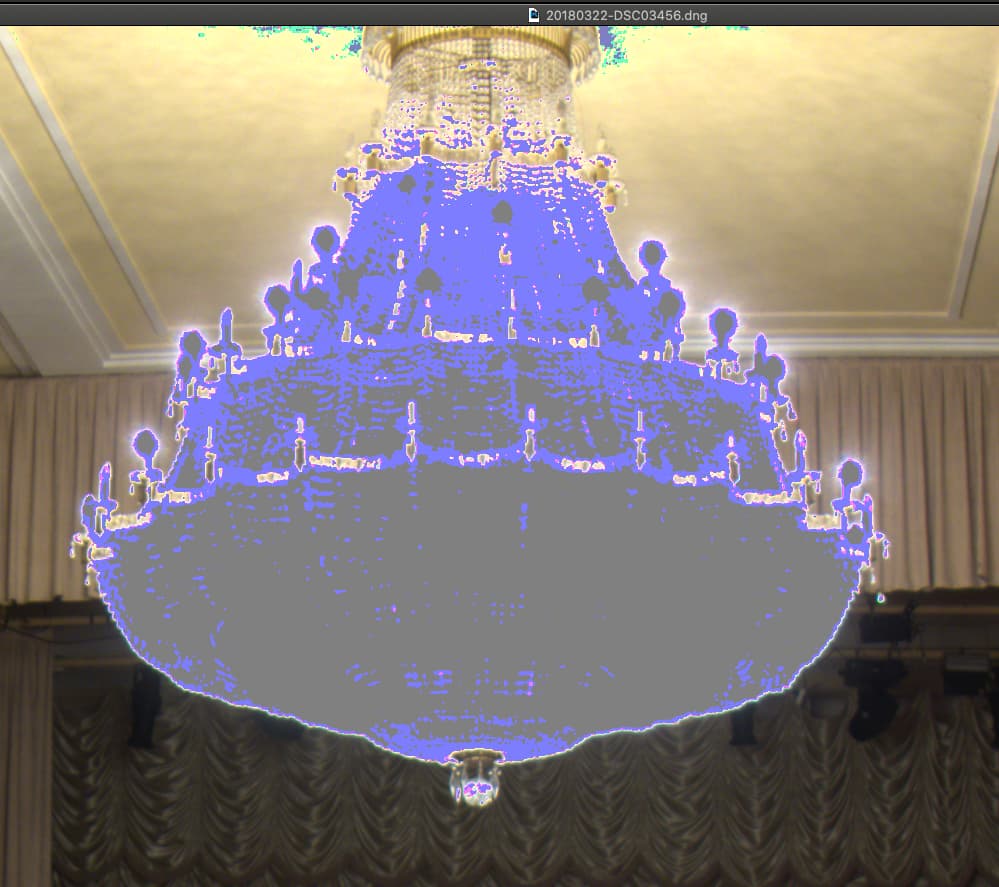
And here it is without the selectivity…
You can see the mask adapts to the outlines of the selected regions to differing degrees, according to the selectivity. So you are no longer constrained to circular regions.
When choosing larger areas such as the sky or land areas that are not uniform across the screen so I don’t really want a full width control line it seems even with the controls it is hard to get an even intensity mask without notable hotspots. I noticed this also in the recent webinar about masking and it seems like there is still room for improvement in mask selection, With a lot of work it you can probably get a reasonable mask, but it ought not to require so much work especially when so many other competing programs are implement one click masking solutions that seem remarkably accurate and flexible.
Can you give an example pic?
Once again, you may not be taking account of how selectivity works with control lines. As Wolfgang says, show us an example picture so we can give you some ideas.
The recent DXO webinar demonstrated several of these complexities much better than I ever could. Here is where I watched it on Youtube:

I do understand you can work and tweak the masks well and they are certainly useable, I just think they could just use improvement to make them much simpler. Things like easier subject selection would be huge. If I could easily select a mask in your flower example that accurately covered only the flower, then it would be simple matter to adjust the color properties without having to work so hard to prevent any halos from forming around the edges if that makes sense. The part of the webinar where the presenter tries to blur the background demonstrates this need very well. Sure it can be overcome with a lot of careful tweaking and work, but the program could also do much more to make the process easier and less time consuming.
I have found blur is notoriously difficult to restrict, no matter what the tool, not just control lines or points. It all depends on the hardness of the transition at the edge you want to blur next to. Try it with the Auto-mask tool.
You are referring to a question from the live demo (~ 54:20), if one could use a control line to blur the background with portrait photography.
So, if I noticed properly, PhotoJoseph mentioned that it depends on the pic – and quickly picked the photo with the sun flower to try out …
Well, this would have been a better result e.g. with Auto mask, but the question was about Control Line.
Just read Joanna’s answer. – I would rarely use that blur tool. This is for correction but never can replace a properly taken portrait pic (I’ve done that in post, but it is really difficult to get something beleaveable in post).
Totally agreed. Unless you like the decidedly dodgy iPhone “portrait” kludge of trying to restrict depth of field on a minute chip.
As you say, just learn how to use your camera better 
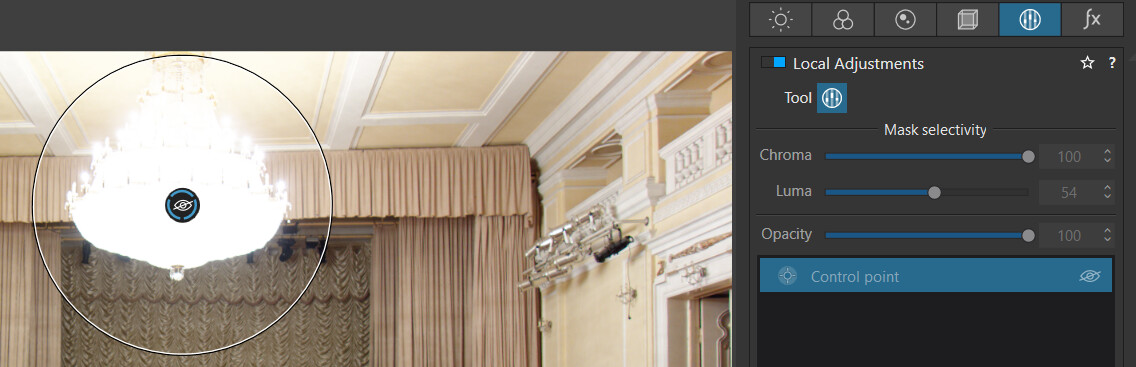
Here is an example of a hot spot I was not able to eliminate even though the mask looks pretty good. The adjustment is extreme to show the graduated effect.
Original:
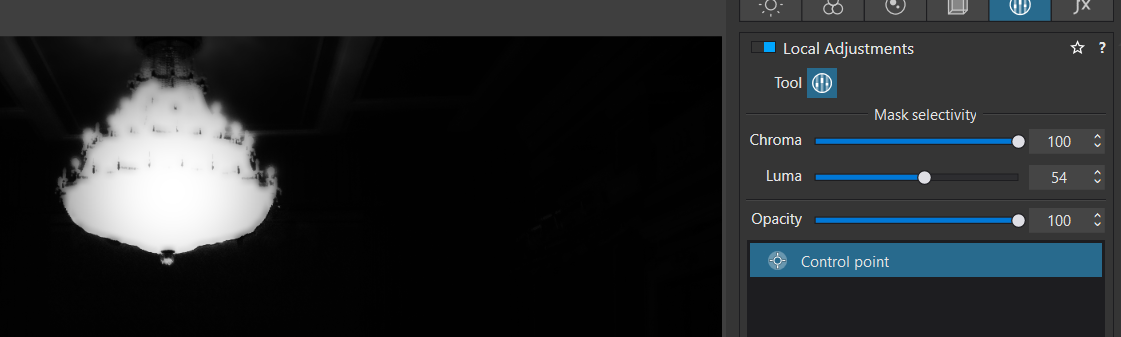
Mask:
Result:
If the area is a blown highlight, nothing can retrieve it. Can you post the original file?
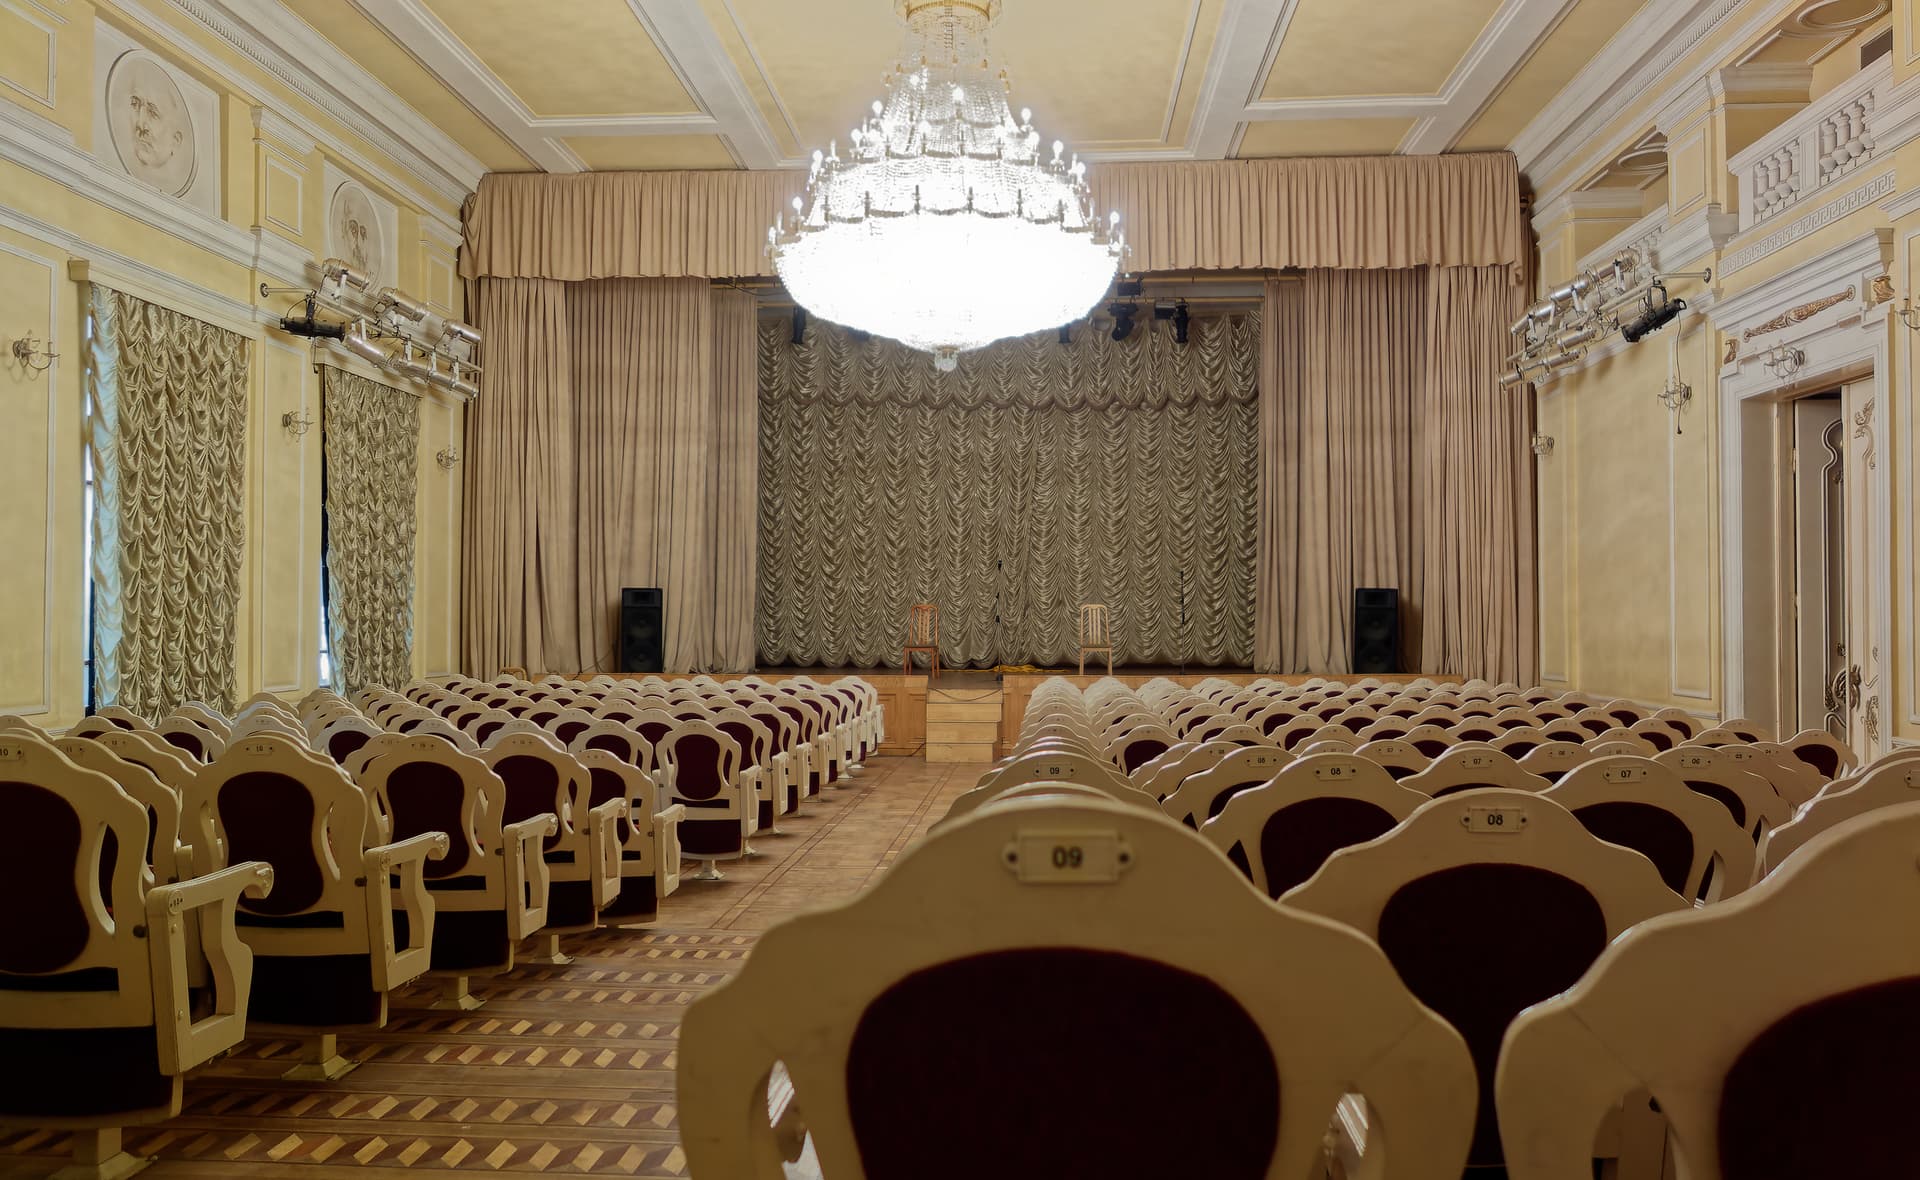
I’m not trying to recover any data, just darken it universally so it’s not so distracting as an example of control point functionality. This is just a test image so nothing I’m actually trying to use in real life. Since the entire lamp is blown out it ought to be a fairly consistent color across the lamp and therefore be easy to select anywhere and get a uniform mask. But even thought the color is reasonably uniform, and the mask looks fairly uniform, I still get the hotspot gradient like effect rather than true universal coverage. That is why a way to eliminate the gradient effect would be helpful. Here is the original image:
20180322-DSC03456.dng (23.4 MB)
If you look carefully, the result matches your mask. The edges of the chandelier are not as fully masked as the center. I suggest trying to adjust the luma slider more to see if the mask can be made to more fully engulf the chandelier. You can also try enlarging the circle of influence. You might also try a different adjustment - maybe highlights instead of exposure - to see if that will create a more even result regardless of irregularities in the mask. (I think I came across this very problem yesterday and was able to resolve it in the manner I’ve described.)
1 Like
Tried with your pic → VC1 20180322-DSC03456.dng.dop (36,5 KB) 
Most of what I see is not halo from bad (unsufficient) masking of the chandelier, but a lot of overexposure reaching into the picture.
1 Like
Honestly, in my opinion, there is no way you can do anything that isn’t going to look fairly rough.
The truth of the matter is that the chandelier is so over-exposed that the sensor has not been able to capture anything but the slightest detail around the edges.
Switching on the over-exposure markers in PL gives me…
… and highlight inspection mode in FastRawViewer gives me…
There are tiny areas around the very edges that are a bit less over-exposed but that still have absolutely no detail. It is these areas that are giving you the halo, not PL5’s masking.
I had to lower the exposure compensation by a full 2.1 stops before the over-exposure indicators went off in PL, which means that the image is around 3-4 stops over-exposed.
I am guessing you didn’t use a tripod, thus your choice of f/1.8 for aperture (equivalent to about f/5.6 on a full frame sensor) and an ISO of 250 in order to try and get a speed fast enough (1/30 sec) to handhold it. Of course, this limits the depth of field, which explains why only the stage curtains are truly sharp and the rest soft.
My standard method for measuring the exposure for such a scene, with such a bright highlight, is to put the camera into manual, spot-metering mode, adjust the exposure compensation to +1 to +1 ⅓ stops and meter on the brightest part (in this case, the chandelier. This will place the exposure so that the chandelier will be exposed as being in the dynamic range of the sensor, which usually extends to +2 stops over the 18% grey reading. Then you would need to recover the shadows in PL.
Your camera has just over 12 stops of dynamic range at 100 ISO and, although the SNR is not great, DeepPRIME should be able to cope.
DxO PhotoLab 5 is amazing at coping with HDR subjects but you do have to get the exposure placed correctly if you want to stand any chance of it working its magic.
Using @Egregius tips and some selective tone procedures of my own. Here is my try. Note that as @Joanna says, there are still haloes around the individual bulbs and the chandelier is base-paper white. This is the best that I could do.
I concur that the halos are all due to severe overexposure of the chandelier. (The rest of the image is properly exposed.) The bloom can’t be eliminated. However, PhotoLab can make an even adjustment of the object if you choose the right approach.
I must note that adjusting highlights in local adjustments does nothing for an object this blown out. I had to adjust exposure way down. When using a single control point, I could get an even adjustment and eliminate all the edge artifacts using a control point having a radius down to the tops of the chairs on the stage, chroma of about 33 and luminance of 100 I think. It darkens more than you want to darken, meaning a lot of negative control points are needed to isolate the subject. A much better solution for this particular challenge is an automask painted over the brightest parts of the chandelier. I tried it and found it very effective - notwithstanding the peripheral blooming which can’t be eliminated. The result is ugly, because there’s no actual detail within the chandelier (for this test, that’s actually helpful) - but it’s pretty close to what you want. With better exposure of the object you want to adjust, it should work better.
Hi All. This was just a test “nightmare” scenario to test how easily I could get an even adjustment without a hot spot in the middle of the light verses the outside. I’m not trying to make a workable image out of this mess, just use it to test Photo Lab’s control point capabilities in an extreme situation. The challenge was getting an even level of applied affect across an object so as to avoid what seems to be a tendency for hot spots and a graduated effect. It is doable, it just take a lot of work and I think that could be made much easier in hopefully future updates.
1 Like
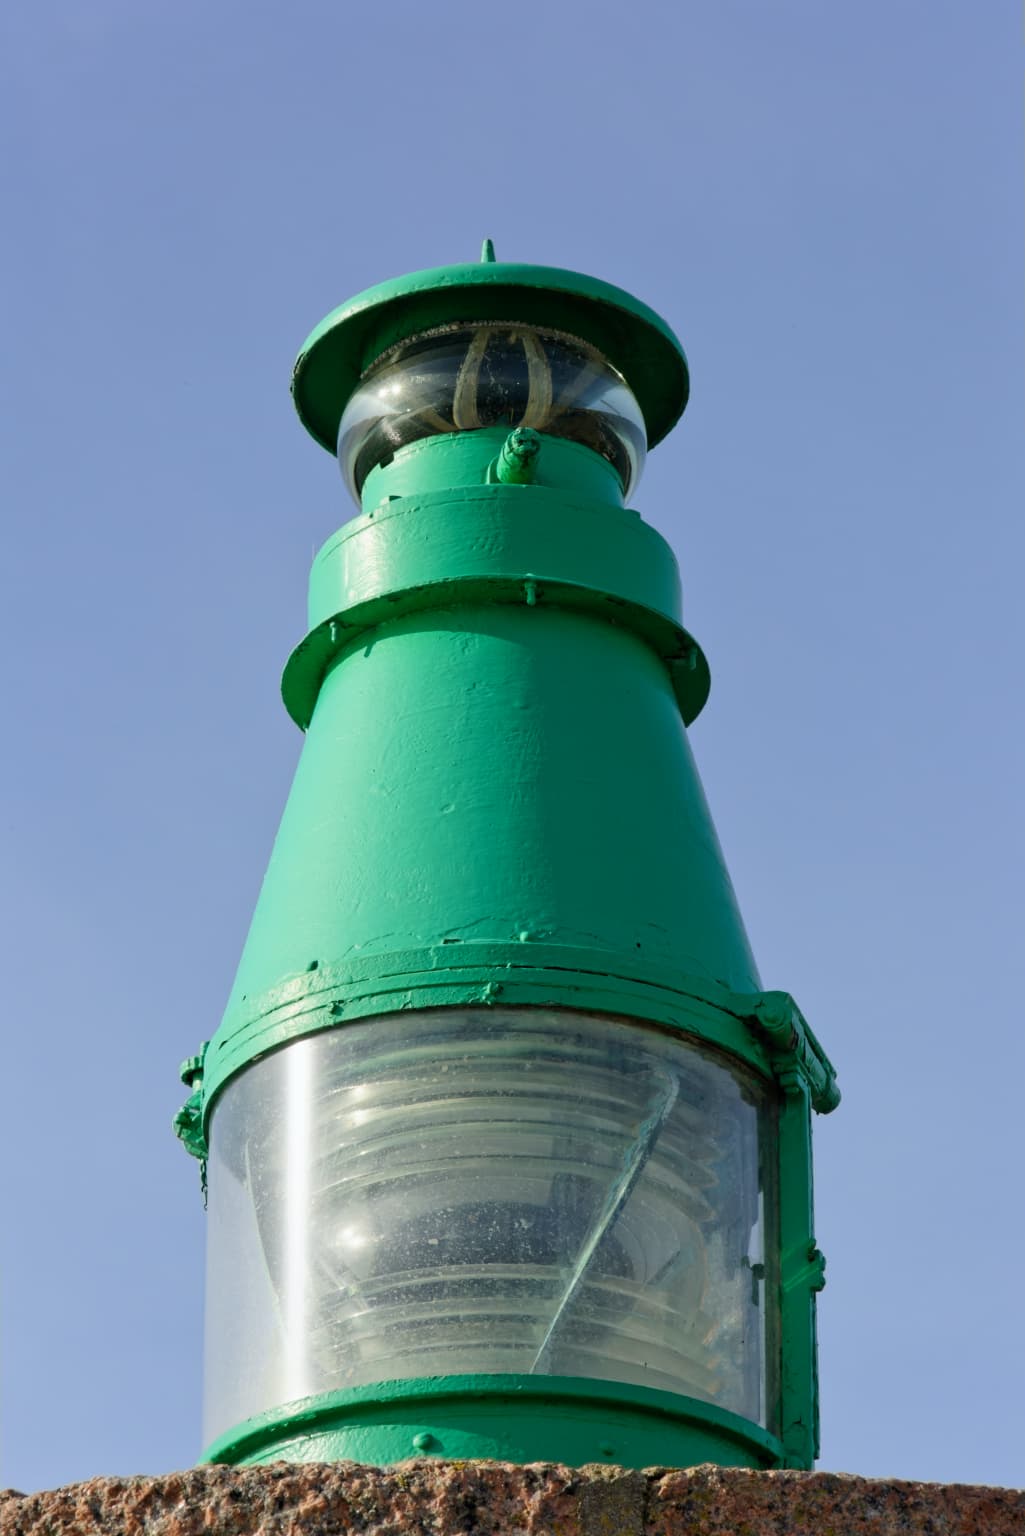
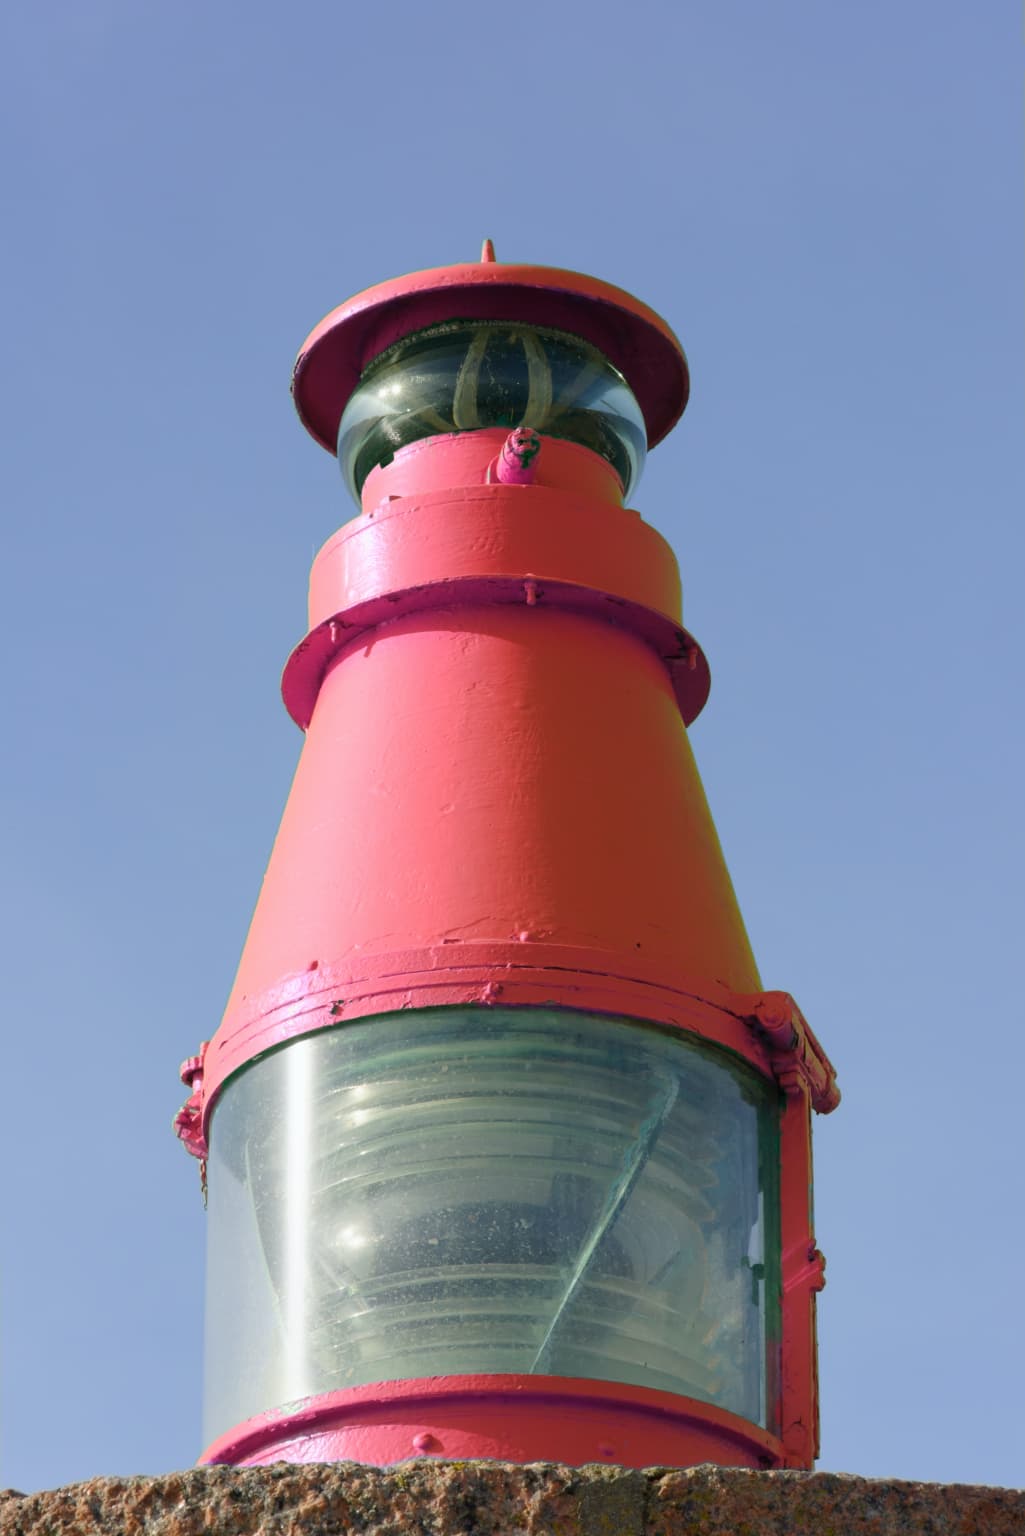
If you want to modify a precise area, then the best tool is the Auto-mask.
Here is a green marker light converted to red…
Tried again → VC1 - VC3 20180322-DSC03456.dng.dop (61,0 KB)
- VC1 - VC3: tone curve highlights down to 252 to counter the slight overall overexposure
- VC2: one really big Control Point and a few minus CPs
- VC3: Automask
One big CP works (and is easier to apply than so many), but the Automask results in ‘sharper edges’ of the mask, what you are longing for.