Hi All,
here is a new thread on Colour Management in PL6 which has been updated for PL6.3. The new diagram for PL6.3 is included below.
Hi All,
here is a new thread on Colour Management in PL6 which has been updated for PL6.3. The new diagram for PL6.3 is included below.
Appreciate it. Thank you.
Related to color management. Many moons ago I was making some tutorials on color management, so I want to share it here as a contribution to your topic. Its not about DXO per se, but its about color management in general. hope you guys find it useful.
https://www.youtube.com/playlist?list=PLGg0Mcsc8P8NDaivkQB9p1hQw_8lxTNnn
I go by what I see, rather the technical details. I thought I’d revisit the subject, after the latest upgrade.
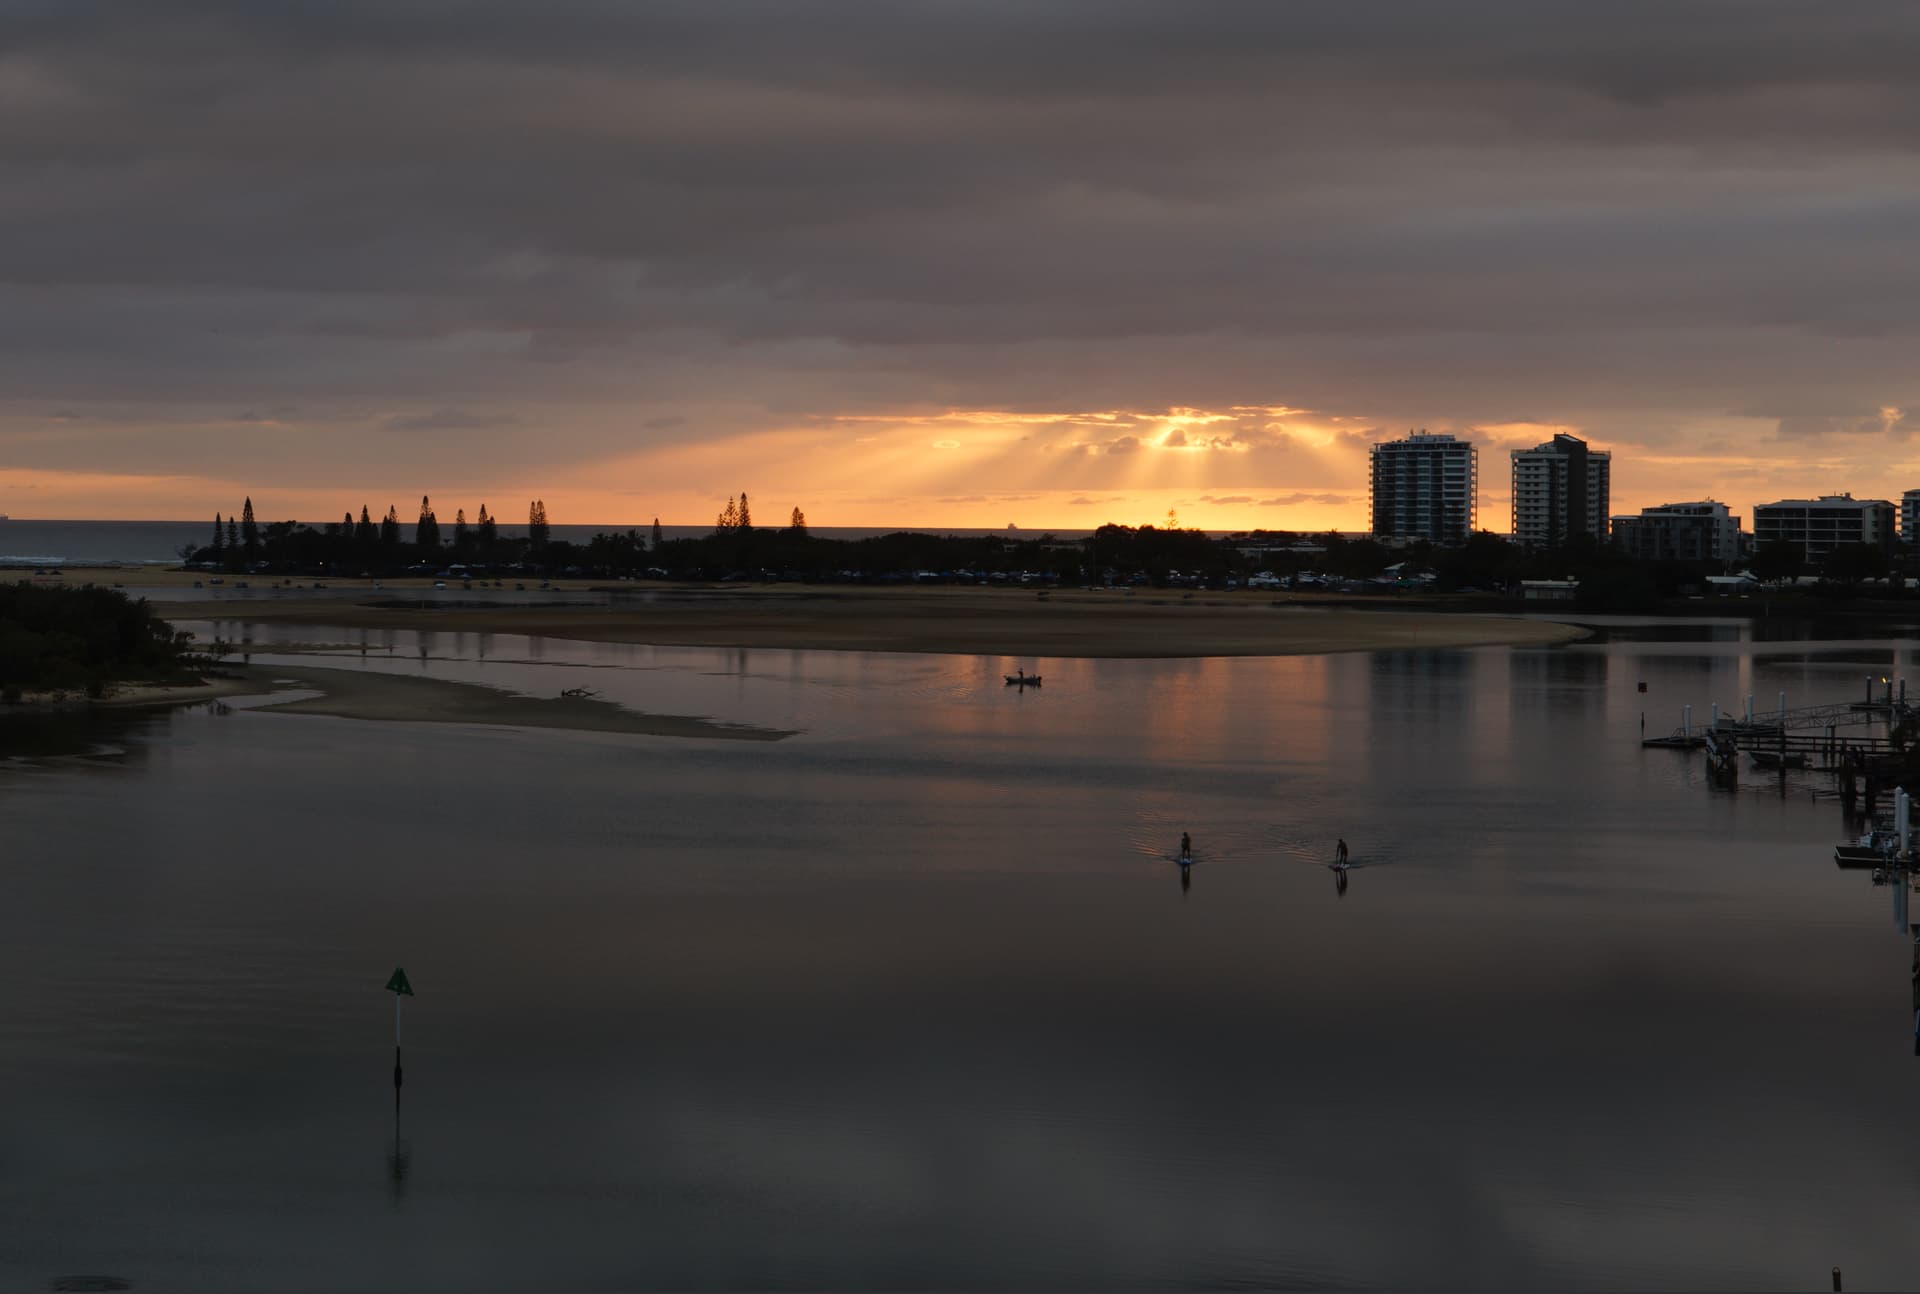
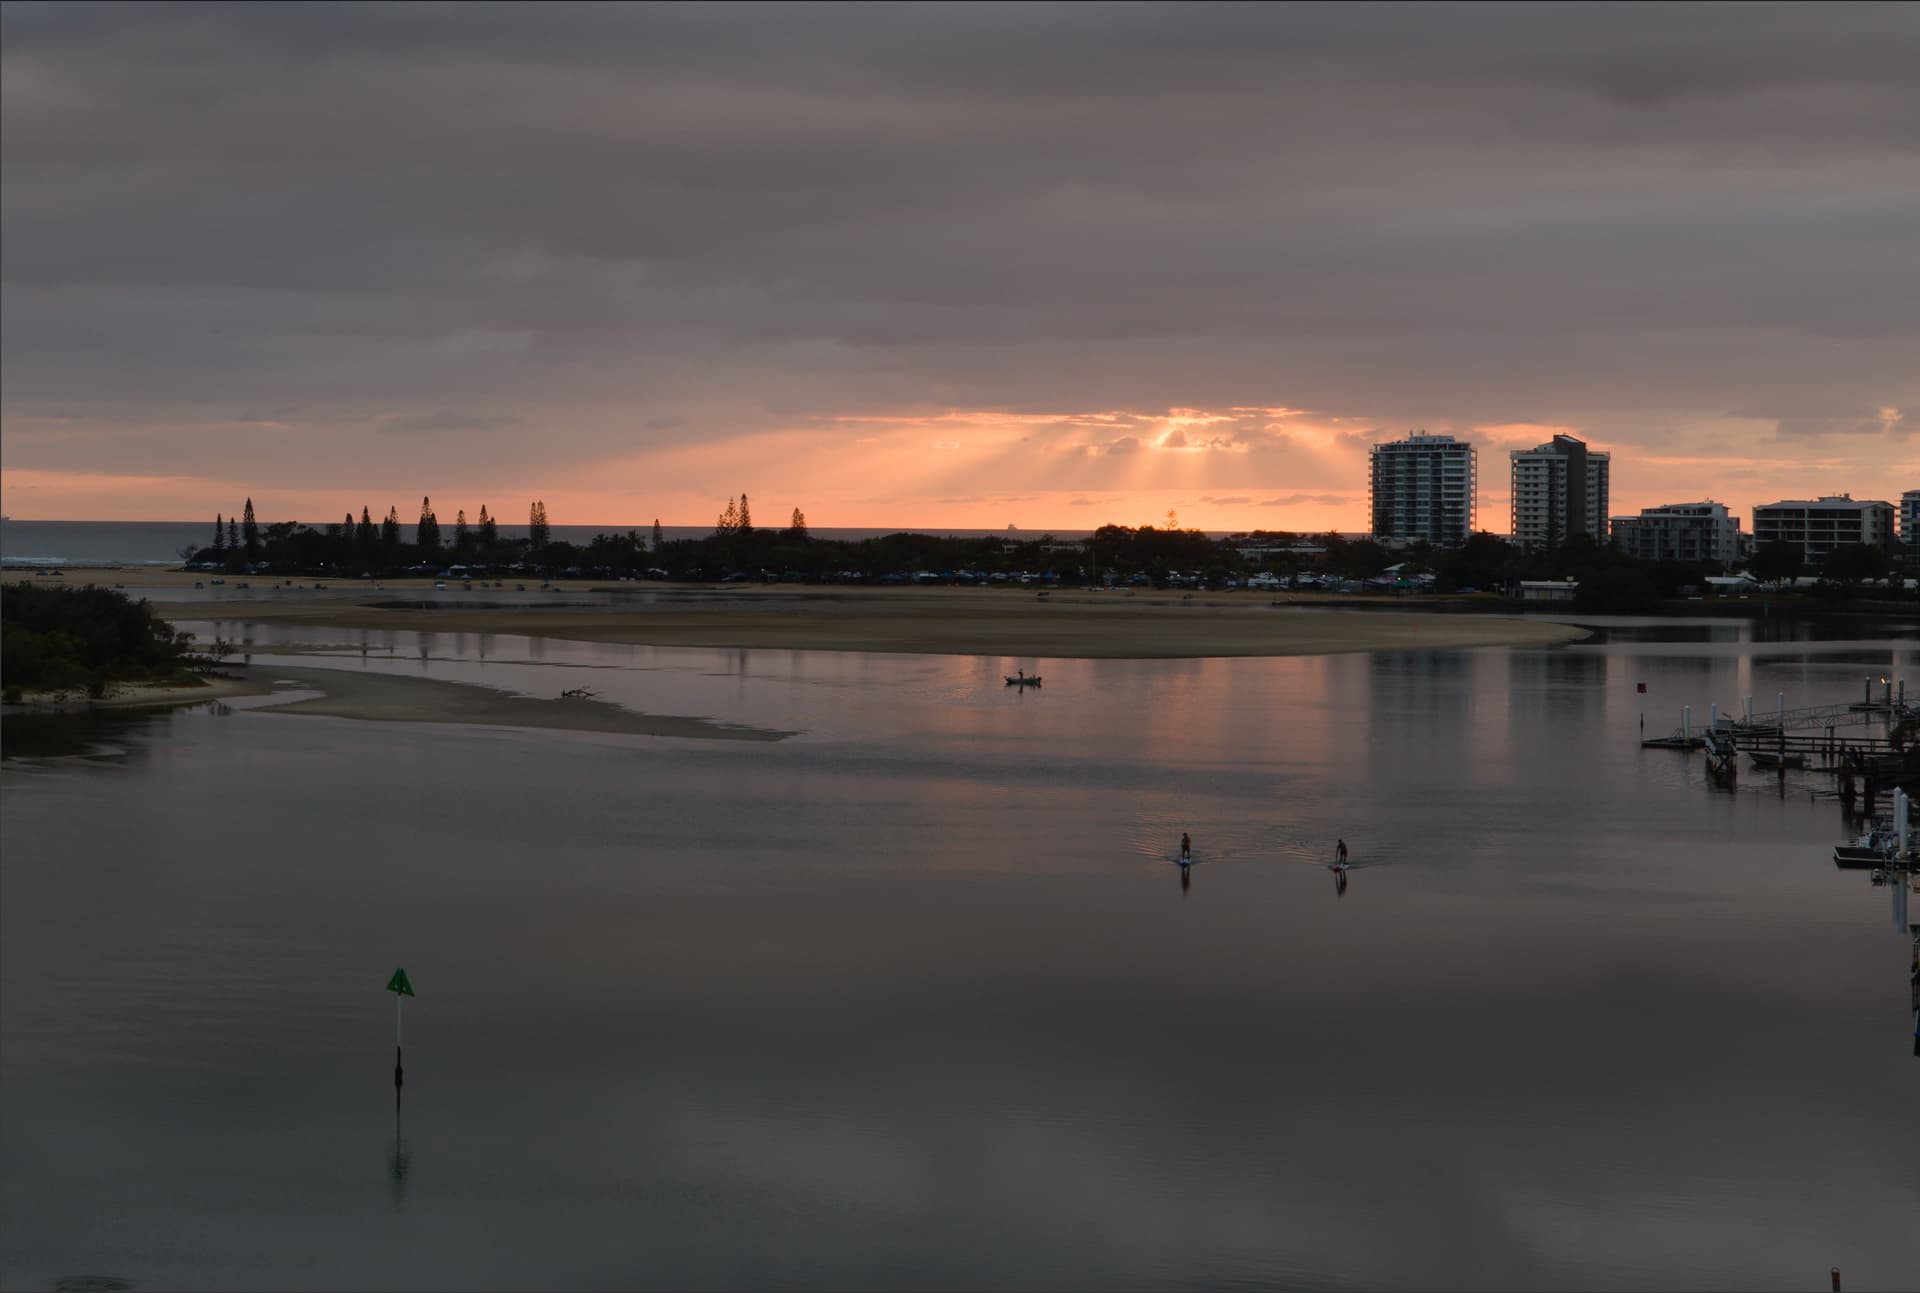
I’m still at a loss to understand how a .CR3 raw file using “Classic” can look so more true to reality than one using “DXO Wide Gamut”.
The magenta colour shift in DXO Wide Gamut has not changed and I’ll avoid it until it’s fixed.
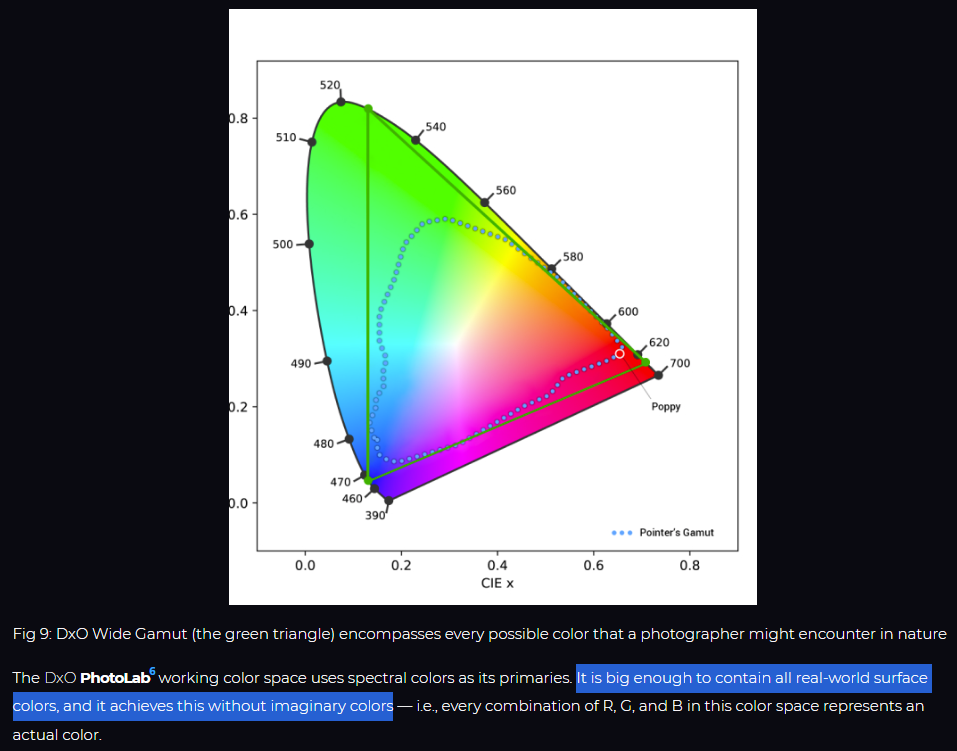
And now we know, from the white-paper/article recently published by DxO …
DxO Wide Gamut (the green triangle) encompasses every possible color that a photographer might encounter in nature
John
Is this issue specific to your .CR3 files, Mike ? … I’ve not seen this with any RAWs from my Sony or Olympus cameras.
And, have you reported this aberration to DxO support ?
John M
Thanks Milan, I will take a look ![]()
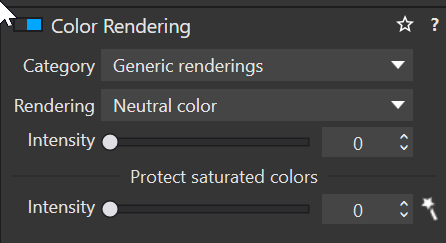
My CR3 files look awful if I use DxO’s camera profile so I set colour rendering to Generic and Neutral and then I am happy with the color.
Well, how interesting is that? I’ve never had a problem before using Wide Gamut. So, @John-M, I’ve never reported it because so many were already reporting the colour shift.
Now, based on @KeithRJ’s input, I tried NOT using my usual generic/neutral rendering, which has alway been good, and used the R5 camera body profile with Wide Gamut and… I’ve got a good result! It’s seems identical to Classic, on this raw file ![]() If the Intensity of rendering is set to 0, then the magenta shift kicks in again but not at 100.
If the Intensity of rendering is set to 0, then the magenta shift kicks in again but not at 100.
Now, I’m at a loss to understand why that should be. Perhaps, I’m just at a loss! ![]()
Thanks, guys!
You still don’t want to include the conversion from soft proof profile to monitor profile.
George
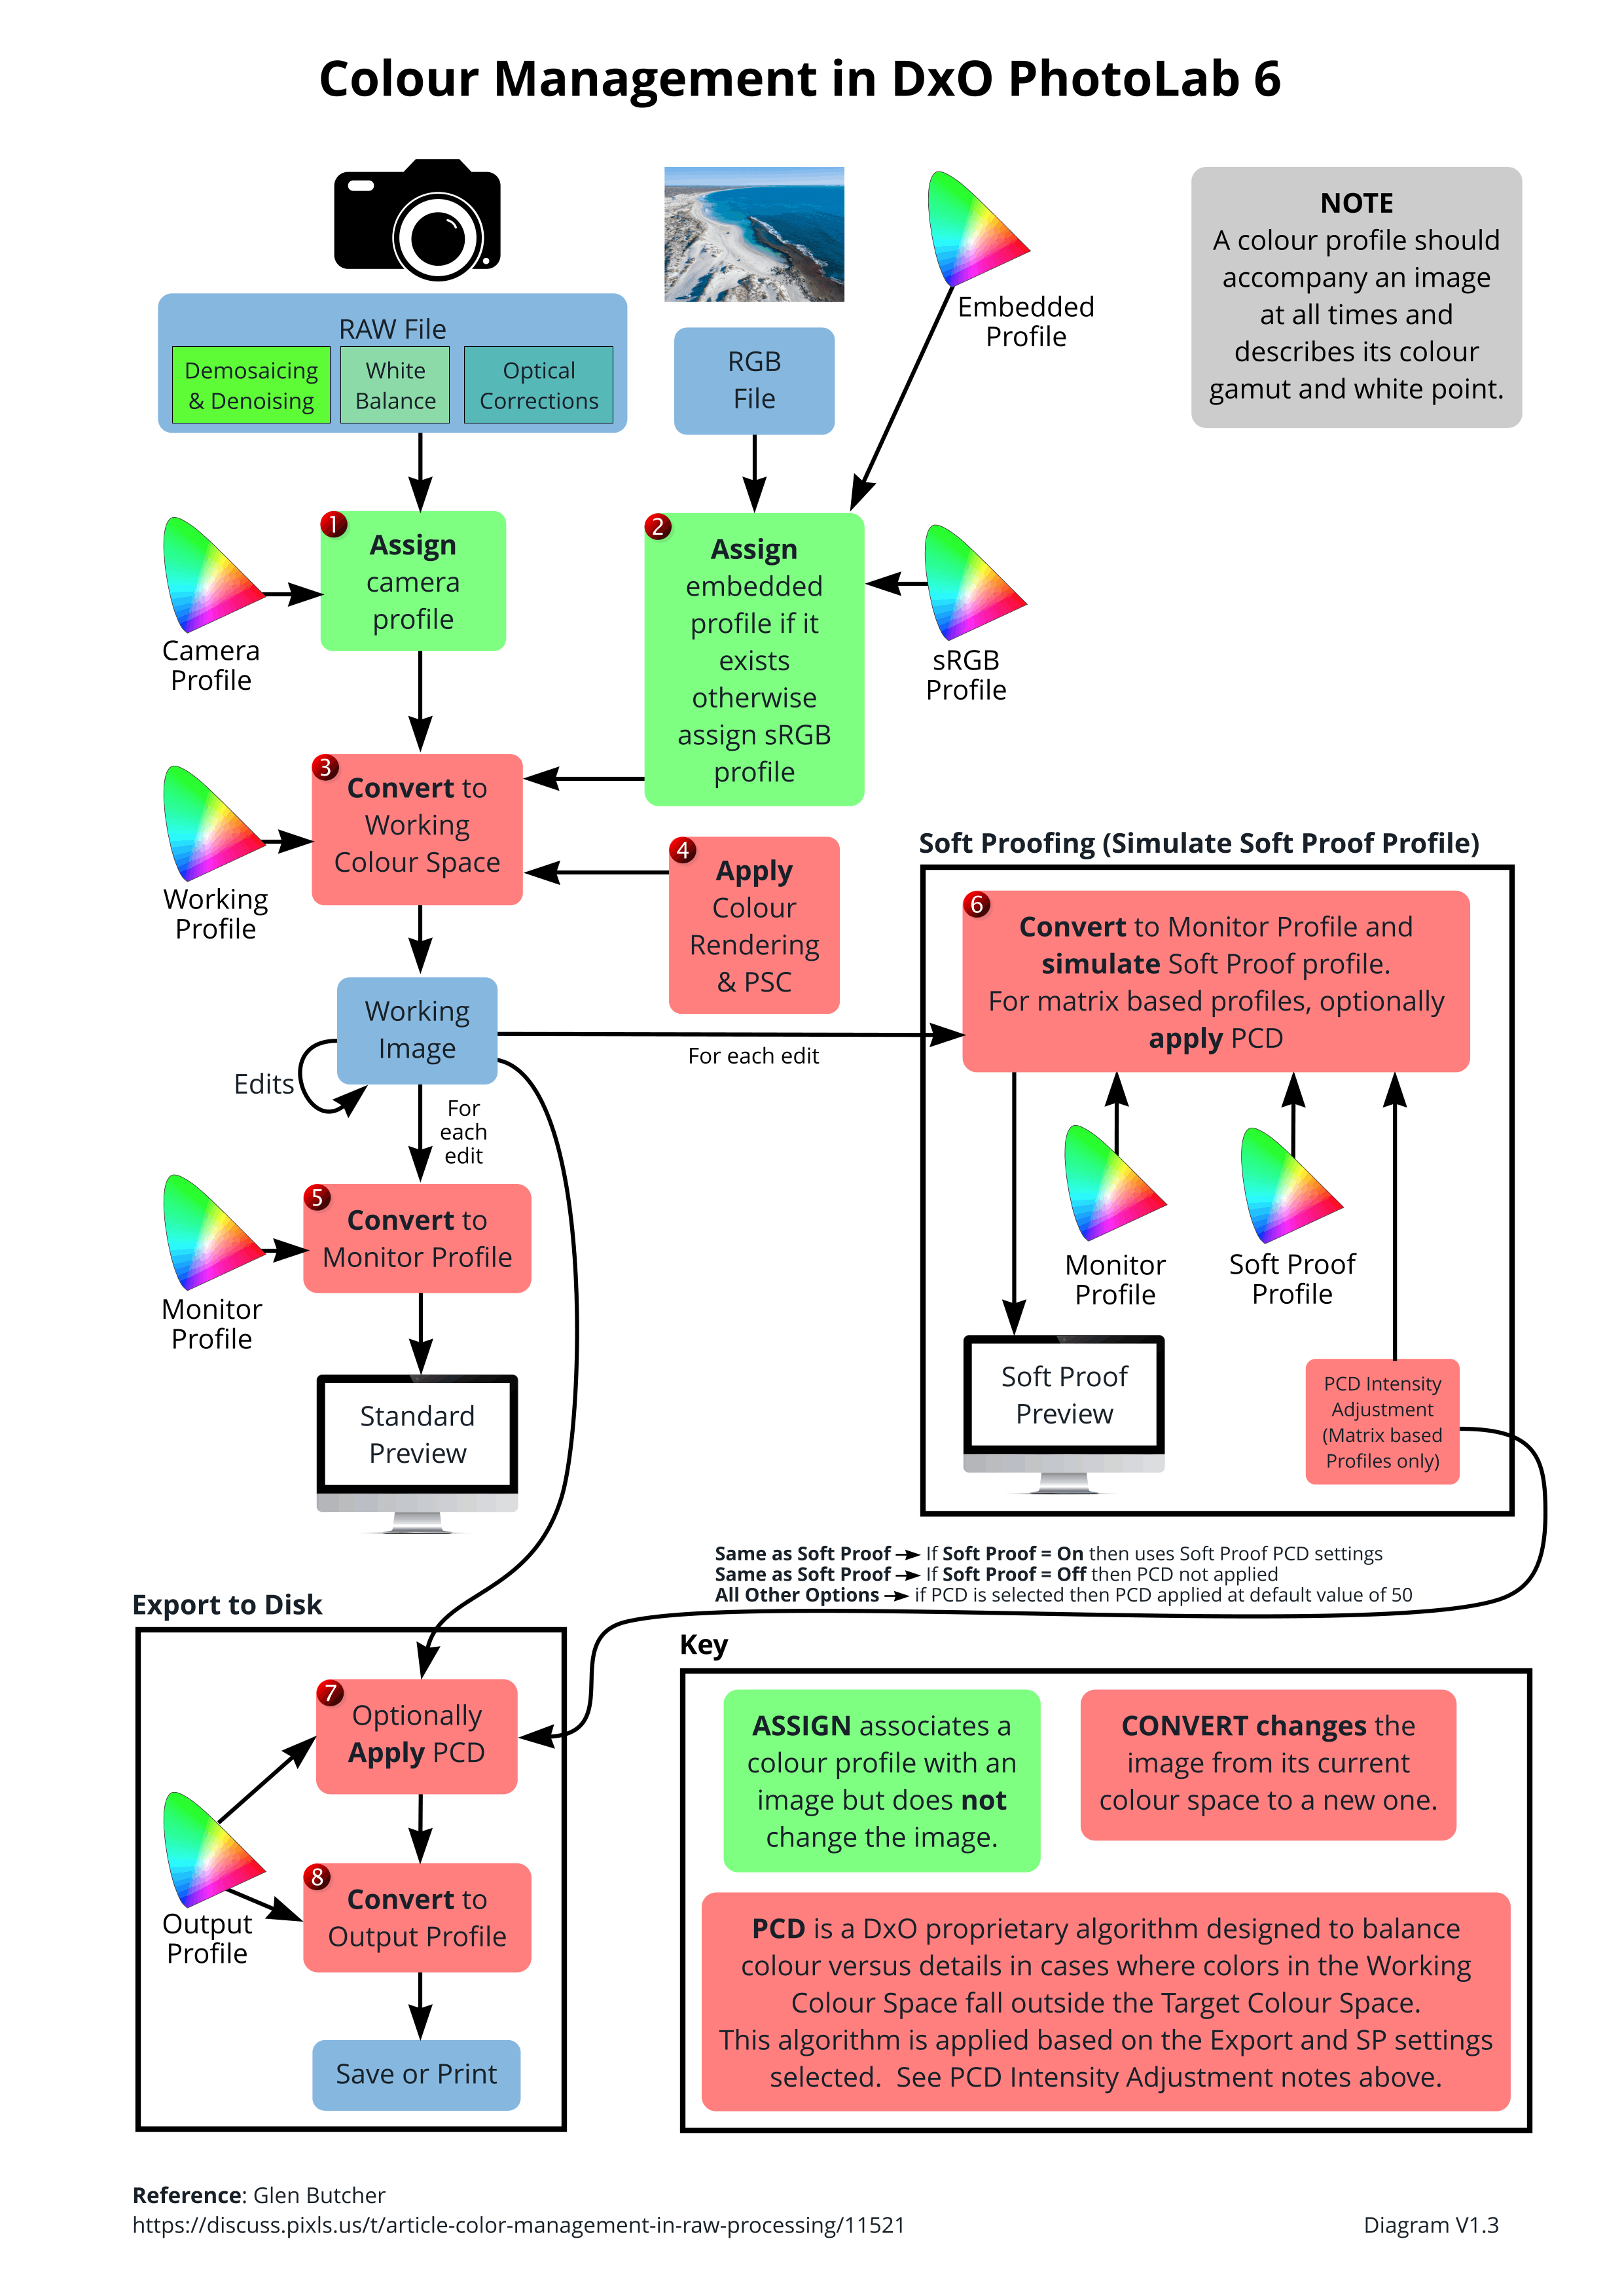
I have updated the diagram (I have also replaced the original diagram in my first post) to more closely reflect what actually happens. Hope this helps clear up some confusion.
In more detail:
The Monitor Profile simulates the SP profile by adjusting the image to only display colours that fit into the SP profile by applying the Intent and possibly applying the PCD algorithm (depending on the type of profile selected). If the SP profile is larger than the monitor profile then you will see NO difference because the image is already in the monitor profile and cannot display any colours outside the monitor gamut. The image is ONLY converted to the SP profile when you export it to that profile.
And from DxO’s white paper on Wide Gamut:
Soft proofing allows photographers to get an on-screen simulation of what an image will look like when displayed or printed on a certain device. It gives an overview of the outcome by emulating the less saturated primaries of a standard screen, or the inks of the printer and the way they physically react with paper.
Thank you very much for sharing !!
For anybody to get an overlook what you are going to expect, check out
→ Color Management "Lost Tapes" Part 1 – Problems We Face In Managing Our Color - YouTube
The explanation seems to be a bit lengthy, but it helps to ‘grapple’ what to look for – highly recommended !
![]()
Thank you. Yes, the videos are detailed step by step for someone who is new to color management topic in general, but I think there is enough for more advanced users as well, if they sit true it. This was recorded some 10 years ago, so looking back I can see the things I could have done a lot better, starting from audio quality hehe, but it is free.
This forum and topic seems like a place where people might find use for it. Cheers!
What does that mean: simulate? It’s just a conversion to the monitor profile. When it’s correct with a rendering intent that doesn’t compress the in-gamut colors so that the out-gamut colors are shown, a kind of relative rendering intent, does ask me which one.
If the SP profile is larger then the monitor profile then you will see a difference. When the SP profile is smaller then the monitor profile you will not see any difference. Assuming that the smaller is a subset of the bigger, which isn’t.
You still didn’t get that image I posted before about soft proofing.
George
I am not sure if I understood the confusion, but I’ll try to explain how I see it, maybe that will help.
I think the difference between term simulate, as in soft proofing method and actual conversion between color spaces is similar to Convert to Profile and Assign a profile in Photoshop, for example.
Convert to profile tries to keep the appearance the same, but it has to change the numbers that describe color of the image, by actually doing conversion, meaning writing the new numbers in the image. This is conversion.
Assign to profile, means the numbers in the image stay the same, there is no actual change in the image itself, there is no conversion, its just a way to describe the appearance based on attached profile. This usually results in change of appearance on screen but numbers remain the same.
Soft Proofing in Photoshop and in another apps like Photo Lab, is like assigning to profile process, but its done only for the purpose of soft proofing, temporally. Its the the least destructive and most temporary process of the three.
I have made a video about convert to profile vs assign to profile many years ago, that might explain this better. Soft Proofing is like assign to profile but only temporally while one is in soft proof mode inside the app.

I think assigning is adding missing info to a disk file. If that disk file doesn’t have color profile info, than you can add that info just by saying: this is meant as sRGB or AdobeRGB or what ever.
I also think that with soft proofing another canvas with that image is created in memory and based on the soft proof gamut: different pixel values. And this image is send to the monitor through the color managment system. Two conversions.
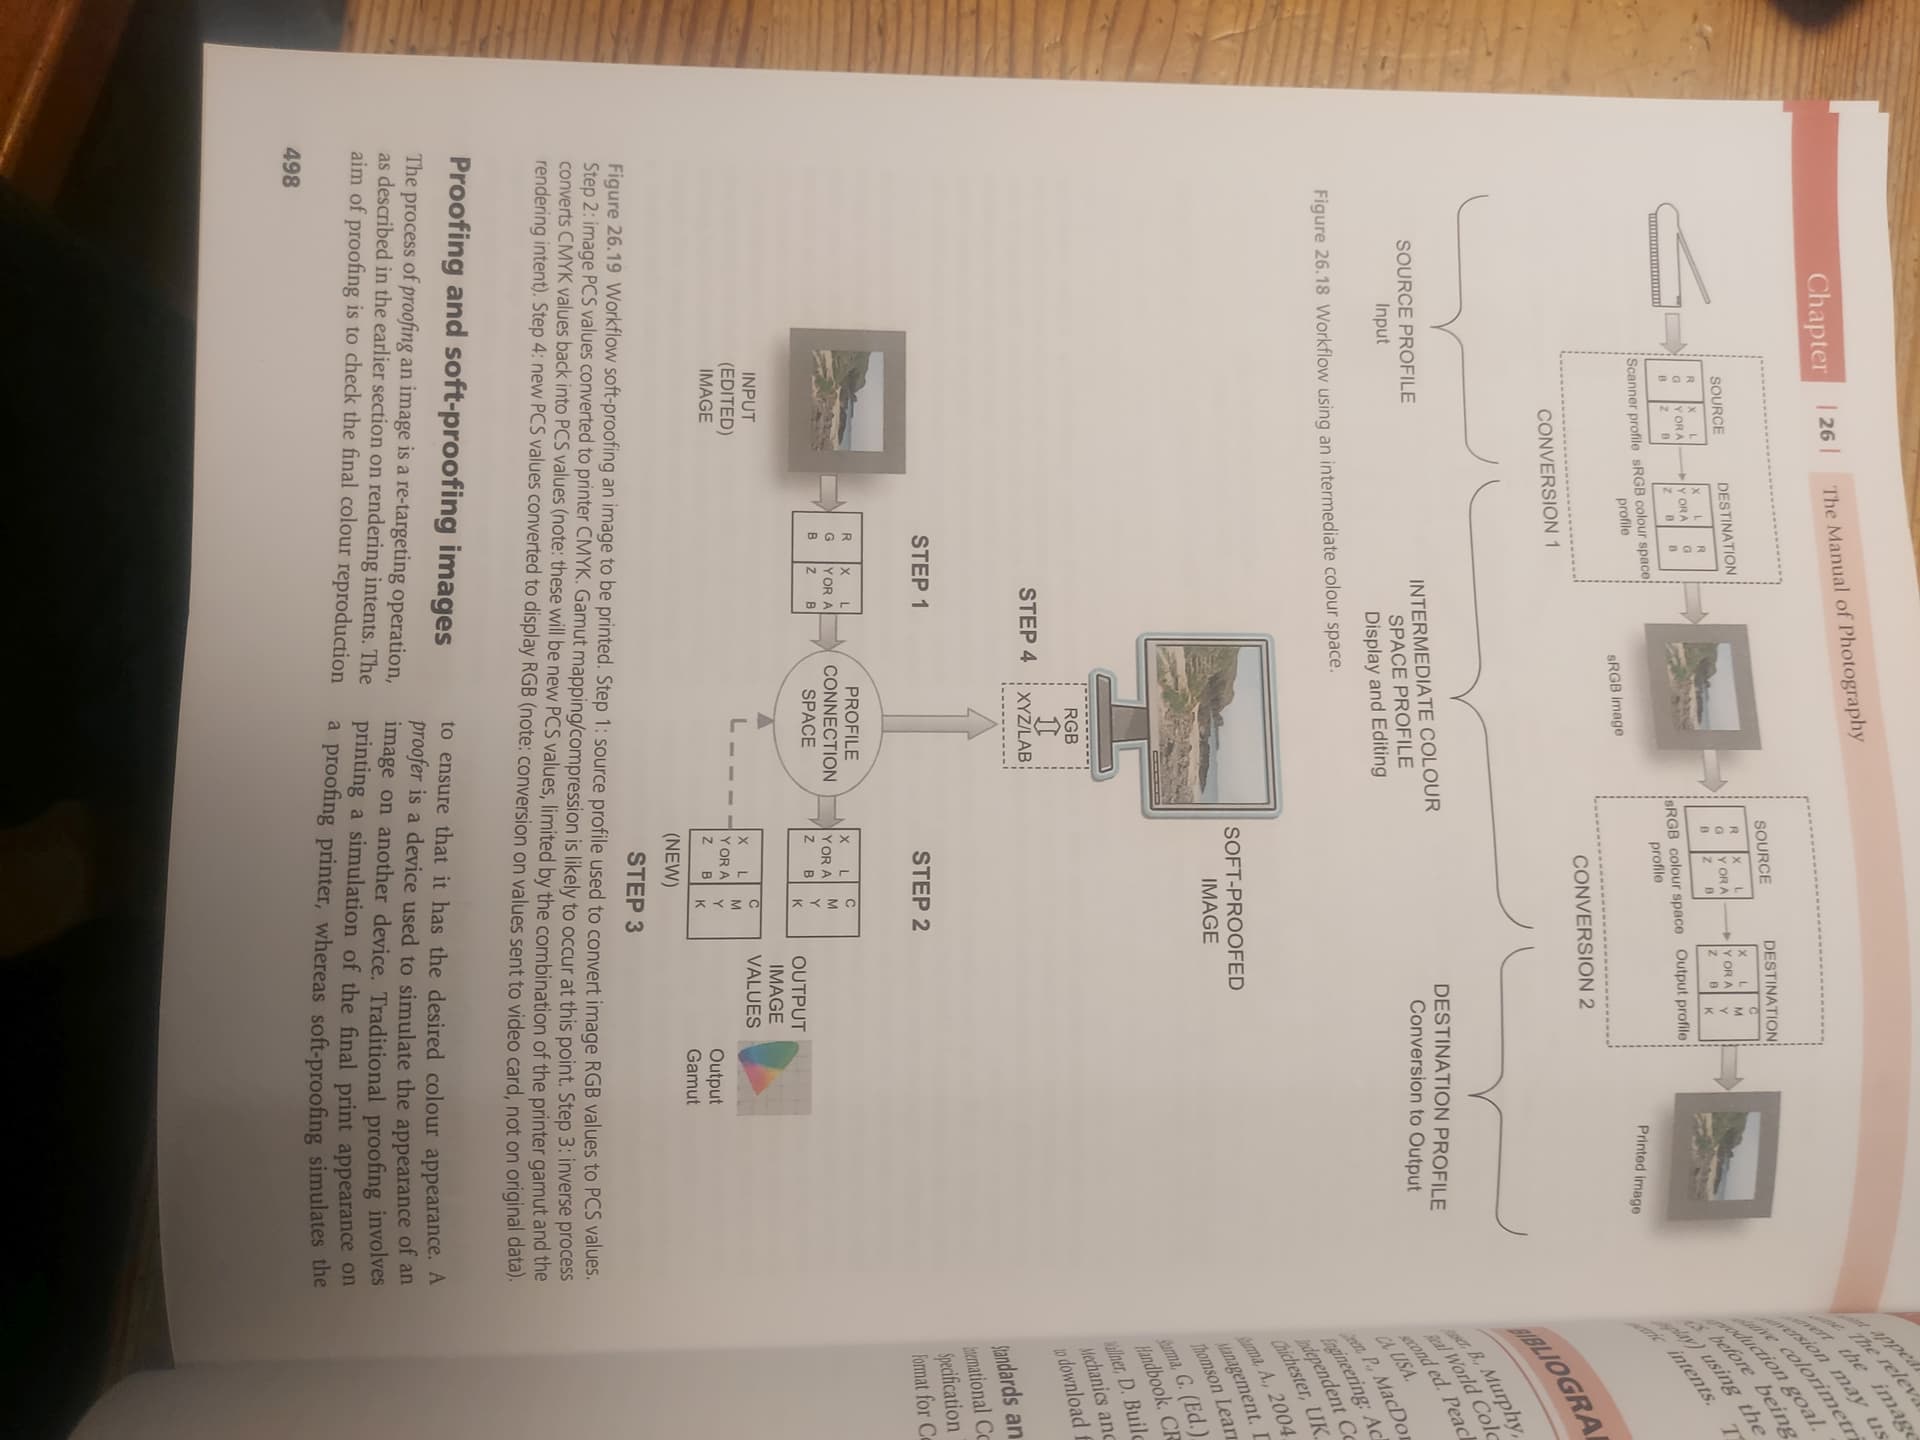
For the ‘profile connection space’ the xyz space is used. Look for the chapter color management.
The collection of ‘true’ colors based on their frequency.
George
Yes. That sounds about right to me.
A temporary assign mode yes. But I don’t think soft proofing is conversion. A term that has importance here. The image is not converted in a sense that original file has been written on, its only another temporary profile assigned to the image for the purpose simulating output device.
I don’t know if that is the space used in PhotoLab, but whatever the color space is used, its critical to be device independent, and usually as in Photoshop that is Lab color space, because of that characteristic. I don’t know if other ones are used or what specific one is used in PhotoLab.
Whatever the conversion space is, it has to be device independent, so it can do proper math between two difference, device dependent color profiles, like monitor vs printer devices for example, which is why we tend to use soft proofing in most cases.
What’s the difference between device dependent and device independent?
"A device dependent colour space is a colour space where the resultant colour depends on the equipment and the set-up used to produce it. For example the colour produced using pixel values of rgb = 250,134,67 will alter as you change the brightness and contrast on your display. In the same way if you swap your monitor the red, green and blue phosphors will have slightly different characteristics and the colour produced will change. Thus RGB is a colour space that is dependent on the system being used, it is device dependent. A device independent colour space is one where the coordinates used to specify the colour will produce the same colour wherever they are applied. An example of a device independent colour space is the CIE Lab* colour space (known as CIELAB and based on the human visual system).
Another way of looking a device dependency is to imagine an RGB cube within a colour space representing all possible colours (for example a CIE based colour space). We define a colour by the values on the three axes, however the exact colour will depend on the position of the cube within the perceptual colour space, move the cube (by changing the set-up) and the colour will change. Some device dependent colour spaces have their position within CIE space defined, these are known as device calibrated colour spaces and are a kind of half way house between dependent and independent colour spaces. For example, a graphics file that contains colorimetric information, i.e. the white point, transfer functions, and phosphor chromaticities, would enable device dependent RGB data to be modified for whatever device was being used - i.e. calibrated to specific devices."
https://www5.in.tum.de/lehre/vorlesungen/graphik/info/csc/COL_6.htm

Lily
Not yet followed by anyone
The Lab color space is itself derived from an earlier reference space, CIE XYZ. In 1931, CIE established a model based on an averaged observers’ visual sensitivity to different wavelengths of light under a specific light source and angle of illumination. From that model, the CIE introduced XYZ tristimulus values and when plotted in 3D form, three coordinates XYZ. In its 2-D form, color is plotted in an elongated n-shaped chart known as the CIE 1931 XY chromaticity diagram.
Lab adopts a 3-D model that uses values that are easier to interpret, with L or Lightness co-ordinate and two a and b color components. The model also closely matches the human color vision, with respect to the perceived differences in color and the distances between them, especially when plotted in a 2-D form using a circular color wheel. However, a Lab coordinate is computed from an XYZ coordinate by “normalizing” to a white-point. This means that under a certain light source, a color that is perceived to have the same color as white is neutral, and will have coordinates, or values, a*=b*=0. In Lab, that light source is D50.
Assigning doesn’t do anything. It just ads missing info to the image. Conversion can be done on a copy of the working image or on the fly sending the pixels to the output device. Read that image I just posted. @KeithRJ refuses to read/understand that image. You too?
Read that DxO link and search for color management.
I still don’t know what ‘simulating’ means.
George
CIE color space is based on the wavelength of the light. Yes, it’s device independent. But we’re discussing editing software, how is the image shown on an output device. And the conversion from gamut 1 to gamut 2 is done through that device independent CIE color space.
George
Well, I think it was explained well, so the problem must be on your end.
Yes, and in all likelihood its modern Lab not CIE XYZ from 1931 that you have talked about. It was good for pre digital era, but not for modern software. Lab is an upgrade to that.
When you do either conversion or simply assign a profile or temporally simulate, in the back end the conversion is done via device independent space, and in all likelihood its Lab color space.
Color Management “Lost Tapes” Part 5 – Introduction to color spaces