Choice of Legacy or Wide Gamut and export sRGB or Display P3? and softproofing or not?

Hi Peter …

The interesting point about that is; you’re making informed choices about whether or not to go with WG as your standard WCS … with good knowledge and understanding of color gamuts, soft proofing, etc

Whereas, the “Average-Joe” user is very unlikely to have that understanding … and, yet, for all newly encountered images, PLv6 will automatically set his/her WCS to Wide Gamut.

Before that’s fair to “innocent” users, I reckon DxO first needs to deal with issues such as;

Request/Suggestion: Fix to avoid being caught-out if NOT using Soft Proofing

John M

3 Likes

RAW development starts with the camera’s internal color gamut (the sensor). PhotoLab has to convert that RAW data to Adobe RGB if the Classic/Legacy WCS is used. Sometimes there’s very little lost in that step. Using DxO Wide Gamut leaves more room for processing saturated colors but that still ultimately has to be rendered correctly in the output. Between the Color Rendering palette and export options, PhotoLab provides some options for doing that more or less for you - and Soft Proofing lets you analyze the resulting transformation a bit. That’s all simple enough for me. Some understanding of color management is needed for RAW development, but as Joanna points out the presets in PL with FilmPack use a recipe that might be dependent on one working color space or the other.

And this is what I find most annoying. I am far from the “average Joe (or Janet)” and have been used to everything “just working” - to the point of producing stunning exhibition prints from the previously “limited” colour space. Why? because screens are not inherently wide gamut and neither is printing paper.

So, the question remains, why bother with wide gamut when the source (RAW file) is only usually AdobeRGB and the paper.

Here is a comparison of AdobeRGB (the larger grey space) and the Canon profile for Fotospeed Lustre paper that I use…

Because, the RAW file (from modern cameras) describes a color-space much wider than AdobeRGB.

The setting that we might assign in-camera applies only to the JPG created by the camera - it has no impact on the “raw” data that’s transferred from the camera’s sensor into the RAW file.

@KeithRJ has posted a link to an excellent article on all this (here) … At first glance, it seems quite dense - but it’s actually not too long and is a relatively easy read.

John M

I suppose my point was that the target, whether that be screen or paper is rarely larger than that, so what is the point of processing for larger, only to have to limit stuff for output?

2 Likes

Hi,

please take a look at the links of the post Using Lab Color in DXO

And I can see a little shift in colours on my sRGB Monitor when switch to wide gamut

But I also believe that it doesn’t change so much, for me is more important that the colours/tonality/brighness I see on screen will be nearest as possible to the colours I will get on paper…so I use soft proof
:grin:

2 Likes

There is an easy fix.
Sun and moon are kind of softproofing tools.
What do we want?
1 a as wide as possible workingcolorspace of the demosiaced rawdata. (no loss of colordata by the first conversion.
2 a control over the colors in saturation and lumination which is
A) converted by monitor driver, icc, to show the virtual image for your eye’s so you can edit. (we want this as close as it should be looking when we export.)
B) the export colorspace and bithdepth and file container. Jpeg, tiff, dng.

So what would be sensible as gauges and viewing this data?
Example.
Multimeter. When i want to measure mA i set the multimeter to mA but then the meter can’t handle big numbers of Ampere. This is physics. In software this isn’t a restriction.
So why not the choice of having Wide Gamut as working space and a choice how the histogram displays the black point and whitepoint(left and right) and how the sun and moon react? (like the monitor out of gamut choice.)

Why?
Wel you are editing for a sRGB or AdobeRGB export mostly.
I assume that when you use Legacy the Rawdata conversion is realtime adjusting from camera colorspace when we work in the Legacy CS. (think we have virtual all colors of the raw file but the gauges are only showing the colors fitting in AdobeRGB.(the rest is out of gamut and activate SCP, sun and moon.
Thus very important question is:
Why do i need WideGamut if i am never use export bigger then AdobeRGB?
Edit: Adding, display P3 is Same size as AdobeRGB , so in the future this still stands.)

1 Like

Exactly. And, when you look at how much smaller than AdobeRGB the average paper profile is, the question gets even more insistent.

3 Likes

Did anybody watch the third linked video Tutorials zu Affinity Photo für Desktop-Computer from beginning to end :innocent:

He tells exact the same story.

No use to edit in a bigger colorspace then the supposed export size.
My test shows this bleeched image he tells about.
1 i edit colors inside WG. (so dxo renders all colors of the rawfile in WG or shows out of gamut warning with scpt, sun and moon and the histogram.)
2 when i just export in sRGB, dxo’s rendering intent convert this WG-image as they find suitable to jpeg sRGB. (same as v5 but then from WG.)
3 when i want control of this action i use softproofing. (turn it on and i see by red later which parts of the image will be touched by this rendering intent. Do nothing and just hit export same as 2 happens.

The problem start when you alter your image accoording to that red warning layer.!!
Desaturate in working space means your shifting the colorvalue distribution of the rawfile to work image. That’s why you images turn up pale.
By overruling the relative and perceptual compression and change the hole range of the color distribution your image has all color values inside but it’s not the captured color distribution any more.(that was based on the latent image of the rawfiles sensorcolorspace.)

So to put this is perspective:
Legacy: Sun moon, histogram and SCPT react on all colors out of gamut based on AdobeRGB. YOU are more in control of this out of gamut color section. Leave it outside Adobe or squeeze it inside by using the visiualisation of sun moon, histogram and SCPT.
Closer to your screen sRGB so much more what you see is what you get. Use monitor tab to see difference of AdobeRGB and your screen srgb gamut.

Wide gamut?
Sun and Moon and such are quite useless and blunt as gauges because export rendering intent is dealing with a much larger piece of the imagecolors when export is sRGB.

What’s the point in living in a house, only to have to end in a coffin?

The bigger space allows manipulations that could lead to lost colours in a smaller space.

4 Likes

This is the main question.
Do we?
Lets assume we have one conversion (demosiacing) from raw file to working file.
Yes then your correct.
But as we think we know dxo does realtime adjusting from the start file.(sensorcolorspace)
So changing highlight, shadow, tonality and WB does “work” with the complete colordata.
(see the SCPT reacting when you play with contrast and saruration.)
Turning down saturation shows that SCPT value gets less, so more colors outside the working space are usable inside.

That’s the first statement I believe…I think in my coffin I will have a lot of lost colours, maybe I will plan LED light inside :rofl: :rofl: :rofl:

2 Likes

mmmuaahh!

( just fell of my chair – and sorry to be disrespectful )

1 Like

Dear Peter,

I’ve watched the video 4 time and I unterstand it this way

it’s better to work in RGB 16 bit Format and with the colour profile ROMMRGB to take advantage of all the colours
Display has to be capable to show this colours
then develop your Photo
because not all devices are colour managed or colour space aware>

  • exporting in ROMMRGB the color information could not be handled and the colours will look desaturated
  • so the best is to export in sRGB

@OXiDant and @Joanna
Thanks for the empirics and opening this discussion Oxidant and thanks for sharing your printing experiencs and reflections on them and the editing and soft proofing Joanna.

I have just bought a new Epson P900 A2 printer and started to use it and also tested the softproofing in PL 6 a little and I have to say that I will never use it IRL.

@Guenterm
I fully agree with you that the important is that the colors, tonality and brightness I can see on my calibrated monitor, when editing an image, corresponds to what I get from the printer.

This match is extremely important, because if what you see on the monitor doesn’t sync very closely with your prints, then you don’t really know what you are doing.

I have a good sync between my monitor and my prints and am pretty pleased with what I get out of my P900 but what I see in the soft proof is mostly something duller and more desaturated. I could not understand why because it did not sync with my reality.

I had a plan starting a tread like this since the results from the soft proofing kind of disturbed me. So, thanks all of you for your contributions that help me eliminate that mental un sync. :slight_smile:

1 Like

right to be clear, RGB is the pixelized rawfile data and 16bit is bitdepth (2^16 possibilities) regulair jpeg is 8bit format.
and ROMMRGB is an other name for the same colorpsace as Prophoto.
So he said use as big as possible first conversion towards a Working (edit) space.
translation: 16Bit Wide Gamut.

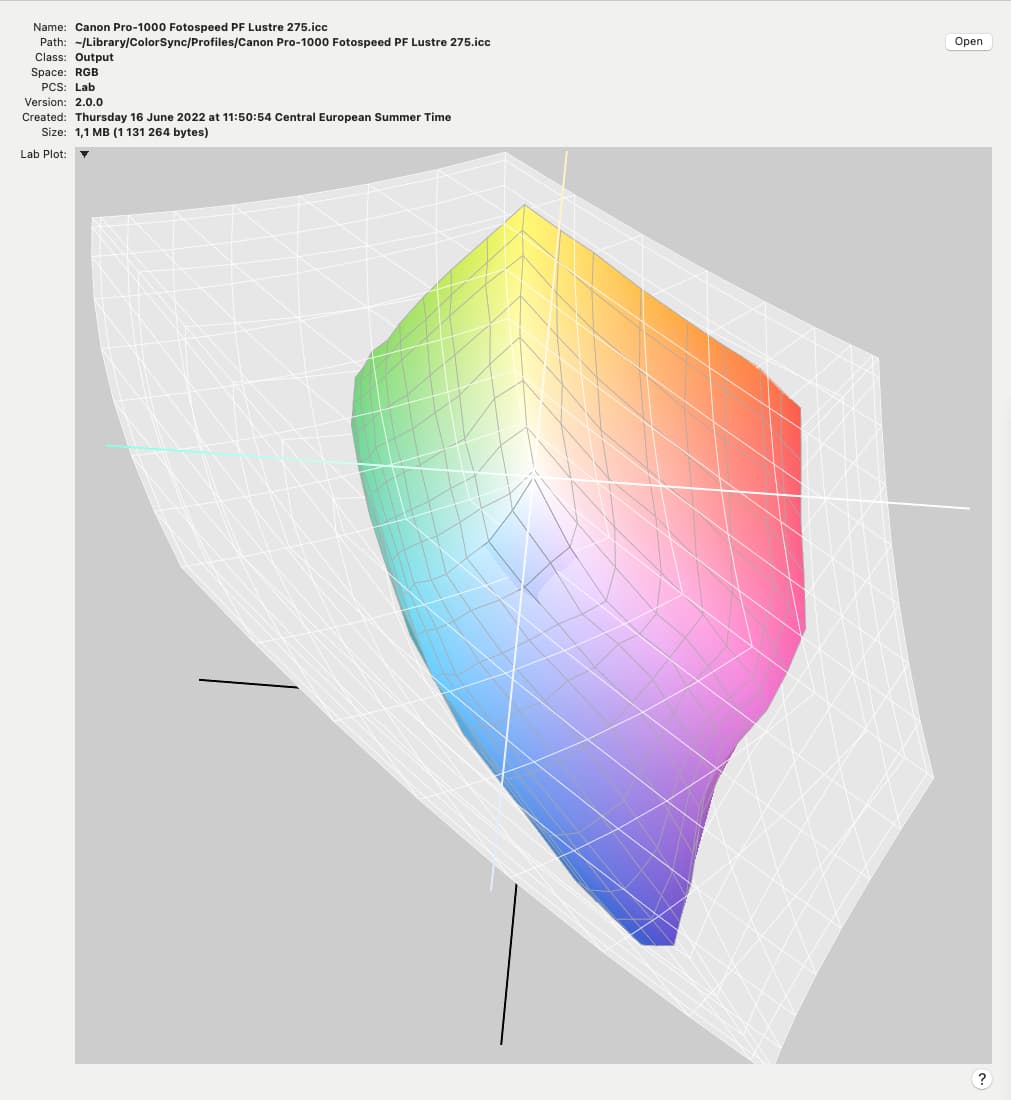
No screen/monitor is capable of reproducing Prophoto only some printers.

That aside:
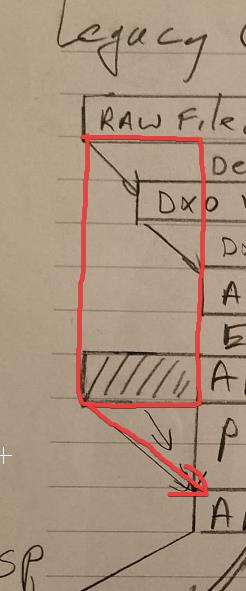
i stil swirle around about does DxO cut off colors or does it “float” the working colorspace inside the bigger box that is called Camera/sensorcolorspace? What i mean if i drag a certain color saturation back does it drag “out of gamut of that color” inside my working space?

here you see the explaination of the horsshoe.

And watch this for how typical RGBscreens create color.(it’s rather simplified but it shows about 8-10(-16) bitdepth difference

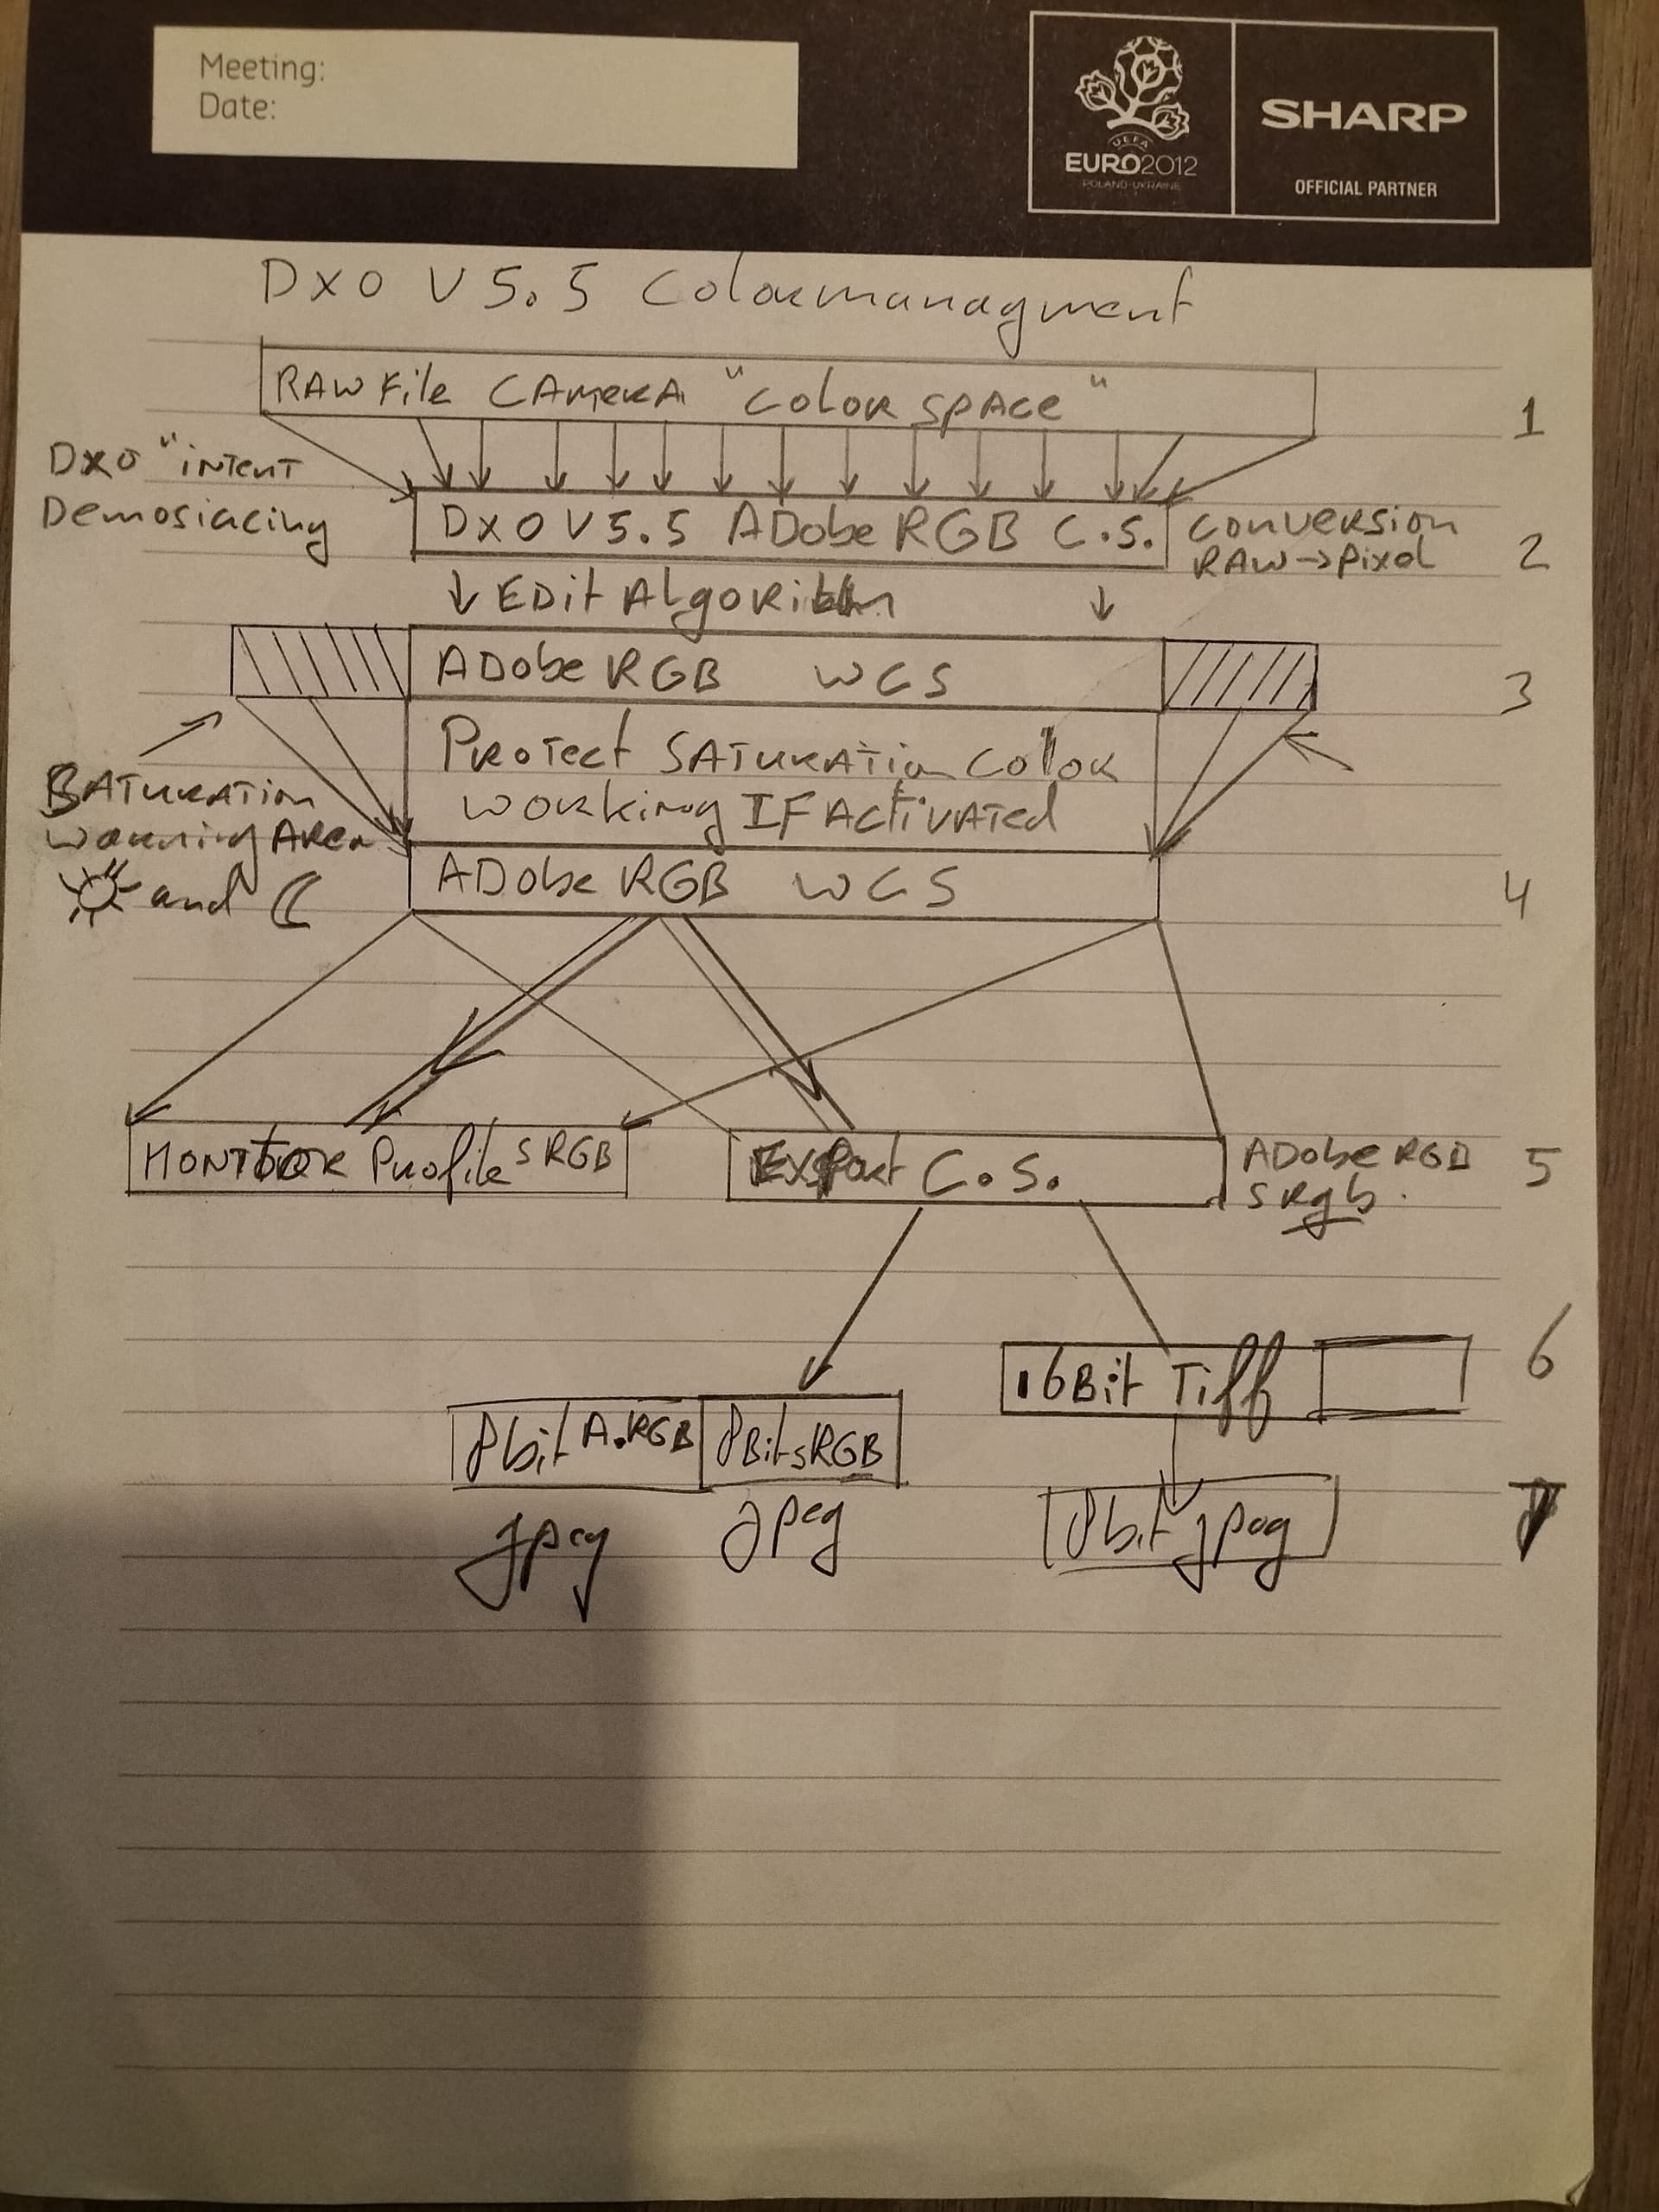
Maybe this makes it more visible what i try to say: (i extracted this from several posts and answers of dxostaff.)
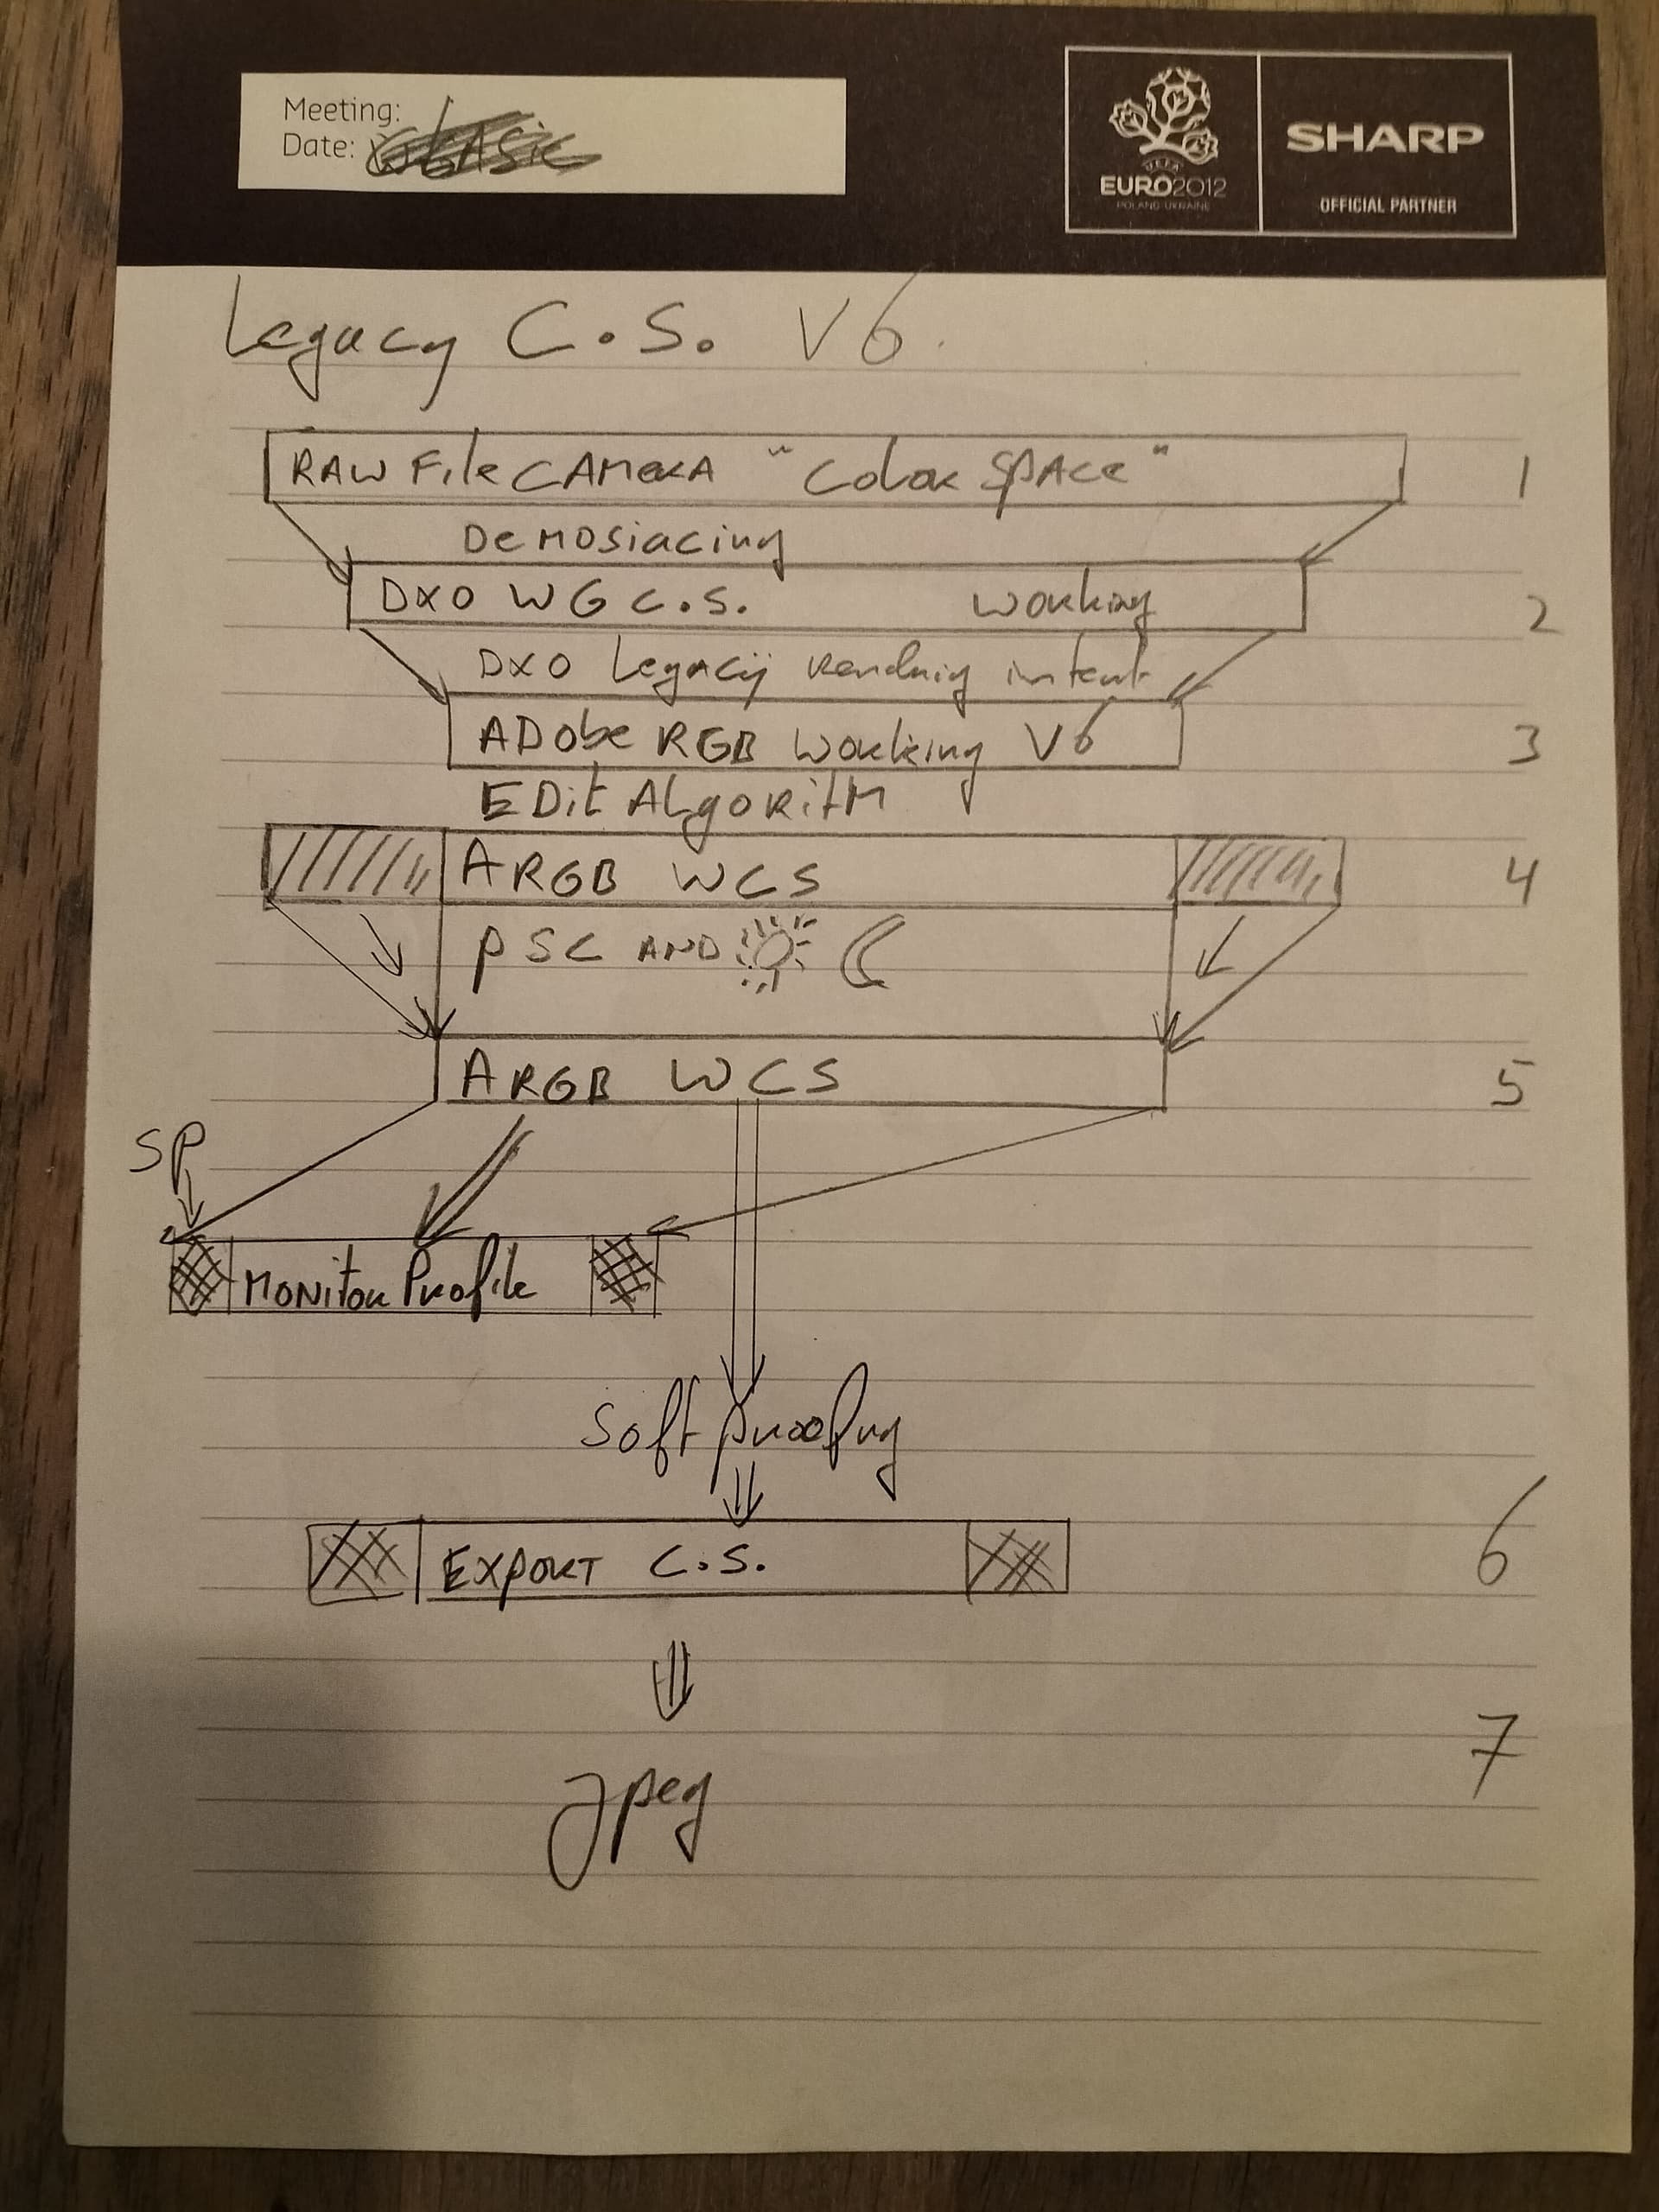
The old before wide gamut colorspace engine of dxopl


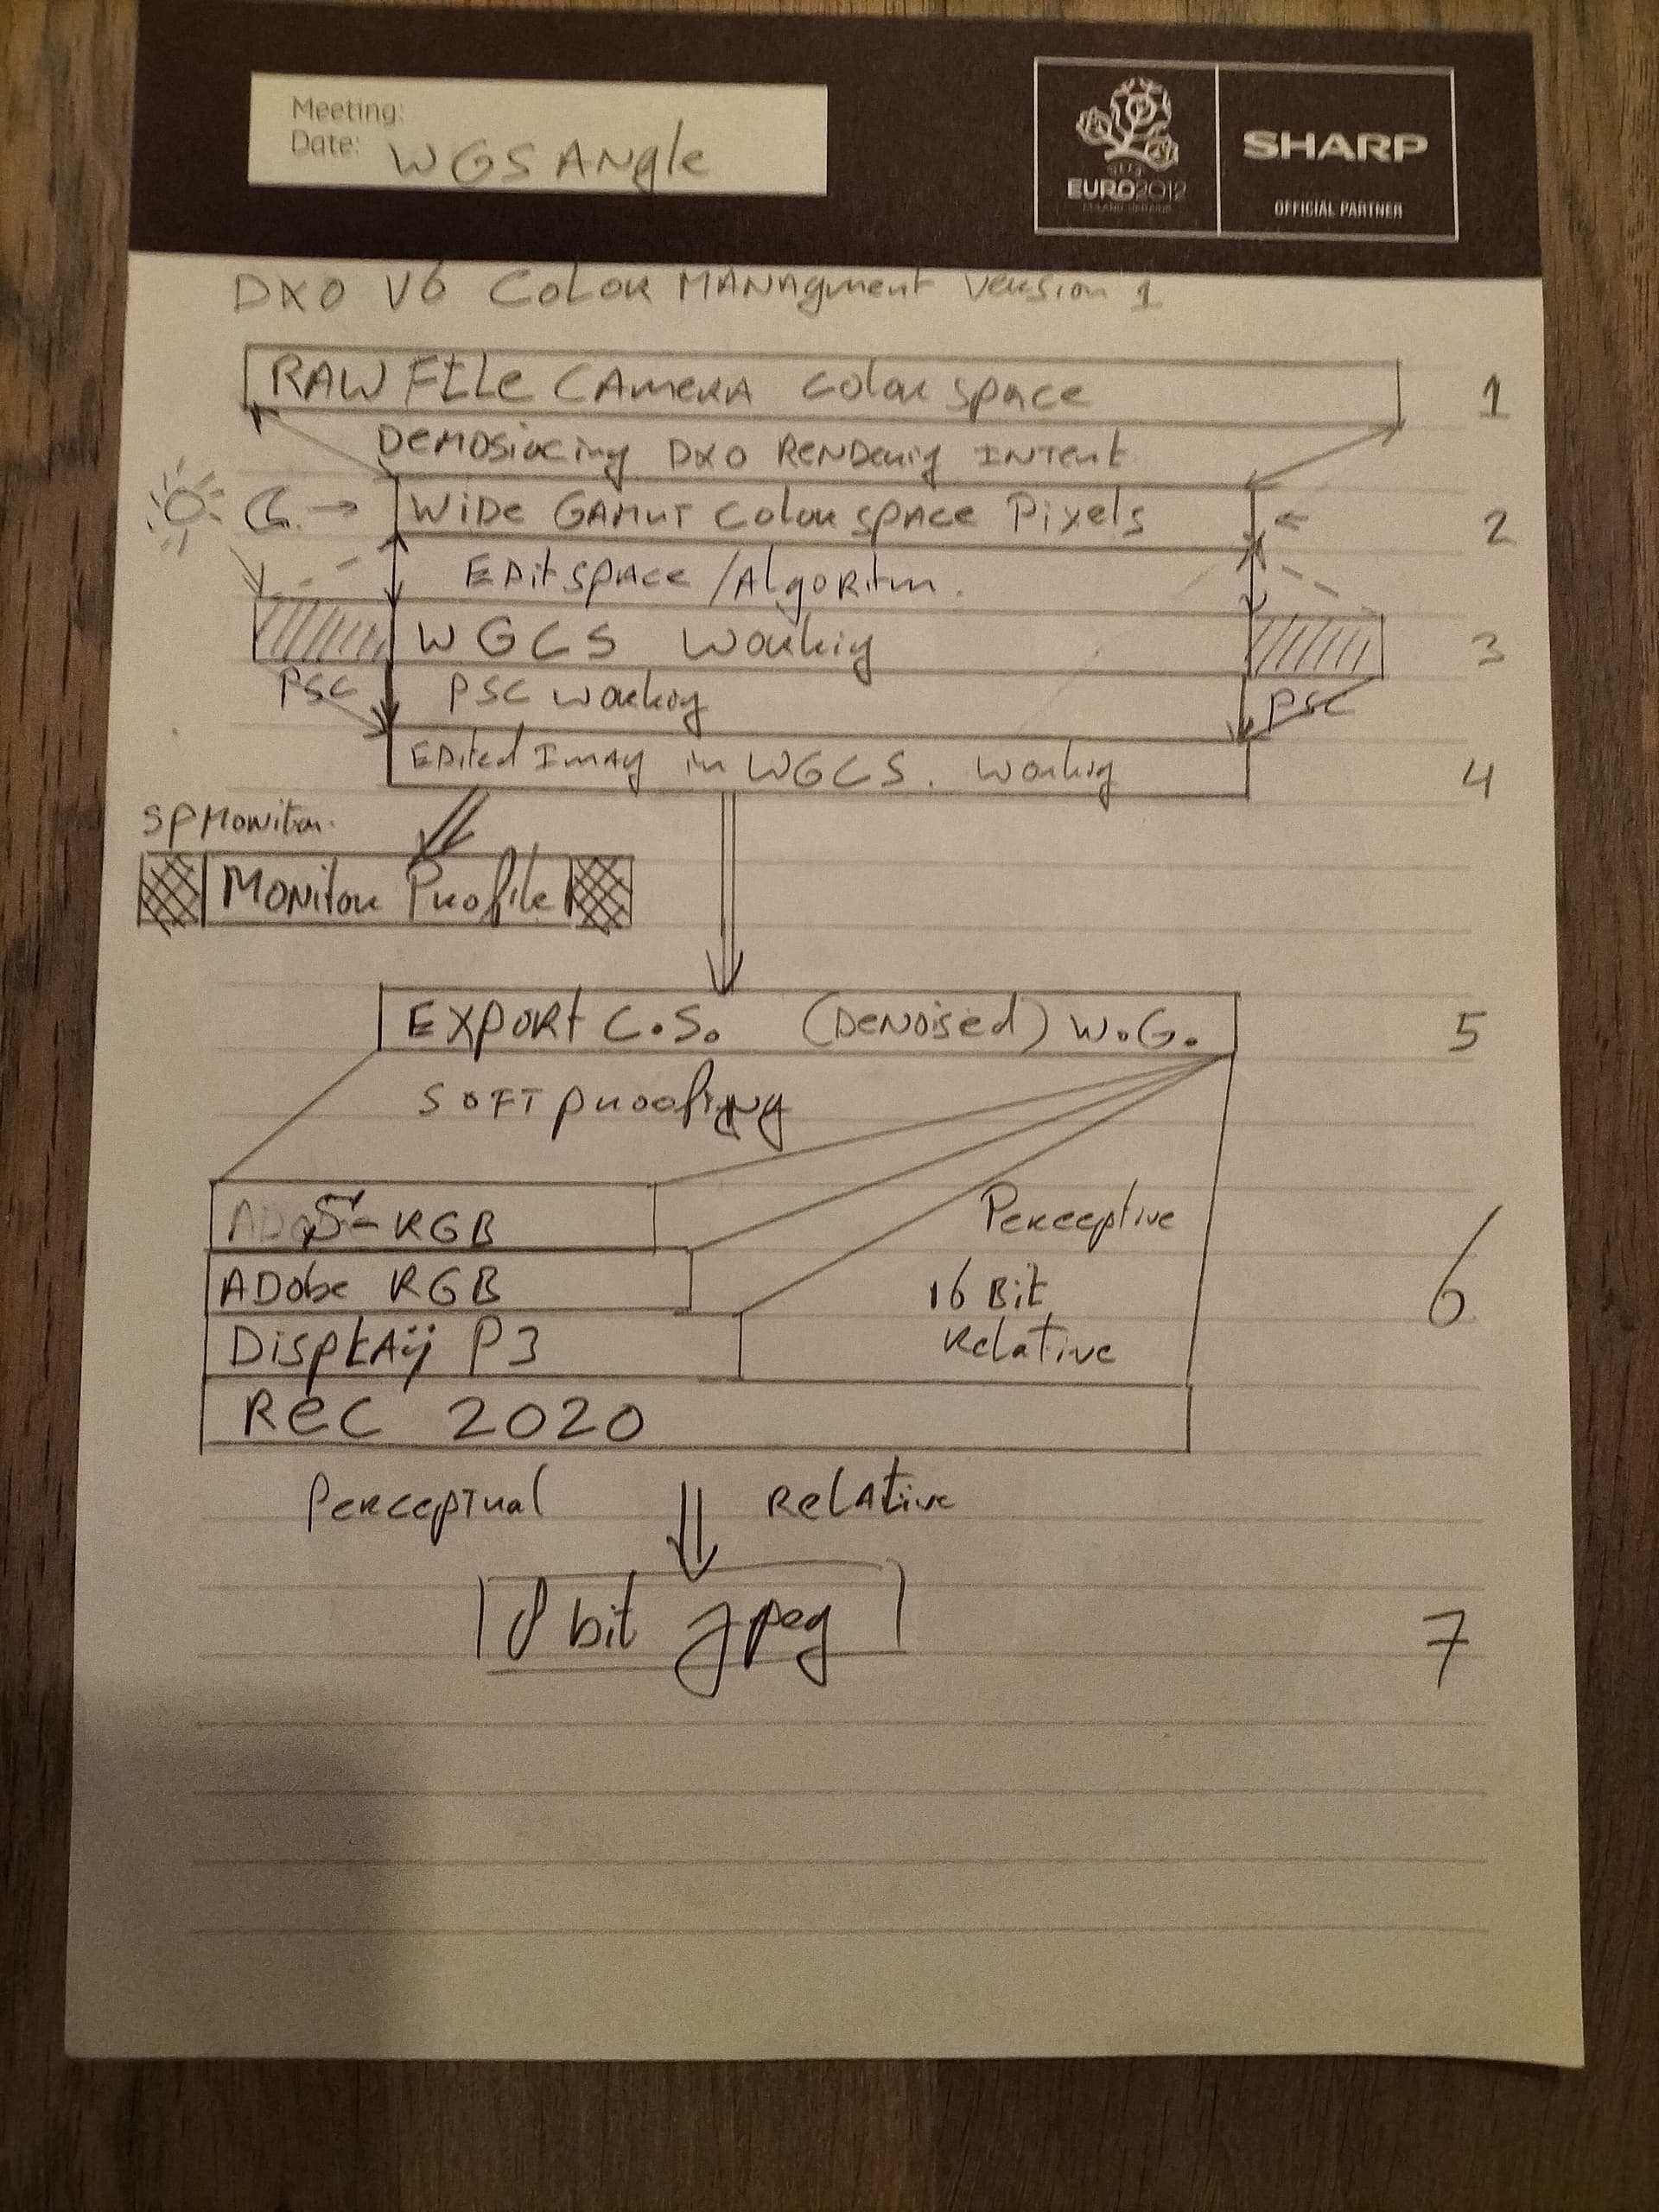
rather “simple” flow chart.
one size fits all like system.

this became this:


(i assume they ignore WG rendering and go straight to Legacy (adobeRGB))
The hatched blocks are the öut of gamut colors which are handled by Protect saturated colors tool in colorrendering.

and the bigger one:


sun and moon and Histogram change when changing working colorspace. (That’s the main problem for some to understand.)
Step 5 is more or less a 16bit Tiff file in Wide Gamut color space. denoised and WB and CA and sharpenend.(microcontrast applied)
And yes microcontrast isn’t applied on your screendump same as sharpening and prime denoising.
when zoomed in above 70% then the “jpeg version” HQ-denoising, sharpening and microcontrast AND CA is applied. changing WB means all this is done again from scratch (step 1 to 2.)

i hope it’s more clear why i think it doesn’t matter if you use Legacy or WideGamut on Rawfiles when you export a jpeg as end result. Even a 16bit tiff adobeRGB doesn’t matter.
Aslong as you don’t export as 16bit tiff or DNG to a second editor.
For those people WG is a big step forward.

Sorry for my not so exact statement
is “…ROMMRGB to take the closest advantage of all the colours…” better?

but this are the terms James Ritson uses in his video und sets in the dialog

so who should i believe

When working in color spaces with such a large gamut, it is **recommended to work in 16-bit color depth to avoid posterization** effects. This will occur more frequently in 8-bit modes as the gradient steps are much larger.
I didn’t say he was wrong :slight_smile:
i did say it’s also called (ProPhoto.) and bitdepth is about “smoothness” in the color hue.

:slight_smile: