Can PhotoLab process infrared images with channel swapping?

How about this - one of your non-IR shots processed only in PL5…

All I get is an image of a pair of gloves

And this requires me to sign in to Instagram and I don’t have or want an account.

Hey, some of our new club photo members have got some really weird cameras and they expect me to know how to adjust things on them, and they might have a 200 page paper manual that I am expected to leaf through. That’s when you realise that a proper DSLR is so much easier than a hybrid or compact where everything is “somewhere” in the menu system :crazy_face:

In my 20s I used to drive buses (double-decker) and they had a 5-speed all manual crash box, where you had to double de-clutch to change gears, both up and down. I haven’t owned a manual box car for many years and only ever drive one under sufferance when that is all the garage can lend me as a “courtesy” car.

I’m not sure how to respond. Perhaps there’s no more need to shoot using infrared light, when the end result can be simulated so well. In fact, when I went back to the KolariVision site, they talk about all the wonderful new tools for infrared that are available in “Luminar 4”, including channel swapping and a lot more.

Also, from the page I originally meant to link to before:
https://backlightblog.com/infrared-photography-with-iphone
…scroll down until you find “How to simulate infrared photos with VSCO”.
I have no idea if this is any good, and apparently I need to subscribe to something, meaning I’m less likely to even try it.

Two links for suggested reading from the Kolarivision.com website:

https://kolarivision.com/getting-started/

https://kolarivision.com/articles/

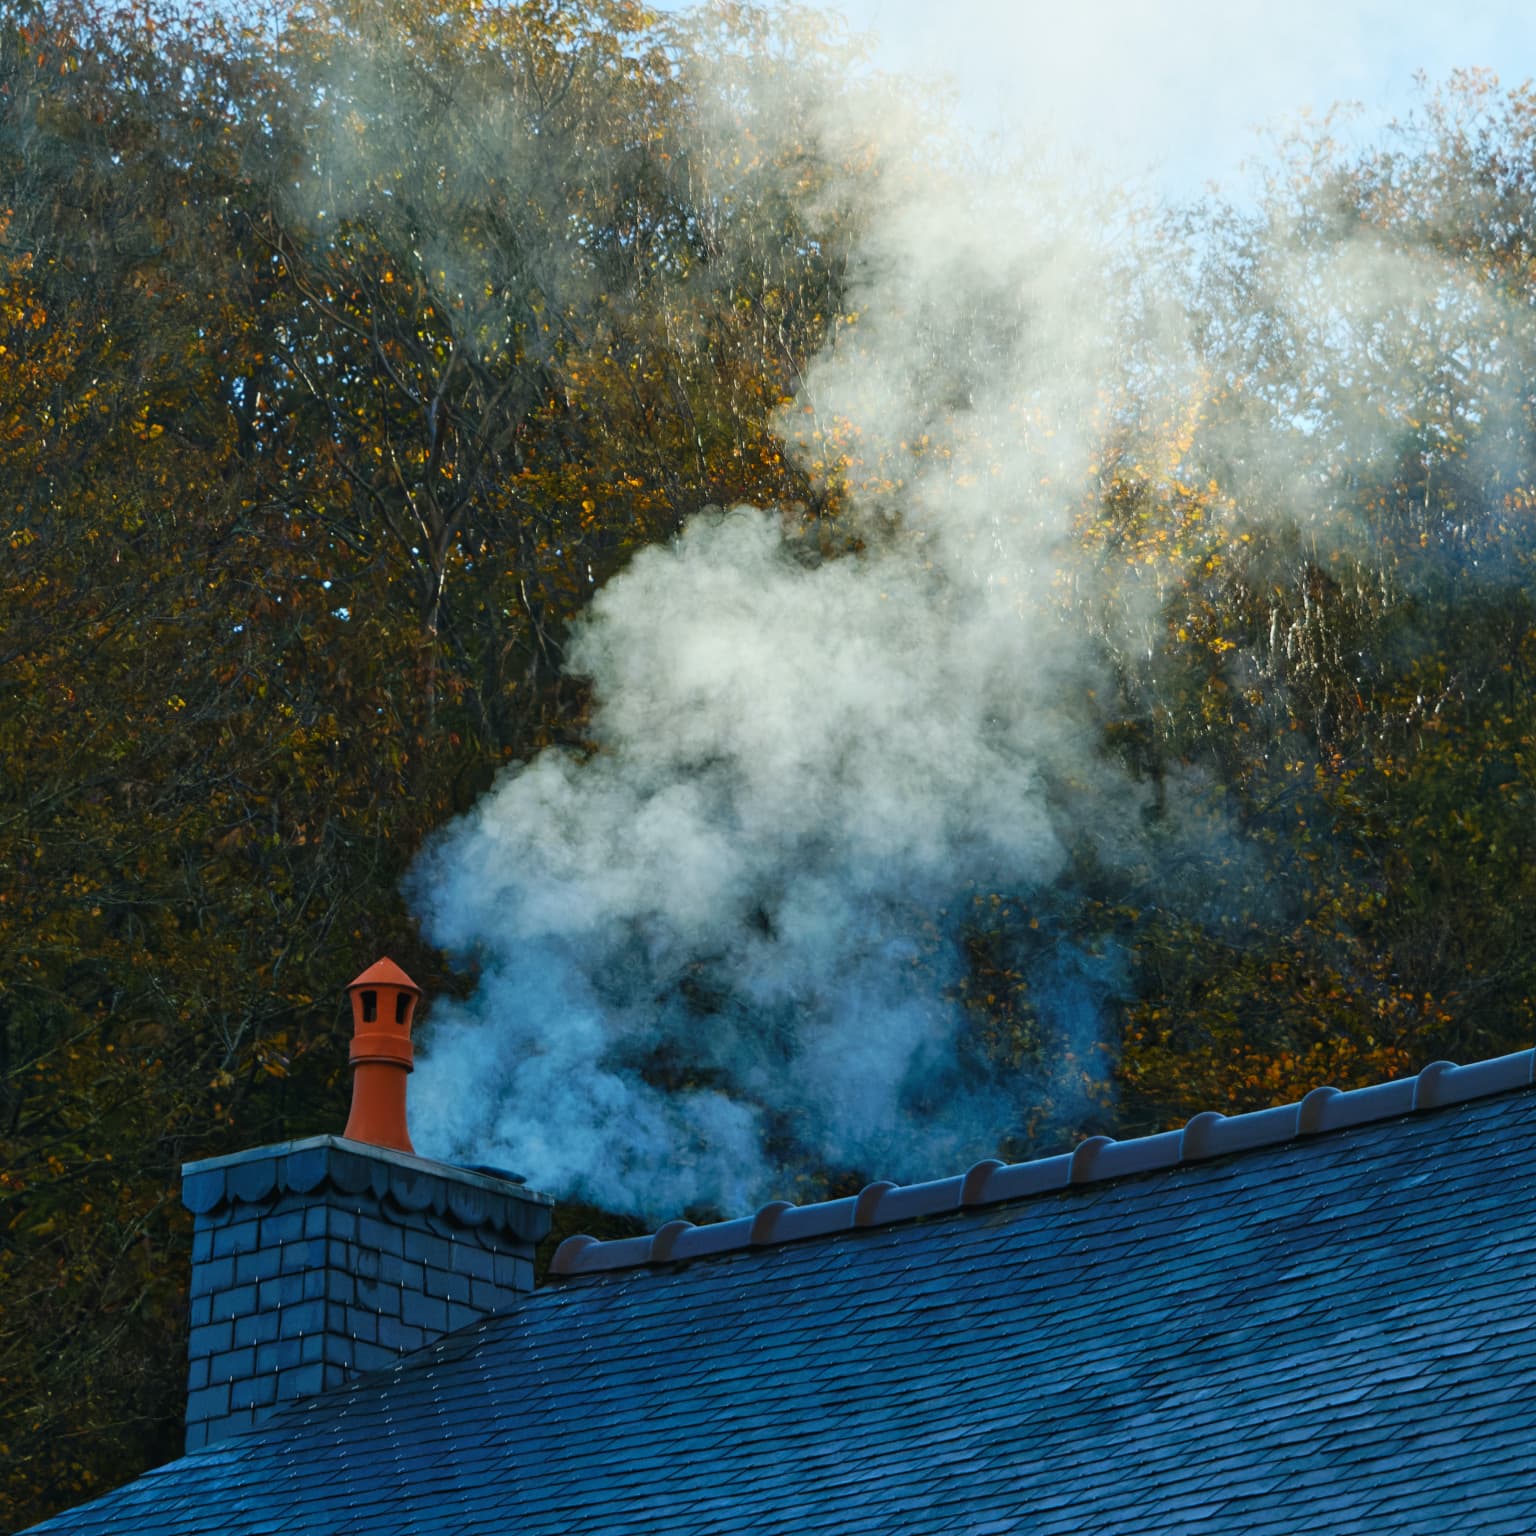
OK, back to what you wrote - and I agree, the photo I posted, which you edited to simulate an infrared photo looks more like the infrared photos I captured years ago on Ektachrome Infrared slide film than anything I have yet been able to do. So am I wasting my time trying to do the “real thing” when a simulation is so much better?

About the instagram page, I have an instagram account from many years ago, which I haven’t used other than my initial attempt to see what it was like. I want nothing to do with the facebook, and nothing to do with any of their …stuff.

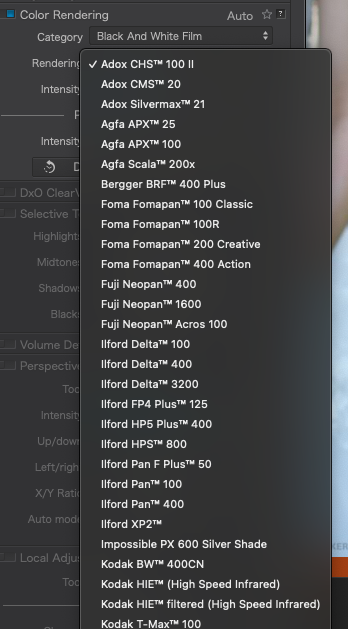
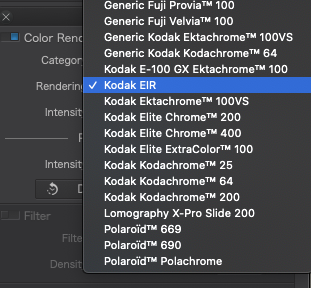
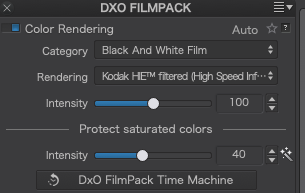
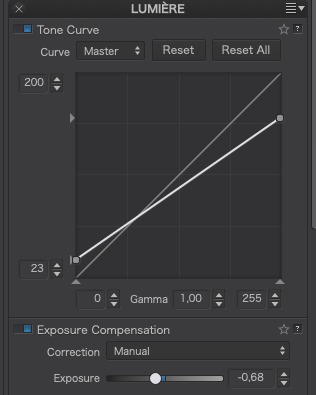
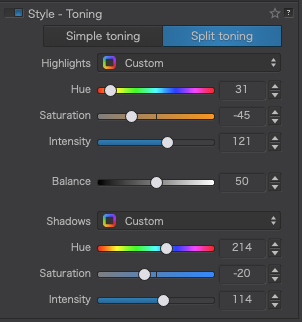
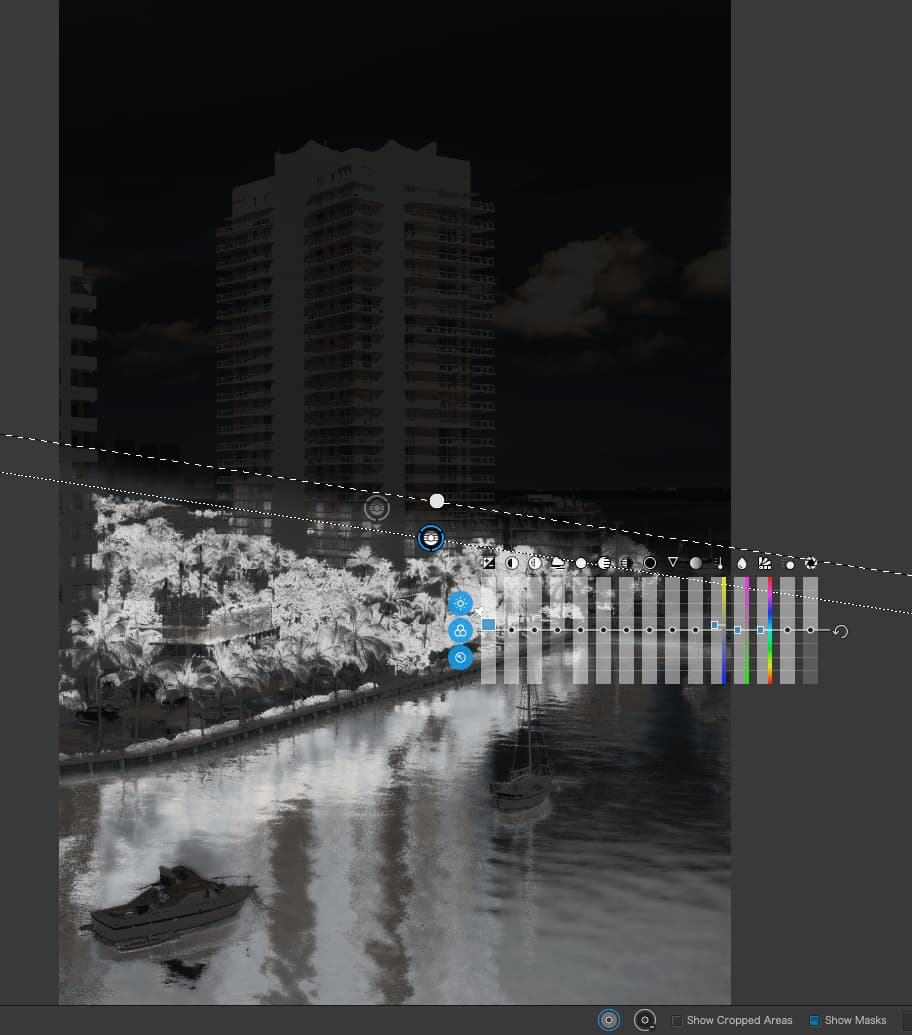
Shows how silly I am. Fuji made sure to create mechanic controls for the basics, and here I was, digging through all their menus. I completely, totally, 100% agree with you, except for me, the DSLR cameras are even worse. On the other hand, my SLR cameras (such as my Nikon F4) have mechanical controls and switches for everything, and no menu system at all. Everything is out in the open. About you? Yes, you are now expected to know everything about everything!! :slight_smile: …and when you don’t know something, it seems like overnight you are an expert. What you do over night would take me many days, and I still might not recognize the significance of what I was reading. If I’m serious about learning about infrared photography, I can already see how much reading I need to do. >>>BUT<<< if all I want to do is create photographs that look like they were shot with infrared film, you’ve shown me how I can accomplish that with a few filters in PL5. It really takes the wind out of my sails, as in why am I going to all that effort, when I can get prettier results in 1/100th the time using PL5 and FilmPack, and Presets. ???

I understand about you and manual transmission cars. I still remember with horror how I was first taught how to start off on an uphill grade, in a manual transmission Volkswagen. Fortunately, I already had the general idea from having ridden motorcycles, but even so, it was a real challenge.

Meanwhile, back to this discussion. I have decided that I want to learn infrared photography both ways, by manipulating a real image from one of my cameras that is capable of capturing good images in infrared, and also creating a simulated image with the tools you’ve been demonstrating. This is in addition to working with PL5, not in any way instead of the other things I’ve been working on.

Thank you!!!

I spent much of today learning how to use Affinity Photo for processing images that I had taken with an infrared filter. To get your version, which is quite beautiful, you seem to have made it easy. I’d like to say it isn’t “real”, as it was all created, but with people taking photos with infrared light, that is also un-real as none of us can “see” infrared light. I think all the things we’re doing nowadays are designed to imitate what Kodak Infrared Ektachrome looked like when we get the slides back after processing.

Since PL5 doesn’t allow channel swapping, and since I got overwhelmed using Photoshop, I decided to to the channel swapping in Affinity Photo, then come back to PL5 to do the rest. After a few hours I ended up with a horrible image, which I already posted. Then I tried with a “normal” image, no filters, and was able to go through the editing process.

After several hours break, I did a bit more searching, and found out how to do the entire process in Affinity Photo:

https://www.youtube.com/watch?v=CxLi5YYavOI

Since my Bullseye range is holding matches Saturday and Sunday, I’ve got two days with nothing planned. I still need to learn some more of the things you did, such as changing the water color, so that comes first.

Then I will try an entire edit in Affinity Photo, as was shown in the video. First I need to take a properly exposed photo from one of my cameras with the IR filter on the lens - will probably use the M8.2 with my old Summicron 50mm, which will act sort of like an 80mm, but I should get a nice photo mostly exposed by infrared light.

If I get that done, then I will send my image to Affinity, do the channel swap, then return it to PL5 to try to accomplish everything else.

(All this is just a side diversion, as I see it as a year’s long challenge. If the weather is suitable, I will take another sunset photo with the D750, using all the things I’ve learned over the past week. I wish I could go walking along the seashore, and capturing some beautiful sunrise photos…)

Oh, and before I forget, I wanted to ask if you and Helen both take similar types of images, or is there a difference between the types of photos you try to create, and the ones that Helen creates? I get the feeling that you spend forever setting up a perfect scene, as what Ansel Adams did, but Helen takes normal photos of “real life”, showing off many details that the rest of us don’t even notice until we see her photographs… I’m thinking now of the village street, lit up by those old street lamps.

Personally, I only really like B&W IR, but each to their own.You are only wasting your time if there is an easier way to do want you want to achieve and you still press ahead with the hard way - unless you take pleasure in doing things a certain way.

That is going to depend on what kind of IR you want to do.

“Standard” B&W IR is easy. You can either put a 720-780nm filter on the lens and convert to B&W in PL, or you can shoot in colour without a filter and use the Kodak IR emulation.

Where it gets tricky is when you want to do false colour IR, where it is very much down to you to establish the look and feel that you want to achieve and is going to require a fair deal of messing around with all sorts of layers in Affinity Photo or similar.

Here’s the DOP for your image I “faked” in PL…

_MJM9117 | 2021-10-04-Comparison - Nikon vs Leica.nef.dop (9,3 Ko)

So, how did I do it?

Starting with applying the Kodak HE™ filtered (High Speed Infrared) colour rendering…

Capture d’écran 2021-11-13 à 16.16.42

This can make the image very bright, so we need to normalise it a bit using the tone curve and exposure compensation tools…

Capture d’écran 2021-11-13 à 16.37.41

To get the coloration, you need to use the Style - Toning tool…

Capture d’écran 2021-11-13 à 16.42.45

This is where the fun starts and you can choose whichever colours/tones you want for the shadows and the highlights…

The sky is not yet right because it has too wide a tonal range, so I applied a control line to the lower sky…

… with a Luma selectivity of 82…

Capture d’écran 2021-11-13 à 16.48.58

… and a negative control line for the upper sky because that was already dark enough…

Turning off the masks now shows that the lower sky is now dull enough to adopt the bluish colour.

But the foliage is still quite dull, so we need to add a control line to select it…

… with a Chroma and Luma selectivities like this…

Capture d’écran 2021-11-13 à 16.55.41

… which now gives us a nice tinted foliage…

Et voilà ! As they say here.

1 Like

Yes and no. It just depends on who sees what, when and where. We both see differently and Helen has much more of an eye for B&W subjects than I do and we can both take time to work out how the shot is going to come out or we can equally take a grab shot that “just works™”

Here are two shots from a recent outing with our club photo…

Now, the question is, who took which?

Both took some serious work in PL to get right.

1 Like

Based on what I think I’ve seen, if I look at any spot on one of your photos it will be sharp, and clear, and colorful. So I think you took the second photo, because of all the “detail”.

The top photo reminds me of the photo Helen took of some quaint street overseas (for me it’s overseas) with the lamps in the photo illuminating things differently. Maybe I’m just dreaming, but I think this photo was taken by Helen.

I guess either photo could have been taken by either of you, but like I said, I can pick any spot at random in your photos, mask it so all I see is that spot, and it will still be perfect. Helen’s photos seem to be “spread out”, in that my eye doesn’t look for details like I do so often with your photos - with this one, teething I’m looking at (smoke? steam? ) is spreading out towards the top, and the only detail is th red “chimney”. I don’t dare call it an American name!

I think you’ve convinced me that I don’t want to do false-color infrared photos, at least not right now. Last month I ordered a B+W F-PRO 39mm 092 infrared dark 695 filter. It is so dark I can barely see through it. It ought to be very good for capturing B&W photos. It should be between the 720nm and 850 nm filters in this chart:

On a separate note, I started wondering how useful my M8.2 Leica might be. I read a lot of articles on it, telling me to essentially leave the ISO at 160. I set it up on the tripod on my balcony this morning, did everything as perfectly as I knew how, and got several useless IR photos taken with my perhaps useless red filter, and this image, about 45 minutes after sunrise, as the sun peeked out from above the clouds and lit up the scene - finally. It’s no match for my D750, but with the CCD sensor, it did create some interesting colors. I only processed this image, in PL5, and here’s the result:

Original image:
L1031094.dng (5.7 MB)

Converted to TIFF:
(82 meg file size - too big to post)

.dop
L1031094.tiff.dop (12.4 KB)

I’ll work on a B&W infrared image later today or tomorrow, and forget about false color for now.

1 Like

:x:

:x:

I’m sorry Mike, we have a knack of not fitting in boxes :nerd_face: If you’ve got spare hour or two, you could always go to our Grandes Images website and try to guess who took which there :wink:

That’s smoke from a wood fire - something that a lot of us heat our houses with here because electricity is much more expensive and properly dried wood is “eco-friendly” because France has an enormous resource of sustainable forests.

From looking on the B&H site, it appears to be have a cutoff of 650nm and, I’m guessing the 695 on the end of the name might be its official wavelength. They say things like you can see through it, so I think it is meant for more “creative” IR work including false colour. So possibly only a little better than your current one. My guess is that you might get results similar to my D100 shot until you convert them to B&W.

Don’t forget IR is at its strongest in the middle of the day and, to get the most noticeable effect you will benefit from paler green foliage rather than very dark stuff. Have fun and I look forwards to seeing the results.

One more thing I didn’t know.
Here’s my test photo, not really aimed “at” anything, just a lot of different stuff to see how it would turn out. Bright sun, late morning, M8.2, tripod, 50mm lens, 1/24th second at f/11, 160 ISO. I started with f/2 and took a photo at every aperture up to f/11 which I expected would be way too dark, but wasn’t. In retrospect, f/8 might have been preferable, as the M8 isn’t good at low light photography.

(I wish DxO could open the DNG images from my M8.2, but I’ll mostly be using my M10, and even more likely my D750, assuming they are sensitive to IR.)

1 Like

It might be a bit more useful if you cleaned the sensor. I counted 26 dust spots in the sky :roll_eyes::woozy_face:

Not bad. It is obviously not “pure” IR but the foliage has turned out well.

The main difference with cameras that have an IR filter on the sensor is that it just takes longer to expose. My D810 shot was a 4 minute exposure but it worked.

From what you wrote, I found there was no sensor cleaning tool in the M8 like there is in the M10, where the camera takes a dust sensing photo. So, I set the camera to a tiny aperture, and took a photo of a piece of white paper. I counted only half as many dust specs as you, but you must have a better way to check this?? Anyway, I got out my rocket blower, and for three times I tried to blow the dust off with no success. Then I got out my VisibleDust tool from Arctic Butterfly (never used it yet). and followed the instructions.

When finished, I took a photo of my white paper, and another of a typical scene. As far as I can see, I still have only one spec of dust. I can try again, but if you see an angry crowd of dust particles, I will need to get the sensor cleaned by Southern Photo, my local camera repair shop. (I don’t know how, or trust myself, to do it the professional way.)

Thanks for checking this out - I probably need to check all the sensors.

Oops, never mind - there are several… I guess they’re stuck in place too well to blow them off, or brush them off. A few are now gone, but not enough.

Edit: I deleted both images, and replaced them with a new image edited to make dust (and a strange discoloration) more prominent.

Once again - how can I download this? Doing an internet search didn’t help. I should have asked you this long ago.

If you have FilmPack installed, you already have it. Just go to the Colour Rendering tool on the FilmPack palette, choose Black and White Film in the top drop-down and you should see it in the bottom drop-down

1 Like

Found it:

I was looking in all the wrong places. Thanks, at long last, I found it!!

1 Like

Do you think of your cameras as tools, or as extensions of yourself?

(Often, but not always, for me, it’s the latter. Anything else is dangerous for me, as I believe in using the best tool for the job, in which case the risk of wanting to buy a Z9 becomes too high… But still, why use the M8.2 when I can use the M10, and why use the M10 when I can use my D750, and it follows then that I should buy a D850… https://www.keh.com/shop/nikon-d850-digital-slr-camera-body-45-7-m-p-1.html

There are two conflicting ways of seeing this, emotion, and reason.

I wanted the M8.1 >>>>so<<<<< badly, and went to so much effort to get it, that it feels like part of me.
Ditto for the M10, but probably more time debating with myself.

I simply decided on the D750 as a useful tool, and bought it without much thinking.
Along those lines, if I thought it made that big a difference, I’d already have purchased the D850.

I realize that all of the above sounds rather silly.

You could ask me why I got my old Nikon F4 going again, and why I sent off my Leica M3 to DAG Camera so he could make it like new.

…and I constantly tell myself that none of this stuff matters, good photos come from ME, not from my equipment. I accept that, but don’t good artists care for which brush is in their hand?

@mikemyers Did you know that the new FilmPack 6 includes the Kodak EIR colour rendering?

Capture d’écran 2021-11-14 à 10.45.31

Think of reality as something that has a lot of layers. In our context here, this simply means that you, your gear and your process matter. Disconnecting links in a chain denies any sense that a chain might have.

1 Like

Wow! That sounds incredibly deep and philosophical :nerd_face: :smiley:

1 Like

Maybe, but we’d not be discussing Mike’s works without either Mike, his cameras or his processing. Without Mike, his cameras would slowly rot, without his cameras, Mike would read a book, watch tv etc.

Try to ride your bike without handlebar!

I have a bike? Not with the hills around here I don’t :mountain_biking_woman: