Right click for a pop-up menu (on the Windows version anyway).
…find it as a palette in the right dock. Depending on the workspace you select, some of the tools don’t appear because they move to different palettes (e.g. color rendering).
The screenshot shows the “DxO Standard” workspace setting:
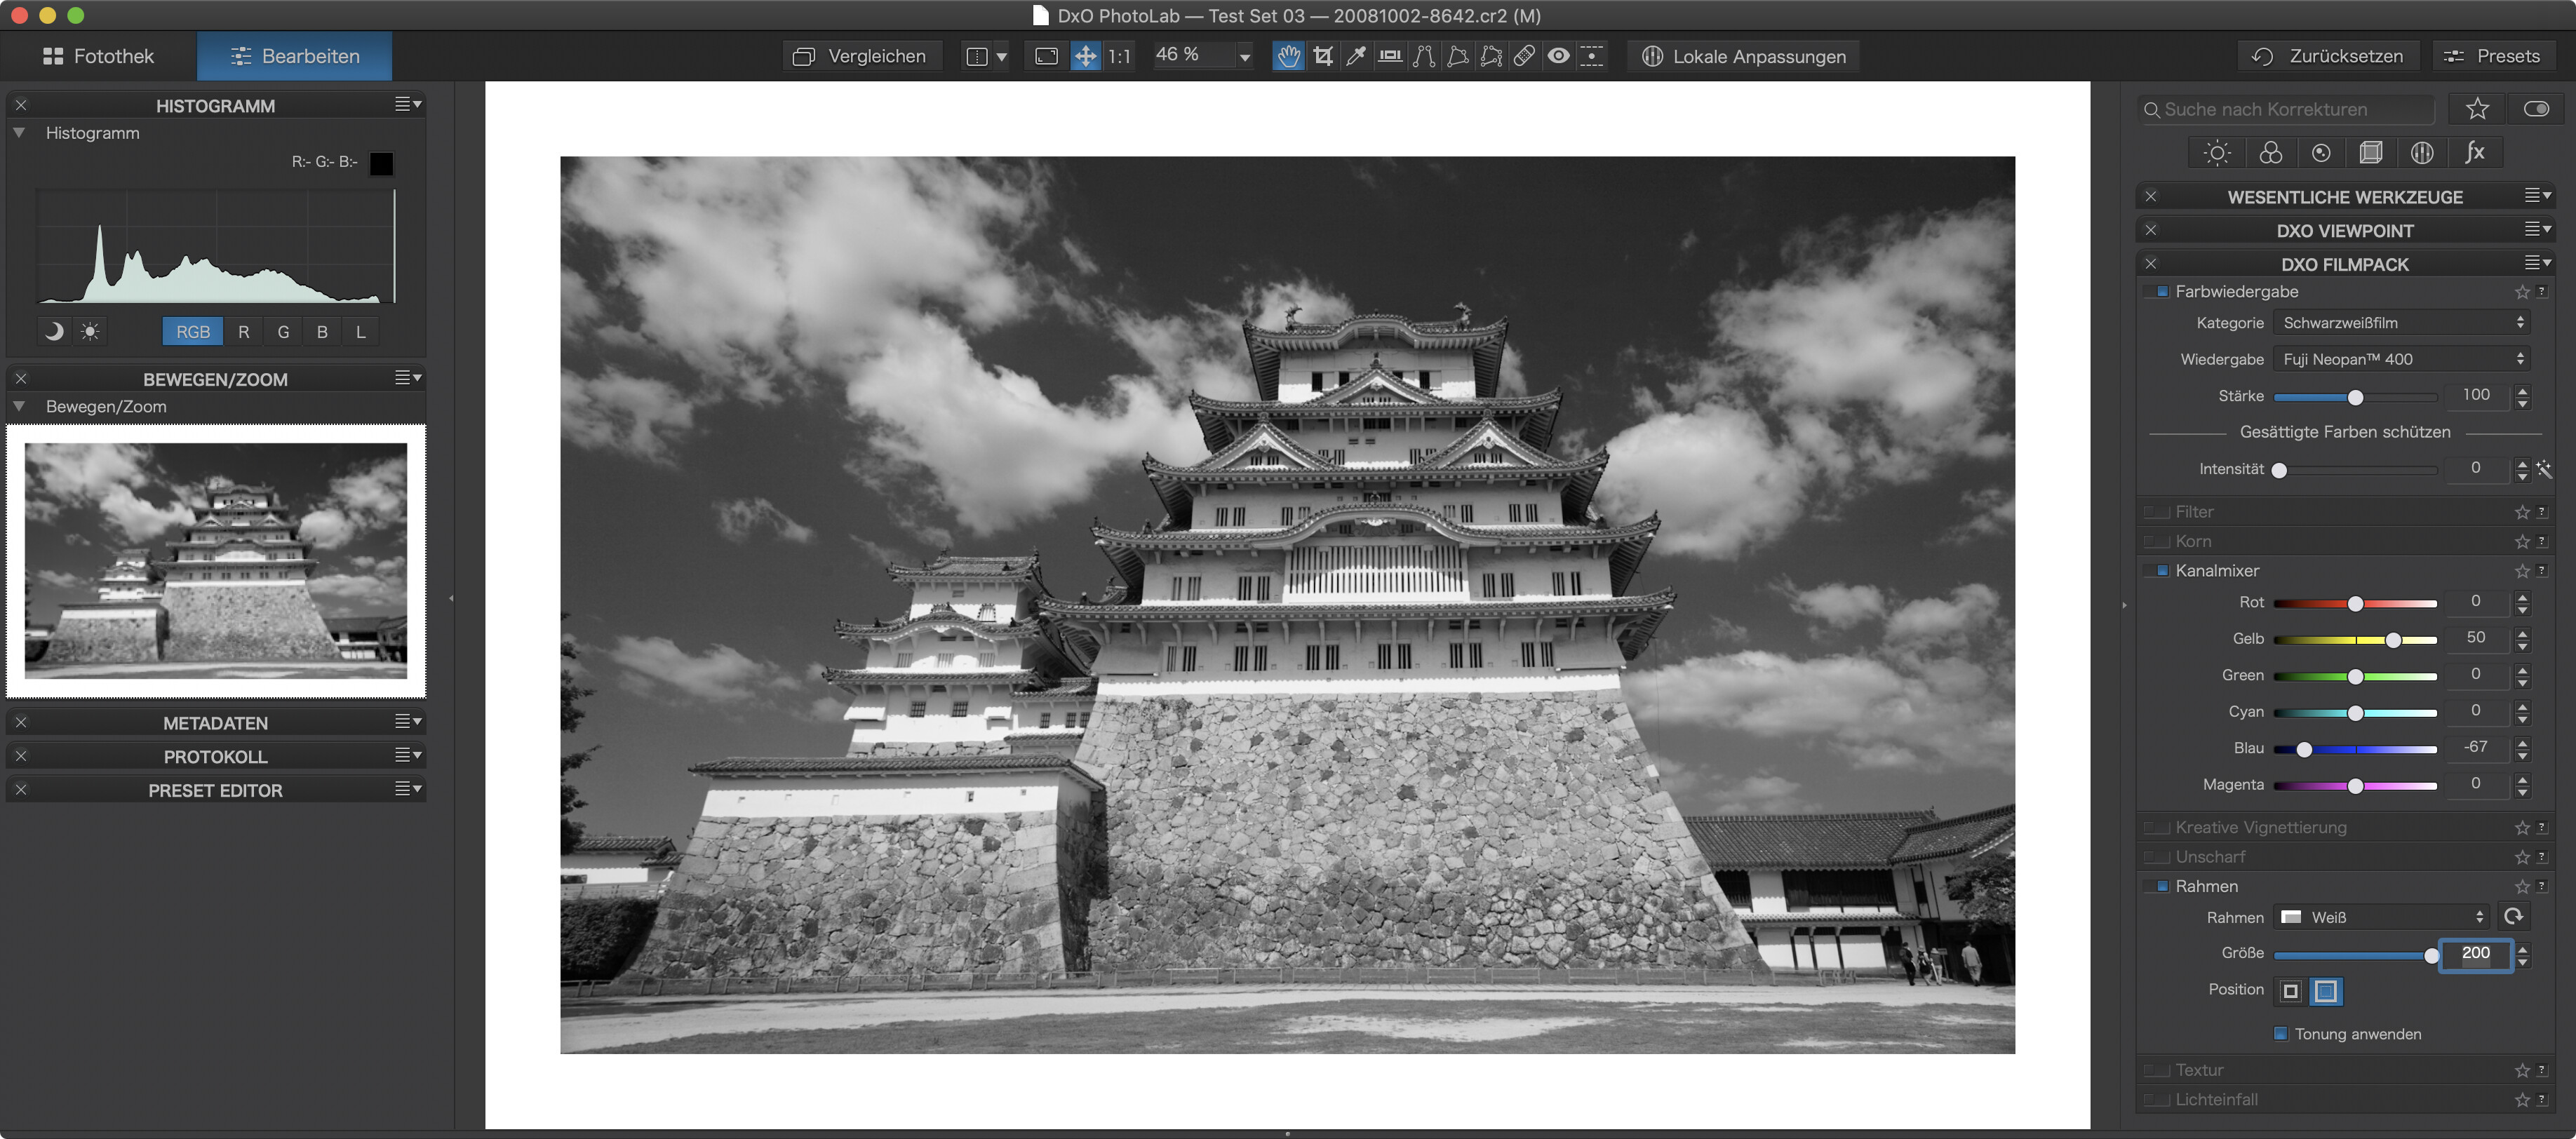
Note
- Color Rendering: Fuji Neopan 400 (one of my favorite emulations)
- Channel Mixer: Darken sky, brighter stone basement of castle (Himeji)
- Frame: Added to the outside of the original image. Can be added inside -> dumb crop
- Grain: Not used, can increase character as well as impression of sharpness (try it)
Found it. Hey, lovely photo!!!
I’m scanning in several 35mm negatives. Scanning the 8x10 photo, the scanning was very fast. With the 35mm negatives, it is taking forever. I’m mostly practicing, learning how to do it. At least these new negatives actually look sharp.
I’ve got an old Epson V500 Photo scanner, which is not compatible with my newer Mac computers. When Apple went to their newer software, it broke a lot of things. So, I’m using an old iMac 2013 which is slow to begin with. Maybe these newer negatives will be acceptably exposed.
Something very useful I just found - the iPhones have an option to view images “reversed”. Not sure what it will do with color negatives, but for b&w I can quickly determine which images are worth scanning.
The scanner wanted me to select the resolution. I entered 300. Is that an appropriate number for scanning 35mm negatives? If it’s too high, maybe that is why my scanner is so slow. TBC.
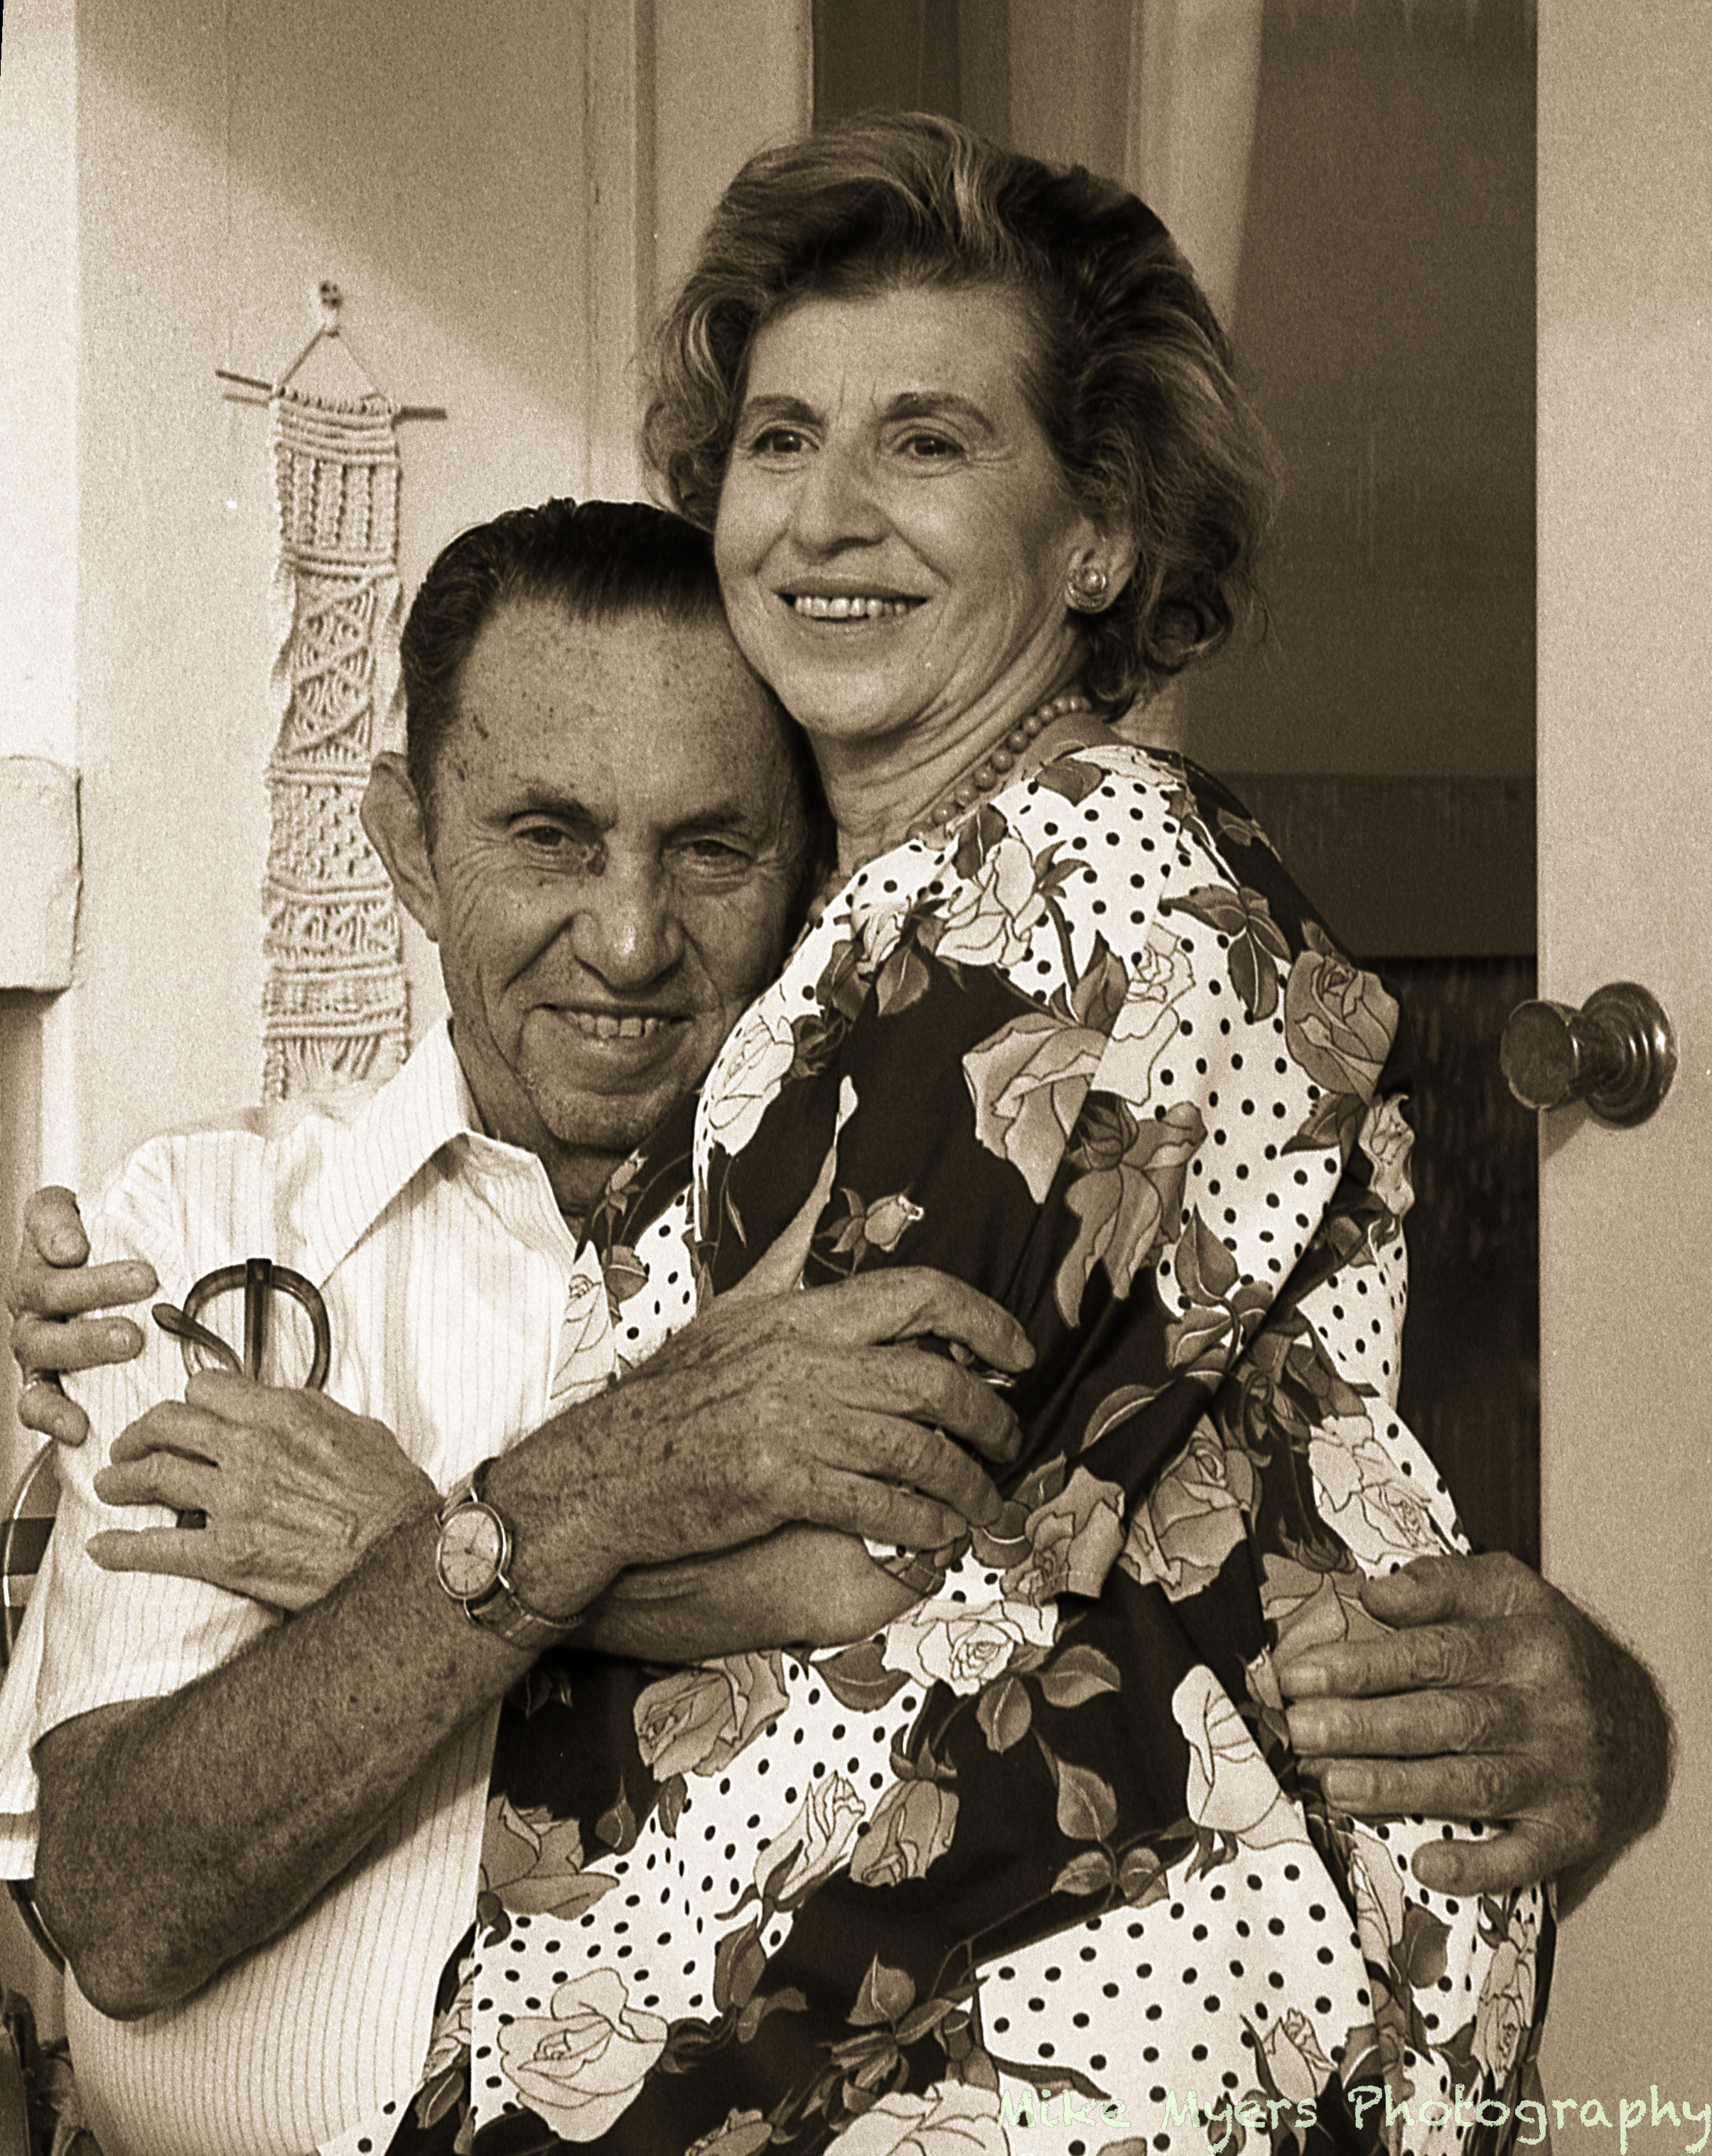
This is what makes the effort all worth it. A great picture to cherish.
I have an Epson V370 Photo and I’m running Epson Scan 2 just fine on my M1 MacBook Pro running Big Sur. If Epson Scan 2 isn’t working for you, there is also VueScan which is updated regularly and supports a huge range of scanners going back many, many years.
When I was researching best practices I found a consensus that archival scans should be done at 4000dpi. My scanner only allows 4800 so that’s what I used. Except I’m finding there simply isn’t the sharpness in the photos that warrants this level and the penalty of file sizes, so I have now dropped to 2400.
For scanning film, you need to think of how large you want the processed image to be.
If you are planning on printing, your processed image should be at 240ppi. Therefore, for a 10" x 8" print, you need 2400px x 1920px. Since the short edge of a 35mm neg is just under 1", you will need to scan at 1920 ppi.
Bearing in mind it is easier to only scan once for all uses, what do you plan on doing with the images?
I think that’s where I would go. It’s what I use for 5" x 4" film scans.
1 Like
Here’s a conversion of a shot taken off of a b/w shot, taken in 1978 with a Mamiya 645 and 80mm lens with a yellow filter.
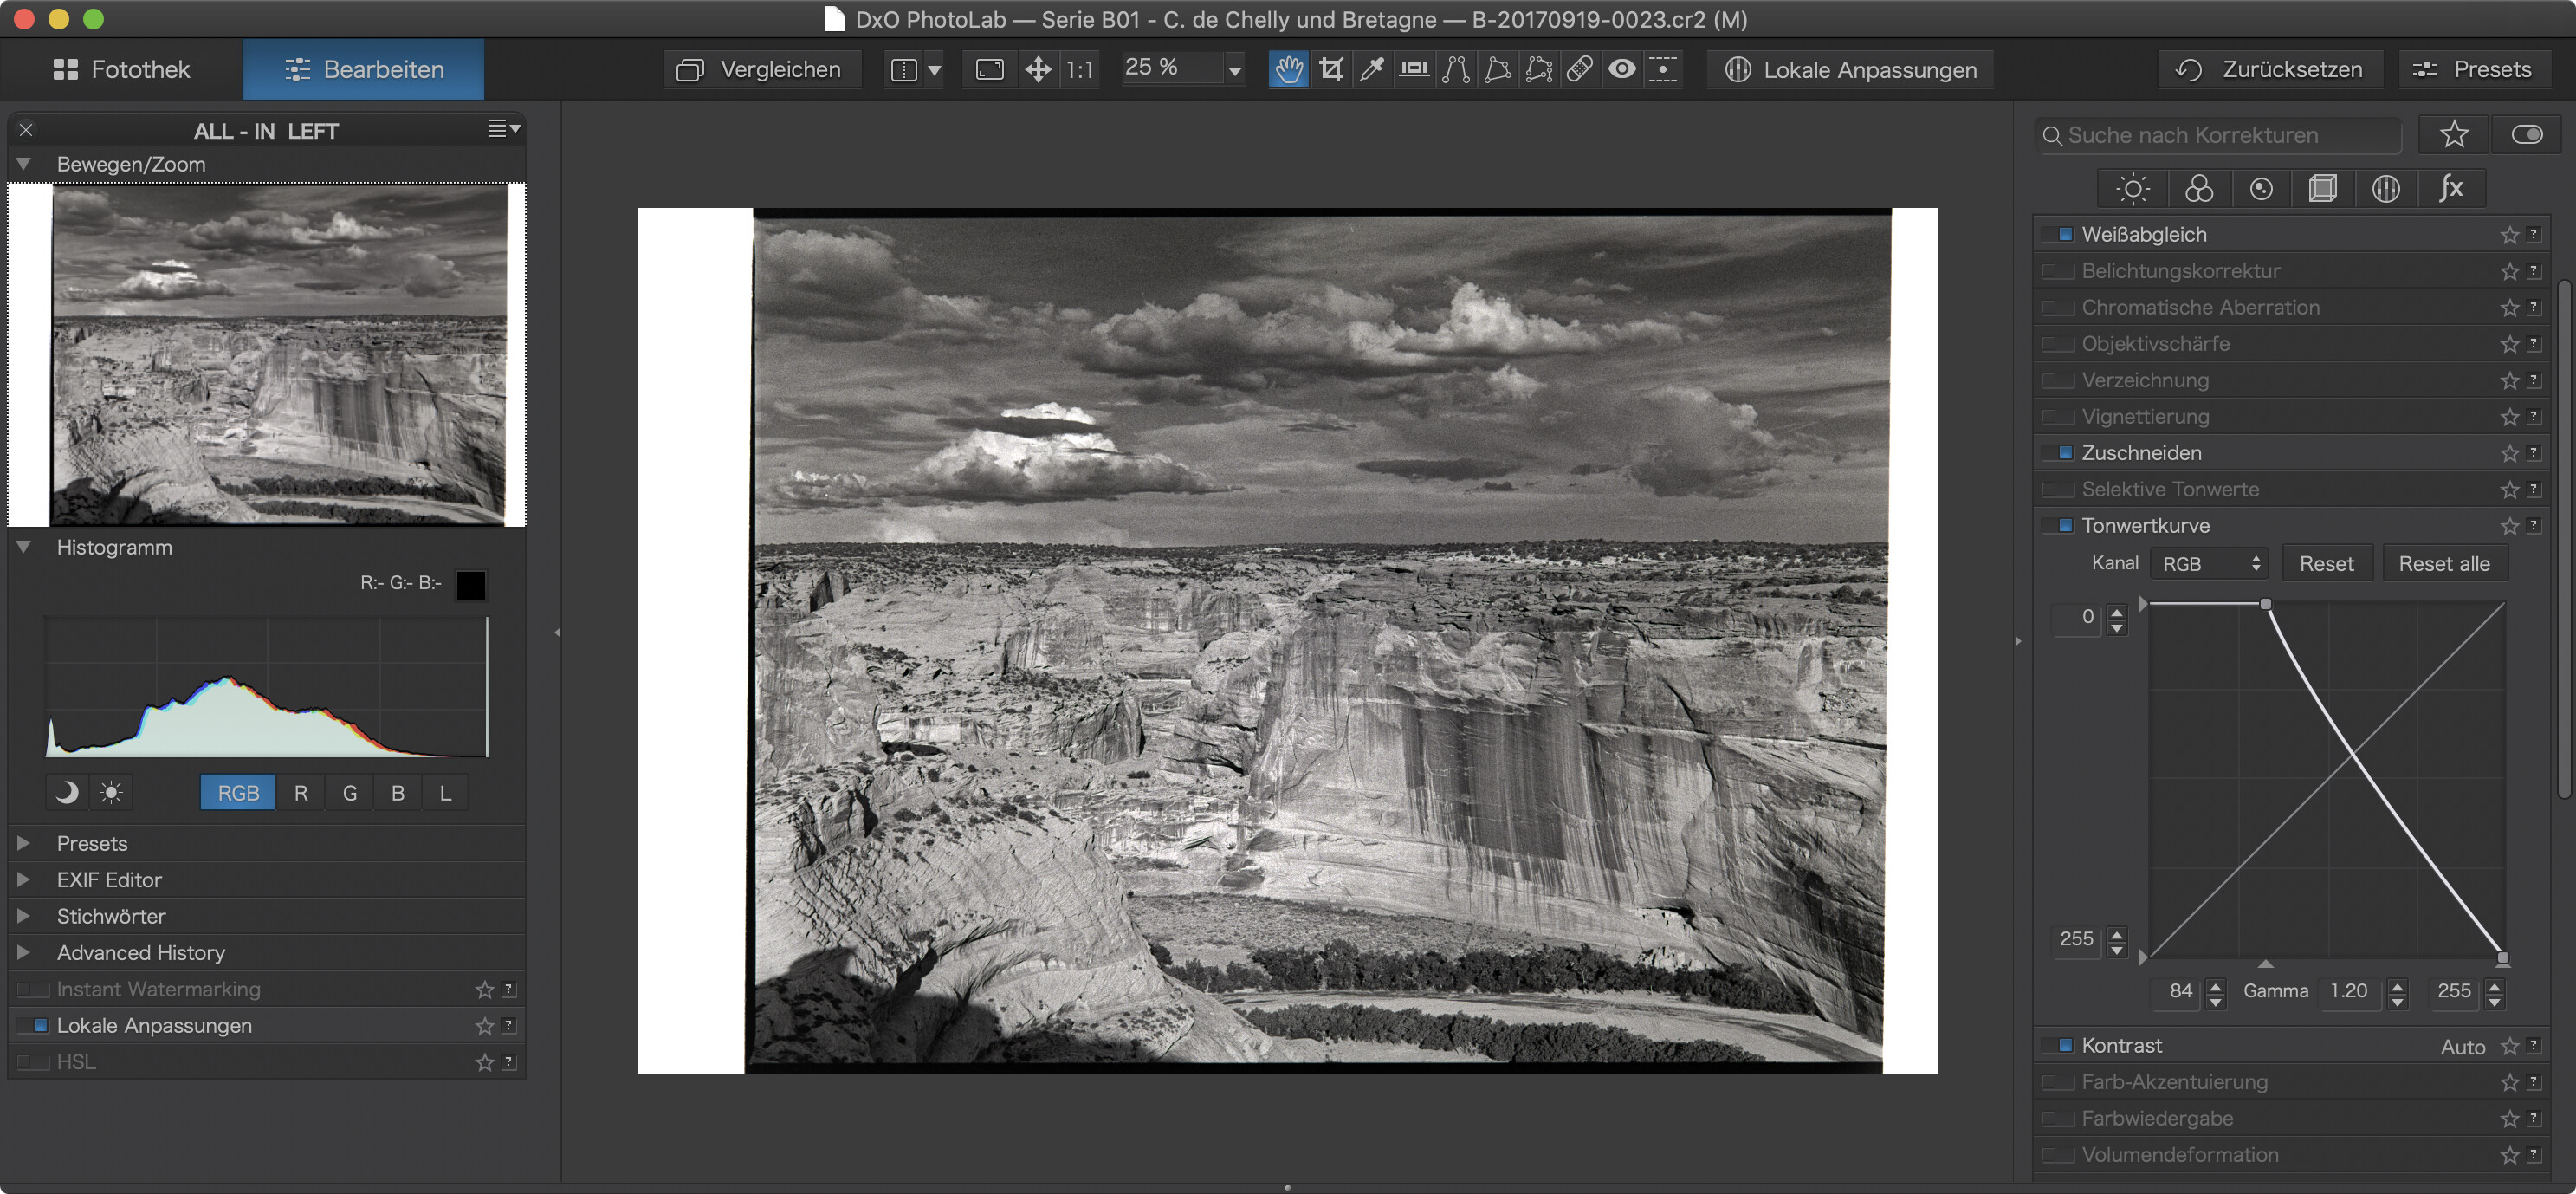
I shot the negative with a Canon EOS M6 and an EF f/2.8 100mm USM Macro lens. Tonal inversion done with the tone curve. You can see a hint of color that I could have eliminated with the Stile/Toning tool. Grain can be seen - I usually shot with 400 ASA film, I don’t worry too much about grain. I did not crop the shot. The white sides are from the negative holder. Note that the shot should be horizontally mirrored, something that DPL cannot do now.
1 Like
VueScan works well, and does indeed support a huge range of scanners and multiple operating systems. It’s allowed many ‘ancient’ scanners to continue working.
My head is spinning. Too much happening.
On my first attempt, the scanned images were horrible. Giant white hairs all over, and dust. Cleaned as best I could, with a camel’s hair lens brush, and then blowing at the negative with a “rocket blower” for cleaning sensors.
I found a recommendation to set the resolution to 3200. I think I can lower that as you all suggest.
My gosh, I must have been using tri-x pushed to a million ISO - or more likely, I just forgot what grain was like, or more realistically, I never noticed the grain as well as I do now. The scanner picks up everything. I know I can’t get rid of the grain, because unlike digital, the grain IS the picture.
To answer you question, my only goal is to mail the images out to my relatives. I highly doubt they will print them, and if they did, I doubt they would go beyond 8x10. Maybe 2400 or so would be a good setting for resolution. I’ll try that next.
I’ll post this negative here, but I haven’t changed anything but for cropping. It’s 100% “real” so that part of me is pleased. As for sharpness, I looked at my dad’s watch. The image as a whole looks acceptably sharp, but his watch is not as good as I might have hoped for - but with all the grain, maybe that’s the best I can do. When I view it at 100%, I wonder if I should have scanned it at an even higher resolution - some parts of the image appear almost “pixelated”.
I’m excited in two ways - first, now that I can, to print more photos from the past, and second, to see how well I can do with the black & white film that should arrive today.
I also need to see which of the tools available in PL4 would help improve images from film. Maybe I’ll try that tonight.
mom at 404 Beverly.tif.dop (13.8 KB)
Gosh, thanks to all of you, I’m light-years ahead of where I used to be!!! Long ways to go I guess, but every day it seems things improve.
We can do the things we did in the “chemical darkroom” in the “DPL darkroom” and then some, easier, and less smelly too.
and no more stains 
You are right! Good flatbed scanners (including so-called ‘photo’ models) are able to deliver a (true) resolution of around 2400 pixel.*) Everything else is interpolated (and marketing blub). When using a good driver (windows) or e.g. VueScan as already mentioned, they are comfortable to scan paper pictures (better bigger than small one’s).
Otherwise one might consider to take a sharp photo with the camera and develop / edit to taste.
have fun, Wolfgang
*) a few highly specialized (and pricey) flatbed scanners with a dual lens system for film scans produce high resolution – follow link to Epson in Joanna’s post # 114
(I remember some models from Linotype Hell AG or from Microtek – long long time ago)
So true - and so many other things are easier. I thought I thoroughly cleaned my negative before re-scanning, but a white thingie got in there anyway. I was going to re-scan, but then I searched for, and found, the repair tool. That took care of it lickety split! (whatever that means…). I found another silly mistake on my part. I thought the negatives should go into the scanner emulsion side down, but it’s the opposite. The photo I posted up above is a mirror image. I searched all over to be sure, and yep, I was wrong.
I think the film grain is less annoying with the film inserted properly, but that makes no sense to me. It’s got to by my imagionation playing tricks on me. (another word I have fun with…). But when I look at the two images, the one with the film inserted the right way looks better than what I posted up above.
I’m getting to enjoy the whole process. Now that I am starting to understand what to do, things are moving along nicely. Maybe next week I’ll try to do some color negatives.
By the way, I wrote something incorrectly up above. My Epson V500Photo Scanner works fine with any of my operating systems, including the latest from Apple. BUT… the very nice software program that came with the scan never got updated from 32-bit to 64-bit, so it’s incompatible with the newer macOS. Fortunately, I never gave away my ancient 2013 iMac, so the scanner works fine there. I haven’t used it in a long time, but I also installed Windows on that computer.
If you can “see” the grain, it means you are getting more than one pixel per grain, which, in turn, means that what you see as “pixelated” is more than likely just the grain of the film.
The emulsion side should be nearest the “sensor” of the scanner, which will give you a reversed image but, since you are scanning to TIFF, you can use macOS Preview to open the image and flip it before you get into PhotoLab.
In fact, Epson provide an ICA scanner driver that allows you to use Apple’s Image Capture software that is already on your (newer) computers.
Once installed, you can either open Image Capture, or better Preview, and scan from there. If you use Preview, you can do the scan and flip the image straight away after scanning.
1 Like
Once I accept that unlike digital, the grain IS the picture, I should do the scanning such that I can see the grain as we’ll as possible. I have a feeling a resolution of 2400 is not enough for 35mm negatives. I will try this for a comparison, scanning at 2400, and then at the highest resolution of the Epson, then compare. It’s an “alien thought” that I’m not scanning an image - what I am really scanning, and capturing, is the grain. If the grain isn’t sharp, the image won’t be sharp. This is especially true for “grainy” film, like Tri-X. I wish I had used Pan-X.
THANK YOU!!! What you wrote is what I know to be true, but ALL the documentation I can find suggest shiny-side down. NOW I see this is just for convenience, and it’s to avoid having to create a reversed image, and need to flip kit. Starting today, I will go back to doing it right.
Sure would be nice if PM4 could reverse an image, without my having to do so in a separate program, but I will do as you suggested.
(I thought the image looked “worse” (more grainy) when I did this our way, than when I followed the instructions. I need to keep telling myself that I absolutely DO want the grain, as sharp and detailed as possible. Question, are there tools to “slightly” change the grain so it is smoother, without making a noticeable change in how sharp the image looks? I guess I need to decide what is most important, the sharp grain, or a less grainy photograph at the expense of some sharpnes.))
I’ve tried all that, but the official Epson software is SO much better in SO many ways. Having used it in the past, I’m now spoiled. By comparison, Image Capture is a joke. Epson provides the ability to fully control how you scan an image. It “knows” where the images are, so after the “preview” it shows each image individually previewed - you can select which ones you want, and only those are fully scanned. I can preview up to 12 35mm negatives, and view small views of each of them. If I’m not sure, I can view them individually at full size on my screen. Once I select the images I want, each of them is scanned to a separate image file.
I was told Epson has a newer version of their software, but it’s greatly simplified, and doesn’t do everything the old software did.
I will find and post the instructional video I found that explains this.
If you view this short video, you’ll learn about all the things I lose if I don’t use the Epson software.
(https://www.youtube.com/watch?v=3NqDlaOTGgw&feature=emb_logo)
Take a close look at the screen 2 minutes and 13 seconds into the video. This fellow does things the way you suggest, not according to all the instructions I found so far. His preview images are reversed! I think he forgot to explain this in his video.
Epson includes “Digital Ice” and other software to remove dust that might have been missed.
My own solution will be to scan the images as you suggest (emulsion side down), then reverse the scanned images before opening them in PL4.
Scanning color negatives:
(https://www.youtube.com/watch?v=48FStinOSVY)
Fast forward to three minutes into the video, to see how this fellow adjusts the preview images, and then. uses the histogram to get a better scan. Would this simplify editing once the image is opened in PL4?
Ain’t nothing easy!!!
Hmmm. I just exported one of my images to TIFF, to give the same pixel dimensions as if I had scanned a 35mm neg at 2400ppi. It gives me a 55.5MB file, which for an image that is roughly only 8Mpx, is a big file. Nonetheless, such a file, printed at 240ppi, will give you a print of 14" x 11" that can be held at arm’s length and viewed without seeing either grain or pixels - surely that is adequate for most purposes?
I did a quick search on film grain size and equivalent digital resolution and found that a film camera shooting Tri-X comes in at around 2400ppi with a very high quality lens, and a lot less with the average lens. it’s all well and good being able to see the grain structure but it won’t make up for the fact that the image recorded in the emulsion is never going to be as sharp as that structure due to limitations on lens resolution, etc.
Then I tried exporting an image at the equivalent of scanning a 35mm neg at 4000ppi. It gives me a TIFF file of 129MB!!! - but would only yield a print size of 23" x 16" at 240ppi.
Bear in mind that a Nikon D810 36Mpx image will only occupy 77MB as a RAW file but will yield a print up to 30" x 20" when printed and viewed under the same conditions.
Apparently, that would give you the equivalent of around 8600ppi.
The problem with scanning, especially on a low-end scanner like the Epson V500, which was only ever intended for office and hobby photographer use, is achieving the high resolution the manufacturers claim…
- the film holders are flimsy plastic and not guaranteed to hold the film perfectly flat
- the film holders may not hold the film at the optimum focusing distance from the scan head
- the higher resolutions are interpolated and don’t give as much improvement as you would expect
On my Epson V700, the only way I could get sharp enough scans of my 5" x 4" negs was to purchase a BetterScanning film holder with an Anti-Newton glass platen that I tape the film to and height adjustment to find the optimum focus distance.
Some scanning software will flip the image at the same time as, or after, scanning and, since you are producing TIFF files, PL4 won’t notice the difference.
I understand why you like Epson Scan but, as you know, it is not available for 64bit macOS. I found that Digital ICE not only gets rid of some dust, it also can lose a lot of detail and sharpness. And you really don’t want to apply unsharp mask until you have edited the image at the resolution you want and can determine if it is too strong or not on a 100% view of the image.
I optimise the black and white points and the histogram when scanning 5" x 4" - it is definitely worthwhile doing as it gives you a properly “exposed” image, making it easier to work on in PL4.
We are not thinking the same way. Your way is correct, but I don’t think that is what I need.
To me, I have a 35mm negative I just captured today on my Nikon D880. I also took the same photo with my Nikon D7, who knows how many megapixels that might be.
I want to get the best image I can out of the film negative. I may or may not be cropping it - that comes later. So, how do I scan this negative into the computer, so I can later on crop it as needed, and get just as good a result as had I used the D880, or next year, my D890? Let’s say the D880 has a 100 meg sensor, or 500 if you wish. The limit to the image quality at some point tops out at what the camera lens is capable of capturing.
With film, let’s say I use the best quality film I can buy, with no grain - the quality of the image again is based on the quality of the lens, and probably limited by the film - not sure.
Let’s say YOU are doing this, not me, as I don’t print, and let’s say you want to make just as good a print from some portion of the negative, just as good as were you to have done it with a digital file cropped in the developing software.
I’m guessing that there is a limit of the resolution that is possible on a scanner, regardless of whether you selected 2400, 4,000, or 40,000. There will be a point where it’s useless to set the value higher.
Why not go one step further - suppose your full name was Jaoanna Adams, directly related to Ansel, and you wanted to duplicate his work using. I suspect if you used his 8x10 view camera, or your own 4x5 camera, and scanned the negative in high enough resolution, you could match everything Ansel did. That makes sense to me. Would it be possible with a 2 1/4" x 2 1/4" negative? How about with a 35mm negative?
I’m not sure of a lot of things any more. I used to think that a very high quality lens, shot on Kodachrome film, was “as good as it gets”. I suspect that is no longer true, but I don’t think your D810 is “good enough”.
All this stuff is hypothetical. Ain’t no way I’m going to be able to do that stuff, without at least as much talent as you have, and an outrageous budget. For me, I’d like to take my Leica M3, or perhaps my Nikon F4, with a “standard” lens, and be able to create an image just as good as if I shot it using my digital gear. That being the case, and without knowing ahead of time how much I would be cropping the image, what scanning resolution would you suggest?
(I’m still learning, so for now, I’m going to use your first suggestion, 2400 dpi. In the unlikely chance I get good enough, maybe I’ll need to use more?)
To me, this is very surprising. I used to have 16x20" prints made from my 35mm negatives. I never thought it was unusual, or excessively large. I didn’t do it often, and I still have some of those prints.
If this is stretching the world of digital to the limits, maybe digital isn’t yet “the” answer.
(My professionally made 16x20 prints were better than what I could do in my darkroom, but I never was that skilled at this. My prints were mostly 8 x 10, and occasionally 11x14. Fascinating to understand all this from your point of view…)