Here’s one I converted recently. RAW to full colour TIFF using PL, then opened the TIFF in Afinity Photo and used Nik Silver Efex to convert to B&W:
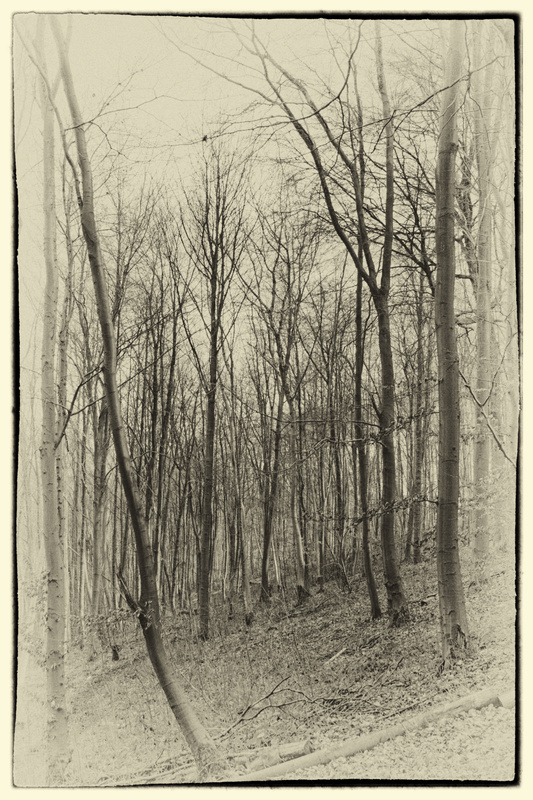
The original is very boring:

stuck
Here’s one I converted recently. RAW to full colour TIFF using PL, then opened the TIFF in Afinity Photo and used Nik Silver Efex to convert to B&W:
stuck
Why did you need to open Affinity Photo to use Silver Efex Pro?
Mark
Well, now it looks like a photo that might have come from my grandfather’s old photo album, except you fixed it so the brown/yellow discoloration is gone, along with the cracks from when it was folded long ago. 
More seriously, yes, it’s a lovely effect, and it’s certainly not boring like the original.
If it’s considered a “photo illustration”, I think it is superb.
With no explanation, I think it’s misleading - but that’s just me.
I think I’ll have to give this a go, maybe tonight. Very interesting, and well done!
(imho)
A very important subtlety - if you are shooting RAW, setting your camera to B&W will only change the jpeg preview image that you see on the back of the camera, the RAW image will always be in colour.
Using FilmPack in PL means that you stay with the RAW image all the way through. Sending your image to NIK involves converting to tiff and losing the RAW capabilities like DeepPRIME.
As others have said, FilmPack is much more tha just a bunch of film emulations. The extra tools you get mean you can do your own colour to B&W conversion, how you want. Yes, you can take a preset as a starting point but then you can change anything you want. Personally, I don’t see the need to use the NIK tools if you’ve got FilmPack already integrated into PL.
Even with FilmPack, you don’t need to use a preset to convert to B&W, you can simply desaturate the image and start from there. But then tools like the channel mixer and coloured filters that come with FilmPack can help to change the tonal response to different colours just like putting coloured filters in front of the lens when you took the picture.
When it comes to handling digitised film, unless you use a digital camera, most, if not all, scanners will give you a tiff file, which then means you lose RAW tools like DeepPRIME noise reduction. Although I’m not sure what DeepPRIME will do to “real” film grain.
Then you need to consider how you are going to deal with the inevitable dust spots that accompany handling film. The PL repair/clone tool is OK but I find it “clumsy” in that you need to define the target, PL decides on a source and then you have to move the source if it is not suitable. Î would prefer the other way round of defining the source and then applying it to a target area.
But, whatever the tool, dust spot removal can be laborious and time consuming, which, for me, is one of the reasons why I stick with digital for small format. Film sounds “romantic” until you realise just how much extra work it involves, unless you consider that extra work part of an artisan process 
My father was a keen photographer — he is the reason I shoot Pentax — but also an historian. I recall him once talking about figuring out what colour markings were on an aircraft in a black and white photo based on the relative shades and using other cues in the picture. I don’t remember a lot of the detail but, for example, if you could see a national insignia on a military aircraft, and could date the shot, then you knew the colours used in the insignia and could correlate that to other colours on the aircraft. He also used to talk about colour temperatures as well, though I don’t recall any detail of that. Not sure what he would have done with digitally desaturated shots where every frame was at the photographer’s whim!
I can’t remember which software it was — one of Lightroom, Aperture, or Luminar I guess — that would allow you to click to place the target and then immediately drag to pick the source, all while showing a live result. I may be misremembering because that would imply spots only and no random brushed shape.
I used film SLRs for very nearly 20 years. I don’t find the film concept romantic at all.
Simply because it is my preference to use a workflow that does pixel stuff in a proper pixel editor and leaves PL to do what it does best, i.e. RAW conversion.
Of course, “Other workflows are available.” Go with whatever works for you 
stuck
Two things I eventually need to look into. Both very important. Eventually.
How do you plan on digitising your film?
If you only want a photograph to be ‘realistic’ then this sort of conversion is pointless. However, in this case realism was uninteresting whereas an artistic rendering evokes a response, a feeling of a bygone era. To me, that’s an ‘improvement’ but art rarely pleases everyone so others are entitled to disagree.
The camera may not lie but software sure does 
stuck
I take a picture of my dia’s. I made a construction for on my lens and just put the slider in it. Very fast and if you want you can shoot raw and see what that gives you in pl. 
With a little modification also to be used for unframed negatives.
George
I have a Nikon CoolScan V ED that I use to digitise my 35mm transparencies. One of the file types it can save files in is .NEF. Superficially that is a RAW format but it’s not a normal .NEF, it is a CoolScan specific file type that in my experience is only readable by the Nikon Scan software*.
stuck
*if anyone here knows different, I’d love to learn!
When I digitise my 5" x 4" negs/transparencies, I have the emulsion side closest to the lens to avoid any distortion in the film base. The problem is that this produces a reversed image that PL can’t flip unless I convert it to TIFF and flip it before getting to PL 
That means the light is coming from the side of the camera. My negatives are light from the back. Something like the nikon es2 film scanner. I only have 35mm negatives/dias.
George
For all who want to bring analog film into a digital form:
Apart from dealing with a Lr plugin, the forum has a lot of information
on how to digitalize analog shots, gear, methods, lighting etc.
So are mine. I think you mis-read what I wrote. I have the side of the film that has the emulsion facing towards the front of the lens, just like any slide copier would.
The point I was trying to make is that if you have the film base towards the lens, the image may not be as sharp due to the thickness of the base distorting the detail.
I see.
George
I have three ways I might do this.
First is to take the negative holders that came with my Epson Scanner, and use that to scan the negatives. I think this gives me essentially a pdf, or jpg - not a raw file.
Second is to get something like this:
Last is something I might try just to get started - I have an (unused) negative scanner where you attach a smart phone to take the picture. I don’t expect much from this, but I can see how things are working before I buy something more expensive.
That is the proper way, for the sharpest image. I expect to have the same problem. If so, I’ll use PL4 on a reversed image, and after I export a finished jpg image, I’ll use one of the editing programs that can “flip” it.
Yes, I have VueScan, which claims to produce RAW files but, which are in reality, uncompressed TIFFs. I also have an Epson V700 scanner and I use their own EpsonScan software to produce TIFFs, which limits what you can do in PL but, at least, you can flip the image whilst you are scanning.
Apparently this works with any full frame camera with the 60mm macro lens fitted. They talk about using it with the D850 because that actually has special software built in to deal with the “scans” in camera - although it only produces jpeg files.
My initial reaction is that you’d have to be fairly desperate to use this solution.
The Nikon solution is not too expensive - as long as you don’t count the price of the lens 
Personally, I would look at using the Epson scanner you already have.
I’ve done that in the past when using the D810 on a tripod above a light table for 5" x 4" stuff. It depends how much you want RAW files(camera but need flipping) or how prepared you are to work with TIFFs (scanner and already flipped)
I have the V500 Epson - rather old.
After reading your advice, I went looking at my scanner, my extra gear that works with it, and I also found this YouTube video. I suspect it is identical to what you’re doing. Anyway, it’s decided - for now, I’ll just use my scanner.
