Uploaded the file.
Dear Clifford,
Mark is absolutely correct. Here is like your mask looks like with the large zoom:
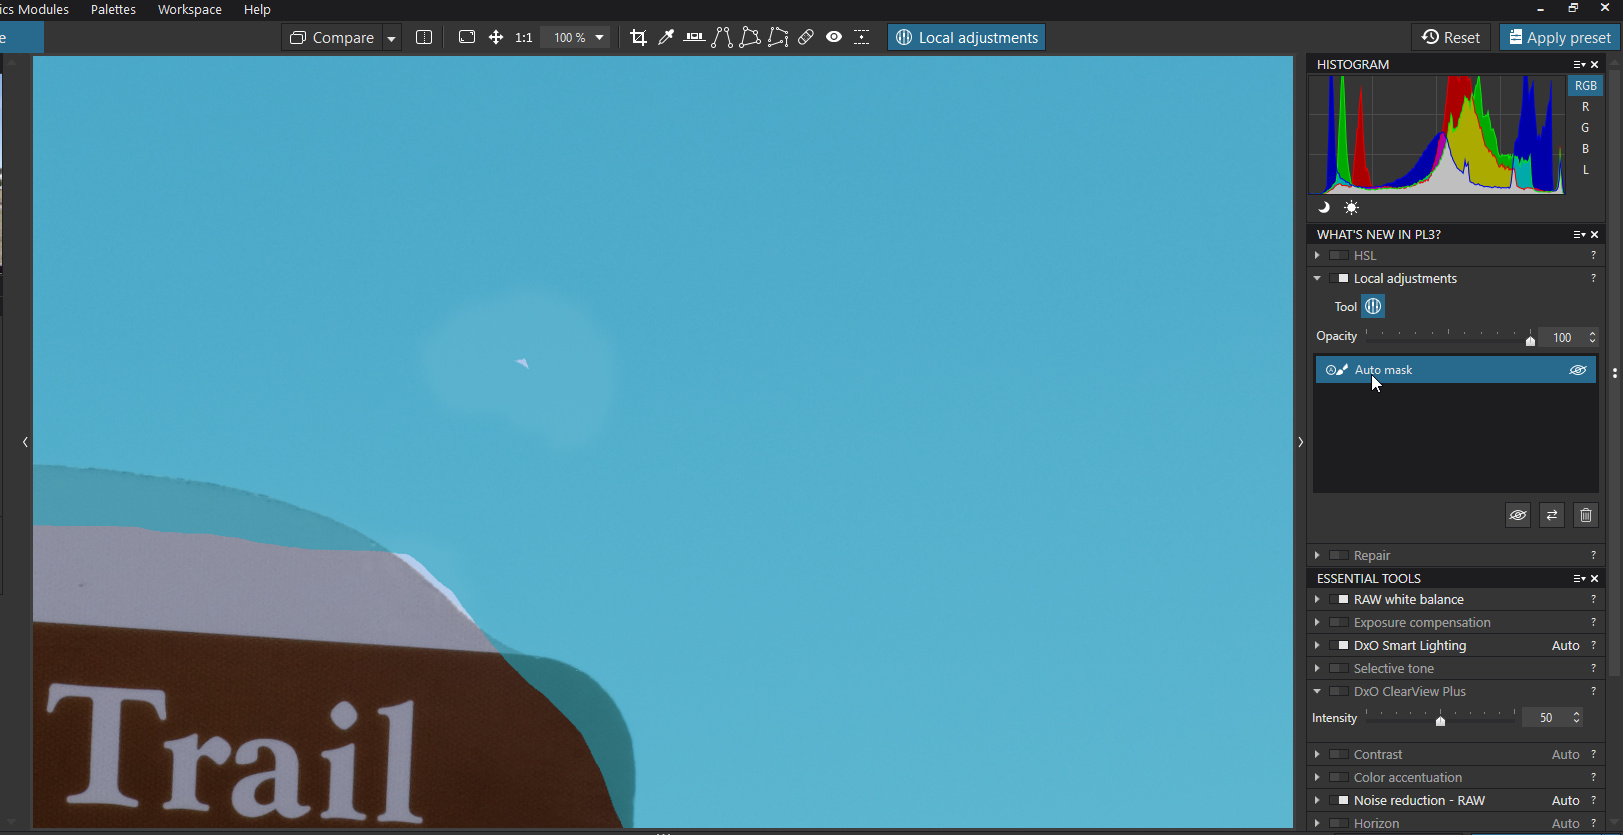
You see there is an uncovered spot which causes this effect.
Thank you, @mwsilvers 
Regards,
Svetlana G.
1 Like
Agree, As I mentioned in the additional edit to my first note, “For some reason it seems easier to miss spots with the Auto Brush than with the other tools. Even if the mask looks like it it covering that area, go over it again.” I understand when you painted the mask, that area seemed to be completely covered. After two years of using this tool extensively I’ve seen occurrences of this more often than I would prefer, but it is so easy to fix, especially when you are aware that it can occur, I’ve never been very concerned about it. Whether it’s a bug or the result of application of the tool, I can’t say for sure. The Auto Brush works differently than the other tools. However, just to reiterate, it is not an artifact, just a missed spot.
Mark
1 Like
The real cause for that is that “auto mask” still has not been corrected. You don’t get any information about which part of the image is actually picked, and even worse, you also can’t manually correct a wrong selection. There’s only trial and error using extreme adjustments to see what was picked.
“Auto mask” is the only local adjustment with this fail, that’s why it doesn’t show with the other ones.
1 Like
I’m not sure what you mean by “still has not been corrected”. Is this a known and documented issue? I don’t agree that you don’t get any information, it just not as clear as I would like it. I also am not sure what you mean by “you also can’t manually correct a wrong selection”. What exactly did you mean by that? You can correct a wrong selection by using the eraser or deleting the mask and reapplying.
I reported that right after PL1 was introduced. First, I tried mail support, but after a while I moved to the forum. Unfortunately, that was the “old” forum which is not accessible any more.
After the change to the new forum, I commented that issue here:
https://forum.dxo.com/t/local-adjustments-in-new-photolab-1-2/3088
ALL other local adjustments clearly display the exact area and shape of any adjustments you may apply. “Auto mask” does not. You can see what was picked only if you apply adjustments. So the only way to get some feedback is to apply extreme adjustments just for testing, and then retry changing the auto mask until it picks the right parts of the image.
For a quick look at how this could be done better, see the Anthropics Smart Photo Editor which I already mentioned as reference.
But (to my knowledge) you can’t manually ADD something that was not picked by the automatic.
Teach me if I’m wrong - but AFAICT the behaviour of “auto mask” has not been changed since it was introduced two years ago. At least there’s no official statement about such a change.
However, I must confess that since it’s rather uncomfortable to use “auto mask” for the given reasons, I only (extremely) rarely use it. So it’s not impossible I missed something.
Hy did you tried this technique?
this shows even better
Use the Saturation slider to desaturated. It showes exact the selected area
And use ALT for temporaly erasor so you don’t have to switch by menu.
Auto mask is my most used mask. I use it all the time, literally almost every day on multiple images, and the issues described in this thread have rarely been a problem for me. On those relatively few occasions when I see that the Auto masking has missed a spot, I simply go back into local adjustments, select the mask that missed the spot and paint over the area that was missed. Granted i shouldn’t have to do that, but it’s not like I have to jump through hoops to fix it, and it certainly has not deterred my extensive use of Auto Mask.
Mark
1 Like
Peter and Mark,
I gave it a new try with a few photos. While it’s true that some manual corrections to auto masks are possible, it’s still extremely uncomfortable to me that there’s no way to see what finally will get picked - there’s only the workaround to apply an extreme adjustment and then wait to see (and be surprised…) what it will inadvertently pick this time (and what it won’t pick even if it was definitely selected…). These iterations take quite long, since after each correction you need seconds before the changes affect the display on screen.
I still think that the only “correct” way to implement this is to display the resulting PICK mask while drawing (and allowing for manually ADD as well). This way, you could easily correct it before applying adjustments.
If that was finally corrected, I would surely use auto mask much more frequently.
Tilmann
True, i agree.
i did a proposal to have no “masking blue” on area’s which are touched by the outer ring of automask and not been selected as part of the object/area you originally started on only masking blue on parts which are “selected by the automated selection algorithm” and the inner circle of the brush it self.
(i think the algorithm is calculation the area to pick when you stop brushing so just stop painting and you should see the selected area turning blue)
Until then i use the “desaturate methode” al the time to “see” the mask influence in all masktools and HSL. Works al the time and by using ALT for eraser i can quickly correct and redo.
This way you see immediately the selected area of influence which also can be inverted without further correction due the “outercircle selection mask” which also is inverted and left out the inverted mask as influence area. so you get a extra non selected area which you must rebrush to correct.
Maybe this can be fixed to use the same Ctrl+m shortkey for the U-point masks?
Not sure why you are struggling so much more applying automask than I am. As I indicated It misses a spot only occasionally but once I notice it, it takes only a couple of seconds to fix. The key to applying it is to make sure the darker central area of tool doesn’t extend over the boundary of the area you want masked. I’m sure you know that. Once I became comfortable using the tool two years ago in PL1, I’ve rarely been disappointed with it. Perhaps the mask could be implemented better, but I use it all the time with great success.
Mark
Eventually there are some reasons:
- I want to use it in situations where the required mask is rather complex;
- I know how comfortable the function could be.
I keep referencing the Anthropics Smart Photo Editor which handles automatic masking really good.
Tilmann
I’d rather like seeing the generated mask while drawing.
Even if that would limit the drawing speed to some extent. However, I think that changing the algorithm to just “look” at the currently drawn area and generating a mask that is constant after that, would probably even faster than the current method (where after each change of the mask it takes many seconds to recalculate the complete mask).
Just have a look at the Smart Photo Editor…
Tilmann
Hello guys,
Can we stop the discussion here? We do know that Auto Brush mask needs to be improved and moreover we have a task for it. So let us work on it and then, when released, we will be waiting for your feedback.
Thank you,
Regards,
Svetlana G.
3 Likes
Thanks for the feedback!
Eager to see improvements in upcoming versions…
Tilmann
1 Like
Will do. 
I will wait in peace now knowing it’s gonna be solved. 
1 Like
Great. Thanks Svetlana.
Mark
1 Like
That was two years ago - any news meanwhile?
1 Like
Good morning!
Well, it’s not an easy task and it’s not done yet. But I will try to push it.
Regards,
Svetlana G.